SUZUKI GRAND VITARA 1999 2.G Owners Manual
Manufacturer: SUZUKI, Model Year: 1999, Model line: GRAND VITARA, Model: SUZUKI GRAND VITARA 1999 2.GPages: 656, PDF Size: 14.31 MB
Page 411 of 656
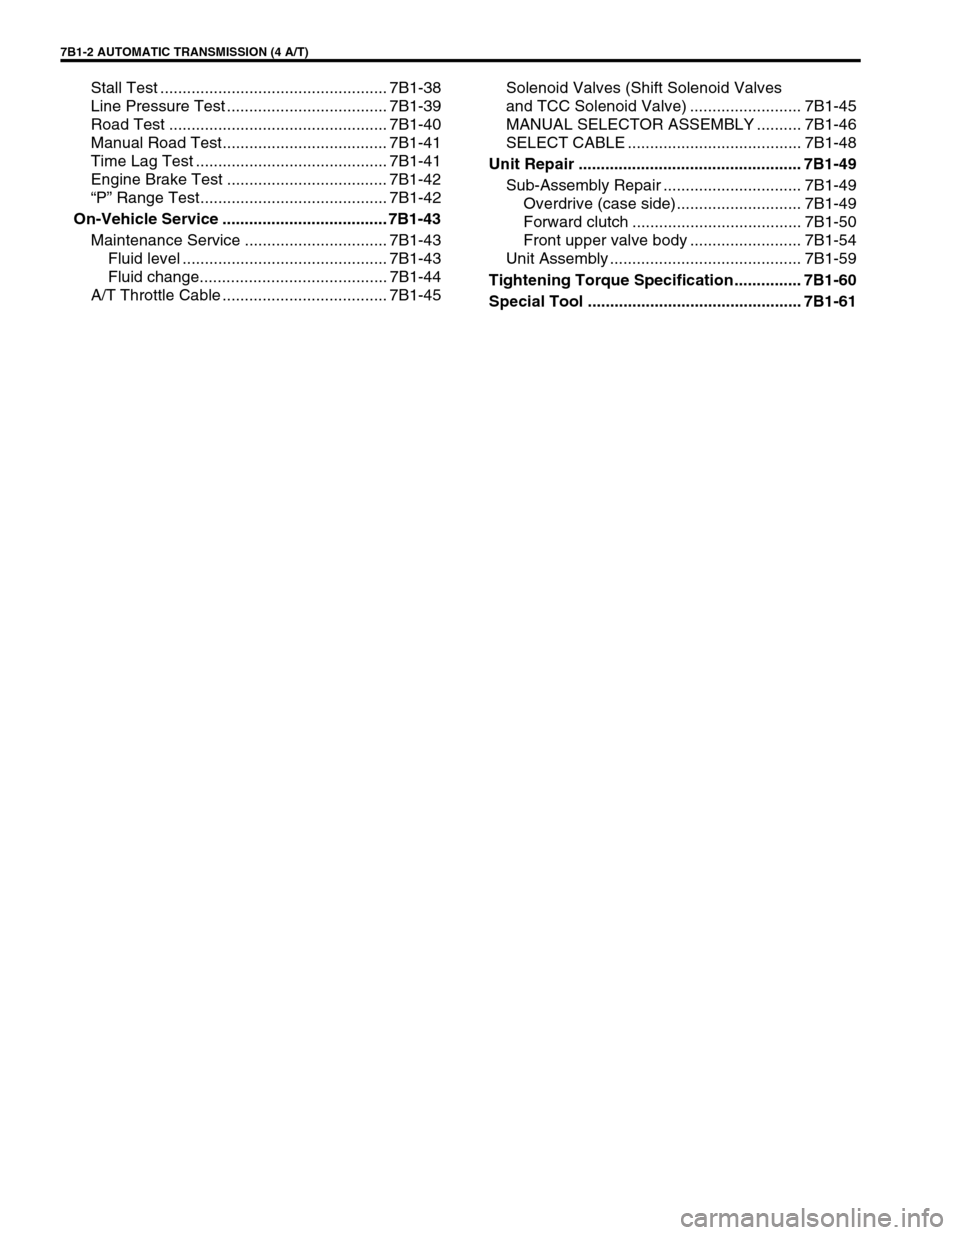
7B1-2 AUTOMATIC TRANSMISSION (4 A/T)
Stall Test ................................................... 7B1-38
Line Pressure Test .................................... 7B1-39
Road Test ................................................. 7B1-40
Manual Road Test..................................... 7B1-41
Time Lag Test ........................................... 7B1-41
Engine Brake Test .................................... 7B1-42
“P” Range Test.......................................... 7B1-42
On-Vehicle Service ..................................... 7B1-43
Maintenance Service ................................ 7B1-43
Fluid level .............................................. 7B1-43
Fluid change.......................................... 7B1-44
A/T Throttle Cable ..................................... 7B1-45Solenoid Valves (Shift Solenoid Valves
and TCC Solenoid Valve) ......................... 7B1-45
MANUAL SELECTOR ASSEMBLY .......... 7B1-46
SELECT CABLE ....................................... 7B1-48
Unit Repair .................................................. 7B1-49
Sub-Assembly Repair ............................... 7B1-49
Overdrive (case side) ............................ 7B1-49
Forward clutch ...................................... 7B1-50
Front upper valve body ......................... 7B1-54
Unit Assembly ........................................... 7B1-59
Tightening Torque Specification............... 7B1-60
Special Tool ................................................ 7B1-61
Page 412 of 656
AUTOMATIC TRANSMISSION (4 A/T) 7B1-3
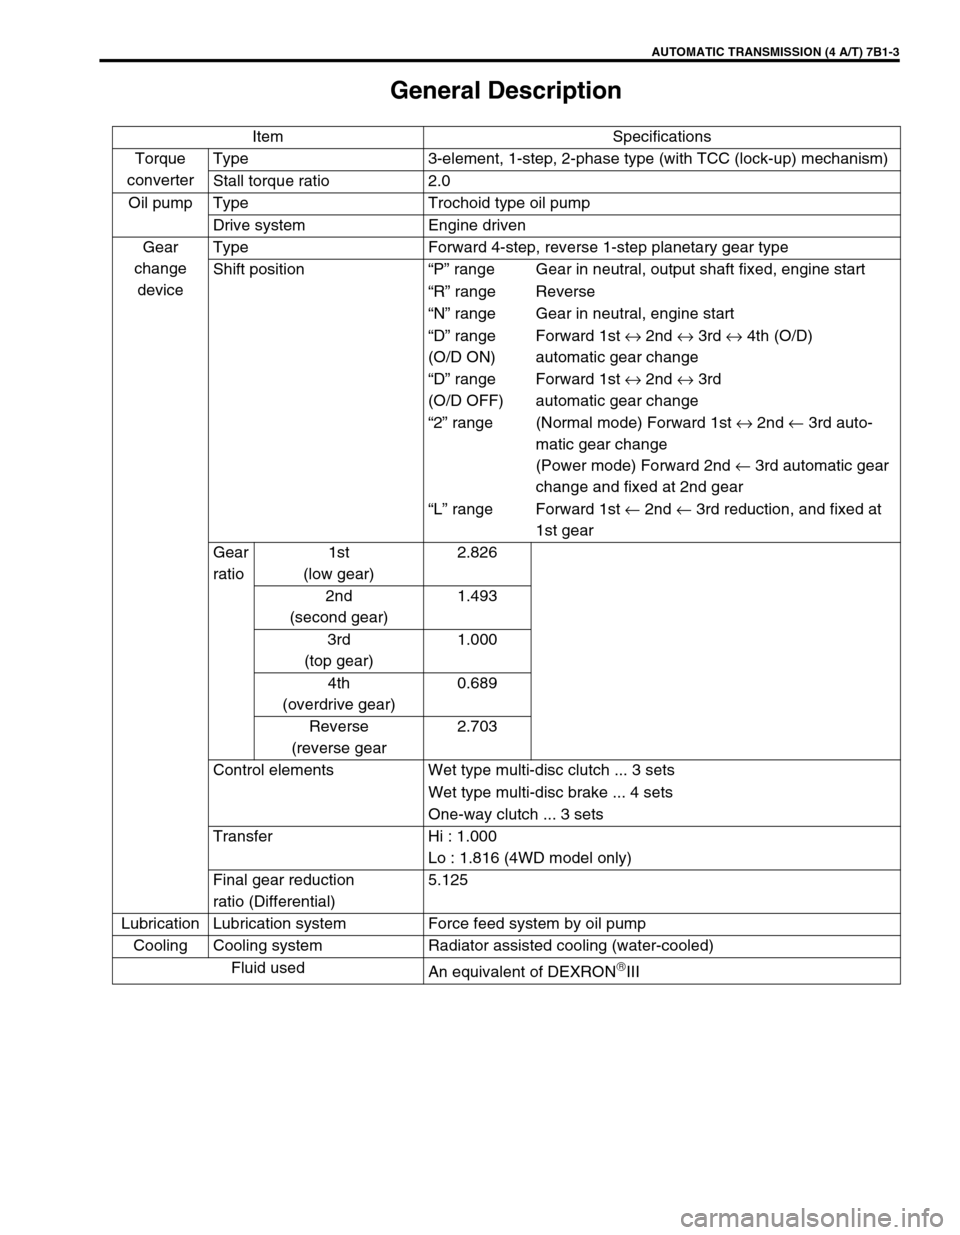
General Description
Item Specifications
Torque
converterType 3-element, 1-step, 2-phase type (with TCC (lock-up) mechanism)
Stall torque ratio 2.0
Oil pump Type Trochoid type oil pump
Drive system Engine driven
Gear
change
deviceType Forward 4-step, reverse 1-step planetary gear type
Shift position“P” range Gear in neutral, output shaft fixed, engine start
“R” range Reverse
“N” range Gear in neutral, engine start
“D” range
(O/D ON)Forward 1st ↔ 2nd ↔ 3rd ↔ 4th (O/D)
automatic gear change
“D” range
(O/D OFF)Forward 1st ↔ 2nd ↔ 3rd
automatic gear change
“2” range (Normal mode) Forward 1st ↔ 2nd ← 3rd auto-
matic gear change
(Power mode) Forward 2nd ← 3rd automatic gear
change and fixed at 2nd gear
“L” range Forward 1st ← 2nd ← 3rd reduction, and fixed at
1st gear
Gear
ratio1st
(low gear)2.826
2nd
(second gear)1.493
3rd
(top gear)1.000
4th
(overdrive gear)0.689
Reverse
(reverse gear2.703
Control elements Wet type multi-disc clutch ... 3 sets
Wet type multi-disc brake ... 4 sets
One-way clutch ... 3 sets
Transfer Hi : 1.000
Lo : 1.816 (4WD model only)
Final gear reduction
ratio (Differential)5.125
Lubrication Lubrication system Force feed system by oil pump
Cooling Cooling system Radiator assisted cooling (water-cooled)
Fluid used
An equivalent of DEXRON
III
Page 413 of 656
7B1-4 AUTOMATIC TRANSMISSION (4 A/T)
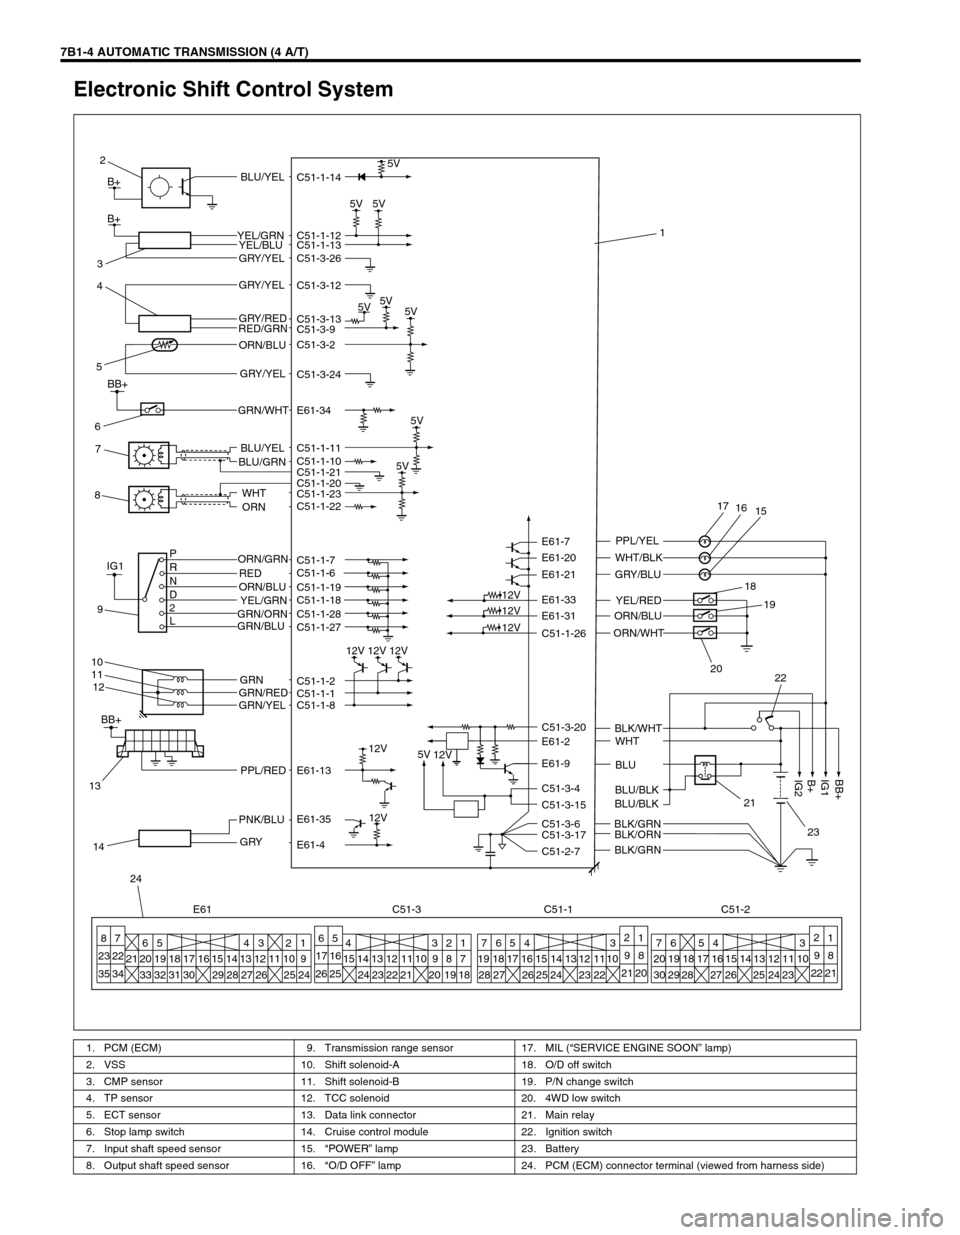
Electronic Shift Control System
1. PCM (ECM) 9. Transmission range sensor 17. MIL (“SERVICE ENGINE SOON” lamp)
2. VSS 10. Shift solenoid-A 18. O/D off switch
3. CMP sensor 11. Shift solenoid-B 19. P/N change switch
4. TP sensor 12. TCC solenoid 20. 4WD low switch
5. ECT sensor 13. Data link connector 21. Main relay
6. Stop lamp switch 14. Cruise control module 22. Ignition switch
7. Input shaft speed sensor 15.“POWER” lamp 23. Battery
8. Output shaft speed sensor 16.“O/D OFF” lamp 24. PCM (ECM) connector terminal (viewed from harness side)
5V
5V5V
5V5V
5V
5V 5V C51-1-14
C51-1-12
C51-1-13
C51-3-26
C51-3-12
C51-3-13
C51-3-9
C51-3-2
C51-3-24
C51-1-11
C51-1-10
C51-1-20 C51-1-21
C51-1-23
C51-1-22
C51-1-7
C51-1-6
C51-1-19
C51-1-18
C51-1-28
C51-1-27
C51-1-2
C51-1-1
C51-1-8
E61-13
E61-35
E61-4C51-1-26 E61-31 E61-33 E61-21 E61-20 E61-7
C51-3-20
E61-2
E61-9
C51-3-4
C51-3-15
C51-3-6
C51-3-17
C51-2-7
12V
12V 12V 12V
12V
12V
12V
12V
5V
12V
BLU/YEL
YEL/GRN
YEL/BLU
GRY/YEL
GRY/YEL
GRY/RED
RED/GRN
ORN/BLU
GRY/YEL
BLU/YEL
BLU/GRN
WHT
ORN
ORN/GRN
RED P
R
N
D
2
LORN/BLU
YEL/GRN
GRN/ORN
GRN/BLU
GRN
GRN/RED
GRN/YEL
PPL/RED
PNK/BLU
GRY
PPL/YEL
WHT/BLK
GRY/BLU
YEL/RED
ORN/BLU
WHT
BLU
BLU/BLK
BLU/BLK
BLK/GRN
BLK/ORN
BLK/GRNBLK/WHT ORN/WHT
8
7
23 22
35 346
20 21
335
19
3218
3117
3016 15
2914
284
13
273
12
26112
10
256
5
17 16
26 252
1
98
21 202
1
98
22 21 1
9
247
20
306
19
2918
27 17
2816 15
2614
25 5
13 4
12
24113
10
23 7
19
28654 3
18
2717 16
2615 14
2513
2412
2311
2210 4
15 14
2413
2312
2211 10 9 8 7
213
202
191
18
24
E61 C51-3 C51-1 C51-2 14
13
B+
B+
17
16
15
18
19
20
22
21
23
BB+
IG1
B+
IG2
1 2
3
4
5
7 6
8
IG1
9
10
11
12
BB+
E61-34 GRN/WHT
BB+
Page 414 of 656
AUTOMATIC TRANSMISSION (4 A/T) 7B1-5
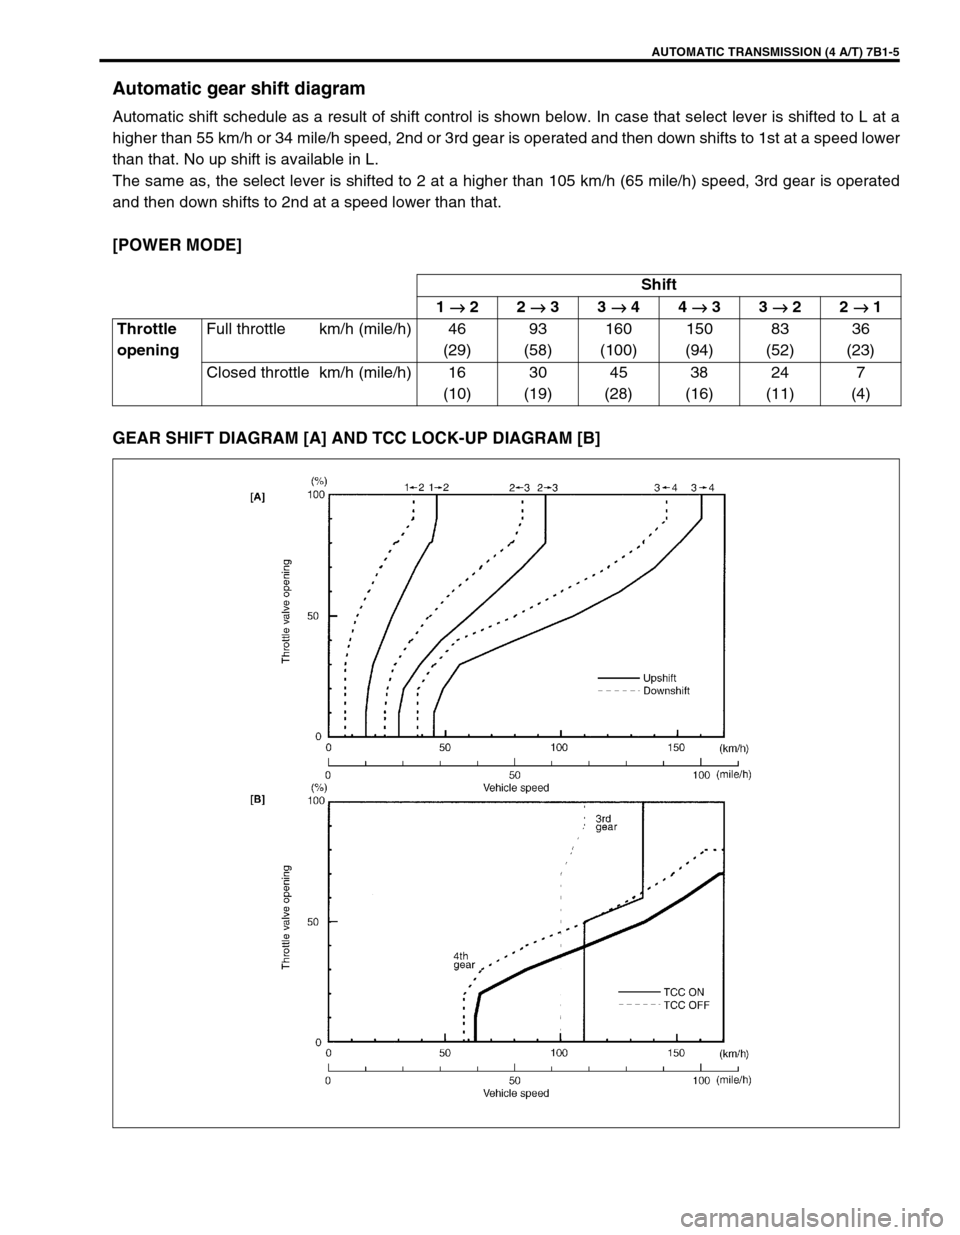
Automatic gear shift diagram
Automatic shift schedule as a result of shift control is shown below. In case that select lever is shifted to L at a
higher than 55 km/h or 34 mile/h speed, 2nd or 3rd gear is operated and then down shifts to 1st at a speed lower
than that. No up shift is available in L.
The same as, the select lever is shifted to 2 at a higher than 105 km/h (65 mile/h) speed, 3rd gear is operated
and then down shifts to 2nd at a speed lower than that.
[POWER MODE]
GEAR SHIFT DIAGRAM [A] AND TCC LOCK-UP DIAGRAM [B]
Shift
1 →
→→ → 22 →
→→ → 33 →
→→ → 44 →
→→ → 33 →
→→ → 22 →
→→ → 1
Throttle
openingFull throttle km/h (mile/h) 46
(29)93
(58)160
(100)150
(94)83
(52)36
(23)
Closed throttle km/h (mile/h) 16
(10)30
(19)45
(28)38
(16)24
(11)7
(4)
Page 415 of 656
![SUZUKI GRAND VITARA 1999 2.G Owners Manual 7B1-6 AUTOMATIC TRANSMISSION (4 A/T)
[NORMAL MODE]
GEAR SHIFT DIAGRAM [A] AND TCC LOCK-UP DIAGRAM [B]
Shift
1 →
→→ → 22 →
→→ → 33 →
→→ → 44 →
→→ → 33 →
→→ → 22 SUZUKI GRAND VITARA 1999 2.G Owners Manual 7B1-6 AUTOMATIC TRANSMISSION (4 A/T)
[NORMAL MODE]
GEAR SHIFT DIAGRAM [A] AND TCC LOCK-UP DIAGRAM [B]
Shift
1 →
→→ → 22 →
→→ → 33 →
→→ → 44 →
→→ → 33 →
→→ → 22](/img/20/7583/w960_7583-414.png)
7B1-6 AUTOMATIC TRANSMISSION (4 A/T)
[NORMAL MODE]
GEAR SHIFT DIAGRAM [A] AND TCC LOCK-UP DIAGRAM [B]
Shift
1 →
→→ → 22 →
→→ → 33 →
→→ → 44 →
→→ → 33 →
→→ → 22 →
→→ → 1
Throttle
openingFull throttle km/h (mile/h) 46
(29)93
(58)160
(100)150
(94)83
(52)36
(23)
Closed throttle km/h (mile/h) 11
(7)27
(17)40
(25)35
(22)21
(13)7
(4)
Page 416 of 656
AUTOMATIC TRANSMISSION (4 A/T) 7B1-7
Diagnosis
This vehicle is equipped with an electronic transmission control system, which control the automatic shift up and
shift down timing, TCC operation, etc. suitably to vehicle driving conditions.
PCM (ECM) has an On-Board Diagnosis system which detects a malfunction in this system and abnormality of
those parts that influence the engine exhaust emission.
When diagnosing a trouble in the transmission including this system, be sure to have full understanding of the
outline of “ON-BOARD DIAGNOSTIC SYSTEM” and each item in “PRECAUTION IN DIAGNOSING TROUBLE”
and execute diagnosis according to “AUTOMATIC TRANSMISSION DIAGNOSTIC FLOW TABLE” to obtain
correct result smoothly.
On-Board Diagnostic System (Vehicle without
monitor connector)
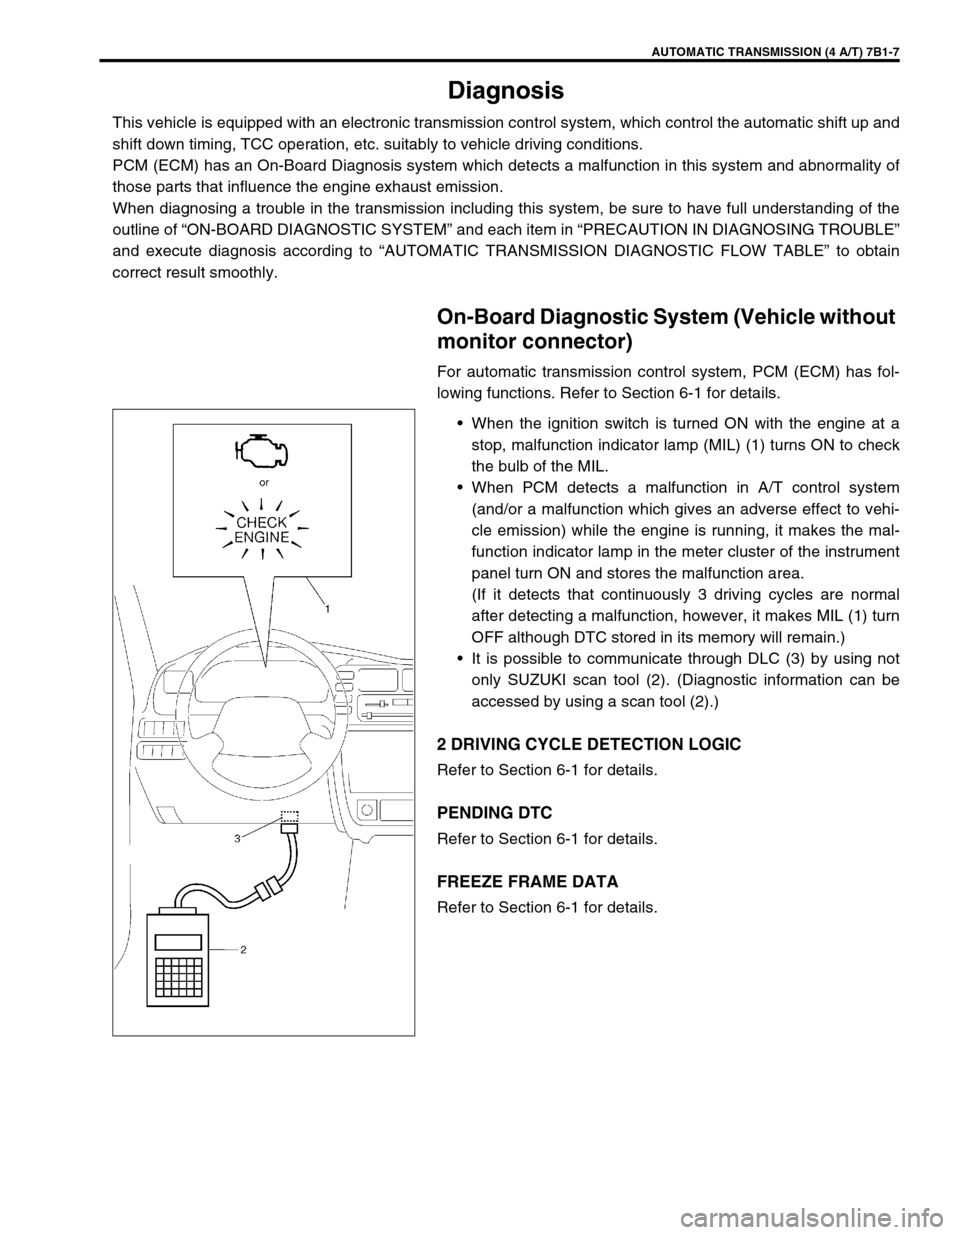
For automatic transmission control system, PCM (ECM) has fol-
lowing functions. Refer to Section 6-1 for details.
•When the ignition switch is turned ON with the engine at a
stop, malfunction indicator lamp (MIL) (1) turns ON to check
the bulb of the MIL.
•When PCM detects a malfunction in A/T control system
(and/or a malfunction which gives an adverse effect to vehi-
cle emission) while the engine is running, it makes the mal-
function indicator lamp in the meter cluster of the instrument
panel turn ON and stores the malfunction area.
(If it detects that continuously 3 driving cycles are normal
after detecting a malfunction, however, it makes MIL (1) turn
OFF although DTC stored in its memory will remain.)
•It is possible to communicate through DLC (3) by using not
only SUZUKI scan tool (2). (Diagnostic information can be
accessed by using a scan tool (2).)
2 DRIVING CYCLE DETECTION LOGIC
Refer to Section 6-1 for details.
PENDING DTC
Refer to Section 6-1 for details.
FREEZE FRAME DATA
Refer to Section 6-1 for details.
Page 417 of 656
7B1-8 AUTOMATIC TRANSMISSION (4 A/T)
On-Board Diagnostic System (Vehicle with
monitor connector)
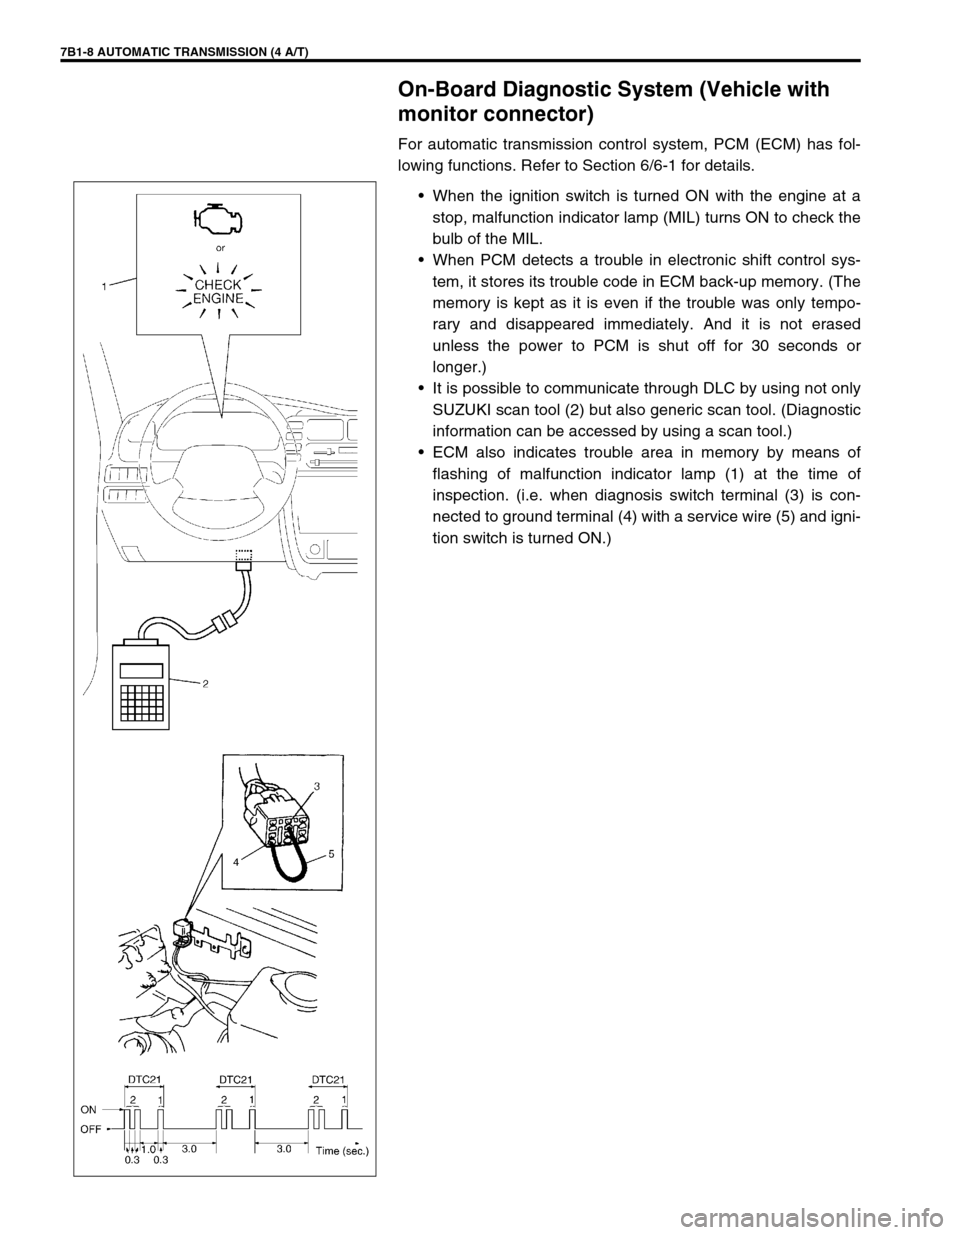
For automatic transmission control system, PCM (ECM) has fol-
lowing functions. Refer to Section 6/6-1 for details.
•When the ignition switch is turned ON with the engine at a
stop, malfunction indicator lamp (MIL) turns ON to check the
bulb of the MIL.
•When PCM detects a trouble in electronic shift control sys-
tem, it stores its trouble code in ECM back-up memory. (The
memory is kept as it is even if the trouble was only tempo-
rary and disappeared immediately. And it is not erased
unless the power to PCM is shut off for 30 seconds or
longer.)
•It is possible to communicate through DLC by using not only
SUZUKI scan tool (2) but also generic scan tool. (Diagnostic
information can be accessed by using a scan tool.)
•ECM also indicates trouble area in memory by means of
flashing of malfunction indicator lamp (1) at the time of
inspection. (i.e. when diagnosis switch terminal (3) is con-
nected to ground terminal (4) with a service wire (5) and igni-
tion switch is turned ON.)
Page 418 of 656
AUTOMATIC TRANSMISSION (4 A/T) 7B1-9
Precaution in Diagnosing Trouble
•Don’t disconnect couplers from PCM (ECM), battery cable
from battery, PCM ground wire harness from engine or main
fuse before checking the diagnosis information (DTC, freeze
frame data, etc.) stored in PCM memory. Such disconnec-
tion will clear memorized information in PCM memory.
•Using SUZUKI scan tool or also generic scan tool for vehicle
without monitor connector, the diagnostic information stored
in PCM memory can be checked and cleared as well. Before
its use, be sure to read Operator’s (Instruction) Manual sup-
plied with it carefully to have good understanding of its func-
tions and usage.
•Priorities for diagnosing troubles
If two or more diagnostic trouble codes (DTCs) are stored,
proceed to the flow table of the DTC which was detected
earliest in the order and follow the instruction in that table.
If no instructions are given, troubleshoot diagnostic trouble
codes according to the following priorities.
–Diagnostic trouble codes (DTCs) other than DTC P0171/
P0172/P0174/P0175 (Fuel system too lean/too rich), DTC
P0300/P0301/P0302/P0303/P0304/P0305/P0306 (Misfire
detected) and DTC P0400 (EGR flow malfunction)
–DTC P0171/P0172/P0174/P0175 (Fuel system too lean/too
rich) and DTC P0400 (EGR flow malfunction)
–DTC P0300/P0301/P0302/P0303/P0304/P0305/P0306
(Misfire detected)
•Be sure to read “PRECAUTIONS FOR ELECTRICAL CIR-
CUIT SERVICE” in Section 0A before inspection and
observe what is written there.
•PCM replacement
When substituting a known-good PCM, check for following
conditions.
Neglecting this check may result in damage to a good PCM.
–All relays and actuators have resistance of specified value.
–MAF sensor, MDP sensor, TP sensor and fuel tank pres-
sure sensor are in good condition. Also, the power circuit of
these sensors is not shorted to the ground.
Page 419 of 656
7B1-10 AUTOMATIC TRANSMISSION (4 A/T)
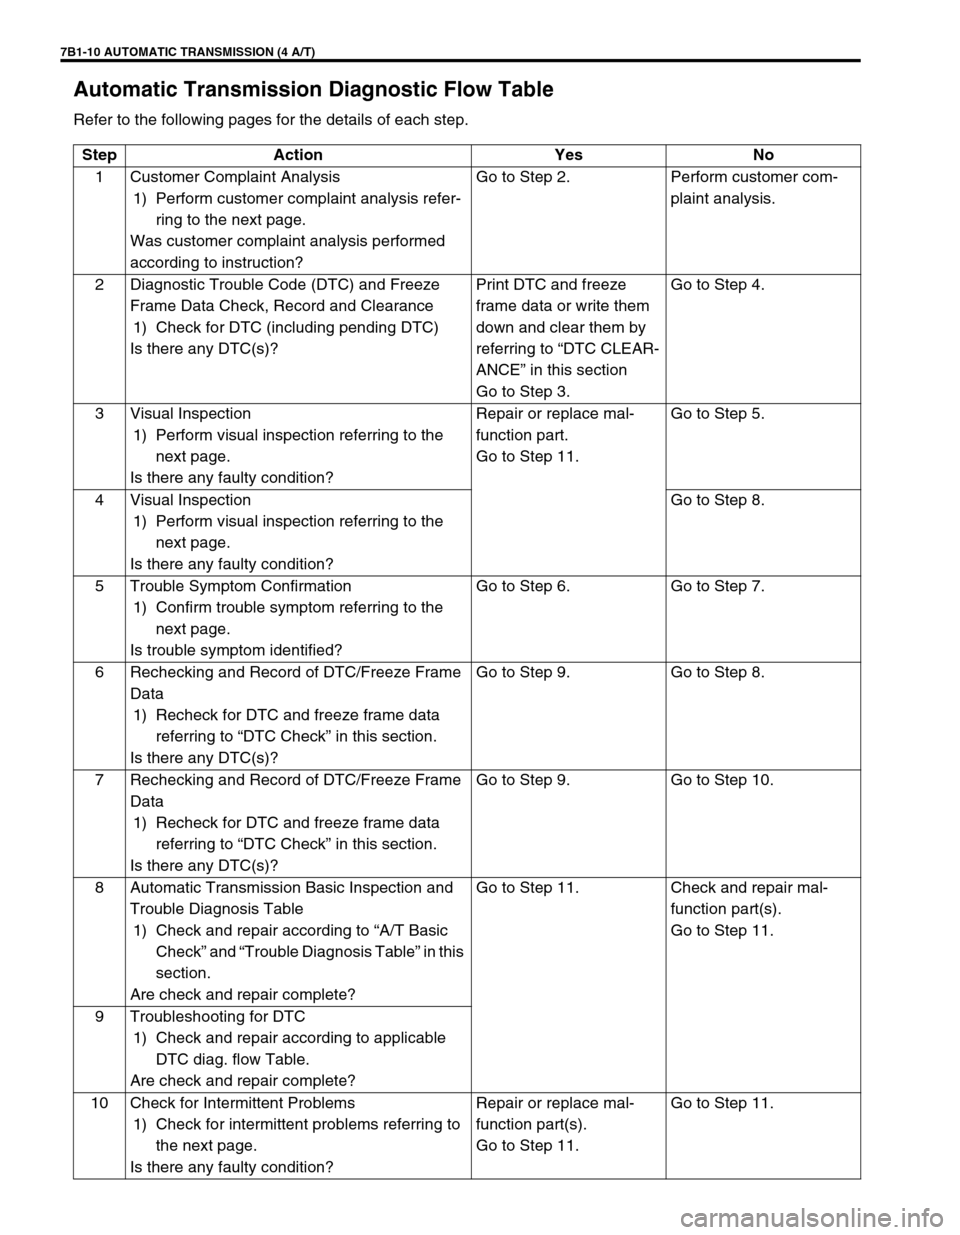
Automatic Transmission Diagnostic Flow Table
Refer to the following pages for the details of each step.
Step Action Yes No
1 Customer Complaint Analysis
1) Perform customer complaint analysis refer-
ring to the next page.
Was customer complaint analysis performed
according to instruction?Go to Step 2. Perform customer com-
plaint analysis.
2 Diagnostic Trouble Code (DTC) and Freeze
Frame Data Check, Record and Clearance
1) Check for DTC (including pending DTC)
Is there any DTC(s)?Print DTC and freeze
frame data or write them
down and clear them by
referring to “DTC CLEAR-
ANCE” in this section
Go to Step 3.Go to Step 4.
3 Visual Inspection
1) Perform visual inspection referring to the
next page.
Is there any faulty condition?Repair or replace mal-
function part.
Go to Step 11.Go to Step 5.
4 Visual Inspection
1) Perform visual inspection referring to the
next page.
Is there any faulty condition?Go to Step 8.
5 Trouble Symptom Confirmation
1) Confirm trouble symptom referring to the
next page.
Is trouble symptom identified?Go to Step 6. Go to Step 7.
6 Rechecking and Record of DTC/Freeze Frame
Data
1) Recheck for DTC and freeze frame data
referring to “DTC Check” in this section.
Is there any DTC(s)?Go to Step 9. Go to Step 8.
7 Rechecking and Record of DTC/Freeze Frame
Data
1) Recheck for DTC and freeze frame data
referring to “DTC Check” in this section.
Is there any DTC(s)?Go to Step 9. Go to Step 10.
8 Automatic Transmission Basic Inspection and
Trouble Diagnosis Table
1) Check and repair according to “A/T Basic
Check” and “Trouble Diagnosis Table” in this
section.
Are check and repair complete?Go to Step 11. Check and repair mal-
function part(s).
Go to Step 11.
9 Troubleshooting for DTC
1) Check and repair according to applicable
DTC diag. flow Table.
Are check and repair complete?
10 Check for Intermittent Problems
1) Check for intermittent problems referring to
the next page.
Is there any faulty condition?Repair or replace mal-
function part(s).
Go to Step 11.Go to Step 11.
Page 420 of 656
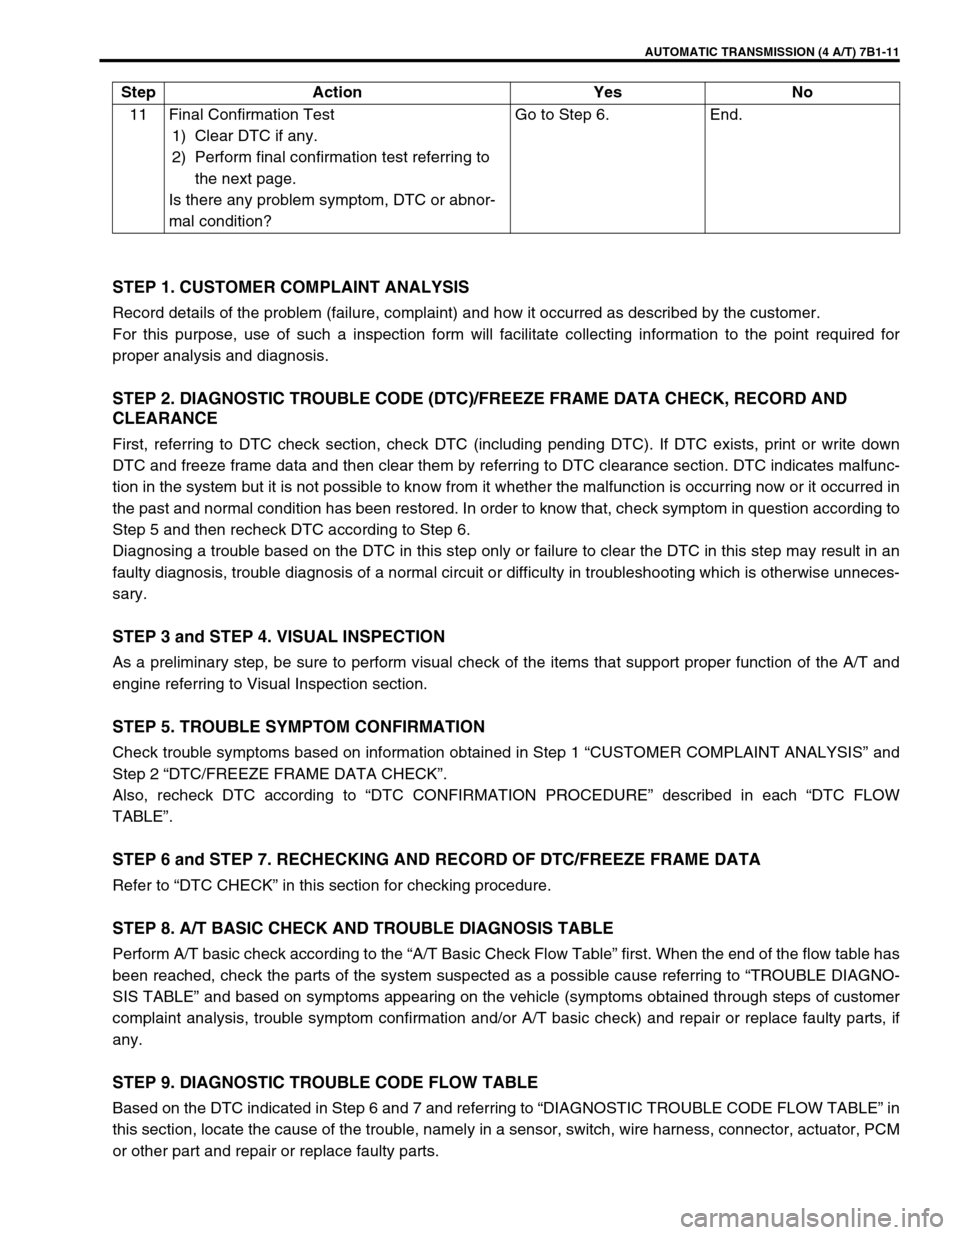
AUTOMATIC TRANSMISSION (4 A/T) 7B1-11
STEP 1. CUSTOMER COMPLAINT ANALYSIS
Record details of the problem (failure, complaint) and how it occurred as described by the customer.
For this purpose, use of such a inspection form will facilitate collecting information to the point required for
proper analysis and diagnosis.
STEP 2. DIAGNOSTIC TROUBLE CODE (DTC)/FREEZE FRAME DATA CHECK, RECORD AND
CLEARANCE
First, referring to DTC check section, check DTC (including pending DTC). If DTC exists, print or write down
DTC and freeze frame data and then clear them by referring to DTC clearance section. DTC indicates malfunc-
tion in the system but it is not possible to know from it whether the malfunction is occurring now or it occurred in
the past and normal condition has been restored. In order to know that, check symptom in question according to
Step 5 and then recheck DTC according to Step 6.
Diagnosing a trouble based on the DTC in this step only or failure to clear the DTC in this step may result in an
faulty diagnosis, trouble diagnosis of a normal circuit or difficulty in troubleshooting which is otherwise unneces-
sary.
STEP 3 and STEP 4. VISUAL INSPECTION
As a preliminary step, be sure to perform visual check of the items that support proper function of the A/T and
engine referring to Visual Inspection section.
STEP 5. TROUBLE SYMPTOM CONFIRMATION
Check trouble symptoms based on information obtained in Step 1 “CUSTOMER COMPLAINT ANALYSIS” and
Step 2 “DTC/FREEZE FRAME DATA CHECK”.
Also, recheck DTC according to “DTC CONFIRMATION PROCEDURE” described in each “DTC FLOW
TABLE”.
STEP 6 and STEP 7. RECHECKING AND RECORD OF DTC/FREEZE FRAME DATA
Refer to “DTC CHECK” in this section for checking procedure.
STEP 8. A/T BASIC CHECK AND TROUBLE DIAGNOSIS TABLE
Perform A/T basic check according to the “A/T Basic Check Flow Table” first. When the end of the flow table has
been reached, check the parts of the system suspected as a possible cause referring to “TROUBLE DIAGNO-
SIS TABLE” and based on symptoms appearing on the vehicle (symptoms obtained through steps of customer
complaint analysis, trouble symptom confirmation and/or A/T basic check) and repair or replace faulty parts, if
any.
STEP 9. DIAGNOSTIC TROUBLE CODE FLOW TABLE
Based on the DTC indicated in Step 6 and 7 and referring to “DIAGNOSTIC TROUBLE CODE FLOW TABLE” in
this section, locate the cause of the trouble, namely in a sensor, switch, wire harness, connector, actuator, PCM
or other part and repair or replace faulty parts.11 Final Confirmation Test
1) Clear DTC if any.
2) Perform final confirmation test referring to
the next page.
Is there any problem symptom, DTC or abnor-
mal condition?Go to Step 6. End. Step Action Yes No