Map sensor SUZUKI JIMNY 2005 3.G Service User Guide
[x] Cancel search | Manufacturer: SUZUKI, Model Year: 2005, Model line: JIMNY, Model: SUZUKI JIMNY 2005 3.GPages: 687, PDF Size: 13.38 MB
Page 385 of 687

Downloaded from www.Manualslib.com manuals search engine 6-28 ENGINE GENERAL INFORMATION AND DIAGNOSIS
Scan Tool Data
As the data values given below are standard values estimated on the basis of values obtained from the normally
operating vehicles by using a scan tool, use them as reference values. Even when the vehicle is in good condi-
tion, there may be cases where the checked value does not fall within each specified data range. Therefore,
judgment as abnormal should not be made by checking with these data alone.
Also, conditions in the below table that can be checked by the scan tool are those detected by ECM and output
from ECM as commands and there may be cases where the engine or actuator is not operating (in the condi-
tion) as indicated by the scan tool. Be sure to use the timing light to check the ignition timing.
NOTE:
With the generic scan tool, only star (
✱
✱✱ ✱) marked data in the table below can be read.
The triangle (
∆
∆∆ ∆) marked data in the table below can not be read for vehicle without immobilizer indi-
cator lamp at combination meter.
When checking the data with the engine running at idle or racing, be sure to shift M/T gear to the
neutral gear position and A/T gear to the “Park” position and pull the parking brake fully. Also, if
nothing or “no load” is indicated, turn OFF A/C, all electric loads, P/S and all the other necessary
switches.
SCAN TOOL DATA CONDITION REFERENCE VALUES
✱
✱✱ ✱FUEL SYSTEM B1 (FUEL
SYSTEM STATUS)At specified idle speed after warming up CLOSED (closed loop)
✱
✱✱ ✱
CALC LOAD
(CALCULATED LOAD
VALUE)At specified idle speed with no load after
warming up3 – 9 %
At 2500 r/min with no load after warming up 12 – 17 %
✱
✱✱ ✱COOLANT TEMP.
(ENGINE COOLANT
TEMP.)At specified idle speed after warming up 80 – 100 °C, 176 – 212 °F
✱
✱✱ ✱SHORT FT B1 (SHORT
TERM FUEL TRIM)At specified idle speed after warming up– 20 – +20 %
✱
✱✱ ✱LONG FT B1 (LONG TERM
FUEL TRIM)At specified idle speed after warming up– 15 – +15 %
✱
✱✱ ✱MAP (INTAKE MANIFOLD
ABSOLUTE PRESSURE)At specified idle speed with no load after30 – 37 kPa,
220 – 340 mmHg
✱
✱✱ ✱
ENGINE SPEED At idling with no load after warming upDesired idle speed
±50 r/min
✱
✱✱ ✱VEHICLE SPEED At stop 0 km/h, 0 MPH
✱
✱✱ ✱IGNITION ADVANCE
(IGNITION TIMING
ADVANCE FOR NO.1 CYL-
INDER)At specified idle speed with no load after
warming up5 – 16° BTDC
✱
✱✱ ✱
INTAKE AIR TEMP. At specified idle speed after warming upAmbient temp. :
+15 °C (59 °F)
–5 °C (23 °F)
✱
✱✱ ✱MAF (MASS AIR FLOW
RATE)At specified idle speed with no load after
warming up1 – 4 gm/sec
✱
✱✱ ✱
THROTTLE POS
(THROTTLE POSITION)Ignition switch
ON / engine
stoppedThrottle valve fully closed 7 – 18 %
Throttle valve fully open 70 – 90 %
✱
✱✱ ✱O2S B1 S1 (HEATED OXY-
GEN SENSOR-1)At specified idle speed after warming up 0.01 – 0.95 V
Page 387 of 687

Downloaded from www.Manualslib.com manuals search engine 6-30 ENGINE GENERAL INFORMATION AND DIAGNOSIS
Scan tool data definitions
FUEL SYSTEM (FUEL SYSTEM STATUS)
Air / fuel ratio feedback loop status displayed as either open or closed loop. Open indicates that ECM ignores
feedback from the exhaust oxygen sensor.
Closed indicates final injection duration is corrected for oxygen sensor feedback.
CALC LOAD (CALCULATED LOAD VALUE, %)
Engine load displayed as a percentage of maximum possible load. Value is calculated mathematically using the
formula : actual (current) intake air volume ÷ maximum possible intake air volume x 100%.
COOLANT TEMP. (ENGINE COOLANT TEMPERATURE, °C, °F)
It is detected by engine coolant temp. sensor
SHORT FT B1 (SHORT TERM FUEL TRIM, %)
Short term fuel trim value represents short term corrections to the air / fuel mixture computation. A value of 0
indicates no correction, a value greater than 0 means an enrichment correction, and a value less than 0 implies
an enleanment correction.
LONG FT B1 (LONG TERM FUEL TRIM, %)
Long term fuel trim Value represents long term corrections to the air / fuel mixture computation. A value of 0 indi-
cates no correction, a value greater than 0 means an enrichment correction, and a value less than 0 implies an
enleanment correction.
MAP (INTAKE MANIFOLD ABSOLUTE PRESSURE, kPa, inHg)
It is detected by manifold absolute pressure sensor and used (among other things) to compute engine load.
ENGINE SPEED (rpm)
It is computed by reference pulses from crankshaft position sensor.
VEHICLE SPEED (km/h, MPH)
It is computed based on pulse signals from vehicle speed sensor.
IGNITION ADVANCE (IGNITION TIMING ADVANCE FOR NO.1 CYLINDER, °)
Ignition timing of NO.1 cylinder is commanded by ECM. The actual ignition timing should be checked by using
the timing light.
INTAKE AIR TEMP. (°C, °F)
It is detected by intake air temp. sensor and used to determine the amount of air passing into the intake manifold
as air density varies with temperature.
MAF (MASS AIR FLOW RATE, gm/s, lb/min)
It represents total mass of air entering intake manifold which is computed based on signals from MAP sensor,
IAT sensor, TP sensor, etc.BRAKE SWIgnition switch
ONBrake pedal is depressing ON
Brake pedal is releasing OFF
BLOWER FANIgnition switch
ONBlower fan switch ON ON
Blower fan switch OFF OFF
A/C MAG CLUTCHIgnition switch
ONA/C operating ON
A/C not operating OFF SCAN TOOL DATA CONDITION REFERENCE VALUES
Page 399 of 687

Downloaded from www.Manualslib.com manuals search engine 6-42 ENGINE GENERAL INFORMATION AND DIAGNOSIS
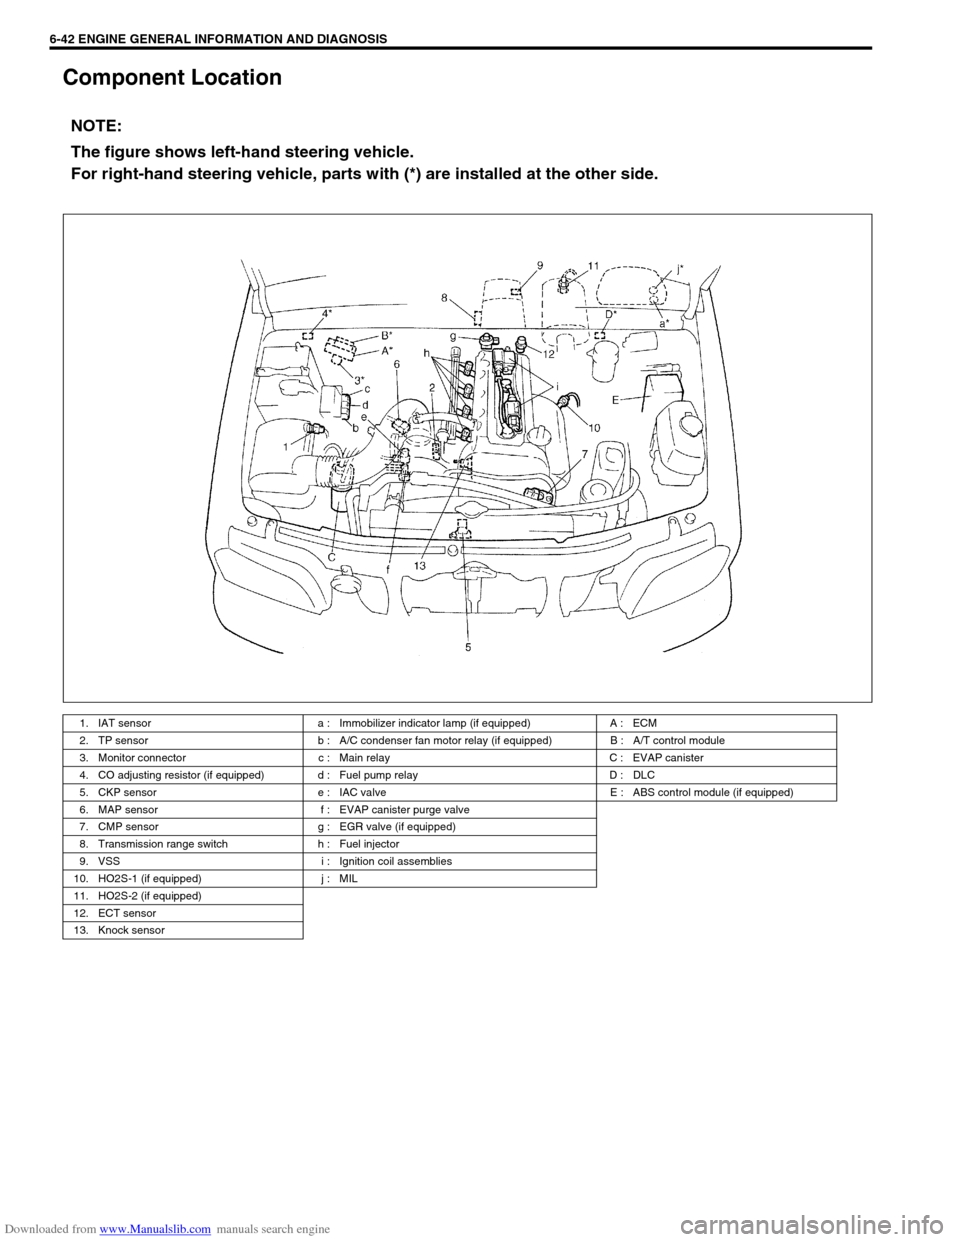
Component Location
NOTE:
The figure shows left-hand steering vehicle.
For right-hand steering vehicle, parts with (*) are installed at the other side.
1. IAT sensor a : Immobilizer indicator lamp (if equipped) A : ECM
2. TP sensor b : A/C condenser fan motor relay (if equipped) B : A/T control module
3. Monitor connector c : Main relay C : EVAP canister
4. CO adjusting resistor (if equipped) d : Fuel pump relay D : DLC
5. CKP sensor e : IAC valve E : ABS control module (if equipped)
6. MAP sensor f : EVAP canister purge valve
7. CMP sensor g : EGR valve (if equipped)
8. Transmission range switch h : Fuel injector
9. VSS i : Ignition coil assemblies
10. HO2S-1 (if equipped) j : MIL
11. HO2S-2 (if equipped)
12. ECT sensor
13. Knock sensor
Page 405 of 687

Downloaded from www.Manualslib.com manuals search engine 6-48 ENGINE GENERAL INFORMATION AND DIAGNOSIS
DTC P0105 (DTC No.11) Manifold Absolute Pressure (MAP) Circuit Malfunc-
tion
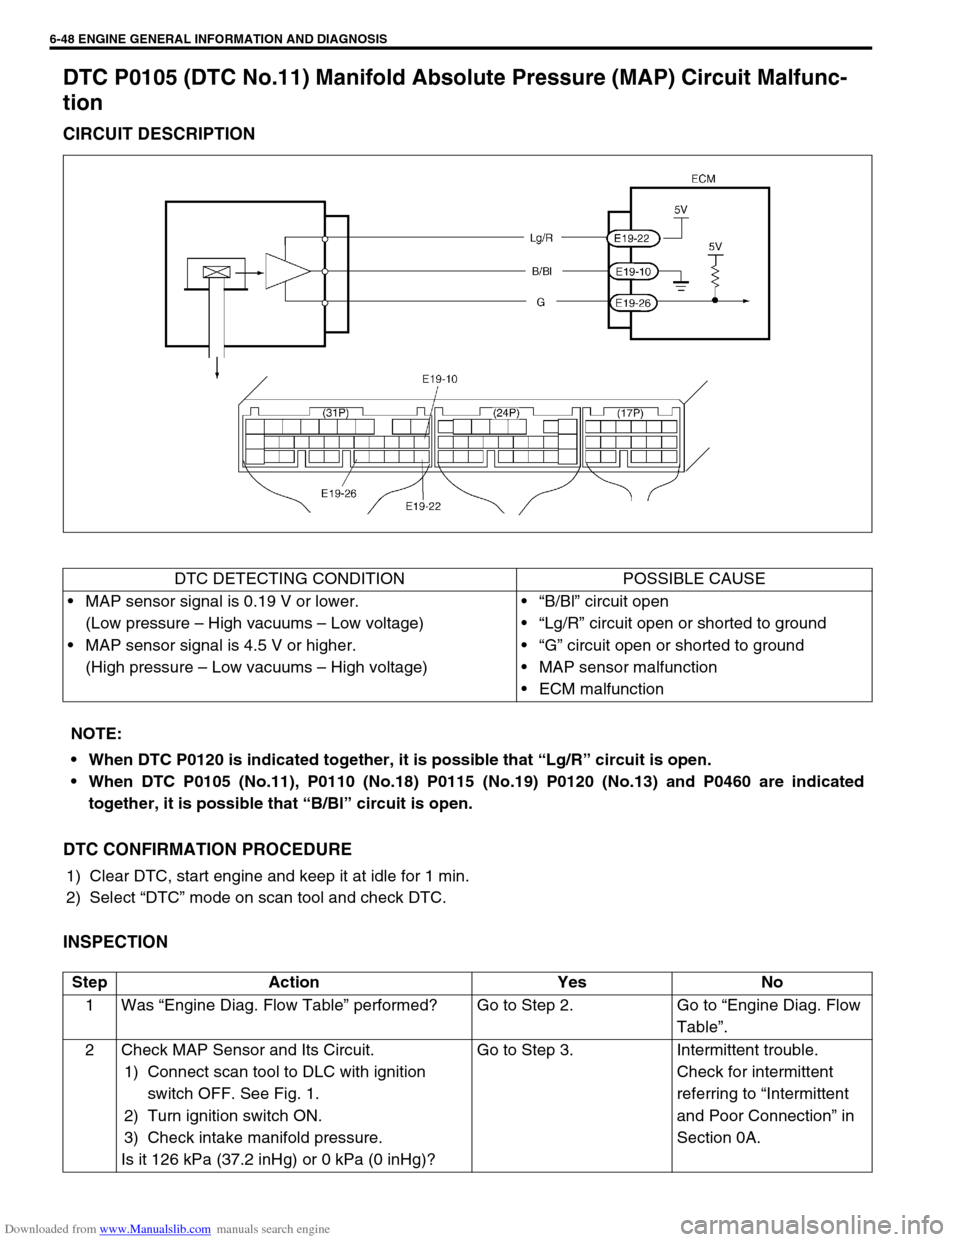
CIRCUIT DESCRIPTION
DTC CONFIRMATION PROCEDURE
1) Clear DTC, start engine and keep it at idle for 1 min.
2) Select “DTC” mode on scan tool and check DTC.
INSPECTION
DTC DETECTING CONDITION POSSIBLE CAUSE
MAP sensor signal is 0.19 V or lower.
(Low pressure – High vacuums – Low voltage)
MAP sensor signal is 4.5 V or higher.
(High pressure – Low vacuums – High voltage)“B/Bl” circuit open
“Lg/R” circuit open or shorted to ground
“G” circuit open or shorted to ground
MAP sensor malfunction
ECM malfunction
NOTE:
When DTC P0120 is indicated together, it is possible that “Lg/R” circuit is open.
When DTC P0105 (No.11), P0110 (No.18) P0115 (No.19) P0120 (No.13) and P0460 are indicated
together, it is possible that “B/Bl” circuit is open.
Step Action Yes No
1Was “Engine Diag. Flow Table” performed? Go to Step 2. Go to “Engine Diag. Flow
Table”.
2 Check MAP Sensor and Its Circuit.
1) Connect scan tool to DLC with ignition
switch OFF. See Fig. 1.
2) Turn ignition switch ON.
3) Check intake manifold pressure.
Is it 126 kPa (37.2 inHg) or 0 kPa (0 inHg)?Go to Step 3. Intermittent trouble.
Check for intermittent
referring to “Intermittent
and Poor Connection” in
Section 0A.
Page 406 of 687
![SUZUKI JIMNY 2005 3.G Service User Guide Downloaded from www.Manualslib.com manuals search engine ENGINE GENERAL INFORMATION AND DIAGNOSIS 6-49
[A] Fig. 1 for Step 2 / [B] Fig. 2 for Step 33 Check Wire Harness.
1) Disconnect MAP sensor conne SUZUKI JIMNY 2005 3.G Service User Guide Downloaded from www.Manualslib.com manuals search engine ENGINE GENERAL INFORMATION AND DIAGNOSIS 6-49
[A] Fig. 1 for Step 2 / [B] Fig. 2 for Step 33 Check Wire Harness.
1) Disconnect MAP sensor conne](/img/20/7588/w960_7588-405.png)
Downloaded from www.Manualslib.com manuals search engine ENGINE GENERAL INFORMATION AND DIAGNOSIS 6-49
[A] Fig. 1 for Step 2 / [B] Fig. 2 for Step 33 Check Wire Harness.
1) Disconnect MAP sensor connector with
ignition switch OFF.
2) Check for proper connection of MAP sensor
at “G” and “B/Bl” wire terminals.
3) If OK, then with ignition switch ON, check
voltage at each of “Lg/R” and “G” wire termi-
nals and body ground. See Fig. 2.
Is voltage about 4 – 6 V at each terminal?Go to Step 4.“Lg/R” wire open or
shorted to ground circuit
or shorted to power circuit
(See NOTE), “G” wire
open or shorted to
ground, poor E19-26 con-
nection or E19-22 con-
nection.
If wire and connection are
OK, confirm that MAP
sensor is normal and then
substitute a known-good
ECM and recheck.
4 Check MAP sensor according to “MAP Sensor
Individual Check” below.
Is it in good condition?“Lg/R” wire shorted to “G”
wire, “B/Bl” wire open,
poor E19-10 connection.
If wire and connection are
OK, substitute a known-
good ECM and recheck.Replace MAP sensor. Step Action Yes No
NOTE:
When battery voltage is applied to “Lg/R” wire, it is possible that MAP sensor is also faulty.
Page 407 of 687

Downloaded from www.Manualslib.com manuals search engine 6-50 ENGINE GENERAL INFORMATION AND DIAGNOSIS
MAP Sensor Individual Check
1) Disconnect connector from MAP sensor (1).
2) Remove MAP sensor (1).
3) Arrange 3 new 1.5 V batteries (2) in series (check that total
voltage is 4.5 – 5.0 V) and connect its positive terminal to
“Vin” terminal of sensor and negative terminal to “Ground”
terminal. Then check voltage between “Vout” and “Ground”.
Also, check if voltage reduces when vacuum is applied up to
400 mmHg by using vacuum pump (3).
If check result is not satisfactory, replace MAP sensor (1).
Output voltage (When input voltage is 4.5 – 5.5 V, ambient
temp. 20 – 30 °C, 68 – 86 °F)
4) Install MAP sensor (1) securely.
5) Connect MAP sensor (1) connector securely.ALTITUDE
(Reference)BAROMETRIC
PRESSUREOUTPUT
VOLTAGE
(ft) (m) (mmHg) (kPa) (V)
0
|
2 0000
|
610760
|
707100
|
943.3 – 4.3
2 001
|
5 000611
|
1 524Under 707
over 63494
|
853.0 – 4.1
5 001
|
8 0001 525
|
2 438Under 634
over 56785
|
762.7 – 3.7
8 001
|
10 0002 439
|
3 048Under 567
over 52676
|
702.5 – 3.3
Page 425 of 687
![SUZUKI JIMNY 2005 3.G Service User Guide Downloaded from www.Manualslib.com manuals search engine 6-68 ENGINE GENERAL INFORMATION AND DIAGNOSIS
DTC P0171 Fuel System Too Lean
DTC P0172 Fuel System Too Rich
CIRCUIT DESCRIPTION
[a] : Signal to SUZUKI JIMNY 2005 3.G Service User Guide Downloaded from www.Manualslib.com manuals search engine 6-68 ENGINE GENERAL INFORMATION AND DIAGNOSIS
DTC P0171 Fuel System Too Lean
DTC P0172 Fuel System Too Rich
CIRCUIT DESCRIPTION
[a] : Signal to](/img/20/7588/w960_7588-424.png)
Downloaded from www.Manualslib.com manuals search engine 6-68 ENGINE GENERAL INFORMATION AND DIAGNOSIS
DTC P0171 Fuel System Too Lean
DTC P0172 Fuel System Too Rich
CIRCUIT DESCRIPTION
[a] : Signal to decrease amount of fuel injection [d] : A/F mixture becomes richer
(Oxygen concentration decreases)1. Injector
[b] : Signal to increase amount of fuel injection [e] : High voltage 2. Heated oxygen sensor-1 (HO2S-1)
[c] : A/F mixture becomes leaner
(Oxygen concentration increases)[f] : Low voltage
DTC DETECTING CONDITION POSSIBLE CAUSE
When following condition occurs while engine running
under closed loop condition.
–Air / fuel ratio too lean
(Total fuel trim (short and long terms added) is more
than 30%)
or
–Air / fuel ratio too rich
(Total fuel trim is less than –30%)
✱
✱✱ ✱2 driving cycle detection logic, continuous monitoring.Vacuum leaks (air drawn in).
Exhaust gas leakage.
Heated oxygen sensor-1 circuit malfunction.
Fuel pressure out of specification.
Fuel injector malfunction (clogged or leakage).
MAP sensor poor performance.
ECT sensor poor performance.
IAT sensor poor performance.
TP sensor poor performance.
EVAP control system malfunction.
PCV valve malfunction.
Page 457 of 687
![SUZUKI JIMNY 2005 3.G Service User Guide Downloaded from www.Manualslib.com manuals search engine 6-100 ENGINE GENERAL INFORMATION AND DIAGNOSIS
[A] Fig. 1 for Step 2 / [B] Fig. 2 for Step 3
Table 13 Check MAP Sensor
1) Remove MAP sensor fro SUZUKI JIMNY 2005 3.G Service User Guide Downloaded from www.Manualslib.com manuals search engine 6-100 ENGINE GENERAL INFORMATION AND DIAGNOSIS
[A] Fig. 1 for Step 2 / [B] Fig. 2 for Step 3
Table 13 Check MAP Sensor
1) Remove MAP sensor fro](/img/20/7588/w960_7588-456.png)
Downloaded from www.Manualslib.com manuals search engine 6-100 ENGINE GENERAL INFORMATION AND DIAGNOSIS
[A] Fig. 1 for Step 2 / [B] Fig. 2 for Step 3
Table 13 Check MAP Sensor
1) Remove MAP sensor from intake manifold
and connect vacuum pump gauge to MAP
sensor. See Fig. 2.
2) Connect scan tool to DLC and turn ignition
switch ON.
3) Check intake manifold absolute pressure
displayed on scan tool for specified value.
See Table 1.
Is check result satisfactory?Check air intake system
for air being drawn in and
engine compression.
If OK, then substitute a
known-good ECM and
recheck.Replace MAP sensor. Step Action Yes No
Applying Vacuum Displayed Value on Scan Tool
0 Barometric pressure
(Approx. 100 kPa, 760 mmHg)
027 kPa
200 mmHgBarometric pressure – 27 kPa
(Approx. 73 kPa, 560 mmHg)
67 kPa
500 mmHgBarometric pressure – 67 kPa
(Approx. 33 kPa, 260 mmHg)
Page 499 of 687

Downloaded from www.Manualslib.com manuals search engine 6A1-18 ENGINE MECHANICAL (M13 ENGINE)
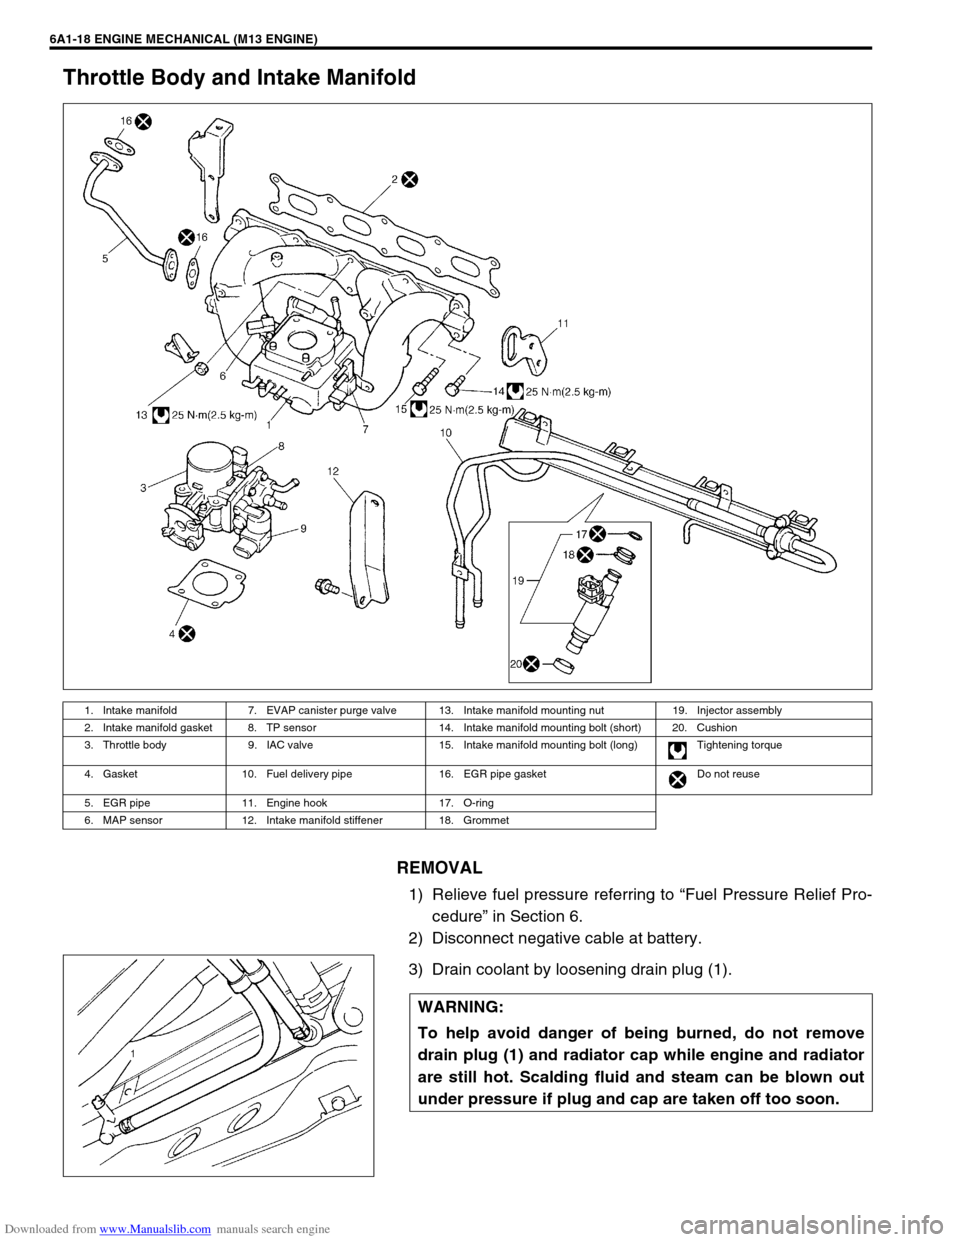
Throttle Body and Intake Manifold
REMOVAL
1) Relieve fuel pressure referring to “Fuel Pressure Relief Pro-
cedure” in Section 6.
2) Disconnect negative cable at battery.
3) Drain coolant by loosening drain plug (1).
1. Intake manifold 7. EVAP canister purge valve 13. Intake manifold mounting nut 19. Injector assembly
2. Intake manifold gasket 8. TP sensor 14. Intake manifold mounting bolt (short) 20. Cushion
3. Throttle body 9. IAC valve 15. Intake manifold mounting bolt (long) Tightening torque
4. Gasket 10. Fuel delivery pipe 16. EGR pipe gasket Do not reuse
5. EGR pipe 11. Engine hook 17. O-ring
6. MAP sensor 12. Intake manifold stiffener 18. Grommet
WARNING:
To help avoid danger of being burned, do not remove
drain plug (1) and radiator cap while engine and radiator
are still hot. Scalding fluid and steam can be blown out
under pressure if plug and cap are taken off too soon.
Page 500 of 687

Downloaded from www.Manualslib.com manuals search engine ENGINE MECHANICAL (M13 ENGINE) 6A1-19
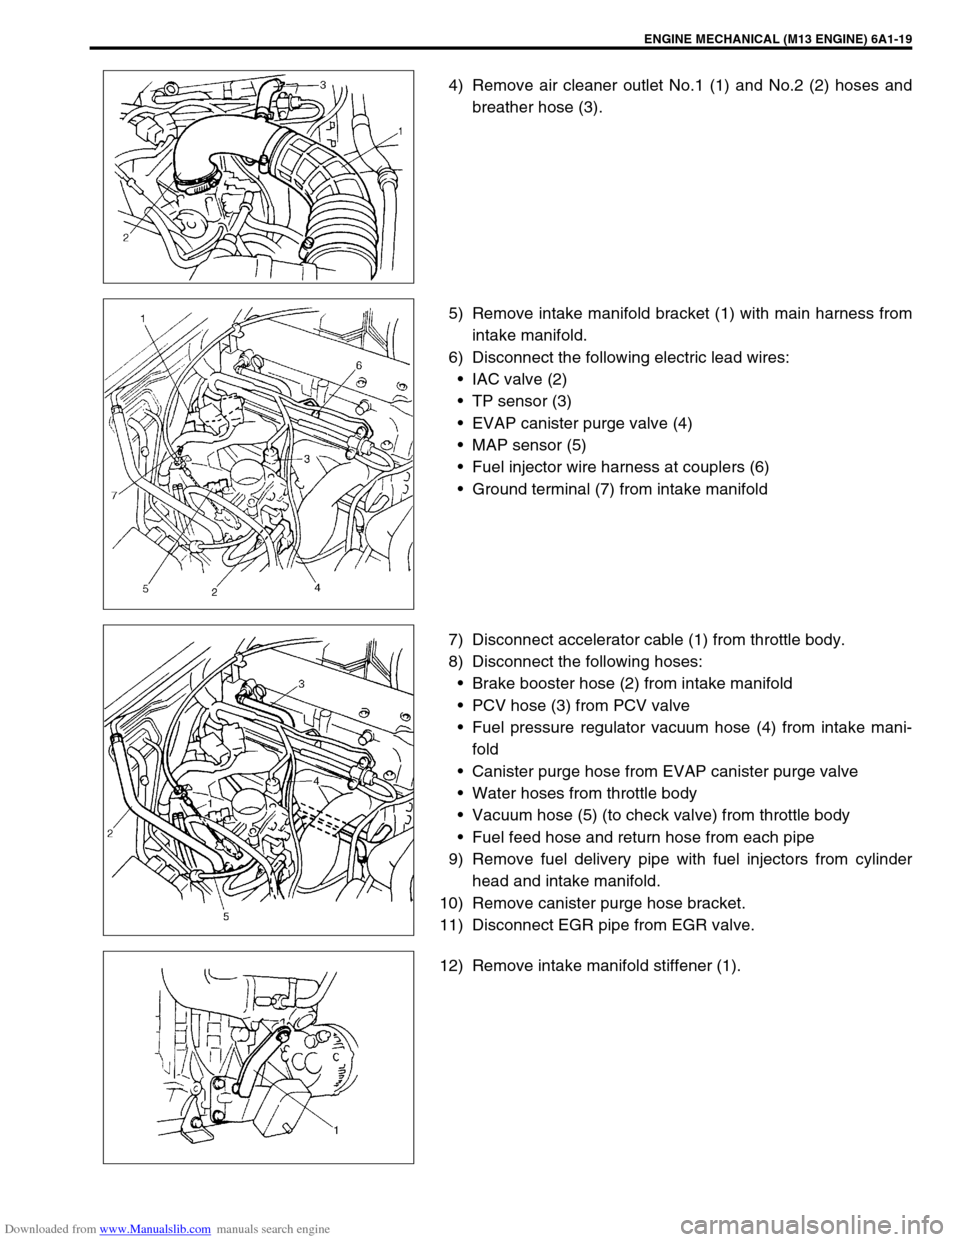
4) Remove air cleaner outlet No.1 (1) and No.2 (2) hoses and
breather hose (3).
5) Remove intake manifold bracket (1) with main harness from
intake manifold.
6) Disconnect the following electric lead wires:
IAC valve (2)
TP sensor (3)
EVAP canister purge valve (4)
MAP sensor (5)
Fuel injector wire harness at couplers (6)
Ground terminal (7) from intake manifold
7) Disconnect accelerator cable (1) from throttle body.
8) Disconnect the following hoses:
Brake booster hose (2) from intake manifold
PCV hose (3) from PCV valve
Fuel pressure regulator vacuum hose (4) from intake mani-
fold
Canister purge hose from EVAP canister purge valve
Water hoses from throttle body
Vacuum hose (5) (to check valve) from throttle body
Fuel feed hose and return hose from each pipe
9) Remove fuel delivery pipe with fuel injectors from cylinder
head and intake manifold.
10) Remove canister purge hose bracket.
11) Disconnect EGR pipe from EGR valve.
12) Remove intake manifold stiffener (1).