Ignition system SUZUKI JIMNY 2005 3.G Service Owner's Manual
[x] Cancel search | Manufacturer: SUZUKI, Model Year: 2005, Model line: JIMNY, Model: SUZUKI JIMNY 2005 3.GPages: 687, PDF Size: 13.38 MB
Page 183 of 687
Downloaded from www.Manualslib.com manuals search engine 3D-10 FRONT SUSPENSION
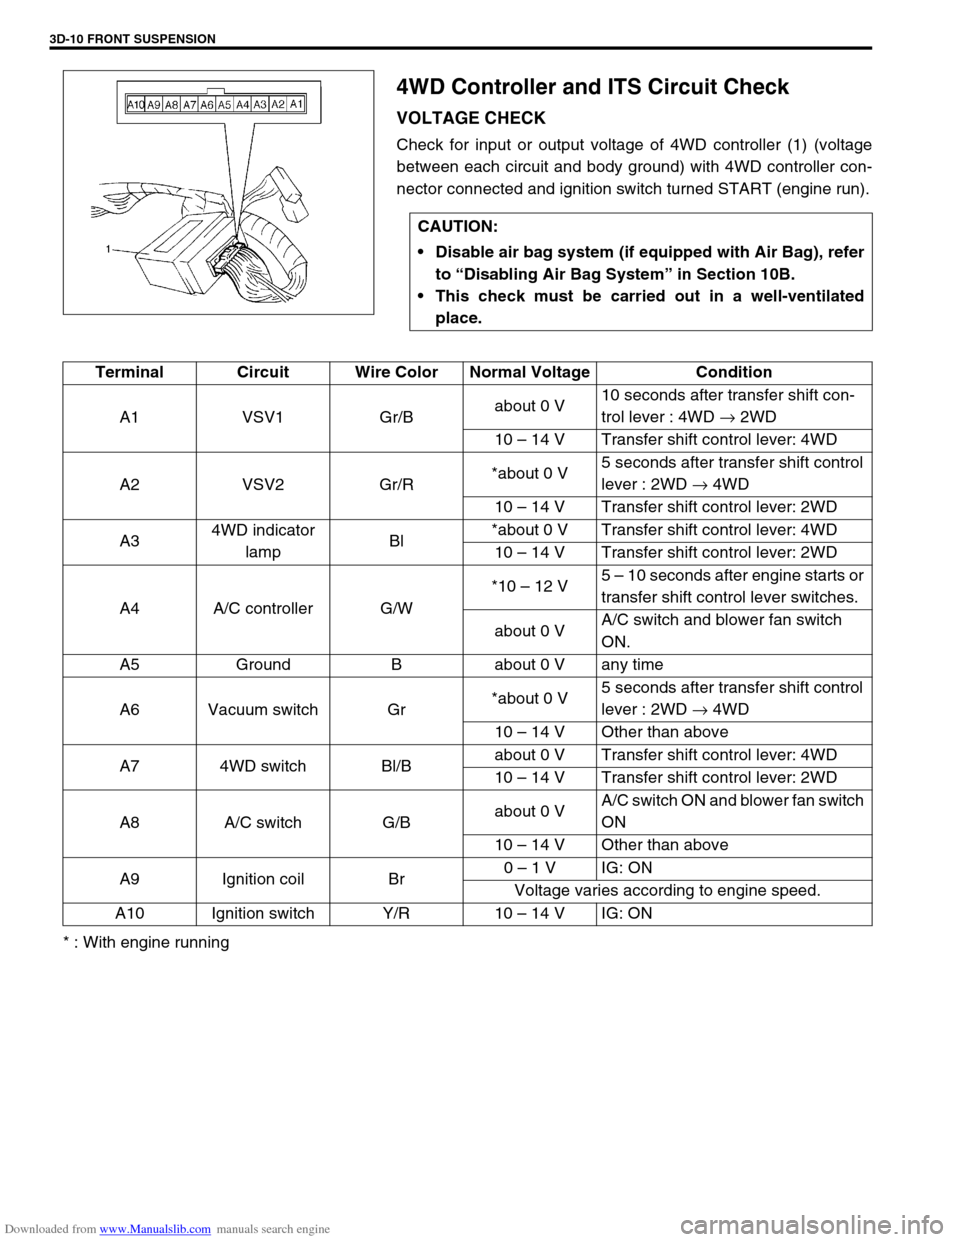
4WD Controller and ITS Circuit Check
VOLTAGE CHECK
Check for input or output voltage of 4WD controller (1) (voltage
between each circuit and body ground) with 4WD controller con-
nector connected and ignition switch turned START (engine run).
* : With engine runningCAUTION:
Disable air bag system (if equipped with Air Bag), refer
to “Disabling Air Bag System” in Section 10B.
This check must be carried out in a well-ventilated
place.
Terminal Circuit Wire Color Normal Voltage Condition
A1 VSV1 Gr/Babout 0 V10 seconds after transfer shift con-
trol lever : 4WD → 2WD
10 – 14 V Transfer shift control lever: 4WD
A2 VSV2 Gr/R*about 0 V5 seconds after transfer shift control
lever : 2WD → 4WD
10 – 14 V Transfer shift control lever: 2WD
A34WD indicator
lampBl*about 0 V Transfer shift control lever: 4WD
10 – 14 V Transfer shift control lever: 2WD
A4 A/C controller G/W*10 – 12 V5 – 10 seconds after engine starts or
transfer shift control lever switches.
about 0 VA/C switch and blower fan switch
ON.
A5 Ground B about 0 V any time
A6 Vacuum switch Gr*about 0 V5 seconds after transfer shift control
lever : 2WD → 4WD
10 – 14 V Other than above
A7 4WD switch Bl/Babout 0 V Transfer shift control lever: 4WD
10 – 14 V Transfer shift control lever: 2WD
A8 A/C switch G/Babout 0 VA/C switch ON and blower fan switch
ON
10 – 14 V Other than above
A9 Ignition coil Br0 – 1 V IG: ON
Voltage varies according to engine speed.
A10 Ignition switch Y/R 10 – 14 V IG: ON
Page 248 of 687

Downloaded from www.Manualslib.com manuals search engine WHEELS AND TIRES 3F-5
WARNING:
Wheel spin should be limited to 35 mph (55 km/h) as indicated on speedometer.
This limit is necessary because speedometer only indicates one-half of actual wheel speed when one
drive wheel is spinning and the other drive wheel is stopped.
Unless care is taken in limiting drive wheel spin, spinning wheel can reach excessive speeds. This
can result in possible tire disintegration or differential failure, which could cause serious personal
injury or extensive vehicle damage.
CAUTION:
For vehicle equipped with ABS, using on-vehicle balancing method with ignition switch ON may set
malfunction diagnostic trouble code (DTC) of ABS even when system is in good condition.
Never turn ignition switch ON while spinning wheel.
Page 262 of 687

Downloaded from www.Manualslib.com manuals search engine BRAKES 5-1
6F1
6F2
6G
6H
6K
7A
7A1
7B1
7C1
7D
7E
5
9
10
10A
10B
9
10
10A
10B
SECTION 5
BRAKES
CONTENTS
General Description ......................................... 5-3
Diagnosis .......................................................... 5-4
Road Testing Brakes ...................................... 5-4
Brake Fluid Leaks .......................................... 5-4
Substandard or Contaminated Brake Fluid .... 5-4
Diagnosis Table ............................................. 5-5
Brake Pedal Free Height Adjustment ............. 5-8
Brake Pedal Play Check ................................ 5-8
Stop Light Switch Adjustment ........................ 5-8
Excessive Pedal Travel Check ....................... 5-9
Front Brake Disc Check ................................. 5-9
Front Brake Pad Check .................................. 5-9
Rear Brake Shoe Check .............................. 5-10
Master Cylinder and Brake Fluid Level
Check ........................................................... 5-10
Rear Drum Brake Shoe Adjustment ............. 5-11
Parking Brake Inspection and Adjustment ... 5-11
Booster Operation Check ............................. 5-12Fluid Pressure Test
(If Equipped with LSPV) ............................... 5-15
On-Vehicle Service ........................................ 5-17
Air Bleeding of Brake System ...................... 5-17
Brake Hose and Pipe Inspection.................. 5-18
Front Disc Brake .......................................... 5-19
Brake pad ................................................. 5-20
Caliper assembly...................................... 5-22
Brake Disc.................................................... 5-26
Rear Brake ................................................... 5-29
Brake drum............................................... 5-29
Brake shoe ............................................... 5-32
Wheel Cylinder............................................. 5-33
Brake back plate ...................................... 5-34
Master Cylinder .............................................. 5-36
Master Cylinder Reservoir ........................... 5-36
Master Cylinder Assembly ........................... 5-37 WARNING:
For lifting point of vehicle, refer to Section 0A.
WARNING:
For vehicles equipped with Supplement Restraint (Air Bag) System:
Service on and around the air bag system components or wiring must be performed only by an
authorized SUZUKI dealer. Refer to “Air Bag System Components and Wiring Location View” under
“General Description” in air bag system section in order to confirm whether you are performing ser-
vice on or near the air bag system components or wiring. Please observe all WARNINGS and “Ser-
vice Precautions” under “On-Vehicle Service” in air bag system section before performing service
on or around the air bag system components or wiring. Failure to follow WARNINGS could result in
unintentional activation of the system or could render the system inoperative. Either of these two
conditions may result in severe injury.
Technical service work must be started at least 90 seconds after the ignition switch is turned to the
“LOCK” position and the negative cable is disconnected from the battery. Otherwise, the system
may be activated by reserve energy in the Sensing and Diagnostic Module (SDM).
NOTE:
When inspecting and servicing vehicle equipped with ABS, be sure to refer to section 5E first.
All brake fasteners are important attaching parts in that they could affect the performance of vital
parts and systems, and/or could result in major repair expense. They must be replaced with one of
same part number or with an equivalent part if replacement becomes necessary. Do not use a
replacement part of lesser quality or substitute design. Torque values must be used as specified
during reassembly to assure proper retention of all parts. There is to be no welding as it may result
in extensive damage and weakening of the metal.
Page 268 of 687

Downloaded from www.Manualslib.com manuals search engine BRAKES 5-7
Brake warning light
turns on when brake
is appliedBrake fluid leaking from brake line Investigate leaky point, correct it
and add brake fluid.
Insufficient amount of brake fluid Add brake fluid.
Faulty P & Differential valve (Differential switch) Replace.
Brake warning light
fails to turn on even
when parking brake is
appliedBulb burnt out Replace bulb.
Brake warning light circuit open Repair circuit.
ABS warning light
does not turn on for 2
sec. after ignition
switch has turned ON.Bulb burnt out Replace bulb.
ABS warning light circuit open, if equipped with
ABS (including check relay)Check system referring to “TABLE-
A” in Section 5E.
ABS warning light
remains on after igni-
tion switch has turned
on for 2 sec.Malfunctioning ABS, if equipped with ABS Check system referring to “TABLE-
B” in Section 5E. Condition Possible Cause Correction
Page 318 of 687

Downloaded from www.Manualslib.com manuals search engine ANTILOCK BRAKE SYSTEM (ABS) 5E-1
6F1
6F2
6G
6H
6K
7A
7A1
7B1
7C1
7D
7E
7F
8E
5E
9
10
10A
10B
10
10A
10B
SECTION 5E
ANTILOCK BRAKE SYSTEM (ABS)
CONTENTS
General Description ....................................... 5E-2
System Schematic ....................................... 5E-3
ABS Component Parts Location .................. 5E-4
ABS Control Module ..................................... 5E-5
Self-diagnosis function ............................. 5E-5
Fail-safe function ...................................... 5E-5
Diagnosis ........................................................ 5E-6
Precaution in Diagnosing Troubles .............. 5E-6
ABS Diagnostic Flow Table .......................... 5E-6
“ABS” Warning Lamp Check ........................ 5E-9
Diagnostic Trouble Code (DTC) Check ........ 5E-9
DTC Check (Using SUZUKI Scan Tool) ..... 5E-10
Diagnostic Trouble Code (DTC)
Clearance ................................................... 5E-10
Diagnostic Trouble Code (DTC) Table ....... 5E-11
System Circuit ............................................ 5E-12
Table – A “ABS” Warning Lamp Circuit
Check – Lamp Does Not Come “ON”
at Ignition Switch ON .................................. 5E-14
Table – B “ABS” Warning Lamp Circuit
Check – Lamp Comes “ON” Steady ........... 5E-15
Table – C “ABS” Warning Lamp Circuit
Check – Lamp Flashes Continuously
While Ignition Switch is ON ........................ 5E-16
Table – D Code (DTC) is Not Outputted
Even With Diag. Switch Terminal
Connected to Ground. ................................ 5E-17
DTC C1015 (DTC 15) – G Sensor
Circuit ......................................................... 5E-18
DTC C1016 (DTC 16) – Stop Lamp
Circuit ......................................................... 5E-20
DTC C1021 (DTC 21), DTC C1022
(DTC 22) – Right Front Wheel Speed
Sensor Circuit ............................................. 5E-21
DTC C1025 (DTC 25), DTC C1026
(DTC 26) – Left Front Wheel Speed
Sensor Circuit ............................................. 5E-21DTC C1031 (DTC 31), DTC C1032
(DTC 32) – Right Rear Wheel Speed
Sensor Circuit ............................................ 5E-21
DTC C1035 (DTC 35), DTC C1036
(DTC 36) – Left Rear Wheel Speed
Sensor Circuit ............................................ 5E-21
DTC C1041 (DTC 41), DTC C1042
(DTC 42) – Right Front Solenoid Circuit .... 5E-24
DTC C1045 (DTC 45), DTC C1046
(DTC 46) – Left Front Solenoid Circuit....... 5E-24
DTC C1055 (DTC 55), DTC C1056
(DTC 56) – Rear Solenoid Circuit .............. 5E-24
DTC C1057 (DTC 57) – Power Source
Circuit ......................................................... 5E-25
DTC C1061 (DTC 61) – ABS Pump
Motor Circuit............................................... 5E-26
DTC C1063 (DTC 63) – ABS Fail Safe
Circuit ......................................................... 5E-27
DTC C1071 (DTC 71) – ABS Control
Module ....................................................... 5E-28
On-Vehicle Service ...................................... 5E-29
Precaution .................................................. 5E-29
ABS Hydraulic Unit Operation Check ........ 5E-29
ABS Hydraulic Unit / Control Module
Assembly ................................................... 5E-30
Front Wheel Speed Sensor........................ 5E-32
Front Wheel Sensor Ring........................... 5E-35
Rear Wheel Speed Sensor ........................ 5E-36
Rear Wheel Sensor Ring ........................... 5E-38
G Sensor .................................................... 5E-39
Tightening Torque Specification ................ 5E-40
Special Tool .................................................. 5E-40 NOTE:
All brake fasteners are important attaching parts in that they could affect the performance of vital
parts and systems, and/or could result in major repair expense. They must be replaced with one of
same part number or with an equivalent part if replacement part of lesser quality or substitute design.
Torque values must be used as specified during reassembly to assure proper retention of all parts.
There is to be no welding as it may result in extensive damage and weakening of the metal.
Page 322 of 687
Downloaded from www.Manualslib.com manuals search engine ANTILOCK BRAKE SYSTEM (ABS) 5E-5
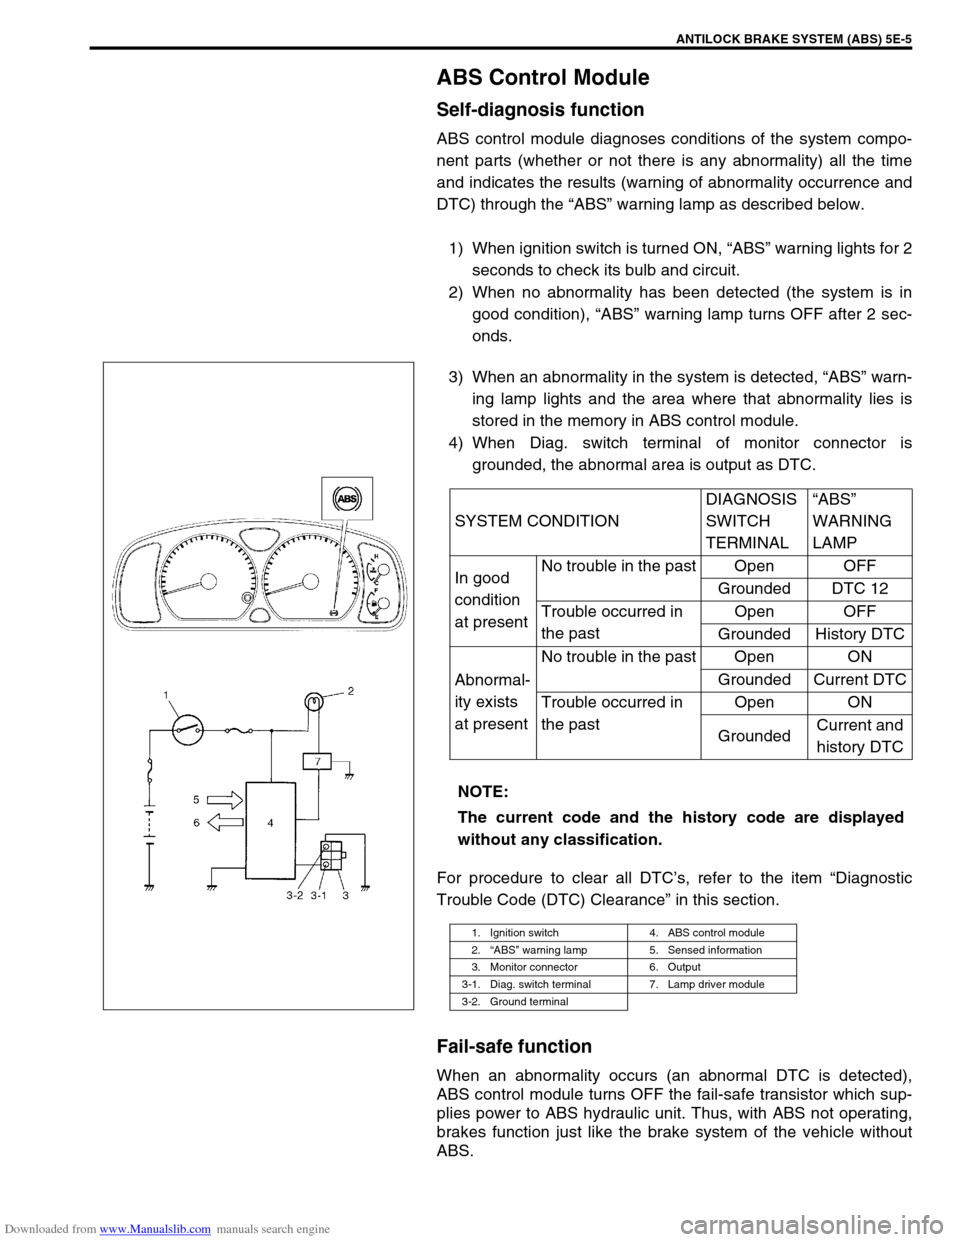
ABS Control Module
Self-diagnosis function
ABS control module diagnoses conditions of the system compo-
nent parts (whether or not there is any abnormality) all the time
and indicates the results (warning of abnormality occurrence and
DTC) through the “ABS” warning lamp as described below.
1) When ignition switch is turned ON, “ABS” warning lights for 2
seconds to check its bulb and circuit.
2) When no abnormality has been detected (the system is in
good condition), “ABS” warning lamp turns OFF after 2 sec-
onds.
3) When an abnormality in the system is detected, “ABS” warn-
ing lamp lights and the area where that abnormality lies is
stored in the memory in ABS control module.
4) When Diag. switch terminal of monitor connector is
grounded, the abnormal area is output as DTC.
For procedure to clear all DTC’s, refer to the item “Diagnostic
Trouble Code (DTC) Clearance” in this section.
Fail-safe function
When an abnormality occurs (an abnormal DTC is detected),
ABS control module turns OFF the fail-safe transistor which sup-
plies power to ABS hydraulic unit. Thus, with ABS not operating,
brakes function just like the brake system of the vehicle without
ABS.SYSTEM CONDITIONDIAGNOSIS
SWITCH
TERMINAL“ABS”
WARNING
LAMP
In good
condition
at presentNo trouble in the past Open OFF
Grounded DTC 12
Trouble occurred in
the pastOpen OFF
Grounded History DTC
Abnormal-
ity exists
at presentNo trouble in the past Open ON
Grounded Current DTC
Trouble occurred in
the pastOpen ON
GroundedCurrent and
history DTC
NOTE:
The current code and the history code are displayed
without any classification.
1. Ignition switch 4. ABS control module
2.“ABS” warning lamp 5. Sensed information
3. Monitor connector 6. Output
3-1. Diag. switch terminal 7. Lamp driver module
3-2. Ground terminal
Page 324 of 687
Downloaded from www.Manualslib.com manuals search engine ANTILOCK BRAKE SYSTEM (ABS) 5E-7
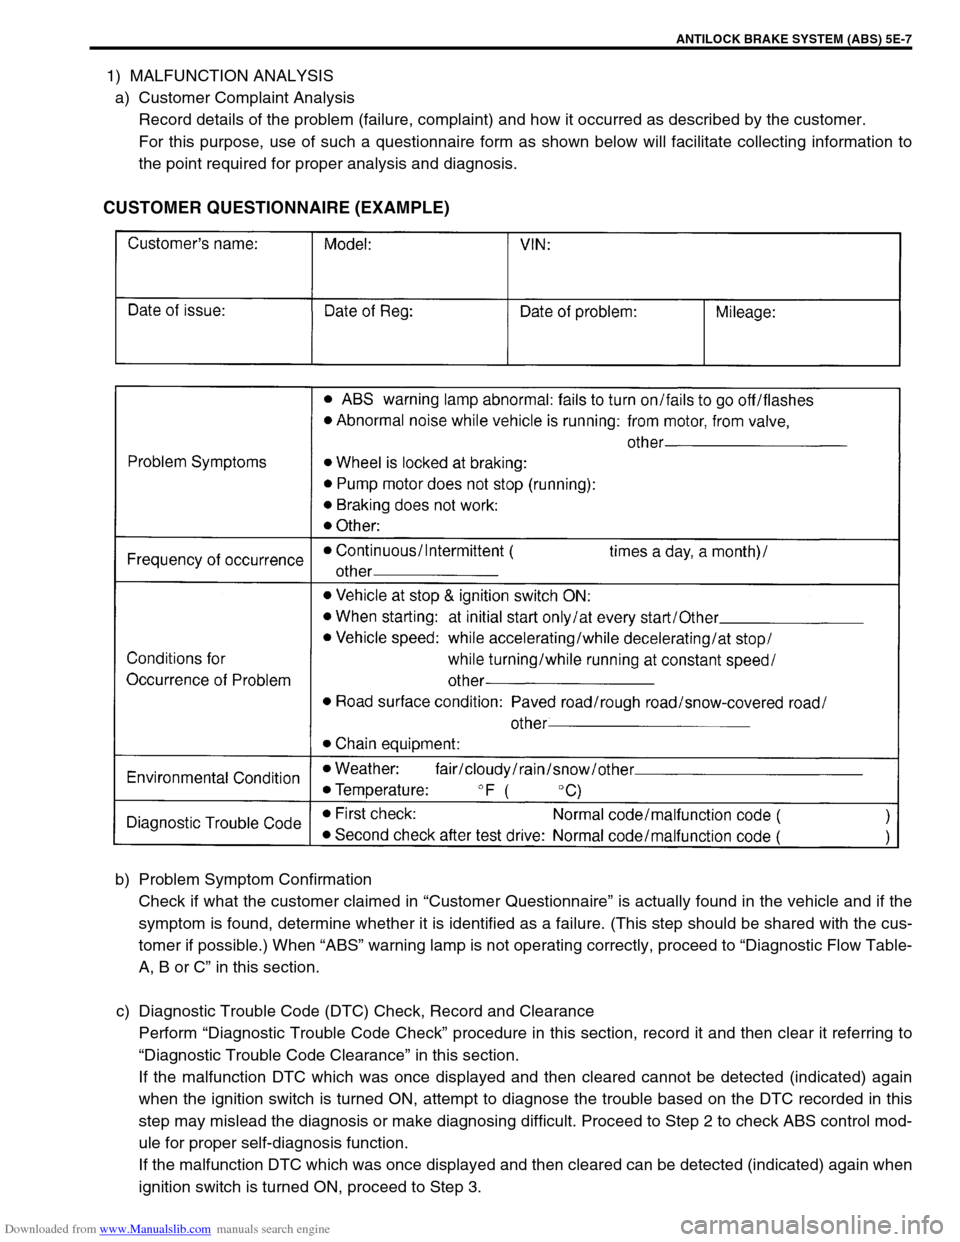
1) MALFUNCTION ANALYSIS
a) Customer Complaint Analysis
Record details of the problem (failure, complaint) and how it occurred as described by the customer.
For this purpose, use of such a questionnaire form as shown below will facilitate collecting information to
the point required for proper analysis and diagnosis.
CUSTOMER QUESTIONNAIRE (EXAMPLE)
b) Problem Symptom Confirmation
Check if what the customer claimed in “Customer Questionnaire” is actually found in the vehicle and if the
symptom is found, determine whether it is identified as a failure. (This step should be shared with the cus-
tomer if possible.) When “ABS” warning lamp is not operating correctly, proceed to “Diagnostic Flow Table-
A, B or C” in this section.
c) Diagnostic Trouble Code (DTC) Check, Record and Clearance
Perform “Diagnostic Trouble Code Check” procedure in this section, record it and then clear it referring to
“Diagnostic Trouble Code Clearance” in this section.
If the malfunction DTC which was once displayed and then cleared cannot be detected (indicated) again
when the ignition switch is turned ON, attempt to diagnose the trouble based on the DTC recorded in this
step may mislead the diagnosis or make diagnosing difficult. Proceed to Step 2 to check ABS control mod-
ule for proper self-diagnosis function.
If the malfunction DTC which was once displayed and then cleared can be detected (indicated) again when
ignition switch is turned ON, proceed to Step 3.
Page 325 of 687

Downloaded from www.Manualslib.com manuals search engine 5E-8 ANTILOCK BRAKE SYSTEM (ABS)
2) DRIVING TEST
Test drive the vehicle at 40 km/h for more than a minute and check if any trouble symptom (such as abnor-
mal lighting of “ABS” warning lamp) exists.
If the malfunction DTC is confirmed again at ignition switch ON, driving test as described in above is not nec-
essary. Proceed to Step 3.
3) DIAGNOSTIC TROUBLE CODE CHECK
Recheck diagnostic trouble code referring to “DTC Check” in this section.
4) DIAGNOSTIC TROUBLE CODE FLOW TABLE
According to Diagnostic Flow Table for the diagnostic trouble code confirmed in Step 3, locate the cause of
the trouble, namely in a sensor, switch, wire harness, connector, actuator, ABS control module or other part
and repair or replace faulty parts.
5)“DIAGNOSIS TABLE” IN SECTION 5
Check the parts or system suspected as a possible cause referring to “Diagnosis Table” in Section 5 and
based on symptoms appearing on the vehicle (symptoms obtained through Step 1)-a, 1)-b and 2) and repair
or replace faulty parts, if any.
6) CHECK FOR INTERMITTENT PROBLEM
Check parts where an intermittent trouble is easy to occur (e.g., wire harness, connector, etc.), referring to
Intermittent Trouble in Section 0A and related circuit of trouble code recorded in Step 1)-c.
7) FINAL CONFIRMATION TEST
Confirm that the problem symptom has gone and the ABS is free from any abnormal conditions. If what has
been repaired is related to the malfunction DTC, clear the DTC once and perform test driving and confirm
that a normal code is indicated.
Page 326 of 687
Downloaded from www.Manualslib.com manuals search engine ANTILOCK BRAKE SYSTEM (ABS) 5E-9
“ABS” Warning Lamp Check
Turn ignition switch ON and check that “ABS” warning lamp
comes ON for about 2 seconds and then goes OFF. If any faulty
condition is found, advance to Diagnostic Flow Table-A, B or C.
Diagnostic Trouble Code (DTC) Check
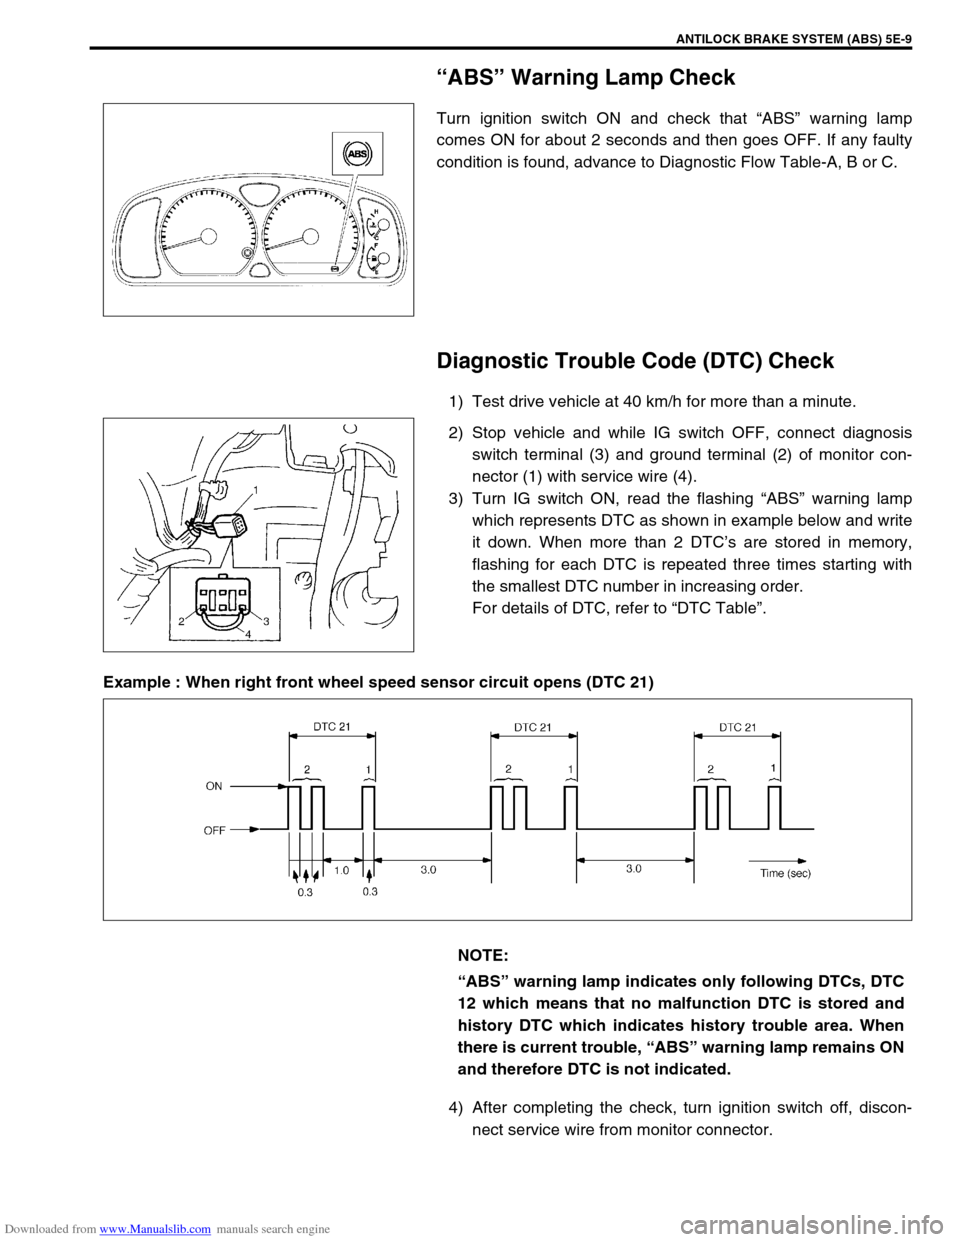
1) Test drive vehicle at 40 km/h for more than a minute.
2) Stop vehicle and while IG switch OFF, connect diagnosis
switch terminal (3) and ground terminal (2) of monitor con-
nector (1) with service wire (4).
3) Turn IG switch ON, read the flashing “ABS” warning lamp
which represents DTC as shown in example below and write
it down. When more than 2 DTC’s are stored in memory,
flashing for each DTC is repeated three times starting with
the smallest DTC number in increasing order.
For details of DTC, refer to “DTC Table”.
Example : When right front wheel speed sensor circuit opens (DTC 21)
4) After completing the check, turn ignition switch off, discon-
nect service wire from monitor connector.
NOTE:
“ABS” warning lamp indicates only following DTCs, DTC
12 which means that no malfunction DTC is stored and
history DTC which indicates history trouble area. When
there is current trouble, “ABS” warning lamp remains ON
and therefore DTC is not indicated.
Page 327 of 687
Downloaded from www.Manualslib.com manuals search engine 5E-10 ANTILOCK BRAKE SYSTEM (ABS)
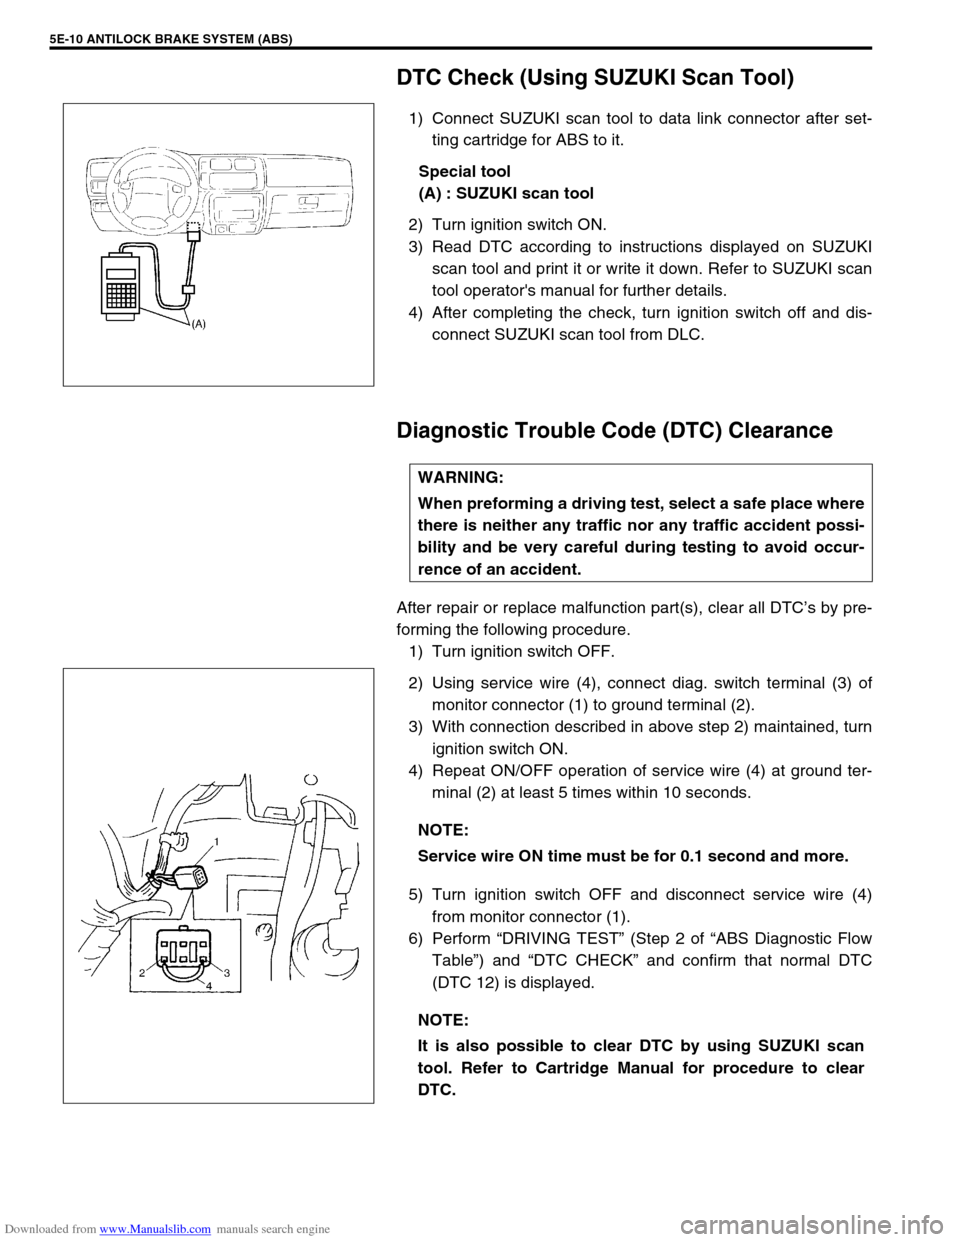
DTC Check (Using SUZUKI Scan Tool)
1) Connect SUZUKI scan tool to data link connector after set-
ting cartridge for ABS to it.
Special tool
(A) : SUZUKI scan tool
2) Turn ignition switch ON.
3) Read DTC according to instructions displayed on SUZUKI
scan tool and print it or write it down. Refer to SUZUKI scan
tool operator's manual for further details.
4) After completing the check, turn ignition switch off and dis-
connect SUZUKI scan tool from DLC.
Diagnostic Trouble Code (DTC) Clearance
After repair or replace malfunction part(s), clear all DTC’s by pre-
forming the following procedure.
1) Turn ignition switch OFF.
2) Using service wire (4), connect diag. switch terminal (3) of
monitor connector (1) to ground terminal (2).
3) With connection described in above step 2) maintained, turn
ignition switch ON.
4) Repeat ON/OFF operation of service wire (4) at ground ter-
minal (2) at least 5 times within 10 seconds.
5) Turn ignition switch OFF and disconnect service wire (4)
from monitor connector (1).
6) Perform “DRIVING TEST” (Step 2 of “ABS Diagnostic Flow
Table”) and “DTC CHECK” and confirm that normal DTC
(DTC 12) is displayed.
WARNING:
When preforming a driving test, select a safe place where
there is neither any traffic nor any traffic accident possi-
bility and be very careful during testing to avoid occur-
rence of an accident.
NOTE:
Service wire ON time must be for 0.1 second and more.
NOTE:
It is also possible to clear DTC by using SUZUKI scan
tool. Refer to Cartridge Manual for procedure to clear
DTC.