Ps sensor SUZUKI JIMNY 2005 3.G Service Service Manual
[x] Cancel search | Manufacturer: SUZUKI, Model Year: 2005, Model line: JIMNY, Model: SUZUKI JIMNY 2005 3.GPages: 687, PDF Size: 13.38 MB
Page 349 of 687
Downloaded from www.Manualslib.com manuals search engine 5E-32 ANTILOCK BRAKE SYSTEM (ABS)
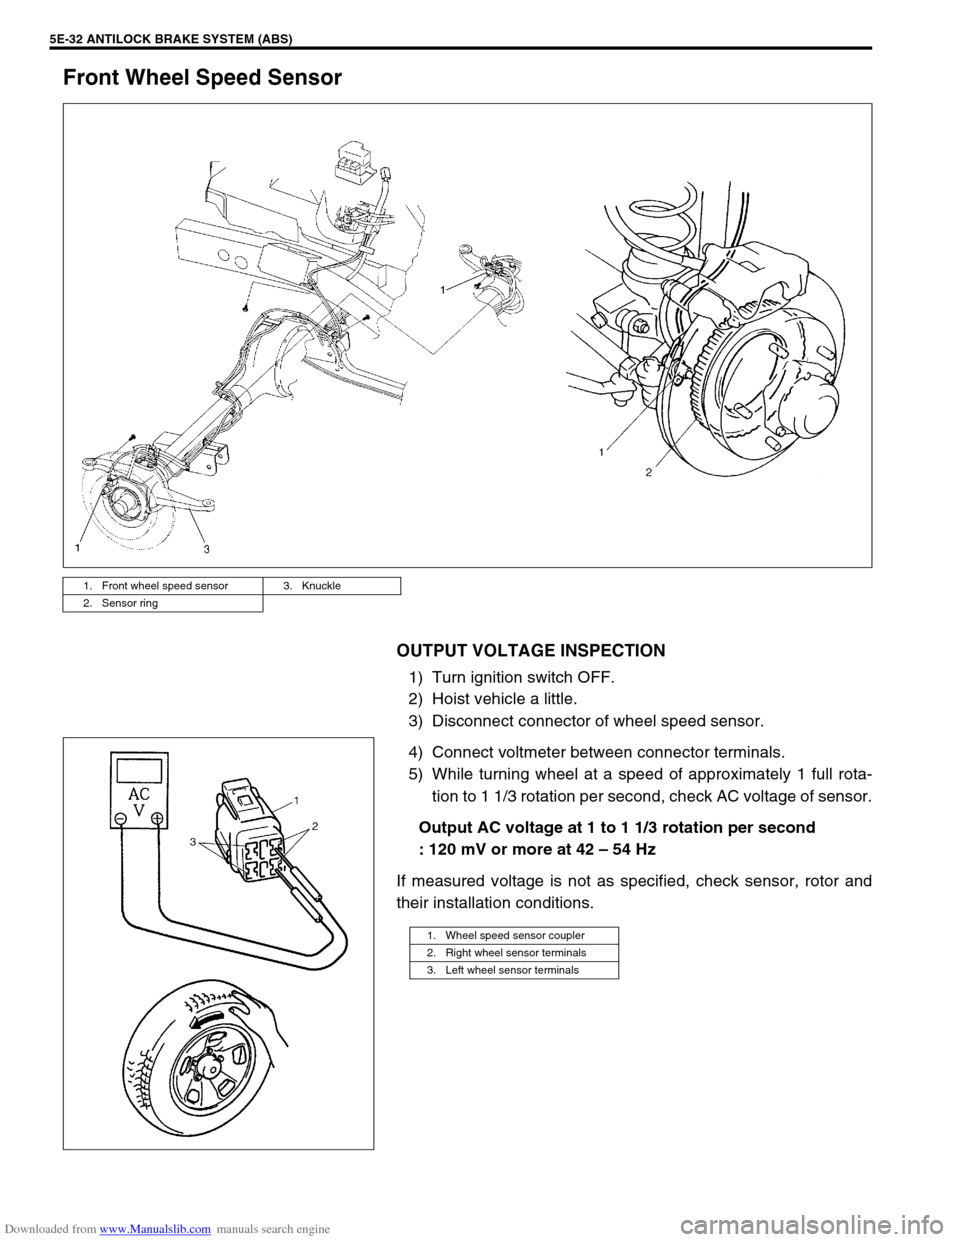
Front Wheel Speed Sensor
OUTPUT VOLTAGE INSPECTION
1) Turn ignition switch OFF.
2) Hoist vehicle a little.
3) Disconnect connector of wheel speed sensor.
4) Connect voltmeter between connector terminals.
5) While turning wheel at a speed of approximately 1 full rota-
tion to 1 1/3 rotation per second, check AC voltage of sensor.
Output AC voltage at 1 to 1 1/3 rotation per second
: 120 mV or more at 42 – 54 Hz
If measured voltage is not as specified, check sensor, rotor and
their installation conditions.
1. Front wheel speed sensor 3. Knuckle
2. Sensor ring
1. Wheel speed sensor coupler
2. Right wheel sensor terminals
3. Left wheel sensor terminals
Page 350 of 687
Downloaded from www.Manualslib.com manuals search engine ANTILOCK BRAKE SYSTEM (ABS) 5E-33
Reference
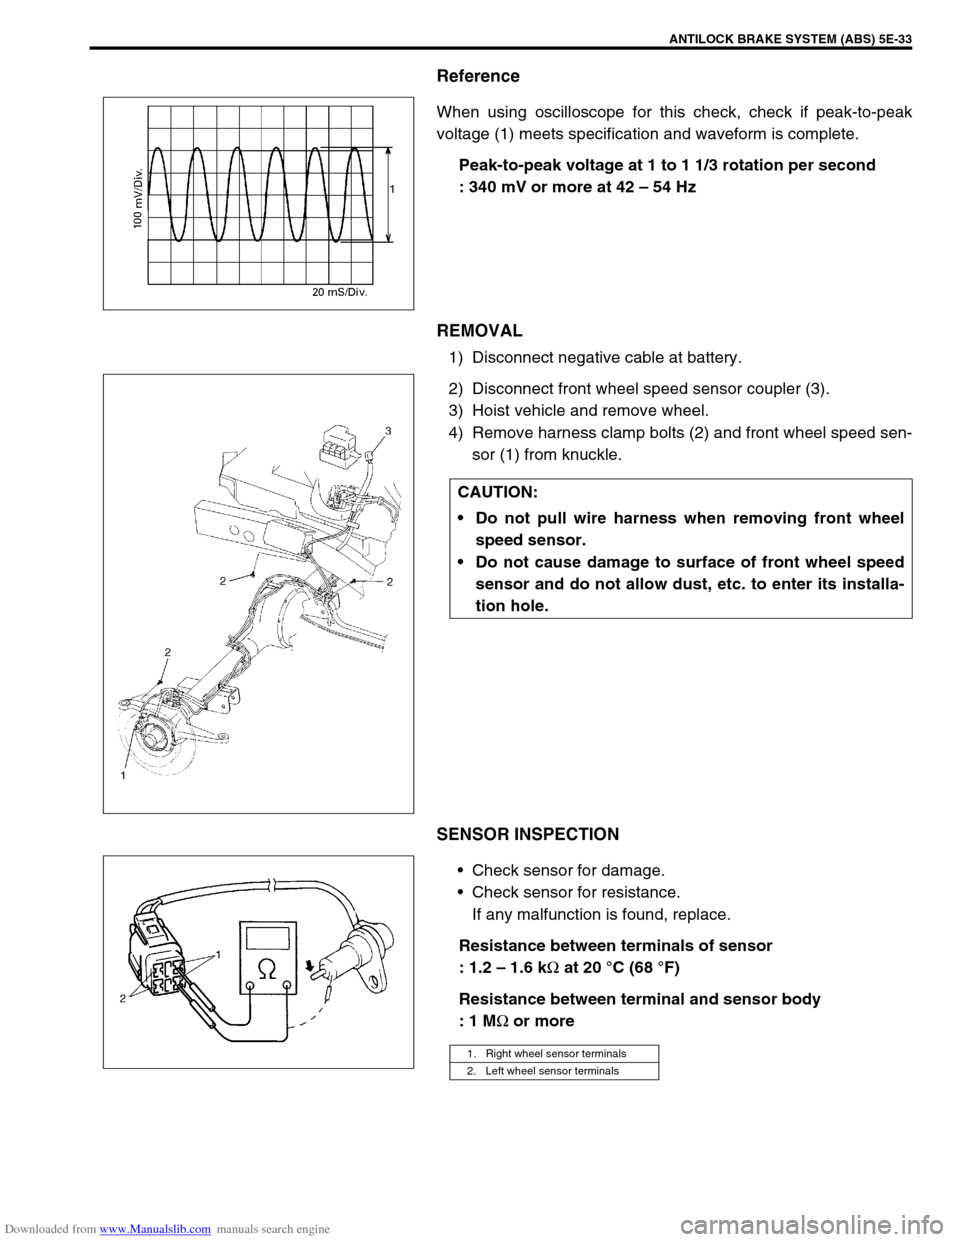
When using oscilloscope for this check, check if peak-to-peak
voltage (1) meets specification and waveform is complete.
Peak-to-peak voltage at 1 to 1 1/3 rotation per second
: 340 mV or more at 42 – 54 Hz
REMOVAL
1) Disconnect negative cable at battery.
2) Disconnect front wheel speed sensor coupler (3).
3) Hoist vehicle and remove wheel.
4) Remove harness clamp bolts (2) and front wheel speed sen-
sor (1) from knuckle.
SENSOR INSPECTION
Check sensor for damage.
Check sensor for resistance.
If any malfunction is found, replace.
Resistance between terminals of sensor
: 1.2 – 1.6 k
Ω at 20 °C (68 °F)
Resistance between terminal and sensor body
: 1 M
Ω or more
CAUTION:
Do not pull wire harness when removing front wheel
speed sensor.
Do not cause damage to surface of front wheel speed
sensor and do not allow dust, etc. to enter its installa-
tion hole.
1. Right wheel sensor terminals
2. Left wheel sensor terminals
Page 351 of 687
Downloaded from www.Manualslib.com manuals search engine 5E-34 ANTILOCK BRAKE SYSTEM (ABS)
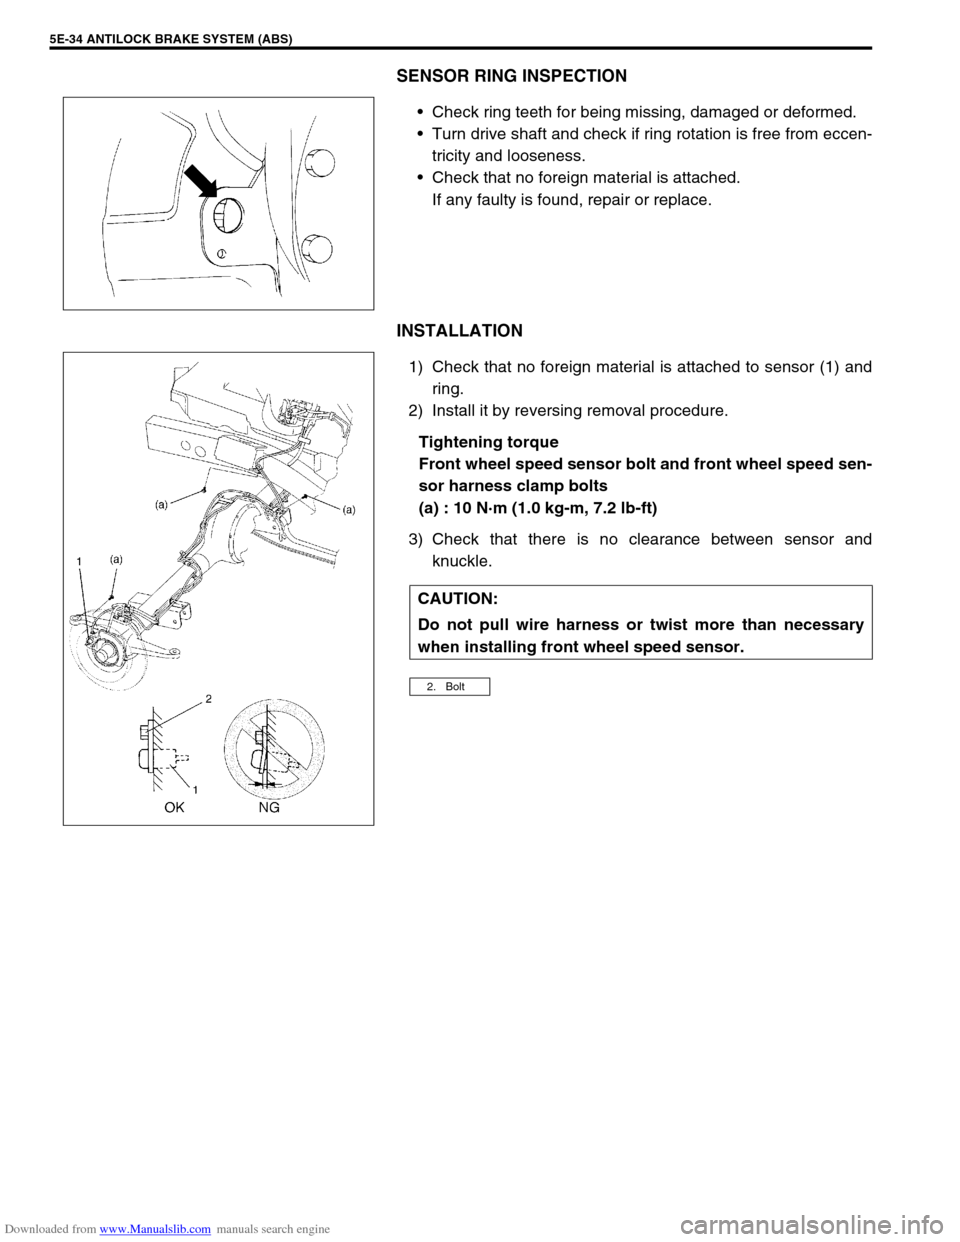
SENSOR RING INSPECTION
Check ring teeth for being missing, damaged or deformed.
Turn drive shaft and check if ring rotation is free from eccen-
tricity and looseness.
Check that no foreign material is attached.
If any faulty is found, repair or replace.
INSTALLATION
1) Check that no foreign material is attached to sensor (1) and
ring.
2) Install it by reversing removal procedure.
Tightening torque
Front wheel speed sensor bolt and front wheel speed sen-
sor harness clamp bolts
(a) : 10 N·m (1.0 kg-m, 7.2 lb-ft)
3) Check that there is no clearance between sensor and
knuckle.
CAUTION:
Do not pull wire harness or twist more than necessary
when installing front wheel speed sensor.
2. Bolt
Page 352 of 687
Downloaded from www.Manualslib.com manuals search engine ANTILOCK BRAKE SYSTEM (ABS) 5E-35
Front Wheel Sensor Ring
REMOVAL
1) Remove wheel hub with sensor ring. Refer to “Wheel Hub /
Bearing / Oil Seal” in Section 3D.
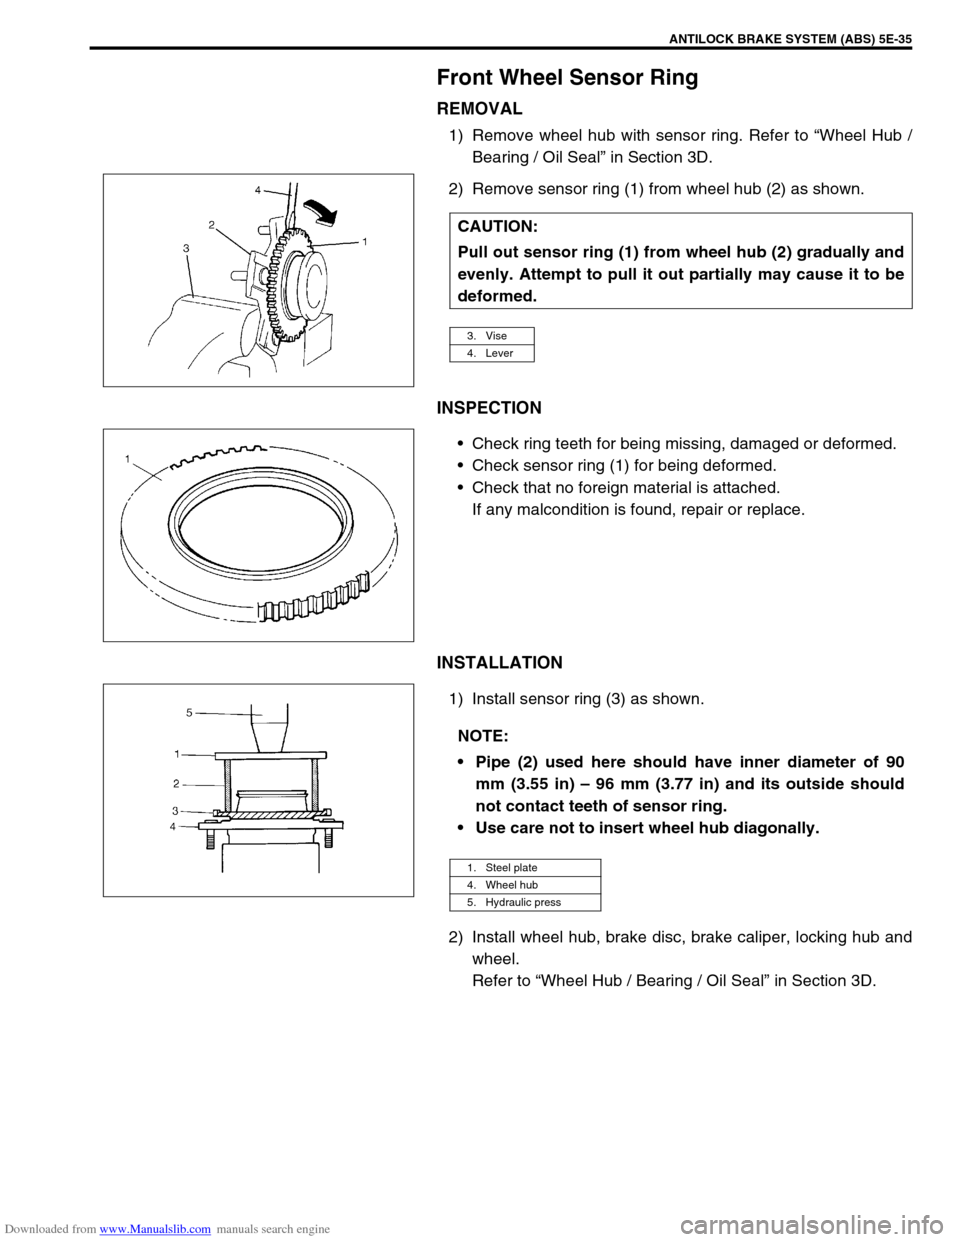
2) Remove sensor ring (1) from wheel hub (2) as shown.
INSPECTION
Check ring teeth for being missing, damaged or deformed.
Check sensor ring (1) for being deformed.
Check that no foreign material is attached.
If any malcondition is found, repair or replace.
INSTALLATION
1) Install sensor ring (3) as shown.
2) Install wheel hub, brake disc, brake caliper, locking hub and
wheel.
Refer to “Wheel Hub / Bearing / Oil Seal” in Section 3D. CAUTION:
Pull out sensor ring (1) from wheel hub (2) gradually and
evenly. Attempt to pull it out partially may cause it to be
deformed.
3. Vise
4. Lever
NOTE:
Pipe (2) used here should have inner diameter of 90
mm (3.55 in) – 96 mm (3.77 in) and its outside should
not contact teeth of sensor ring.
Use care not to insert wheel hub diagonally.
1. Steel plate
4. Wheel hub
5. Hydraulic press
Page 353 of 687
Downloaded from www.Manualslib.com manuals search engine 5E-36 ANTILOCK BRAKE SYSTEM (ABS)
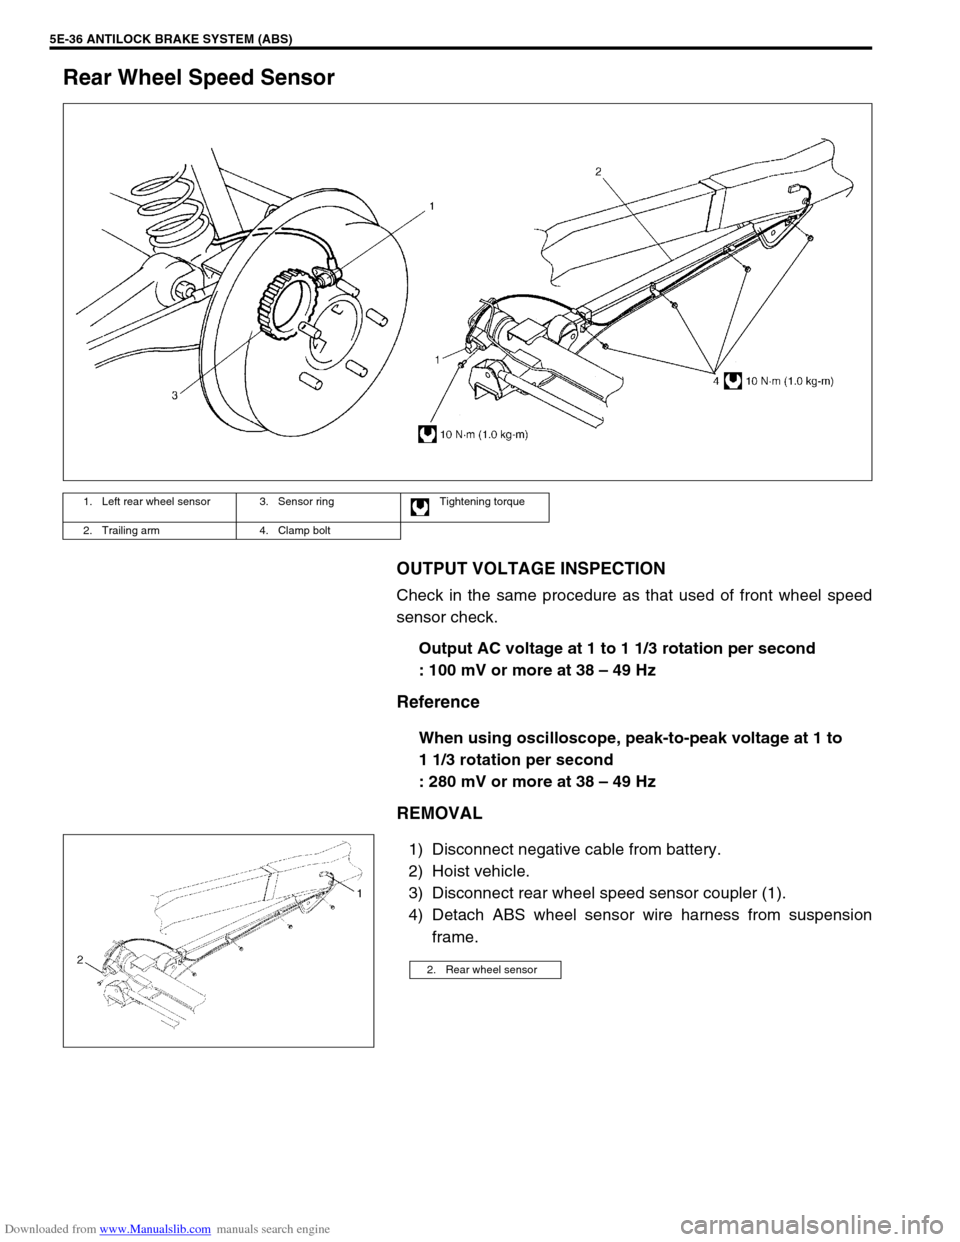
Rear Wheel Speed Sensor
OUTPUT VOLTAGE INSPECTION
Check in the same procedure as that used of front wheel speed
sensor check.
Output AC voltage at 1 to 1 1/3 rotation per second
: 100 mV or more at 38 – 49 Hz
Reference
When using oscilloscope, peak-to-peak voltage at 1 to
1 1/3 rotation per second
: 280 mV or more at 38 – 49 Hz
REMOVAL
1) Disconnect negative cable from battery.
2) Hoist vehicle.
3) Disconnect rear wheel speed sensor coupler (1).
4) Detach ABS wheel sensor wire harness from suspension
frame.
1. Left rear wheel sensor 3. Sensor ring Tightening torque
2. Trailing arm 4. Clamp bolt
2. Rear wheel sensor
Page 354 of 687
Downloaded from www.Manualslib.com manuals search engine ANTILOCK BRAKE SYSTEM (ABS) 5E-37
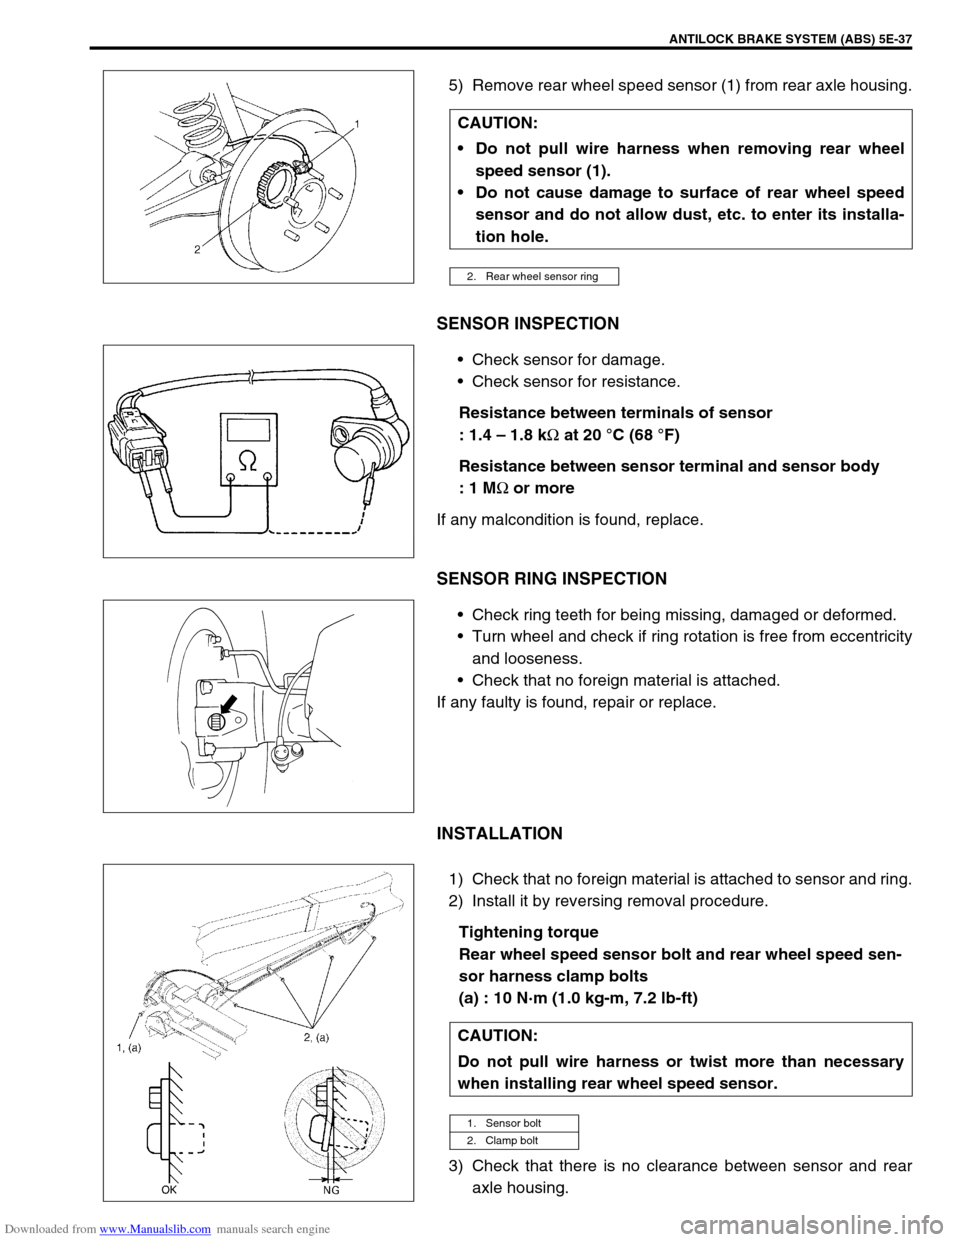
5) Remove rear wheel speed sensor (1) from rear axle housing.
SENSOR INSPECTION
Check sensor for damage.
Check sensor for resistance.
Resistance between terminals of sensor
: 1.4 – 1.8 k
Ω at 20 °C (68 °F)
Resistance between sensor terminal and sensor body
: 1 M
Ω or more
If any malcondition is found, replace.
SENSOR RING INSPECTION
Check ring teeth for being missing, damaged or deformed.
Turn wheel and check if ring rotation is free from eccentricity
and looseness.
Check that no foreign material is attached.
If any faulty is found, repair or replace.
INSTALLATION
1) Check that no foreign material is attached to sensor and ring.
2) Install it by reversing removal procedure.
Tightening torque
Rear wheel speed sensor bolt and rear wheel speed sen-
sor harness clamp bolts
(a) : 10 N·m (1.0 kg-m, 7.2 lb-ft)
3) Check that there is no clearance between sensor and rear
axle housing. CAUTION:
Do not pull wire harness when removing rear wheel
speed sensor (1).
Do not cause damage to surface of rear wheel speed
sensor and do not allow dust, etc. to enter its installa-
tion hole.
2. Rear wheel sensor ring
CAUTION:
Do not pull wire harness or twist more than necessary
when installing rear wheel speed sensor.
1. Sensor bolt
2. Clamp bolt
Page 355 of 687

Downloaded from www.Manualslib.com manuals search engine 5E-38 ANTILOCK BRAKE SYSTEM (ABS)
Rear Wheel Sensor Ring
REMOVAL
1) Remove rear axle shaft. Refer to “Rear Axle Shaft and
Wheel Bearing” in Section 3E.
2) In order to remove sensor ring (3) from retainer ring (2),
grind with a grinder one part of the sensor ring (3) as illus-
trated till it becomes thin.
3) Break with a chisel the thin ground sensor ring, and it can be
removed.
INSTALLATION
1) Press-fit sensor ring (1) as shown.
2) Install rear axle shaft referring to “Rear Axle Shaft and Wheel
Bearing” in Section 3E.
3) Install brake drum and wheel.
Refer to “Brake Drum” in Section 5. CAUTION:
Cover vinyl sheet (4) or the like over wheel bearing so
that fine grains from grinding will not enter there.
Be careful not to go so far as to grind the retainer ring
(2).
1. Rear axle
“A”: Grind with grinder
NOTE:
Use care not to cause any damage to outside of retainer
ring.
Page 356 of 687
Downloaded from www.Manualslib.com manuals search engine ANTILOCK BRAKE SYSTEM (ABS) 5E-39
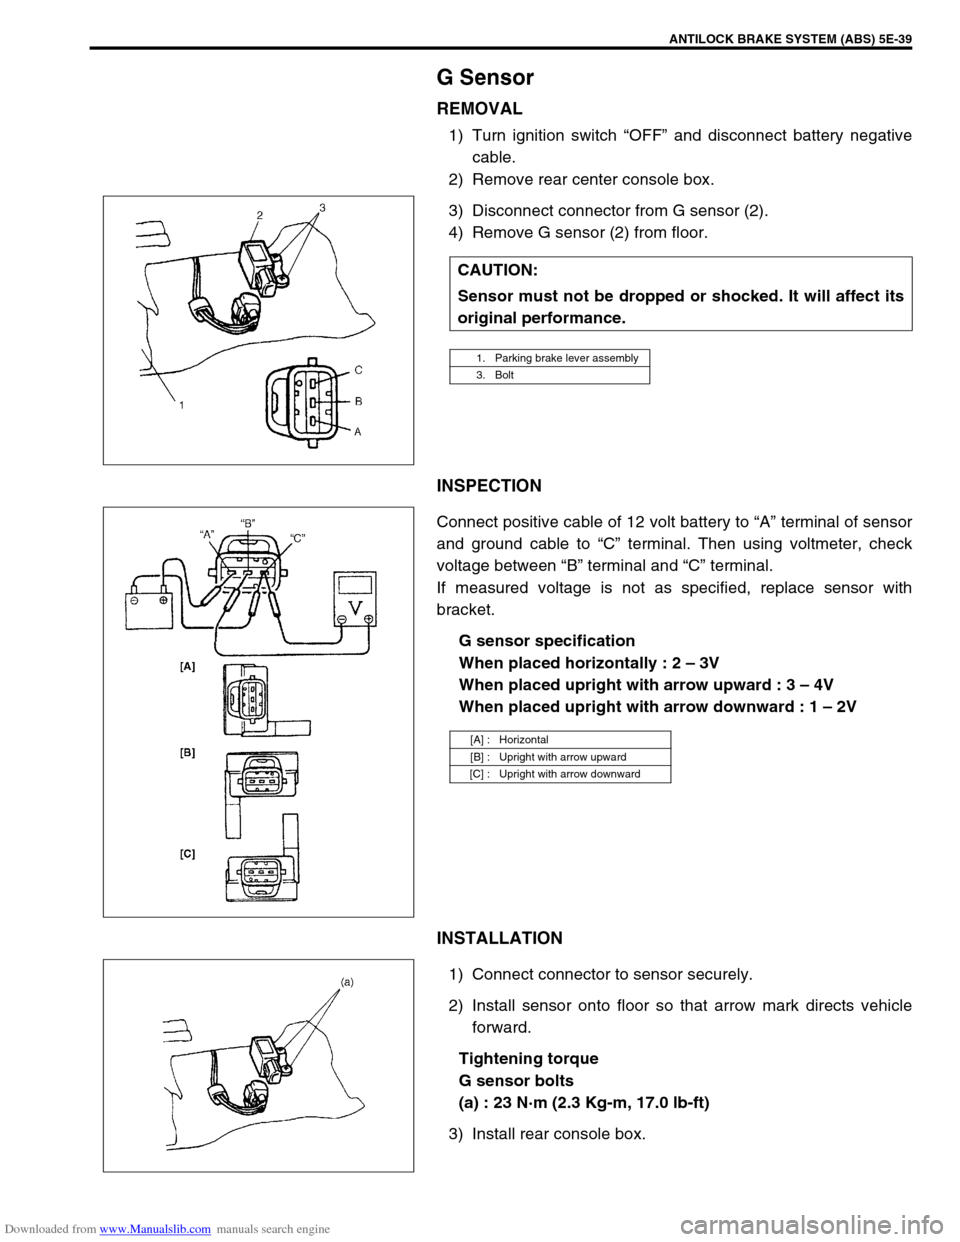
G Sensor
REMOVAL
1) Turn ignition switch “OFF” and disconnect battery negative
cable.
2) Remove rear center console box.
3) Disconnect connector from G sensor (2).
4) Remove G sensor (2) from floor.
INSPECTION
Connect positive cable of 12 volt battery to “A” terminal of sensor
and ground cable to “C” terminal. Then using voltmeter, check
voltage between “B” terminal and “C” terminal.
If measured voltage is not as specified, replace sensor with
bracket.
G sensor specification
When placed horizontally : 2 – 3V
When placed upright with arrow upward : 3 – 4V
When placed upright with arrow downward : 1 – 2V
INSTALLATION
1) Connect connector to sensor securely.
2) Install sensor onto floor so that arrow mark directs vehicle
forward.
Tightening torque
G sensor bolts
(a) : 23 N·m (2.3 Kg-m, 17.0 lb-ft)
3) Install rear console box.CAUTION:
Sensor must not be dropped or shocked. It will affect its
original performance.
1. Parking brake lever assembly
3. Bolt
[A] : Horizontal
[B] : Upright with arrow upward
[C] : Upright with arrow downward
Page 357 of 687
Downloaded from www.Manualslib.com manuals search engine 5E-40 ANTILOCK BRAKE SYSTEM (ABS)
Tightening Torque Specification
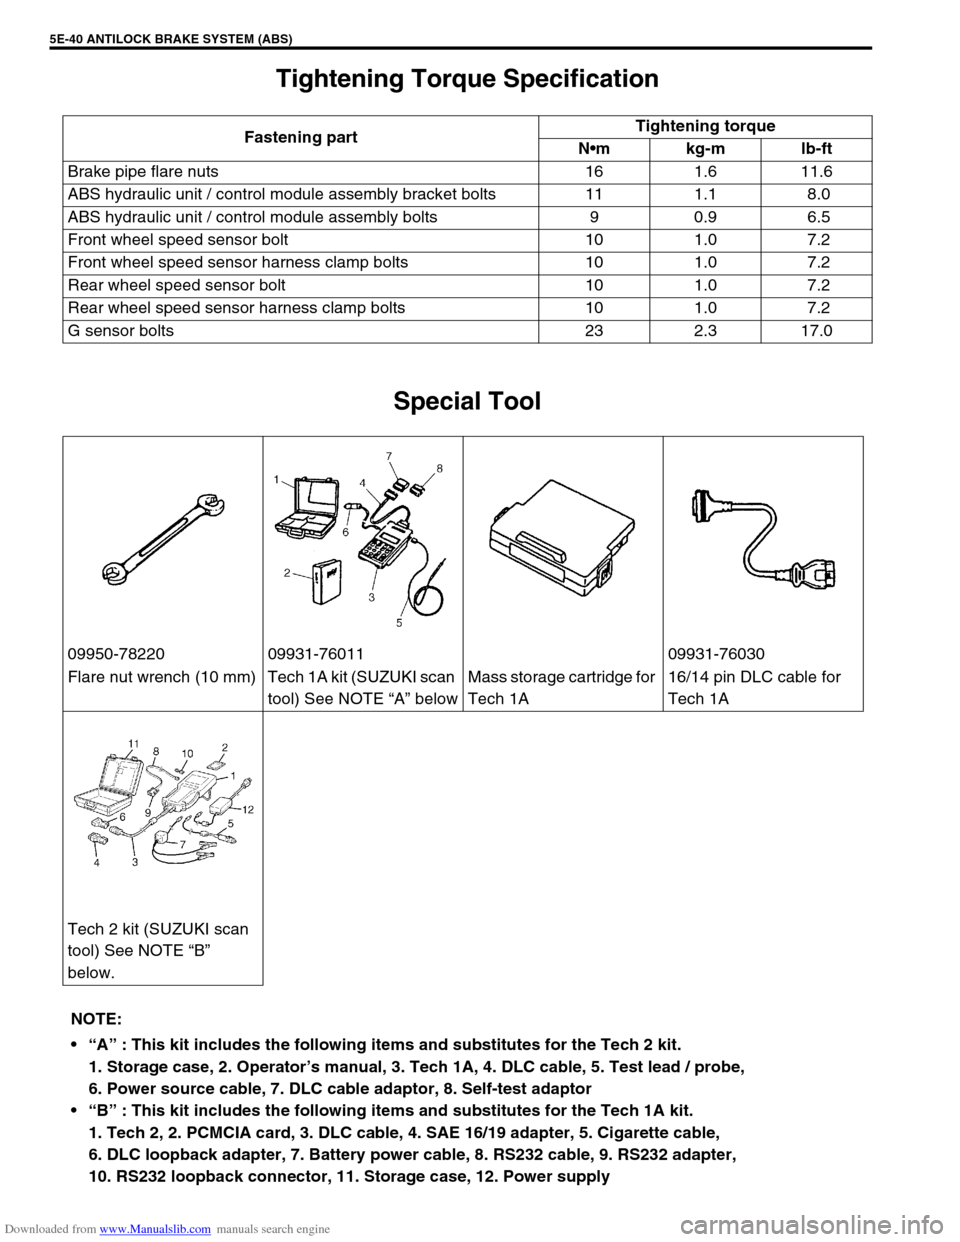
Special Tool
Fastening partTightening torque
Nm kg-m lb-ft
Brake pipe flare nuts 16 1.6 11.6
ABS hydraulic unit / control module assembly bracket bolts 11 1.1 8.0
ABS hydraulic unit / control module assembly bolts 9 0.9 6.5
Front wheel speed sensor bolt 10 1.0 7.2
Front wheel speed sensor harness clamp bolts 10 1.0 7.2
Rear wheel speed sensor bolt 10 1.0 7.2
Rear wheel speed sensor harness clamp bolts 10 1.0 7.2
G sensor bolts 23 2.3 17.0
09950-78220 09931-76011 09931-76030
Flare nut wrench (10 mm) Tech 1A kit (SUZUKI scan
tool) See NOTE “A” belowMass storage cartridge for
Tech 1A16/14 pin DLC cable for
Tech 1A
Tech 2 kit (SUZUKI scan
tool) See NOTE “B”
below.
NOTE:
“A” : This kit includes the following items and substitutes for the Tech 2 kit.
1. Storage case, 2. Operator’s manual, 3. Tech 1A, 4. DLC cable, 5. Test lead / probe,
6. Power source cable, 7. DLC cable adaptor, 8. Self-test adaptor
“B” : This kit includes the following items and substitutes for the Tech 1A kit.
1. Tech 2, 2. PCMCIA card, 3. DLC cable, 4. SAE 16/19 adapter, 5. Cigarette cable,
6. DLC loopback adapter, 7. Battery power cable, 8. RS232 cable, 9. RS232 adapter,
10. RS232 loopback connector, 11. Storage case, 12. Power supply
Page 358 of 687

Downloaded from www.Manualslib.com manuals search engine ENGINE GENERAL INFORMATION AND DIAGNOSIS 6-1
6F2
6G
6H
6K
7A
7A1
7B1
7C1
7D
7E
7F
8B
6
8D
8E
8B
9
10A
10B
SECTION 6
ENGINE GENERAL INFORMATION AND
DIAGNOSIS
GENERAL INFORMATION AND ENGINE DIAGNOSIS ..............................................................................
6-1
ENGINE MECHANICAL ...........................................................................................................................
6A1-1
ENGINE COOLING.....................................................................................................................................
6B-1
ENGINE FUEL ............................................................................................................................................
6C-1
ENGINE AND EMISSION CONTROL SYSTEM ........................................................................................
6E-1
IGNITION SYSTEM ....................................................................................................................................
6F-1
CRANKING SYSTEM .................................................................................................................................
6G-1
CHARGING SYSTEM .................................................................................................................................
6H-1
EXHAUST SYSTEM ...................................................................................................................................
6K-1
CONTENTS
General Information .......................................... 6-3
Statement on Cleanliness and Care ............... 6-3
General Information on Engine Service .......... 6-3
Precaution on fuel system service............... 6-4
Fuel pressure relief procedure .................... 6-5
Fuel leakage check procedure .................... 6-5
Engine Diagnosis .............................................. 6-6
General Description ........................................ 6-6
On-Board Diagnostic System (Vehicle with
Immobilizer Indicator Lamp) ............................ 6-6On-Board Diagnostic System (Vehicle without
Immobilizer Indicator Lamp)............................ 6-9
Precaution in Diagnosing Trouble ................. 6-10
Engine Diagnostic Flow Table ...................... 6-11
Customer problem inspection form
(example) .................................................. 6-13
Malfunction indicator lamp (MIL) check..... 6-14
Diagnostic trouble code (DTC) check ....... 6-14
Diagnostic trouble code (DTC)
clearance................................................... 6-15 WARNING:
For vehicles equipped with Supplemental Restraint (Air Bag) System :
Service on and around the air bag system components or wiring must be performed only by an
authorized SUZUKI dealer. Refer to “Air Bag System Components and Wiring Location View” under
“General Description” in air bag system section in order to confirm whether you are performing ser-
vice on or near the air bag system components or wiring. Please observe all WARNINGS and “Ser-
vice Precautions” under “On-Vehicle Service” in air bag system section before performing service
on or around the air bag system components or wiring. Failure to follow WARNINGS could result in
unintentional activation of the system or could render the system inoperative. Either of these two
conditions may result in severe injury.
Technical service work must be started at least 90 seconds after the ignition switch is turned to the
“LOCK” position and the negative cable is disconnected from the battery. Otherwise, the system
may be activated by reserve energy in the Sensing and Diagnostic Module (SDM).
NOTE:
Whether the following systems (parts) are used in the particular vehicle or not depends on vehicle
specifications. Be sure to bear this in mind when performing service work.
EGR valve
Heated oxygen sensor(s) or CO adjusting resistor
Three-way catalytic converter (TWC) and warm up three-way catalytic converter (WU-TWC)