SUZUKI JIMNY 2022 Owners Manual
Manufacturer: SUZUKI, Model Year: 2022, Model line: JIMNY, Model: SUZUKI JIMNY 2022Pages: 421, PDF Size: 6.35 MB
Page 271 of 421

OTHER CONTROLS AND EQUIPMENT
Information on disposal for users of waste electrical & electronic equip
ment (private households)
68LM560
This symbol on the products and/or accompanying documents
means that used electrical and electronic products should not be
mixed with general household waste.
For proper treatment, recovery and recycling, please take these products to designated collection points, where they will be accepted
on a free of charge basis. Alternatively, in some countries you may
be able to return your products to your local retailer upon the pur
chase of an equivalent new product.
Disposing of this product correctly will help to save valuable
resources and prevent any potential negative effects on human health and the environment which could otherwise arise from inap
propriate waste handling. Please contact your local authority for fur
ther details of your nearest designated collection point.
Penalties may be applicable for incorrect disposal of this waste, in accordance with national legislation.
For business users in the European Union
If you wish to discard electrical and electronic equipment, please contact your dealer or
supplier for further information.
Information on disposal in other countries outside the European Union
This symbol is only valid in the European Union.
If you wish to discard this product, please contact your local authorities or dealer and ask
for the correct method of disposal.
5-36
Page 272 of 421
OTHER CONTROLS AND EQUIPMENT
Part 15 of the FCC Rules
FCC ID: ACJ932AZ1601
NOTE: Properly shielded and grounded cables and connectors must be used for connection to host computers and/or peripherals in order to meet FCC emission limits.
.A. WARNING
RF Exposure This equipment complies with FCC radiation exposure limits set forth for an uncontrolled environment and meets the FCC radio frequency (RF) Exposure Guidelines. This equipment has very low levels of RF energy that it deemed to comply without maximum permissive exposure evaluation (MPE). [But it is desirable that it should be installed and operated keeping the radiator at least 20 cm or more away from person's body.]
.A. CAUTION
Changes or modifications not expressly approved by the party responsible for compliance could void the user's authority to operate the equipment.
5-37
.A. WARNING
This is a class I laser product. Use of controls or adjustments or performance of procedures other than those specified herein may result in hazardous radiation exposure. Do not open covers and do not attempt to repair this unit by yourself. Ask an authorized dealer for the repair.
0 Bluetooth'
The Bluetooth® word mark and logo are
registered trademarks and are owned by
the Bluetooth SIG, Ink.
NOTE:
This equipment complies with FCC radiation exposure limits set forth for uncontrolled equipment and meets the FCC radio frequency (RF) Exposure Guidelines in Supplement C to OET65. This equipment has very low level of RF energy which does not comply with maximum permissive exposure (MPE) evaluation. But it is desirable that it should be installed and operated with at least 20cm and more between the radiator and person's body (excluding extremities: hands, wrists, feet and ankles).
Page 273 of 421
Stop using this unit and a Bluetooth®
ready device whenever requested.
This unit shares the communication fre
quency with other private or public wireless
communication equipment such as a wire
less LAN and other wireless communica
tion radios.
You should stop using this unit whenever
you are notified that your unit disturbs
other wireless communication immediately.
OTHER CONTROLS AND EQUIPMENT
NOTE:
These limits are designed to provide rea
sonable protection against harmful interfer
ence in a residential installation. This
equipment generates, uses and can radi
ate radio frequency energy and, if not
installed and used in accordance with the
instructions, may cause harmful interfer
ence to radio communications. However,
there is no guarantee that interference will
not occur in a particular installation. If this
equipment does cause harmful interfer
ence to radio or television reception, which
can be determined by turning the equip
ment off and on, the user is encouraged to
try to correct the interference by one or
more of the following measures:
Reorient or relocate the receiving anten
na.
Increase the separation between the
equipment and receiver.
Connect the equipment into an outlet on
a circuit different from that to which the
receiver is connected.
Consult the dealer or an experienced
radio/TV technician for help.
This transmitter must not be co-located
or operated in conjunction with any other
antenna or transmitter.
5-38
Page 274 of 421
OTHER CONTROLS AND EQUIPMENT
Basic operations
Type B ,,.,.,-------,..,
(1)
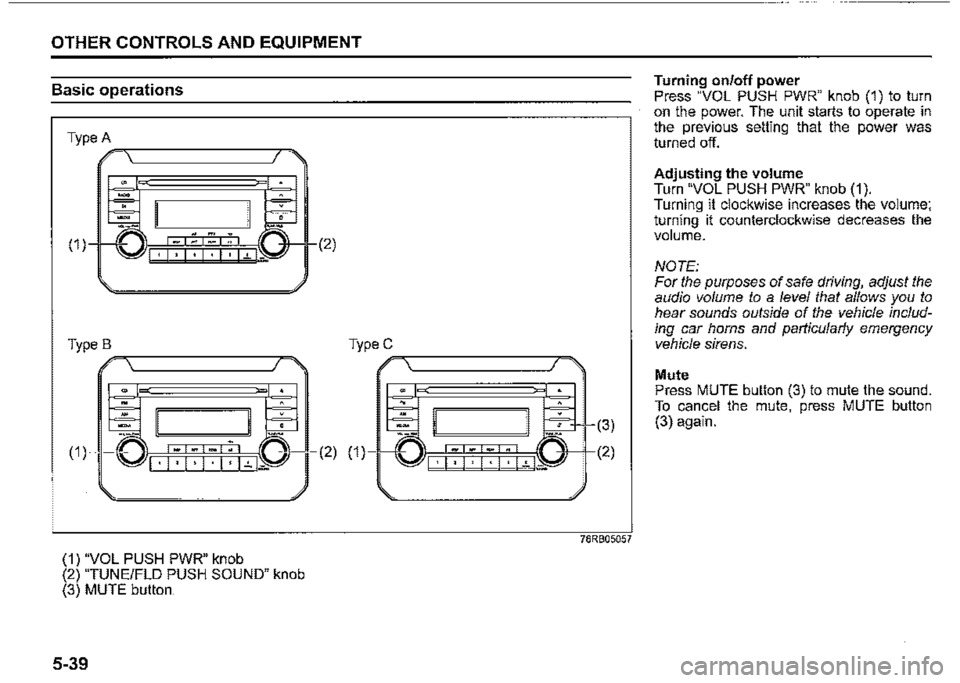
(1) "VOL PUSH PWR" knob (2) "TUNE/FLO PUSH SOUND" knob (3) MUTE button
5-39
(2)
TypeC ,,,=<.,--------------,,-,,,_
(2) (1)
78RB05057
Turning on/off power Press "VOL PUSH PWR" knob (1) to turn on the power. The unit starts to operate in the previous setting that the power was turned off.
Adjusting the volume Turn "VOL PUSH PWR" knob (1). Turning it clockwise increases the volume; turning it counterclockwise decreases the volume.
NOTE: For the purposes of safe driving, adjust the audio volume to a level that allows you to hear sounds outside of the vehicle including car horns and particularly emergency vehicle sirens.
Mute Press MUTE button (3) to mute the sound. To cancel the mute, press MUTE button (3) again.
Page 275 of 421

Adjusting bass/treble/balance/fader 1) Press "TUNE/FLD PUSH SOUND" knob (2). Each time the knob is pressed, sound adjustment will change as follows:
Preset-EQ (EQ OFF) -!, Bass adjustment (BASS 0) -!, Treble adjustment (TREBLE 0) -!, Balance adjustment (BALANCE 0) -!, Fader adjustment (FADER 0) -!, AVC adjustment (AVC LEVEL 2) -
2) Turn "TUNE/FLD PUSH SOUND" knob (2) to adjust the sound.
OTHER CONTROLS AND EQUIPMENT
Adjusting the AVC (Auto volume control) The Auto Volume Control (AVC) function automatically adjusts (increases/ decreases) the sound volume in accordance with vehicle speed. The AVC control is provided with three selectable levels (LEVEL OFF, 1, 2, 3). The range of volume adjustment increases together with the LEVEL number. 1) Press "TUNEIFLD PUSH SOUND" knob (2) until the AVC adjustment mode is selected. 2) Turn "TUNEIFLD PUSH SOUND" knob (2) to select the desired AVC adjustment level. (Initial setting: LEVEL 2)
Preset-EQ Preset-EQ calls up various sound types in accordance with the listening music type. 1) Press "TUNEIFLD PUSH SOUND" knob (2) several times until "PRESETEQ" appears. 2) Turn "TUNEIFLD PUSH SOUND" knob (2). Each time the knob is turned, preset EQ mode will change as follows:
OFF (FLAT)
$ ROCK
$ POP
$ CLASSIC
$ HIP-HOP
5-40
Page 276 of 421
OTHER CONTROLS AND EQUIPMENT
Listening to the radio (Type A)
" (1) =•
" MEDIA
" =
-"" """
' I ' I ' I "
(5)
5-41
• A (2)
(3)
(6)
~
•
I
(4)
78RB05058
Display
(A)
I FM!
68LM561
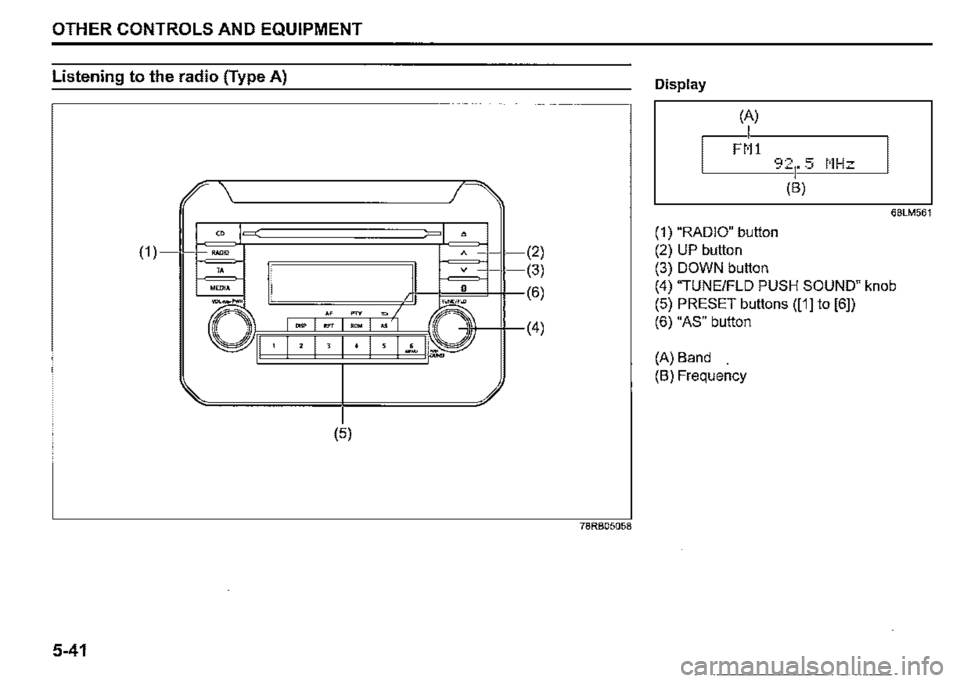
(1) "RADIO" button
(2) UP button
(3) DOWN button
(4) "TUNE/FLO PUSH SOUND" knob
(5) PRESET buttons ([1] to [6])
(6) "AS" button
(A) Band
(B) Frequency
Page 277 of 421
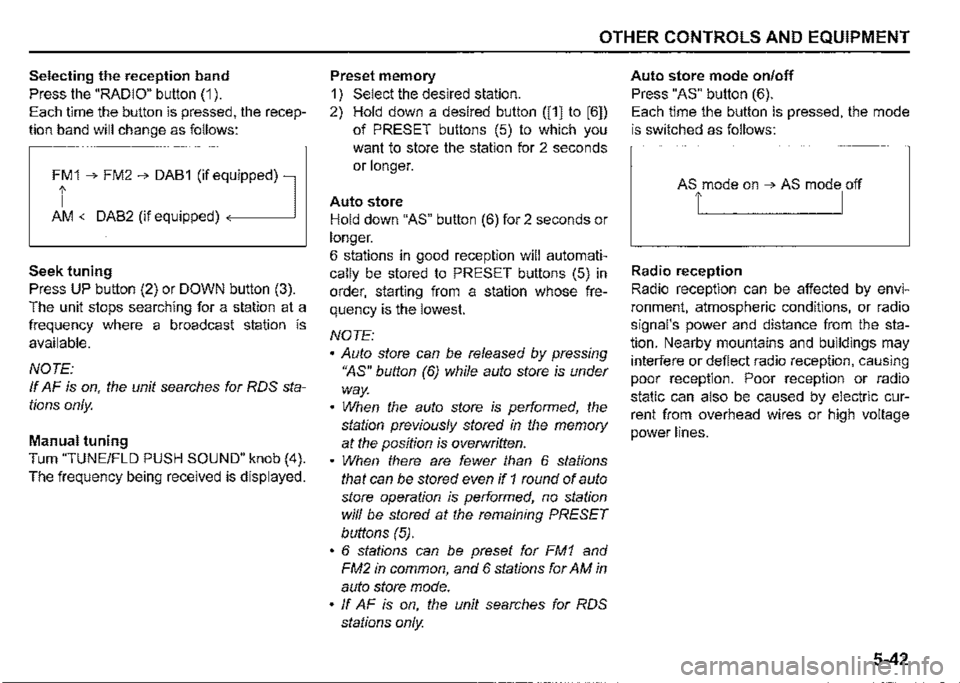
Selecting the reception band
Press the "RADIO" button (1 ).
Each time the button is pressed, the recep
tion band will change as follows:
Ff 1 ➔ FM2 ➔ DAB1 (if eq,uipped) l
AM <-DAB2 (if equipped)
Seek tuning
Press UP button (2) or DOWN button (3).
The unit stops searching for a station at a
frequency where a broadcast station is
available.
NOTE:
If AF is on, the unit searches for RDS sta
tions only.
Manual tuning
Turn "TUNE/FLO PUSH SOUND" knob (4).
The frequency being received is displayed.
OTHER CONTROLS AND EQUIPMENT
Preset memory
1) Select the desired station.
2) Hold down a desired button ([1] to [6])
of PRESET buttons (5) to which you
want to store the station for 2 seconds
or longer.
Auto store
Hold down "AS" button (6) for 2 seconds or
longer.
6 stations in good reception will automati
cally be stored to PRESET buttons (5) in
order, starting from a station whose fre
quency is the lowest.
NOTE:
• Auto store can be released by pressing
"AS" button (6) while auto store is under
way.
• When the auto store is performed, the
station previously stored in the memory
at the position is overwritten.
• When there are fewer than 6 stations
that can be stored even if 1 round of auto
store operation is performed, no station
will be stored at the remaining PRESET
buttons (5).
• 6 stations can be preset for FM1 and
FM2 in common, and 6 stations for AM in
auto store mode.
• ff AF is on, the unit searches for RDS
stations only.
Auto store mode on/off
Press "AS" button (6).
Each time the button is pressed, the mode
is switched as follows:
Radio reception
Radio reception can be affected by envi
ronment, atmospheric conditions, or radio
signal's power and distance from the sta
tion. Nearby mountains and buildings may
interfere or deflect radio reception, causing
poor reception. Poor reception or radio
static can also be caused by electric cur
rent from overhead wires or high voltage
power lines.
5-42
Page 278 of 421
OTHER CONTROLS AND EQUIPMENT
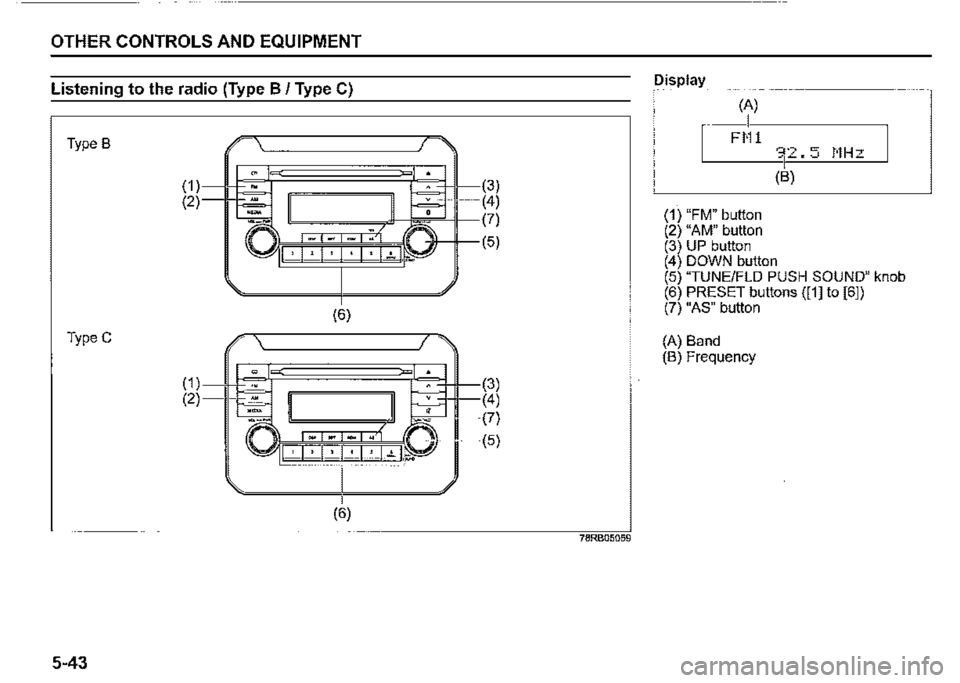
Listening to the radio (Type B / Type C)
Type B
TypeC
5-43
(1) (2)
(1) (2)
(6)
(3) (4)
~~~n~'M~(?)
I ' I ".' I 7 I ".' I : I ..,_ .P J (5)
(6)
78RB05059
Display
(A)
I FM1
(1) "FM" button (2) "AM" button (3) UP button
(B)
(4) DOWN button (5) "TUNE/FLO PUSH SOUND" knob (6) PRESET buttons ([1] to [61) (7) "AS" button
(A) Band (B) Frequency
Page 279 of 421
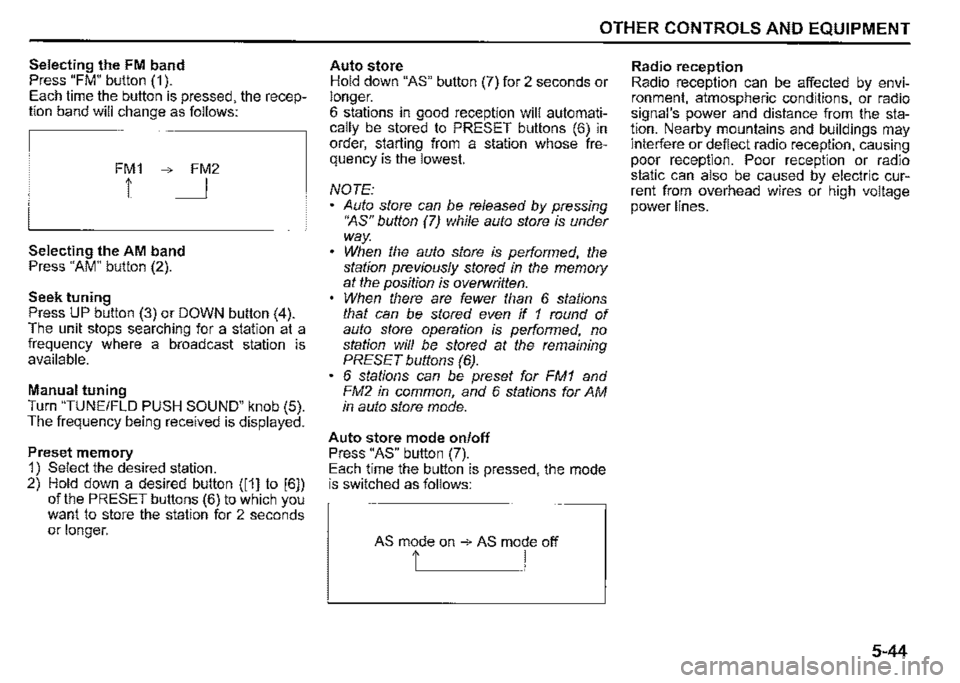
Selecting the FM band Press "FM" button (1 ). Each time the button is pressed, the reception band will change as follows:
FM1 ➔ FM2
1 I
Selecting the AM band Press "AM" button (2).
Seek tuning Press UP button (3) or DOWN button (4). The unit stops searching for a station at a frequency where a broadcast station is available.
Manual tuning Turn "TUNE/FLO PUSH SOUND" knob (5). The frequency being received is displayed.
Preset memory 1) Select the desired station. 2) Hold down a desired button ([1] to [6]) of the PRESET buttons (6) to which you want to store the station for 2 seconds or longer.
OTHER CONTROLS AND EQUIPMENT
Auto store Hold down "AS" button (7) for 2 seconds or longer. 6 stations in good reception will automatically be stored to PRESET buttons (6) in order, starting from a station whose frequency is the lowest.
NOTE: Auto store can be released by pressing •~s" button (7) while auto store is under way. When the auto store is performed, the station previously stored in the memory at the position is overwritten. When there are fewer than 6 stations that can be stored even if 1 round of auto store operation is performed, no station will be stored at the remaining PRESET buttons (6). 6 stations can be preset for FM1 and FM2 in common, and 6 stations for AM in auto store mode.
Auto store mode on/off Press "AS" button (7). Each time the button is pressed, the mode is switched as follows:
AS mode on ➔ AS mode off
t I
Radio reception Radio reception can be affected by environment, atmospheric conditions, or radio signal's power and distance from the station. Nearby mountains and buildings may interfere or deflect radio reception, causing poor reception. Poor reception or radio static can also be caused by electric current from overhead wires or high voltage power lines.
5-44
Page 280 of 421

OTHER CONTROLS AND EQUIPMENT
Using the RDS functions (Type A)
(1) MEDIA
(6) (3) (2)
5-45
•
V (4)
(5)
78RB05060
Display
(A)
I FM-l=IS
(1) "TA" button
(2) "RDM/PTY" button
(3) "RPT/AF" button
(4) UP button
(5) DOWN button
(6) "DISP" button
(A) Band
(B) Channel number
(B)
I Cl-16 881 f;:4
(C)
(C) Program service (PS) name
68LM562