SUZUKI JIMNY 2022 Owners Manual
Manufacturer: SUZUKI, Model Year: 2022, Model line: JIMNY, Model: SUZUKI JIMNY 2022Pages: 421, PDF Size: 6.35 MB
Page 301 of 421
Automatic transfer of phonebook/call history You can select whether or not the device transfers the phonebook and the call history automatically when the phone is regis
tered. Follow the instructions below to select. 1) Press the Bluetooth® setup button (5)
or (6). The Bluetooth® setup menu will be dis
played. 2) Turn "TUNE/FLO PUSH SOUND" knob (1) to select "Setup Telephone", and press the knob (1) to determine the
selection. 3) Turn "TUNE/FLO PUSH SOUND" knob (1) to select "A.Transfer", and press the knob (1) to determine the selection. 4) Pressing "TUNE/FLO PUSH SOUND" knob (1) switches between "A.transfer On" and "A.transfer Off'. 5) Selecting "Go Back" or pressing the BACK button (4) stores displayed setting and the previous menu is displayed.
OTHER CONTROLS AND EQUIPMENT
Making a call by phonebook Follow the instructions below to dial a number registered in phonebook. 1) Press OFF HOOK button (7). The Bluetooth® phonebook menu will
be displayed. 2) Turn "TUNE/FLO PUSH SOUND" knob (1) to select "Phonebook", and press the knob (1) to determine the selection. 3) Turn "TUNE/FLO PUSH SOUND" knob (1) to select the initial of the name you would like to make a call, and press the knob (1) to determine the selection. The registered numbers will be displayed in sequence. If names have been registered together with numbers, the names will be displayed. Turn "TUNE/FLO PUSH SOUND" knob (1) to select the name you would like to make a call, and press the knob (1) to determine the selection. 4) Turn "TUNE/FLO PUSH SOUND" knob (1) to select "Dial", and press the knob (1) or OFF HOOK button (7). The displayed number or the number registered with the displayed name will be dialed.
Deletion of registered data (Delete
Entry) Follow the instructions below to delete a number registered in phonebook. 1) Press the Bluetooth® setup button (5) or (6). The Bluetooth® setup menu will be dis
played. 2) Turn "TUNE/FLO PUSH SOUND" knob (1) to select "Setup Telephone", and press the knob (1) to determine the
selection. 3) Turn "TUNE/FLO PUSH SOUND" knob (1) to select "Setup Phonebook", and press the knob (1) to determine the
selection. 4) Turn "TUNE/FLO PUSH SOUND" knob (1) to select "Delete Contacts", and press the knob (1) to determine the selection. 5) Turn "TUNE/FLO PUSH SOUND" knob (1) to select the initial of the name you would like to delete or "ALL", and press the knob (1) to determine the selection. Turn "TUNE/FLO PUSH SOUND" knob (1) to select the name you would like to delete, and press the knob (1) to determine the selection. 6) Turn "TUNE/FLO PUSH SOUND" knob (1) to select "Delete?" or "Delete All?", and press the knob (1) to determine the selection. 7) Turn "TUNE/FLO PUSH SOUND" knob (1) to select "Confirm", and press the knob (1) to complete the deletion.
5-66
Page 302 of 421
OTHER CONTROLS AND EQUIPMENT
NOTE: When selecting "Go Back" or pressing BACK button (4), the previous menu will be displayed.
Registration in speed dial Follow the instructions below to assign a number to one of PRESET buttons (3) to use as the speed dial. 1) Press the Bluetooth® setup button (5) or (6). The Bluetooth® setup menu will be displayed. 2) Turn "TUNEIFLD PUSH SOUND" knob (1) to select "Setup Telephone", and press the knob (1) to determine the selection. 3) Turn "TUNEIFLD PUSH SOUND" knob (1) to select "Setup Phonebook", and press the knob (1) to determine the selection. 4) Turn "TUNEIFLD PUSH SOUND" knob (1) to select "Add Speed Dial", and press the knob (1) to determine the selection.
5-67
5) Turn "TUNEIFLD PUSH SOUND" knob (1) to select the initial of the name you would like to register in speed dial, and press the knob (1) to determine the selection. The registered numbers will be displayed in sequence. If names have been registered together with numbers, the names will be displayed. Turn "TUNEIFLD PUSH SOUND" knob (1) to select the name you would like to register in speed dial, and press the knob (1) to determine the selection. 6) Turn "TUNEIFLD PUSH SOUND" knob (1) to select "Choose Preset", and press one of PRESET buttons (3) to which the selected number is to be assigned. If a number is already assigned to the selected button, a confirmation message will be displayed. Turn "TUNEIFLD PUSH SOUND" knob (1) to select a confirmation message, and press the knob (1) to complete the assignment. Turn "TUNEIFLD PUSH SOUND" knob (1) to select "Confirm", and press the knob (1) to complete the assignment. When the assignment is completed, the "Setup Phonebook" will be displayed.
NOTE: When selecting "Go Back" or pressing BACK button (4), the previous menu will be displayed.
One-touch call (Speed dial) Follow the instructions below to dial the . number assigned to each of the PRESET buttons (3). 1) Press OFF HOOK button (7). The Bluetooth® phonebook menu will be displayed. Pressing one of PRESET buttons (3) can skip step 2) and the 1 st line of step 3). 2) Turn "TUNEIFLD PUSH SOUND" knob (1) to select "Speed Dials", and press the knob (1) to determine the selection. 3) Press one of PRESET buttons (3). The assigned number will be displayed. If no number is assigned, "No Entry" is displayed. 4) Press OFF HOOK button (7). The selected number will be dialed.
Page 303 of 421
Deletion of speed dial (Del Speed Dial) Follow the instructions below to delete the number assigned for the speed dial. 1) Press OFF HOOK button (7). The Bluetooth® phonebook menu will be displayed. 2) Turn "TUNE/FLO PUSH SOUND" knob (1) to select "Speed Dials", and press the knob (1) to determine the selection. 3) Press one of PRESET buttons (3) to which the number to be deleted is
assigned. If the number is not registered, "No
Entry" is displayed. 4) Turn "TUNE/FLO PUSH SOUND" knob (1) to select "Delete", and press the knob (1) to determine the selection. 5) Turn "TUNE/FLD PUSH SOUND" knob (1) to select "Del Speed Dial", and press the knob (1) to determine the
selection. 6) Turn "TUNE/FLO PUSH SOUND" knob (1) to select "Confirm", and press the knob (1) to complete the deletion.
NOTE: When selecting "Go Back" or pressing BACK button /4), the previous menu will be displayed.
OTHER CONTROLS AND EQUIPMENT
Display of device data (Device Name) Follow the instructions below to display the BD (Bluetooth® Device) address and
device name. 1) Press the Bluetooth® setup button (5)
or (6). The Bluetooth® setup menu will be dis
played. 2) Turn "TUNE/FLD PUSH SOUND" knob (1) to select "Setup Bluetooth", and press the knob (1) to determine the selection. 3) Turn "TUNE/FLD PUSH SOUND" knob (1) to select "Bluetooth Info", and press the knob (1) to determine the selection. 4) Turn "TUNE/FLD PUSH SOUND" knob (1) to select "Device Name" or "Device Address", and press the knob (1) to display the device name or the BD (Bluetooth® Device) address.
NOTE: When selecting "Go Back" or pressing BACK button /4), the previous menu will
be displayed.
Reset to the factory defaults Follow the instructions below to reset all the settings to the facto\¥ defaults. 1) Press the Bluetooth setup button (5)
or (6). The Bluetooth® setup menu will be dis
played. 2) Turn "TUNE/FLD PUSH SOUND" knob (1) to select "Setup Bluetooth", and press the knob (1) to determine the
selection. 3) Turn "TUNE/FLD PUSH SOUND" knob (1) to select "Initialize", and press the knob (1) to determine the selection. 4) Turn "TUNE/FLD PUSH SOUND" knob (1) to select "All Initialize", and press the knob (1) to determine the selection. 5) Turn "TUNE/FLD PUSH SOUND" knob (1) to select "Confirm", and press the knob (1) to start the reset.
NOTE: When selecting "Go Back" or pressing BACK button /4), the previous menu will
be displayed.
5-68
Page 304 of 421
OTHER CONTROLS AND EQUIPMENT
Selection of phone (Select Phone) Follow the instructions below to select a phone to be paired with from the registered phones.
1) Press the Bluetooth® setup button (5) or (6).
The Bluetooth® setup menu will be displayed.
2) Turn "TUNE/FLO PUSH SOUND" knob (1) to select "Setup Bluetooth", and press the knob (1) to determine the selection. 3) Turn "TUNE/FLD PUSH SOUND" knob (1) to select "List Phone", and press the knob (1) to determine the selection. 4) Turn "TUNE/FLD PUSH SOUND" knob (1) to select a phone to be paired with, and press the knob (1) to determine the selection.
5) Turn "TUNE/FLO PUSH SOUND" knob (1) to select "Select", and press the knob (1) to determine the selection.
NOTE: When selecting "Go Back" or pressing BACK button (4), the previous menu will be displayed. The Bluetooth® ready audio device will be disconnected when the phone is selected.
5-69
List of phones (List Phones) Follow the instructions below to display the names of the registered phones in sequence.
1) Press the Bluetooth® setup button (5) or (6). The Bluetooth® setup menu will be displayed. 2) Turn "TUNE/FLD PUSH SOUND" knob (1) to select "Setup Bluetooth", and press the· knob (1) to determine the selection. 3) Turn "TUNE/FLD PUSH SOUND" knob (1) to select "List Phone", and press the knob (1) to determine the selection. The names of the registered phones are displayed in sequence.
NOTE: When selecting "Go Back" or pressing BACK button (4), the previous menu will be displayed.
Passkey setting (Set Passkey) Follow the instructions below to set the security number (passkw)-1) Press the Bluetooth setup button (5) or (6).
The Bluetooth® setup menu will be displayed.
2) Turn "TUNE/FLD PUSH SOUND" knob (1) to select "Setup Bluetooth", and press the knob (1) to determine the selection.
3) Turn "TUNE/FLD PUSH SOUND" knob (1) to select "Passkey", and press the knob (1) to determine the selection. 4) Turn "TUNE/FLD PUSH SOUND" knob (1) to select "Enter New Passkey", and press the knob (1) to determine the selection.
5) Press or turn "TUNE/FLD PUSH SOUND" knob (1) to select "Confirm". 6) Turn "TUNE/FLO PUSH SOUND" knob (1) to select a number for the first digit, and press the knob (1) to determine the selection. Select and determine numbers for the second, third and fourth digits in order in the same manner. When not entering up to the eighth digit, enter blanks for the successive digits. 7) Press "TUNE/FLD PUSH SOUND" knob (1) to determine the passkey setting.
NOTE:
When selecting "Go Back" or pressing BACK button (4), the previous menu will be displayed.
Page 305 of 421
Deletion of phone information (Delete
Phone) Follow the instructions below to delete the registered phone information. 1) Press the Bluetooth® setup button (5)
or (6). The Bluetooth® setup menu will be dis
played. 2) Turn "TUNE/FLO PUSH SOUND" knob (1) to select "Setup Bluetooth", and press the knob (1) to determine the
selection. 3) Turn "TUNE/FLO PUSH SOUND" knob (1) to select "List Phone", and press the knob (1) to determine the selection. 4) Turn "TUNE/FLO PUSH SOUND" knob (1) to select a phone to be deleted, and press the knob (1) to determine the
selection. 5) Turn "TUNE/FLO PUSH SOUND" knob (1) to select "Delete", and press the knob (1) to determine the selection. 6) Turn "TUNE/FLO PUSH SOUND" knob (1) to select "Delete?", and press the knob (1) to determine the selection. 7) Turn "TUNE/FLO PUSH SOUND" knob (1) to select "Confirm", and press the knob (1) to determine the selection.
NOTE: When selecting "Go Back" or pressing BACK button (4), the previous menu will be displayed.
OTHER CONTROLS AND EQUIPMENT
BT function on/off (BT Power) Follow the instructions below to turn on/off the Bluetooth® function. 1) Press the Bluetooth® setup button (5)
or (6). The Bluetooth® setup menu will be dis
played. 2) Turn "TUNE/FLO PUSH SOUND" knob (1) to select "Setup Bluetooth", and press the knob (1) to determine the selection. 3) Turn "TUNE/FLO PUSH SOUND" knob (1) to select "BT Power", and press the knob (1) to determine the selection. 4) Press "TUNE/FLO PUSH SOUND" knob (1) to select "BT Power On" or "BT
Power Off'.
NOTE: When the BT function is turned off, the connection between this unit and the registered phone in use will be discon
nected. When selecting "Go Back" or pressing BACK button (4), the previous menu will be displayed.
5-70
Page 306 of 421
OTHER CONTROLS AND EQUIPMENT
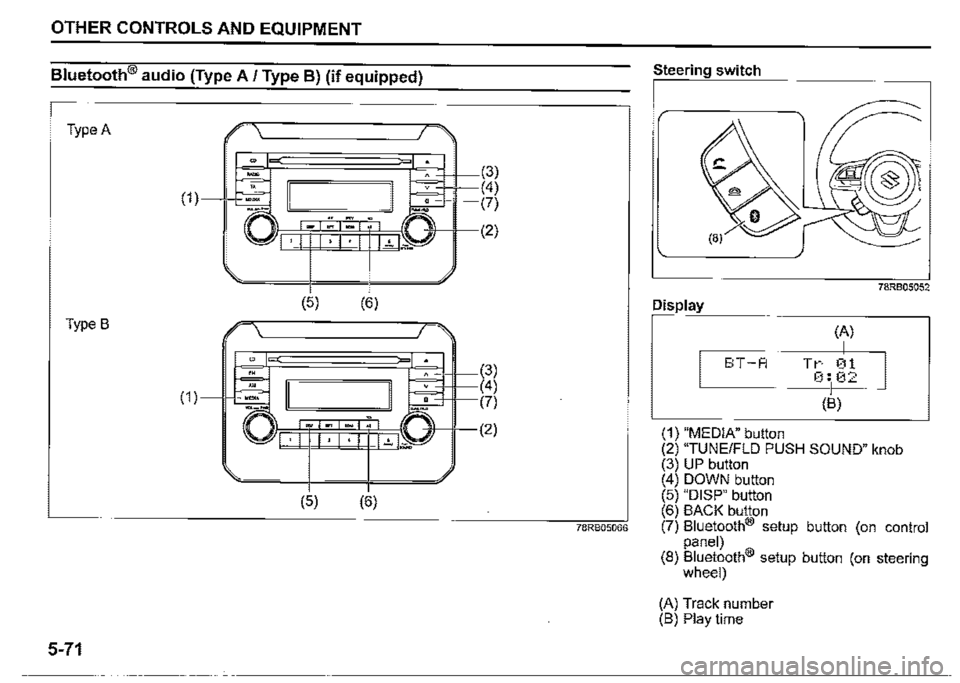
Bluetooth® audio (Type A / Type BJ (if equipped)
Type A
(1)
Type B
5-71
E \'---------~/ >
-" (3)
~ I I . <4)
-□--" -. ~ (7) \\llr=:=Fi_*_~,~-*"~,(!',._;))-,1-(2) 'I •I 1•1•1 l..'..1--=
(5)
(5)
(6)
(6)
(3) (4) L:::.::=Hl----(7)
-'i!-11---(2)
78RB05066
Steering switch
Display
E:T-A
(1) "MEDIA" button
(A)
I Tr 01 0:102
(B)
78RB05052
(2) "TUNE/FLO PUSH SOUND" knob (3) UP button ( 4) DOWN button (5) "DISP" button (6) BACK button (7) Bluetooth® setup button (on control panel) (8) Bluetooth® setup button (on steering wheel)
(A) Track number (B) Play time
Page 307 of 421
Registration of audio devices
To use Bluetooth® ready audio devices with this unit, it is required to register the devices.
NOTE: • To set up a new audio player, disconnect the phone from the unit. Connect the phone after audio player setup is completed if necessary. When. attempts to establish the pairing fail within 60 seconds, the connecting operation will be cance/ed. Try to establish the pairing again or refer to the audio player manual for assistance with the pairing process. 1) Press the Bluetooth® setup button (7) or (8). The Bluetooth® setup menu will be displayed. 2) Turn "TUNE/FLO PUSH SOUND" knob (2) to select "Setup Bluetooth", and press the knob (2) to determine the selection. 3) Turn "TUNE/FLO PUSH SOUND" knob (2) to select "Pairing", and press the knob (2) to determine the selection. 4) Select "My Car" from the Bluetooth® menu of the audio player and establish the pairing. Refer to the manual of the audio player in use for further information. 5) Enter the passkey displayed on the unit to the audio player.
OTHER CONTROLS AND EQUIPMENT
NOTE: When selecting "Go Back" or pressing BACK button (6), the previous menu will be displayed. When registering additional audio devices, repeat Step from 1 ).
Selecting Bluetooth® audio mode Press "MEDIA" button (1). Each time the button is pressed, the mode will change as follows:
USB (iPod) (if equipped) ~
Bltetooth® audio (if equipped) __J
Selecting a group (only for supported models) Turn "TUNE/FLO PUSH SOUND" knob (2) to select a group.
Selecting a track • Press UP button (3) to listen to the next track. Press DOWN button (4) twice to listen to the previous track. When DOWN button (4) is pressed once, the track currently being played will start from the beginning again.
Fast forwarding/rewinding a track • Hold down UP button (3) to fast forward the track. • Hold down DOWN button (4) to fast rewind the track.
NOTE: Some functions may not be available depending on B/uetooth® audio.
Display change Press "DISP" button (5). Each time the button is pressed, display will change as follows:
Play time ~-------~
• Track name
• Artist name
• Album name _______ __J
NOTE: If text data contains more than 16 characters, ">" mark will appear at the right end. Holding down "D/SP" button (5) for 1 second or longer can display the next page.
5-72
Page 308 of 421
OTHER CONTROLS AND EQUIPMENT
Selection of audio device (Select Audio) Follow the instructions below to select an audio device to be paired with from the registered audio devices. 1) Press the Bluetooth® setup button (7) or (8). The Bluetooth® setup menu will be displayed. 2) Turn "TUNE/FLO PUSH SOUND" knob (2) to select "Setup Bluetooth", and press the knob (2) to determine the selection. 3) Turn "TUNE/FLO PUSH SOUND" knob (2) to select "List Audio", and press the knob (2) to determine the selection. 4) Turn "TUNE/FLO PUSH SOUND" knob (2) to select an audio device to be used, and press the knob (2) to determine the selection. 5) Turn "TUNE/FLO PUSH SOUND" knob (2) to select "Select", and press the knob (2) to determine the selection.
NOTE: When selecting "Go Back" or pressing BACK button (6), the previous menu will be displayed. The phone will be disconnected when the Bluetooth® ready audio device is selected.
5-73
List of audio devices (List Audio) Follow the instructions below to display the names of the registered audio devices in sequence. 1) Press the Bluetooth® setup button (7) or (8). The Bluetooth® setup menu will be displayed. 2) Turn "TUNE/FLO PUSH SOUND" knob (2) to select "Setup Bluetooth", and press the knob (2) to determine the selection. 3) Turn "TUNE/FLO PUSH SOUND" knob (2) to select "List Audio", and press the knob (2) to determine the selection. The names of registered audio devices will be displayed in sequence.
NOTE: When selecting "Go Back" or pressing BACK button (6), the previous menu will be displayed.
Passkey setting (Set Passkey) Follow the instructions below to set the security number (Passkw)-1) Press the Bluetooth setup button (7) or (8). The Bluetooth® setup menu will be displayed. 2) Turn "TUNE/FLO PUSH SOUND" knob (2) to select "Setup Bluetooth", and press the knob (2) to determine the selection.
3) Turn "TUNE/FLO PUSH SOUND" knob (2) to select "Passkey", and press the knob (2) to determine the selection. 4) Turn "TUNE/FLO PUSH SOUND" knob (2) to select "Enter New Passkey", and press the knob (2) to determine the selection. 5) Press or turn "TUNE/FLO PUSH SOUND" knob (2) to select "Confirm". 6) Turn "TUNE/FLO PUSH SOUND" knob (2) to select a number for the first digit, and press the knob (2) to determine the selection. Select and determine numbers for the second, third and fourth digits in order in the same manner. When not entering up to the eighth digit, enter blanks for the successive digits. 7) Press "TUNE/FLO PUSH SOUND" knob (2) to determine the passkey setting.
NOTE: When selecting "Go Back" or pressing BACK button (6), the previous menu will be displayed.
Page 309 of 421
Deletion of audio device information (Delete Audio) Follow the instructions below to delete the registered audio device information. 1) Press the Bluetooth® setup button (7) or (8). The Bluetooth® setup menu will be displayed. 2) Turn "TUNE/FLD PUSH SOUND" knob (2) to select "Setup Bluetooth", and press the knob (2) to determine the selection. 3) Turn "TUNE/FLD PUSH SOUND" knob (2) to select "List Audio", and press the knob (2) to determine the selection. 4) Turn "TUNE/FLD PUSH SOUND" knob (2) to select an audio device to be deleted, and press the knob (2) to determine the selection. 5) Turn "TUNE/FLD PUSH SOUND" knob (2) to select "Delete", and press the knob (2) to determine the selection. 6) Turn "TUNE/FLD PUSH SOUND" knob (2) to select "Delete?", and press the knob (2) to determine the selection. 7) Turn "TUNE/FLD PUSH SOUND" knob (2) to select "Confirm", and press the knob (2) to complete the deletion.
NOTE: When selecting "Go Back" or pressing BACK button (6), the previous menu will be displayed.
OTHER CONTROLS AND EQUIPMENT
Disclaimer for Bluetooth® function
Depending on compatibility of mobile phone models, no Bluetooth® function can be used, or some Bluetooth® func
tions may be restricted. Connectivity or voice quality may get affected depending on circumstances. After the ignition switch is turned "ON" to change the ignition mode to ON, the audio system takes few seconds to detect and connect to the Bluetooth®
device (if already paired).
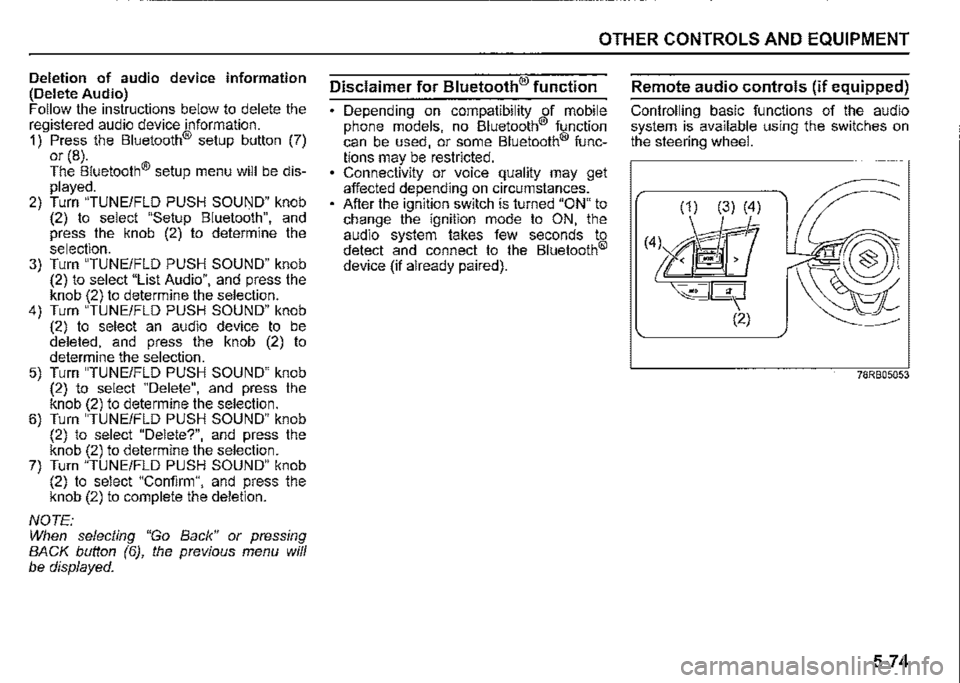
Remote audio controls (if equipped)
Controlling basic functions of the audio system is available using the switches on the steering wheel.
(1) (3) (4)
(4l M'r ~<@
~--- (2)
78RB05053
5-74
Page 310 of 421
OTHER CONTROLS AND EQUIPMENT
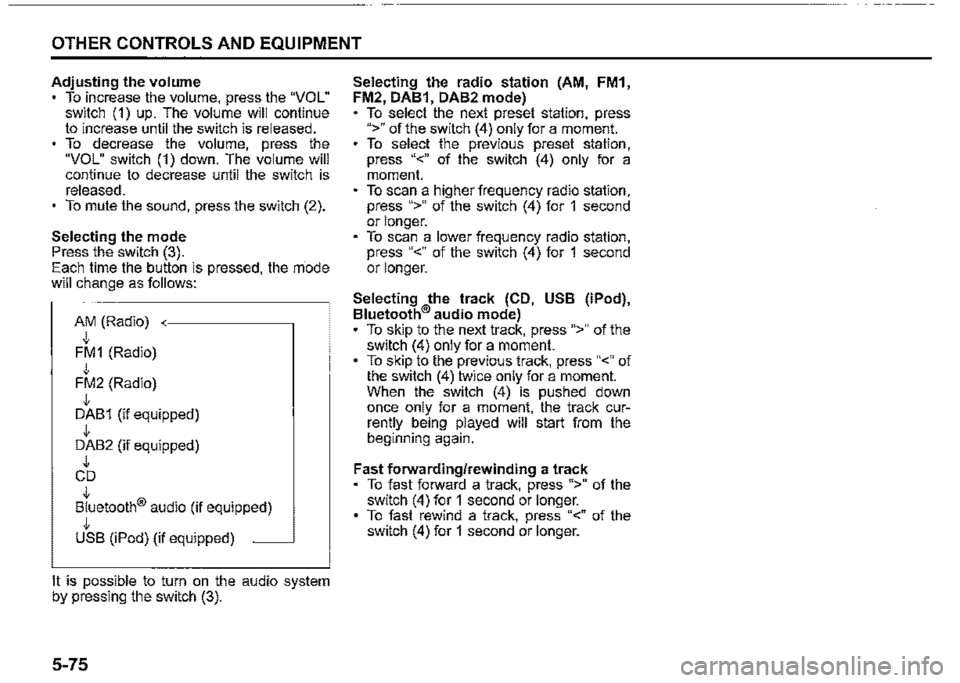
Adjusting the volume To increase the volume, press the "VOL" switch (1) up. The volume will continue to increase until the switch is released. To decrease the volume, press the "VOL" switch (1) down. The volume will continue to decrease until the switch is released. To mute the sound, press the switch (2).
Selecting the mode Press the switch (3). Each time the button is pressed, the rriode will change as follows:
AM (Radio) J, FM1 (Radio) J, FM2 (Radio) J, DAB1 (if equipped) J, DAB2 (if equipped) J, CD J, Bluetooth® audio (if equipped) J, USB (iPod) (if equipped) ~
It is possible to turn on the audio system by pressing the switch (3).
5-75
Selecting the radio station (AM, FM1, FM2, DAB1, DAB2 mode) To select the next preset station, press ">" of the switch (4) only for a moment. To select the previous preset station, press "<" of the switch (4) only for a moment. To scan a higher frequency radio station, press ">" of the switch (4) for 1 second or longer. To scan a lower frequency radio station, press "<" of the switch (4) for 1 second or longer.
Selecting the track (CD, USB (iPod), Bluetooth® audio mode) To skip to the next track, press ">" of the switch (4) only for a moment. To skip to the previous track, press "<" of the switch (4) twice only for a moment. When the switch (4) is pushed down once only for a moment, the track currently being played will start from the beginning again.
Fast forwarding/rewinding a track To fast forward a track, press ">" of the switch (4) for 1 second or longer. To fast rewind a track, press "<" of the switch (4) for 1 second or longer.