SUZUKI JIMNY 2022 Owners Manual
Manufacturer: SUZUKI, Model Year: 2022, Model line: JIMNY, Model: SUZUKI JIMNY 2022Pages: 421, PDF Size: 6.35 MB
Page 351 of 421

NOTE: SUZUKI highly recommends the use of ECSTAR brend brake fluid. ECSTAR has been specially formulated for your SUZUKI product and contributes to the desired vehicle performance and ideal driving experience.
A WARNING
Failure to follow the guidelines below can result in personal injury or serious damage to the brake system. . If the brake fluid in the reservoir drops below a certain level, the brake warning light on the instrument cluster will come on (the engine must be running with the parking brake fully dise~gaged). Should the light come on, 1mmed1-ately ask a SUZUKI dealer to inspect the brake system. A rapid fluid loss indicates leakage in the brake system which should be inspected by a SUZUKI dealer immediately. Do not use any fluid other than DOT3 or SAE J1703 brake fluid. Do not use reclaimed fluid or fluid that has been stored in old or open containers. It is essential that foreign particles and other liquids are kept out of the brake fluid reservoir.
A CAUTION
Brake fluid can harm your eyes and damage painted surfaces. Be careful when refilling the reservoir.
A WARNING
Brake fluid is harmful or fatal if swallowed, and harmful if it comes in contact with skin or eyes. If swallowed, do not induce vomiting. Immediately contact a poison control center or a physician. If brake fluid gets in eye~, flush eyes with water and seek medical attention. Wash thoroughly after handling. Solution can be poisonous to animals. Keep out of reach of children and animals.
NOTE: • The fluid /eve/ can be expected to gredually fall as the brake pad and/or shoe wear. Brake fluid absorbs water over time and brake fluid with high water content may cause vapor lock or breke system malfunction. Replace your breke fluid in accordance with the maintenance schedule m your Owner's Manual.
INSPECTION AND MAINTENANCE
Brake pedal
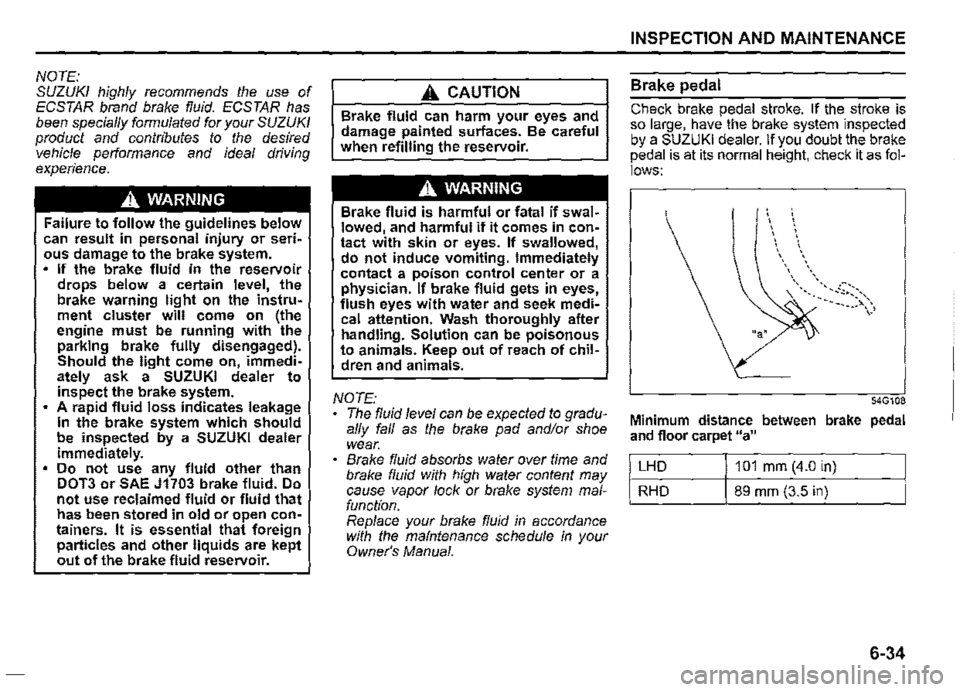
Check brake pedal stroke. If the stroke is so large, have the brake system inspected by a SUZUKI dealer. If you doubt th_e brake pedal is at its normal height, check 1t as follows:
54G108
Minimum distance between brake pedal and floor carpet "a"
LHD 101 mm (4.0 in)
RHD 89 mm (3.5 in)
6-34
Page 352 of 421

INSPECTION AND MAINTENANCE
With the engine running, measure the distance between the brake pedal and floor carpet when the pedal is depressed with approximately 30 kg (66 lbs) of force. The minimum distance required is as specified. Since your vehicle's brake system is selfadjusting, there is no need for pedal adjustment. If the pedal to floor carpet distance as measured above is less than the minimum distance required, have your vehicle inspected by a SUZUKI dealer.
NOTE: • When measuring the distance between the brake pedal and floor wall, be sure not to include the floor mat or rubber on the floor carpet in your measurement. Measure the distance at the brake pedal's side facing toward the passenger's door.
6-35
52RM70500
A WARNING
If you experience any of the following problems with your vehicle's brake system, have the vehicle inspected immediately by a SUZUKI dealer. Poor braking performance Uneven braking (brakes not working uniformly on all wheels.) Excessive pedal travel Brake dragging Excessive noise
Parking brake
~
54G109
Ratchet tooth specification 11b": 4th-9th Lever pull force (1 ): 200 N (20 kg, 45 lbs)
Check the parking brake for proper adjustment by counting the number of clicks made by the ratchet teeth as you slowly pull up on the parking brake lever to the point of full engagement. The parking brake lever should stop between the specified ratchet teeth and the rear wheels should be securely locked. If the parking brake is not properly adjusted or the brakes drag is suspected even after the lever has been fully released, have the parking brake inspected and/or adjusted by a SUZUKI dealer.
Page 353 of 421

Brake discs and brake drums
Brake disc
Brake location Minimum thickness
Front wheels 8.0 mm (0.3 in.)
Brake drum
Brake location Maximum inner diameter
Rear wheels 222 mm (8.74 in.)
If the measured thickness or inner diameter of the most worn part falls below or exceeds the value indicated above, the parts should be replaced with a new one. The measurement involves disassembling each brake and requires the use of a micrometer or caliper, which must be done according to the instructions described in the relevant service manual or available from the relevant repair information site.
Steering wheel
78RB07012
Steering wheel play 11c": 0-30 mm (0.0 -1.2 in.)
Check the free play of the steering wheel by gently turning it from left to right and measuring the distance that it moves before you feel slight resistance. The play should be between the specified values.
Check that the steering wheel turns easily and smoothly without rattling by turning it all the way to the right and to the left while driving very slowly in an open area. If the amount of free play is not as specified or you find anything else to be wrong, an inspection must be performed by a SUZUKI dealer.
INSPECTION AND MAINTENANCE
Tyres
78RB07013
The front and rear tyre pressure specifications are listed in the tyre information label. Both front and rear tyres should have the specified tyre pressure.
NOTE: The tyre pressure will change due to changes in atmospheric pressure, temperature or tyre temperature when driving. To reduce the chance that the low tyre pressure warning light (if equipped) will come on due to normal changes in temperature and atmospheric pressure, it is important to check and adjust the tyre pressures when the tyres are cold. If you check tyres after driving, they are warm. Even if the tyre pressure seems to be good in this condition, it could fall below the
6-36
Page 354 of 421

INSPECTION AND MAINTENANCE
specified pressure when tyres cool down. Also, tyres that are inflated to the specified pressure in a warm garage may have pressure below the specification when the vehicle is driven outside in very cold temperature. If you adjust the tyre pressure in a garage that is warmer than the outside temperature, you should add 1 kPa to the recommended cold tyre pressure for every O.B'C difference between garage temperature and outside temperature.
6-37
Tyre inspection
Inspect your vehicle's tyres at least once a month or before long trip by performing the following checks:
1) Measure the air pressure with a tyre gauge. Adjust the pressure if necessary. Remember to check the spare tyre, too.
A WARNING
• Air pressures should be checked when the tyres are cold or you may get inaccurate readings. Check the inflation pressure from time to time while inflating the tyre gradually, until the specified pressure is obtained. Never under-inflate or over-inflate the tyres. Under-inflation can cause unusual handling characteristics or can cause the rim to slip on the tyre bead, resulting in an accident or damage to the tyre or rim. Over-inflation can cause the lyre to burst, resulting in personal injury. Over-inflation can also cause unusual handling characteristics which may result in an accident.
(1)
~ (2)
78RB07048
(1) Tread wear indicator (2) Indicator location mark
2) Check that the depth of the tread groove is more than 1.6 mm (0.06 in.). To help you check this, the tyres have molded-in tread wear indicators in the grooves. When the indicators appear on the tread surface, the remaining depth of the tread is 1.6 mm (0.06 in.) or less and the tyre should be replaced. 3) Check for abnormal wear, cracks and damage. Any tyres with cracks or other damage should be replaced. If any tyres show abnormal wear, have them inspected by a SUZUKI dealer.
Page 355 of 421

A CAUTION
Hitting curbs and running over rocks can damage tyres and affect wheel alignment. Have tyres and wheel alignment checked periodically by a SUZUKI dealer.
4) Check for loose wheel nuts. 5) Check that there are no nails, stones or other objects sticking into the tyres.
A WARNING
• Your SUZUKI vehicle is equipped with tyres which are all the same type and size. This is important to ensure proper steering and handling of the vehicle. Never mix tyres of different size or type on the four wheels of your vehicle. The size and type of tyres used should be only those approved by SUZUKI as standard or optional equipment for your vehicle. Replacing the wheels and tyres equipped on your vehicle with certain combinations of aftermarket wheels and tyres can significantly change the steering and handling characteristics of your vehicle. Therefore, use only those wheel and tyre combinations approved by SUZUKI as standard or optional equipment for your vehicle.
NOTICE
Replacing the original tyres with tyres of a different size may result in false speedometer or odometer readings. Check with a SUZUKI dealer before purchasing replacement tyres that differ in size from the original tyres. Replacing a tyre with one of a different size, or using different brands among the four tyres can result in damage to the drive train.
INSPECTION AND MAINTENANCE
Tyre rotation
5-tyre rotation
L A
65D445
L: Left hand drive R: Right hand drive
NOTE: If your vehicle is equipped with the tyre pressure monitoring system, the spare tyre TPMS sensor must be recognized when you include the spare tyre during a tyre rotation. For details, refer to "Replacing Tyres and/or Wheels" in "Tyre Pressure Monitoring System (TPMS)" in the "OPERATING YOUR VEHICLE" section.
6-38
Page 356 of 421

INS.PECTION AND MAINTENANCE
4-tyre rotation
65D459
To avoid uneven wear of your tyres and to prolong their life, rotate the tyres as illustrated. Tyres should be rotated every 10000 km (6000 miles). After rotation, adjust front and rear tyre pressures to the specification listed on your vehicle's Tyre Information Label.
6-39
Changing Wheels
78RB07014
To change a wheel, use the following procedure:
1) Remove the jack, tools and spare wheel from the vehicle.
NOTE: How to remove the spare wheel:
78RB07052
1. Remove the center nut (1 ), then remove the spare wheel half cover (2) (if equipped). 2. Remove the wheel nuts of the spare wheel, then remove the spare wheel with both hands.
2) Loosen, but do not remove the wheel nuts. 3) Jack up the vehicle (follow the jacking instructions in the "EMERGENCY SERVICE" section in this manual) 4) Remove the wheel nuts and wheel. 5) Before installing the new wheel, clean any mud or dirt off from the surface of the wheel and hub with a clean cloth. Clean the hub carefully; it may be hot from driving.
Page 357 of 421

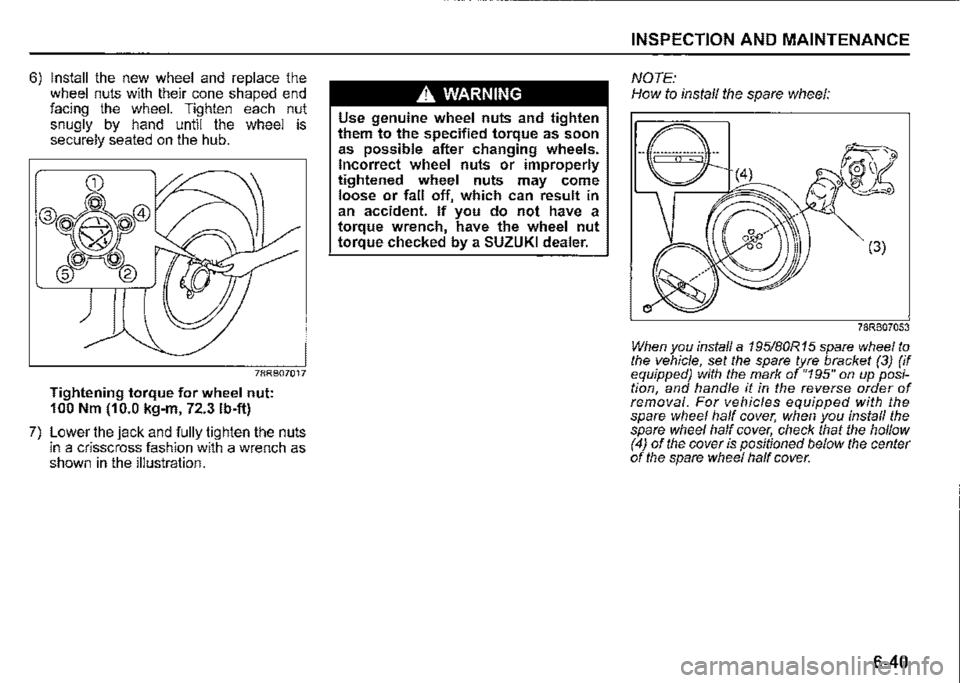
6) Install the new wheel and replace the wheel nuts with their cone shaped end facing the wheel. Tighten each nut snugly by hand until the wheel is securely seated on the hub.
78RB07017
Tightening torque for wheel nut: 100 Nm (10.0 kg-m, 72.3 lb-ft)
7) Lower the jack and fully tighten the nuts in a crisscross fashion with a wrench as shown in the illustration.
A WARNING
Use genuine wheel nuts and tighten them to the specified torque as soon as possible after changing wheels. Incorrect wheel nuts or improperly tightened wheel nuts may come loose or fall off, which can result in an accident. If you do not have a torque wrench, have the wheel nut torque checked by a SUZUKI dealer.
INSPECTION AND MAINTENANCE
NOTE: How to install the spare wheel:
(3)
78RB07053
When you install a 195/B0R 15 spare wheel to the vehicle, set the spare tyre bracket (3) (if equipped) with the mark of "195" on up position, and handle it in the reverse order of removal. For vehicles equipped with the spare wheel half cover; when you install the spare wheel half cover, check that the hollow (4) of the cover is positioned below the center of the spare wheel half cover.
6-40
Page 358 of 421

INSPECTION AND MAINTENANCE
Battery
A WARNING
• Batteries produce flammable hydrogen gas. Keep flames and sparks away from the battery or an explosion may occur. Never smoke when working near the battery. • When checking or servicing the battery, disconnect the negative cable. Be careful not to cause a short circuit by allowing metal objects to contact the battery posts and the vehicle at the same time. To avoid harm to yourself or damage to your vehicle or battery, follow the jump-starting instructions in "EMERGENCY SERVICE" section if it is necessary to jump-start your vehicle. • Diluted sulfuric acid spilled from battery can cause blindness or severe burns. Use proper eye protection and gloves. Flush eyes or bodi,: with ample water and get medical care immediately if suffered. Keep batteries out of reach of children.
6-41
~~,,_!s:./--(1)
~"1.L(2)
76MS006
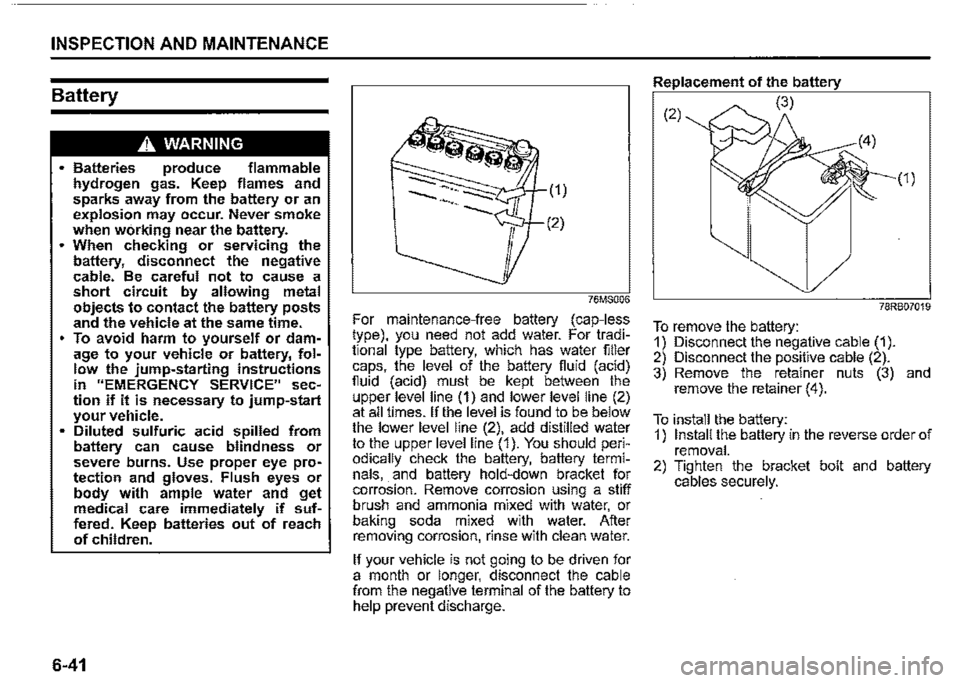
For maintenance-free battery (cap-less type), you need not add water. For traditional type battery, which has water filler caps, the level of the battery fluid (acid) fluid (acid) must be kept between the upper level line (1) and lower level line (2) at all times. If the level is found to be below the lower level line (2), add distilled water to the upper level line (1 ). You should periodically check the battery, battery terminals, . and battery hold-down bracket for corrosion. Remove corrosion using a stiff brush and ammonia mixed with water or baking soda mixed with water. After removing corrosion, rinse with clean water.
If your vehicle is not going to be driven for a month or longer, disconnect the cable from the negative terminal of the battery to help prevent discharge.
Replacement of the battery
(2) (3)
(1)
78RB07019
To remove the battery: 1) Disconnect the negative cable (1). 2) Disconnect the positive cable (2). 3) Remove the retainer nuts (3) and remove the retainer (4).
To install the battery: 1) Install the battery in the reverse order of removal. 2) Tighten the bracket bolt and battery cables securely.
Page 359 of 421

NOTE: (Battery label) When the battery is disconnected, some i::::-==-=="---------
of the vehicle's functions will be initialized and/or deactivated. These functions must be required to reset after the battery is reconnected. Do not disconnect the battery terminals for at least one minute after the ignition switch is turned off.
A WARNING
Batteries contain toxic substances including sulfuric acid and lead. They could have potential negative consequences for the environment and human health. Used batteries must be disposed of or recycled according to applicable rules or regulations and must not be disposed of with ordinary household trash. Make sure not to tip over the battery when you remove it from the vehicle. Otherwise, sulfuric acid could run out and you might get injury.
NOTICE
After stopping the engine, controller and system are operated for a while. Therefore, before removing the battery, wait for more than one minute after turning the ignition switch to 110FF".
Pb>----(5)
51KM042
(5) Crossed-out wheeled bin symbol (6) Chemical symbol of "Pb"
The crossed-out wheeled bin symbol (5) located on the battery label indicates that the used battery should be collected separately from ordinary household trash. The chemical symbol of "Pb" (6) indicates the battery contains more than 0.004% lead.
By ensuring the used battery is disposed of or recycled correctly, you will help prevent potential negative consequences for the environment and human health, which could otherwise be caused by inappropriate trash handling of the battery. The recycling of materials will help to conserve natural resources. For more detailed information about disposing of or recycling the used battery, consult a SUZUKI dealer.
INSPECTION AND MAINTENANCE
Fuses
Your vehicle has three types of fuses, as described below:
Main fuse The main fuse takes current directly from the lead-acid battery.
Primary fuses These fuses are between the main fuse and individual fuses, and are for electrical load groups.
Individual fuses These fuses are for individual electrical cir
cuits.
To remove a fuse, use the fuse puller provided in the fuse box cover.
78R807020
6-42
Page 360 of 421
![SUZUKI JIMNY 2022 Owners Manual INSPECTION AND MAINTENANCE
Fuses in engine compartment
(1) Main fuse box (2) Relay box
Main fuse box
~I----,
6-43
§]
§]
§]
0
[N]
78RB07021
78RB07022
Relay box
00illJ[@[]~ [£C][@[]~( SUZUKI JIMNY 2022 Owners Manual INSPECTION AND MAINTENANCE
Fuses in engine compartment
(1) Main fuse box (2) Relay box
Main fuse box
~I----,
6-43
§]
§]
§]
0
[N]
78RB07021
78RB07022
Relay box
00illJ[@[]~ [£C][@[]~(](/img/20/43483/w960_43483-359.png)
INSPECTION AND MAINTENANCE
Fuses in engine compartment
(1) Main fuse box (2) Relay box
Main fuse box
~I'----,
6-43
§]
§]
§]
0
[N]
78RB07021
78RB07022
Relay box
00illJ[@[]~ [£C][@[]~(30) [@[]Dill]
0~'12217a ~ ~(31} ~[@[]Dill]
~[@[]~ !Jill] Dill]
~ ~ [@[] [illiJ 8 ;~ ~(32) cc
!ril @DB ~z v (33) :~ ~ ~ FRONT ~
78RB07023
MAIN FUSE / PRIMARY FUSE
(1) 120A FL 1
(2) 100A FL2
(3) BOA FL3
(4) 100A FL4
(5) 50A FL5
(6) 50A Ignition switch
(7) 40A ABS motor
(8) -Blank
(9) 30A Blower fan
(10) 30A Starter motor
(11) 30A Headlight cleaner
(12) 15A Headlight (Right)
(13) 15A Headlight (Left)
(14) 25A ABS/ESP® control mod-ule
(15) -Blank
(16) 15A Ignition coil
(17) 25A Headlight high
(18) 30A Back up
(19) -Blank
(20) 15A Fuel injection