SUZUKI KIZASHI 2010 1.G Owners Manual
Manufacturer: SUZUKI, Model Year: 2010, Model line: KIZASHI, Model: SUZUKI KIZASHI 2010 1.GPages: 388, PDF Size: 4.94 MB
Page 301 of 388
7-16
INSPECTION AND MAINTENANCE
57L20-03E
52D084
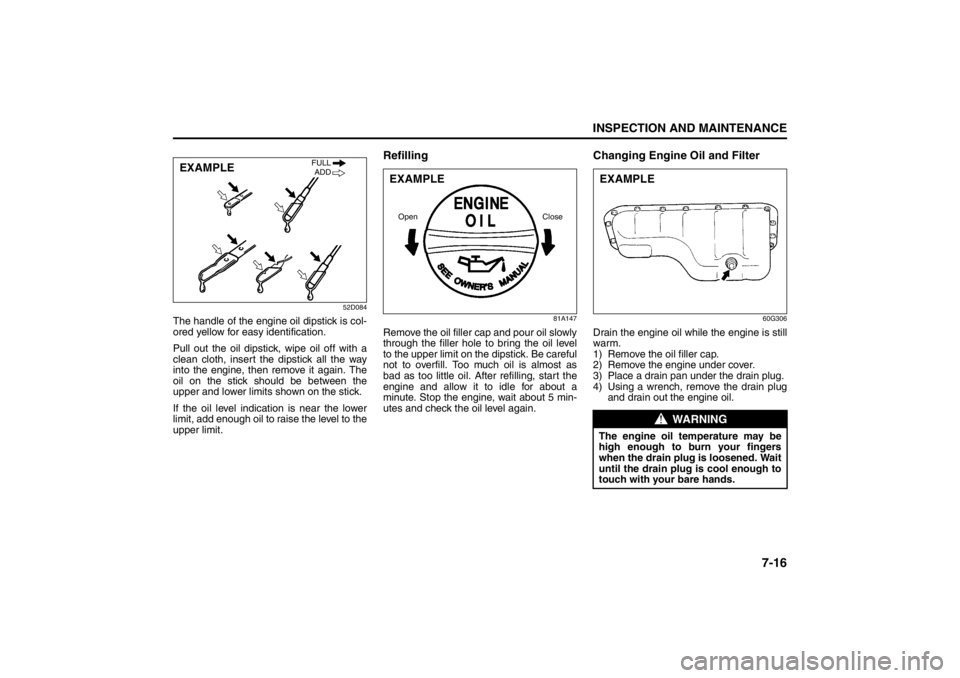
The handle of the engine oil dipstick is col-
ored yellow for easy identification.
Pull out the oil dipstick, wipe oil off with a
clean cloth, insert the dipstick all the way
into the engine, then remove it again. The
oil on the stick should be between the
upper and lower limits shown on the stick.
If the oil level indication is near the lower
limit, add enough oil to raise the level to the
upper limit.
Refilling
81A147
Remove the oil filler cap and pour oil slowly
through the filler hole to bring the oil level
to the upper limit on the dipstick. Be careful
not to overfill. Too much oil is almost as
bad as too little oil. After refilling, start the
engine and allow it to idle for about a
minute. Stop the engine, wait about 5 min-
utes and check the oil level again.
Changing Engine Oil and Filter
60G306
Drain the engine oil while the engine is still
warm.
1) Remove the oil filler cap.
2) Remove the engine under cover.
3) Place a drain pan under the drain plug.
4) Using a wrench, remove the drain plug
and drain out the engine oil.
EXAMPLE
FULL
ADD
EXAMPLEOpen Close
WARNING
The engine oil temperature may be
high enough to burn your fingers
when the drain plug is loosened. Wait
until the drain plug is cool enough to
touch with your bare hands.EXAMPLE
Page 302 of 388
7-17INSPECTION AND MAINTENANCE
57L20-03E
5) Reinstall the drain plug and gasket.
Tighten the plug with a wrench to the
specified torque.
6) Reinstall the engine under cover.
Replace the Oil Filter
60A198
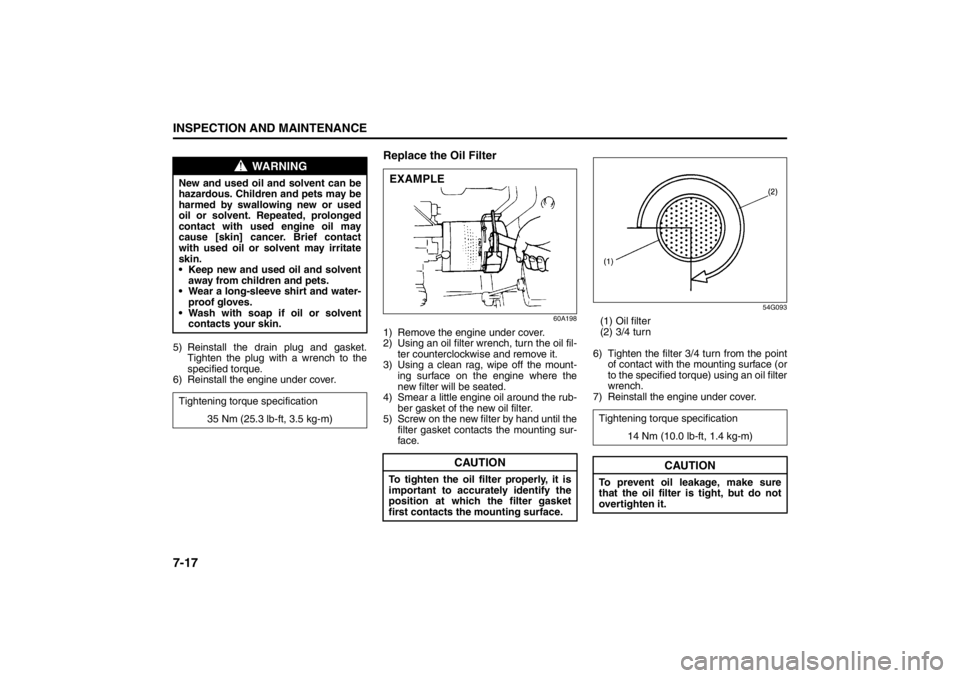
1) Remove the engine under cover.
2) Using an oil filter wrench, turn the oil fil-
ter counterclockwise and remove it.
3) Using a clean rag, wipe off the mount-
ing surface on the engine where the
new filter will be seated.
4) Smear a little engine oil around the rub-
ber gasket of the new oil filter.
5) Screw on the new filter by hand until the
filter gasket contacts the mounting sur-
face.
54G093
(1) Oil filter
(2) 3/4 turn
6) Tighten the filter 3/4 turn from the point
of contact with the mounting surface (or
to the specified torque) using an oil filter
wrench.
7) Reinstall the engine under cover.
WARNING
New and used oil and solvent can be
hazardous. Children and pets may be
harmed by swallowing new or used
oil or solvent. Repeated, prolonged
contact with used engine oil may
cause [skin] cancer. Brief contact
with used oil or solvent may irritate
skin.
Keep new and used oil and solvent
away from children and pets.
Wear a long-sleeve shirt and water-
proof gloves.
Wash with soap if oil or solvent
contacts your skin.
Tightening torque specification
35 Nm (25.3 lb-ft, 3.5 kg-m)
CAUTION
To tighten the oil filter properly, it is
important to accurately identify the
position at which the filter gasket
first contacts the mounting surface.EXAMPLE
Tightening torque specification
14 Nm (10.0 lb-ft, 1.4 kg-m)
CAUTION
To prevent oil leakage, make sure
that the oil filter is tight, but do not
overtighten it.
Page 303 of 388
7-18
INSPECTION AND MAINTENANCE
57L20-03E
NOTE:
When it is difficult to remove the oil filter,
we recommend you take your vehicle to
your SUZUKI dealer for oil filter replace-
ment.Refill with Oil and Check for Leaks1) Pour oil through the filler hole and
install the filler cap.
For the approximate capacity of the oil,
refer to the “Capacities” item in the
“SPECIFICATIONS” section.
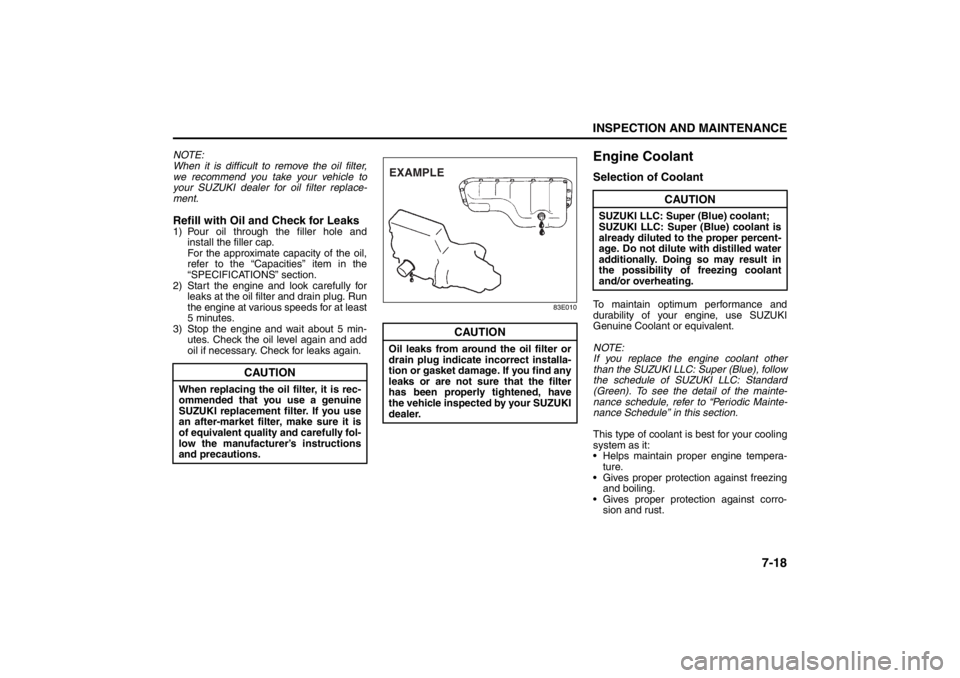
2) Start the engine and look carefully for
leaks at the oil filter and drain plug. Run
the engine at various speeds for at least
5 minutes.
3) Stop the engine and wait about 5 min-
utes. Check the oil level again and add
oil if necessary. Check for leaks again.
83E010
Engine CoolantSelection of CoolantTo maintain optimum performance and
durability of your engine, use SUZUKI
Genuine Coolant or equivalent.
NOTE:
If you replace the engine coolant other
than the SUZUKI LLC: Super (Blue), follow
the schedule of SUZUKI LLC: Standard
(Green). To see the detail of the mainte-
nance schedule, refer to “Periodic Mainte-
nance Schedule” in this section.
This type of coolant is best for your cooling
system as it:
Helps maintain proper engine tempera-
ture.
Gives proper protection against freezing
and boiling.
Gives proper protection against corro-
sion and rust.
CAUTION
When replacing the oil filter, it is rec-
ommended that you use a genuine
SUZUKI replacement filter. If you use
an after-market filter, make sure it is
of equivalent quality and carefully fol-
low the manufacturer’s instructions
and precautions.
CAUTION
Oil leaks from around the oil filter or
drain plug indicate incorrect installa-
tion or gasket damage. If you find any
leaks or are not sure that the filter
has been properly tightened, have
the vehicle inspected by your SUZUKI
dealer.EXAMPLE
CAUTION
SUZUKI LLC: Super (Blue) coolant;
SUZUKI LLC: Super (Blue) coolant is
already diluted to the proper percent-
age. Do not dilute with distilled water
additionally. Doing so may result in
the possibility of freezing coolant
and/or overheating.
Page 304 of 388
7-19INSPECTION AND MAINTENANCE
57L20-03E
Failure to use the proper coolant can dam-
age your cooling system. Your authorized
SUZUKI dealer can help you select the
proper coolant.
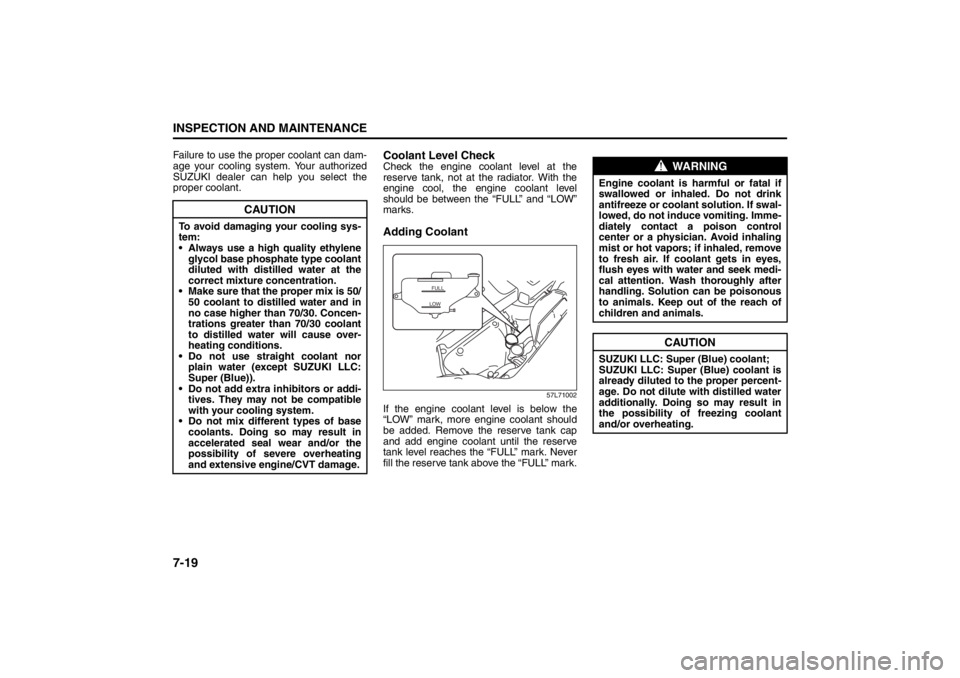
Coolant Level CheckCheck the engine coolant level at the
reserve tank, not at the radiator. With the
engine cool, the engine coolant level
should be between the “FULL” and “LOW”
marks.Adding Coolant
57L71002
If the engine coolant level is below the
“LOW” mark, more engine coolant should
be added. Remove the reserve tank cap
and add engine coolant until the reserve
tank level reaches the “FULL” mark. Never
fill the reserve tank above the “FULL” mark.
CAUTION
To avoid damaging your cooling sys-
tem:
Always use a high quality ethylene
glycol base phosphate type coolant
diluted with distilled water at the
correct mixture concentration.
Make sure that the proper mix is 50/
50 coolant to distilled water and in
no case higher than 70/30. Concen-
trations greater than 70/30 coolant
to distilled water will cause over-
heating conditions.
Do not use straight coolant nor
plain water (except SUZUKI LLC:
Super (Blue)).
Do not add extra inhibitors or addi-
tives. They may not be compatible
with your cooling system.
Do not mix different types of base
coolants. Doing so may result in
accelerated seal wear and/or the
possibility of severe overheating
and extensive engine/CVT damage.
FULL
LOW
WARNING
Engine coolant is harmful or fatal if
swallowed or inhaled. Do not drink
antifreeze or coolant solution. If swal-
lowed, do not induce vomiting. Imme-
diately contact a poison control
center or a physician. Avoid inhaling
mist or hot vapors; if inhaled, remove
to fresh air. If coolant gets in eyes,
flush eyes with water and seek medi-
cal attention. Wash thoroughly after
handling. Solution can be poisonous
to animals. Keep out of the reach of
children and animals.
CAUTION
SUZUKI LLC: Super (Blue) coolant;
SUZUKI LLC: Super (Blue) coolant is
already diluted to the proper percent-
age. Do not dilute with distilled water
additionally. Doing so may result in
the possibility of freezing coolant
and/or overheating.
Page 305 of 388
7-20
INSPECTION AND MAINTENANCE
57L20-03E
Coolant ReplacementSince special procedures are required, we
recommend you take your vehicle to your
SUZUKI dealer for coolant replacement.
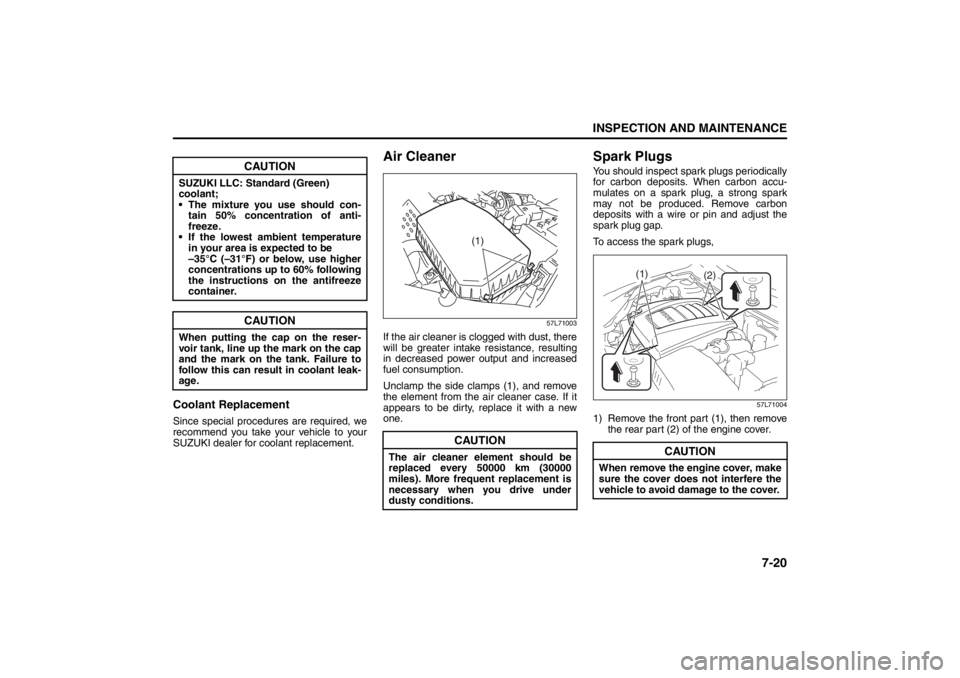
Air Cleaner
57L71003
If the air cleaner is clogged with dust, there
will be greater intake resistance, resulting
in decreased power output and increased
fuel consumption.
Unclamp the side clamps (1), and remove
the element from the air cleaner case. If it
appears to be dirty, replace it with a new
one.
Spark PlugsYou should inspect spark plugs periodically
for carbon deposits. When carbon accu-
mulates on a spark plug, a strong spark
may not be produced. Remove carbon
deposits with a wire or pin and adjust the
spark plug gap.
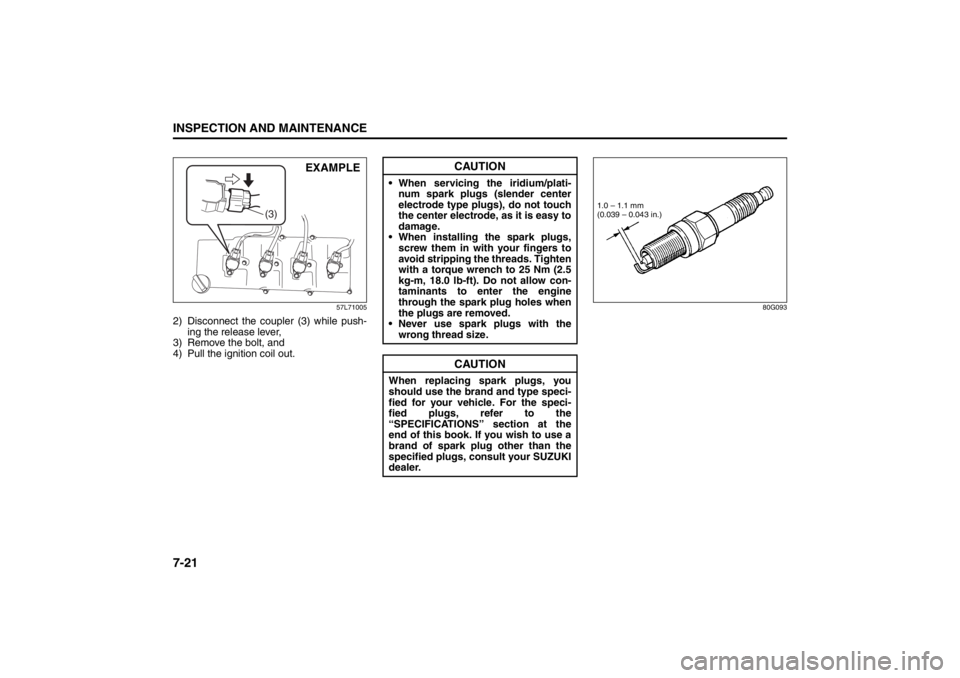
To access the spark plugs,
57L71004
1) Remove the front part (1), then remove
the rear part (2) of the engine cover.
CAUTION
SUZUKI LLC: Standard (Green)
coolant;
The mixture you use should con-
tain 50% concentration of anti-
freeze.
If the lowest ambient temperature
in your area is expected to be
–35°C (–31°F) or below, use higher
concentrations up to 60% following
the instructions on the antifreeze
container.
CAUTION
When putting the cap on the reser-
voir tank, line up the mark on the cap
and the mark on the tank. Failure to
follow this can result in coolant leak-
age.
CAUTION
The air cleaner element should be
replaced every 50000 km (30000
miles). More frequent replacement is
necessary when you drive under
dusty conditions.
(1)
CAUTION
When remove the engine cover, make
sure the cover does not interfere the
vehicle to avoid damage to the cover.
(1)
(2)
Page 306 of 388
7-21INSPECTION AND MAINTENANCE
57L20-03E
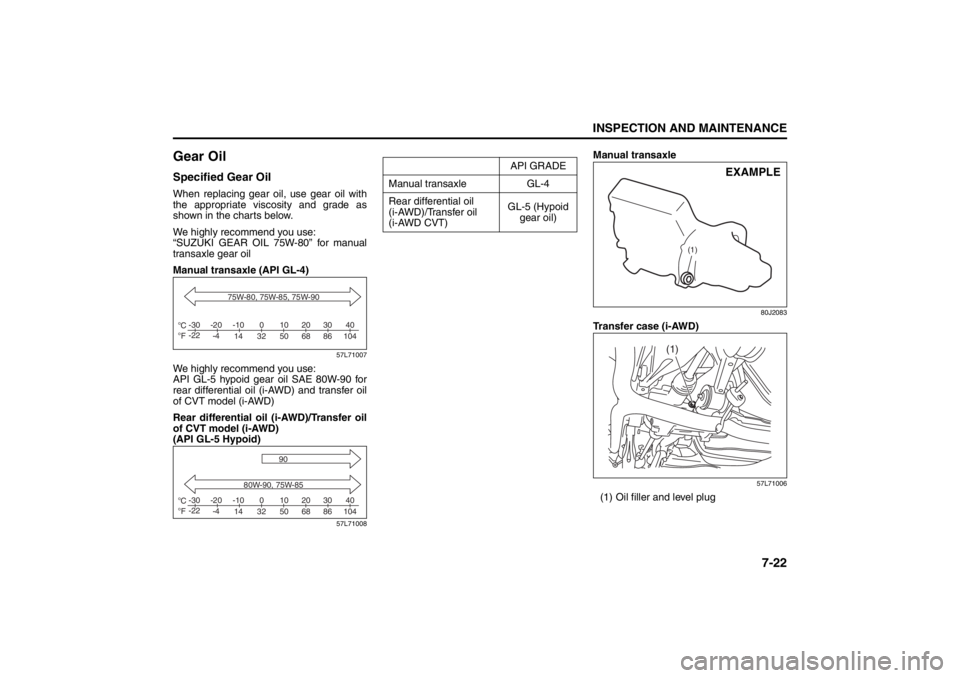
57L71005
2) Disconnect the coupler (3) while push-
ing the release lever,
3) Remove the bolt, and
4) Pull the ignition coil out.
80G093
(3)
EXAMPLE
CAUTION
When servicing the iridium/plati-
num spark plugs (slender center
electrode type plugs), do not touch
the center electrode, as it is easy to
damage.
When installing the spark plugs,
screw them in with your fingers to
avoid stripping the threads. Tighten
with a torque wrench to 25 Nm (2.5
kg-m, 18.0 lb-ft). Do not allow con-
taminants to enter the engine
through the spark plug holes when
the plugs are removed.
Never use spark plugs with the
wrong thread size.
CAUTION
When replacing spark plugs, you
should use the brand and type speci-
fied for your vehicle. For the speci-
fied plugs, refer to the
“SPECIFICATIONS” section at the
end of this book. If you wish to use a
brand of spark plug other than the
specified plugs, consult your SUZUKI
dealer.
1.0 – 1.1 mm
(0.039 – 0.043 in.)
Page 307 of 388
7-22
INSPECTION AND MAINTENANCE
57L20-03E
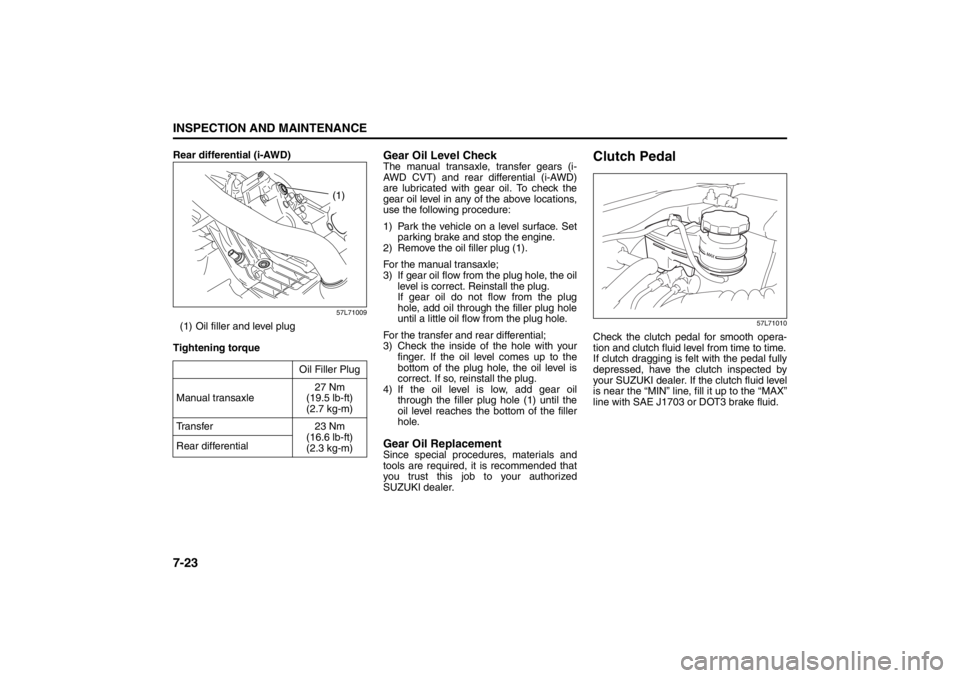
Gear OilSpecified Gear OilWhen replacing gear oil, use gear oil with
the appropriate viscosity and grade as
shown in the charts below.
We highly recommend you use:
“SUZUKI GEAR OIL 75W-80” for manual
transaxle gear oil
Manual transaxle (API GL-4)
57L71007
We highly recommend you use:
API GL-5 hypoid gear oil SAE 80W-90 for
rear differential oil (i-AWD) and transfer oil
of CVT model (i-AWD)
Rear differential oil (i-AWD)/Transfer oil
of CVT model (i-AWD)
(API GL-5 Hypoid)
57L71008
Manual transaxle
80J2083
Transfer case (i-AWD)
57L71006
(1) Oil filler and level plug
C
Fo o-30
-22-20
-4-10
14 32 50 68 86 104010203040
75W-80, 75W-85, 75W-90
C
Fo o-30
-22-20
-4-10
14 32 50 68 86 104010203040
80W-90, 75W-85
90
API GRADE
Manual transaxle GL-4
Rear differential oil
(i-AWD)/Transfer oil
(i-AWD CVT)GL-5 (Hypoid
gear oil)
(1)
EXAMPLE
(1)
Page 308 of 388
7-23INSPECTION AND MAINTENANCE
57L20-03E
Rear differential (i-AWD)
57L71009
(1) Oil filler and level plug
Tightening torque
Gear Oil Level CheckThe manual transaxle, transfer gears (i-
AWD CVT) and rear differential (i-AWD)
are lubricated with gear oil. To check the
gear oil level in any of the above locations,
use the following procedure:
1) Park the vehicle on a level surface. Set
parking brake and stop the engine.
2) Remove the oil filler plug (1).
For the manual transaxle;
3) If gear oil flow from the plug hole, the oil
level is correct. Reinstall the plug.
If gear oil do not flow from the plug
hole, add oil through the filler plug hole
until a little oil flow from the plug hole.
For the transfer and rear differential;
3) Check the inside of the hole with your
finger. If the oil level comes up to the
bottom of the plug hole, the oil level is
correct. If so, reinstall the plug.
4) If the oil level is low, add gear oil
through the filler plug hole (1) until the
oil level reaches the bottom of the filler
hole.Gear Oil ReplacementSince special procedures, materials and
tools are required, it is recommended that
you trust this job to your authorized
SUZUKI dealer.
Clutch Pedal
57L71010
Check the clutch pedal for smooth opera-
tion and clutch fluid level from time to time.
If clutch dragging is felt with the pedal fully
depressed, have the clutch inspected by
your SUZUKI dealer. If the clutch fluid level
is near the “MIN” line, fill it up to the “MAX”
line with SAE J1703 or DOT3 brake fluid. Oil Filler Plug
Manual transaxle27 Nm
(19.5 lb-ft)
(2.7 kg-m)
Transfer 23 Nm
(16.6 lb-ft)
(2.3 kg-m) Rear differential
(1)
Page 309 of 388
7-24
INSPECTION AND MAINTENANCE
57L20-03E
Continuously Variable
Transaxle (CVT) FluidSpecified FluidUse a CVT fluid SUZUKI CVT FLUID
GREEN-1 or Shell GREEN-1V.Fluid Level CheckYou must check the fluid level with the CVT
fluid at normal operating temperature.
To check the fluid level:
1) To warm up the CVT fluid, drive the
vehicle or idle the engine until the tem-
perature gauge indicates normal oper-
ating temperature.
2) Then drive for ten more minutes.
NOTE:
Do not check the fluid level if you have just
driven the vehicle for a long time at high
speed, or if you have driven in city traffic inhot weather. Wait until the fluid cools down
(about 30 minutes), or the fluid level indica-
tion will not be correct.
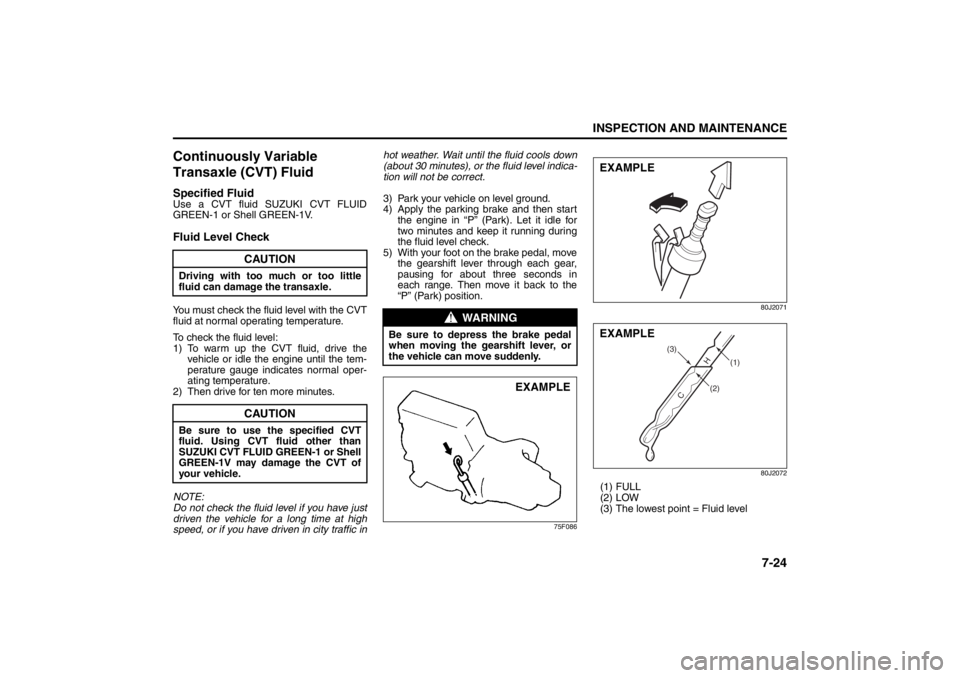
3) Park your vehicle on level ground.
4) Apply the parking brake and then start
the engine in “P” (Park). Let it idle for
two minutes and keep it running during
the fluid level check.
5) With your foot on the brake pedal, move
the gearshift lever through each gear,
pausing for about three seconds in
each range. Then move it back to the
“P” (Park) position.
75F08680J2071
80J2072
(1) FULL
(2) LOW
(3) The lowest point = Fluid level
CAUTION
Driving with too much or too little
fluid can damage the transaxle.
CAUTION
Be sure to use the specified CVT
fluid. Using CVT fluid other than
SUZUKI CVT FLUID GREEN-1 or Shell
GREEN-1V may damage the CVT of
your vehicle.
WARNING
Be sure to depress the brake pedal
when moving the gearshift lever, or
the vehicle can move suddenly.
EXAMPLE
EXAMPLE
(2)H
C
(1) (3)
EXAMPLE
Page 310 of 388
7-25INSPECTION AND MAINTENANCE
57L20-03E
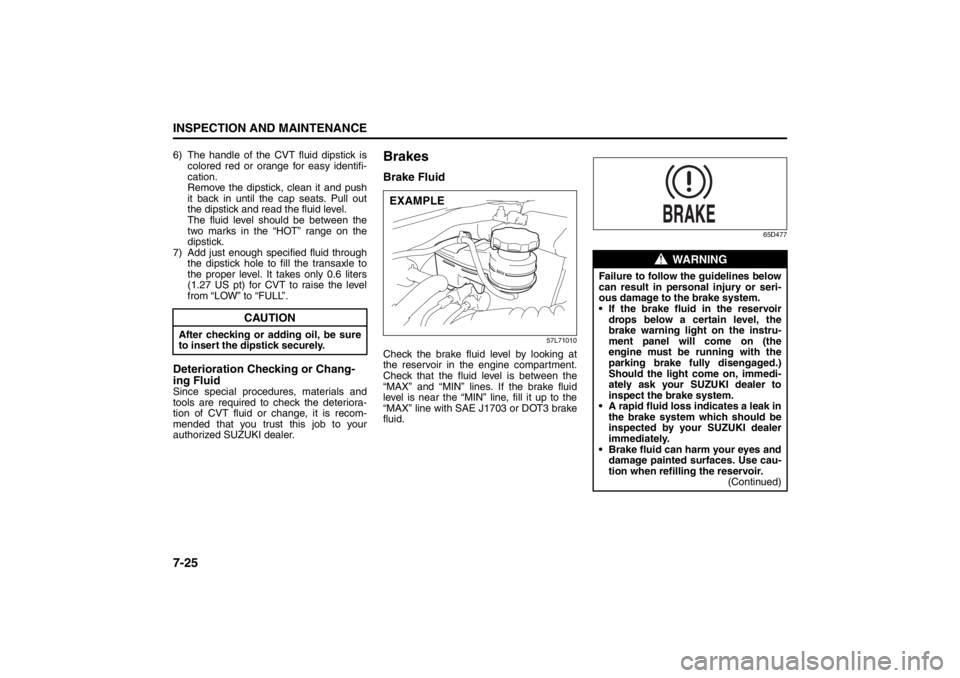
6) The handle of the CVT fluid dipstick is
colored red or orange for easy identifi-
cation.
Remove the dipstick, clean it and push
it back in until the cap seats. Pull out
the dipstick and read the fluid level.
The fluid level should be between the
two marks in the “HOT” range on the
dipstick.
7) Add just enough specified fluid through
the dipstick hole to fill the transaxle to
the proper level. It takes only 0.6 liters
(1.27 US pt) for CVT to raise the level
from “LOW” to “FULL”.Deterioration Checking or Chang-
ing FluidSince special procedures, materials and
tools are required to check the deteriora-
tion of CVT fluid or change, it is recom-
mended that you trust this job to your
authorized SUZUKI dealer.
BrakesBrake Fluid
57L71010
Check the brake fluid level by looking at
the reservoir in the engine compartment.
Check that the fluid level is between the
“MAX” and “MIN” lines. If the brake fluid
level is near the “MIN” line, fill it up to the
“MAX” line with SAE J1703 or DOT3 brake
fluid.
65D477
CAUTION
After checking or adding oil, be sure
to insert the dipstick securely.
EXAMPLE
WARNING
Failure to follow the guidelines below
can result in personal injury or seri-
ous damage to the brake system.
If the brake fluid in the reservoir
drops below a certain level, the
brake warning light on the instru-
ment panel will come on (the
engine must be running with the
parking brake fully disengaged.)
Should the light come on, immedi-
ately ask your SUZUKI dealer to
inspect the brake system.
A rapid fluid loss indicates a leak in
the brake system which should be
inspected by your SUZUKI dealer
immediately.
Brake fluid can harm your eyes and
damage painted surfaces. Use cau-
tion when refilling the reservoir.
(Continued)