valve SUZUKI SWIFT 2000 1.G RG413 Service Workshop Manual
[x] Cancel search | Manufacturer: SUZUKI, Model Year: 2000, Model line: SWIFT, Model: SUZUKI SWIFT 2000 1.GPages: 698, PDF Size: 16.01 MB
Page 555 of 698
6A1-54 ENGINE MECHANICAL (M13 ENGINE)
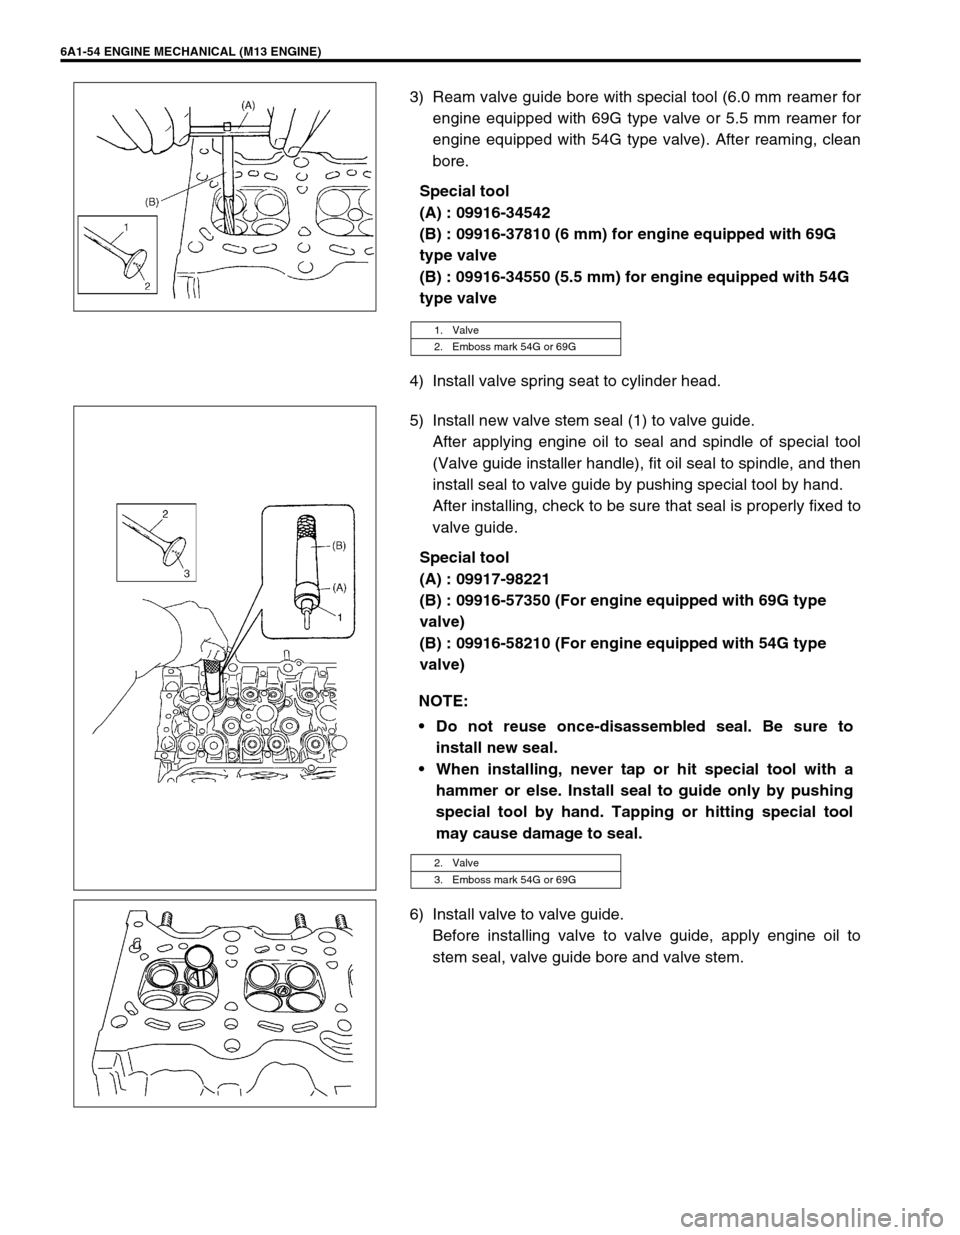
3) Ream valve guide bore with special tool (6.0 mm reamer for
engine equipped with 69G type valve or 5.5 mm reamer for
engine equipped with 54G type valve). After reaming, clean
bore.
Special tool
(A) : 09916-34542
(B) : 09916-37810 (6 mm) for engine equipped with 69G
type valve
(B) : 09916-34550 (5.5 mm) for engine equipped with 54G
type valve
4) Install valve spring seat to cylinder head.
5) Install new valve stem seal (1) to valve guide.
After applying engine oil to seal and spindle of special tool
(Valve guide installer handle), fit oil seal to spindle, and then
install seal to valve guide by pushing special tool by hand.
After installing, check to be sure that seal is properly fixed to
valve guide.
Special tool
(A) : 09917-98221
(B) : 09916-57350 (For engine equipped with 69G type
valve)
(B) : 09916-58210 (For engine equipped with 54G type
valve)
6) Install valve to valve guide.
Before installing valve to valve guide, apply engine oil to
stem seal, valve guide bore and valve stem.
1. Valve
2. Emboss mark 54G or 69G
NOTE:
Do not reuse once-disassembled seal. Be sure to
install new seal.
When installing, never tap or hit special tool with a
hammer or else. Install seal to guide only by pushing
special tool by hand. Tapping or hitting special tool
may cause damage to seal.
2. Valve
3. Emboss mark 54G or 69G
Page 556 of 698
ENGINE MECHANICAL (M13 ENGINE) 6A1-55
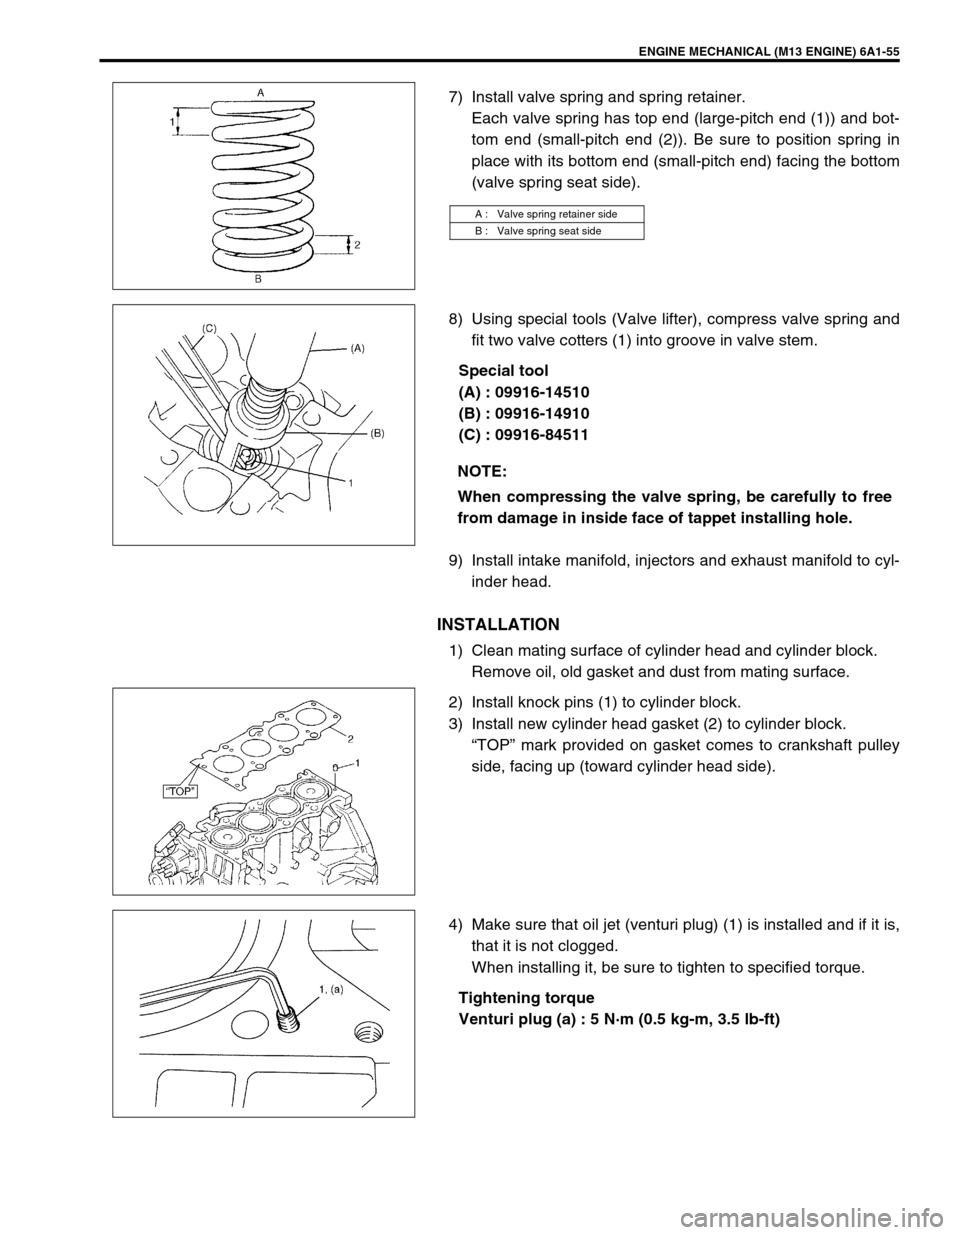
7) Install valve spring and spring retainer.
Each valve spring has top end (large-pitch end (1)) and bot-
tom end (small-pitch end (2)). Be sure to position spring in
place with its bottom end (small-pitch end) facing the bottom
(valve spring seat side).
8) Using special tools (Valve lifter), compress valve spring and
fit two valve cotters (1) into groove in valve stem.
Special tool
(A) : 09916-14510
(B) : 09916-14910
(C) : 09916-84511
9) Install intake manifold, injectors and exhaust manifold to cyl-
inder head.
INSTALLATION
1) Clean mating surface of cylinder head and cylinder block.
Remove oil, old gasket and dust from mating surface.
2) Install knock pins (1) to cylinder block.
3) Install new cylinder head gasket (2) to cylinder block.
“TOP” mark provided on gasket comes to crankshaft pulley
side, facing up (toward cylinder head side).
4) Make sure that oil jet (venturi plug) (1) is installed and if it is,
that it is not clogged.
When installing it, be sure to tighten to specified torque.
Tightening torque
Venturi plug (a) : 5 N·m (0.5 kg-m, 3.5 lb-ft)
A : Valve spring retainer side
B : Valve spring seat side
NOTE:
When compressing the valve spring, be carefully to free
from damage in inside face of tappet installing hole.
Page 558 of 698
ENGINE MECHANICAL (M13 ENGINE) 6A1-57
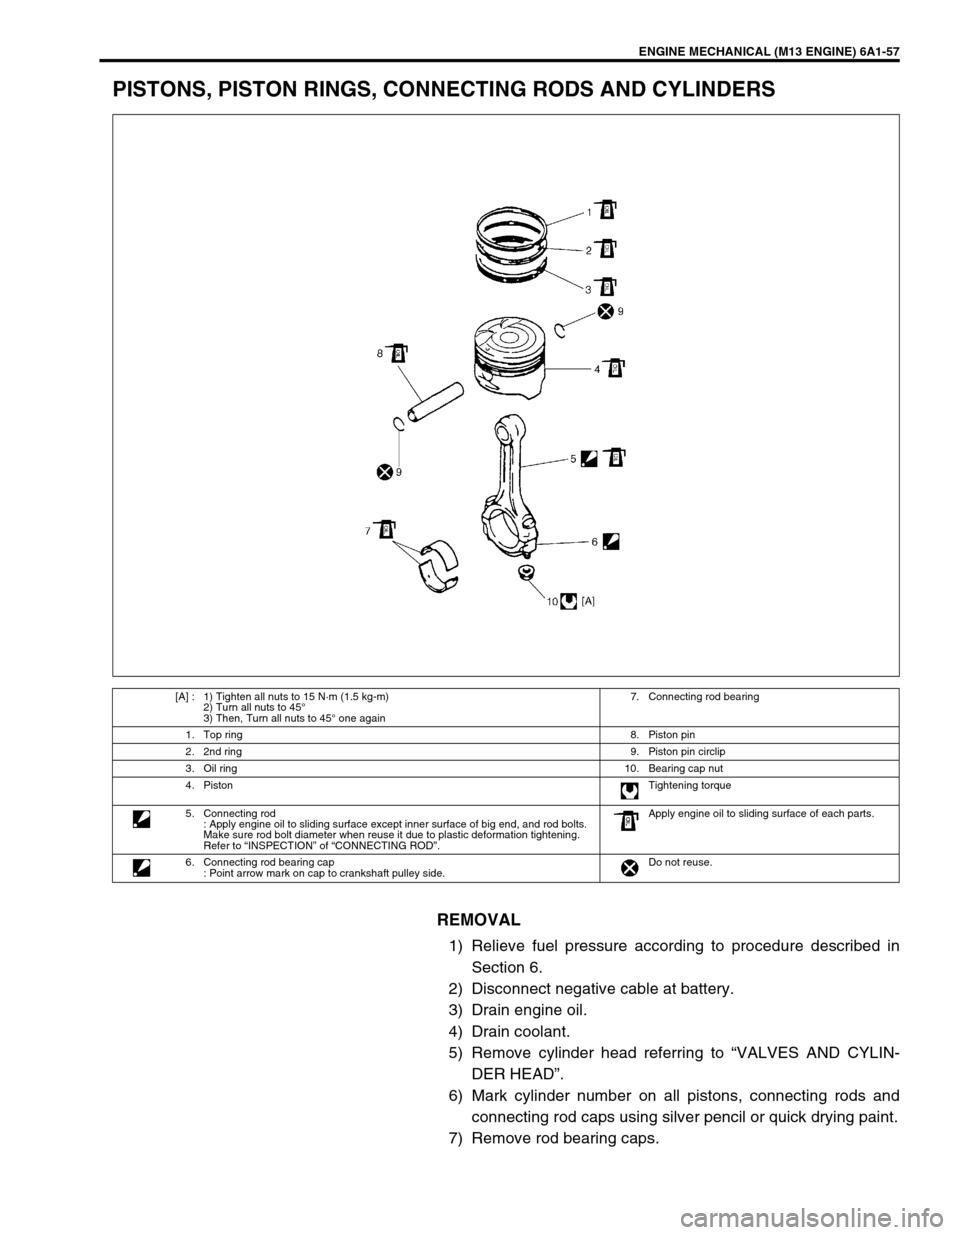
PISTONS, PISTON RINGS, CONNECTING RODS AND CYLINDERS
REMOVAL
1) Relieve fuel pressure according to procedure described in
Section 6.
2) Disconnect negative cable at battery.
3) Drain engine oil.
4) Drain coolant.
5) Remove cylinder head referring to “VALVES AND CYLIN-
DER HEAD”.
6) Mark cylinder number on all pistons, connecting rods and
connecting rod caps using silver pencil or quick drying paint.
7) Remove rod bearing caps.
[A] : 1) Tighten all nuts to 15 N·m (1.5 kg-m)
2) Turn all nuts to 45°
3) Then, Turn all nuts to 45° one again7. Connecting rod bearing
1. Top ring8. Piston pin
2. 2nd ring9. Piston pin circlip
3. Oil ring10. Bearing cap nut
4. PistonTightening torque
5. Connecting rod
: Apply engine oil to sliding surface except inner surface of big end, and rod bolts.
Make sure rod bolt diameter when reuse it due to plastic deformation tightening.
Refer to “INSPECTION” of “CONNECTING ROD”.Apply engine oil to sliding surface of each parts.
6. Connecting rod bearing cap
: Point arrow mark on cap to crankshaft pulley side.Do not reuse.
Page 570 of 698
ENGINE MECHANICAL (M13 ENGINE) 6A1-69
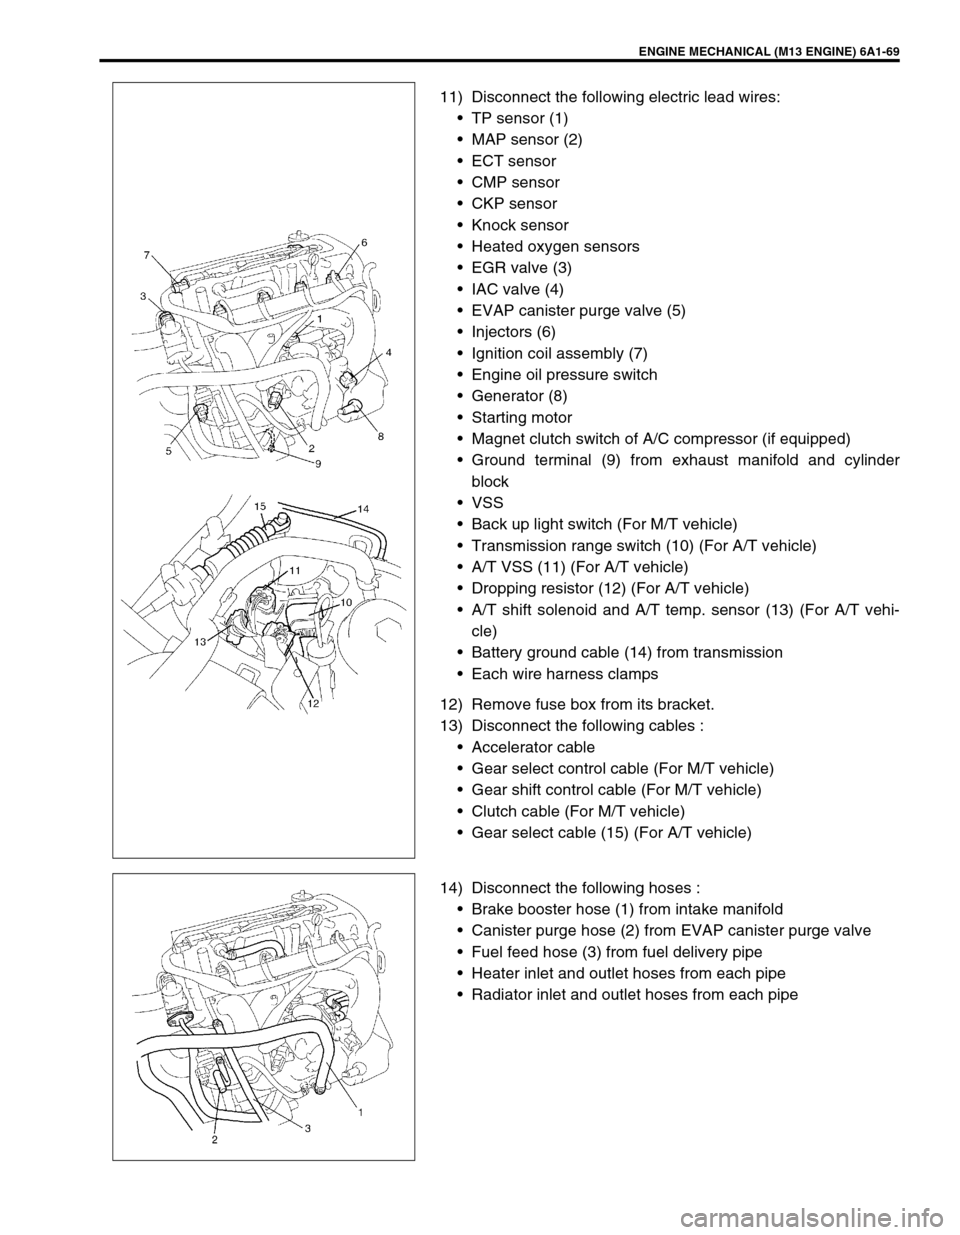
11) Disconnect the following electric lead wires:
TP sensor (1)
MAP sensor (2)
ECT sensor
CMP sensor
CKP sensor
Knock sensor
Heated oxygen sensors
EGR valve (3)
IAC valve (4)
EVAP canister purge valve (5)
Injectors (6)
Ignition coil assembly (7)
Engine oil pressure switch
Generator (8)
Starting motor
Magnet clutch switch of A/C compressor (if equipped)
Ground terminal (9) from exhaust manifold and cylinder
block
VSS
Back up light switch (For M/T vehicle)
Transmission range switch (10) (For A/T vehicle)
A/T VSS (11) (For A/T vehicle)
Dropping resistor (12) (For A/T vehicle)
A/T shift solenoid and A/T temp. sensor (13) (For A/T vehi-
cle)
Battery ground cable (14) from transmission
Each wire harness clamps
12) Remove fuse box from its bracket.
13) Disconnect the following cables :
Accelerator cable
Gear select control cable (For M/T vehicle)
Gear shift control cable (For M/T vehicle)
Clutch cable (For M/T vehicle)
Gear select cable (15) (For A/T vehicle)
14) Disconnect the following hoses :
Brake booster hose (1) from intake manifold
Canister purge hose (2) from EVAP canister purge valve
Fuel feed hose (3) from fuel delivery pipe
Heater inlet and outlet hoses from each pipe
Radiator inlet and outlet hoses from each pipe
Page 588 of 698
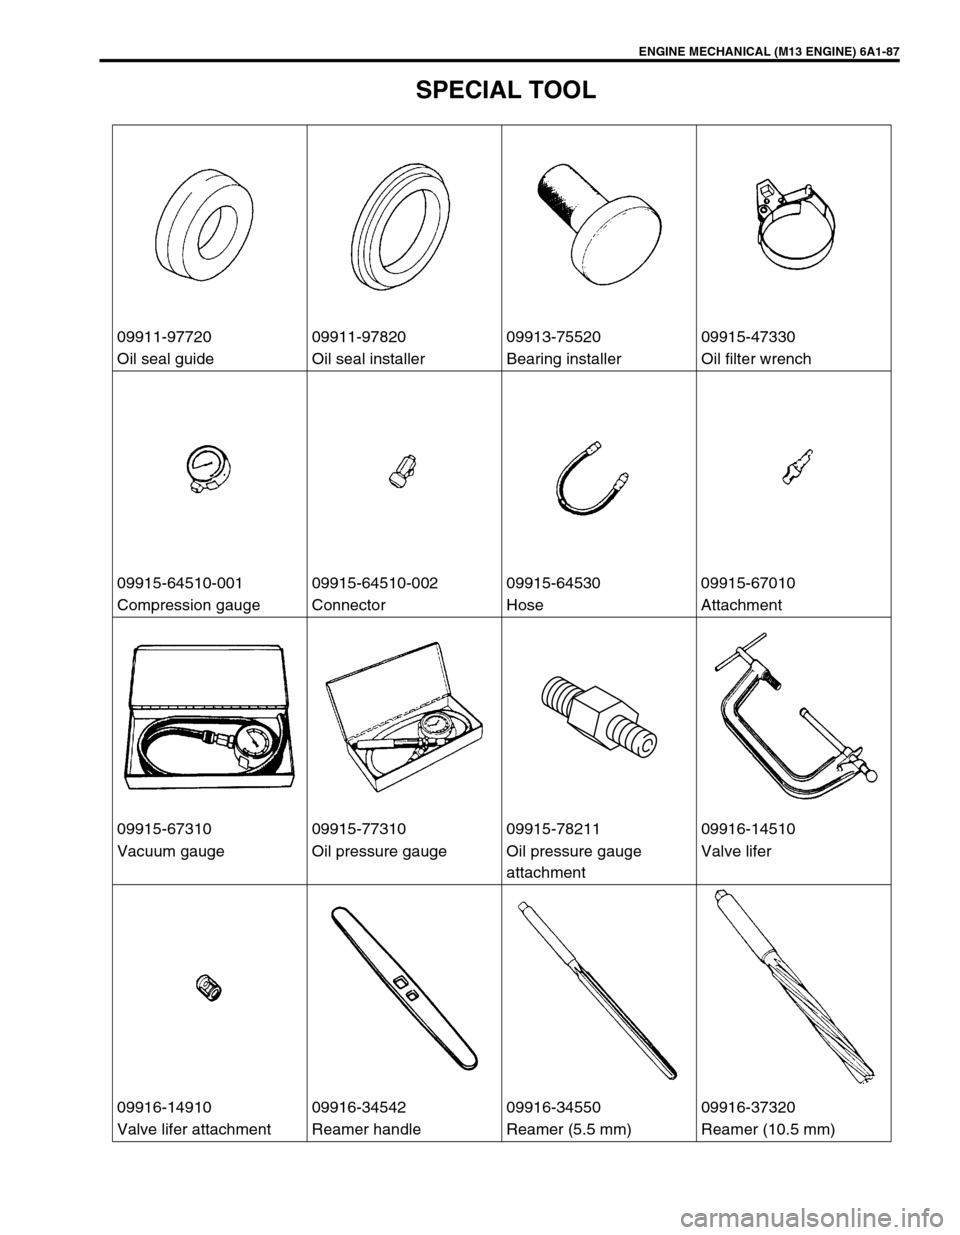
ENGINE MECHANICAL (M13 ENGINE) 6A1-87
SPECIAL TOOL
09911-97720 09911-97820 09913-75520 09915-47330
Oil seal guide Oil seal installer Bearing installer Oil filter wrench
09915-64510-001 09915-64510-002 09915-64530 09915-67010
Compression gauge Connector Hose Attachment
09915-67310 09915-77310 09915-78211 09916-14510
Vacuum gauge Oil pressure gauge Oil pressure gauge
attachmentValve lifer
09916-14910 09916-34542 09916-34550 09916-37320
Valve lifer attachment Reamer handle Reamer (5.5 mm) Reamer (10.5 mm)
Page 589 of 698
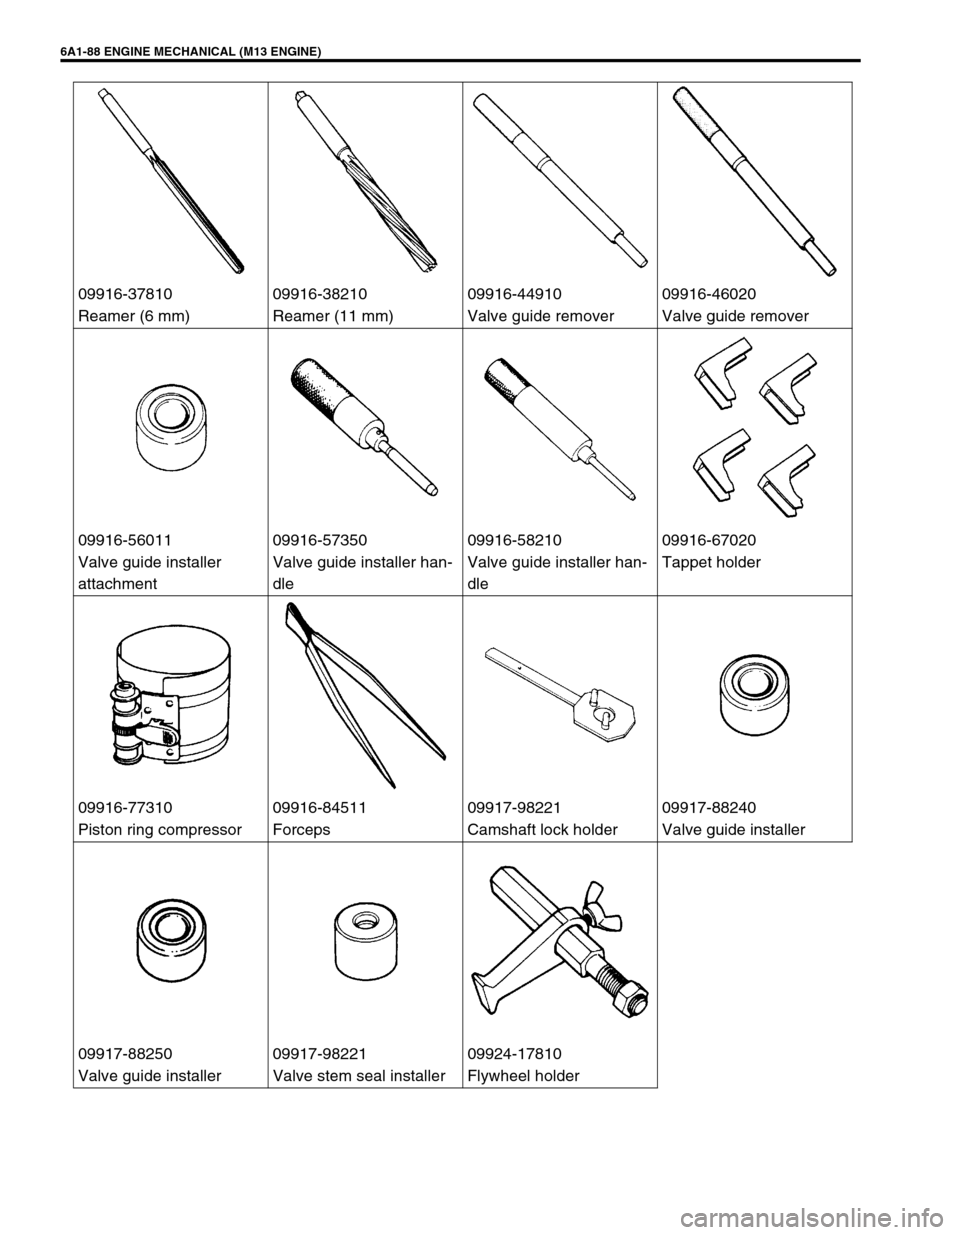
6A1-88 ENGINE MECHANICAL (M13 ENGINE)
09916-37810 09916-38210 09916-44910 09916-46020
Reamer (6 mm) Reamer (11 mm) Valve guide remover Valve guide remover
09916-56011 09916-57350 09916-58210 09916-67020
Valve guide installer
attachmentValve guide installer han-
dleValve guide installer han-
dleTappet holder
09916-77310 09916-84511 09917-98221 09917-88240
Piston ring compressor Forceps Camshaft lock holder Valve guide installer
09917-88250 09917-98221 09924-17810
Valve guide installer Valve stem seal installer Flywheel holder
Page 601 of 698
6B-12 ENGINE COOLING
COOLING WATER PIPES OR HOSES
REMOVAL
1) Drain cooling system.
2) To remove these pipes or hoses, loosen clamp on each
hose and pull hose end off.
INSTALLATION
Install removed parts in reverse order of removal procedure, not-
ing the following.
Tighten each clamp securely.
Refill cooling system with proper coolant referring to “COOL-
ING SYSTEM REFILL”.
THERMOSTAT
REMOVAL
1) Drain cooling system by loosening drain plug of radiator
referring to “COOLING SYSTEM DRAINING”.
2) Remove air cleaner assembly and resonator referring to sec-
tion 6A1
3) Remove intake manifold referring to Section 6A1.
4) Remove generator referring to Section 6H.
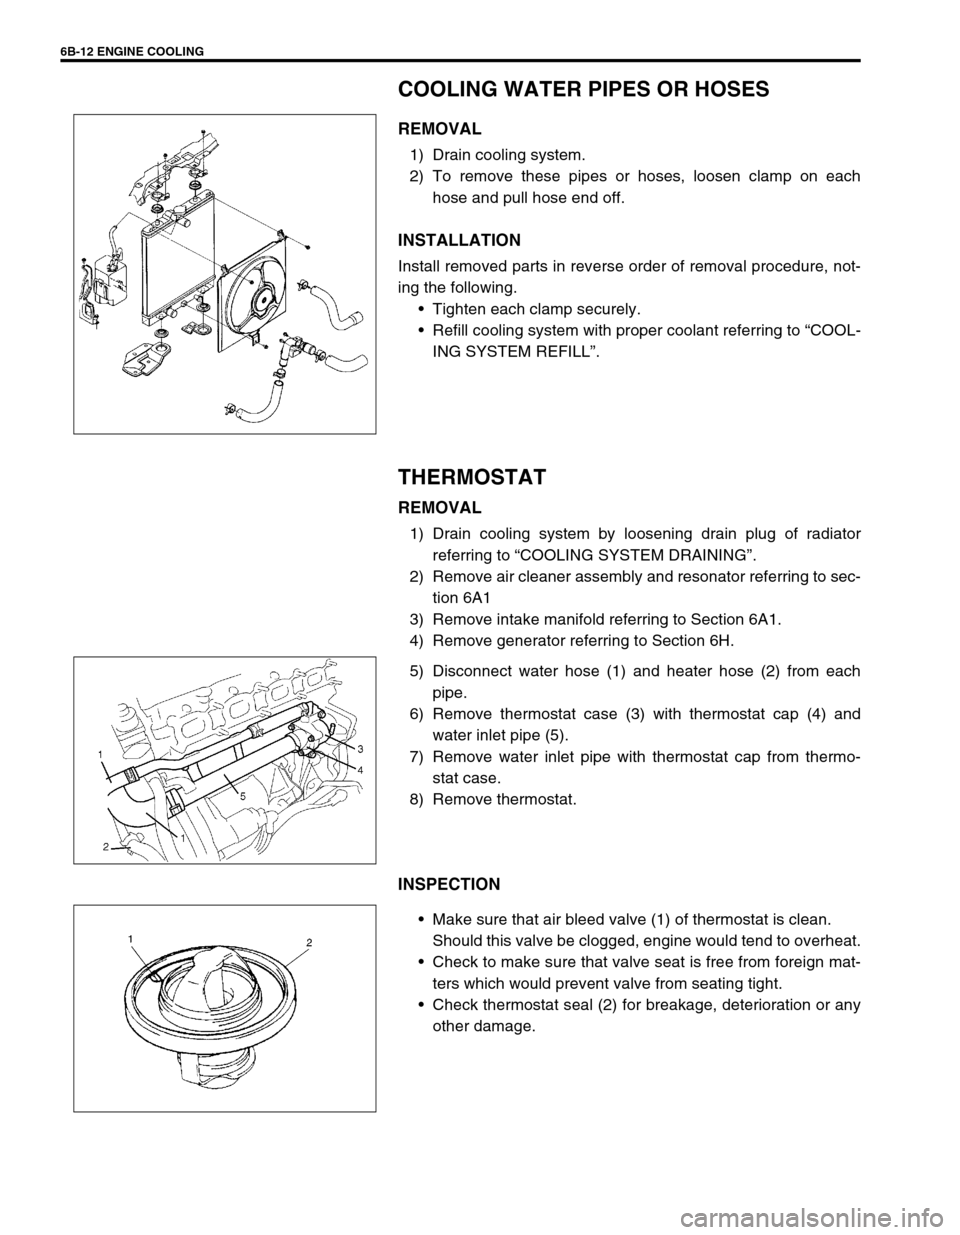
5) Disconnect water hose (1) and heater hose (2) from each
pipe.
6) Remove thermostat case (3) with thermostat cap (4) and
water inlet pipe (5).
7) Remove water inlet pipe with thermostat cap from thermo-
stat case.
8) Remove thermostat.
INSPECTION
Make sure that air bleed valve (1) of thermostat is clean.
Should this valve be clogged, engine would tend to overheat.
Check to make sure that valve seat is free from foreign mat-
ters which would prevent valve from seating tight.
Check thermostat seal (2) for breakage, deterioration or any
other damage.
Page 602 of 698

ENGINE COOLING 6B-13
Check thermostatic movement of wax pellet as follows :
a) Immerse thermostat (1) in water, and heat water gradually.
b) Check that valve starts to open at specific temperature.
Temperature at which valve begins to open
: 80 – 84°C (176 – 183°F)
Temperature at which valve become fully open
: 95 – 97°C (203°F)
Valve lift
: More than 8 mm at 95°C (203°F)
If valve starts to open at a temperature substantially below or
above specific temperature, thermostat unit should be replaced
with a new one. Such a unit, if reused, will bring about overcool-
ing or overheating tendency.
INSTALLATION
Reverse removal procedure for installation noting the following
points.
When positioning thermostat (1) on thermostat case (2), be
sure to position it so that air bleed valve (3) comes at posi-
tion as shown in figure.
Use new O-rings when installing.
Adjust water pump belt tension referring to WATER PUMP/
GENERATOR DRIVE BELT TENSION INSPECTION AND
ADJUSTMENT in this section.
Adjust A/C compressor belt tension (if equipped) referring to
Section 1B.
Refill cooling system with proper coolant referring to “COOL-
ING SYSTEM REFILL”.
Verify that there is no coolant leakage at each connection.
2. Thermometer
3. Heater
Page 608 of 698
ENGINE FUEL 6C-1
6F1
6F2
6G
6C
6K
7A
7A1
7B1
7C1
7D
7E
7F
8A
8B
8C
8D
8E
9
10
10A
10B
SECTION 6C
ENGINE FUEL
CONTENTS
GENERAL DESCRIPTION .............................. 6C-1
ON-VEHICLE SERVICE .................................. 6C-2
COMPONENTS ........................................... 6C-2
PRECAUTIONS ........................................... 6C-3
FUEL LINES ................................................. 6C-4
FUEL PIPE ................................................... 6C-4
FUEL FILLER CAP ...................................... 6C-5FUEL TANK INLET VALVE ......................... 6C-6
FUEL TANK ................................................. 6C-7
FUEL PUMP ASSEMBLY .......................... 6C-10
DISASSEMBLY AND REASSEMBLY .... 6C-12
SPECIAL TOOL ............................................ 6C-14
TIGHTENING TORQUE SPECIFICATION.... 6C-14
GENERAL DESCRIPTION
The main components of the fuel system are fuel tank, fuel pump assembly (with fuel filter, fuel level gauge, fuel
pressure regulator and tank pressure control valve), fuel/vapor separator fuel feed line and fuel vapor line.
For the details of fuel flow and fuel vapor flow, refer to “GENERAL DESCRIPTION” in Section 6E. WARNING:
For vehicles equipped with Supplemental Restraint (Air Bag) System:
Service on and around the air bag system components or wiring must be performed only by an
authorized SUZUKI dealer. Refer to “Air Bag System Components and Wiring Location View” under
“General Description” in air bag system section in order to confirm whether you are performing ser-
vice on or near the air bag system components or wiring. Please observe all WARNINGS and “Ser-
vice Precautions” under “On-Vehicle Service” in air bag system section before performing service
on or around the air bag system components or wiring. Failure to follow WARNINGS could result in
unintentional activation of the system or could render the system inoperative. Either of these two
conditions may result in severe injury.
Technical service work must be started at least 90 seconds after the ignition switch is turned to the
“LOCK” position and the negative cable is disconnected from the battery. Otherwise, the system
may be activated by reserve energy in the Sensing and Diagnostic Module (SDM).
CAUTION:
The engine of this vehicle requires the use of unleaded fuel only. Use of leaded and/or low lead fuel
can result in engine damage and reduce the effectiveness of the emission control system.
Page 613 of 698

6C-6 ENGINE FUEL
FUEL TANK INLET VALVE
REMOVAL
1) Remove fuel filler cap.
2) Insert hose of a hand operated pump into fuel filler hose (1)
and drain fuel in space “A” in the figure.
3) Hoist vehicle and remove clamp (2) and fuel filler hose (1)
from fuel tank.
4) Remove fuel tank inlet valve (1) using flat-bladed screw-
driver.
INSPECTION
Check fuel tank inlet valve for the followings.
Damage
Smooth opening and closing
If any damage or malfunction is found, replace.WARNING:
Refer to the WARNING at the beginning of ON-VEHICLE
SERVICE in this section.
CAUTION:
Do not force pump hose into fuel tank, or pump hose
may damage fuel tank inlet valve (2).
1
2
CAUTION:
Be careful not to damage fuel tank inlet valve (1) with flat-
bladed screwdriver.