valve SUZUKI SWIFT 2000 1.G RG413 Service Manual PDF
[x] Cancel search | Manufacturer: SUZUKI, Model Year: 2000, Model line: SWIFT, Model: SUZUKI SWIFT 2000 1.GPages: 698, PDF Size: 16.01 MB
Page 478 of 698
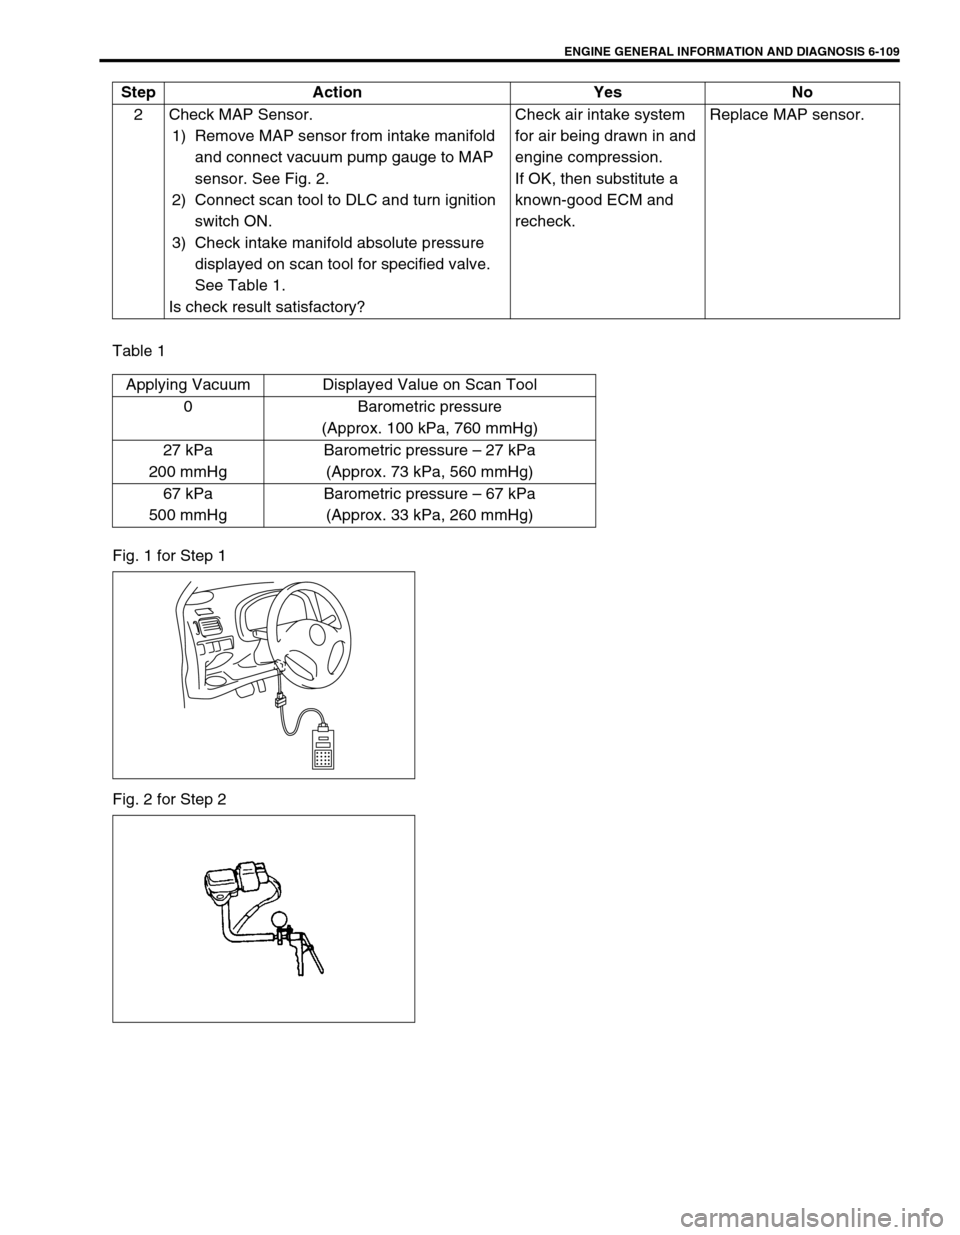
ENGINE GENERAL INFORMATION AND DIAGNOSIS 6-109
Table 1
Fig. 1 for Step 1
Fig. 2 for Step 22 Check MAP Sensor.
1) Remove MAP sensor from intake manifold
and connect vacuum pump gauge to MAP
sensor. See Fig. 2.
2) Connect scan tool to DLC and turn ignition
switch ON.
3) Check intake manifold absolute pressure
displayed on scan tool for specified valve.
See Table 1.
Is check result satisfactory?Check air intake system
for air being drawn in and
engine compression.
If OK, then substitute a
known-good ECM and
recheck.Replace MAP sensor. Step Action Yes No
Applying Vacuum Displayed Value on Scan Tool
0 Barometric pressure
(Approx. 100 kPa, 760 mmHg)
27 kPa
200 mmHgBarometric pressure – 27 kPa
(Approx. 73 kPa, 560 mmHg)
67 kPa
500 mmHgBarometric pressure – 67 kPa
(Approx. 33 kPa, 260 mmHg)
Page 491 of 698
![SUZUKI SWIFT 2000 1.G RG413 Service Manual PDF 6-122 ENGINE GENERAL INFORMATION AND DIAGNOSIS
TABLE B-4 IDLE AIR CONTROL SYSTEM CHECK
INSPECTION
1. IAC valve 2. Main relay 3. To TCM
[A] : Case of TYPE A is shown (See NOTE) [B] : Case of TYPE B is SUZUKI SWIFT 2000 1.G RG413 Service Manual PDF 6-122 ENGINE GENERAL INFORMATION AND DIAGNOSIS
TABLE B-4 IDLE AIR CONTROL SYSTEM CHECK
INSPECTION
1. IAC valve 2. Main relay 3. To TCM
[A] : Case of TYPE A is shown (See NOTE) [B] : Case of TYPE B is](/img/20/7606/w960_7606-490.png)
6-122 ENGINE GENERAL INFORMATION AND DIAGNOSIS
TABLE B-4 IDLE AIR CONTROL SYSTEM CHECK
INSPECTION
1. IAC valve 2. Main relay 3. To TCM
[A] : Case of TYPE A is shown (See NOTE) [B] : Case of TYPE B is shown (See NOTE)
GRN/RED
BLK/YEL
BRN/WHT
BLK/RED
BLK/RED
ECM
C41-10
C41-6
C41-5
C42 (31P) C41 (24P) G02 (17P)1 2 3 4 5 6 7 8 9
10 11 12 13 14 15 16 17 18 19 20 21
22 23 24 25 26 28 27 29 30 315 6
1 2 3 4 5 6 7
11 12
9 10 11 13 12 14 15 16
16 171 2
7 8
13 14 3 4
9 10
15 17 188
19 20 21 22 23 24
3
1
2
C42-6 C41-14 [A]
G02-6 [B]
LT BLU [A]
GRN RED [B]
NOTE:
For TYPE A and TYPE B, refer to NOTE in “ECM VOLTAGE VALUES TABLE” for applicable model.
Step Action Yes No
1 Check engine idle speed and IAC duty referring
to “Idle Speed/IAC Duty Inspection” in Section
6E1.
Is idle speed within specification?Go to Step 2. Go to Step 4.
2 Is IAC duty within specification in Step 1? Go to Step 3. Check for followings :
Vacuum leak
EVAP canister purge con-
trol system
Clog of IAC air passage
Accessory engine load
Closed throttle position
(TP sensor)
Stuck of PCV valve
3 Is engine idle speed kept specified speed even
with headlight ON?System is in good condi-
tion.Check IAC system for
operation referring to Step
2 of DTC P0505 Diag.
Flow Table.
4 Was idle speed higher than specification in
Step 1?Go to Step 5. Go to Step 8.
Page 492 of 698
ENGINE GENERAL INFORMATION AND DIAGNOSIS 6-123
Fig. 1 for Step 105 Check A/C (input) signal circuit referring to Step
1 of Table B-5 A/C Signal Circuit Check, if
equipped. (A/C signal can be also checked by
using SUZUKI scan tool.)
Is it in good condition?Go to Step 6. Repair or replace A/C sig-
nal circuit or A/C system.
6 Check IAC system referring to Step 2 of DTC
P0505 Diag. Flow Table.
Is check result satisfactory?Go to Step 7. Go to Step 3 of DTC
P0505 Diag. Flow Table.
7 Was IAC duty less than about 3% (or more than
about 97% for OFF duty meter) in Step 1 of this
table?Check abnormal air inhal-
ing from air intake system,
PCV valve and EVAP
canister purge control
system.Check TP sensor (closed
throttle position) and ECT
sensor for performance.
If sensors are OK, substi-
tute a known-good ECM.
8 Is SUZUKI scan Tool available? Go to Step 9. Go to Step 10.
9 Check PNP signal (“D” range signal).
1) Connect SUZUKI scan tool to DLC with igni-
tion switch OFF.
2) Turn ignition switch ON and check PNP sig-
nal (“P/N” and “D” range) on display when
shifting selector lever to each range. See
Table 1.
Is check result satisfactory?Go to Step 11. Repair or replace.
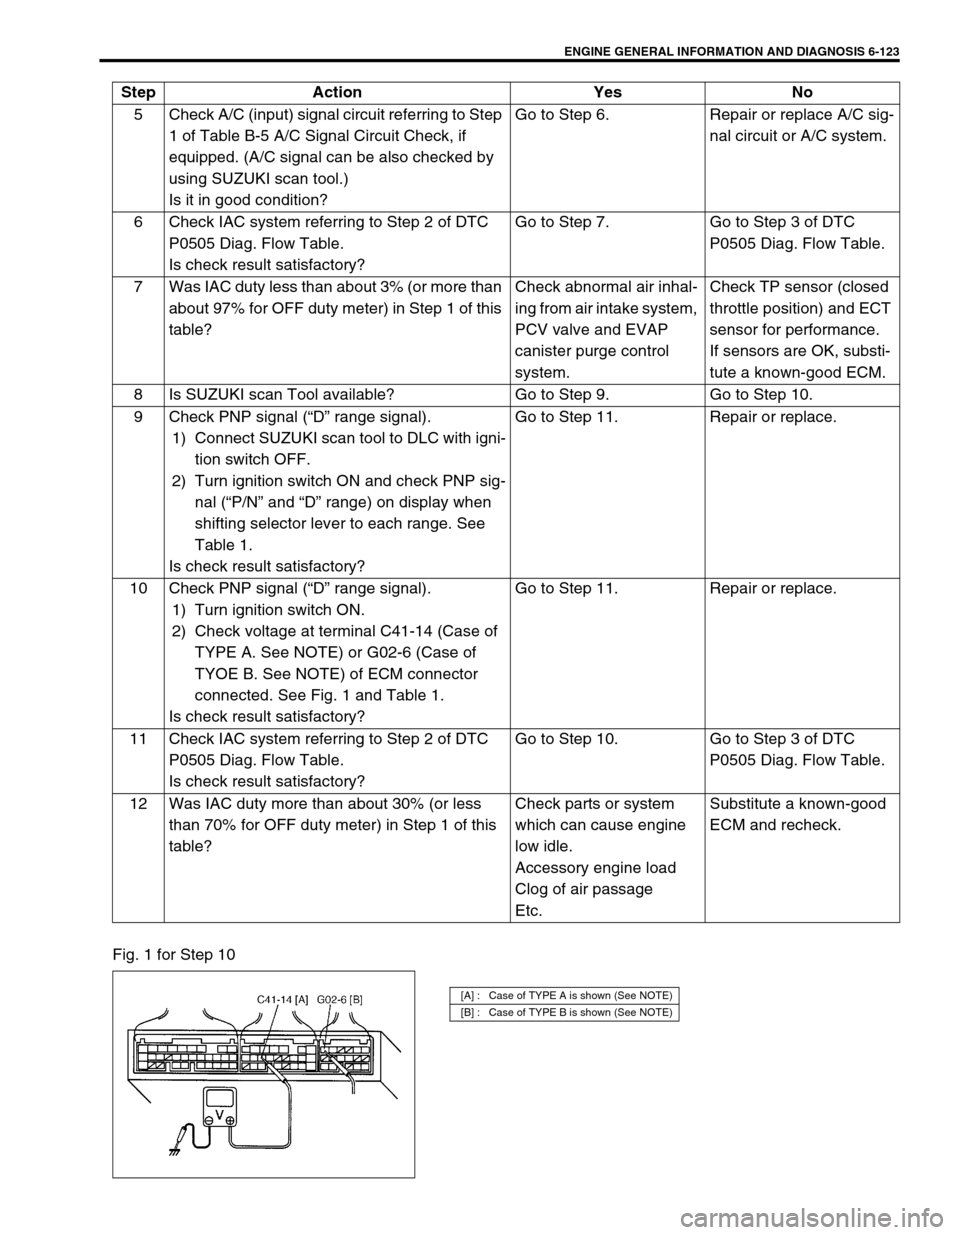
10 Check PNP signal (“D” range signal).
1) Turn ignition switch ON.
2) Check voltage at terminal C41-14 (Case of
TYPE A. See NOTE) or G02-6 (Case of
TYOE B. See NOTE) of ECM connector
connected. See Fig. 1 and Table 1.
Is check result satisfactory?Go to Step 11. Repair or replace.
11 Check IAC system referring to Step 2 of DTC
P0505 Diag. Flow Table.
Is check result satisfactory?Go to Step 10. Go to Step 3 of DTC
P0505 Diag. Flow Table.
12 Was IAC duty more than about 30% (or less
than 70% for OFF duty meter) in Step 1 of this
table?Check parts or system
which can cause engine
low idle.
Accessory engine load
Clog of air passage
Etc.Substitute a known-good
ECM and recheck. Step Action Yes No
[A] : Case of TYPE A is shown (See NOTE)
[B] : Case of TYPE B is shown (See NOTE)
Page 502 of 698
ENGINE MECHANICAL (M13 ENGINE) 6A1-1
6F1
6A1
6G
6H
6K
7A
7A1
7B1
7C1
7D
7E
7F
8A
8B
8C
8D
8E
9
10B
SECTION 6A1
ENGINE MECHANICAL (M13 ENGINE)
CONTENTS
GENERAL DESCRIPTION .............................6A1-2
ENGINE ...................................................... 6A1-2
ENGINE LUBRICATION ............................. 6A1-3
DIAGNOSIS ....................................................6A1-4
DIAGNOSIS TABLE .................................... 6A1-4
COMPRESSION CHECK ............................ 6A1-4
ENGINE VACUUM CHECK ........................ 6A1-6
OIL PRESSURE CHECK ............................ 6A1-7
VALVE LASH (CLEARANCE) ..................... 6A1-9
ON-VEHICLE SERVICE ...............................6A1-12
AIR CLEANER ELEMENT ........................ 6A1-12
AIR CLEANER ASSEMBLY AND
RESONATOR ........................................... 6A1-13
KNOCK SENSOR ..................................... 6A1-13
CYLINDER HEAD COVER ....................... 6A1-13
THROTTLE BODY AND INTAKE
MANIFOLD ................................................ 6A1-16
EXHAUST MANIFOLD .............................. 6A1-19OIL PAN AND OIL PUMP STRAINER ...... 6A1-21
TIMING CHAIN COVER ........................... 6A1-25
OIL PUMP ................................................. 6A1-30
TIMING CHAIN AND CHAIN
TENSIONER ............................................. 6A1-34
CAMSHAFT, TAPPET AND SHIM............ 6A1-39
VALVES AND CYLINDER HEAD ............. 6A1-44
PISTONS, PISTON RINGS,
CONNECTING RODS AND
CYLINDERS ............................................. 6A1-57
ENGINE MOUNTINGS ............................. 6A1-67
UNIT REPAIR OVERHAUL .......................... 6A1-68
ENGINE ASSEMBLY ................................ 6A1-68
MAIN BEARINGS, CRANKSHAFT AND
CYLINDER BLOCK................................... 6A1-73
REQUIRED SERVICE MATERIAL............... 6A1-85
TIGHTENING TORQUE SPECIFICATION... 6A1-86
SPECIAL TOOL ........................................... 6A1-87
WARNING:
For vehicles equipped with Supplemental Restraint (Air Bag) System :
Service on and around the air bag system components or wiring must be performed only by an
authorized SUZUKI dealer. Refer to “Air Bag System Components and Wiring Location View” under
“General Description” in air bag system section in order to confirm whether you are performing ser-
vice on or near the air bag system components or wiring. Please observe all WARNINGS and “Ser-
vice Precautions” under “On-Vehicle Service” in air bag system section before performing service
on or around the air bag system components or wiring. Failure to follow WARNINGS could result in
unintentional activation of the system or could render the system inoperative. Either of these two
conditions may result in severe injury.
Technical service work must be started at least 90 seconds after the ignition switch is turned to the
“LOCK” position and the negative cable is disconnected from the battery. Otherwise, the system
may be activated by reserve energy in the Sensing and Diagnostic Module (SDM).
Page 503 of 698
6A1-2 ENGINE MECHANICAL (M13 ENGINE)
GENERAL DESCRIPTION
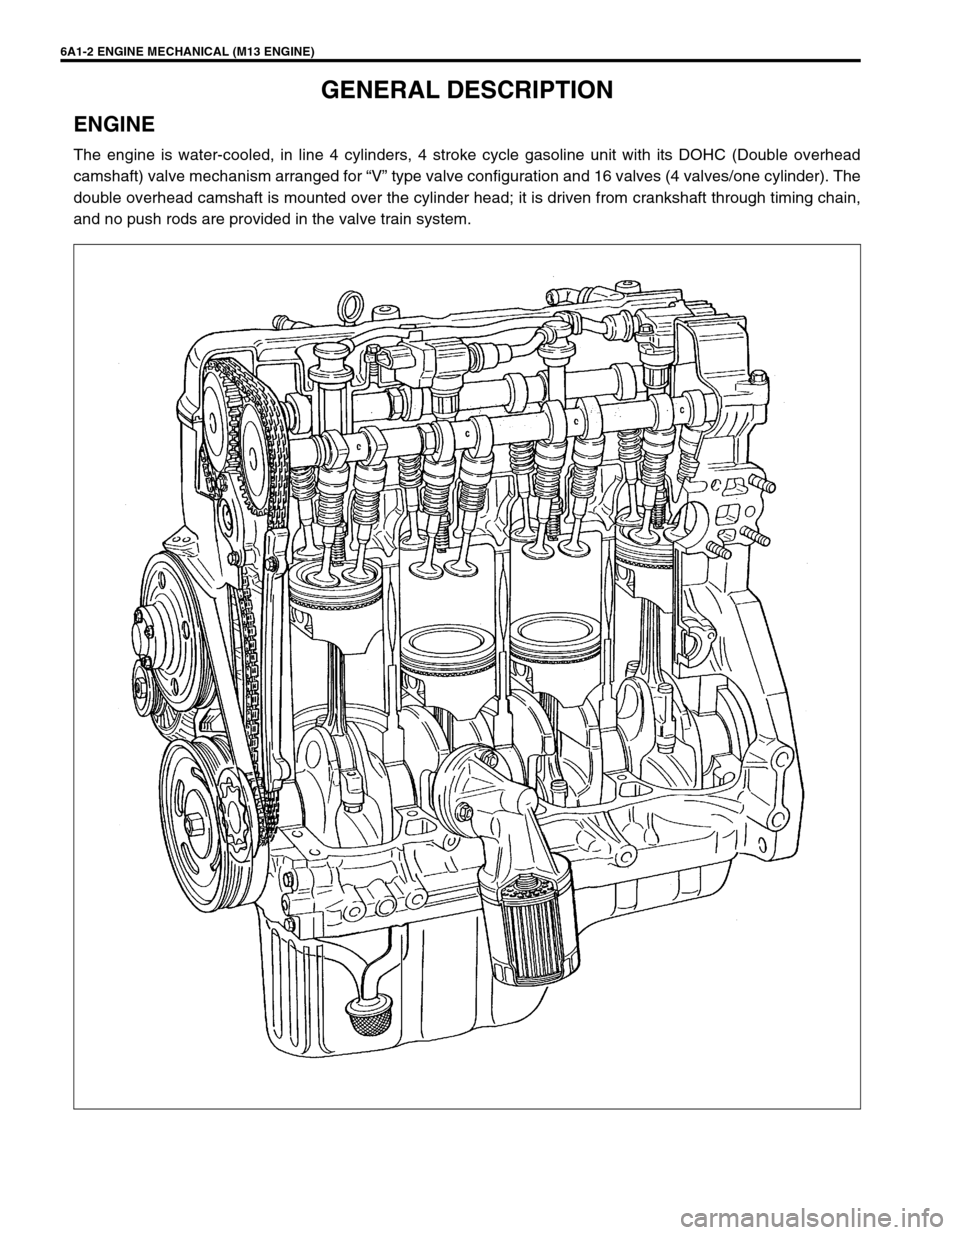
ENGINE
The engine is water-cooled, in line 4 cylinders, 4 stroke cycle gasoline unit with its DOHC (Double overhead
camshaft) valve mechanism arranged for “V” type valve configuration and 16 valves (4 valves/one cylinder). The
double overhead camshaft is mounted over the cylinder head; it is driven from crankshaft through timing chain,
and no push rods are provided in the valve train system.
Page 504 of 698
ENGINE MECHANICAL (M13 ENGINE) 6A1-3
ENGINE LUBRICATION
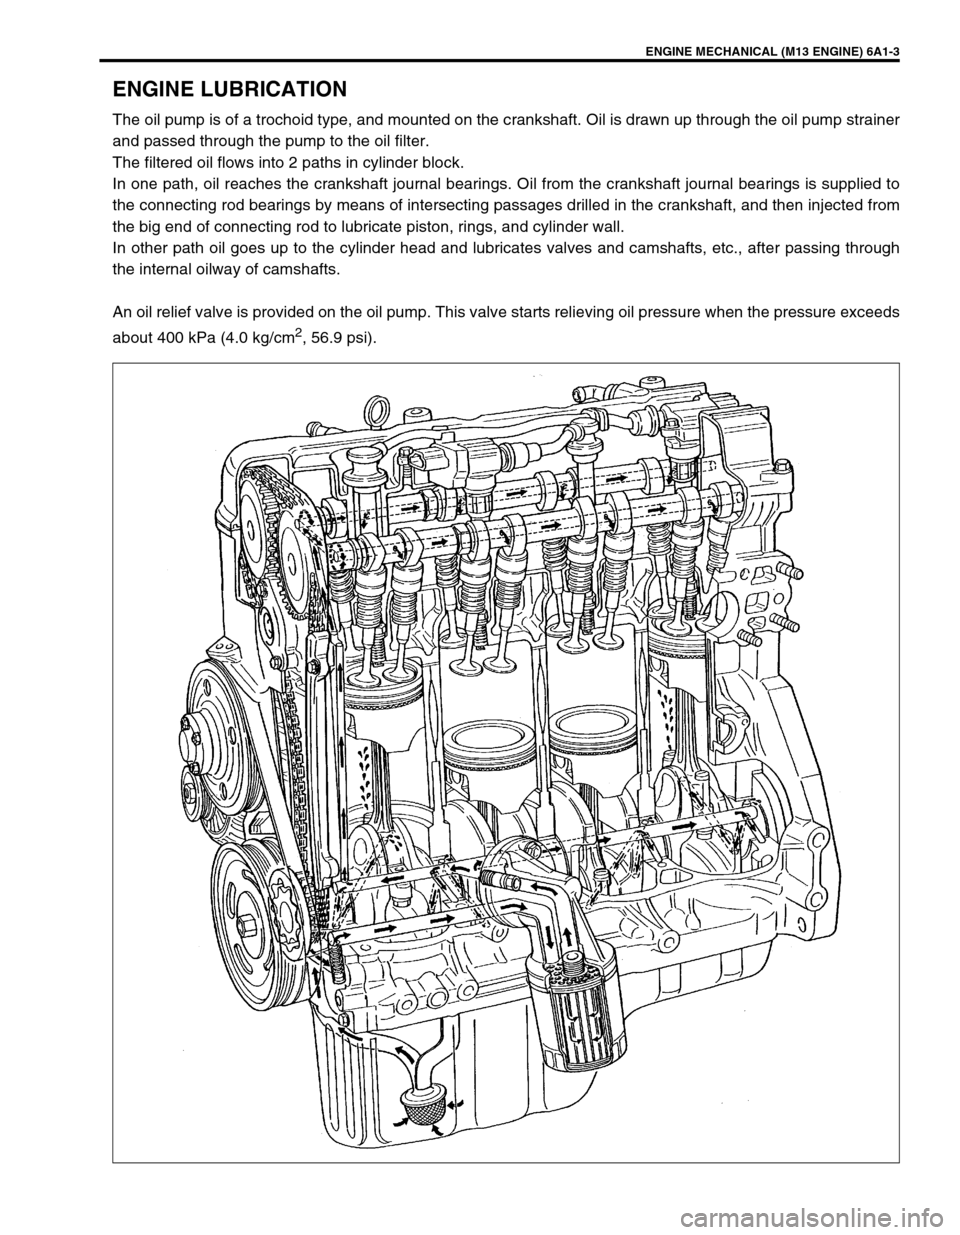
The oil pump is of a trochoid type, and mounted on the crankshaft. Oil is drawn up through the oil pump strainer
and passed through the pump to the oil filter.
The filtered oil flows into 2 paths in cylinder block.
In one path, oil reaches the crankshaft journal bearings. Oil from the crankshaft journal bearings is supplied to
the connecting rod bearings by means of intersecting passages drilled in the crankshaft, and then injected from
the big end of connecting rod to lubricate piston, rings, and cylinder wall.
In other path oil goes up to the cylinder head and lubricates valves and camshafts, etc., after passing through
the internal oilway of camshafts.
An oil relief valve is provided on the oil pump. This valve starts relieving oil pressure when the pressure exceeds
about 400 kPa (4.0 kg/cm
2, 56.9 psi).
Page 506 of 698
ENGINE MECHANICAL (M13 ENGINE) 6A1-5
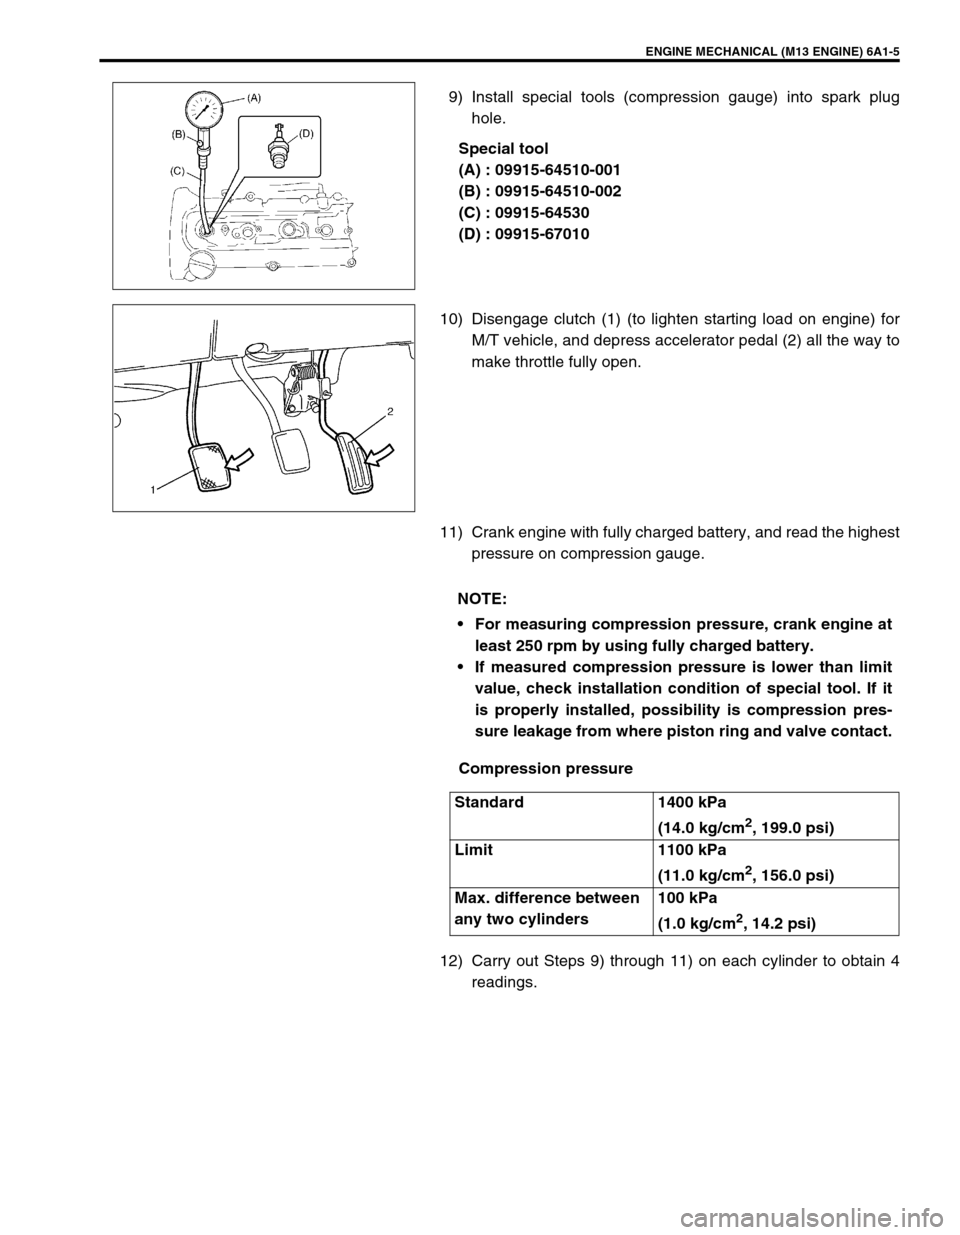
9) Install special tools (compression gauge) into spark plug
hole.
Special tool
(A) : 09915-64510-001
(B) : 09915-64510-002
(C) : 09915-64530
(D) : 09915-67010
10) Disengage clutch (1) (to lighten starting load on engine) for
M/T vehicle, and depress accelerator pedal (2) all the way to
make throttle fully open.
11) Crank engine with fully charged battery, and read the highest
pressure on compression gauge.
Compression pressure
12) Carry out Steps 9) through 11) on each cylinder to obtain 4
readings.
NOTE:
For measuring compression pressure, crank engine at
least 250 rpm by using fully charged battery.
If measured compression pressure is lower than limit
value, check installation condition of special tool. If it
is properly installed, possibility is compression pres-
sure leakage from where piston ring and valve contact.
Standard 1400 kPa
(14.0 kg/cm
2, 199.0 psi)
Limit 1100 kPa
(11.0 kg/cm
2, 156.0 psi)
Max. difference between
any two cylinders100 kPa
(1.0 kg/cm
2, 14.2 psi)
Page 510 of 698
ENGINE MECHANICAL (M13 ENGINE) 6A1-9
VALVE LASH (CLEARANCE)
INSPECTION
1) Remove negative cable at battery.
2) Remove cylinder head cover referring to “CYLINDER HEAD
COVER”.
3) Remove right side engine cover if necessary.
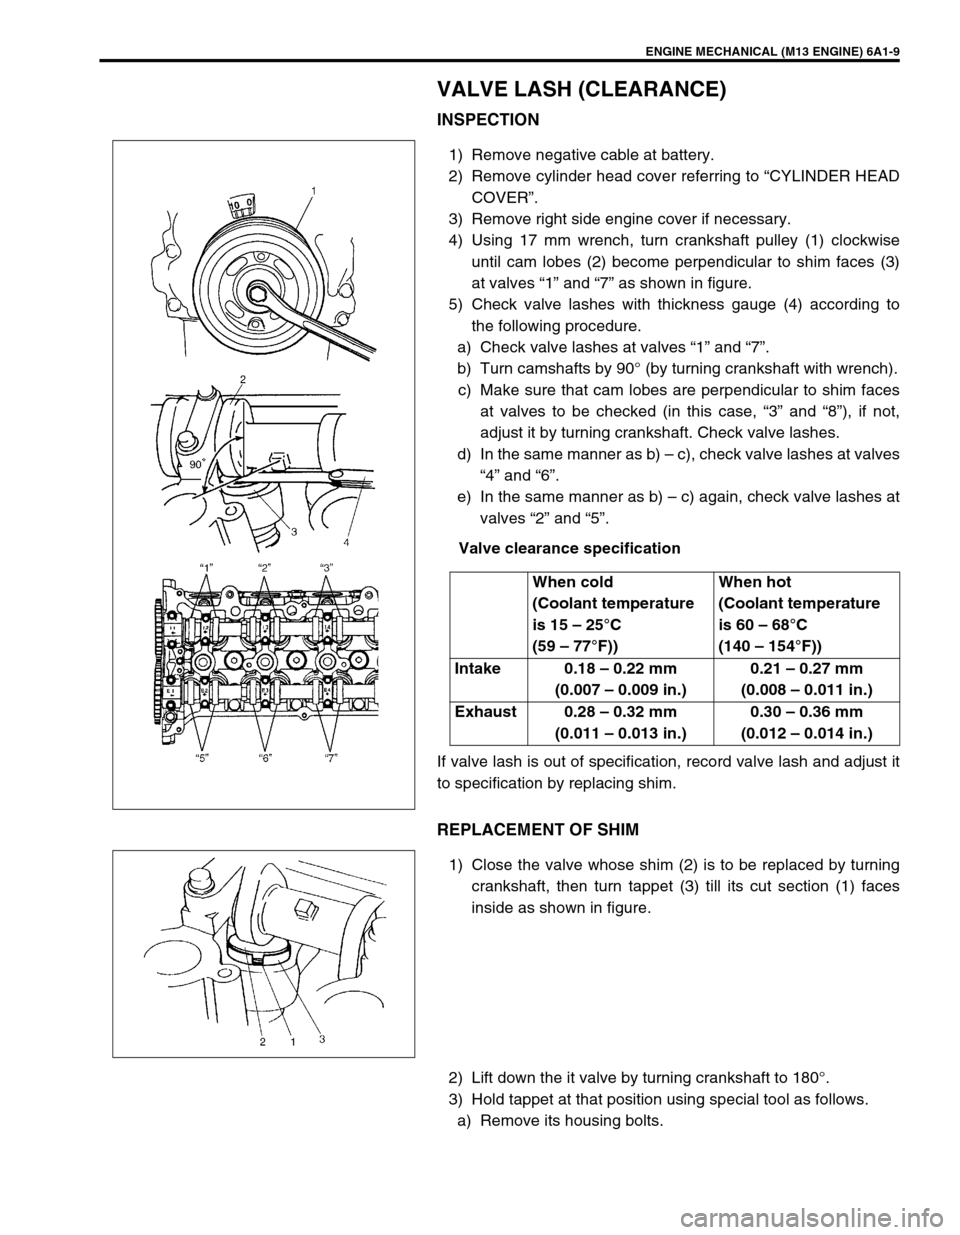
4) Using 17 mm wrench, turn crankshaft pulley (1) clockwise
until cam lobes (2) become perpendicular to shim faces (3)
at valves “1” and “7” as shown in figure.
5) Check valve lashes with thickness gauge (4) according to
the following procedure.
a) Check valve lashes at valves “1” and “7”.
b) Turn camshafts by 90° (by turning crankshaft with wrench).
c) Make sure that cam lobes are perpendicular to shim faces
at valves to be checked (in this case, “3” and “8”), if not,
adjust it by turning crankshaft. Check valve lashes.
d) In the same manner as b) – c), check valve lashes at valves
“4” and “6”.
e) In the same manner as b) – c) again, check valve lashes at
valves “2” and “5”.
Valve clearance specification
If valve lash is out of specification, record valve lash and adjust it
to specification by replacing shim.
REPLACEMENT OF SHIM
1) Close the valve whose shim (2) is to be replaced by turning
crankshaft, then turn tappet (3) till its cut section (1) faces
inside as shown in figure.
2) Lift down the it valve by turning crankshaft to 180°.
3) Hold tappet at that position using special tool as follows.
a) Remove its housing bolts.When cold
(Coolant temperature
is 15 – 25°C
(59 – 77°F))When hot
(Coolant temperature
is 60 – 68°C
(140 – 154°F))
Intake 0.18 – 0.22 mm
(0.007 – 0.009 in.)0.21 – 0.27 mm
(0.008 – 0.011 in.)
Exhaust 0.28 – 0.32 mm
(0.011 – 0.013 in.)0.30 – 0.36 mm
(0.012 – 0.014 in.)
Page 511 of 698
6A1-10 ENGINE MECHANICAL (M13 ENGINE)
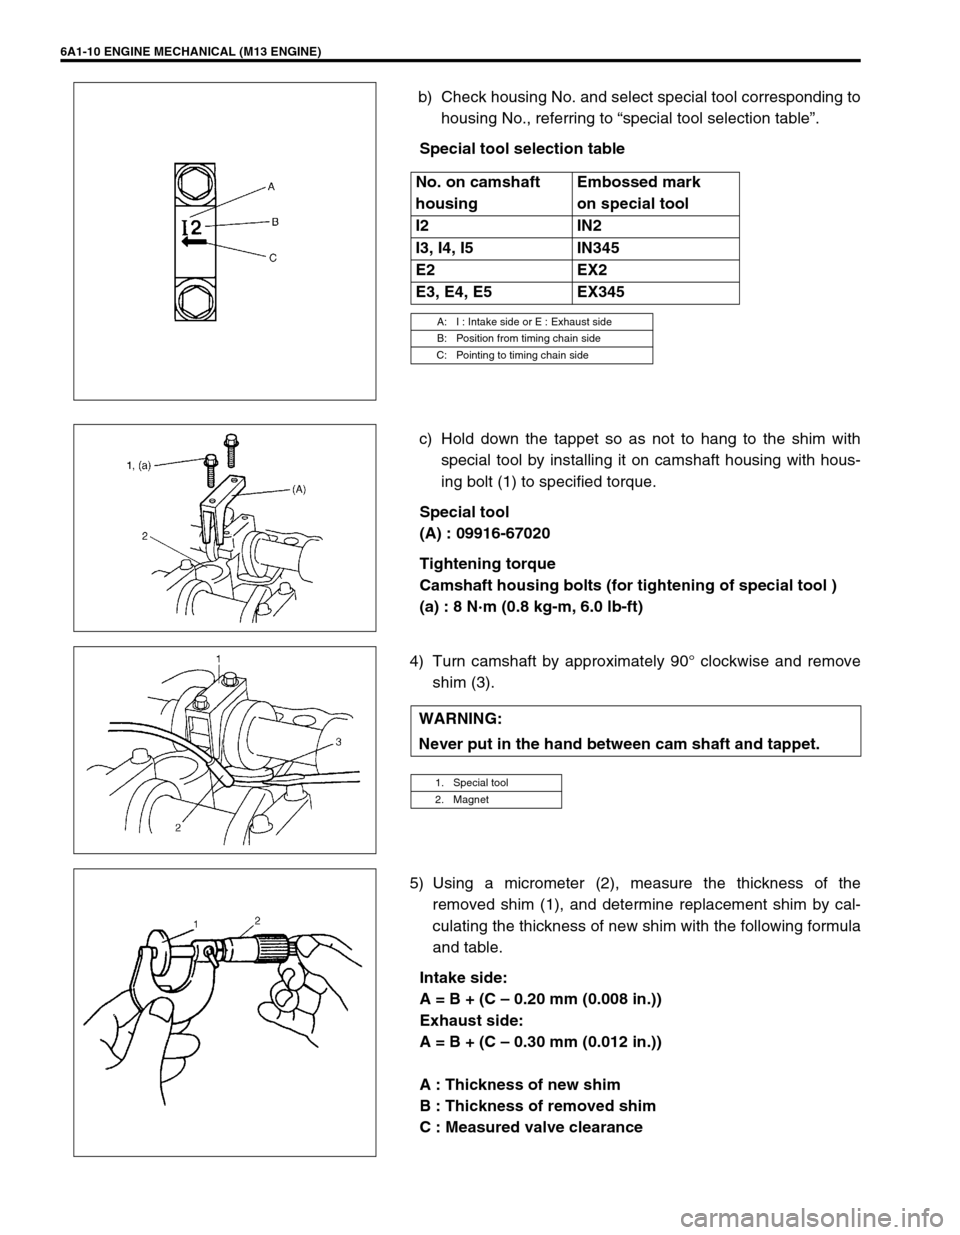
b) Check housing No. and select special tool corresponding to
housing No., referring to “special tool selection table”.
Special tool selection table
c) Hold down the tappet so as not to hang to the shim with
special tool by installing it on camshaft housing with hous-
ing bolt (1) to specified torque.
Special tool
(A) : 09916-67020
Tightening torque
Camshaft housing bolts (for tightening of special tool )
(a) : 8 N·m (0.8 kg-m, 6.0 lb-ft)
4) Turn camshaft by approximately 90° clockwise and remove
shim (3).
5) Using a micrometer (2), measure the thickness of the
removed shim (1), and determine replacement shim by cal-
culating the thickness of new shim with the following formula
and table.
Intake side:
A = B + (C – 0.20 mm (0.008 in.))
Exhaust side:
A = B + (C – 0.30 mm (0.012 in.))
A : Thickness of new shim
B : Thickness of removed shim
C : Measured valve clearance No. on camshaft
housingEmbossed mark
on special tool
I2 IN2
I3, I4, I5 IN345
E2 EX2
E3, E4, E5 EX345
A: I : Intake side or E : Exhaust side
B: Position from timing chain side
C: Pointing to timing chain side
WARNING:
Never put in the hand between cam shaft and tappet.
1. Special tool
2. Magnet
Page 512 of 698
ENGINE MECHANICAL (M13 ENGINE) 6A1-11
For example of intake side :
When thickness of removed shim is 2.40 mm (0.095 in.), and
measured valve clearance is 0.45 mm (0.018 in.).
A = 2.40 mm (0.094 in.) + (0.45 mm (0.018 in.) – 0.20 mm (0.008
in.)) = 2.65 mm (0.104 in.)
Calculated thickness of new shim = 2.65 mm (0.104 in.)
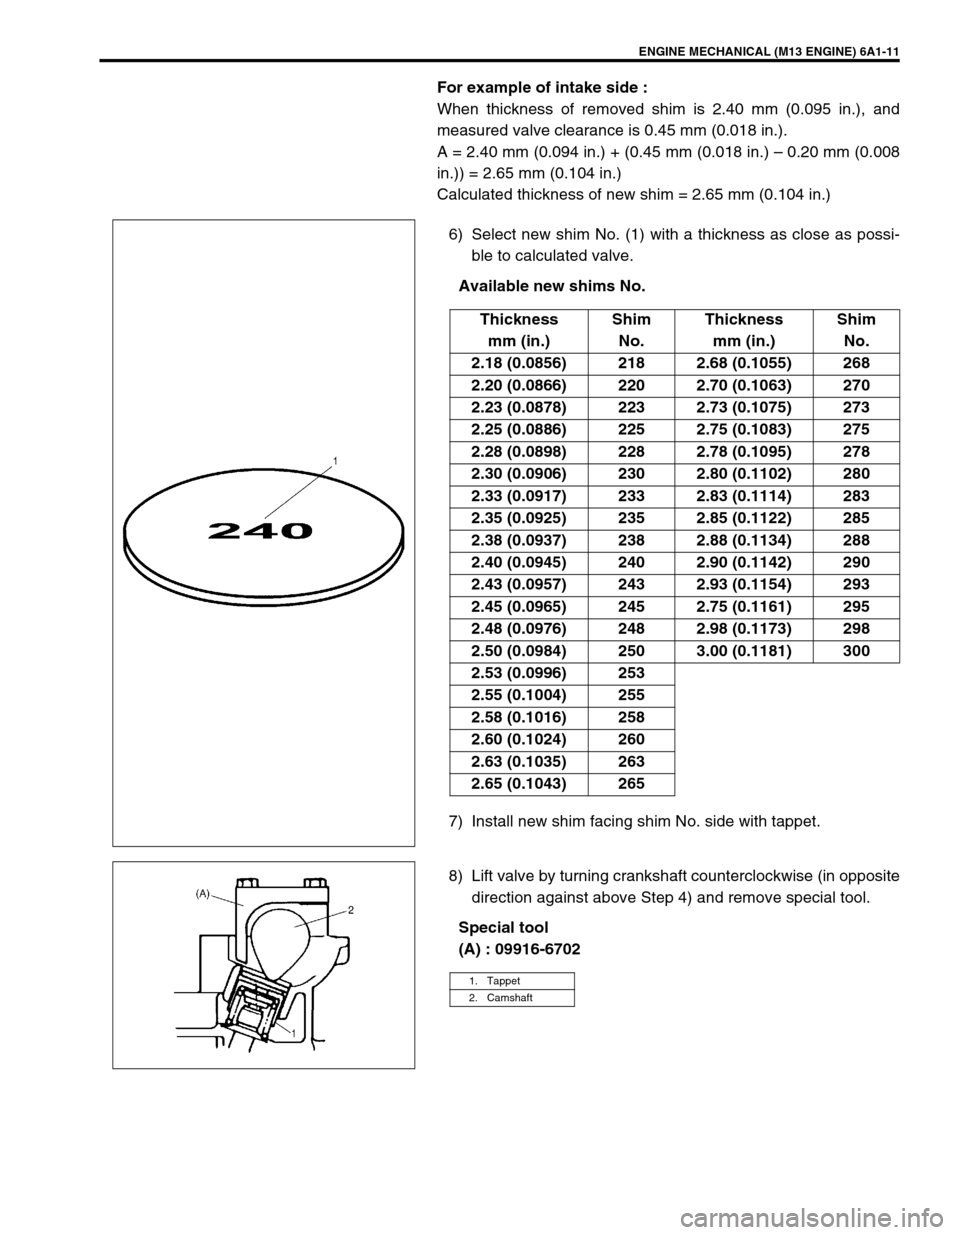
6) Select new shim No. (1) with a thickness as close as possi-
ble to calculated valve.
Available new shims No.
7) Install new shim facing shim No. side with tappet.
8) Lift valve by turning crankshaft counterclockwise (in opposite
direction against above Step 4) and remove special tool.
Special tool
(A) : 09916-6702Thickness
mm (in.)Shim
No.Thickness
mm (in.)Shim
No.
2.18 (0.0856) 218 2.68 (0.1055) 268
2.20 (0.0866) 220 2.70 (0.1063) 270
2.23 (0.0878) 223 2.73 (0.1075) 273
2.25 (0.0886) 225 2.75 (0.1083) 275
2.28 (0.0898) 228 2.78 (0.1095) 278
2.30 (0.0906) 230 2.80 (0.1102) 280
2.33 (0.0917) 233 2.83 (0.1114) 283
2.35 (0.0925) 235 2.85 (0.1122) 285
2.38 (0.0937) 238 2.88 (0.1134) 288
2.40 (0.0945) 240 2.90 (0.1142) 290
2.43 (0.0957) 243 2.93 (0.1154) 293
2.45 (0.0965) 245 2.75 (0.1161) 295
2.48 (0.0976) 248 2.98 (0.1173) 298
2.50 (0.0984) 250 3.00 (0.1181) 300
2.53 (0.0996) 253
2.55 (0.1004) 255
2.58 (0.1016) 258
2.60 (0.1024) 260
2.63 (0.1035) 263
2.65 (0.1043) 265
1. Tappet
2. Camshaft