rear brake SUZUKI SWIFT 2000 1.G RG413 Service User Guide
[x] Cancel search | Manufacturer: SUZUKI, Model Year: 2000, Model line: SWIFT, Model: SUZUKI SWIFT 2000 1.GPages: 698, PDF Size: 16.01 MB
Page 221 of 698

3E-8 REAR SUSPENSION
3) Remove lateral rod right side bolt (1) and nut (2).
4) Detach lateral rod right side from vehicle body.
5) Remove brake flexible hose E-ring (1).
6) Remove LSPV adjust nut and detach spring end from rear
axle (2WD vehicle) or axle housing (4WD vehicle) (if
equipped with LSPV).
7) Remove shock absorber lower bolt (1).
8) Detach shock absorber lower side from rear axle (2WD vehi-
cle) or rear axle housing (4WD vehicle).
9) Lower rear axle (1) (2WD vehicle) or rear axle housing (4WD
vehicle) gradually as far down as where coil springs (2) can
be removed.
10) Remove coil spring.
CAUTION:
Be careful not to let rear axle (2WD vehicle) or rear axle
housing (4WD vehicle) down too much.
It may cause damage to brake flexible hose.
Page 222 of 698

REAR SUSPENSION 3E-9
INSTALLATION
1) Install coil springs (1) (right & left) on spring seat (2) of rear
axle (2WD vehicle) or rear axle housing (4WD vehicle) and
raise rear axle (2WD vehicle) or rear axle housing (4WD
vehicle).
2) Install shock absorber (1) lower side to rear axle (2WD vehi-
cle) or rear axle housing (4WD vehicle).
Tighten shock absorber lower bolt (2) temporarily at this
step.
3) Remove floor jack from rear axle (2WD vehicle) or axle
housing (4WD vehicle).
4) Install brake flexible hose E-ring.
5) Install LSPV spring to rear axle (2WD vehicle) or axle hous-
ing (4WD vehicle). Tighten LSPV adjust nut temporarily at
this step (if equipped with LSPV).
6) Install lateral rod (1) right side to vehicle body, refer to the
figure for proper installing direction of bolt (2).
Tighten nut (3) temporarily at this step.
7) Remove floor jack from rear axle (2WD vehicle) or rear axle
housing (4WD vehicle).
8) Install wheel (1) and tighten wheel nuts (2) to specified
torque.
Tightening torque
Wheel nuts (a) : 85 N·m (8.5 kg-m, 61.5 lb-ft) NOTE:
Upper and lower diameters of coil spring are different.
Bring larger diameter end at bottom and set its open end
in place on spring seat.
A : Upper side
A : Forward
Page 225 of 698
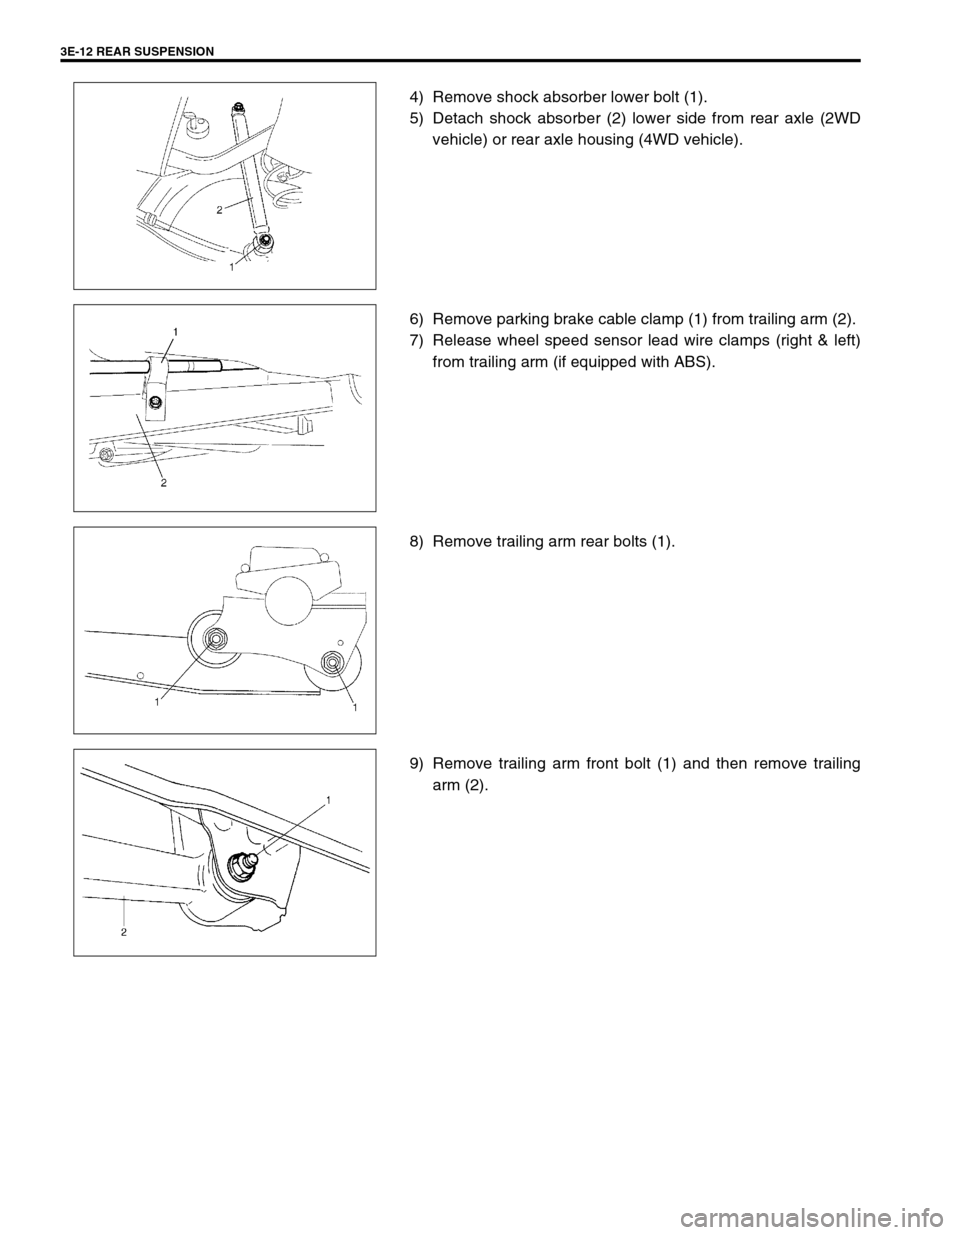
3E-12 REAR SUSPENSION
4) Remove shock absorber lower bolt (1).
5) Detach shock absorber (2) lower side from rear axle (2WD
vehicle) or rear axle housing (4WD vehicle).
6) Remove parking brake cable clamp (1) from trailing arm (2).
7) Release wheel speed sensor lead wire clamps (right & left)
from trailing arm (if equipped with ABS).
8) Remove trailing arm rear bolts (1).
9) Remove trailing arm front bolt (1) and then remove trailing
arm (2).
Page 226 of 698
REAR SUSPENSION 3E-13
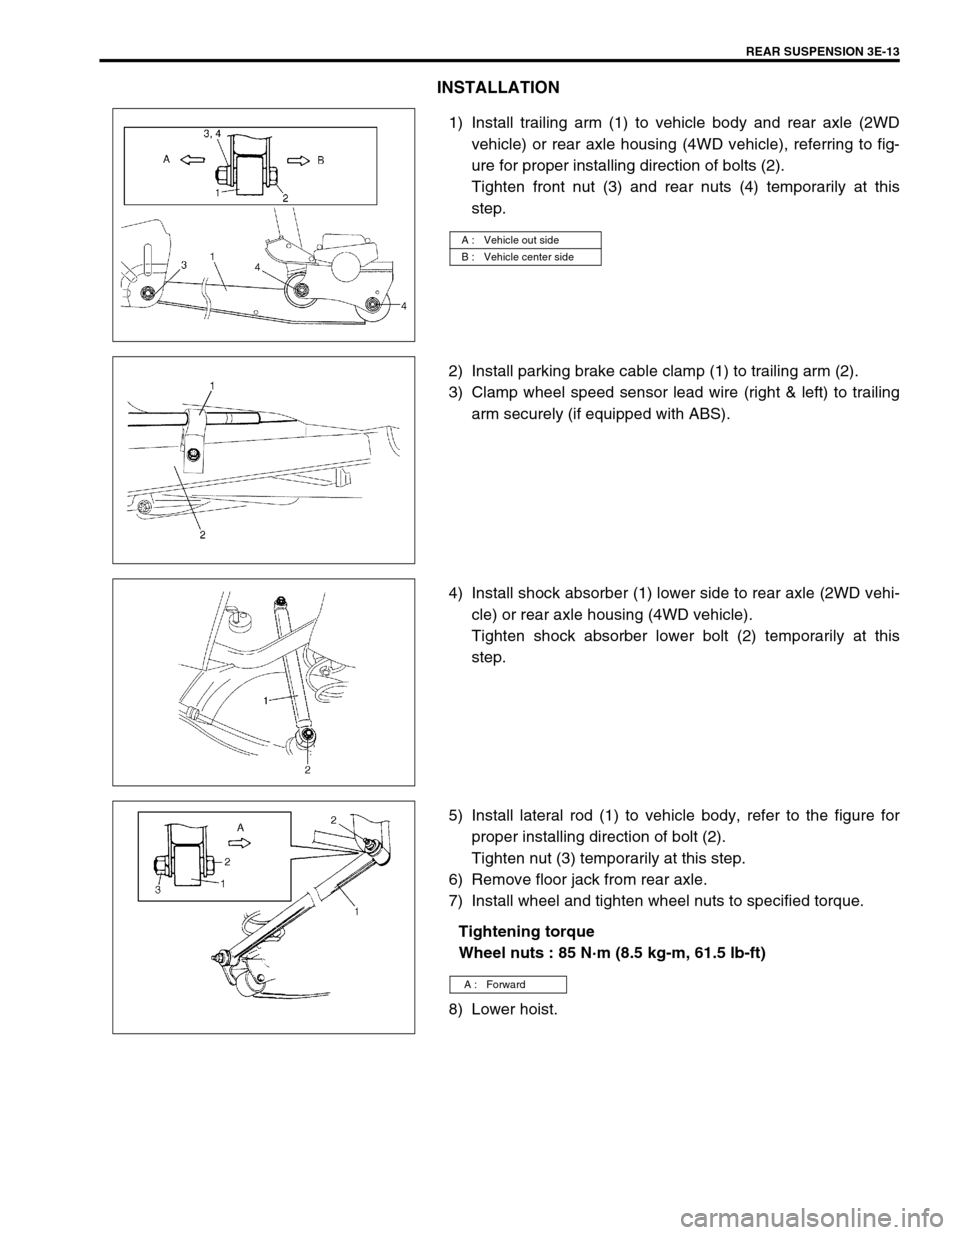
INSTALLATION
1) Install trailing arm (1) to vehicle body and rear axle (2WD
vehicle) or rear axle housing (4WD vehicle), referring to fig-
ure for proper installing direction of bolts (2).
Tighten front nut (3) and rear nuts (4) temporarily at this
step.
2) Install parking brake cable clamp (1) to trailing arm (2).
3) Clamp wheel speed sensor lead wire (right & left) to trailing
arm securely (if equipped with ABS).
4) Install shock absorber (1) lower side to rear axle (2WD vehi-
cle) or rear axle housing (4WD vehicle).
Tighten shock absorber lower bolt (2) temporarily at this
step.
5) Install lateral rod (1) to vehicle body, refer to the figure for
proper installing direction of bolt (2).
Tighten nut (3) temporarily at this step.
6) Remove floor jack from rear axle.
7) Install wheel and tighten wheel nuts to specified torque.
Tightening torque
Wheel nuts : 85 N·m (8.5 kg-m, 61.5 lb-ft)
8) Lower hoist.
A : Vehicle out side
B : Vehicle center side
A : Forward
Page 227 of 698
3E-14 REAR SUSPENSION
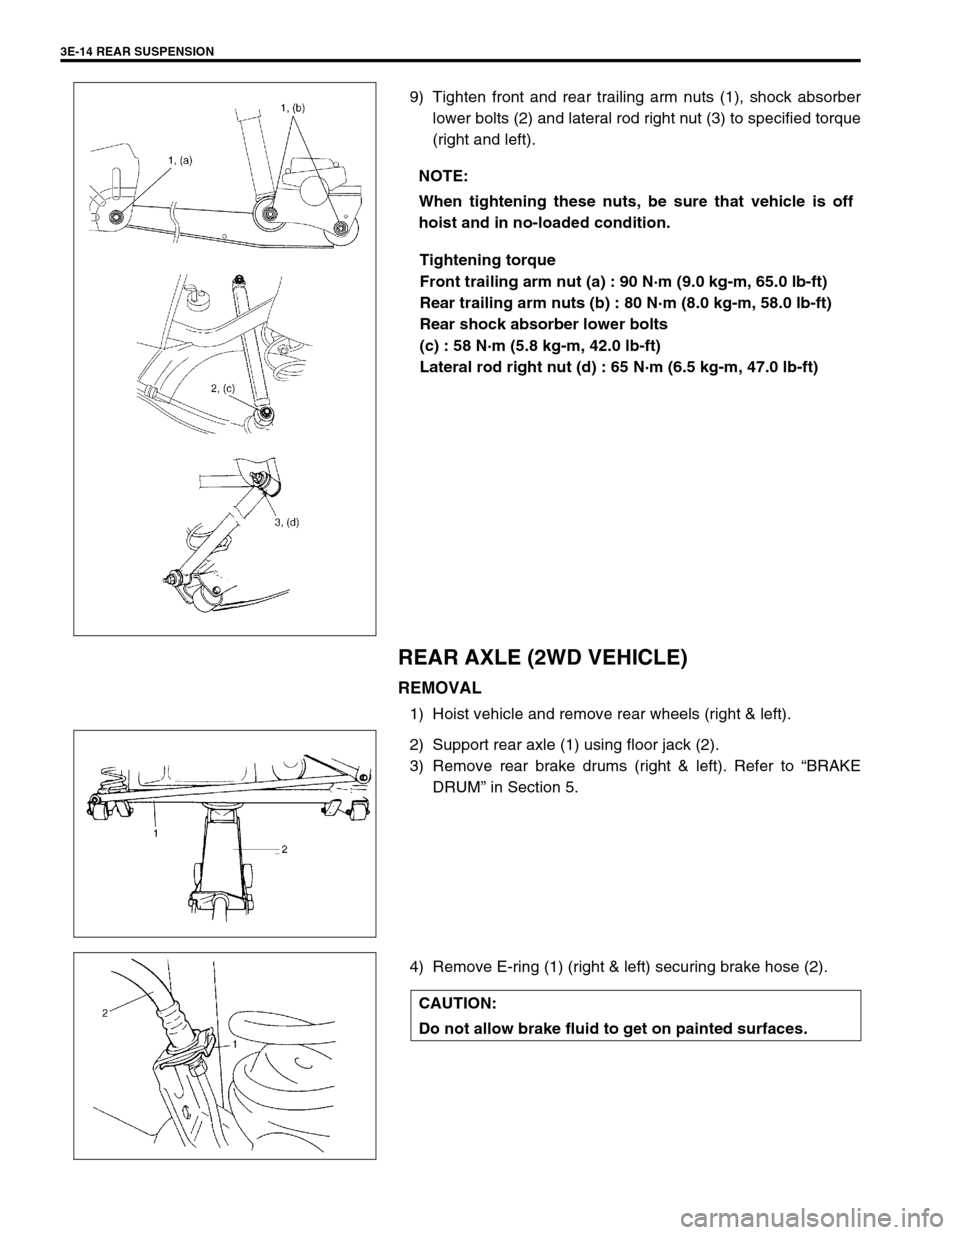
9) Tighten front and rear trailing arm nuts (1), shock absorber
lower bolts (2) and lateral rod right nut (3) to specified torque
(right and left).
Tightening torque
Front trailing arm nut (a) : 90 N·m (9.0 kg-m, 65.0 lb-ft)
Rear trailing arm nuts (b) : 80 N·m (8.0 kg-m, 58.0 lb-ft)
Rear shock absorber lower bolts
(c) : 58 N·m (5.8 kg-m, 42.0 lb-ft)
Lateral rod right nut (d) : 65 N·m (6.5 kg-m, 47.0 lb-ft)
REAR AXLE (2WD VEHICLE)
REMOVAL
1) Hoist vehicle and remove rear wheels (right & left).
2) Support rear axle (1) using floor jack (2).
3) Remove rear brake drums (right & left). Refer to “BRAKE
DRUM” in Section 5.
4) Remove E-ring (1) (right & left) securing brake hose (2).NOTE:
When tightening these nuts, be sure that vehicle is off
hoist and in no-loaded condition.
CAUTION:
Do not allow brake fluid to get on painted surfaces.
Page 228 of 698
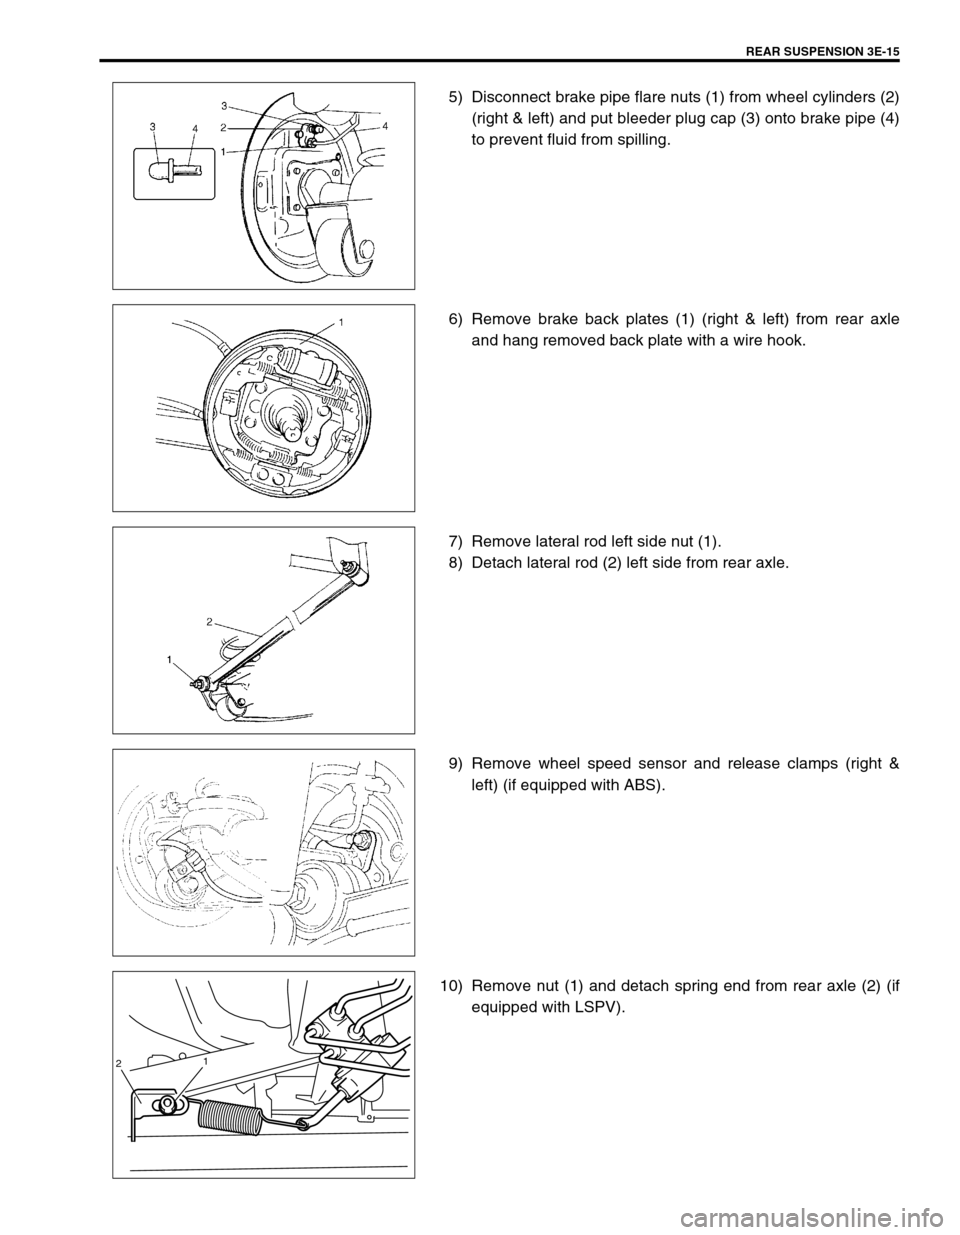
REAR SUSPENSION 3E-15
5) Disconnect brake pipe flare nuts (1) from wheel cylinders (2)
(right & left) and put bleeder plug cap (3) onto brake pipe (4)
to prevent fluid from spilling.
6) Remove brake back plates (1) (right & left) from rear axle
and hang removed back plate with a wire hook.
7) Remove lateral rod left side nut (1).
8) Detach lateral rod (2) left side from rear axle.
9) Remove wheel speed sensor and release clamps (right &
left) (if equipped with ABS).
10) Remove nut (1) and detach spring end from rear axle (2) (if
equipped with LSPV).
21
Page 230 of 698

REAR SUSPENSION 3E-17
2) Install trailing arms (1) (right & left) to rear axle in proper
direction as shown in figure.
Tighten rear trailing arm nuts (2) temporarily at this step.
3) Install coil springs (1) (right & left) on spring seat (2) of rear
axle and raise rear axle.
4) Install shock absorber (1) lower sides (right & left) to rear
axle.
Tighten shock absorber lower bolts (2) temporarily at this
step.
5) Remove floor jack from rear axle.
6) Clean mating surfaces (right and left) of rear axle with brake
back plate and apply water tight sealant as shown in figure.
“A” : Sealant 99000-31090
7) Install brake back plates (1) (right and left) and tighten back
plate bolts (2) to specified torque.
Tightening torque
Brake back plate bolts (a) : 23 N·m (2.3 kg-m, 17.0 lb-ft)
A : Vehicle outside
B : Vehicle center side
NOTE:
Upper and lower diameters of coil spring are different.
Bring larger diameter end at bottom and set its open end
in place on spring seat.
A : Upper side
Page 231 of 698
3E-18 REAR SUSPENSION
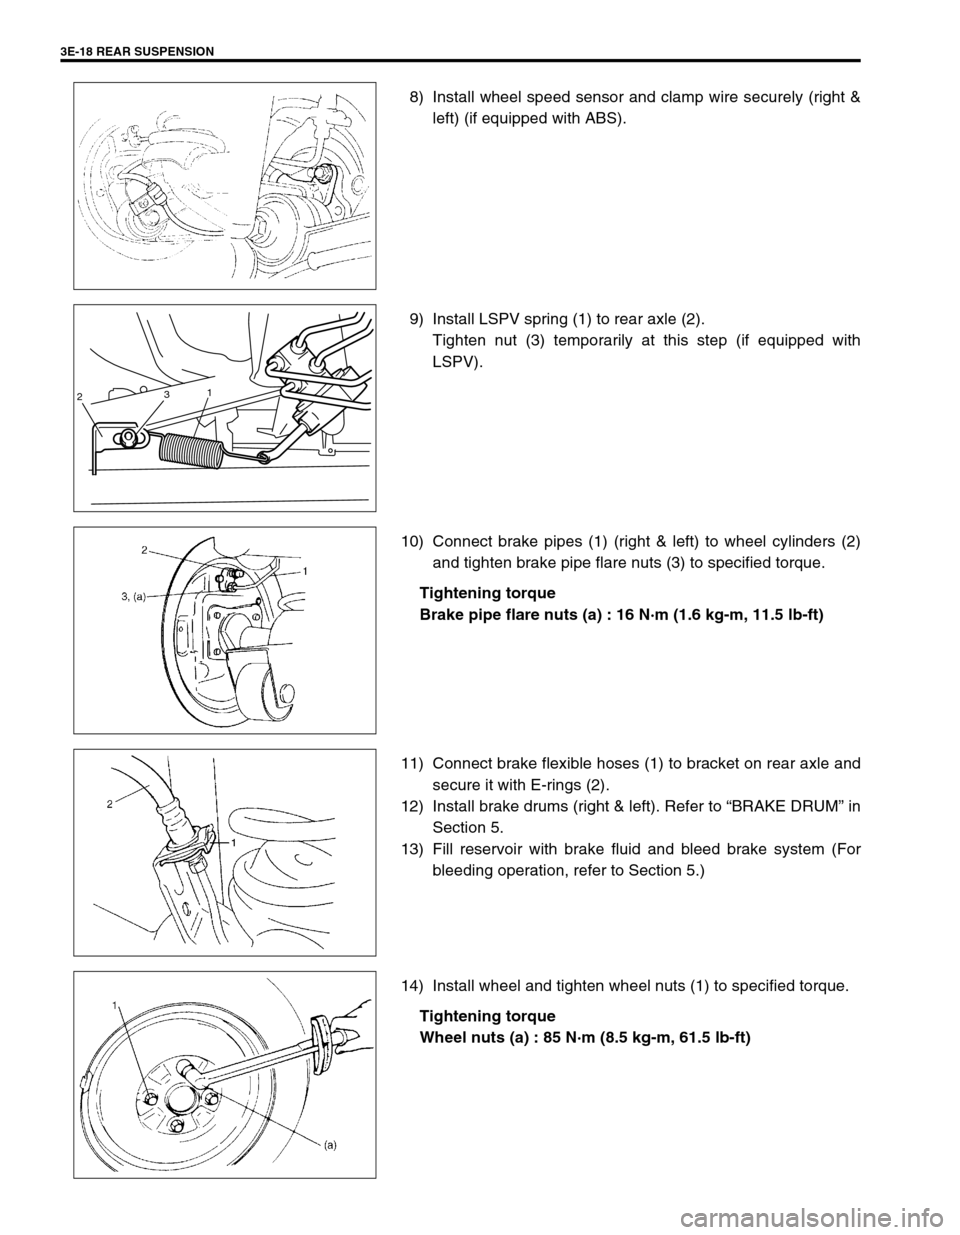
8) Install wheel speed sensor and clamp wire securely (right &
left) (if equipped with ABS).
9) Install LSPV spring (1) to rear axle (2).
Tighten nut (3) temporarily at this step (if equipped with
LSPV).
10) Connect brake pipes (1) (right & left) to wheel cylinders (2)
and tighten brake pipe flare nuts (3) to specified torque.
Tightening torque
Brake pipe flare nuts (a) : 16 N·m (1.6 kg-m, 11.5 lb-ft)
11) Connect brake flexible hoses (1) to bracket on rear axle and
secure it with E-rings (2).
12) Install brake drums (right & left). Refer to “BRAKE DRUM” in
Section 5.
13) Fill reservoir with brake fluid and bleed brake system (For
bleeding operation, refer to Section 5.)
14) Install wheel and tighten wheel nuts (1) to specified torque.
Tightening torque
Wheel nuts (a) : 85 N·m (8.5 kg-m, 61.5 lb-ft)
231
Page 232 of 698
REAR SUSPENSION 3E-19
15) Upon completion of all jobs, depress brake pedal with about
30 kg (66 Ibs) load three to five times so as to obtain proper
drum-to-shoe clearance.
Adjust parking brake cable. Refer to Section 5.
16) Install console box.
17) Lower hoist and bounce vehicle up and down several times
to stabilize suspension.
Be sure that vehicle is off hoist and in non loaded condition.
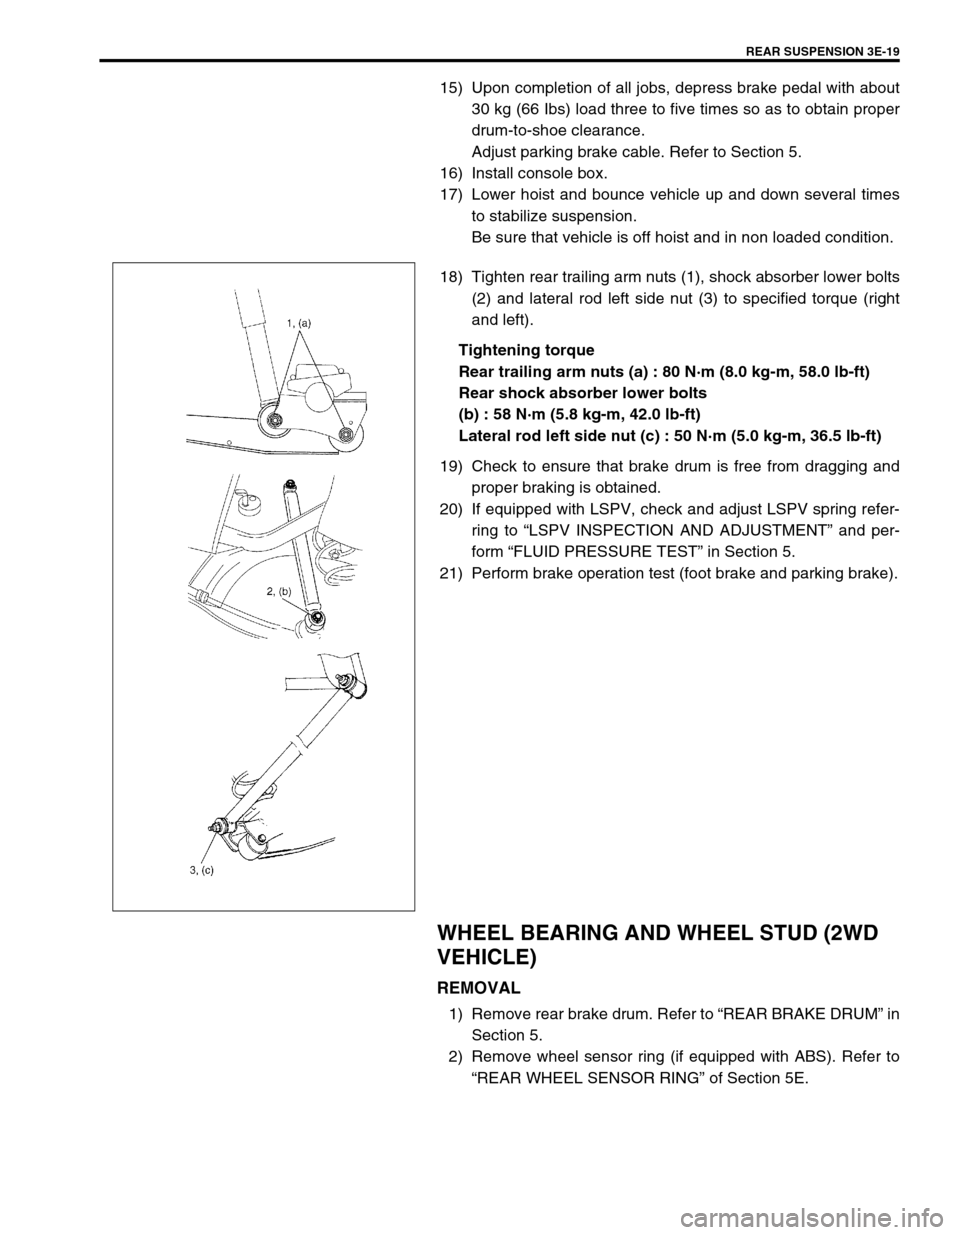
18) Tighten rear trailing arm nuts (1), shock absorber lower bolts
(2) and lateral rod left side nut (3) to specified torque (right
and left).
Tightening torque
Rear trailing arm nuts (a) : 80 N·m (8.0 kg-m, 58.0 lb-ft)
Rear shock absorber lower bolts
(b) : 58 N·m (5.8 kg-m, 42.0 lb-ft)
Lateral rod left side nut (c) : 50 N·m (5.0 kg-m, 36.5 lb-ft)
19) Check to ensure that brake drum is free from dragging and
proper braking is obtained.
20) If equipped with LSPV, check and adjust LSPV spring refer-
ring to “LSPV INSPECTION AND ADJUSTMENT” and per-
form “FLUID PRESSURE TEST” in Section 5.
21) Perform brake operation test (foot brake and parking brake).
WHEEL BEARING AND WHEEL STUD (2WD
VEHICLE)
REMOVAL
1) Remove rear brake drum. Refer to “REAR BRAKE DRUM” in
Section 5.
2) Remove wheel sensor ring (if equipped with ABS). Refer to
“REAR WHEEL SENSOR RING” of Section 5E.
Page 234 of 698
REAR SUSPENSION 3E-21
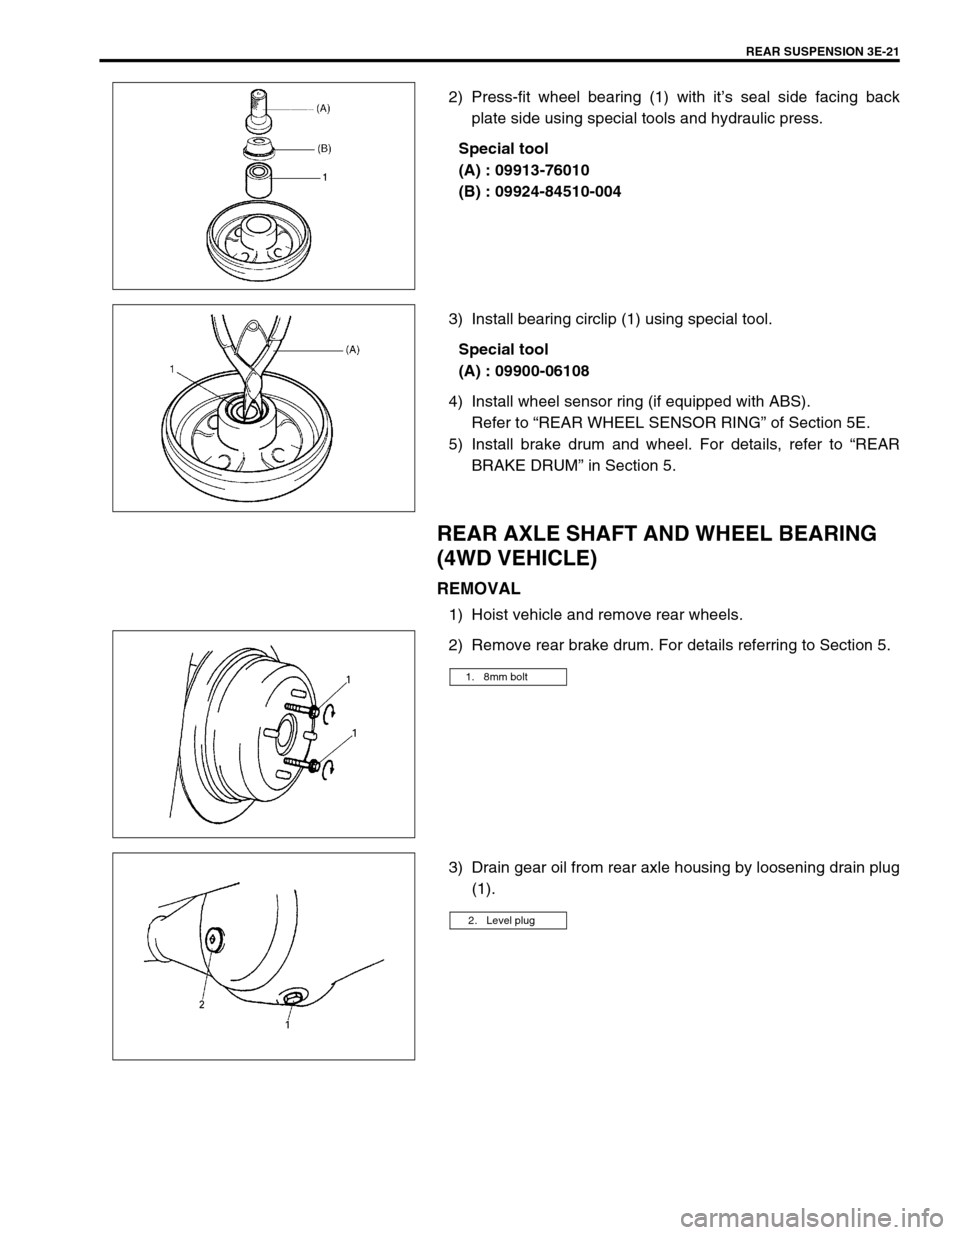
2) Press-fit wheel bearing (1) with it’s seal side facing back
plate side using special tools and hydraulic press.
Special tool
(A) : 09913-76010
(B) : 09924-84510-004
3) Install bearing circlip (1) using special tool.
Special tool
(A) : 09900-06108
4) Install wheel sensor ring (if equipped with ABS).
Refer to “REAR WHEEL SENSOR RING” of Section 5E.
5) Install brake drum and wheel. For details, refer to “REAR
BRAKE DRUM” in Section 5.
REAR AXLE SHAFT AND WHEEL BEARING
(4WD VEHICLE)
REMOVAL
1) Hoist vehicle and remove rear wheels.
2) Remove rear brake drum. For details referring to Section 5.
3) Drain gear oil from rear axle housing by loosening drain plug
(1).
1. 8mm bolt
2. Level plug