sensor SUZUKI SWIFT 2000 1.G RG413 Service Manual Online
[x] Cancel search | Manufacturer: SUZUKI, Model Year: 2000, Model line: SWIFT, Model: SUZUKI SWIFT 2000 1.GPages: 698, PDF Size: 16.01 MB
Page 406 of 698
ENGINE GENERAL INFORMATION AND DIAGNOSIS 6-37
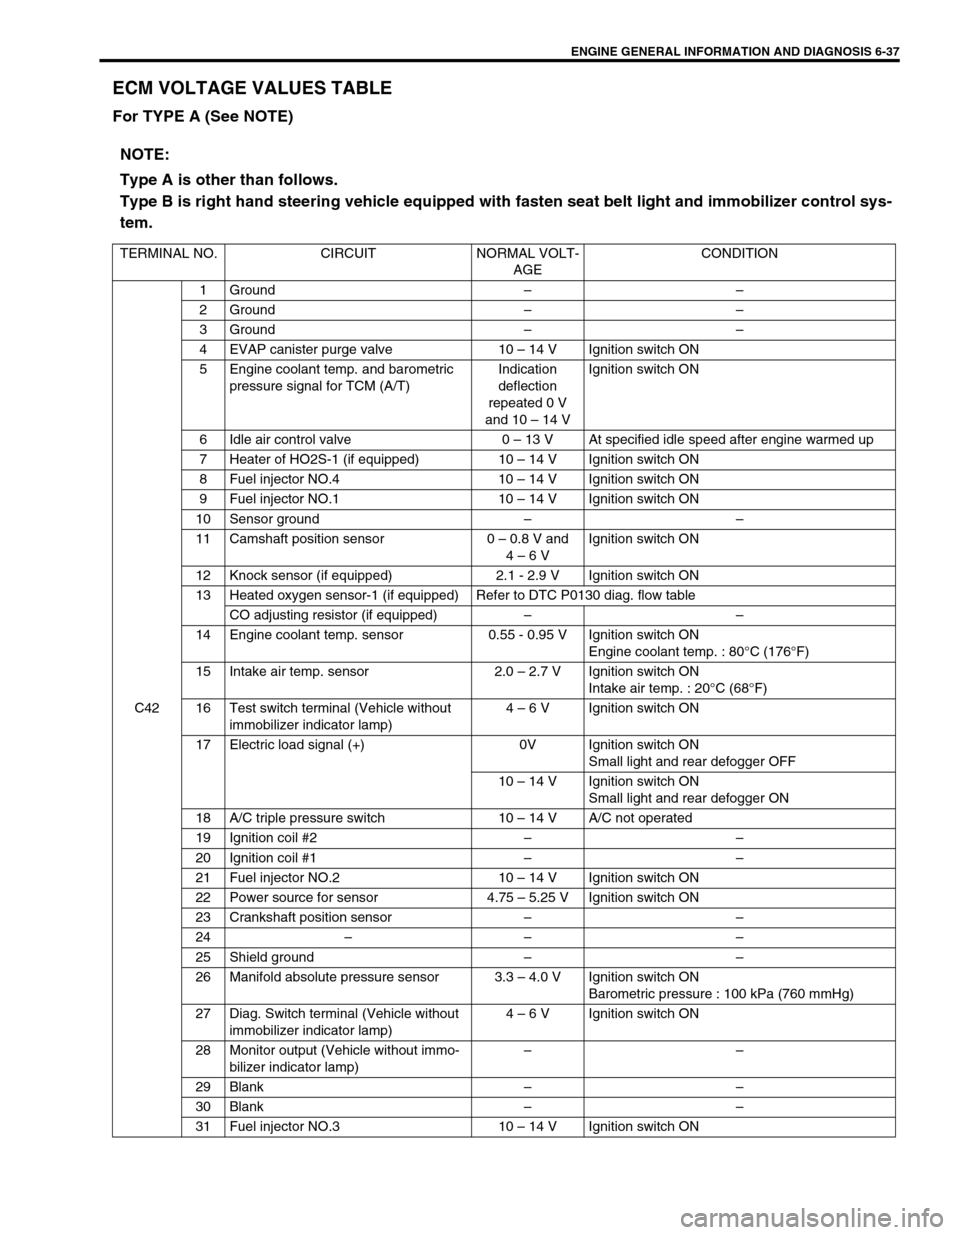
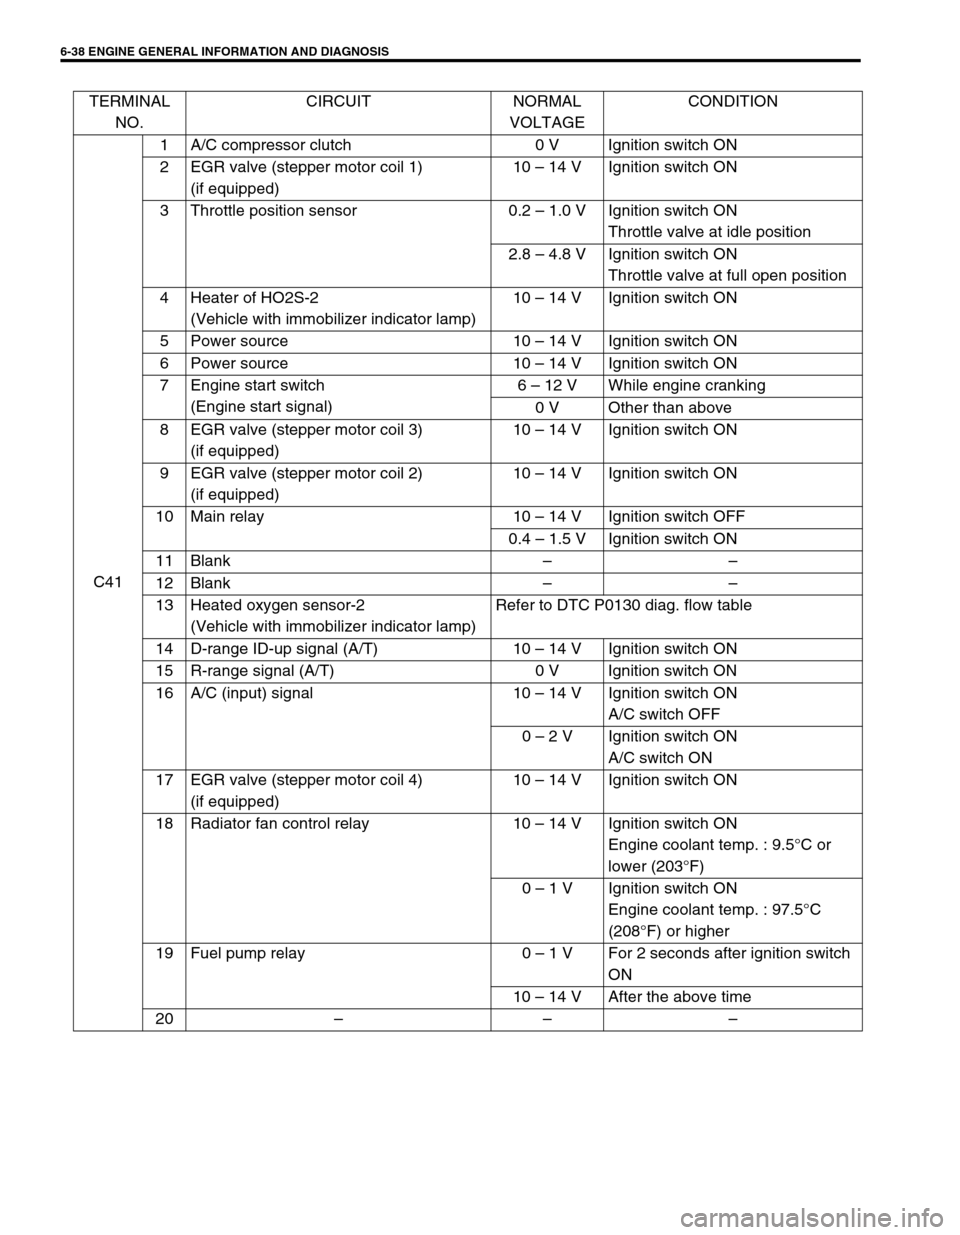
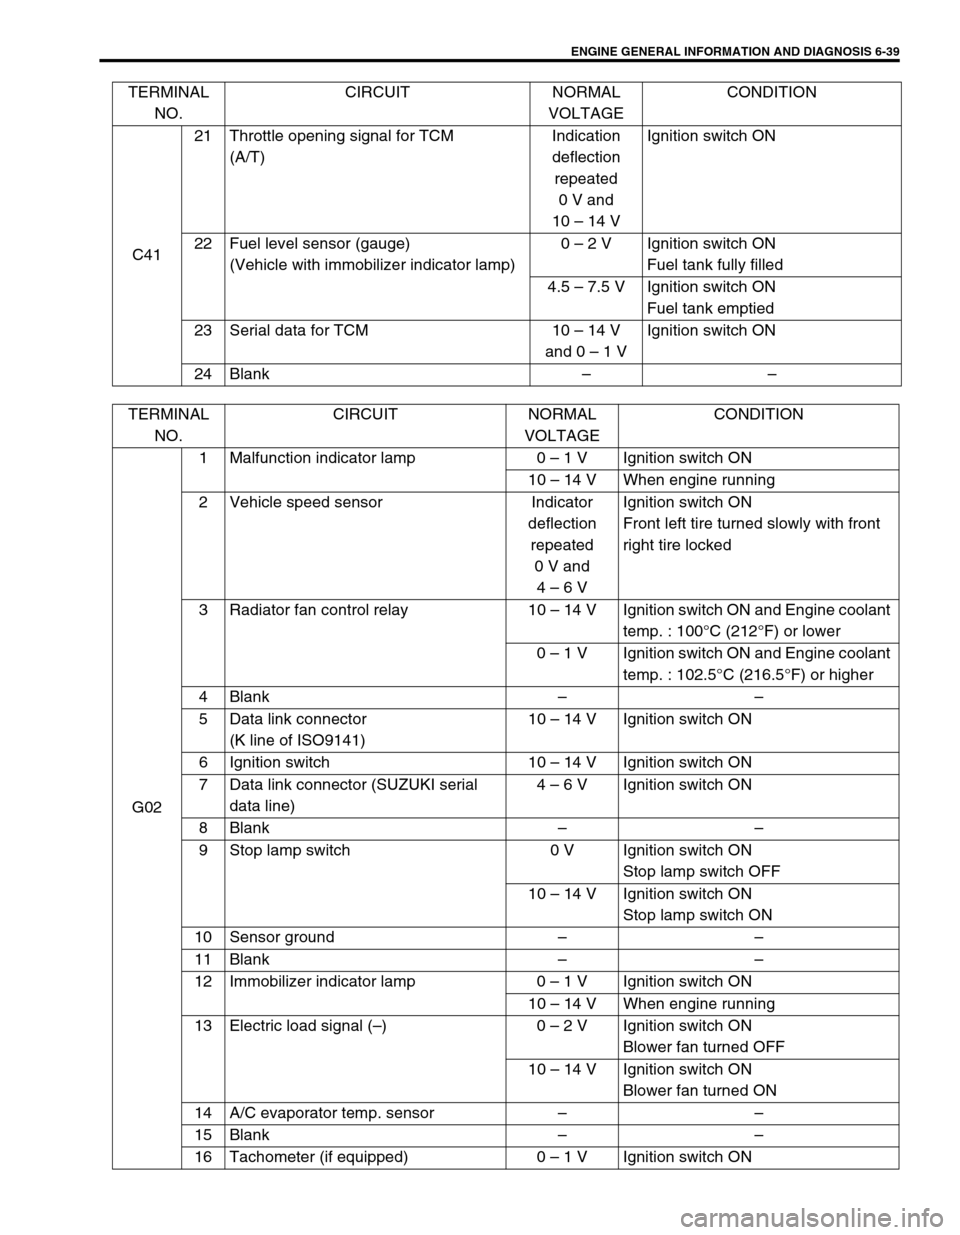
ECM VOLTAGE VALUES TABLE
For TYPE A (See NOTE)
NOTE:
Type A is other than follows.
Type B is right hand steering vehicle equipped with fasten seat belt light and immobilizer control sys-
tem.
TERMINAL NO. CIRCUIT NORMAL VOLT-
AGECONDITION
C421 Ground––
2 Ground––
3 Ground––
4 EVAP canister purge valve 10 – 14 V Ignition switch ON
5 Engine coolant temp. and barometric
pressure signal for TCM (A/T)Indication
deflection
repeated 0 V
and 10 – 14 VIgnition switch ON
6 Idle air control valve 0 – 13 V At specified idle speed after engine warmed up
7 Heater of HO2S-1 (if equipped) 10 – 14 V Ignition switch ON
8 Fuel injector NO.4 10 – 14 V Ignition switch ON
9 Fuel injector NO.1 10 – 14 V Ignition switch ON
10 Sensor ground––
11 Camshaft position sensor 0 – 0.8 V and
4 – 6 VIgnition switch ON
12 Knock sensor (if equipped) 2.1 - 2.9 V Ignition switch ON
13 Heated oxygen sensor-1 (if equipped) Refer to DTC P0130 diag. flow table
CO adjusting resistor (if equipped)––
14 Engine coolant temp. sensor 0.55 - 0.95 V Ignition switch ON
Engine coolant temp. : 80°C (176°F)
15 Intake air temp. sensor 2.0 – 2.7 V Ignition switch ON
Intake air temp. : 20°C (68°F)
16 Test switch terminal (Vehicle without
immobilizer indicator lamp)4 – 6 V Ignition switch ON
17 Electric load signal (+) 0V Ignition switch ON
Small light and rear defogger OFF
10 – 14 V Ignition switch ON
Small light and rear defogger ON
18 A/C triple pressure switch 10 – 14 V A/C not operated
19 Ignition coil #2––
20 Ignition coil #1––
21 Fuel injector NO.2 10 – 14 V Ignition switch ON
22 Power source for sensor 4.75 – 5.25 V Ignition switch ON
23 Crankshaft position sensor––
24–– –
25 Shield ground––
26 Manifold absolute pressure sensor 3.3 – 4.0 V Ignition switch ON
Barometric pressure : 100 kPa (760 mmHg)
27 Diag. Switch terminal (Vehicle without
immobilizer indicator lamp)4 – 6 V Ignition switch ON
28 Monitor output (Vehicle without immo-
bilizer indicator lamp)––
29 Blank––
30 Blank––
31 Fuel injector NO.3 10 – 14 V Ignition switch ON
Page 407 of 698
6-38 ENGINE GENERAL INFORMATION AND DIAGNOSIS
TERMINAL
NO.CIRCUIT NORMAL
VOLTAGECONDITION
C411 A/C compressor clutch 0 V Ignition switch ON
2 EGR valve (stepper motor coil 1)
(if equipped)10 – 14 V Ignition switch ON
3 Throttle position sensor 0.2 – 1.0 V Ignition switch ON
Throttle valve at idle position
2.8 – 4.8 V Ignition switch ON
Throttle valve at full open position
4 Heater of HO2S-2
(Vehicle with immobilizer indicator lamp)10 – 14 V Ignition switch ON
5 Power source 10 – 14 V Ignition switch ON
6 Power source 10 – 14 V Ignition switch ON
7 Engine start switch
(Engine start signal)6 – 12 V While engine cranking
0 V Other than above
8 EGR valve (stepper motor coil 3)
(if equipped)10 – 14 V Ignition switch ON
9 EGR valve (stepper motor coil 2)
(if equipped)10 – 14 V Ignition switch ON
10 Main relay 10 – 14 V Ignition switch OFF
0.4 – 1.5 V Ignition switch ON
11 Blank––
12 Blank––
13 Heated oxygen sensor-2
(Vehicle with immobilizer indicator lamp)Refer to DTC P0130 diag. flow table
14 D-range ID-up signal (A/T) 10 – 14 V Ignition switch ON
15 R-range signal (A/T) 0 V Ignition switch ON
16 A/C (input) signal 10 – 14 V Ignition switch ON
A/C switch OFF
0 – 2 V Ignition switch ON
A/C switch ON
17 EGR valve (stepper motor coil 4)
(if equipped)10 – 14 V Ignition switch ON
18 Radiator fan control relay 10 – 14 V Ignition switch ON
Engine coolant temp. : 9.5°C or
lower (203°F)
0 – 1 V Ignition switch ON
Engine coolant temp. : 97.5°C
(208°F) or higher
19 Fuel pump relay 0 – 1 V For 2 seconds after ignition switch
ON
10 – 14 V After the above time
20–––
Page 408 of 698
ENGINE GENERAL INFORMATION AND DIAGNOSIS 6-39
C4121 Throttle opening signal for TCM
(A/T)Indication
deflection
repeated
0 V and
10 – 14 VIgnition switch ON
22 Fuel level sensor (gauge)
(Vehicle with immobilizer indicator lamp)0 – 2 V Ignition switch ON
Fuel tank fully filled
4.5 – 7.5 V Ignition switch ON
Fuel tank emptied
23 Serial data for TCM 10 – 14 V
and 0 – 1 VIgnition switch ON
24 Blank–– TERMINAL
NO.CIRCUIT NORMAL
VOLTAGECONDITION
TERMINAL
NO.CIRCUIT NORMAL
VOLTAGECONDITION
G021 Malfunction indicator lamp 0 – 1 V Ignition switch ON
10 – 14 V When engine running
2 Vehicle speed sensor Indicator
deflection
repeated
0 V and
4 – 6 VIgnition switch ON
Front left tire turned slowly with front
right tire locked
3 Radiator fan control relay 10 – 14 V Ignition switch ON and Engine coolant
temp. : 100°C (212°F) or lower
0 – 1 V Ignition switch ON and Engine coolant
temp. : 102.5°C (216.5°F) or higher
4 Blank––
5 Data link connector
(K line of ISO9141)10 – 14 V Ignition switch ON
6 Ignition switch 10 – 14 V Ignition switch ON
7 Data link connector (SUZUKI serial
data line)4 – 6 V Ignition switch ON
8 Blank––
9 Stop lamp switch 0 V Ignition switch ON
Stop lamp switch OFF
10 – 14 V Ignition switch ON
Stop lamp switch ON
10 Sensor ground––
11 Blank––
12 Immobilizer indicator lamp 0 – 1 V Ignition switch ON
10 – 14 V When engine running
13 Electric load signal (–)0 – 2 V Ignition switch ON
Blower fan turned OFF
10 – 14 V Ignition switch ON
Blower fan turned ON
14 A/C evaporator temp. sensor––
15 Blank––
16 Tachometer (if equipped) 0 – 1 V Ignition switch ON
Page 409 of 698
6-40 ENGINE GENERAL INFORMATION AND DIAGNOSIS
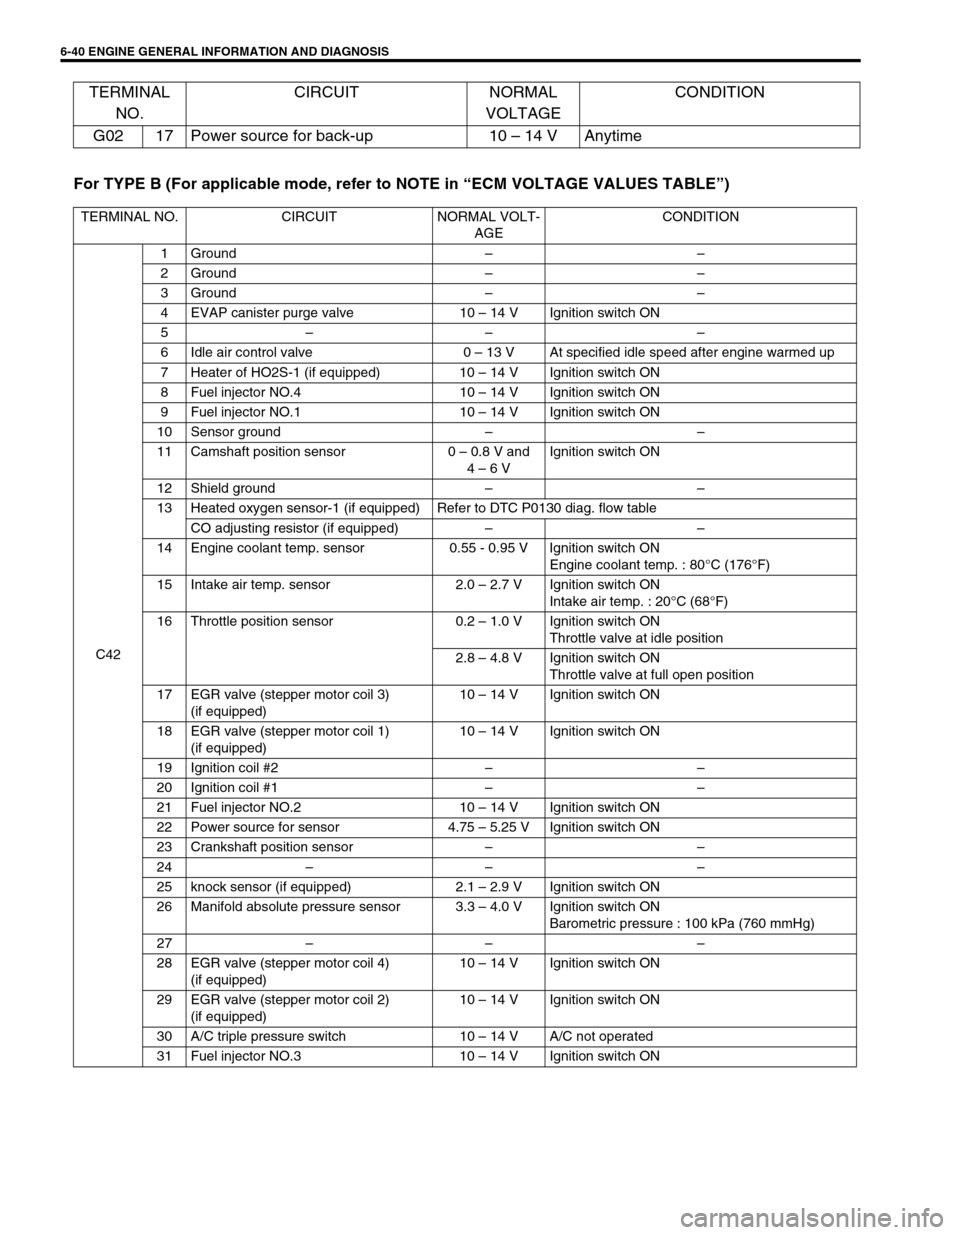
For TYPE B (For applicable mode, refer to NOTE in “ECM VOLTAGE VALUES TABLE”) G02 17 Power source for back-up 10 – 14 V Anytime
TERMINAL NO. CIRCUIT NORMAL VOLT-
AGECONDITION
C421Ground––
2Ground––
3Ground––
4 EVAP canister purge valve 10 – 14 V Ignition switch ON
5–– –
6 Idle air control valve 0 – 13 V At specified idle speed after engine warmed up
7 Heater of HO2S-1 (if equipped) 10 – 14 V Ignition switch ON
8 Fuel injector NO.4 10 – 14 V Ignition switch ON
9 Fuel injector NO.1 10 – 14 V Ignition switch ON
10 Sensor ground––
11 Camshaft position sensor 0 – 0.8 V and
4 – 6 VIgnition switch ON
12 Shield ground––
13 Heated oxygen sensor-1 (if equipped) Refer to DTC P0130 diag. flow table
CO adjusting resistor (if equipped)––
14 Engine coolant temp. sensor 0.55 - 0.95 V Ignition switch ON
Engine coolant temp. : 80°C (176°F)
15 Intake air temp. sensor 2.0 – 2.7 V Ignition switch ON
Intake air temp. : 20°C (68°F)
16 Throttle position sensor 0.2 – 1.0 V Ignition switch ON
Throttle valve at idle position
2.8 – 4.8 V Ignition switch ON
Throttle valve at full open position
17 EGR valve (stepper motor coil 3)
(if equipped)10 – 14 V Ignition switch ON
18 EGR valve (stepper motor coil 1)
(if equipped)10 – 14 V Ignition switch ON
19 Ignition coil #2––
20 Ignition coil #1––
21 Fuel injector NO.2 10 – 14 V Ignition switch ON
22 Power source for sensor 4.75 – 5.25 V Ignition switch ON
23 Crankshaft position sensor––
24–– –
25 knock sensor (if equipped) 2.1 – 2.9 V Ignition switch ON
26 Manifold absolute pressure sensor 3.3 – 4.0 V Ignition switch ON
Barometric pressure : 100 kPa (760 mmHg)
27–– –
28 EGR valve (stepper motor coil 4)
(if equipped)10 – 14 V Ignition switch ON
29 EGR valve (stepper motor coil 2)
(if equipped)10 – 14 V Ignition switch ON
30 A/C triple pressure switch 10 – 14 V A/C not operated
31 Fuel injector NO.3 10 – 14 V Ignition switch ON
TERMINAL
NO.CIRCUIT NORMAL
VOLTAGECONDITION
Page 411 of 698
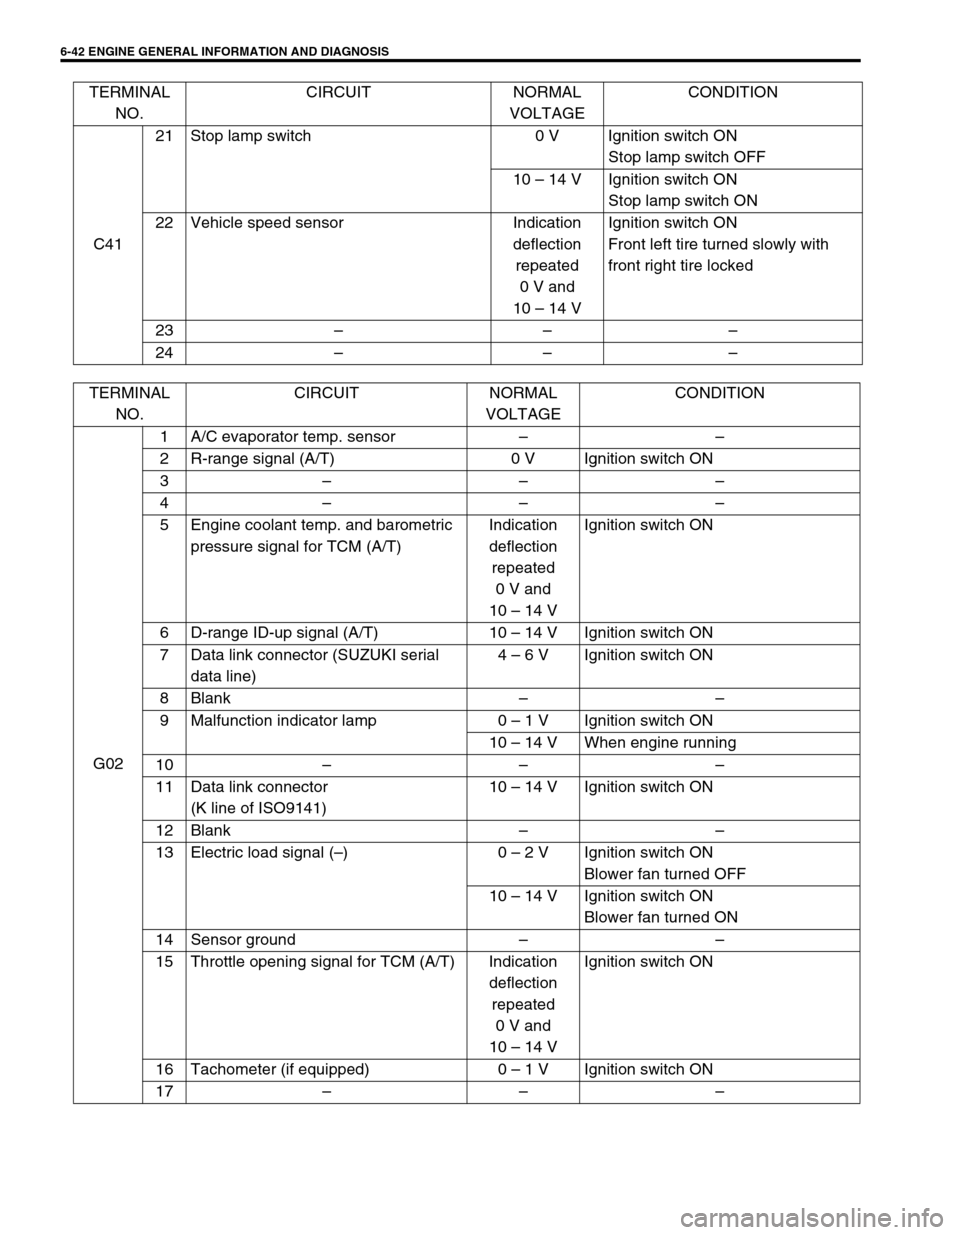
6-42 ENGINE GENERAL INFORMATION AND DIAGNOSIS
C4121 Stop lamp switch 0 V Ignition switch ON
Stop lamp switch OFF
10 – 14 V Ignition switch ON
Stop lamp switch ON
22 Vehicle speed sensor Indication
deflection
repeated
0 V and
10 – 14 VIgnition switch ON
Front left tire turned slowly with
front right tire locked
23–––
24––– TERMINAL
NO.CIRCUIT NORMAL
VOLTAGECONDITION
TERMINAL
NO.CIRCUIT NORMAL
VOLTAGECONDITION
G021 A/C evaporator temp. sensor––
2 R-range signal (A/T) 0 V Ignition switch ON
3–––
4–––
5 Engine coolant temp. and barometric
pressure signal for TCM (A/T)Indication
deflection
repeated
0 V and
10 – 14 VIgnition switch ON
6 D-range ID-up signal (A/T) 10 – 14 V Ignition switch ON
7 Data link connector (SUZUKI serial
data line)4 – 6 V Ignition switch ON
8Blank––
9 Malfunction indicator lamp 0 – 1 V Ignition switch ON
10 – 14 V When engine running
10–––
11 Data link connector
(K line of ISO9141)10 – 14 V Ignition switch ON
12 Blank––
13 Electric load signal (–)0 – 2 V Ignition switch ON
Blower fan turned OFF
10 – 14 V Ignition switch ON
Blower fan turned ON
14 Sensor ground––
15 Throttle opening signal for TCM (A/T) Indication
deflection
repeated
0 V and
10 – 14 VIgnition switch ON
16 Tachometer (if equipped) 0 – 1 V Ignition switch ON
17–––
Page 414 of 698
ENGINE GENERAL INFORMATION AND DIAGNOSIS 6-45
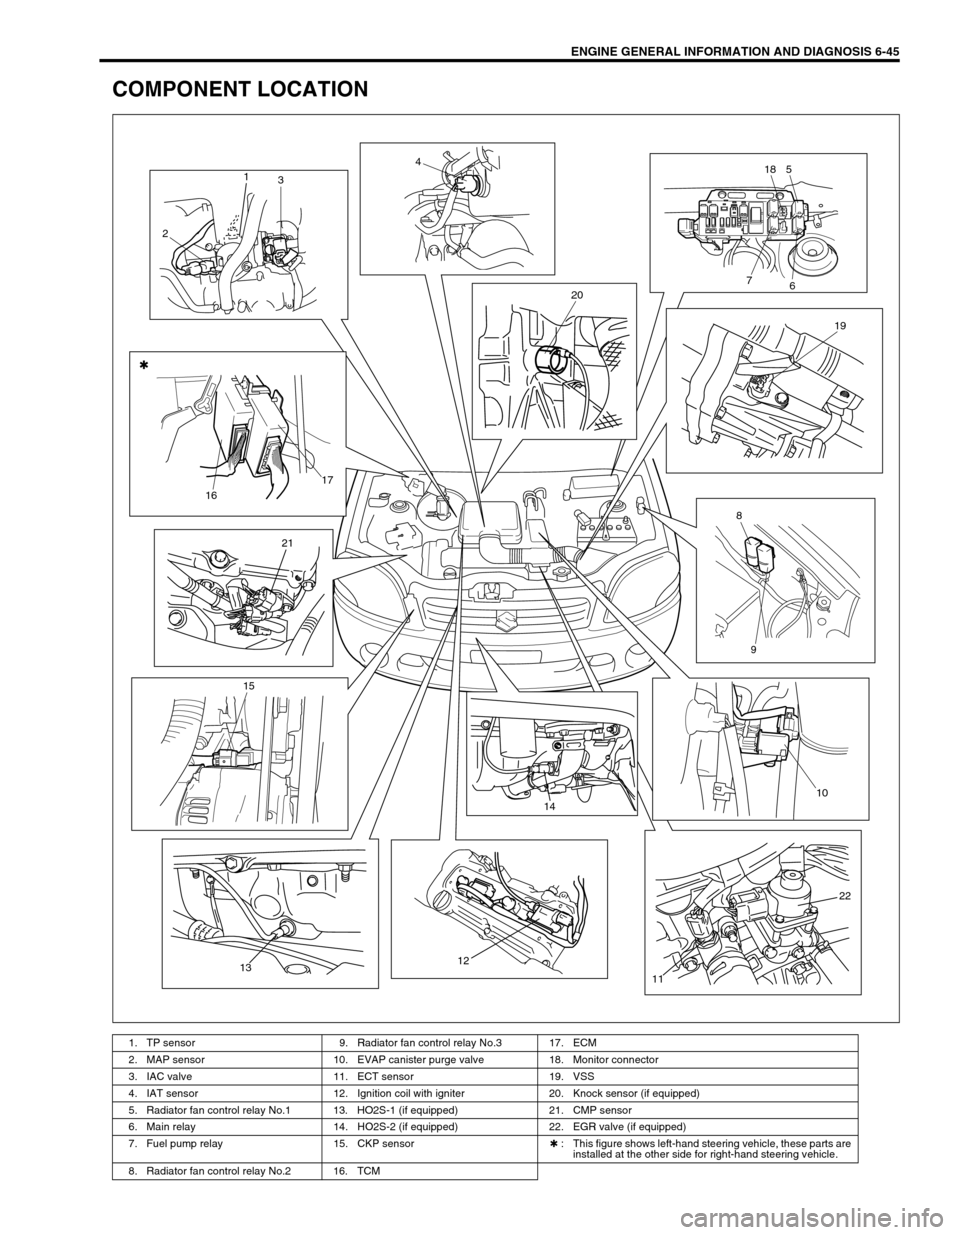
COMPONENT LOCATION
1. TP sensor 9. Radiator fan control relay No.3 17. ECM
2. MAP sensor 10. EVAP canister purge valve 18. Monitor connector
3. IAC valve 11. ECT sensor 19. VSS
4. IAT sensor 12. Ignition coil with igniter 20. Knock sensor (if equipped)
5. Radiator fan control relay No.1 13. HO2S-1 (if equipped) 21. CMP sensor
6. Main relay 14. HO2S-2 (if equipped) 22. EGR valve (if equipped)
7. Fuel pump relay 15. CKP sensor✱ : This figure shows left-hand steering vehicle, these parts are
installed at the other side for right-hand steering vehicle.
8. Radiator fan control relay No.2 16. TCM
1
3
24
518
6 7
20
19
8
9 1617
21
15
131214
10
22
11
Page 421 of 698
6-52 ENGINE GENERAL INFORMATION AND DIAGNOSIS
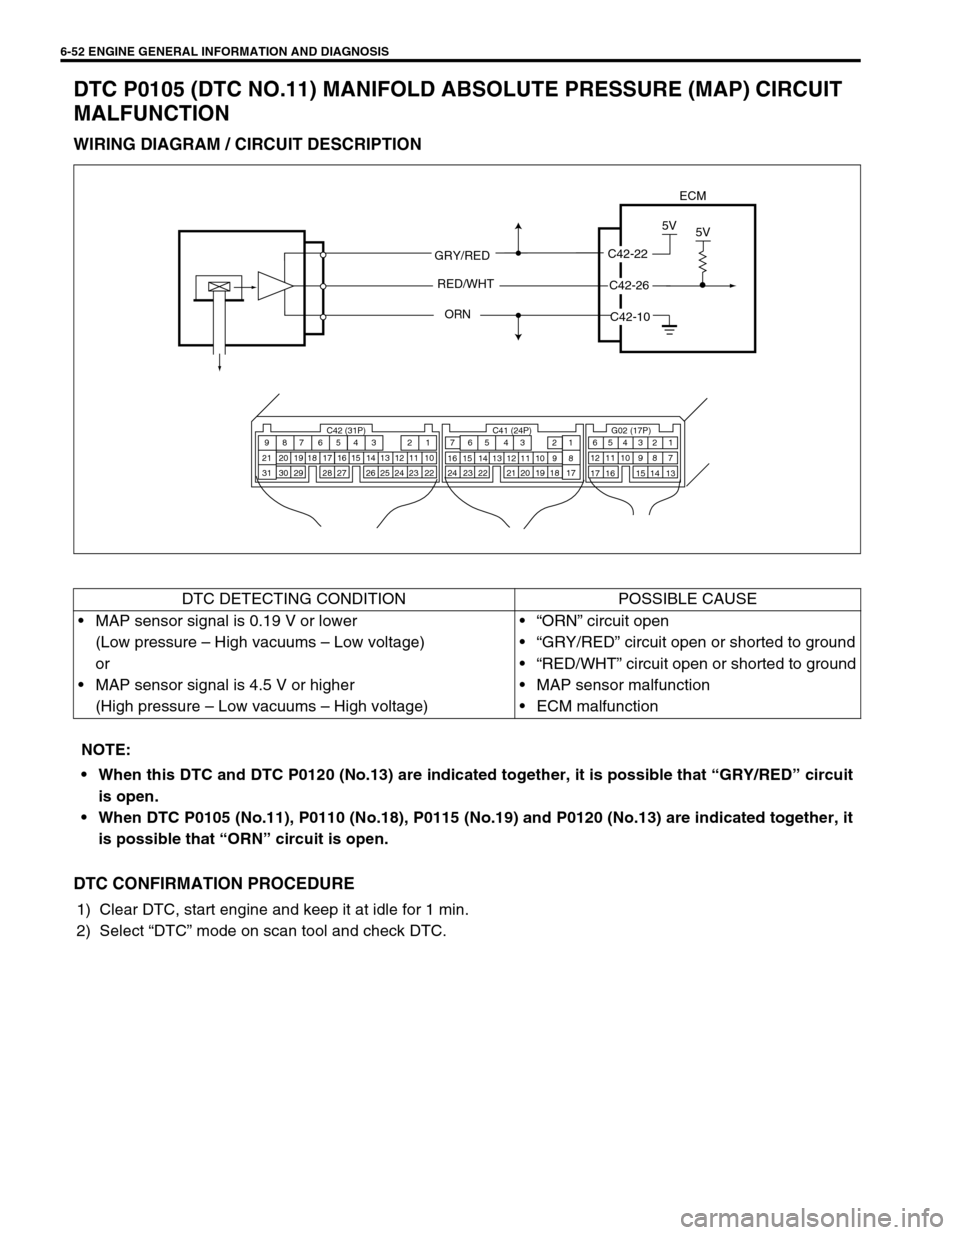
DTC P0105 (DTC NO.11) MANIFOLD ABSOLUTE PRESSURE (MAP) CIRCUIT
MALFUNCTION
WIRING DIAGRAM / CIRCUIT DESCRIPTION
DTC CONFIRMATION PROCEDURE
1) Clear DTC, start engine and keep it at idle for 1 min.
2) Select “DTC” mode on scan tool and check DTC.
ECM
GRY/RED
ORN
C42-22
5V
AMPC42-26
5V
RED/WHT
C42-10
C42 (31P) C41 (24P) G02 (17P)1 2 3 4 5 6 7 8 9
10 11 12 13 14 15 16 17 18 19 20 21
22 23 24 25 26 28 27 29 30 315 6
1 2 3 4 5 6 7
11 12
9 10 11 13 12 14 15 16
16 171 2
7 8
13 14 3 4
9 10
15 17 188
19 20 21 22 23 24
DTC DETECTING CONDITION POSSIBLE CAUSE
MAP sensor signal is 0.19 V or lower
(Low pressure – High vacuums – Low voltage)
or
MAP sensor signal is 4.5 V or higher
(High pressure – Low vacuums – High voltage)“ORN” circuit open
“GRY/RED” circuit open or shorted to ground
“RED/WHT” circuit open or shorted to ground
MAP sensor malfunction
ECM malfunction
NOTE:
When this DTC and DTC P0120 (No.13) are indicated together, it is possible that “GRY/RED” circuit
is open.
When DTC P0105 (No.11), P0110 (No.18), P0115 (No.19) and P0120 (No.13) are indicated together, it
is possible that “ORN” circuit is open.
Page 422 of 698
ENGINE GENERAL INFORMATION AND DIAGNOSIS 6-53
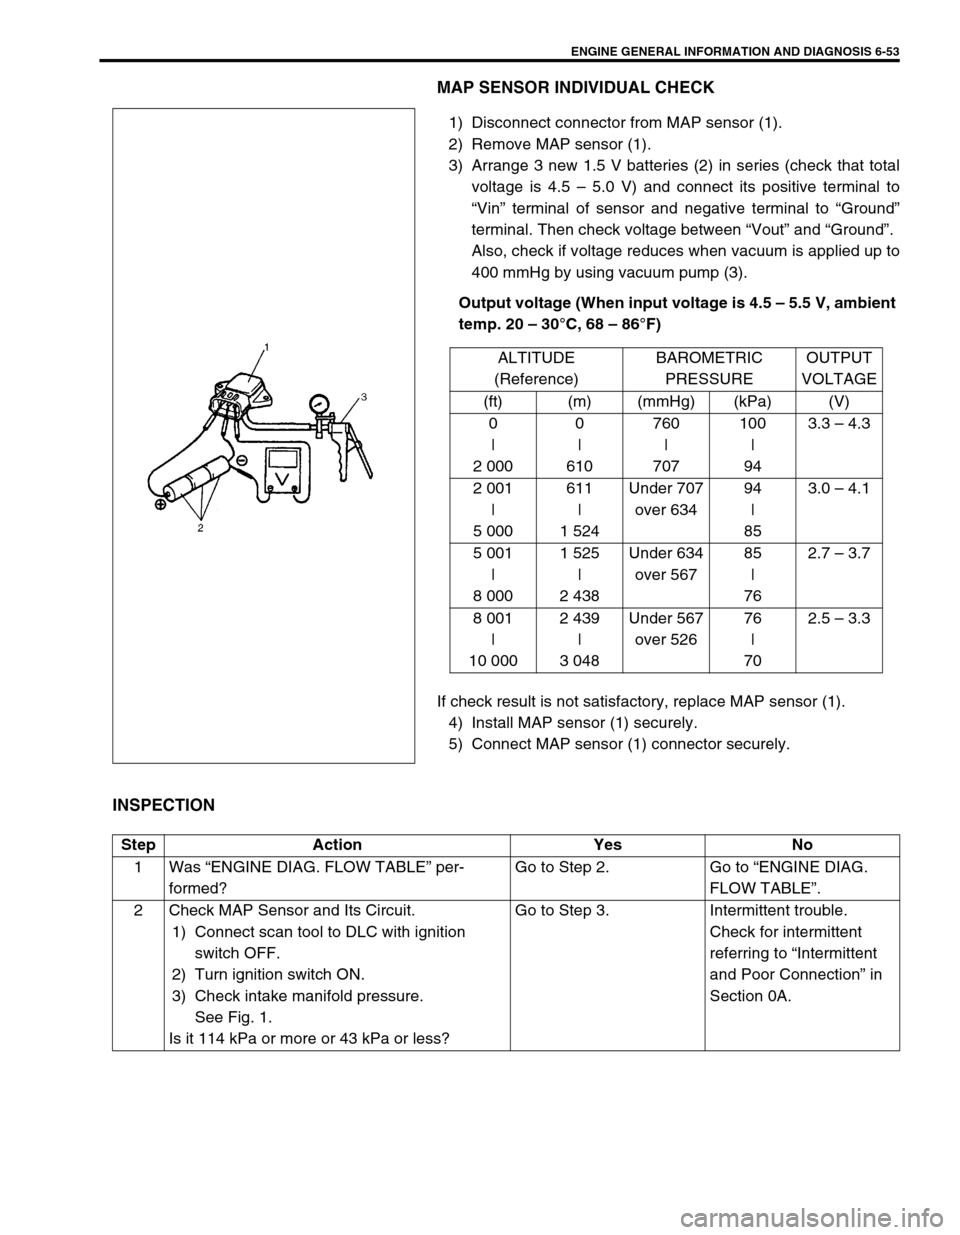
MAP SENSOR INDIVIDUAL CHECK
1) Disconnect connector from MAP sensor (1).
2) Remove MAP sensor (1).
3) Arrange 3 new 1.5 V batteries (2) in series (check that total
voltage is 4.5 – 5.0 V) and connect its positive terminal to
“Vin” terminal of sensor and negative terminal to “Ground”
terminal. Then check voltage between “Vout” and “Ground”.
Also, check if voltage reduces when vacuum is applied up to
400 mmHg by using vacuum pump (3).
Output voltage (When input voltage is 4.5 – 5.5 V, ambient
temp. 20 – 30°C, 68 – 86°F)
If check result is not satisfactory, replace MAP sensor (1).
4) Install MAP sensor (1) securely.
5) Connect MAP sensor (1) connector securely.
INSPECTION
ALTITUDE
(Reference)BAROMETRIC
PRESSUREOUTPUT
VOLTAGE
(ft) (m) (mmHg) (kPa) (V)
0
|
2 0000
|
610760
|
707100
|
943.3 – 4.3
2 001
|
5 000611
|
1 524Under 707
over 63494
|
853.0 – 4.1
5 001
|
8 0001 525
|
2 438Under 634
over 56785
|
762.7 – 3.7
8 001
|
10 0002 439
|
3 048Under 567
over 52676
|
702.5 – 3.3
Step Action Yes No
1Was “ENGINE DIAG. FLOW TABLE” per-
formed?Go to Step 2. Go to “ENGINE DIAG.
FLOW TABLE”.
2 Check MAP Sensor and Its Circuit.
1) Connect scan tool to DLC with ignition
switch OFF.
2) Turn ignition switch ON.
3) Check intake manifold pressure.
See Fig. 1.
Is it 114 kPa or more or 43 kPa or less?Go to Step 3. Intermittent trouble.
Check for intermittent
referring to “Intermittent
and Poor Connection” in
Section 0A.
Page 423 of 698
6-54 ENGINE GENERAL INFORMATION AND DIAGNOSIS
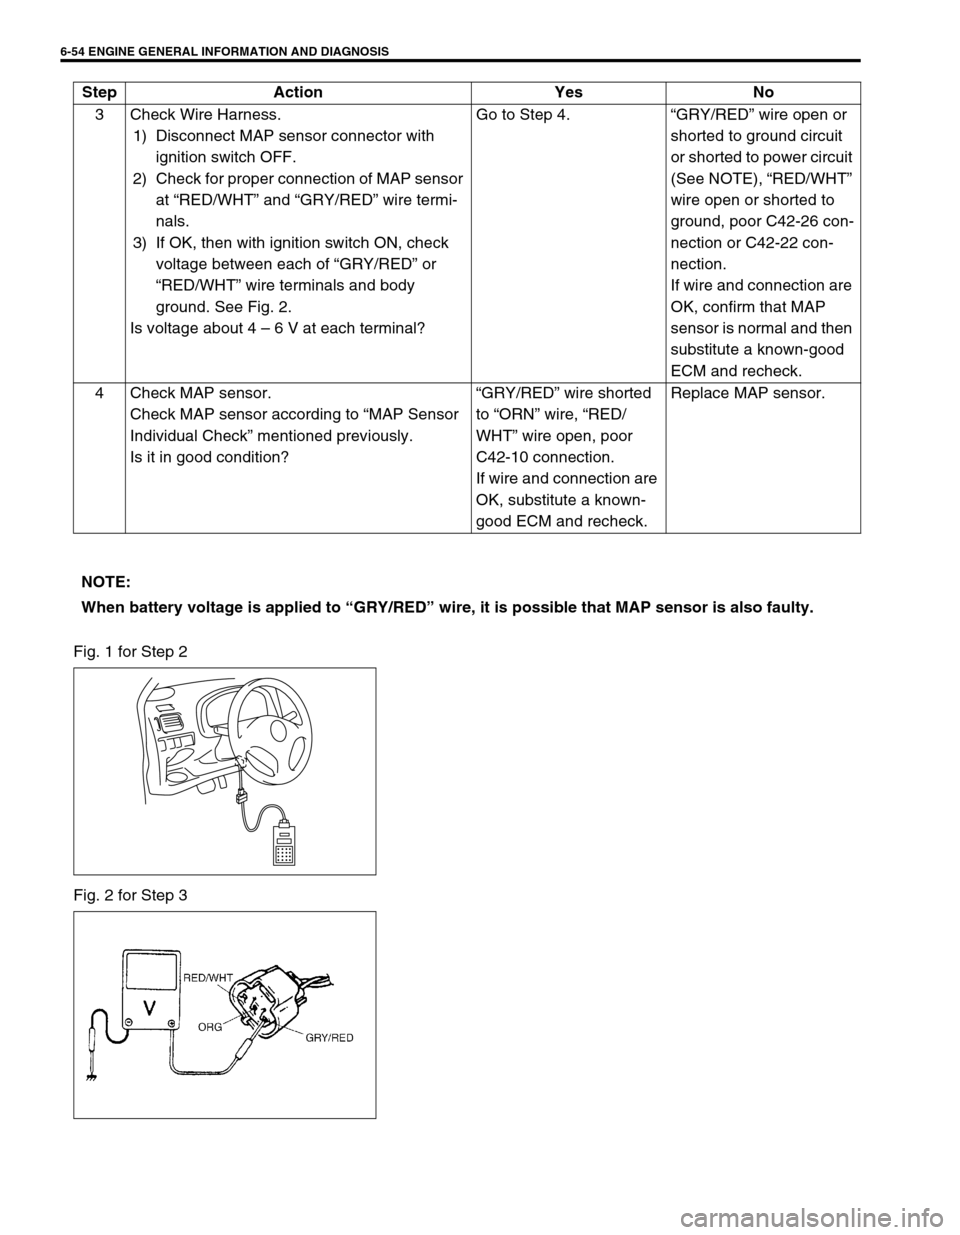
Fig. 1 for Step 2
Fig. 2 for Step 33 Check Wire Harness.
1) Disconnect MAP sensor connector with
ignition switch OFF.
2) Check for proper connection of MAP sensor
at “RED/WHT” and “GRY/RED” wire termi-
nals.
3) If OK, then with ignition switch ON, check
voltage between each of “GRY/RED” or
“RED/WHT” wire terminals and body
ground. See Fig. 2.
Is voltage about 4 – 6 V at each terminal?Go to Step 4.“GRY/RED” wire open or
shorted to ground circuit
or shorted to power circuit
(See NOTE), “RED/WHT”
wire open or shorted to
ground, poor C42-26 con-
nection or C42-22 con-
nection.
If wire and connection are
OK, confirm that MAP
sensor is normal and then
substitute a known-good
ECM and recheck.
4 Check MAP sensor.
Check MAP sensor according to “MAP Sensor
Individual Check” mentioned previously.
Is it in good condition?“GRY/RED” wire shorted
to “ORN” wire, “RED/
WHT” wire open, poor
C42-10 connection.
If wire and connection are
OK, substitute a known-
good ECM and recheck.Replace MAP sensor. Step Action Yes No
NOTE:
When battery voltage is applied to “GRY/RED” wire, it is possible that MAP sensor is also faulty.
Page 424 of 698
ENGINE GENERAL INFORMATION AND DIAGNOSIS 6-55
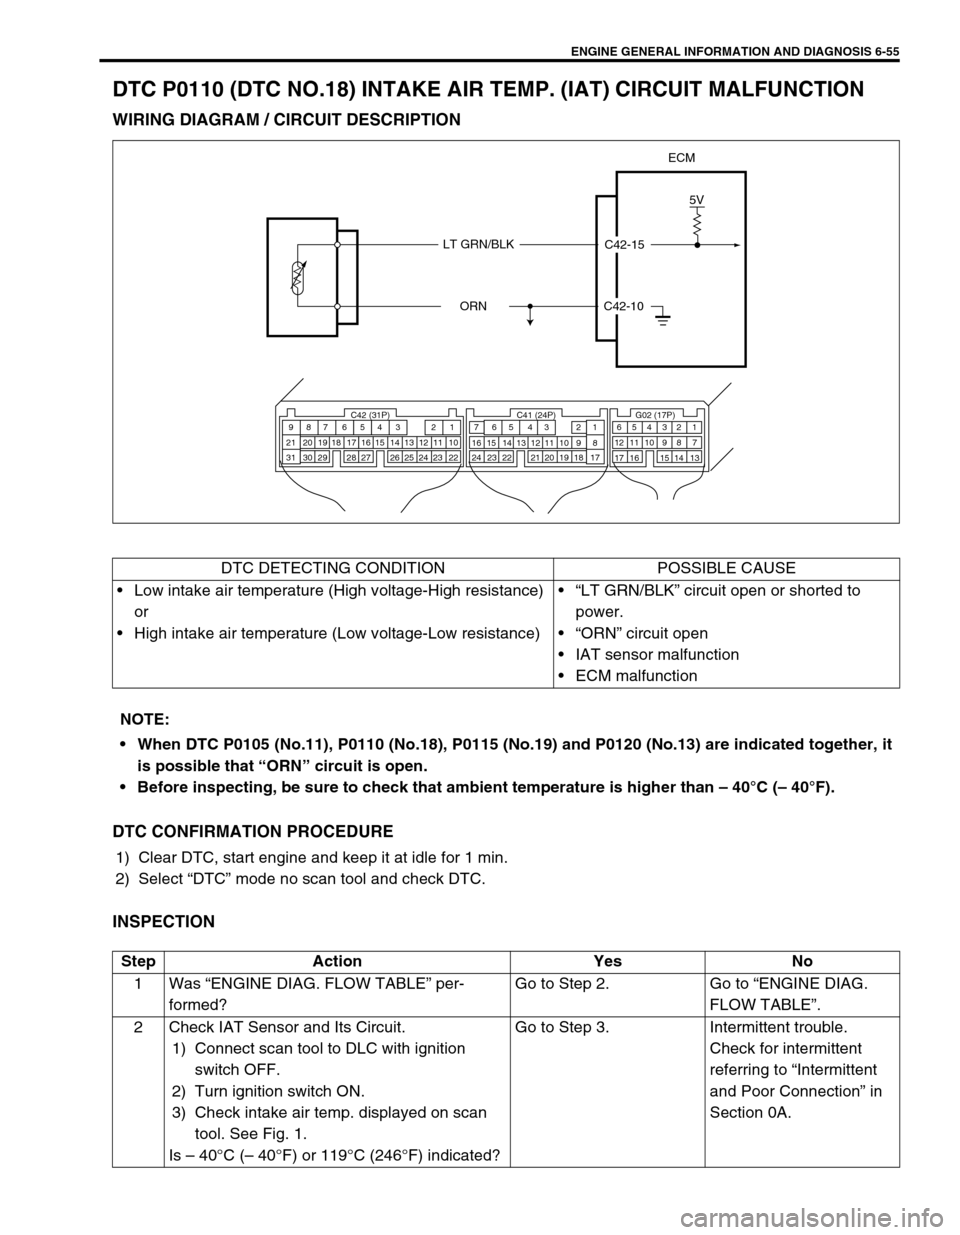
DTC P0110 (DTC NO.18) INTAKE AIR TEMP. (IAT) CIRCUIT MALFUNCTION
WIRING DIAGRAM / CIRCUIT DESCRIPTION
DTC CONFIRMATION PROCEDURE
1) Clear DTC, start engine and keep it at idle for 1 min.
2) Select “DTC” mode no scan tool and check DTC.
INSPECTION
C42-10
C42-15
5V
ECM
LT GRN/BLK
ORN
C42 (31P) C41 (24P) G02 (17P)1 2 3 4 5 6 7 8 9
10 11 12 13 14 15 16 17 18 19 20 21
22 23 24 25 26 28 27 29 30 315 6
1 2 3 4 5 6 7
11 12
9 10 11 13 12 14 15 16
16 171 2
7 8
13 14 3 4
9 10
15 17 188
19 20 21 22 23 24
DTC DETECTING CONDITION POSSIBLE CAUSE
Low intake air temperature (High voltage-High resistance)
or
High intake air temperature (Low voltage-Low resistance)“LT GRN/BLK” circuit open or shorted to
power.
“ORN” circuit open
IAT sensor malfunction
ECM malfunction
NOTE:
When DTC P0105 (No.11), P0110 (No.18), P0115 (No.19) and P0120 (No.13) are indicated together, it
is possible that “ORN” circuit is open.
Before inspecting, be sure to check that ambient temperature is higher than – 40°C (– 40°F).
Step Action Yes No
1Was “ENGINE DIAG. FLOW TABLE” per-
formed?Go to Step 2. Go to “ENGINE DIAG.
FLOW TABLE”.
2 Check IAT Sensor and Its Circuit.
1) Connect scan tool to DLC with ignition
switch OFF.
2) Turn ignition switch ON.
3) Check intake air temp. displayed on scan
tool. See Fig. 1.
Is – 40°C (– 40°F) or 119°C (246°F) indicated?Go to Step 3. Intermittent trouble.
Check for intermittent
referring to “Intermittent
and Poor Connection” in
Section 0A.