ABS SUZUKI SWIFT 2000 1.G Transmission Service Workshop Manual
[x] Cancel search | Manufacturer: SUZUKI, Model Year: 2000, Model line: SWIFT, Model: SUZUKI SWIFT 2000 1.GPages: 447, PDF Size: 10.54 MB
Page 259 of 447

BODY ELECTRICAL SYSTEM 8-15
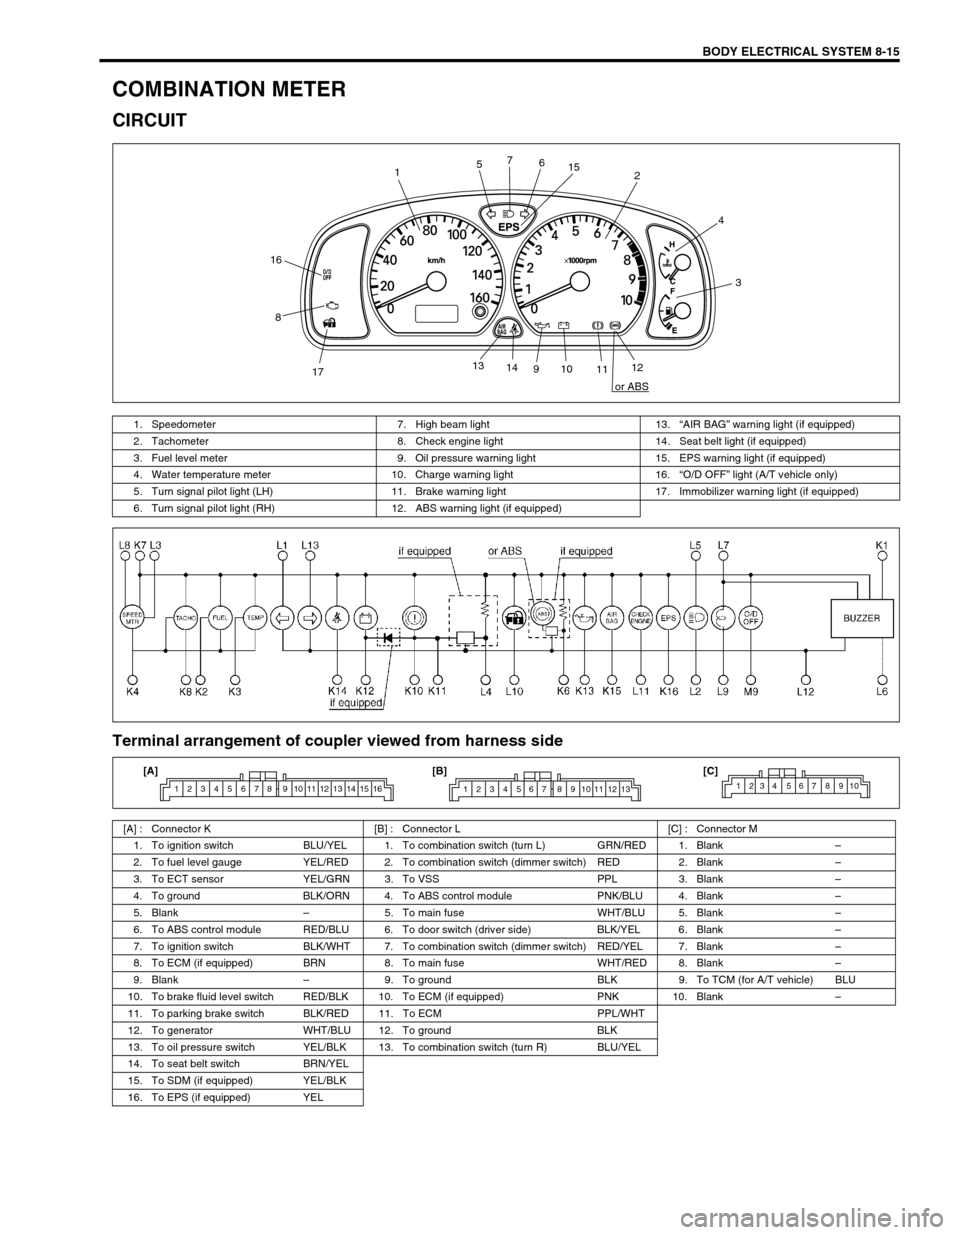
COMBINATION METER
CIRCUIT
Terminal arrangement of coupler viewed from harness side
12
3 4
56 7
8
910
1112 13
14
1715
16
or ABS
1. Speedometer 7. High beam light 13.“AIR BAG” warning light (if equipped)
2. Tachometer 8. Check engine light 14. Seat belt light (if equipped)
3. Fuel level meter 9. Oil pressure warning light 15. EPS warning light (if equipped)
4. Water temperature meter 10. Charge warning light 16.“O/D OFF” light (A/T vehicle only)
5. Turn signal pilot light (LH) 11. Brake warning light 17. Immobilizer warning light (if equipped)
6. Turn signal pilot light (RH) 12. ABS warning light (if equipped)
[A] : Connector K [B] : Connector L [C] : Connector M
1. To ignition switch BLU/YEL 1. To combination switch (turn L) GRN/RED 1. Blank–
2. To fuel level gauge YEL/RED 2. To combination switch (dimmer switch) RED 2. Blank–
3. To ECT sensor YEL/GRN 3. To VSS PPL 3. Blank–
4. To ground BLK/ORN 4. To ABS control module PNK/BLU 4. Blank–
5. Blank–5. To main fuse WHT/BLU 5. Blank–
6. To ABS control module RED/BLU 6. To door switch (driver side) BLK/YEL 6. Blank–
7. To ignition switch BLK/WHT 7. To combination switch (dimmer switch) RED/YEL 7. Blank–
8. To ECM (if equipped) BRN 8. To main fuse WHT/RED 8. Blank–
9. Blank–9. To ground BLK 9. To TCM (for A/T vehicle) BLU
10. To brake fluid level switch RED/BLK 10. To ECM (if equipped) PNK 10. Blank–
11. To parking brake switch BLK/RED 11. To ECM PPL/WHT
12. To generator WHT/BLU 12. To ground BLK
13. To oil pressure switch YEL/BLK 13. To combination switch (turn R) BLU/YEL
14. To seat belt switch BRN/YEL
15. To SDM (if equipped) YEL/BLK
16. To EPS (if equipped) YEL
1 2 3 4 5 6 7 8 9 10 11 12 13 14 15 161 2 3 4 5 6 7 8 9 10 11 12 131234 567 8910[A] [B] [C]
Page 281 of 447

IMMOBILIZER CONTROL SYSTEM 8G-3
WIRING CIRCUIT
1. Immobilizer Control Module 4. Ignition switch 7. Data link connector
2. ECM 5. Fuse 8. To ABS control module, SDM and TCM
3. Main relay 6. Main fuse 9. Immobilizer indicator lamp
BRN/WHT
BLK/RED
BLK/WHT
PNK
BLK/RED
BLK/WHT
BLK
BLK
BLK/ORG
BLK/ORG
BLU
YEL
YEL
BLK/YEL
6
G02-7 G02-5
C42-2
C42-1
C42-3 C41-10
C41-5/6
G02-6
G02-12
G06-4
G06-3
G06-1G06-2
3
45 5
2
8
97
1
BB
BB
Page 354 of 447

9-50 BODY SERVICE
PAINT AND COATINGS
ANTI-CORROSION TREATMENT
As rust proof treatment, steel sheets are given corrosion resistance on the interior and/or exterior.
These corrosion resistance steel sheet materials are called one of two-side galvanized steel sheets.
It is for the sake of rust protection that these materials are selected and given a variety of treatments as
described blow.
Steel sheets are treated with cathodic electroprimer which is excellent in corrosion resistance.
Rust proof wax coatings are applied to door and side sill insides where moisture is liable to stay.
Vinyl coating is applied to body underside and wheel housing inside.
Sealer is applied to door hem, engine compartment steel sheet-to-steel sheet joint, and the like portions to
prevent water penetration and resulting in rust occurrence.
In panel replacement or collision damage repair, leaving the relevant area untreated as it is in any operation
which does disturb the above-mentioned rust proof treatment will cause corrosion to that area. Therefore, it is
the essential function of any repair operation to correctly recoat the related surfaces of the relevant area.
All the metal panels are coated with metal conditioners and primer coating during vehicle production. Following
the repair and/or replacement parts installation, every accessible bare metal surface should be cleaned and
coated with rust proof primer. Perform this operation prior to the application of sealer and rust proof wax coating.
Sealer is applied to the specific joints of a vehicle during production. The sealer is intended to prevent dust from
entering the vehicle and serves also as an anticorrosion barrier. The sealer is applied to the door and hood hem
areas and between panels. Correct and reseal the originally sealed joints if damaged. Reseal the attaching
joints of a new replacement panel and reseal the hem area of a replacement door or hood.
Use a quality sealer to seal the flanged joints, overlap joints and seams. The sealer must have flexible character-
istics and paint ability after it’s applied to repair areas.
For the sealer to fill open joints, use caulking material. Select a sealer in conformance with the place and pur-
pose of a specific use. Observe the manufacturer’s label-stand instructions when using the sealer.
In many cases, repaired places require color painting. When this is required, follow the ordinary techniques
specified for the finish preparation, color painting and undercoating build-up.
Rust proof wax, a penetrative compound, is applied to the metal-to-metal surfaces (door and side sill insides)
where it is difficult to use ordinary undercoating material for coating. Therefore, when selecting the rust proof
wax, it may be the penetrative type.
During the undercoating (vinyl coating) application, care should be taken that sealer is not applied to the engine-
related parts and shock absorber mounting or rotating parts. Following the under coating, make sure that body
drain holes are kept open.
The sequence of the application steps of the anti-corrosion materials are as follows:
1) Clean and prepare the metal surface.
2) Apply primer.
3) Apply sealer (all joints sealed originally).
4) Apply color in areas where color is required such as hem flanges, exposed joints and under body compo-
nents.
5) Apply anticorrosion compound (penetrative wax).
6) Apply undercoating (rust proof material).WARNING:
Standard shop practices, particularly eye protection, should be followed during the performance of the
below-itemized operations to avoid personal injury.
Page 365 of 447

BODY SERVICE 9-61
PLASTIC PARTS FINISHING
Paintable plastic parts are ABS plastic parts.
Painting
Rigid or hand ABS plastic needs no primer coating.
General acrylic lacquers can be painted properly over hard ABS plastic in terms of adherence.
1) Use cleaning solvent for paint finish to wash each part.
2) Apply conventional acrylic color lacquer to part surface.
3) Follow lacquer directions for required drying time. (Proper drying temperature range is 60 – 70 °C (140 – 158
°F)).
Reference
Plastic parts employ not only ABS (Acrylonitrile Butadiene Styrene) plastic but also polypropylene, vinyl, or the
like plastic. Burning test method to identify ABS plastic is described below.
1) Use a sharp blade to cut off a plastic sliver from the part at its hidden backside.
2) Hold sliver with pincers and set it on fire.
3) Carefully observe condition of the burning plastic.
4) ABS plastic must raise readily distinguishable back smoke while burning with its residue suspended in air
temporarily.
5) Polypropylene must raise no readily distinguishable smoke while burning.
REQUIRED SERVICE MATERIAL
Material Recommended SUZUKI product Use
Lithium grease SUZUKI SUPER GREASE A
(99000-25010)Window regulator
Door hinge
Sealant SUZUKI BOND No. 1215
(99000-31110)Hood hinge
Door hinge
Page 379 of 447

AIR BAG SYSTEM 10B-5
SYSTEM WIRING DIAGRAM
TERMINAL ARRANGEMENT OF SDM (VIEWED FROM HARNESS SIDE)
1
2
3
4 BLK/YEL
BLK/YELBLK/WHT
YEL/BLK
YEL/BLKGRN/RED
GRN GRNWHT WHT
GRN
BLU/RED
YEL/RED
GRN/ORN
GRN/YEL
BLU/ORN
BLU/YEL
6
12V
5V REDRED
BLU
BLU
5
8
7“G39”
“Q02”
“Q07” “Q05”
9
10PPL
BLK
“Q04”
Q06-2
Q06-4
Q06-14Q06-7
Q06-8 Q06-10
Q06-9
Q06-12
Q06-11
Q06-5
Q06-6 Q06-15
Q06-17L1
L2
IG
SDL
DNS
GNDLA
PP- PP+ DP- DP+P- P+ D- D+
“Q03”
“Q01”
“Q06”
“Q08”
15
161413
12 11
[A]
[B]
[C]
“Q01” “Q08”, “G39”
“Q06”
[A]: Shorting bar 5.“AIR BAG” fuse 12. Contact coil assembly
[B]: Air bag harness 6. Connection detection pin 13. Driver air bag (inflator) module
[C]: Connector 7. To ECM, TCM (if equipped) and ABS control
module (if equipped) 14. Passenger air bag (inflator) module
1. From main fuse 8. To data link connector (DLC) 15. Driver seat belt pretensioner (if equipped)
2. Ignition switch 9.“AIR BAG” monitor coupler 16. Passenger seat belt pretensioner (if equipped)
3.“IG METER” fuse 10. Ground for air bag system
4.“AIR BAG” warning lamp in combination meter 11. SDM
1. CONNECTOR “Q06” (SDM CONNECTOR)
Page 389 of 447

AIR BAG SYSTEM 10B-15
TABLE A - “AIR BAG” WARNING LAMP COMES ON STEADY
TABLE B - “AIR BAG” WARNING LAMP DOES NOT COME ON
TABLE C - “AIR BAG” WARNING LAMP FLASHES
TABLE D - “AIR BAG” WARNING LAMP CANNOT INDICATE FLASHING PAT-
TERN OF DTC
WIRING DIAGRAM
1. From main fuse 5.“AIR BAG” fuse 9. To ECM, TCM (if equipped) and ABS control
module (if equipped)
2. Ignition switch 6. Connection detection pin 10.“AIR BAG” monitor coupler
3.“IG·COIL METER” fuse 7. SDM 11. Ground for air bag system
4.“AIR BAG” warning lamp in combination meter 8. To DLC [A]: Air bag harness
1
2
34 BLK/YEL
BLK/YELBLK/WHTYEL/BLKYEL/BLK
6
REDRED
BLU
BLU
5
8
9
10
11
PPL
BLK
“Q04”“Q06”
Q06-2
Q06-4
Q06-14
Q06-15
Q06-17L1
L2
IG
SDL
DNS
GNDLA
7
[A]
12V
5V
“G39”“Q02”
CAUTION:
Be sure to perform AIR BAG DIAGNOSTIC SYSTEM CHECK before starting diagnosis according to
flow table.
When measurement of resistance or voltage is required in this table, use a tester along with a cor-
rect terminal adapter from special tool (Connector test adapter kit).
When a check for proper connection is required, refer to INTERMITTENT AND POOR CONNEC-
TIONS in this section.
If there is open circuit in the air bag wire harness, connector or terminal is found damaged, replace
the wire harness, connector and terminal as an assembly.
Page 395 of 447

AIR BAG SYSTEM 10B-21
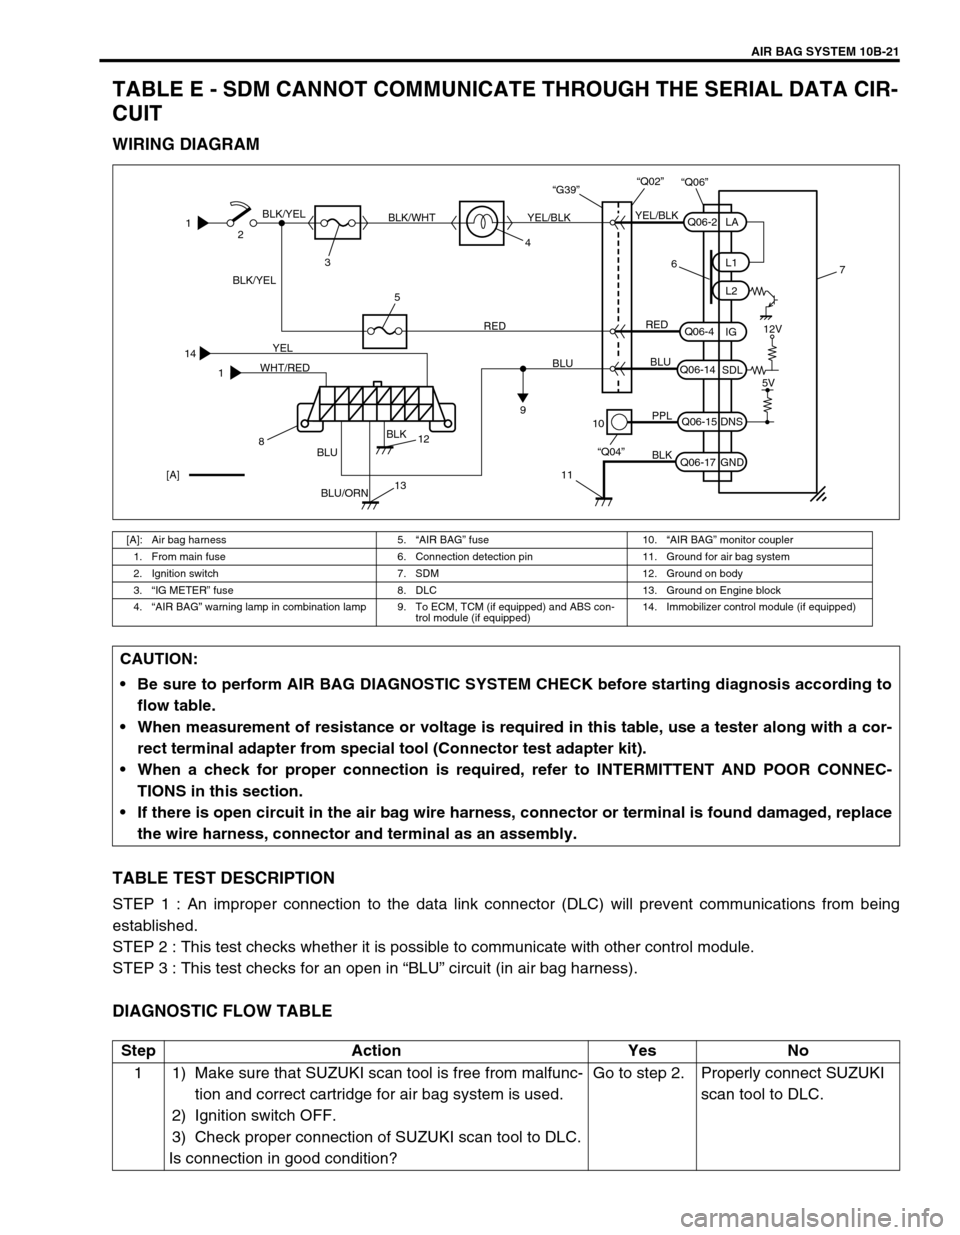
TABLE E - SDM CANNOT COMMUNICATE THROUGH THE SERIAL DATA CIR-
CUIT
WIRING DIAGRAM
TABLE TEST DESCRIPTION
STEP 1 : An improper connection to the data link connector (DLC) will prevent communications from being
established.
STEP 2 : This test checks whether it is possible to communicate with other control module.
STEP 3 : This test checks for an open in “BLU” circuit (in air bag harness).
DIAGNOSTIC FLOW TABLE
[A]: Air bag harness 5.“AIR BAG” fuse 10.“AIR BAG” monitor coupler
1. From main fuse 6. Connection detection pin 11. Ground for air bag system
2. Ignition switch 7. SDM 12. Ground on body
3.“IG METER” fuse 8. DLC 13. Ground on Engine block
4.“AIR BAG” warning lamp in combination lamp 9. To ECM, TCM (if equipped) and ABS con-
trol module (if equipped)14. Immobilizer control module (if equipped)
1
14
12
34 BLK/YEL
BLK/YEL
YELBLK/WHT
BLK
BLU/ORNYEL/BLKYEL/BLK
6
RED
WHT/REDRED
BLU
BLU
BLU
5
9
10
11
PPL
BLK
“Q04”“Q06”
Q06-2
Q06-4
Q06-14
Q06-15
Q06-17L1
L2
IG
SDL
DNS
GNDLA
7
[A]
12V
5V
“G39”“Q02”
812
13
CAUTION:
Be sure to perform AIR BAG DIAGNOSTIC SYSTEM CHECK before starting diagnosis according to
flow table.
When measurement of resistance or voltage is required in this table, use a tester along with a cor-
rect terminal adapter from special tool (Connector test adapter kit).
When a check for proper connection is required, refer to INTERMITTENT AND POOR CONNEC-
TIONS in this section.
If there is open circuit in the air bag wire harness, connector or terminal is found damaged, replace
the wire harness, connector and terminal as an assembly.
Step Action Yes No
1 1) Make sure that SUZUKI scan tool is free from malfunc-
tion and correct cartridge for air bag system is used.
2) Ignition switch OFF.
3) Check proper connection of SUZUKI scan tool to DLC.
Is connection in good condition?Go to step 2. Properly connect SUZUKI
scan tool to DLC.
Page 396 of 447

10B-22 AIR BAG SYSTEM
Fig. for STEP 1
Fig. for STEP 3
Special tool
(A) : 09932-76010 2 1) Check if communication is possible by trying communi-
cation with other control module (ECM, TCM (if
equipped) or ABS control module (if equipped)).
Is it possible to communicate with other control module?Go to step 3. Repair open in common
section of serial data circuit
(“BLU” wire circuit) used by
all controllers or short to
ground or power circuit
which has occurred some-
where in serial data circuit
(“BLU” wire circuit).
3 1) With ignition switch OFF, disconnect SDM and “Q02”
connector.
2) Check proper connection at “Q02-2” (“BLU” wire) termi-
nal for DLC.
3) If OK, then check resistance between “Q02-2” (“BLU”
wire) terminal and “Q06-14” terminal of SDM connec-
tor.
Is resistance 1 Ω or less?Substitute a
known-good
SDM and
recheck.Repair high resistance or
open in “BLU” wire circuit
(in air bag harness). Step Action Yes No
1. DLC
2. Scan tool
1. Air bag harness side connector
2.“BLU” wire terminal
NOTE:
Upon completion of inspection and repair work, perform following items.
Reconnect all air bag system components, ensure all components are properly mounted.
Repeat AIR BAG DIAGNOSTIC SYSTEM CHECK to confirm that the trouble has been corrected.