cat SUZUKI SWIFT 2007 2.G Service Manual PDF
[x] Cancel search | Manufacturer: SUZUKI, Model Year: 2007, Model line: SWIFT, Model: SUZUKI SWIFT 2007 2.GPages: 1496, PDF Size: 34.44 MB
Page 111 of 1496
Downloaded from www.Manualslib.com manuals search engine Engine General Information and Diagnosis: 1A-61
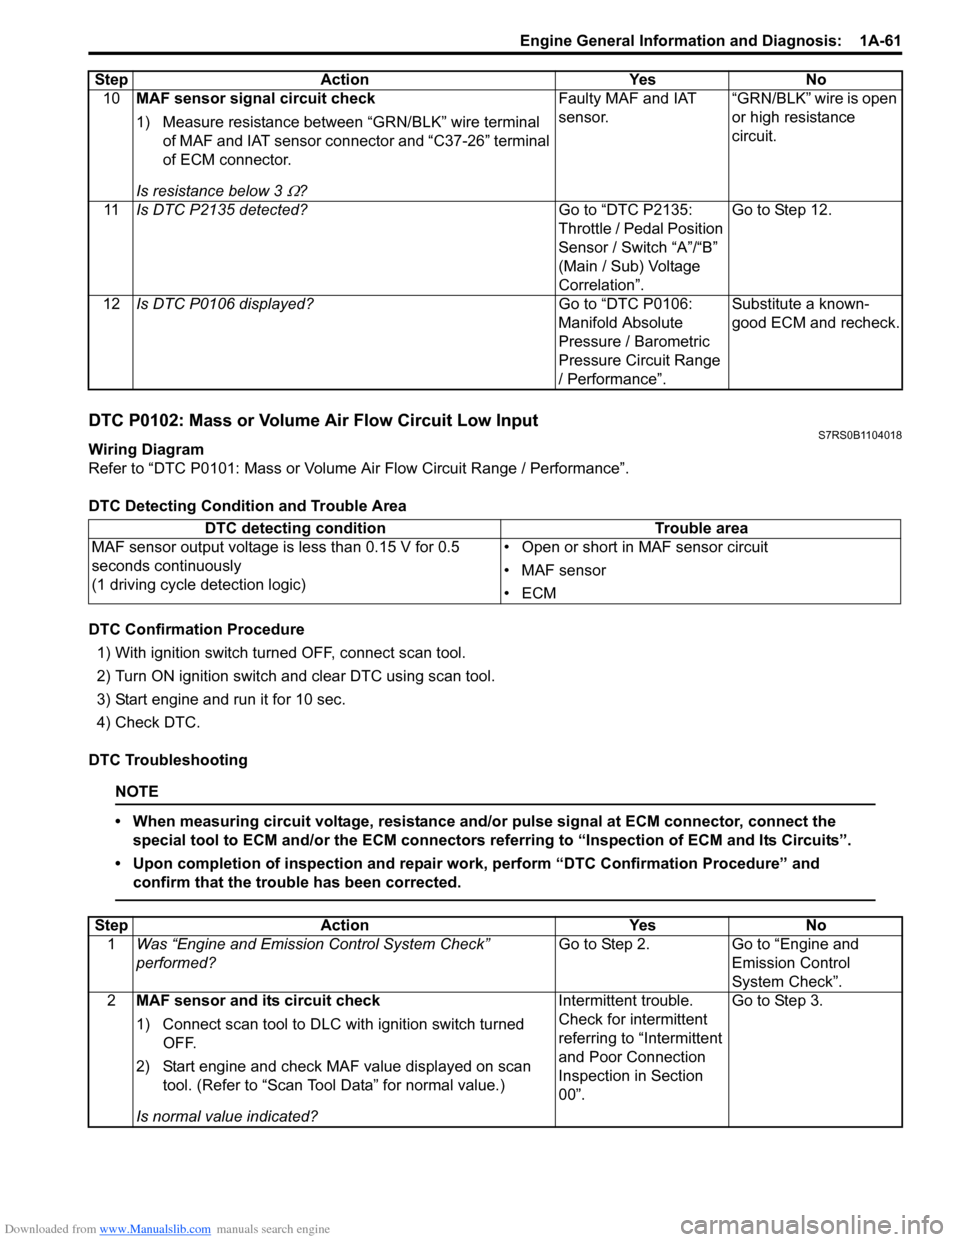
DTC P0102: Mass or Volume Air Flow Circuit Low InputS7RS0B1104018
Wiring Diagram
Refer to “DTC P0101: Mass or Volume Air Flow Circuit Range / Performance”.
DTC Detecting Condition and Trouble Area
DTC Confirmation Procedure1) With ignition switch turned OFF, connect scan tool.
2) Turn ON ignition switch and clear DTC using scan tool.
3) Start engine and run it for 10 sec.
4) Check DTC.
DTC Troubleshooting
NOTE
• When measuring circuit voltage, resistance and/ or pulse signal at ECM connector, connect the
special tool to ECM and/or the ECM connectors re ferring to “Inspection of ECM and Its Circuits”.
• Upon completion of inspection and repair work, perform “DTC Confirmation Procedure” and confirm that the trouble has been corrected.
10 MAF sensor signal circuit check
1) Measure resistance between “GRN/BLK” wire terminal
of MAF and IAT sensor connector and “C37-26” terminal
of ECM connector.
Is resistance below 3
Ω? Faulty MAF and IAT
sensor.
“GRN/BLK” wire is open
or high resistance
circuit.
11 Is DTC P2135 detected? Go to “DTC P2135:
Throttle / Pedal Position
Sensor / Switch “A”/“B”
(Main / Sub) Voltage
Correlation”.Go to Step 12.
12 Is DTC P0106 displayed? Go to “DTC P0106:
Manifold Absolute
Pressure / Barometric
Pressure Circuit Range
/ Performance”.Substitute a known-
good ECM and recheck.
Step
Action YesNo
DTC detecting condition Trouble area
MAF sensor output voltage is less than 0.15 V for 0.5
seconds continuously
(1 driving cycle detection logic) • Open or short in MAF sensor circuit
• MAF sensor
•ECM
Step
Action YesNo
1 Was “Engine and Emission Control System Check”
performed? Go to Step 2.
Go to “Engine and
Emission Control
System Check”.
2 MAF sensor and its circuit check
1) Connect scan tool to DLC with ignition switch turned
OFF.
2) Start engine and check MAF value displayed on scan tool. (Refer to “Scan Tool Data” for normal value.)
Is normal value indicated? Intermittent trouble.
Check for intermittent
referring to “Intermittent
and Poor Connection
Inspection in Section
00”.
Go to Step 3.
Page 113 of 1496
Downloaded from www.Manualslib.com manuals search engine Engine General Information and Diagnosis: 1A-63
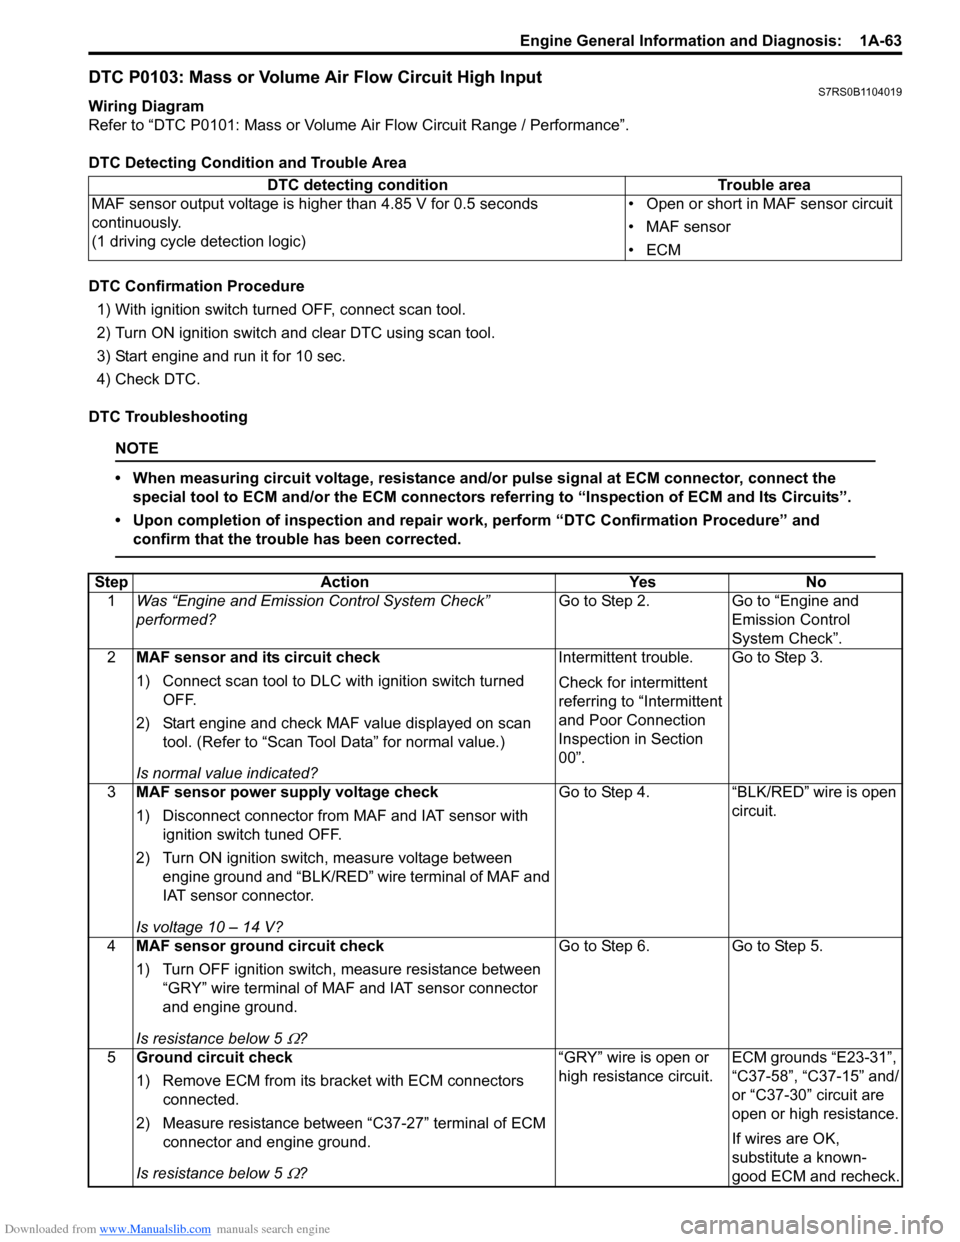
DTC P0103: Mass or Volume Air Flow Circuit High InputS7RS0B1104019
Wiring Diagram
Refer to “DTC P0101: Mass or Volume Air Flow Circuit Range / Performance”.
DTC Detecting Condition and Trouble Area
DTC Confirmation Procedure1) With ignition switch turned OFF, connect scan tool.
2) Turn ON ignition switch and clear DTC using scan tool.
3) Start engine and run it for 10 sec.
4) Check DTC.
DTC Troubleshooting
NOTE
• When measuring circuit voltage, resistance and/ or pulse signal at ECM connector, connect the
special tool to ECM and/or the ECM connectors re ferring to “Inspection of ECM and Its Circuits”.
• Upon completion of inspection and repair work, perform “DTC Confirmation Procedure” and confirm that the trouble has been corrected.
DTC detecting condition Trouble area
MAF sensor output voltage is higher than 4.85 V for 0.5 seconds
continuously.
(1 driving cycle detection logic) • Open or short in MAF sensor circuit
• MAF sensor
•ECM
Step
Action YesNo
1 Was “Engine and Emission Control System Check”
performed? Go to Step 2.
Go to “Engine and
Emission Control
System Check”.
2 MAF sensor and its circuit check
1) Connect scan tool to DLC with ignition switch turned
OFF.
2) Start engine and check MAF value displayed on scan tool. (Refer to “Scan Tool Data” for normal value.)
Is normal value indicated? Intermittent trouble.
Check for intermittent
referring to “Intermittent
and Poor Connection
Inspection in Section
00”.
Go to Step 3.
3 MAF sensor power supply voltage check
1) Disconnect connector from MAF and IAT sensor with
ignition switch tuned OFF.
2) Turn ON ignition switch, measure voltage between engine ground and “BLK/RED” wire terminal of MAF and
IAT sensor connector.
Is voltage 10 – 14 V? Go to Step 4.
“BLK/RED” wire is open
circuit.
4 MAF sensor ground circuit check
1) Turn OFF ignition switch, measure resistance between
“GRY” wire terminal of MAF and IAT sensor connector
and engine ground.
Is resistance below 5
Ω? Go to Step 6. Go to Step 5.
5 Ground circuit check
1) Remove ECM from its br acket with ECM connectors
connected.
2) Measure resistance between “C37-27” terminal of ECM connector and engine ground.
Is resistance below 5
Ω? “GRY” wire is open or
high resistance circuit.
ECM grounds “E23-31”,
“C37-58”, “C37-15” and/
or “C37-30” circuit are
open or high resistance.
If wires are OK,
substitute a known-
good ECM and recheck.
Page 117 of 1496
Downloaded from www.Manualslib.com manuals search engine Engine General Information and Diagnosis: 1A-67
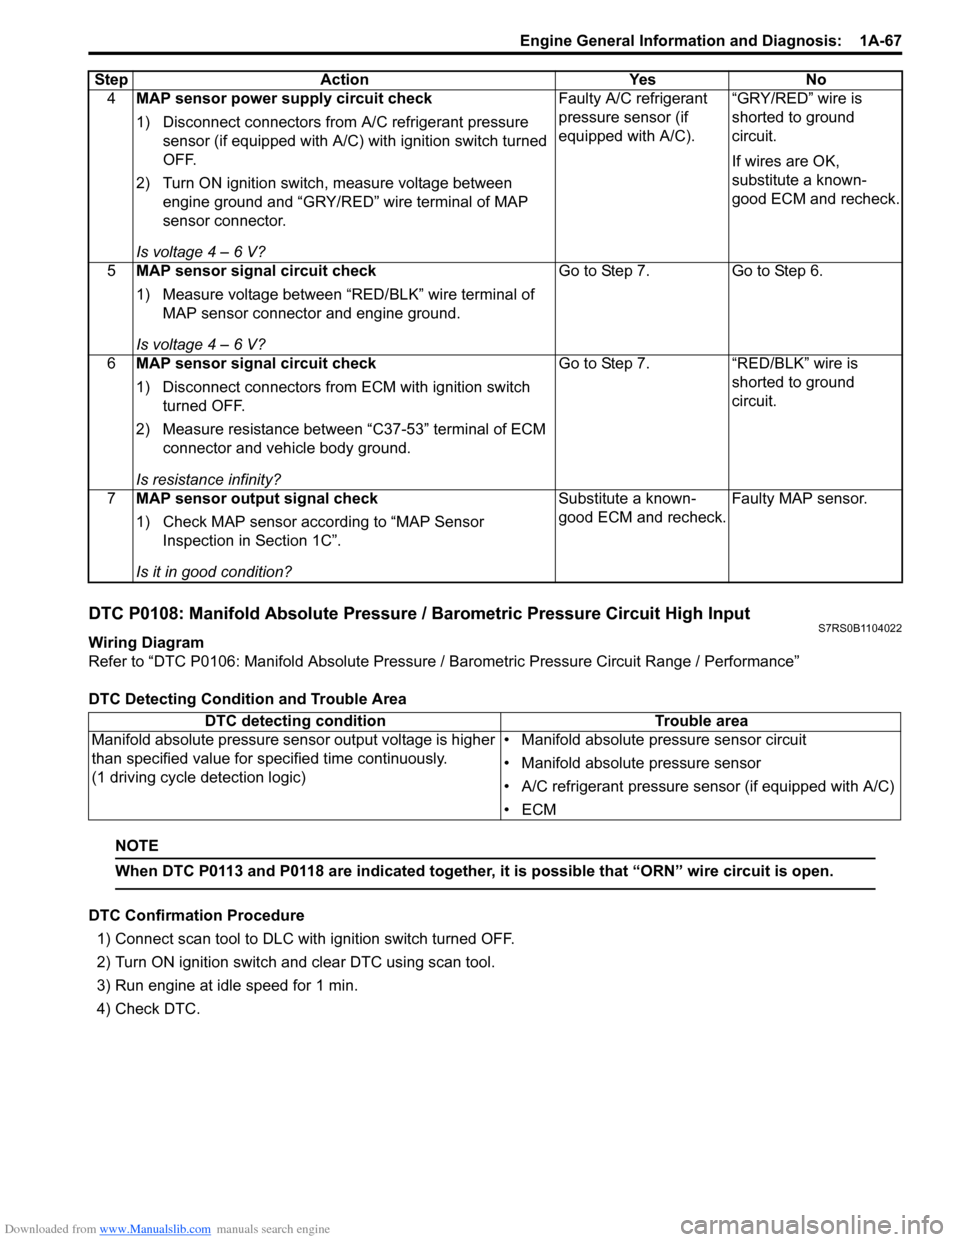
DTC P0108: Manifold Absolute Pressure / Barometric Pressure Circuit High InputS7RS0B1104022
Wiring Diagram
Refer to “DTC P0106: Manifold Absolute Pressure / Barometric Pressure Circuit Range / Performance”
DTC Detecting Condition and Trouble Area
NOTE
When DTC P0113 and P0118 are indicated together, it is possible that “ORN” wire circuit is open.
DTC Confirmation Procedure 1) Connect scan tool to DLC with ignition switch turned OFF.
2) Turn ON ignition switch and clear DTC using scan tool.
3) Run engine at idle speed for 1 min.
4) Check DTC. 4
MAP sensor power supply circuit check
1) Disconnect connectors from A/C refrigerant pressure
sensor (if equipped with A/C) with ignition switch turned
OFF.
2) Turn ON ignition switch, measure voltage between engine ground and “GRY/RED” wire terminal of MAP
sensor connector.
Is voltage 4 – 6 V? Faulty A/C refrigerant
pressure sensor (if
equipped with A/C).
“GRY/RED” wire is
shorted to ground
circuit.
If wires are OK,
substitute a known-
good ECM and recheck.
5 MAP sensor signal circuit check
1) Measure voltage between “RED/BLK” wire terminal of
MAP sensor connector and engine ground.
Is voltage 4 – 6 V? Go to Step 7. Go to Step 6.
6 MAP sensor signal circuit check
1) Disconnect connectors from ECM with ignition switch
turned OFF.
2) Measure resistance between “C37-53” terminal of ECM connector and vehicle body ground.
Is resistance infinity? Go to Step 7. “RED/BLK” wire is
shorted to ground
circuit.
7 MAP sensor output signal check
1) Check MAP sensor acco rding to “MAP Sensor
Inspection in Section 1C”.
Is it in good condition? Substitute a known-
good ECM and recheck.
Faulty MAP sensor.
Step Action Yes No
DTC detecting condition
Trouble area
Manifold absolute pressure sensor output voltage is higher
than specified value for s pecified time continuously.
(1 driving cycle detection logic) • Manifold absolute pressure sensor circuit
• Manifold absolute pressure sensor
• A/C refrigerant pressure sensor (if equipped with A/C)
•ECM
Page 120 of 1496
Downloaded from www.Manualslib.com manuals search engine 1A-70 Engine General Information and Diagnosis:
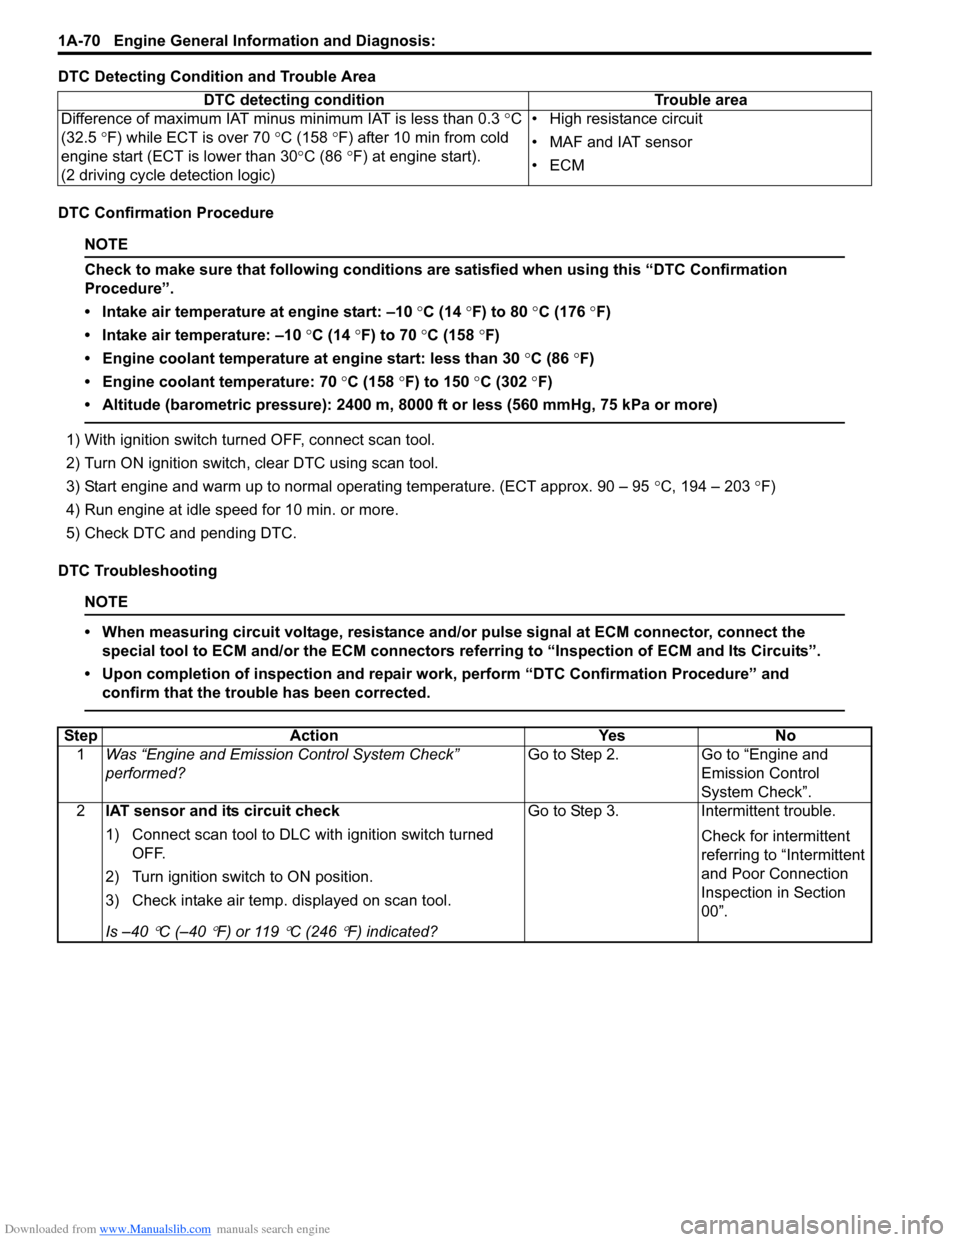
DTC Detecting Condition and Trouble Area
DTC Confirmation Procedure
NOTE
Check to make sure that following conditions are satisfied when using this “DTC Confirmation
Procedure”.
• Intake air temperature at engine start: –10 °C (14 ° F) to 80 °C (176 °F)
• Intake air temperature: –10 °C (14 °F) to 70 °C (158 °F)
• Engine coolant temperature at engine start: less than 30 °C (86 °F)
• Engine coolant temperature: 70 °C (158 °F) to 150 °C (302 °F)
• Altitude (barometric pressure): 2400 m, 8000 ft or less (560 mmHg, 75 kPa or more)
1) With ignition switch turned OFF, connect scan tool.
2) Turn ON ignition switch, clear DTC using scan tool.
3) Start engine and warm up to normal operating temperature. (ECT approx. 90 – 95 °C, 194 – 203 °F)
4) Run engine at idle speed for 10 min. or more.
5) Check DTC and pending DTC.
DTC Troubleshooting
NOTE
• When measuring circuit voltage, resistance and/ or pulse signal at ECM connector, connect the
special tool to ECM and/or the ECM connectors re ferring to “Inspection of ECM and Its Circuits”.
• Upon completion of inspection and repair work, perform “DTC Confirmation Procedure” and confirm that the trouble has been corrected.
DTC detecting condition Trouble area
Difference of maximum IAT minus minimum IAT is less than 0.3 °C
(32.5 °F) while ECT is over 70 °C (158 °F) after 10 min from cold
engine start (ECT is lower than 30 °C (86 °F) at engine start).
(2 driving cycle detection logic) • High resistance circuit
• MAF and IAT sensor
•ECM
Step
Action YesNo
1 Was “Engine and Emission Control System Check”
performed? Go to Step 2.
Go to “Engine and
Emission Control
System Check”.
2 IAT sensor and its circuit check
1) Connect scan tool to DLC with ignition switch turned
OFF.
2) Turn ignition switch to ON position.
3) Check intake air temp. displayed on scan tool.
Is –40
°C (–40 °F) or 119 °C (246 °F) indicated? Go to Step 3. Intermittent trouble.
Check for intermittent
referring to “Intermittent
and Poor Connection
Inspection in Section
00”.
Page 123 of 1496
Downloaded from www.Manualslib.com manuals search engine Engine General Information and Diagnosis: 1A-73
StepAction YesNo
1 Was “Engine and Emission Control System Check”
performed? Go to Step 2.
Go to “Engine and
Emission Control
System Check”.
2 IAT sensor and its circuit check
1) Connect scan tool to DLC with ignition switch turned
OFF.
2) Turn ON ignition switch.
3) Check intake air temp. displayed on scan tool.
Is 119
°C (246 °F) indicated? Go to Step 3. Intermittent trouble.
Check for intermittent
referring to “Intermittent
and Poor Connection
Inspection in Section
00”.
3 ECM voltage check
1) Disconnect connector from MAF and IAT sensor with
ignition switch turned OFF.
2) Check for proper connection to MAF and IAT sensor at “BLK/YEL” and “GRY/BLU” wire terminals.
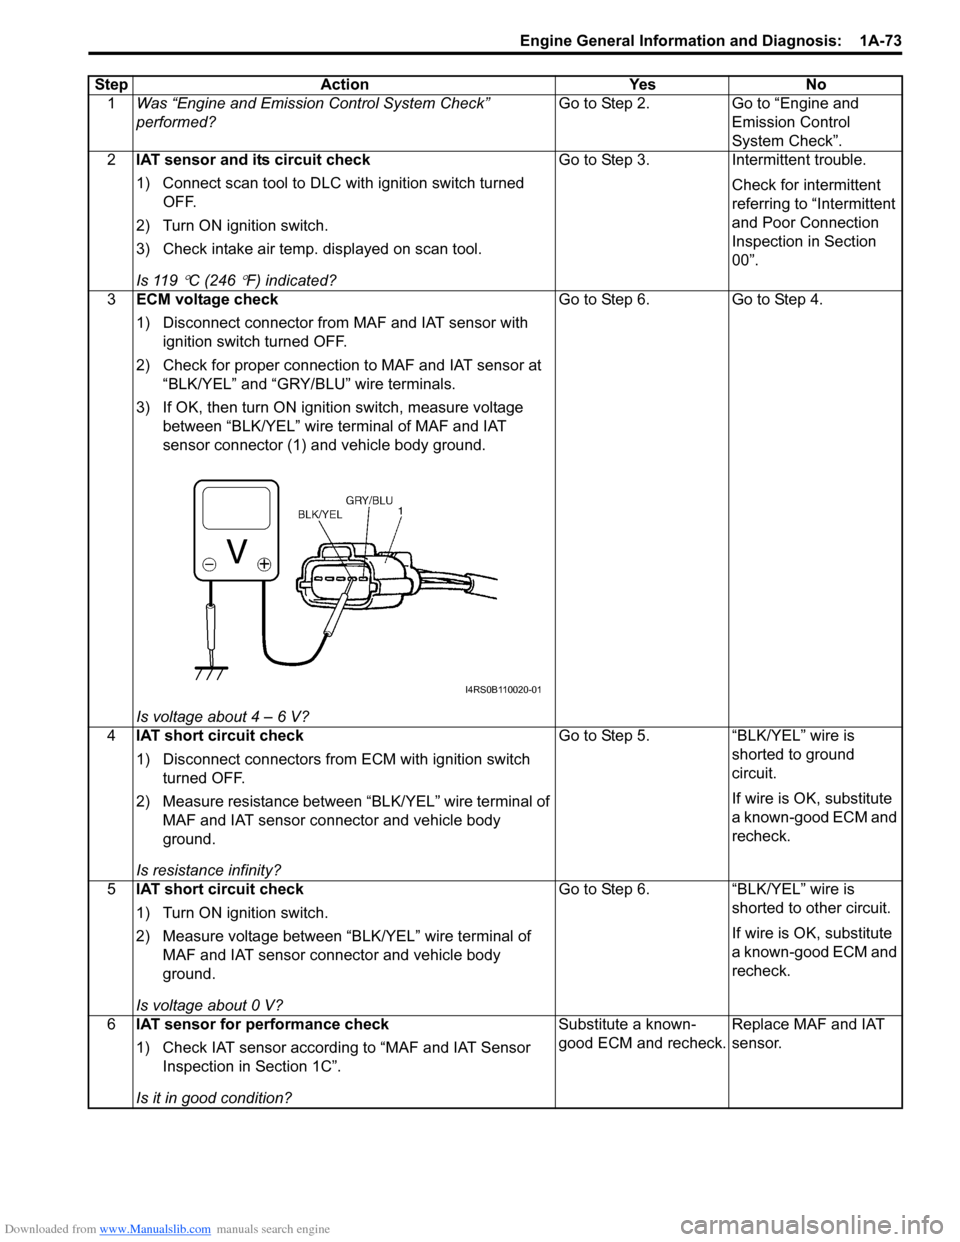
3) If OK, then turn ON igniti on switch, measure voltage
between “BLK/YEL” wire terminal of MAF and IAT
sensor connector (1) and vehicle body ground.
Is voltage about 4 – 6 V? Go to Step 6. Go to Step 4.
4 IAT short circuit check
1) Disconnect connectors from ECM with ignition switch
turned OFF.
2) Measure resistance between “BLK/YEL” wire terminal of MAF and IAT sensor connector and vehicle body
ground.
Is resistance infinity? Go to Step 5. “BLK/YEL” wire is
shorted to ground
circuit.
If wire is OK, substitute
a known-good ECM and
recheck.
5 IAT short circuit check
1) Turn ON ignition switch.
2) Measure voltage between “BLK/YEL” wire terminal of
MAF and IAT sensor connector and vehicle body
ground.
Is voltage about 0 V? Go to Step 6. “BLK/YEL” wire is
shorted to other circuit.
If wire is OK, substitute
a known-good ECM and
recheck.
6 IAT sensor for performance check
1) Check IAT sensor according to “MAF and IAT Sensor
Inspection in Section 1C”.
Is it in good condition? Substitute a known-
good ECM and recheck.
Replace MAF and IAT
sensor.
I4RS0B110020-01
Page 124 of 1496
Downloaded from www.Manualslib.com manuals search engine 1A-74 Engine General Information and Diagnosis:
DTC P0113: Intake Air Temperature 1 Sensor Circuit HighS7RS0B1104025
Wiring Diagram
Refer to “DTC P0111: Intake Air Temperature Sensor 1 Circuit Range / Performance”.
DTC Detecting Condition and Trouble Area
NOTE
When DTC P0108 and P0118 are indicated together, it is possible that “ORN” wire circuit is open.
DTC Confirmation Procedure
1) With ignition switch turned OFF, connect scan tool.
2) Turn ON ignition switch and clear DTC using scan tool.
3) Start engine and run it for 10 sec.
4) Check DTC.
DTC Troubleshooting
NOTE
• When measuring circuit voltage, resistance and/ or pulse signal at ECM connector, connect the
special tool to ECM and/or the ECM connectors re ferring to “Inspection of ECM and Its Circuits”.
• Upon completion of inspection and repair work, perform “DTC Confirmation Procedure” and confirm that the trouble has been corrected.
DTC detecting condition Trouble area
IAT sensor output voltage is hi gher than 4.85 V for 0.5 seconds
continuously.
(Low intake air temperature (high voltage/high resistance))
(1 driving cycle detection logic) • IAT sensor circuit
• IAT sensor
•ECM
Step
Action YesNo
1 Was “Engine and Emission Control System Check”
performed? Go to Step 2.
Go to “Engine and
Emission Control
System Check”.
2 IAT sensor and its circuit check
1) Connect scan tool to DLC with ignition switch turned
OFF.
2) Turn ON ignition switch.
3) Check intake air temp. displayed on scan tool.
Is –40
°C (–40 °F) indicated? Go to Step 3. Intermittent trouble.
Check for intermittent
referring to “Intermittent
and Poor Connection
Inspection in Section
00”.
Page 130 of 1496
Downloaded from www.Manualslib.com manuals search engine 1A-80 Engine General Information and Diagnosis:
DTC Troubleshooting
NOTE
• When measuring circuit voltage, resistance and/or pulse signal at ECM connector, connect the
special tool to ECM and/or the ECM connectors re ferring to “Inspection of ECM and Its Circuits”.
• Upon completion of inspection and repair work, perform “DTC Confirmation Procedure” and confirm that the trouble has been corrected.
Step Action YesNo
1 Was “Engine and Emission Control System Check”
performed? Go to Step 2.
Go to “Engine and
Emission Control
System Check”.
2 ECT sensor and its circuit check
1) Connect scan tool with i gnition switch turned OFF.
2) Turn ON ignition switch.
3) Check engine coolant temp. displayed on scan tool.
Is 119
°C (246 °F) indicated? Go to Step 3. Intermittent trouble.
Check for intermittent
referring to “Intermittent
and Poor Connection
Inspection in Section
00”.
3 ECM voltage check
1) Disconnect connector from ECT sensor with ignition
switch turned OFF.
2) Check for proper connection to ECT sensor at “LT GRN” and “ORN” wire terminals.
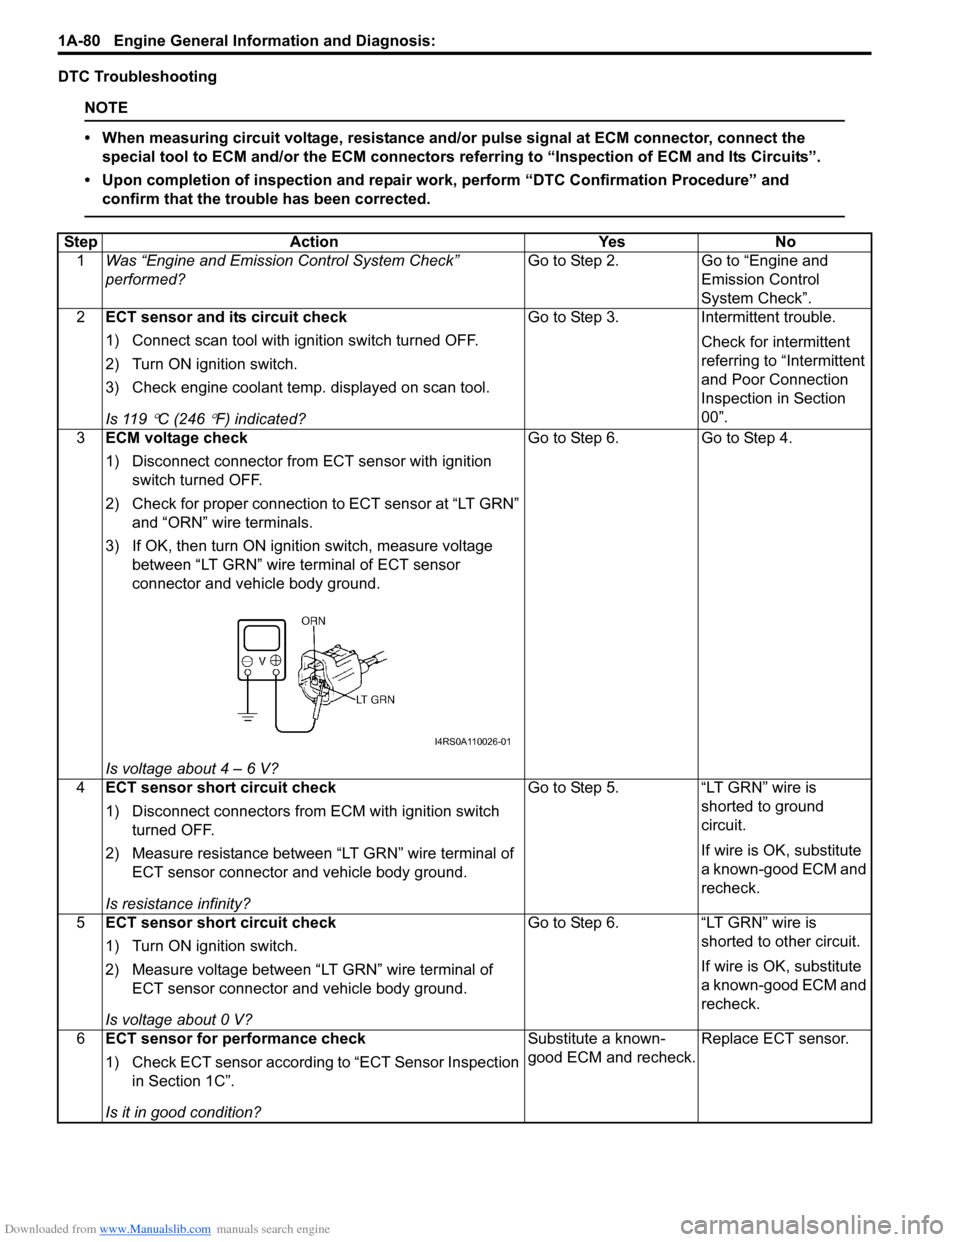
3) If OK, then turn ON igniti on switch, measure voltage
between “LT GRN” wire terminal of ECT sensor
connector and vehicle body ground.
Is voltage about 4 – 6 V? Go to Step 6. Go to Step 4.
4 ECT sensor short circuit check
1) Disconnect connectors from ECM with ignition switch
turned OFF.
2) Measure resistance between “LT GRN” wire terminal of ECT sensor connector and vehicle body ground.
Is resistance infinity? Go to Step 5. “LT GRN” wire is
shorted to ground
circuit.
If wire is OK, substitute
a known-good ECM and
recheck.
5 ECT sensor short circuit check
1) Turn ON ignition switch.
2) Measure voltage between “LT GRN” wire terminal of
ECT sensor connector and vehicle body ground.
Is voltage about 0 V? Go to Step 6. “LT GRN” wire is
shorted to other circuit.
If wire is OK, substitute
a known-good ECM and
recheck.
6 ECT sensor for performance check
1) Check ECT sensor according to “ECT Sensor Inspection
in Section 1C”.
Is it in good condition? Substitute a known-
good ECM and recheck.
Replace ECT sensor.
I4RS0A110026-01
Page 131 of 1496
Downloaded from www.Manualslib.com manuals search engine Engine General Information and Diagnosis: 1A-81
DTC P0118: Engine Coolant Temperature Circuit HighS7RS0B1104028
Wiring Diagram
Refer to “DTC P0116: Engine Coolant Temperature Circuit Range / Performance”.
DTC Detecting Condition and Trouble Area
NOTE
When DTC P0108 and P0113 are indicated together, it is possible that “ORN” wire circuit open.
DTC Confirmation Procedure
1) With ignition switch turned OFF, connect scan tool.
2) Turn ON ignition switch and clear DTC using scan tool.
3) Start engine and run it for 10 sec. or more.
4) Check DTC and pending DTC.
DTC Troubleshooting
NOTE
• When measuring circuit voltage, resistance and/ or pulse signal at ECM connector, connect the
special tool to ECM and/or the ECM connectors re ferring to “Inspection of ECM and Its Circuits”.
• Upon completion of inspection and repair work, perform “DTC Confirmation Procedure” and confirm that the trouble has been corrected.
DTC detecting condition Trouble area
ECT sensor output voltage is higher than 4.85 V for 0.5 seconds
continuously.
(Low engine coolant temperature (high voltage/high resistance))
(1 driving cycle detection logic) • ECT sensor circuit
• ECT sensor
•ECM
Step
Action YesNo
1 Was “Engine and Emission Control System Check”
performed? Go to Step 2.
Go to “Engine and
Emission Control
System Check”.
2 ECT sensor and its circuit check
1) Connect scan tool with i gnition switch turned OFF.
2) Turn ON ignition switch.
3) Check engine coolant temp. displayed on scan tool.
Is –40
°C (–40 °F) indicated? Go to Step 3. Intermittent trouble.
Check for intermittent
referring to “Intermittent
and Poor Connection
Inspection in Section
00”.
3 ECT voltage check
1) Disconnect connector from ECT sensor with ignition
switch turned OFF.
2) Check for proper connection to ECT sensor at “LT GRN” and “ORN” wire terminals.
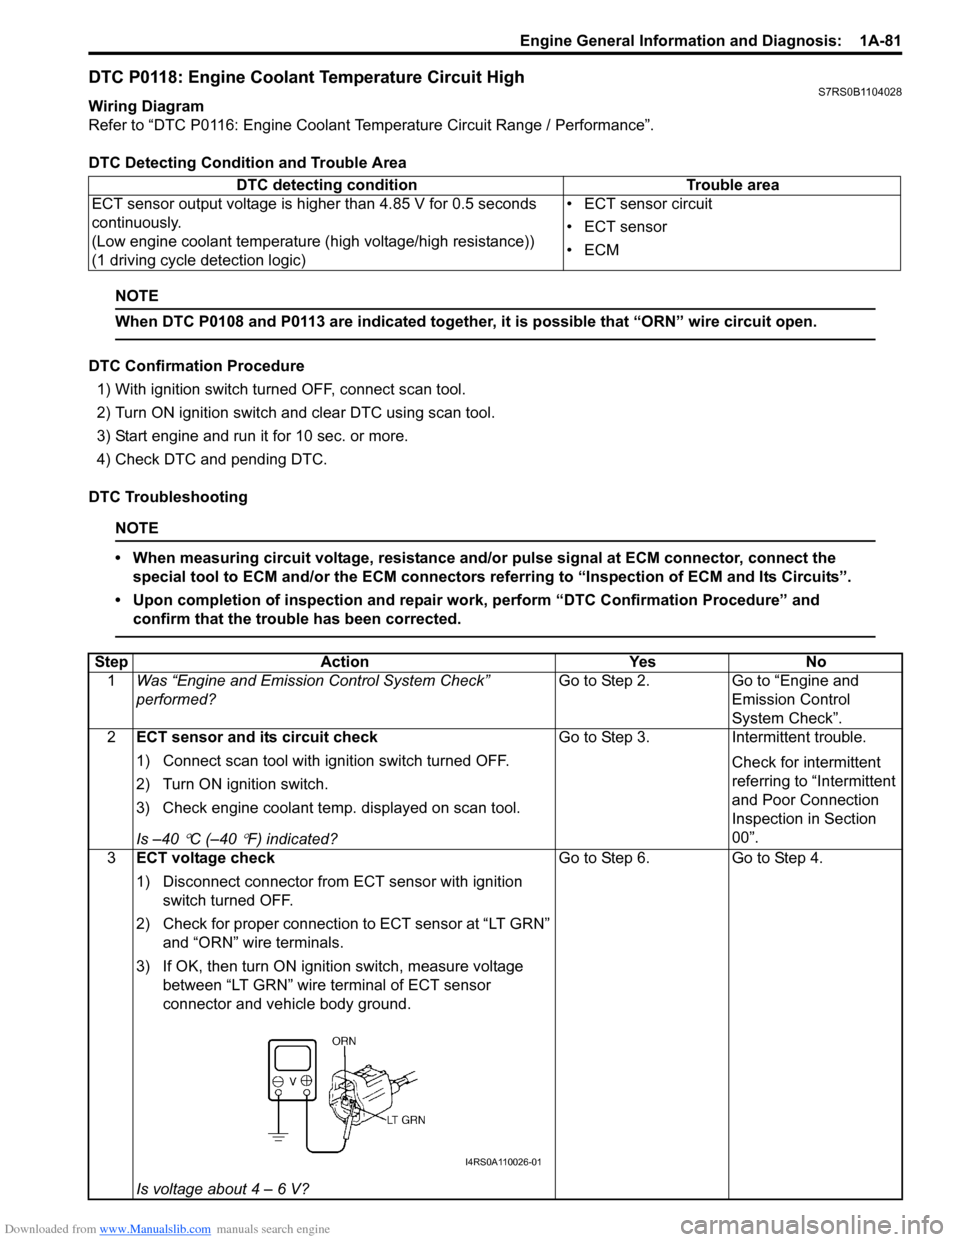
3) If OK, then turn ON igniti on switch, measure voltage
between “LT GRN” wire terminal of ECT sensor
connector and vehicle body ground.
Is voltage about 4 – 6 V? Go to Step 6. Go to Step 4.
I4RS0A110026-01
Page 133 of 1496
Downloaded from www.Manualslib.com manuals search engine Engine General Information and Diagnosis: 1A-83
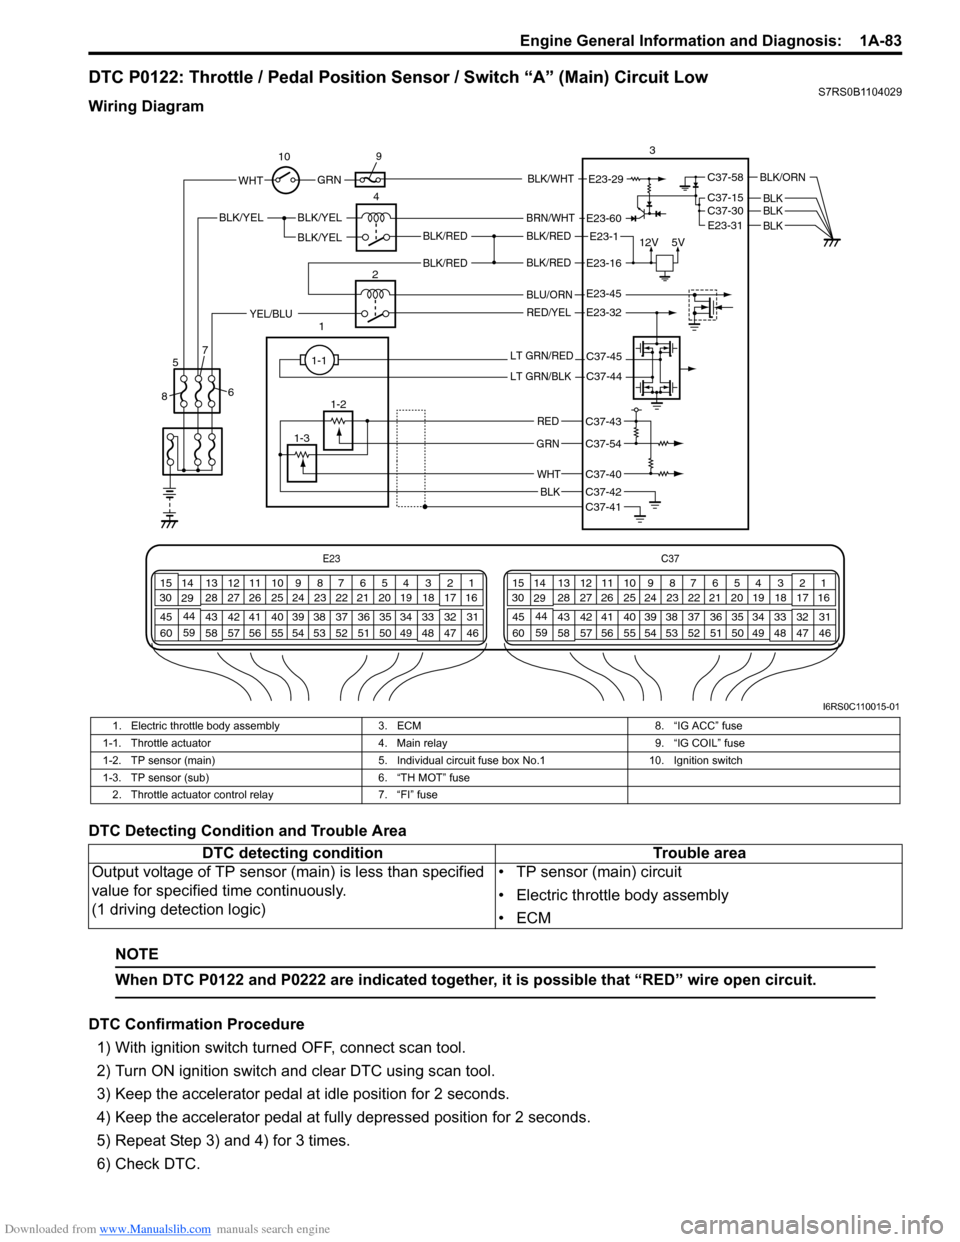
DTC P0122: Throttle / Pedal Position Sensor / Switch “A” (Main) Circuit LowS7RS0B1104029
Wiring Diagram
DTC Detecting Condition and Trouble Area
NOTE
When DTC P0122 and P0222 are indicated together, it is possible that “RED” wire open circuit.
DTC Confirmation Procedure
1) With ignition switch turned OFF, connect scan tool.
2) Turn ON ignition switch and clear DTC using scan tool.
3) Keep the accelerator pedal at idle position for 2 seconds.
4) Keep the accelerator pedal at fully depressed position for 2 seconds.
5) Repeat Step 3) and 4) for 3 times.
6) Check DTC.
E23 C37
34
1819
567
1011
17
20
47 46
495051
2122
52 16
25 9
24
14
29
55
57 54 53
59
60 58 2
262728
15
30
56 4832 31
34353637
40
42 39 38
44
45 43 41 331
1213
238
34
1819
567
1011
17
20
47 46
495051
2122
52 16
25 9
24
14
29
55
57 54 53
59
60 58 2
262728
15
30
56 4832 31
34353637
40
42 39 38
44
45 43 41 331
1213
238
12V
5VBLK/REDBLK/RED
BLK/YEL
12BLK/YEL
BLK/YEL
BRN/WHT
E23-1
E23-60
C37-58
C37-15 C37-30
BLK/ORN
BLKBLKE23-31 BLK
BLK/RED
BLU/ORN
RED/YELYEL/BLU
LT GRN/RED
LT GRN/BLK
RED
GRN
WHT
BLK
E23-16
E23-45
E23-32
C37-45
C37-44
C37-41C37-42
C37-40
C37-54
C37-43
1-1
1-2
1-3 3
4
5
8 67
10
9
E23-29 GRNBLK/WHTWHT
BLK/RED
I6RS0C110015-01
1. Electric throttle body assembly
3. ECM 8. “IG ACC” fuse
1-1. Throttle actuator 4. Main relay 9. “IG COIL” fuse
1-2. TP sensor (main) 5. Individual circuit fuse box No.110. Ignition switch
1-3. TP sensor (sub) 6. “TH MOT” fuse
2. Throttle actuator control relay 7. “FI” fuse
DTC detecting condition Trouble area
Output voltage of TP sensor (main) is less than specified
value for specified time continuously.
(1 driving detection logic) • TP sensor (main) circuit
• Electric throttle body assembly
•ECM
Page 135 of 1496
Downloaded from www.Manualslib.com manuals search engine Engine General Information and Diagnosis: 1A-85
DTC P0123: Throttle / Pedal Position Sensor / Switch “A” (Main) Circuit HighS7RS0B1104030
Wiring Diagram
Refer to “DTC P0122: Throttle / Pedal Position Sensor / Switch “A” (Main) Circuit Low”.
DTC Detecting Condition and Trouble Area
NOTE
When DTC P0123 and P0223 are indicated together, it is possible that “RED” wire shorted to power
circuit and/or “BLK” wire open.
DTC Confirmation Procedure
1) With ignition switch turned OFF, connect scan tool.
2) Turn ON ignition switch and clear DTC using scan tool.
3) Keep the accelerator pedal at idle position for 2 seconds.
4) Keep the accelerator pedal at fully depressed position for 2 seconds.
5) Repeat Step 3) and 4) for 3 times.
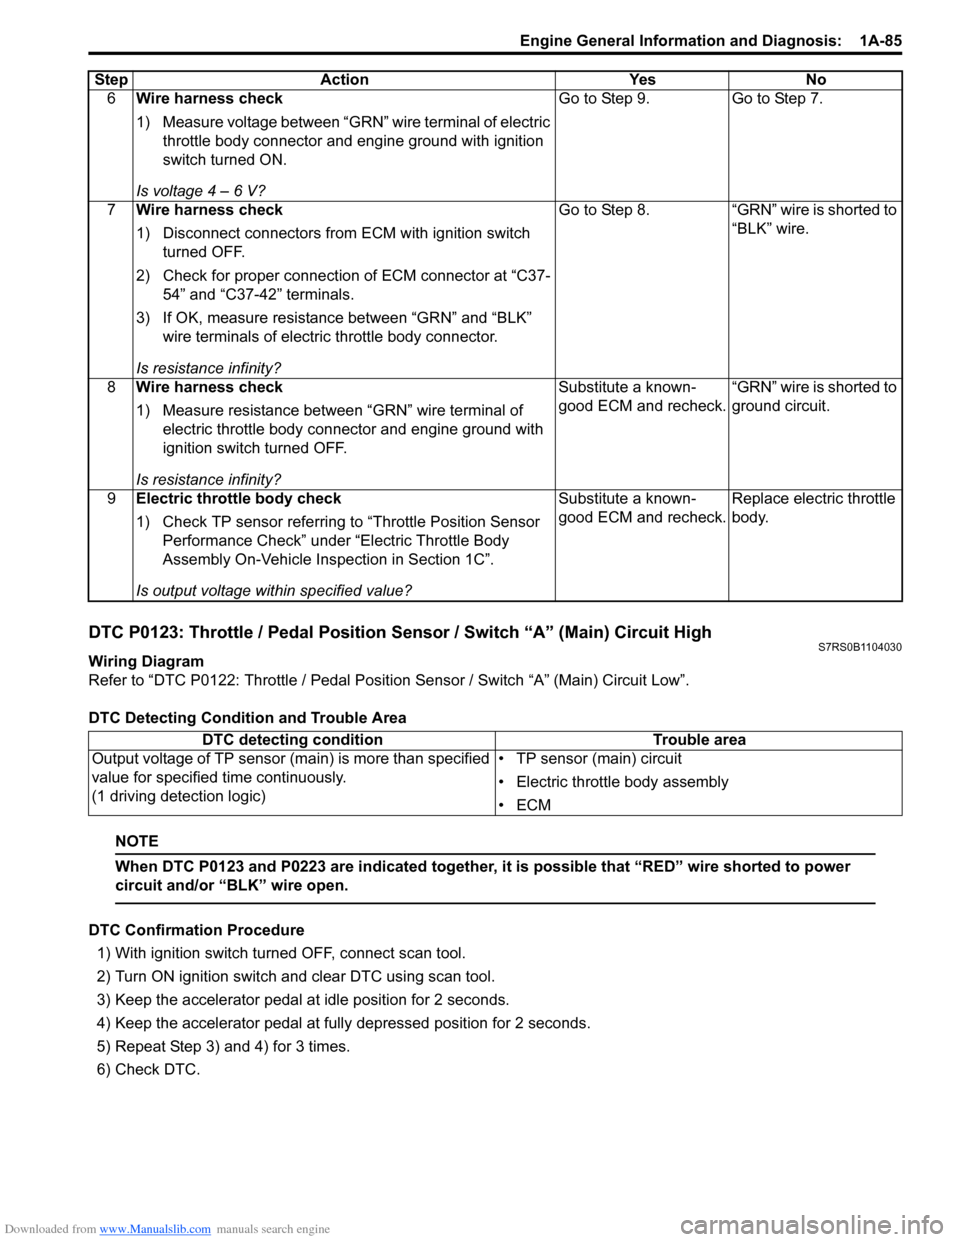
6) Check DTC. 6
Wire harness check
1) Measure voltage between “GRN” wire terminal of electric
throttle body connector and engine ground with ignition
switch turned ON.
Is voltage 4 – 6 V? Go to Step 9. Go to Step 7.
7 Wire harness check
1) Disconnect connectors from ECM with ignition switch
turned OFF.
2) Check for proper connection of ECM connector at “C37- 54” and “C37-42” terminals.
3) If OK, measure resistance between “GRN” and “BLK” wire terminals of electric throttle body connector.
Is resistance infinity? Go to Step 8. “GRN” wire is shorted to
“BLK” wire.
8 Wire harness check
1) Measure resistance between “GRN” wire terminal of
electric throttle body connector and engine ground with
ignition switch turned OFF.
Is resistance infinity? Substitute a known-
good ECM and recheck.
“GRN” wire is shorted to
ground circuit.
9 Electric throttle body check
1) Check TP sensor referring to “Throttle Position Sensor
Performance Check” under “Electric Throttle Body
Assembly On-Vehicle Inspection in Section 1C”.
Is output voltage within specified value? Substitute a known-
good ECM and recheck.
Replace electric throttle
body.
Step Action Yes No
DTC detecting condition
Trouble area
Output voltage of TP sensor (main) is more than specified
value for specified time continuously.
(1 driving detection logic) • TP sensor (main) circuit
• Electric throttle body assembly
•ECM