Turning on engine SUZUKI SWIFT 2017 5.G User Guide
[x] Cancel search | Manufacturer: SUZUKI, Model Year: 2017, Model line: SWIFT, Model: SUZUKI SWIFT 2017 5.GPages: 336, PDF Size: 6.24 MB
Page 208 of 336

7-17INSPECTION AND MAINTENANCE
74LH0-74E
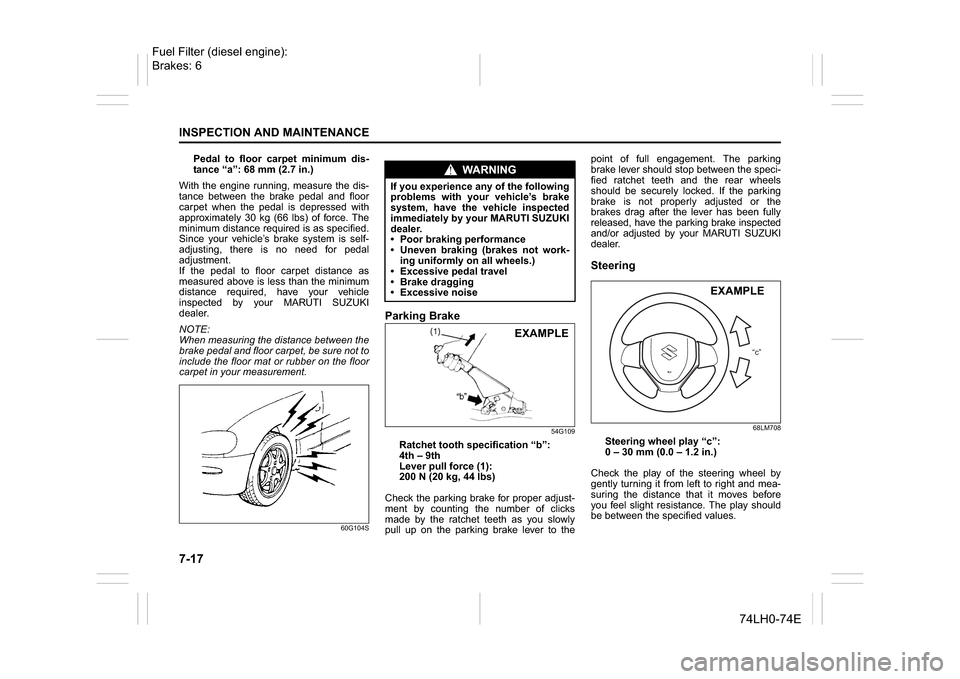
Pedal to floor carpet minimum dis-
tance “a”: 68 mm (2.7 in.)
With the engine running, measure the dis-
tance between the brake pedal and floor
carpet when the pedal is depressed with
approximately 30 kg (66 lbs) of force. The
minimum distance required is as specified.
Since your vehicle’s brake system is self-
adjusting, there is no need for pedal
adjustment.
If the pedal to floor carpet distance as
measured above is less than the minimum
distance required, have your vehicle
inspected by your MARUTI SUZUKI
dealer.
NOTE:
When measuring the distance between the
brake pedal and floor carpet, be sure not to
include the floor mat or rubber on the floor
carpet in your measurement.
60G104S
Parking Brake
54G109
Ratchet tooth specification “b”:
4th – 9th
Lever pull force (1):
200 N (20 kg, 44 lbs)
Check the parking brake for proper adjust-
ment by counting the number of clicks
made by the ratchet teeth as you slowly
pull up on the parking brake lever to thepoint of full engagement. The parking
brake lever should stop between the speci-
fied ratchet teeth and the rear wheels
should be securely locked. If the parking
brake is not properly adjusted or the
brakes drag after the lever has been fully
released, have the parking brake inspected
and/or adjusted by your MARUTI SUZUKI
dealer.
Steering
68LM708
Steering wheel play “c”:
0 – 30 mm (0.0 – 1.2 in.)
Check the play of the steering wheel by
gently turning it from left to right and mea-
suring the distance that it moves before
you feel slight resistance. The play should
be between the specified values.
WA R N I N G
If you experience any of the following
problems with your vehicle’s brake
system, have the vehicle inspected
immediately by your MARUTI SUZUKI
dealer.
Poor braking performance
Uneven braking (brakes not work-
ing uniformly on all wheels.)
Excessive pedal travel
Brake dragging
Excessive noise
EXAMPLE
“c”
EXAMPLE
Fuel Filter (diesel engine):
Brakes: 6
Page 229 of 336

8-6
EMERGENCY SERVICE
74LH0-74E
71LST0802
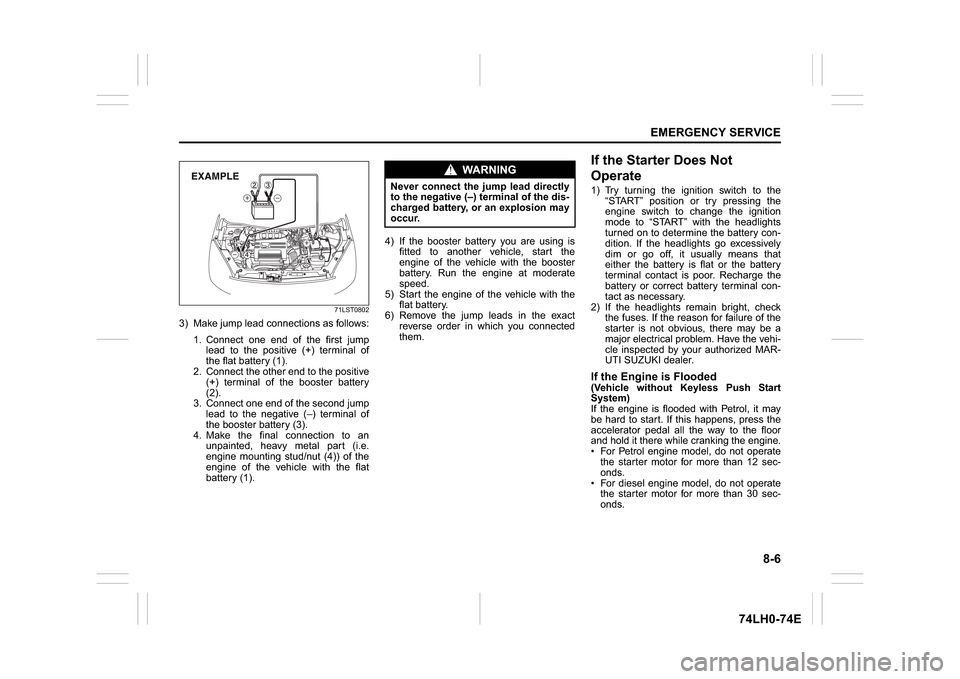
3) Make jump lead connections as follows:
1. Connect one end of the first jump
lead to the positive (+) terminal of
the flat battery (1).
2. Connect the other end to the positive
(+) terminal of the booster battery
(2).
3. Connect one end of the second jump
lead to the negative (–) terminal of
the booster battery (3).
4. Make the final connection to an
unpainted, heavy metal part (i.e.
engine mounting stud/nut (4)) of the
engine of the vehicle with the flat
battery (1).4) If the booster battery you are using is
fitted to another vehicle, start the
engine of the vehicle with the booster
battery. Run the engine at moderate
speed.
5) Start the engine of the vehicle with the
flat battery.
6) Remove the jump leads in the exact
reverse order in which you connected
them.
If the Starter Does Not
Operate1) Try turning the ignition switch to the
“START” position or try pressing the
engine switch to change the ignition
mode to “START” with the headlights
turned on to determine the battery con-
dition. If the headlights go excessively
dim or go off, it usually means that
either the battery is flat or the battery
terminal contact is poor. Recharge the
battery or correct battery terminal con-
tact as necessary.
2) If the headlights remain bright, check
the fuses. If the reason for failure of the
starter is not obvious, there may be a
major electrical problem. Have the vehi-
cle inspected by your authorized MAR-
UTI SUZUKI dealer.If the Engine is Flooded(Vehicle without Keyless Push Start
System)
If the engine is flooded with Petrol, it may
be hard to start. If this happens, press the
accelerator pedal all the way to the floor
and hold it there while cranking the engine.
For Petrol engine model, do not operate
the starter motor for more than 12 sec-
onds.
For diesel engine model, do not operate
the starter motor for more than 30 sec-
onds.
EXAMPLE
WA R N I N G
Never connect the jump lead directly
to the negative (–) terminal of the dis-
charged battery, or an explosion may
occur.