sign SUZUKI SWIFT 2017 5.G User Guide
[x] Cancel search | Manufacturer: SUZUKI, Model Year: 2017, Model line: SWIFT, Model: SUZUKI SWIFT 2017 5.GPages: 336, PDF Size: 6.24 MB
Page 30 of 336
2-11
BEFORE DRIVING
74LH0-74E
Replacement of the battery
If the remote controller becomes unreli-
able, replace the battery.
To replace the battery of the remote con-
troller:
57L20201
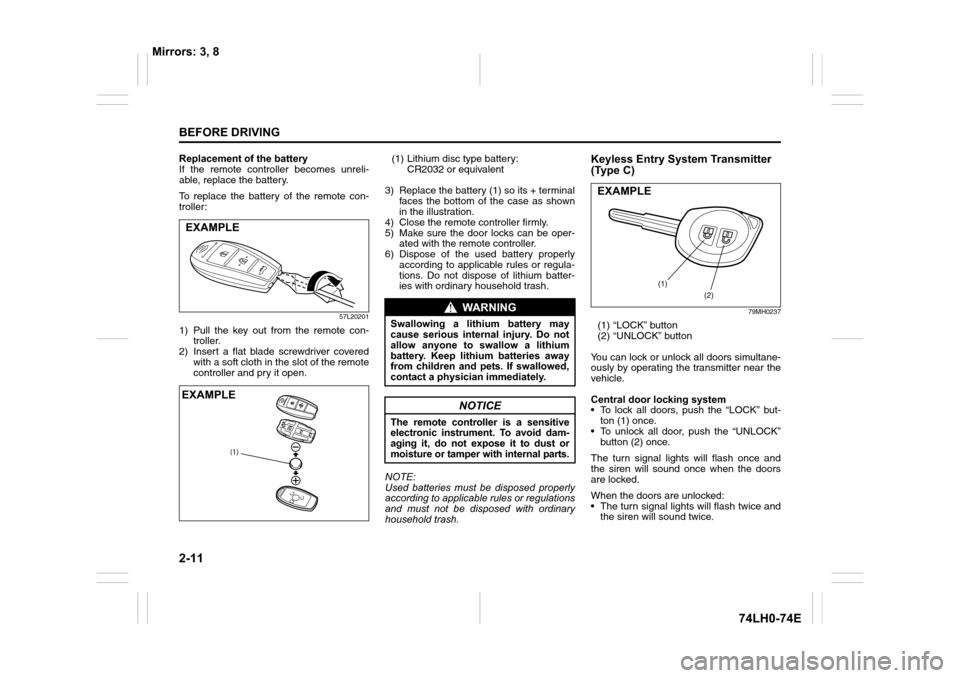
1) Pull the key out from the remote con-
troller.
2) Insert a flat blade screwdriver covered
with a soft cloth in the slot of the remote
controller and pry it open.(1) Lithium disc type battery:
CR2032 or equivalent
3) Replace the battery (1) so its + terminal
faces the bottom of the case as shown
in the illustration.
4) Close the remote controller firmly.
5) Make sure the door locks can be oper-
ated with the remote controller.
6) Dispose of the used battery properly
according to applicable rules or regula-
tions. Do not dispose of lithium batter-
ies with ordinary household trash.
NOTE:
Used batteries must be disposed properly
according to applicable rules or regulations
and must not be disposed with ordinary
household trash.
Keyless Entry System Transmitter
(Type C)
79MH0237
(1) “LOCK” button
(2) “UNLOCK” button
You can lock or unlock all doors simultane-
ously by operating the transmitter near the
vehicle.
Central door locking system
• To lock all doors, push the “LOCK” but-
ton (1) once.
• To unlock all door, push the “UNLOCK”
button (2) once.
The turn signal lights will flash once and
the siren will sound once when the doors
are locked.
When the doors are unlocked:
• The turn signal lights will flash twice and
the siren will sound twice.
EXAMPLE
(1)
EXAMPLE
WA R N I N G
Swallowing a lithium battery may
cause serious internal injury. Do not
allow anyone to swallow a lithium
battery. Keep lithium batteries away
from children and pets. If swallowed,
contact a physician immediately.
NOTICE
The remote controller is a sensitive
electronic instrument. To avoid dam-
aging it, do not expose it to dust or
moisture or tamper with internal parts.
(1)
(2)
EXAMPLE
Mirrors: 3, 8
Page 31 of 336
2-12
BEFORE DRIVING
74LH0-74E
• If the interior light switch is in the
“DOOR” position, the interior light will
turn on for about 15 seconds and then
fade out. If you insert the key into the
ignition switch during this time, the light
will start to fade out immediately.
Be sure the doors are locked after you
operate the “LOCK” button (1). If no door is
opened within about 30 seconds after the
“UNLOCK” button (2) is operated, the
doors will automatically lock again.NOTE:
• The maximum operating distance of the
keyless entry system transmitter is about
5 m (16 ft.), but this can vary depending
on the surroundings, especially near
other transmitting devices such as radio
towers or CB (Citizen’s Band) radios.
• The door locks cannot be operated with
the transmitter, if the ignition key is
inserted in the ignition switch.
• If any door is open, you cannot lock the
door by operating the transmitter, how-
ever unlock the door.
• If you lose one of the transmitters, ask
your MARUTI SUZUKI dealer as soon
as possible for a replacement. Be sure
to have your dealer program the new
transmitter code in your vehicle’s mem-
ory so that the old code is erased.Security System (Vehicle with
Keyless entry system)
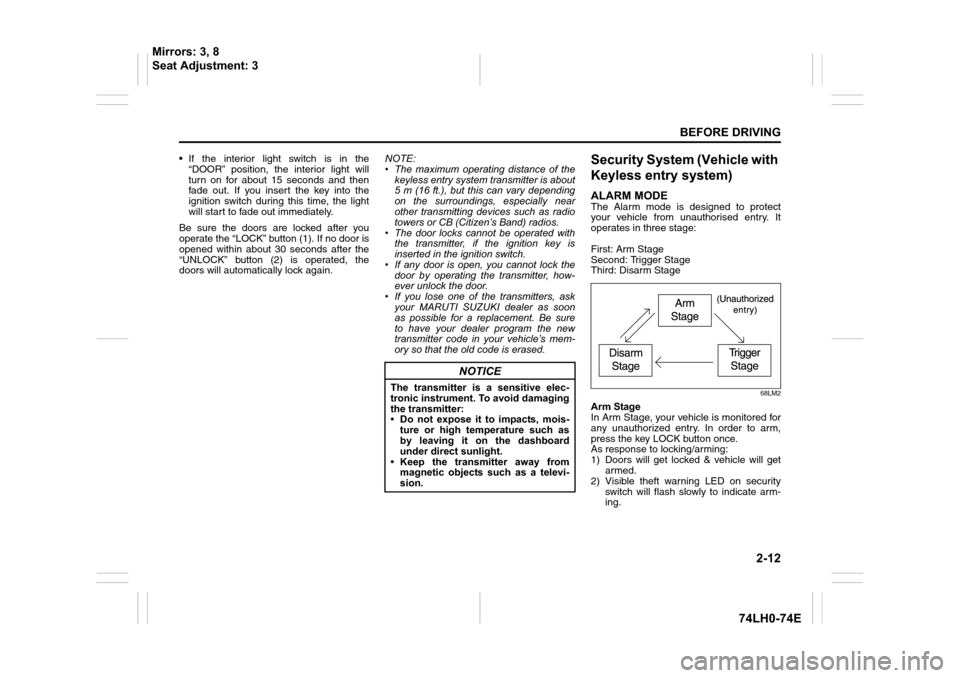
ALARM MODEThe Alarm mode is designed to protect
your vehicle from unauthorised entry. It
operates in three stage:
First: Arm Stage
Second: Trigger Stage
Third: Disarm Stage
68LM2
Arm Stage
In Arm Stage, your vehicle is monitored for
any unauthorized entry. In order to arm,
press the key LOCK button once.
As response to locking/arming:
1) Doors will get locked & vehicle will get
armed.
2) Visible theft warning LED on security
switch will flash slowly to indicate arm-
ing.
NOTICE
The transmitter is a sensitive elec-
tronic instrument. To avoid damaging
the transmitter:
• Do not expose it to impacts, mois-
ture or high temperature such as
by leaving it on the dashboard
under direct sunlight.
• Keep the transmitter away from
magnetic objects such as a televi-
sion.
Mirrors: 3, 8
Seat Adjustment: 3
Page 33 of 336
2-14
BEFORE DRIVING
74LH0-74E
GENERAL FEATURES
Illuminated Entry
When vehicle is unlocked, the room lamp
will turn ON to facilitate illuminated entry
into the vehicle. If no door is opened in
about 15 seconds of above operation,
room lamp will fade out.
If any door is opened after 15 seconds, the
room lamp turns ON again and after 15
seconds of closing all doors room lamp will
fade out.
If within 15 seconds after closing all the
doors the driver inserts the key into the key
cylinder, then the room lamp will fade out.
Illuminated Exit
When key is removed from the key cylin-
der,the room lamp will turn ON to facilitate
illuminated exit. If no door is opened in
about 15 seconds of key removal from key
cylinder, the room lamp will fade out.
When door is opened to exit the vehicle,
the room lamp will turn ON again (if it has
turned OFF after 15 seconds of key
removal from key cylinder) and will turn
OFF after 15 seconds of closing all the
doors.
If within 15 seconds of all doors closure,
vehicle is locked by pressing the LOCK
button, the room lamp will fade out.
NOTE: Room lamp will fade out gradually
approximately in 2 seconds.Mute Lock/Unlock
To Lock/Unlock the vehicle without siren
chirps use this function.
a) Press and release the Key LOCK &
UNLOCK buttons simultaneously.
b) Press and release Key LOCK or
UNLOCK button for desired function.
Example: To Lock the system without the
Siren chirp sound, press and release the
Key LOCK & UNLOCK button simultane-
ously, then press and release the Key
LOCK button once.
Auto Rearm
In case of accidental Unlock/Disarm of
vehicle by Key, vehicle will automatically
Lock & Arm within 30 sec. without any indi-
cation. Auto rearm cycle gets canceled if
user does any of the following operation
within 30sec :
1. Open any door (including back door).
2. Open Engine Hood.
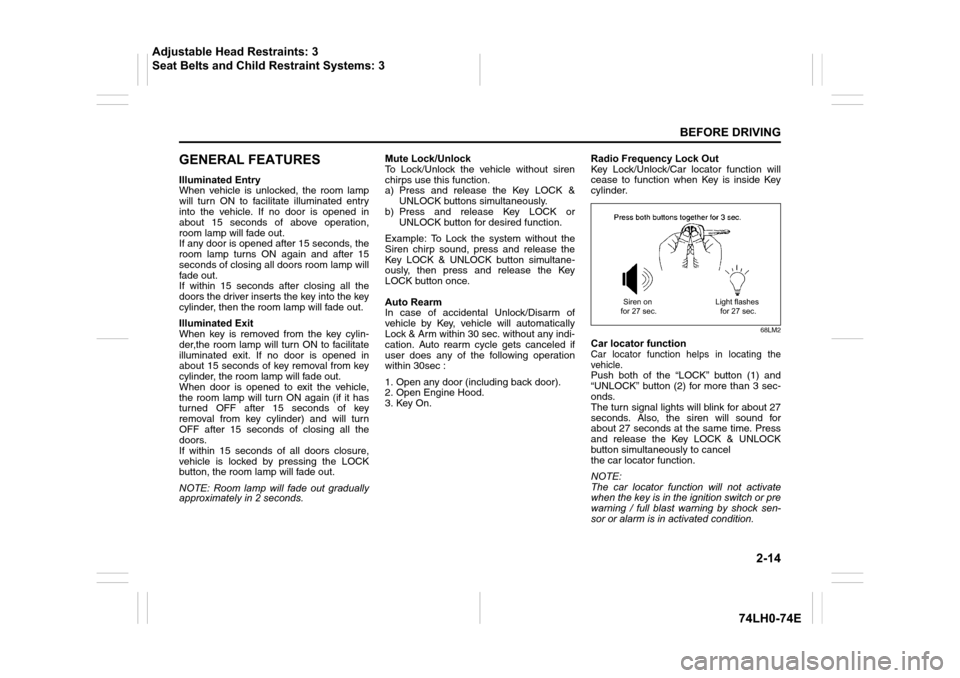
3. Key On.Radio Frequency Lock Out
Key Lock/Unlock/Car locator function will
cease to function when Key is inside Key
cylinder.
68LM2
Car locator functionCar locator function helps in locating the
vehicle.
Push both of the “LOCK” button (1) and
“UNLOCK” button (2) for more than 3 sec-
onds.
The turn signal lights will blink for about 27
seconds. Also, the siren will sound for
about 27 seconds at the same time. Press
and release the Key LOCK & UNLOCK
button simultaneously to cancel
the car locator function.
NOTE:
The car locator function will not activate
when the key is in the ignition switch or pre
warning / full blast warning by shock sen-
sor or alarm is in activated condition.
Siren on
for 27 sec.Light flashes
for 27 sec.
Adjustable Head Restraints: 3
Seat Belts and Child Restraint Systems: 3
Page 40 of 336
2-21
BEFORE DRIVING
74LH0-74E
• If any door is not operated within approx-
imately 30 seconds after the doors have
been unlocked using the keyless push
start system remote controller, the doors
are automatically locked again. When
the doors are locked, the security sys-
tem will be armed.
• If the security system indicator (1) blinks
when the ignition mode is “ON”, there
may be something wrong with the secu-
rity system. Ask your MARUTI SUZUKI
dealer to inspect the system.
How to disarm the security system
Simply unlock the doors using the keyless
push start system remote controller. The
security system indicator will go out, indi-
cating that the security system is dis-
armed.
How to stop the alarm
Should the alarm be triggered accidentally,
unlock the doors using the keyless push
start system remote controller or request
switch, or in case of emergency, press the
engine switch to change the ignition mode
to “ON”.
NOTE:
• Even after the alarm has stopped, if you
lock the doors using the keyless push
start system remote controller, the secu-
rity system will be rearmed.
• If you disconnect the battery while the
security system is in the armed condition
or the alarm is actually in operation, thealarm will be re-triggered when the bat-
tery is then reconnected.
• Even after the alarm has stopped at the
end of the predetermined operation time,
it will be triggered again if any of the
doors, trunk/tailgate or engine hood is
opened, or the warning may be triggered
if the vehicle feels a shock (if the shock
sensor is in the enabled state), without
disarming the security system.
Checking whether the alarm has been
triggered during parking
If the alarm was triggered and you then
turn the ignition mode is “ON”, the security
system indicator will blink rapidly for about
8 seconds and a buzzer will beep 4 times
during this period. If this happens, check
whether the vehicle has been broken into
while you were away from it.
Security system indication
• If any of the doors or trunk/tailgate are
opened without unlocking by the keyless
push start system remote controller, all
turn signal lights start to blink and the
interior buzzer beeps intermittently. After
5 seconds, the siren will sound for about
27.5 seconds. The security system indi-
cator continues to blink during this time.
• If the engine hood is opened, all turn sig-
nal lights blink, and the siren sounds for
about 27.5 seconds. The security sys-
tem indicator continues to blink during
this time.• If the shock sensor is in the enabled
state and the vehicle feels a shock
higher than the pre-warning sensitivity,
the siren sounds for about 2 seconds
(pre-warning). If the vehicle feel a shock
higher than the full blast warning sensi-
tivity, siren will sound for about 4.5 sec-
onds (full blast warning). The security
system indicator continues to blink
during this time.
NOTE:
If you set the full blast warning sensitivity
higher than the pre-warning sensitivity in
the setting mode of the information display,
or the vehicle feels such shock as to be
able to trigger the full blast warning, the full
blast warning will be triggered preferen-
tially. In this case, the pre-warning will not
be triggered.
Seat Belts and Child Restraint Systems: 3
Page 44 of 336
2-25
BEFORE DRIVING
74LH0-74E
NOTE:
• The defogger will work only when the
engine is running.
• The defogger will automatically turn off
after the defogger remains on for 15 min-
utes to prevent discharging of the bat-
tery.
Front Seats
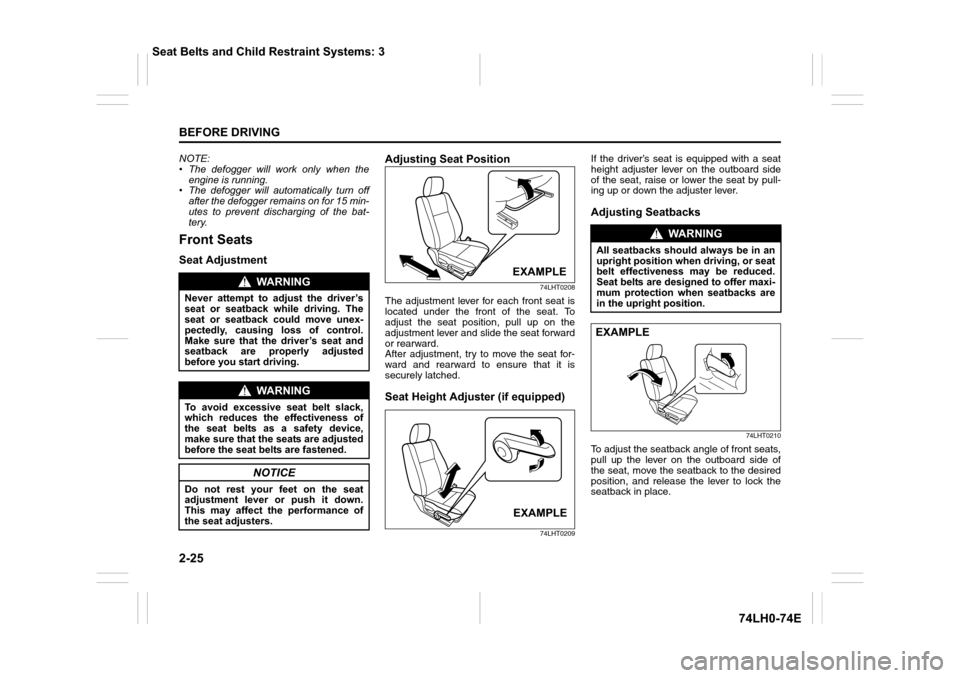
Seat AdjustmentAdjusting Seat Position
74LHT0208
The adjustment lever for each front seat is
located under the front of the seat. To
adjust the seat position, pull up on the
adjustment lever and slide the seat forward
or rearward.
After adjustment, try to move the seat for-
ward and rearward to ensure that it is
securely latched.
Seat Height Adjuster (if equipped)
74LHT0209
If the driver’s seat is equipped with a seat
height adjuster lever on the outboard side
of the seat, raise or lower the seat by pull-
ing up or down the adjuster lever.
Adjusting Seatbacks
74LHT0210
To adjust the seatback angle of front seats,
pull up the lever on the outboard side of
the seat, move the seatback to the desired
position, and release the lever to lock the
seatback in place.
WA R N I N G
Never attempt to adjust the driver’s
seat or seatback while driving. The
seat or seatback could move unex-
pectedly, causing loss of control.
Make sure that the driver’s seat and
seatback are properly adjusted
before you start driving.
WA R N I N G
To avoid excessive seat belt slack,
which reduces the effectiveness of
the seat belts as a safety device,
make sure that the seats are adjusted
before the seat belts are fastened.
NOTICE
Do not rest your feet on the seat
adjustment lever or push it down.
This may affect the performance of
the seat adjusters.
EXAMPLE
EXAMPLE
WA R N I N G
All seatbacks should always be in an
upright position when driving, or seat
belt effectiveness may be reduced.
Seat belts are designed to offer maxi-
mum protection when seatbacks are
in the upright position.
EXAMPLE
Seat Belts and Child Restraint Systems: 3
Page 45 of 336
2-26
BEFORE DRIVING
74LH0-74E
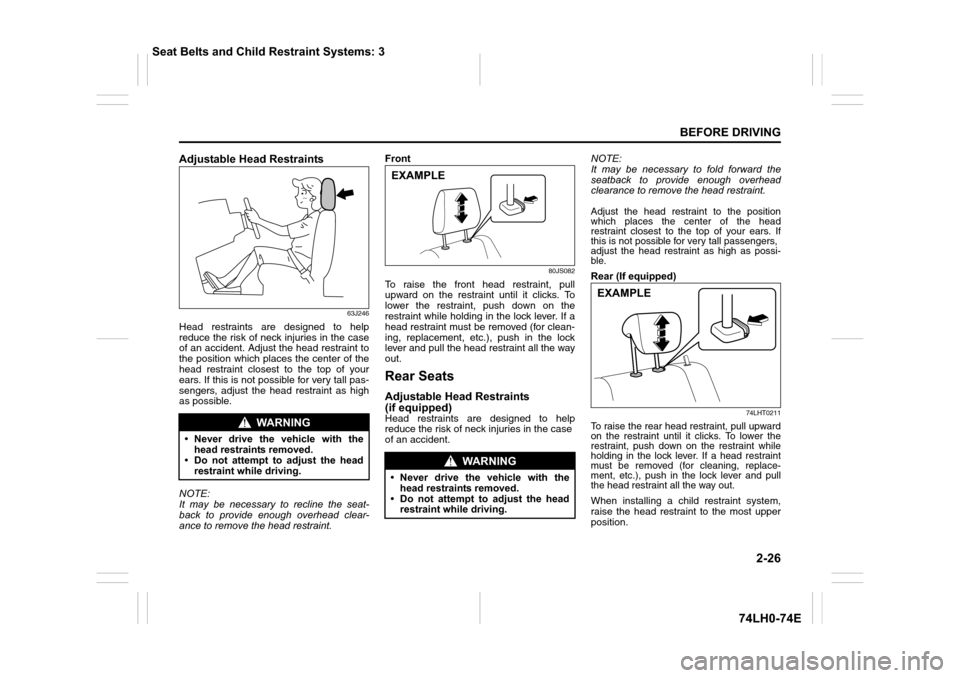
Adjustable Head Restraints
63J246
Head restraints are designed to help
reduce the risk of neck injuries in the case
of an accident. Adjust the head restraint to
the position which places the center of the
head restraint closest to the top of your
ears. If this is not possible for very tall pas-
sengers, adjust the head restraint as high
as possible.
NOTE:
It may be necessary to recline the seat-
back to provide enough overhead clear-
ance to remove the head restraint.Front
80JS082
To raise the front head restraint, pull
upward on the restraint until it clicks. To
lower the restraint, push down on the
restraint while holding in the lock lever. If a
head restraint must be removed (for clean-
ing, replacement, etc.), push in the lock
lever and pull the head restraint all the way
out.
Rear Seats
Adjustable Head Restraints
(if equipped)
Head restraints are designed to help
reduce the risk of neck injuries in the case
of an accident.NOTE:
It may be necessary to fold forward the
seatback to provide enough overhead
clearance to remove the head restraint.
Adjust the head restraint to the position
which places the center of the head
restraint closest to the top of your ears. If
this is not possible for very tall passengers,
adjust the head restraint as high as possi-
ble.
Rear (If equipped)
74LHT0211
To raise the rear head restraint, pull upward
on the restraint until it clicks. To lower the
restraint, push down on the restraint while
holding in the lock lever. If a head restraint
must be removed (for cleaning, replace-
ment, etc.), push in the lock lever and pull
the head restraint all the way out.
When installing a child restraint system,
raise the head restraint to the most upper
position.
WA R N I N G
• Never drive the vehicle with the
head restraints removed.
• Do not attempt to adjust the head
restraint while driving.
WA R N I N G
• Never drive the vehicle with the
head restraints removed.
• Do not attempt to adjust the head
restraint while driving.
EXAMPLE
EXAMPLE
Seat Belts and Child Restraint Systems: 3
Page 47 of 336
2-28
BEFORE DRIVING
74LH0-74E
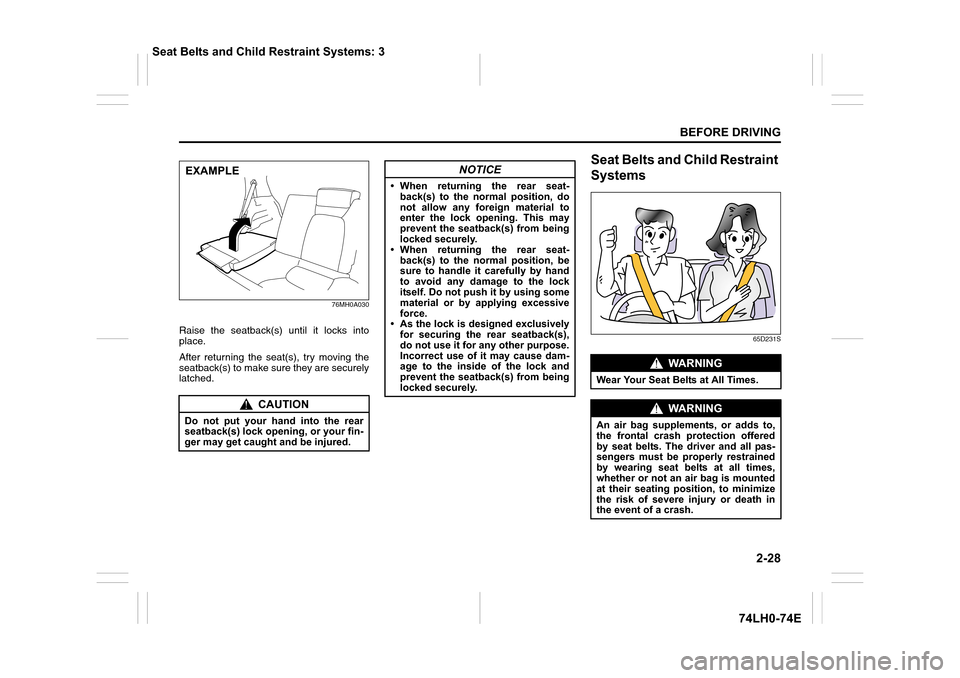
76MH0A030
Raise the seatback(s) until it locks into
place.
After returning the seat(s), try moving the
seatback(s) to make sure they are securely
latched.
Seat Belts and Child Restraint
Systems
65D231S
CAUTION
Do not put your hand into the rear
seatback(s) lock opening, or your fin-
ger may get caught and be injured.
EXAMPLENOTICE
• When returning the rear seat-
back(s) to the normal position, do
not allow any foreign material to
enter the lock opening. This may
prevent the seatback(s) from being
locked securely.
• When returning the rear seat-
back(s) to the normal position, be
sure to handle it carefully by hand
to avoid any damage to the lock
itself. Do not push it by using some
material or by applying excessive
force.
• As the lock is designed exclusively
for securing the rear seatback(s),
do not use it for any other purpose.
Incorrect use of it may cause dam-
age to the inside of the lock and
prevent the seatback(s) from being
locked securely.
WA R N I N G
Wear Your Seat Belts at All Times.
WA R N I N G
An air bag supplements, or adds to,
the frontal crash protection offered
by seat belts. The driver and all pas-
sengers must be properly restrained
by wearing seat belts at all times,
whether or not an air bag is mounted
at their seating position, to minimize
the risk of severe injury or death in
the event of a crash.
Seat Belts and Child Restraint Systems: 3
Page 48 of 336
2-29
BEFORE DRIVING
74LH0-74E
65D606 65D201 65D199
WA R N I N G
• Never allow persons to ride in the
cargo area of a vehicle. In the event
of an accident, there is a much
greater risk of injury for persons
who are not riding in a seat with
their seat belt securely fastened.
• Seat belts should always be
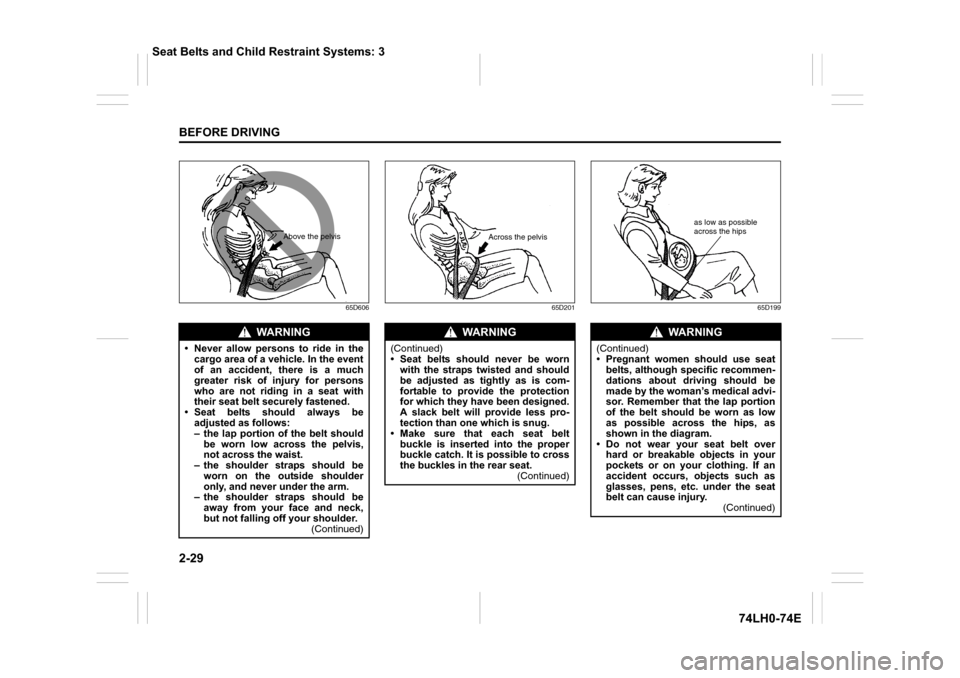
adjusted as follows:
– the lap portion of the belt should
be worn low across the pelvis,
not across the waist.
– the shoulder straps should be
worn on the outside shoulder
only, and never under the arm.
– the shoulder straps should be
away from your face and neck,
but not falling off your shoulder.
(Continued)
Above the pelvis
WA R N I N G
(Continued)
• Seat belts should never be worn
with the straps twisted and should
be adjusted as tightly as is com-
fortable to provide the protection
for which they have been designed.
A slack belt will provide less pro-
tection than one which is snug.
• Make sure that each seat belt
buckle is inserted into the proper
buckle catch. It is possible to cross
the buckles in the rear seat.
(Continued)
Across the pelvis
WA R N I N G
(Continued)
• Pregnant women should use seat
belts, although specific recommen-
dations about driving should be
made by the woman’s medical advi-
sor. Remember that the lap portion
of the belt should be worn as low
as possible across the hips, as
shown in the diagram.
• Do not wear your seat belt over
hard or breakable objects in your
pockets or on your clothing. If an
accident occurs, objects such as
glasses, pens, etc. under the seat
belt can cause injury.
(Continued)
as low as possible
across the hips
Seat Belts and Child Restraint Systems: 3
Page 49 of 336
2-30
BEFORE DRIVING
74LH0-74E
Lap-Shoulder Belt
Emergency Locking Retractor (ELR)
(if equipped)
The seat belt has an emergency locking
retractor (ELR), which is designed to lock
the seat belt only during a sudden stop or
impact. It also may lock if you pull the belt
across your body very quickly. If this hap-pens, let the belt go back to unlock it, then
pull the belt across your body more slowly.
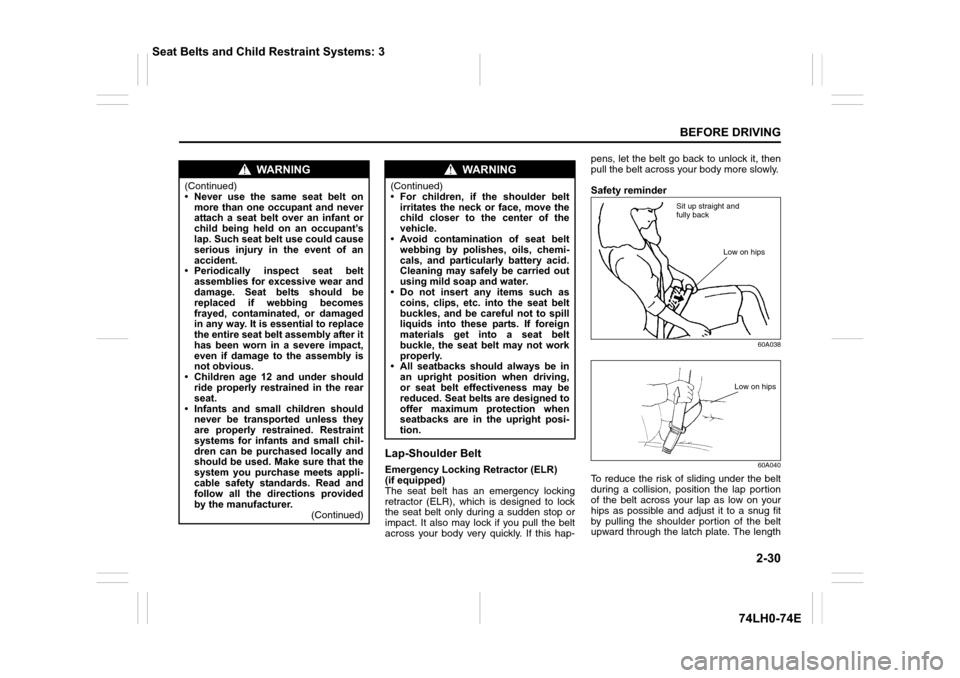
Safety reminder
60A038
60A040
To reduce the risk of sliding under the belt
during a collision, position the lap portion
of the belt across your lap as low on your
hips as possible and adjust it to a snug fit
by pulling the shoulder portion of the belt
upward through the latch plate. The length
WA R N I N G
(Continued)
• Never use the same seat belt on
more than one occupant and never
attach a seat belt over an infant or
child being held on an occupant’s
lap. Such seat belt use could cause
serious injury in the event of an
accident.
• Periodically inspect seat belt
assemblies for excessive wear and
damage. Seat belts should be
replaced if webbing becomes
frayed, contaminated, or damaged
in any way. It is essential to replace
the entire seat belt assembly after it
has been worn in a severe impact,
even if damage to the assembly is
not obvious.
• Children age 12 and under should
ride properly restrained in the rear
seat.
• Infants and small children should
never be transported unless they
are properly restrained. Restraint
systems for infants and small chil-
dren can be purchased locally and
should be used. Make sure that the
system you purchase meets appli-
cable safety standards. Read and
follow all the directions provided
by the manufacturer.
(Continued)
WA R N I N G
(Continued)
• For children, if the shoulder belt
irritates the neck or face, move the
child closer to the center of the
vehicle.
• Avoid contamination of seat belt
webbing by polishes, oils, chemi-
cals, and particularly battery acid.
Cleaning may safely be carried out
using mild soap and water.
• Do not insert any items such as
coins, clips, etc. into the seat belt
buckles, and be careful not to spill
liquids into these parts. If foreign
materials get into a seat belt
buckle, the seat belt may not work
properly.
• All seatbacks should always be in
an upright position when driving,
or seat belt effectiveness may be
reduced. Seat belts are designed to
offer maximum protection when
seatbacks are in the upright posi-
tion.
Sit up straight and
fully back
Low on hips
Low on hips
Seat Belts and Child Restraint Systems: 3
Page 51 of 336
2-32
BEFORE DRIVING
74LH0-74E
NOTE:
The word “CENTER” is molded on the
buckle and latch plate of the center lap
belt. The buckles are designed so a latch
plate can not be inserted into the wrong
buckle.
Driver’s Seat Belt Reminder
(if equipped)
74LHT0214
When the driver does not buckle his or her
seat belt, the driver’s seat belt reminder
light in the instrument cluster will come on
or blink and a buzzer (if equipped) will
sound as a reminder to the driver to buckle
his or her seat belt. For more details, refer
to the explanation below.
If the driver’s seat belt remains unbuckled
when the ignition switch is turned to the
“ON” position or the engine switch is
pressed to change the ignition mode to
“ON”. The reminder works as follows:1) The driver’s seat belt reminder light will
come on.
2) After the vehicle’s speed has reached
about 15 km/h, the driver’s seat belt
reminder light will blink and a buzzer
(if equipped) will sound for about 95
seconds.
3) After step 2) has finished, the reminder
light will remain on until the driver’s seat
belt is buckled.
If the driver has buckled his or her seat belt
and later unbuckles the seat belt, the
reminder system will be activated from
step 1) or step 2) according to the vehicle’s
speed. When the vehicle’s speed is below
about 15 km/h, the reminder will start from
step 1). When the vehicle’s speed is above
about 15 km/h, the reminder will start from
step 2).
The reminder will be automatically can-
celed when the driver’s seat belt is buckled
or the ignition switch is turned off, or the
engine switch is pressed to change the
ignition mode to “LOCK” (OFF).
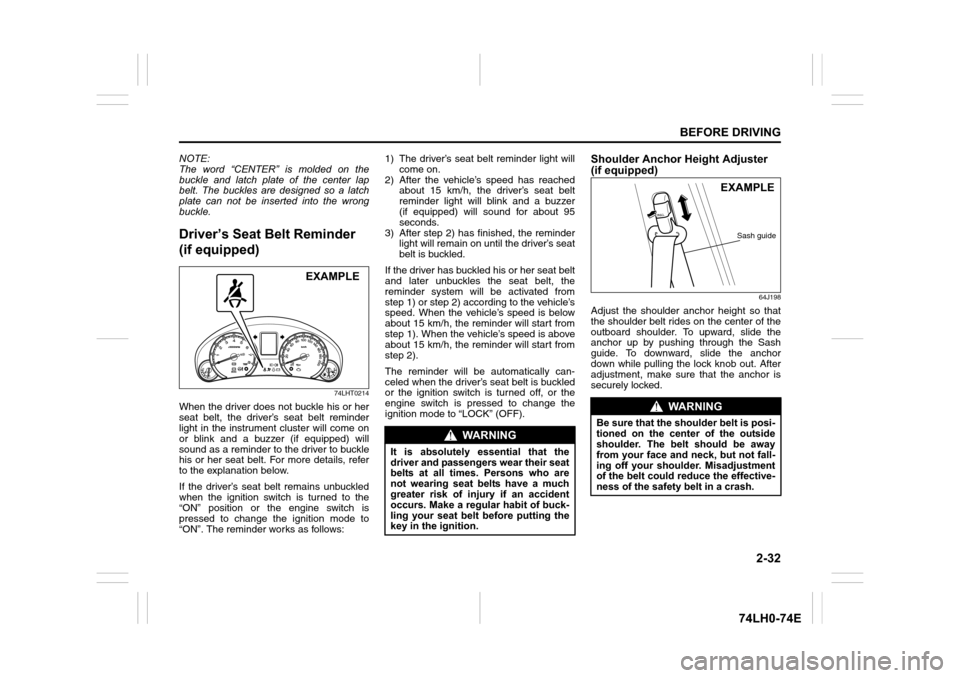
Shoulder Anchor Height Adjuster
(if equipped)
64J198
Adjust the shoulder anchor height so that
the shoulder belt rides on the center of the
outboard shoulder. To upward, slide the
anchor up by pushing through the Sash
guide. To downward, slide the anchor
down while pulling the lock knob out. After
adjustment, make sure that the anchor is
securely locked.
EXAMPLE
WA R N I N G
It is absolutely essential that the
driver and passengers wear their seat
belts at all times. Persons who are
not wearing seat belts have a much
greater risk of injury if an accident
occurs. Make a regular habit of buck-
ling your seat belt before putting the
key in the ignition.
WA R N I N G
Be sure that the shoulder belt is posi-
tioned on the center of the outside
shoulder. The belt should be away
from your face and neck, but not fall-
ing off your shoulder. Misadjustment
of the belt could reduce the effective-
ness of the safety belt in a crash.
EXAMPLE
Sash guide