Timing SUZUKI SX4 2006 1.G Service User Guide
[x] Cancel search | Manufacturer: SUZUKI, Model Year: 2006, Model line: SX4, Model: SUZUKI SX4 2006 1.GPages: 1556, PDF Size: 37.31 MB
Page 94 of 1556
Downloaded from www.Manualslib.com manuals search engine 1A-44 Engine General Information and Diagnosis:
4Check keyless start control system malfunction
1) Check keyless start control system referring to “Keyless
Start System Operation Inspection in Section 10E”.
Is check result satisfactory?Go to Step 5. Keyless start control
system malfunction.
5Is engine cranked?Go to Step 6. Go to “Cranking System
Symptom Diagnosis in
Section 1I”.
6Does engine start?Go to Step 7. Go to Step 9.
7Check idle speed
1) Check engine idle speed referring to “Idle Speed and
IAC Throttle Valve Opening Inspection”.
Is check result as specified?Go to Step 8. Go to “Engine Symptom
Diagnosis”.
8Check ignition timing
1) Check ignition timing referring to “Ignition Timing
Inspection in Section 1H”.
Is check result as specified?Go to “Engine Symptom
Diagnosis”.Check ignition control
related parts referring to
“Ignition Timing
Inspection in Section
1H”.
9Check immobilizer system malfunction
1) Check immobilizer indicator lamp for flashing.
Is it flashing when ignition switch is turned to ON position?Go to “DTC Check in
Section 10C”.Go to Step 10.
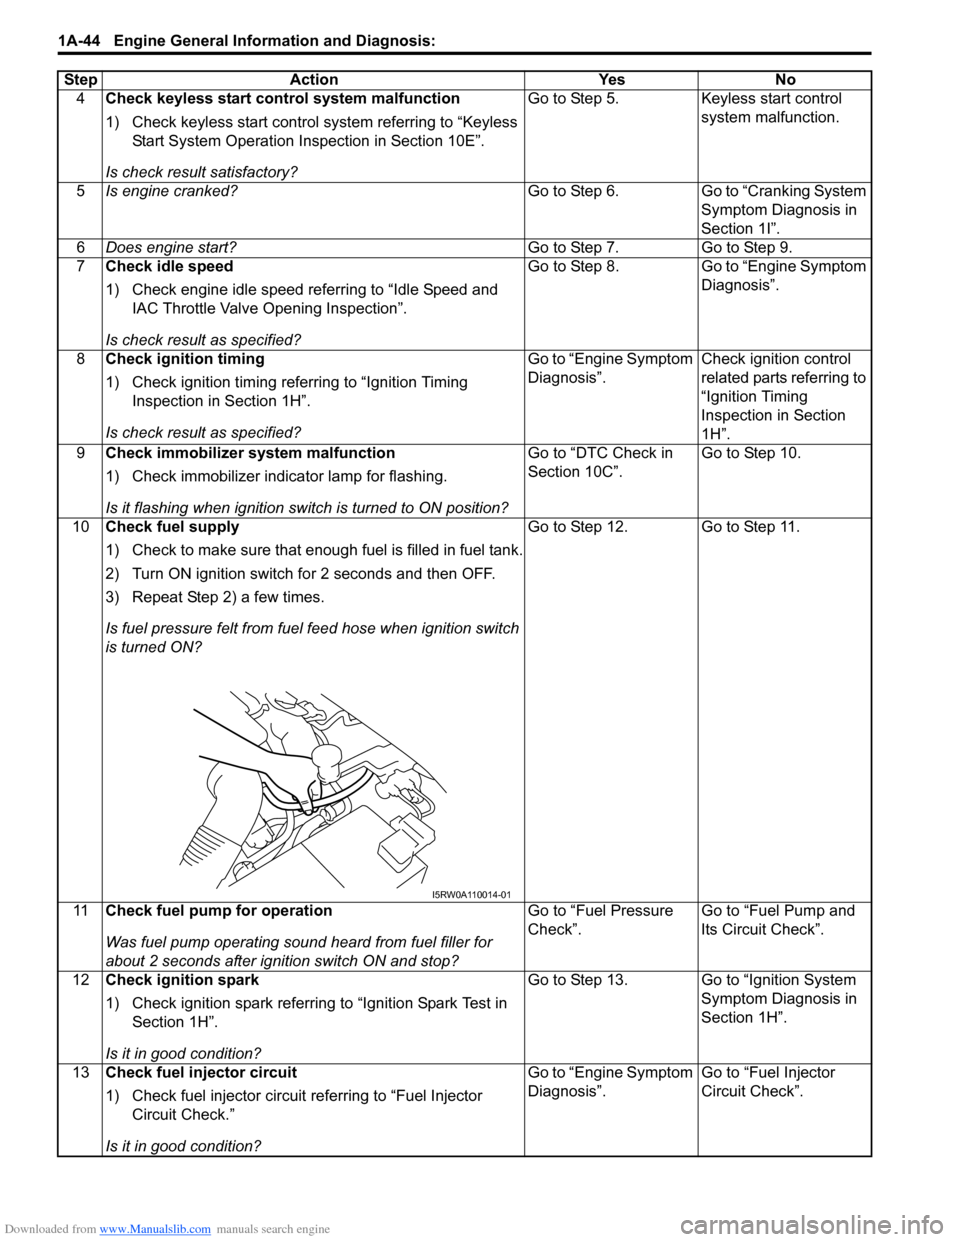
10Check fuel supply
1) Check to make sure that enough fuel is filled in fuel tank.
2) Turn ON ignition switch for 2 seconds and then OFF.
3) Repeat Step 2) a few times.
Is fuel pressure felt from fuel feed hose when ignition switch
is turned ON?Go to Step 12. Go to Step 11.
11Check fuel pump for operation
Was fuel pump operating sound heard from fuel filler for
about 2 seconds after ignition switch ON and stop?Go to “Fuel Pressure
Check”.Go to “Fuel Pump and
Its Circuit Check”.
12Check ignition spark
1) Check ignition spark referring to “Ignition Spark Test in
Section 1H”.
Is it in good condition?Go to Step 13. Go to “Ignition System
Symptom Diagnosis in
Section 1H”.
13Check fuel injector circuit
1) Check fuel injector circuit referring to “Fuel Injector
Circuit Check.”
Is it in good condition?Go to “Engine Symptom
Diagnosis”.Go to “Fuel Injector
Circuit Check”. Step Action Yes No
I5RW0A110014-01
Page 101 of 1556
Downloaded from www.Manualslib.com manuals search engine Engine General Information and Diagnosis: 1A-51
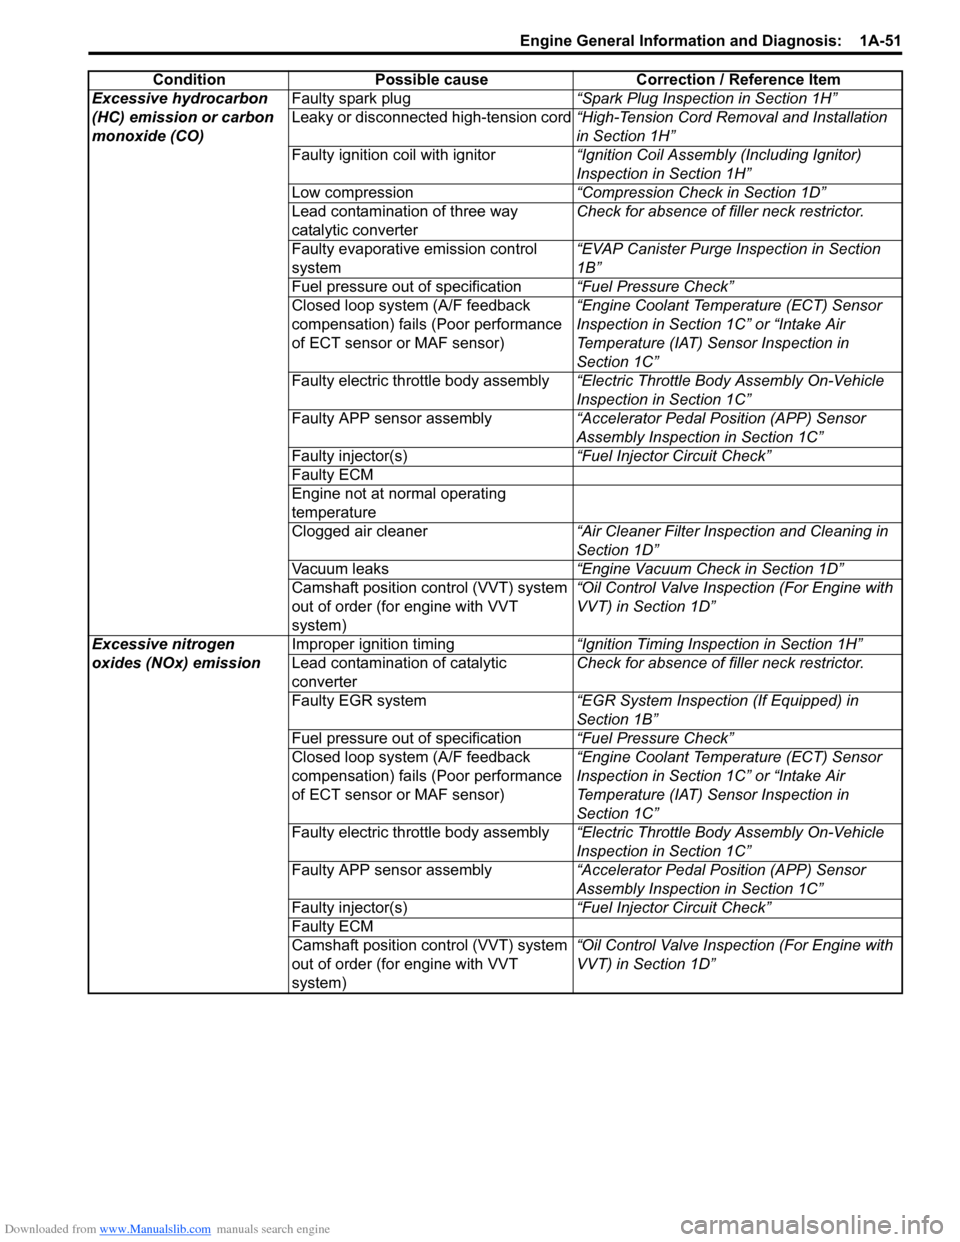
Excessive hydrocarbon
(HC) emission or carbon
monoxide (CO)Faulty spark plug“Spark Plug Inspection in Section 1H”
Leaky or disconnected high-tension cord“High-Tension Cord Removal and Installation
in Section 1H”
Faulty ignition coil with ignitor“Ignition Coil Assembly (Including Ignitor)
Inspection in Section 1H”
Low compression“Compression Check in Section 1D”
Lead contamination of three way
catalytic converterCheck for absence of filler neck restrictor.
Faulty evaporative emission control
system“EVAP Canister Purge Inspection in Section
1B”
Fuel pressure out of specification“Fuel Pressure Check”
Closed loop system (A/F feedback
compensation) fails (Poor performance
of ECT sensor or MAF sensor)“Engine Coolant Temperature (ECT) Sensor
Inspection in Section 1C” or “Intake Air
Temperature (IAT) Sensor Inspection in
Section 1C”
Faulty electric throttle body assembly“Electric Throttle Body Assembly On-Vehicle
Inspection in Section 1C”
Faulty APP sensor assembly“Accelerator Pedal Position (APP) Sensor
Assembly Inspection in Section 1C”
Faulty injector(s)“Fuel Injector Circuit Check”
Faulty ECM
Engine not at normal operating
temperature
Clogged air cleaner“Air Cleaner Filter Inspection and Cleaning in
Section 1D”
Vacuum leaks“Engine Vacuum Check in Section 1D”
Camshaft position control (VVT) system
out of order (for engine with VVT
system)“Oil Control Valve Inspection (For Engine with
VVT) in Section 1D”
Excessive nitrogen
oxides (NOx) emissionImproper ignition timing“Ignition Timing Inspection in Section 1H”
Lead contamination of catalytic
converterCheck for absence of filler neck restrictor.
Faulty EGR system“EGR System Inspection (If Equipped) in
Section 1B”
Fuel pressure out of specification“Fuel Pressure Check”
Closed loop system (A/F feedback
compensation) fails (Poor performance
of ECT sensor or MAF sensor)“Engine Coolant Temperature (ECT) Sensor
Inspection in Section 1C” or “Intake Air
Temperature (IAT) Sensor Inspection in
Section 1C”
Faulty electric throttle body assembly“Electric Throttle Body Assembly On-Vehicle
Inspection in Section 1C”
Faulty APP sensor assembly“Accelerator Pedal Position (APP) Sensor
Assembly Inspection in Section 1C”
Faulty injector(s)“Fuel Injector Circuit Check”
Faulty ECM
Camshaft position control (VVT) system
out of order (for engine with VVT
system)“Oil Control Valve Inspection (For Engine with
VVT) in Section 1D” Condition Possible cause Correction / Reference Item
Page 105 of 1556
Downloaded from www.Manualslib.com manuals search engine Engine General Information and Diagnosis: 1A-55
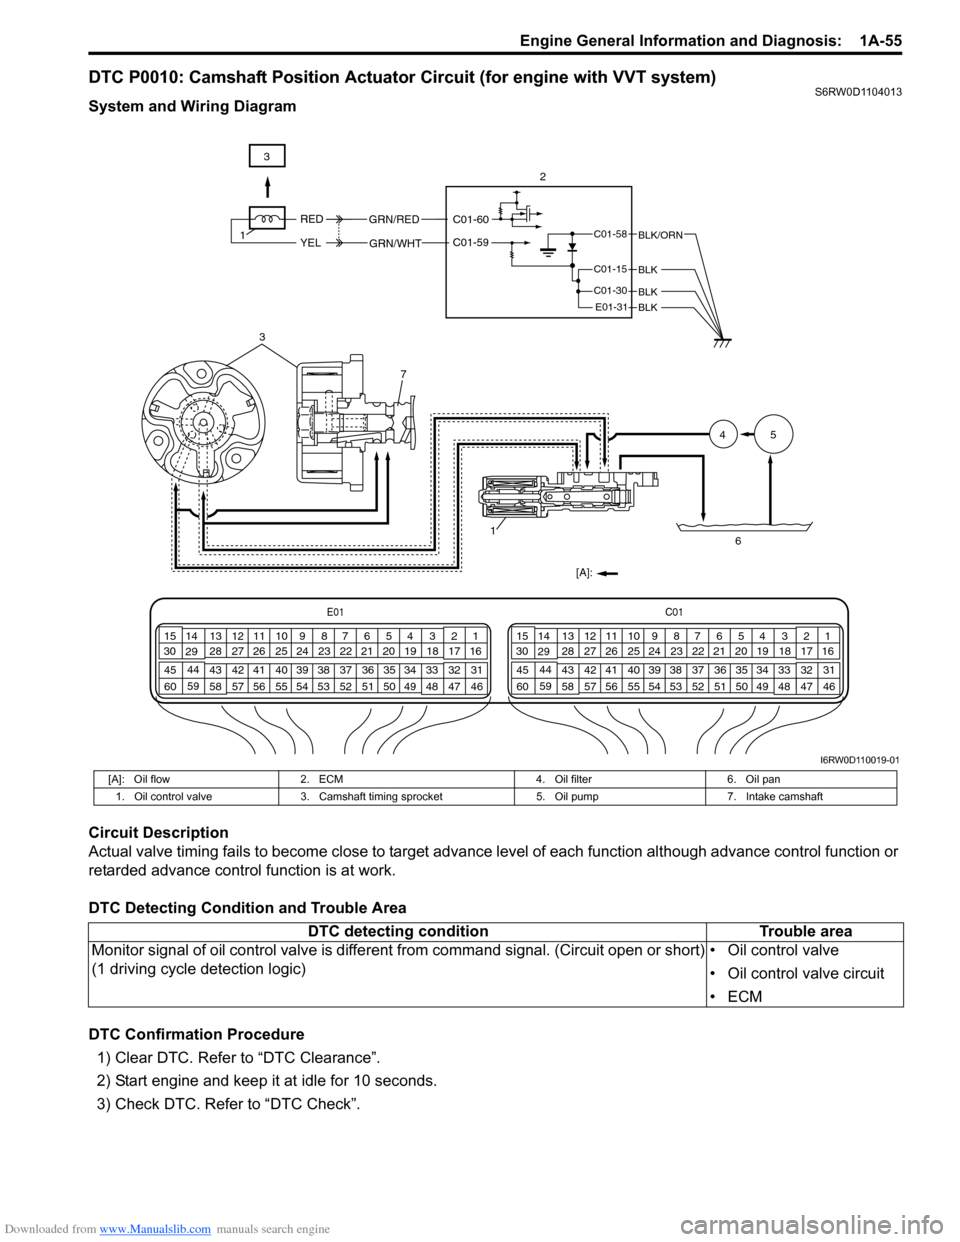
DTC P0010: Camshaft Position Actuator Circuit (for engine with VVT system)S6RW0D1104013
System and Wiring Diagram
Circuit Description
Actual valve timing fails to become close to target advance level of each function although advance control function or
retarded advance control function is at work.
DTC Detecting Condition and Trouble Area
DTC Confirmation Procedure
1) Clear DTC. Refer to “DTC Clearance”.
2) Start engine and keep it at idle for 10 seconds.
3) Check DTC. Refer to “DTC Check”.
3
7
1
[A]:45
6
C01-58
C01-15
C01-30
E01-31BLK
BLK
BLK/ORN
RED
YEL
GRN/RED
GRN/WHT
C01-60
C01-59
3
2
1
E01C01
3 4
18 19 5 6 7 10 11
17 20
47 46 49 50 51 21 22
5216 259
24 14
29
55 57 54 53 59
60 582
26 27 28 15
30
56 4832 31 34 35 36 37 40 42 39 38 44
45 43 41 331 12 13
238 3 4
18 19 5 6 7 10 11
17 20
47 46 49 50 51 21 22
5216 259
24 14
29
55 57 54 53 59
60 582
26 27 28 15
30
56 4832 31 34 35 36 37 40 42 39 38 44
45 43 41 331 12 13
238
BLK
I6RW0D110019-01
[A]: Oil flow 2. ECM 4. Oil filter 6. Oil pan
1. Oil control valve 3. Camshaft timing sprocket 5. Oil pump 7. Intake camshaft
DTC detecting condition Trouble area
Monitor signal of oil control valve is different from command signal. (Circuit open or short)
(1 driving cycle detection logic)• Oil control valve
• Oil control valve circuit
•ECM
Page 107 of 1556
Downloaded from www.Manualslib.com manuals search engine Engine General Information and Diagnosis: 1A-57
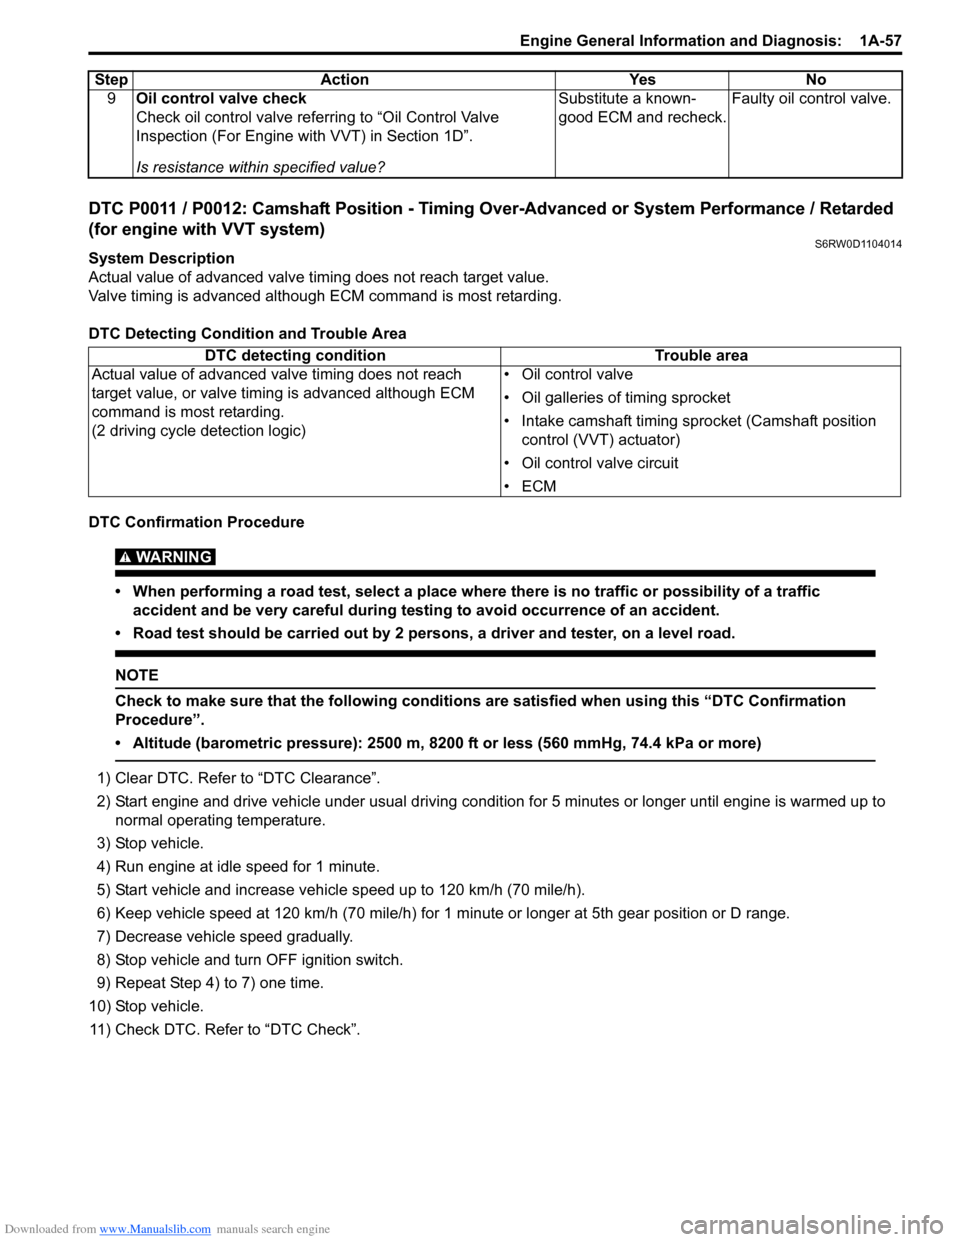
DTC P0011 / P0012: Camshaft Position - Timing Over-Advanced or System Performance / Retarded
(for engine with VVT system)
S6RW0D1104014
System Description
Actual value of advanced valve timing does not reach target value.
Valve timing is advanced although ECM command is most retarding.
DTC Detecting Condition and Trouble Area
DTC Confirmation Procedure
WARNING!
• When performing a road test, select a place where there is no traffic or possibility of a traffic
accident and be very careful during testing to avoid occurrence of an accident.
• Road test should be carried out by 2 persons, a driver and tester, on a level road.
NOTE
Check to make sure that the following conditions are satisfied when using this “DTC Confirmation
Procedure”.
• Altitude (barometric pressure): 2500 m, 8200 ft or less (560 mmHg, 74.4 kPa or more)
1) Clear DTC. Refer to “DTC Clearance”.
2) Start engine and drive vehicle under usual driving condition for 5 minutes or longer until engine is warmed up to
normal operating temperature.
3) Stop vehicle.
4) Run engine at idle speed for 1 minute.
5) Start vehicle and increase vehicle speed up to 120 km/h (70 mile/h).
6) Keep vehicle speed at 120 km/h (70 mile/h) for 1 minute or longer at 5th gear position or D range.
7) Decrease vehicle speed gradually.
8) Stop vehicle and turn OFF ignition switch.
9) Repeat Step 4) to 7) one time.
10) Stop vehicle.
11) Check DTC. Refer to “DTC Check”.9Oil control valve check
Check oil control valve referring to “Oil Control Valve
Inspection (For Engine with VVT) in Section 1D”.
Is resistance within specified value?Substitute a known-
good ECM and recheck.Faulty oil control valve. Step Action Yes No
DTC detecting condition Trouble area
Actual value of advanced valve timing does not reach
target value, or valve timing is advanced although ECM
command is most retarding.
(2 driving cycle detection logic)• Oil control valve
• Oil galleries of timing sprocket
• Intake camshaft timing sprocket (Camshaft position
control (VVT) actuator)
• Oil control valve circuit
•ECM
Page 108 of 1556
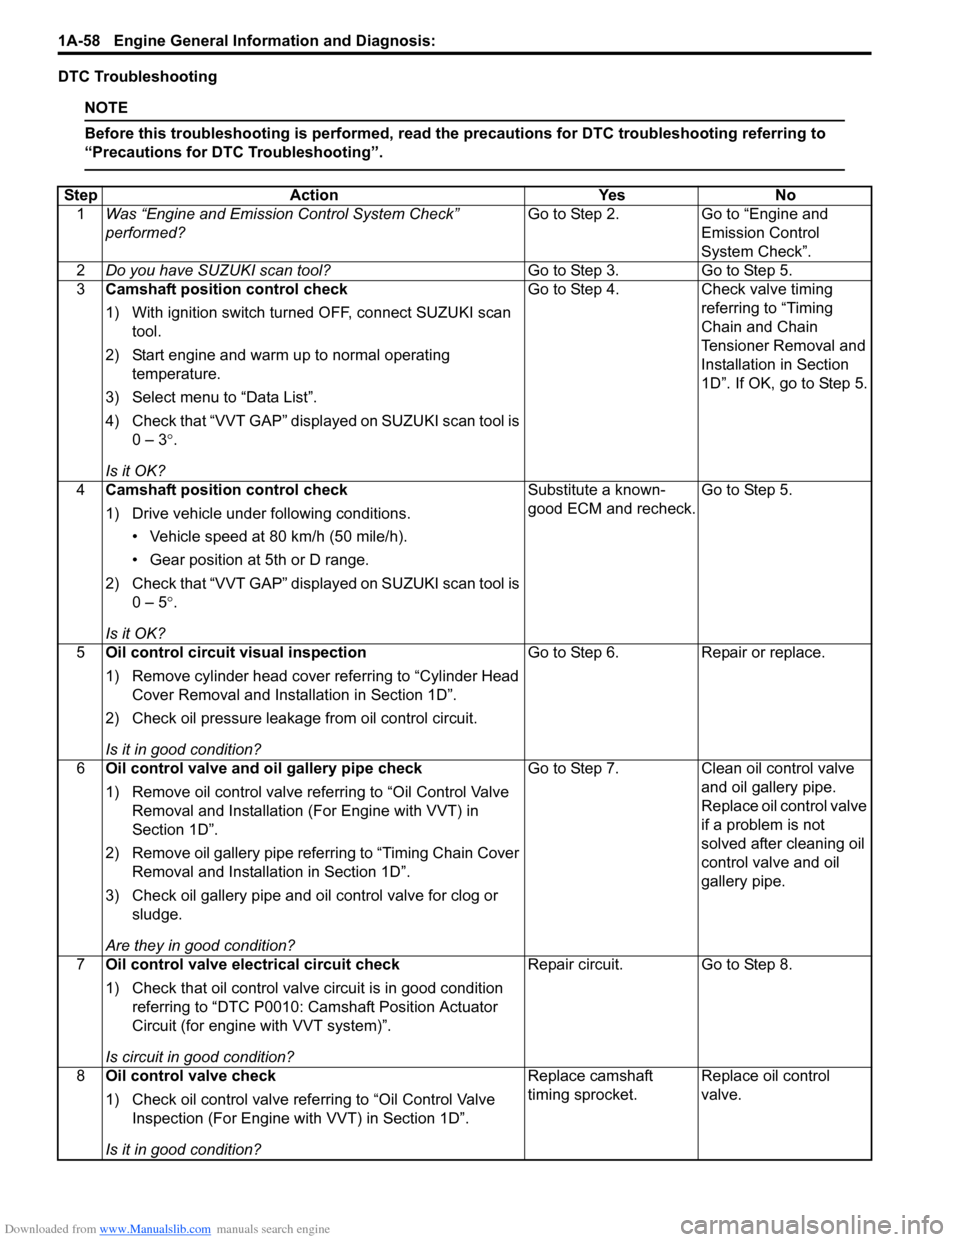
Downloaded from www.Manualslib.com manuals search engine 1A-58 Engine General Information and Diagnosis:
DTC Troubleshooting
NOTE
Before this troubleshooting is performed, read the precautions for DTC troubleshooting referring to
“Precautions for DTC Troubleshooting”.
Step Action Yes No
1Was “Engine and Emission Control System Check”
performed?Go to Step 2. Go to “Engine and
Emission Control
System Check”.
2Do you have SUZUKI scan tool?Go to Step 3. Go to Step 5.
3Camshaft position control check
1) With ignition switch turned OFF, connect SUZUKI scan
tool.
2) Start engine and warm up to normal operating
temperature.
3) Select menu to “Data List”.
4) Check that “VVT GAP” displayed on SUZUKI scan tool is
0 – 3°.
Is it OK?Go to Step 4. Check valve timing
referring to “Timing
Chain and Chain
Tensioner Removal and
Installation in Section
1D”. If OK, go to Step 5.
4Camshaft position control check
1) Drive vehicle under following conditions.
• Vehicle speed at 80 km/h (50 mile/h).
• Gear position at 5th or D range.
2) Check that “VVT GAP” displayed on SUZUKI scan tool is
0 – 5°.
Is it OK?Substitute a known-
good ECM and recheck.Go to Step 5.
5Oil control circuit visual inspection
1) Remove cylinder head cover referring to “Cylinder Head
Cover Removal and Installation in Section 1D”.
2) Check oil pressure leakage from oil control circuit.
Is it in good condition?Go to Step 6. Repair or replace.
6Oil control valve and oil gallery pipe check
1) Remove oil control valve referring to “Oil Control Valve
Removal and Installation (For Engine with VVT) in
Section 1D”.
2) Remove oil gallery pipe referring to “Timing Chain Cover
Removal and Installation in Section 1D”.
3) Check oil gallery pipe and oil control valve for clog or
sludge.
Are they in good condition?Go to Step 7. Clean oil control valve
and oil gallery pipe.
Replace oil control valve
if a problem is not
solved after cleaning oil
control valve and oil
gallery pipe.
7Oil control valve electrical circuit check
1) Check that oil control valve circuit is in good condition
referring to “DTC P0010: Camshaft Position Actuator
Circuit (for engine with VVT system)”.
Is circuit in good condition?Repair circuit. Go to Step 8.
8Oil control valve check
1) Check oil control valve referring to “Oil Control Valve
Inspection (For Engine with VVT) in Section 1D”.
Is it in good condition?Replace camshaft
timing sprocket.Replace oil control
valve.
Page 160 of 1556
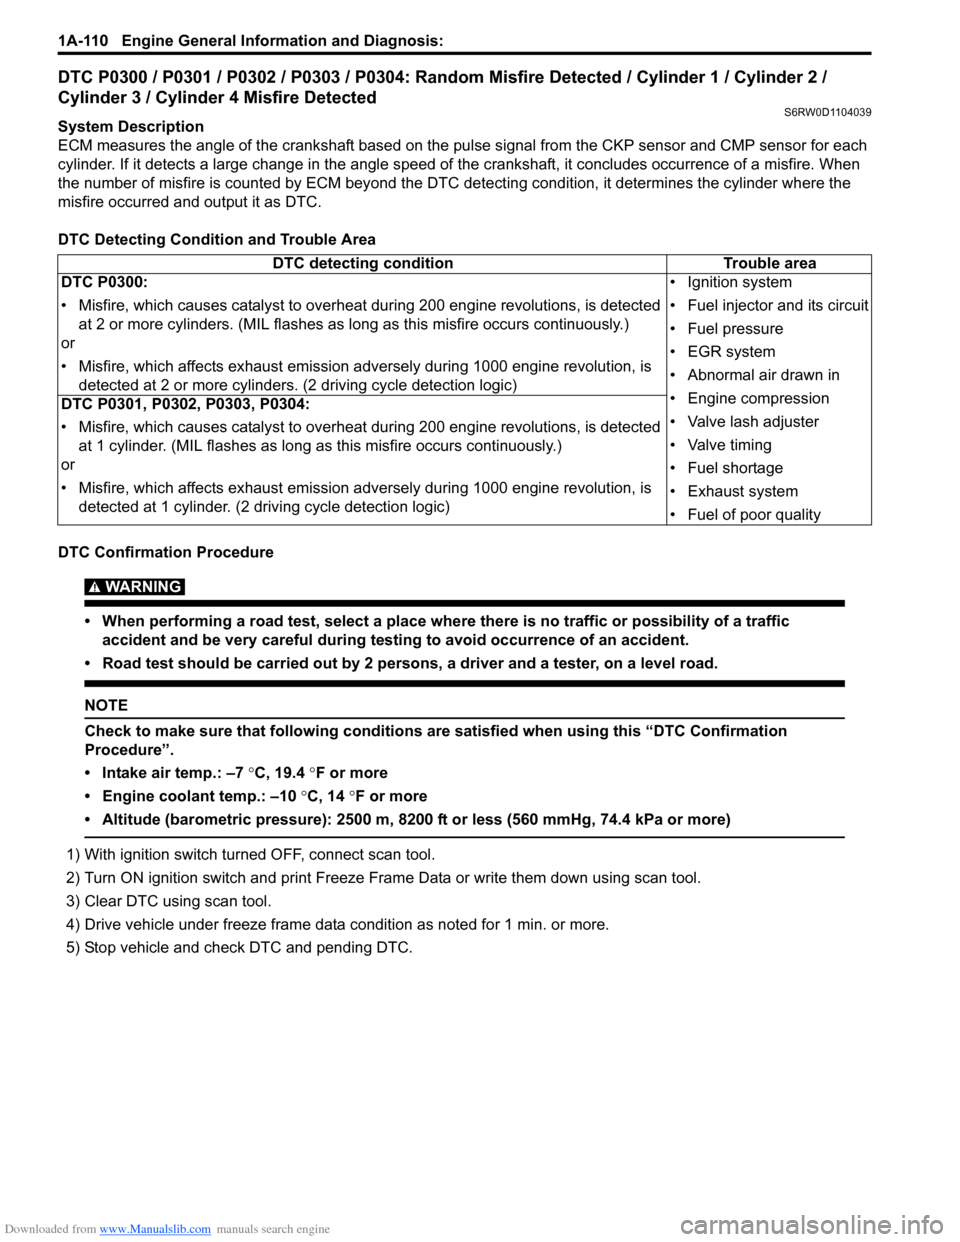
Downloaded from www.Manualslib.com manuals search engine 1A-110 Engine General Information and Diagnosis:
DTC P0300 / P0301 / P0302 / P0303 / P0304: Random Misfire Detected / Cylinder 1 / Cylinder 2 /
Cylinder 3 / Cylinder 4 Misfire Detected
S6RW0D1104039
System Description
ECM measures the angle of the crankshaft based on the pulse signal from the CKP sensor and CMP sensor for each
cylinder. If it detects a large change in the angle speed of the crankshaft, it concludes occurrence of a misfire. When
the number of misfire is counted by ECM beyond the DTC detecting condition, it determines the cylinder where the
misfire occurred and output it as DTC.
DTC Detecting Condition and Trouble Area
DTC Confirmation Procedure
WARNING!
• When performing a road test, select a place where there is no traffic or possibility of a traffic
accident and be very careful during testing to avoid occurrence of an accident.
• Road test should be carried out by 2 persons, a driver and a tester, on a level road.
NOTE
Check to make sure that following conditions are satisfied when using this “DTC Confirmation
Procedure”.
• Intake air temp.: –7 °C, 19.4 °F or more
• Engine coolant temp.: –10 °C, 14 °F or more
• Altitude (barometric pressure): 2500 m, 8200 ft or less (560 mmHg, 74.4 kPa or more)
1) With ignition switch turned OFF, connect scan tool.
2) Turn ON ignition switch and print Freeze Frame Data or write them down using scan tool.
3) Clear DTC using scan tool.
4) Drive vehicle under freeze frame data condition as noted for 1 min. or more.
5) Stop vehicle and check DTC and pending DTC.DTC detecting condition Trouble area
DTC P0300:
• Misfire, which causes catalyst to overheat during 200 engine revolutions, is detected
at 2 or more cylinders. (MIL flashes as long as this misfire occurs continuously.)
or
• Misfire, which affects exhaust emission adversely during 1000 engine revolution, is
detected at 2 or more cylinders. (2 driving cycle detection logic)• Ignition system
• Fuel injector and its circuit
• Fuel pressure
• EGR system
• Abnormal air drawn in
• Engine compression
• Valve lash adjuster
• Valve timing
• Fuel shortage
• Exhaust system
• Fuel of poor quality DTC P0301, P0302, P0303, P0304:
• Misfire, which causes catalyst to overheat during 200 engine revolutions, is detected
at 1 cylinder. (MIL flashes as long as this misfire occurs continuously.)
or
• Misfire, which affects exhaust emission adversely during 1000 engine revolution, is
detected at 1 cylinder. (2 driving cycle detection logic)
Page 161 of 1556
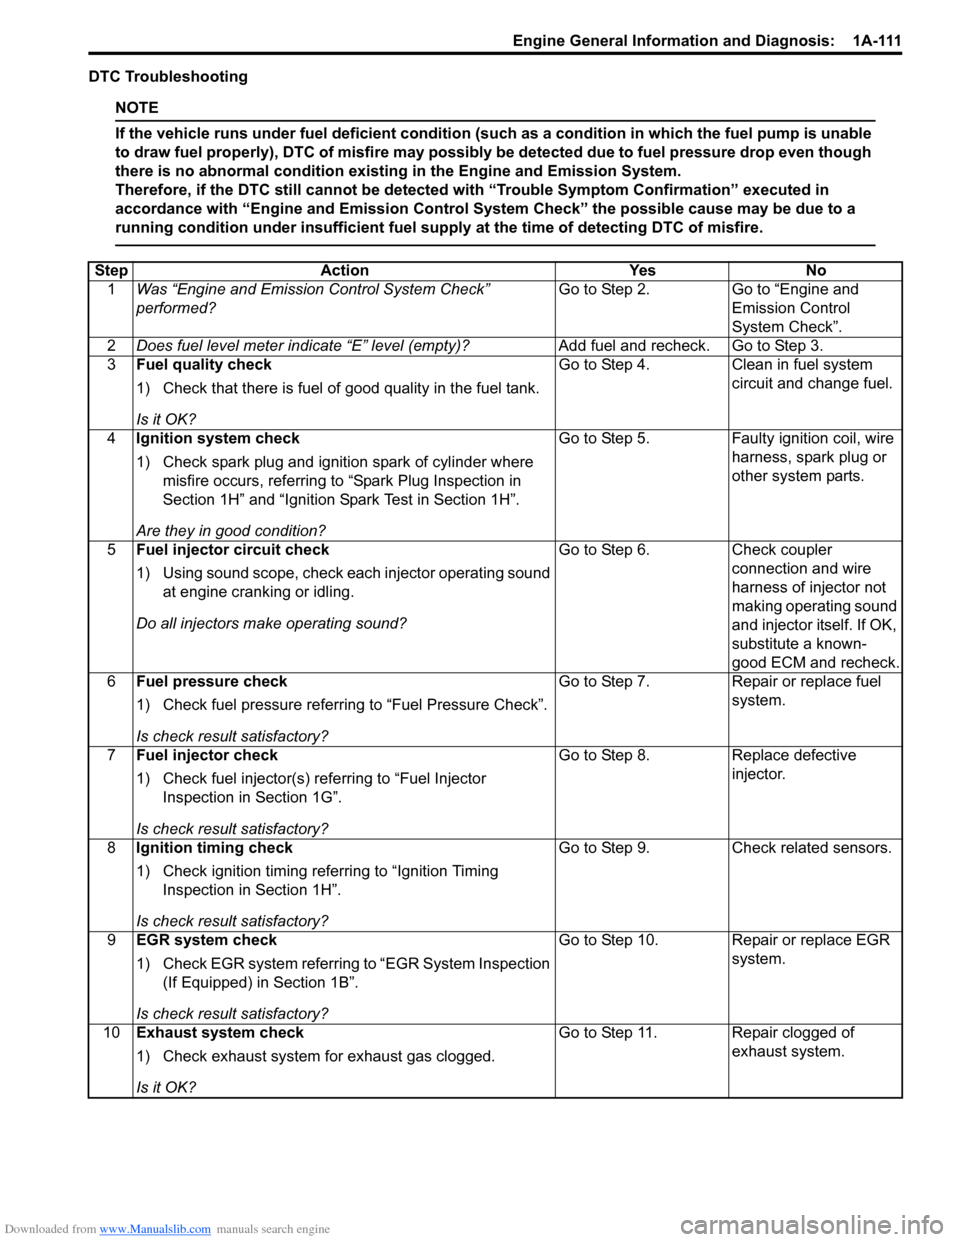
Downloaded from www.Manualslib.com manuals search engine Engine General Information and Diagnosis: 1A-111
DTC Troubleshooting
NOTE
If the vehicle runs under fuel deficient condition (such as a condition in which the fuel pump is unable
to draw fuel properly), DTC of misfire may possibly be detected due to fuel pressure drop even though
there is no abnormal condition existing in the Engine and Emission System.
Therefore, if the DTC still cannot be detected with “Trouble Symptom Confirmation” executed in
accordance with “Engine and Emission Control System Check” the possible cause may be due to a
running condition under insufficient fuel supply at the time of detecting DTC of misfire.
Step Action Yes No
1Was “Engine and Emission Control System Check”
performed?Go to Step 2. Go to “Engine and
Emission Control
System Check”.
2Does fuel level meter indicate “E” level (empty)?Add fuel and recheck. Go to Step 3.
3Fuel quality check
1) Check that there is fuel of good quality in the fuel tank.
Is it OK?Go to Step 4. Clean in fuel system
circuit and change fuel.
4Ignition system check
1) Check spark plug and ignition spark of cylinder where
misfire occurs, referring to “Spark Plug Inspection in
Section 1H” and “Ignition Spark Test in Section 1H”.
Are they in good condition?Go to Step 5. Faulty ignition coil, wire
harness, spark plug or
other system parts.
5Fuel injector circuit check
1) Using sound scope, check each injector operating sound
at engine cranking or idling.
Do all injectors make operating sound?Go to Step 6. Check coupler
connection and wire
harness of injector not
making operating sound
and injector itself. If OK,
substitute a known-
good ECM and recheck.
6Fuel pressure check
1) Check fuel pressure referring to “Fuel Pressure Check”.
Is check result satisfactory?Go to Step 7. Repair or replace fuel
system.
7Fuel injector check
1) Check fuel injector(s) referring to “Fuel Injector
Inspection in Section 1G”.
Is check result satisfactory?Go to Step 8. Replace defective
injector.
8Ignition timing check
1) Check ignition timing referring to “Ignition Timing
Inspection in Section 1H”.
Is check result satisfactory?Go to Step 9. Check related sensors.
9EGR system check
1) Check EGR system referring to “EGR System Inspection
(If Equipped) in Section 1B”.
Is check result satisfactory?Go to Step 10. Repair or replace EGR
system.
10Exhaust system check
1) Check exhaust system for exhaust gas clogged.
Is it OK?Go to Step 11. Repair clogged of
exhaust system.
Page 162 of 1556
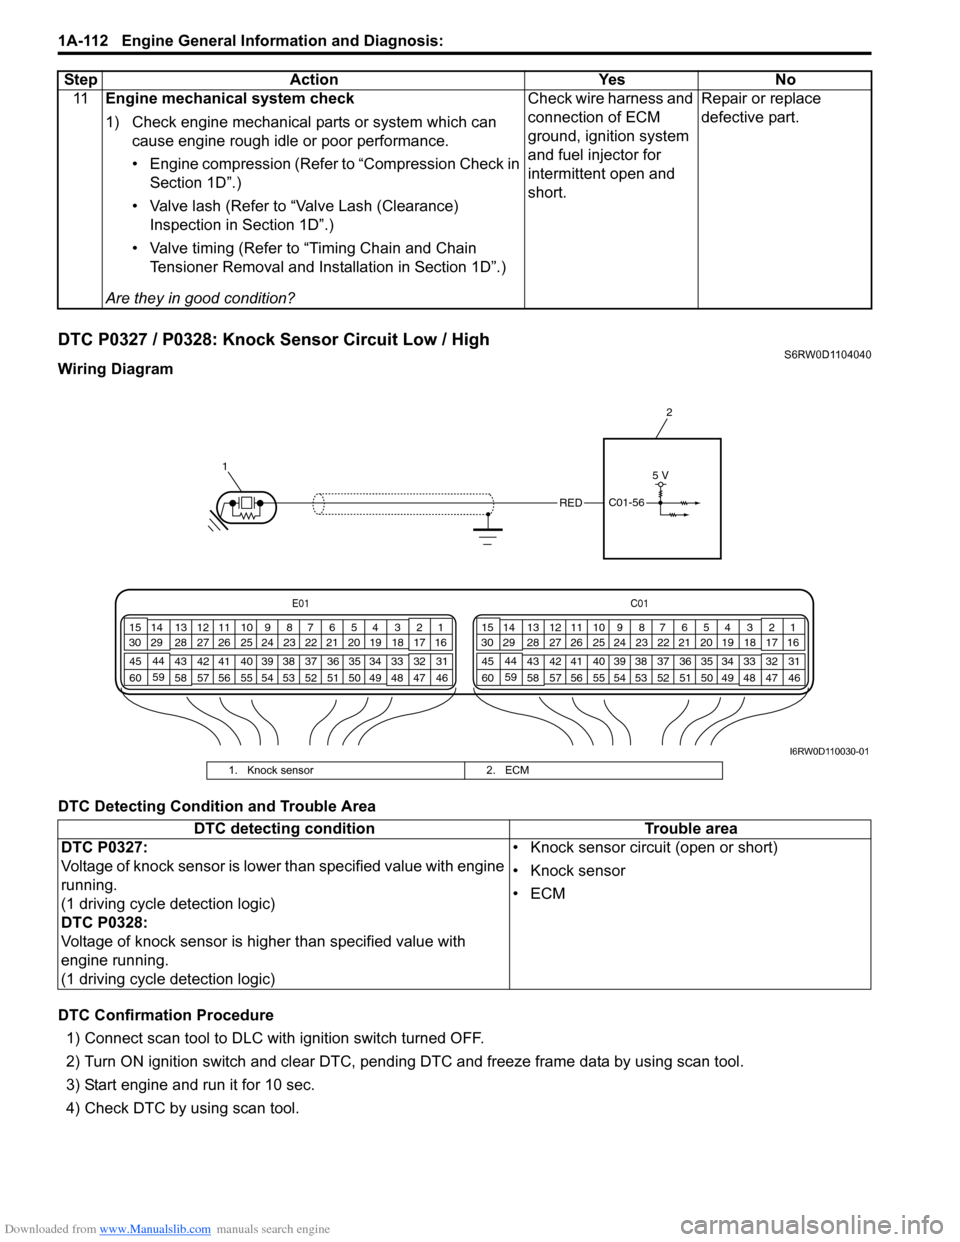
Downloaded from www.Manualslib.com manuals search engine 1A-112 Engine General Information and Diagnosis:
DTC P0327 / P0328: Knock Sensor Circuit Low / HighS6RW0D1104040
Wiring Diagram
DTC Detecting Condition and Trouble Area
DTC Confirmation Procedure
1) Connect scan tool to DLC with ignition switch turned OFF.
2) Turn ON ignition switch and clear DTC, pending DTC and freeze frame data by using scan tool.
3) Start engine and run it for 10 sec.
4) Check DTC by using scan tool.11Engine mechanical system check
1) Check engine mechanical parts or system which can
cause engine rough idle or poor performance.
• Engine compression (Refer to “Compression Check in
Section 1D”.)
• Valve lash (Refer to “Valve Lash (Clearance)
Inspection in Section 1D”.)
• Valve timing (Refer to “Timing Chain and Chain
Tensioner Removal and Installation in Section 1D”.)
Are they in good condition?Check wire harness and
connection of ECM
ground, ignition system
and fuel injector for
intermittent open and
short.Repair or replace
defective part. Step Action Yes No
E01C01
3 4
18 19 5 6 7 10 11
17 20
47 46 49 50 51 21 22
5216 259
24 14
29
55 57 54 53 59
60 582
26 27 28 15
30
56 4832 31 34 35 36 37 40 42 39 38 44
45 43 41 331 12 13
238 3 4
18 19 5 6 7 10 11
17 20
47 46 49 50 51 21 22
5216 259
24 14
29
55 57 54 53 59
60 582
26 27 28 15
30
56 4832 31 34 35 36 37 40 42 39 38 44
45 43 41 331 12 13
238
12
REDC01-56
5 V
I6RW0D110030-01
1. Knock sensor 2. ECM
DTC detecting condition Trouble area
DTC P0327:
Voltage of knock sensor is lower than specified value with engine
running.
(1 driving cycle detection logic)
DTC P0328:
Voltage of knock sensor is higher than specified value with
engine running.
(1 driving cycle detection logic)• Knock sensor circuit (open or short)
• Knock sensor
•ECM
Page 167 of 1556
Downloaded from www.Manualslib.com manuals search engine Engine General Information and Diagnosis: 1A-117
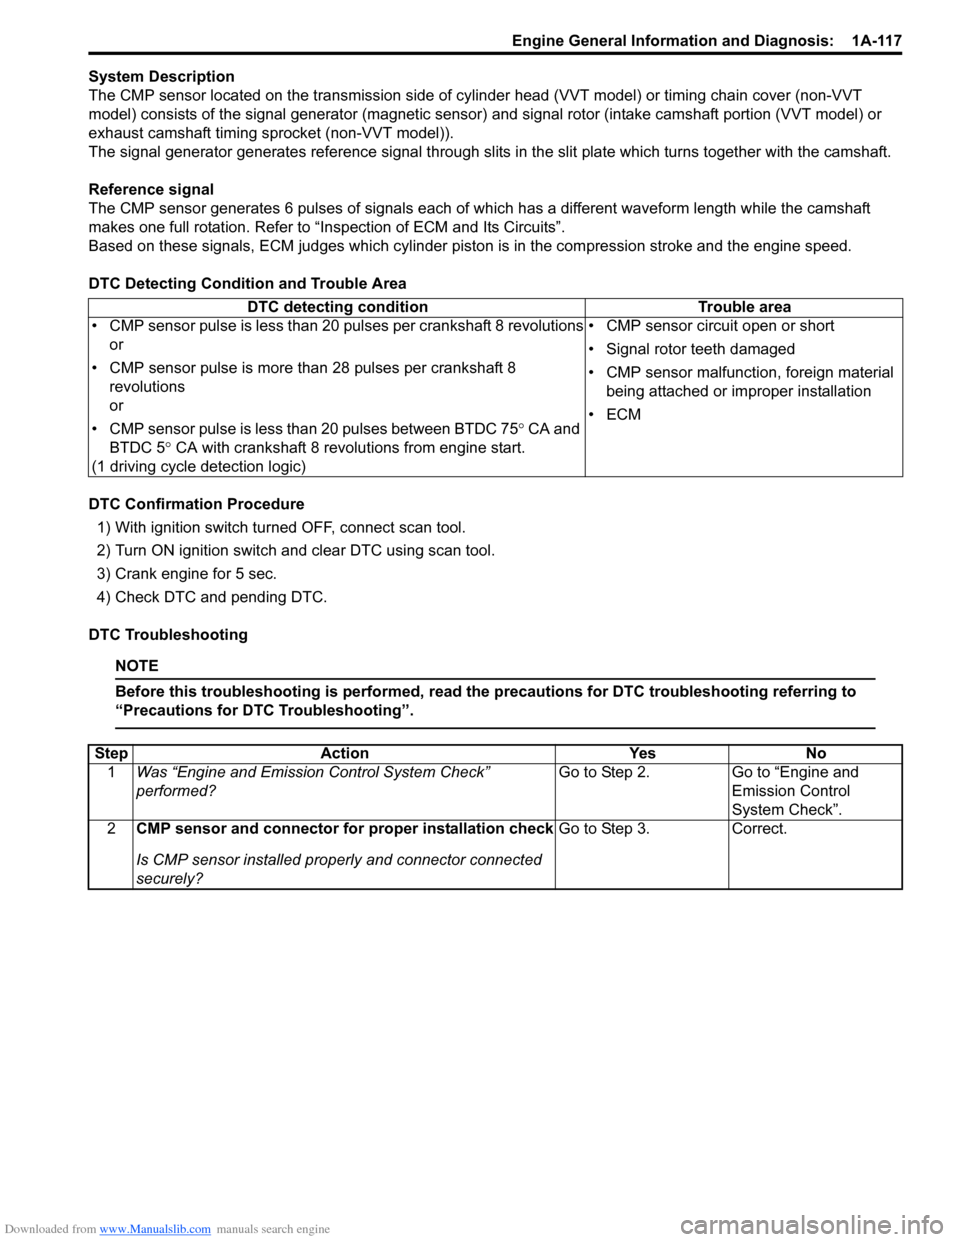
System Description
The CMP sensor located on the transmission side of cylinder head (VVT model) or timing chain cover (non-VVT
model) consists of the signal generator (magnetic sensor) and signal rotor (intake camshaft portion (VVT model) or
exhaust camshaft timing sprocket (non-VVT model)).
The signal generator generates reference signal through slits in the slit plate which turns together with the camshaft.
Reference signal
The CMP sensor generates 6 pulses of signals each of which has a different waveform length while the camshaft
makes one full rotation. Refer to “Inspection of ECM and Its Circuits”.
Based on these signals, ECM judges which cylinder piston is in the compression stroke and the engine speed.
DTC Detecting Condition and Trouble Area
DTC Confirmation Procedure
1) With ignition switch turned OFF, connect scan tool.
2) Turn ON ignition switch and clear DTC using scan tool.
3) Crank engine for 5 sec.
4) Check DTC and pending DTC.
DTC Troubleshooting
NOTE
Before this troubleshooting is performed, read the precautions for DTC troubleshooting referring to
“Precautions for DTC Troubleshooting”.
DTC detecting condition Trouble area
• CMP sensor pulse is less than 20 pulses per crankshaft 8 revolutions
or
• CMP sensor pulse is more than 28 pulses per crankshaft 8
revolutions
or
• CMP sensor pulse is less than 20 pulses between BTDC 75° CA and
BTDC 5° CA with crankshaft 8 revolutions from engine start.
(1 driving cycle detection logic)• CMP sensor circuit open or short
• Signal rotor teeth damaged
• CMP sensor malfunction, foreign material
being attached or improper installation
•ECM
Step Action Yes No
1Was “Engine and Emission Control System Check”
performed?Go to Step 2. Go to “Engine and
Emission Control
System Check”.
2CMP sensor and connector for proper installation check
Is CMP sensor installed properly and connector connected
securely?Go to Step 3. Correct.
Page 262 of 1556
Downloaded from www.Manualslib.com manuals search engine 1A-212 Engine General Information and Diagnosis:
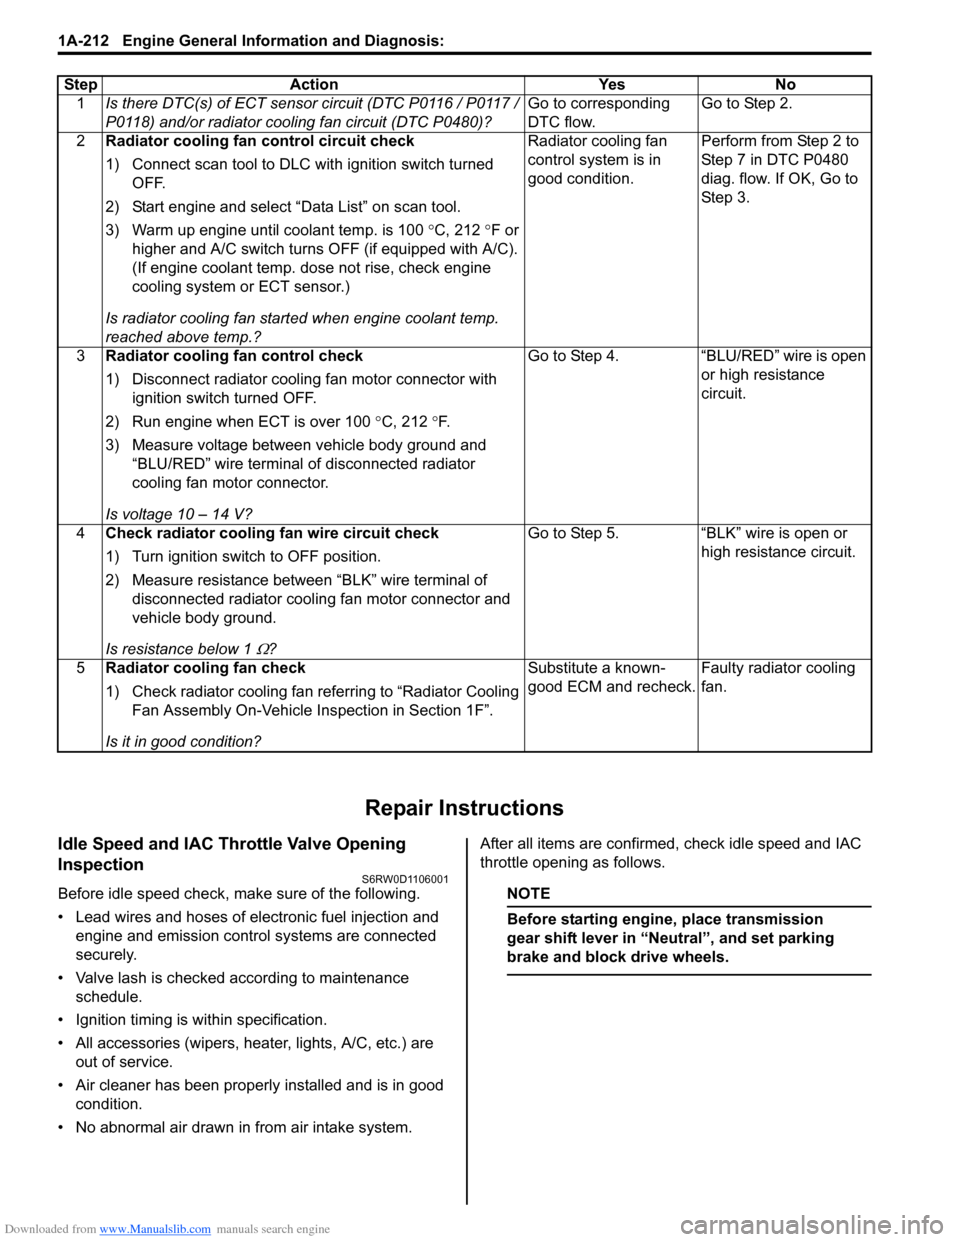
Repair Instructions
Idle Speed and IAC Throttle Valve Opening
Inspection
S6RW0D1106001
Before idle speed check, make sure of the following.
• Lead wires and hoses of electronic fuel injection and
engine and emission control systems are connected
securely.
• Valve lash is checked according to maintenance
schedule.
• Ignition timing is within specification.
• All accessories (wipers, heater, lights, A/C, etc.) are
out of service.
• Air cleaner has been properly installed and is in good
condition.
• No abnormal air drawn in from air intake system.After all items are confirmed, check idle speed and IAC
throttle opening as follows.NOTE
Before starting engine, place transmission
gear shift lever in “Neutral”, and set parking
brake and block drive wheels.
Step Action Yes No
1Is there DTC(s) of ECT sensor circuit (DTC P0116 / P0117 /
P0118) and/or radiator cooling fan circuit (DTC P0480)?Go to corresponding
DTC flow.Go to Step 2.
2Radiator cooling fan control circuit check
1) Connect scan tool to DLC with ignition switch turned
OFF.
2) Start engine and select “Data List” on scan tool.
3) Warm up engine until coolant temp. is 100 °C, 212 °F or
higher and A/C switch turns OFF (if equipped with A/C).
(If engine coolant temp. dose not rise, check engine
cooling system or ECT sensor.)
Is radiator cooling fan started when engine coolant temp.
reached above temp.?Radiator cooling fan
control system is in
good condition.Perform from Step 2 to
Step 7 in DTC P0480
diag. flow. If OK, Go to
Ste p 3.
3Radiator cooling fan control check
1) Disconnect radiator cooling fan motor connector with
ignition switch turned OFF.
2) Run engine when ECT is over 100 °C, 212 °F.
3) Measure voltage between vehicle body ground and
“BLU/RED” wire terminal of disconnected radiator
cooling fan motor connector.
Is voltage 10 – 14 V?Go to Step 4. “BLU/RED” wire is open
or high resistance
circuit.
4Check radiator cooling fan wire circuit check
1) Turn ignition switch to OFF position.
2) Measure resistance between “BLK” wire terminal of
disconnected radiator cooling fan motor connector and
vehicle body ground.
Is resistance below 1
Ω?Go to Step 5. “BLK” wire is open or
high resistance circuit.
5Radiator cooling fan check
1) Check radiator cooling fan referring to “Radiator Cooling
Fan Assembly On-Vehicle Inspection in Section 1F”.
Is it in good condition?Substitute a known-
good ECM and recheck.Faulty radiator cooling
fan.