front light SUZUKI SX4 2006 1.G Service Owner's Manual
[x] Cancel search | Manufacturer: SUZUKI, Model Year: 2006, Model line: SX4, Model: SUZUKI SX4 2006 1.GPages: 1556, PDF Size: 37.31 MB
Page 639 of 1556

Downloaded from www.Manualslib.com manuals search engine ABS: 4E-34
Installation
1) Install hydraulic unit / control module assembly by
reversing removal procedure noting the following.
Install ABS hydraulic unit / control module assembly
bracket bolt as follows.
a) Tighten bracket bolt (1) and (2) by hand.
b) Then tighten bracket bolt to specified torque.
Tightening order (1) → (2)
Tightening torque
Brake pipe flare nut (a): 16 N·m (1.6 kgf-m, 11.5
lb-ft)
ABS hydraulic unit / control module assembly
bolt (b): 9 N·m (0.9 kgf-m, 6.5 lb-ft)
ABS hydraulic unit / control module assembly
bracket bolt (c): 26 N·m (2.6 kgf-m, 19.0 lb-ft)2) Bleed air from brake system referring to “Air
Bleeding of Brake System in Section 4A”.
3) Check each installed part for fluid leakage and
perform “ABS Hydraulic Unit Operation Check”.
NOTE
For new ABS hydraulic unit / control module
assembly, if “ABS Hydraulic Unit Operation
Check” has not been performed, ABS
warning light may flash when ignition switch
is turned ON position.
Accordingly preform “ABS Hydraulic Unit
Operation Check” to stop flashing of ABS
warning light.
Front and Rear Wheel Speed Sensor On-Vehicle
Inspection
S6RW0D4506005
Output Voltage Inspection
1) Disconnect negative (–) cable from battery.
2) Hoist vehicle a little.
3) Disconnect wheel speed sensor connector.
4) Set up measuring device as shown in figure, the
resistance to 115 Ω and the power supply voltage to
12 V.
CAUTION!
Incorrect voltage and/or wrong connection
cause damage to wheel speed sensor.
I6RW0C450011-01
1. Wheel speed sensor connector 4. “BLK” wire terminal
2. Resistance (115Ω) 5. Power supply (12 V)
3. “WHT” wire terminal
V
41
3
2
5
I5JB0A450026-03
Page 755 of 1556
Downloaded from www.Manualslib.com manuals search engine Automatic Transmission/Transaxle: 5A-107
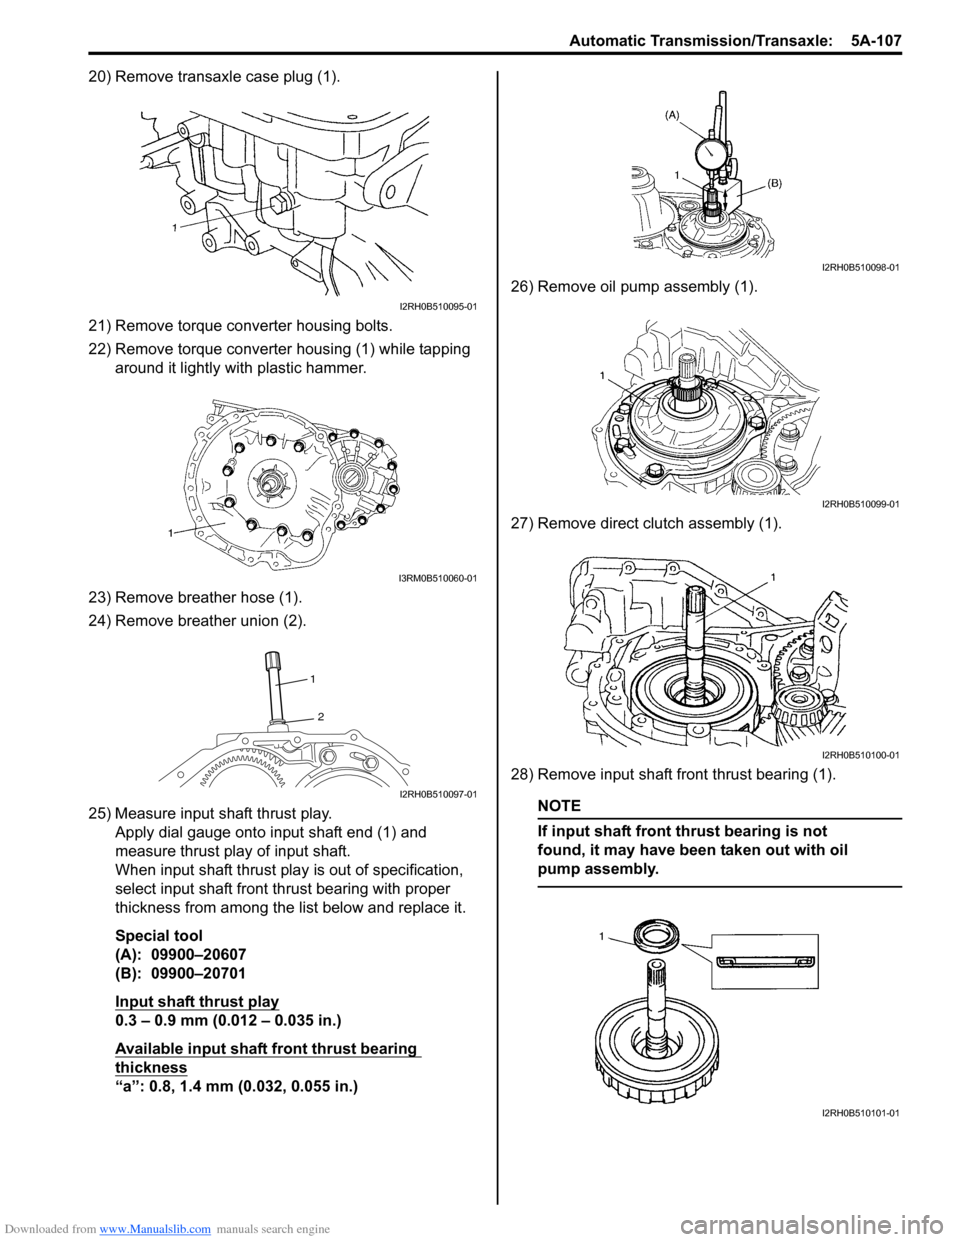
20) Remove transaxle case plug (1).
21) Remove torque converter housing bolts.
22) Remove torque converter housing (1) while tapping
around it lightly with plastic hammer.
23) Remove breather hose (1).
24) Remove breather union (2).
25) Measure input shaft thrust play.
Apply dial gauge onto input shaft end (1) and
measure thrust play of input shaft.
When input shaft thrust play is out of specification,
select input shaft front thrust bearing with proper
thickness from among the list below and replace it.
Special tool
(A): 09900–20607
(B): 09900–20701
Input shaft thrust play
0.3 – 0.9 mm (0.012 – 0.035 in.)
Available input shaft front thrust bearing
thickness
“a”: 0.8, 1.4 mm (0.032, 0.055 in.)26) Remove oil pump assembly (1).
27) Remove direct clutch assembly (1).
28) Remove input shaft front thrust bearing (1).
NOTE
If input shaft front thrust bearing is not
found, it may have been taken out with oil
pump assembly.
I2RH0B510095-01
I3RM0B510060-01
1
2
I2RH0B510097-01
I2RH0B510098-01
I2RH0B510099-01
I2RH0B510100-01
I2RH0B510101-01
Page 824 of 1556
Downloaded from www.Manualslib.com manuals search engine 5B-12 Manual Transmission/Transaxle:
Manual Transaxle Unit Dismounting and
Remounting
S6RW0D5206010
Dismounting
1) Drain coolant.
2) Remove battery and tray with ECM.
3) Remove air cleaner case and resonator.
4) Remove clutch fluid pipe referring to “Clutch Fluid
Pipe Removal and Installation in Section 5C”.
5) Disconnect back up light switch coupler and undo
wiring harness clamps.
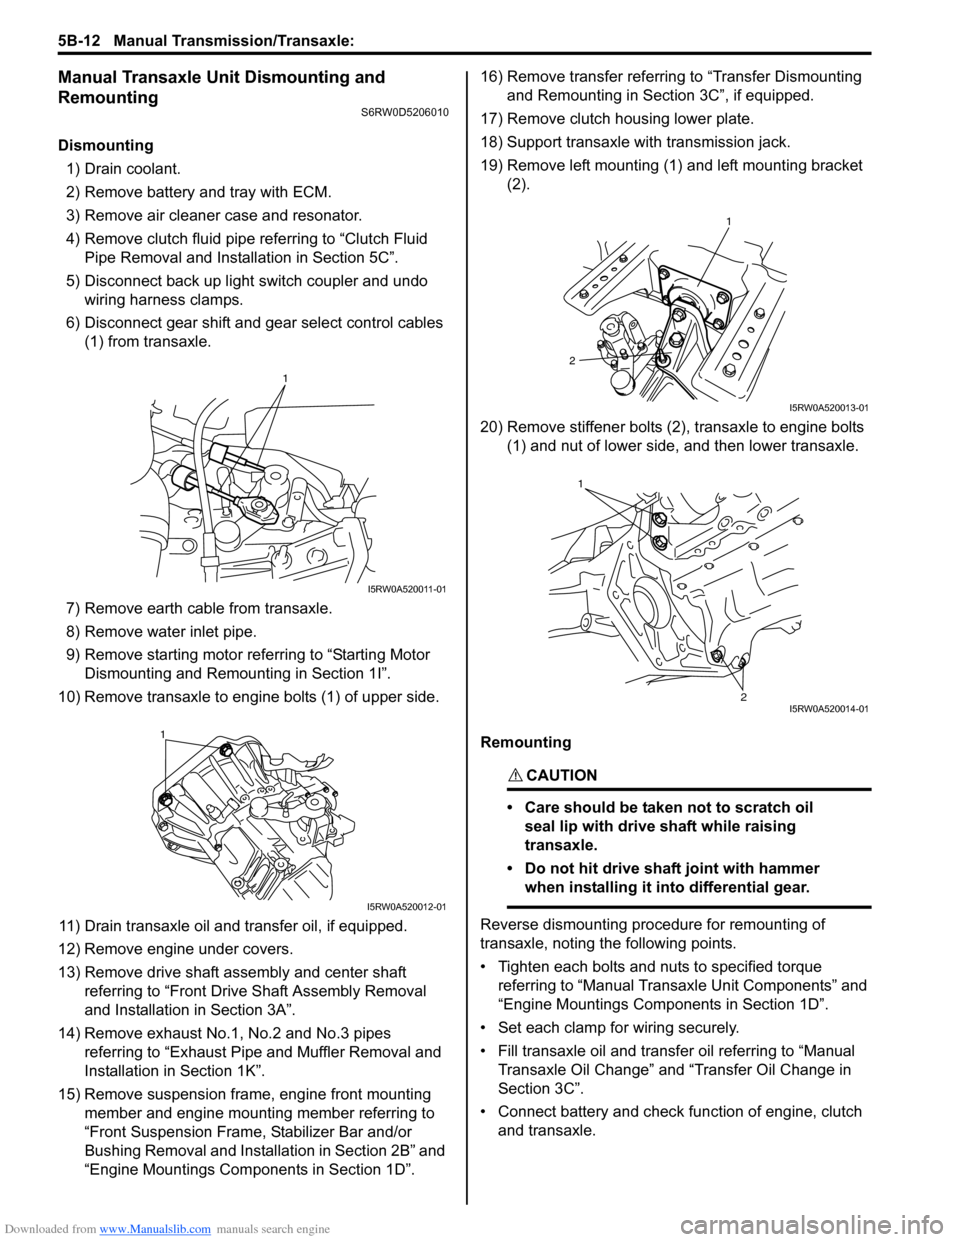
6) Disconnect gear shift and gear select control cables
(1) from transaxle.
7) Remove earth cable from transaxle.
8) Remove water inlet pipe.
9) Remove starting motor referring to “Starting Motor
Dismounting and Remounting in Section 1I”.
10) Remove transaxle to engine bolts (1) of upper side.
11) Drain transaxle oil and transfer oil, if equipped.
12) Remove engine under covers.
13) Remove drive shaft assembly and center shaft
referring to “Front Drive Shaft Assembly Removal
and Installation in Section 3A”.
14) Remove exhaust No.1, No.2 and No.3 pipes
referring to “Exhaust Pipe and Muffler Removal and
Installation in Section 1K”.
15) Remove suspension frame, engine front mounting
member and engine mounting member referring to
“Front Suspension Frame, Stabilizer Bar and/or
Bushing Removal and Installation in Section 2B” and
“Engine Mountings Components in Section 1D”.16) Remove transfer referring to “Transfer Dismounting
and Remounting in Section 3C”, if equipped.
17) Remove clutch housing lower plate.
18) Support transaxle with transmission jack.
19) Remove left mounting (1) and left mounting bracket
(2).
20) Remove stiffener bolts (2), transaxle to engine bolts
(1) and nut of lower side, and then lower transaxle.
Remounting
CAUTION!
• Care should be taken not to scratch oil
seal lip with drive shaft while raising
transaxle.
• Do not hit drive shaft joint with hammer
when installing it into differential gear.
Reverse dismounting procedure for remounting of
transaxle, noting the following points.
• Tighten each bolts and nuts to specified torque
referring to “Manual Transaxle Unit Components” and
“Engine Mountings Components in Section 1D”.
• Set each clamp for wiring securely.
• Fill transaxle oil and transfer oil referring to “Manual
Transaxle Oil Change” and “Transfer Oil Change in
Section 3C”.
• Connect battery and check function of engine, clutch
and transaxle.
1
I5RW0A520011-01
1
I5RW0A520012-01
1
2
I5RW0A520013-01
1
2I5RW0A520014-01
Page 875 of 1556
Downloaded from www.Manualslib.com manuals search engine Steering Wheel and Column: 6B-6
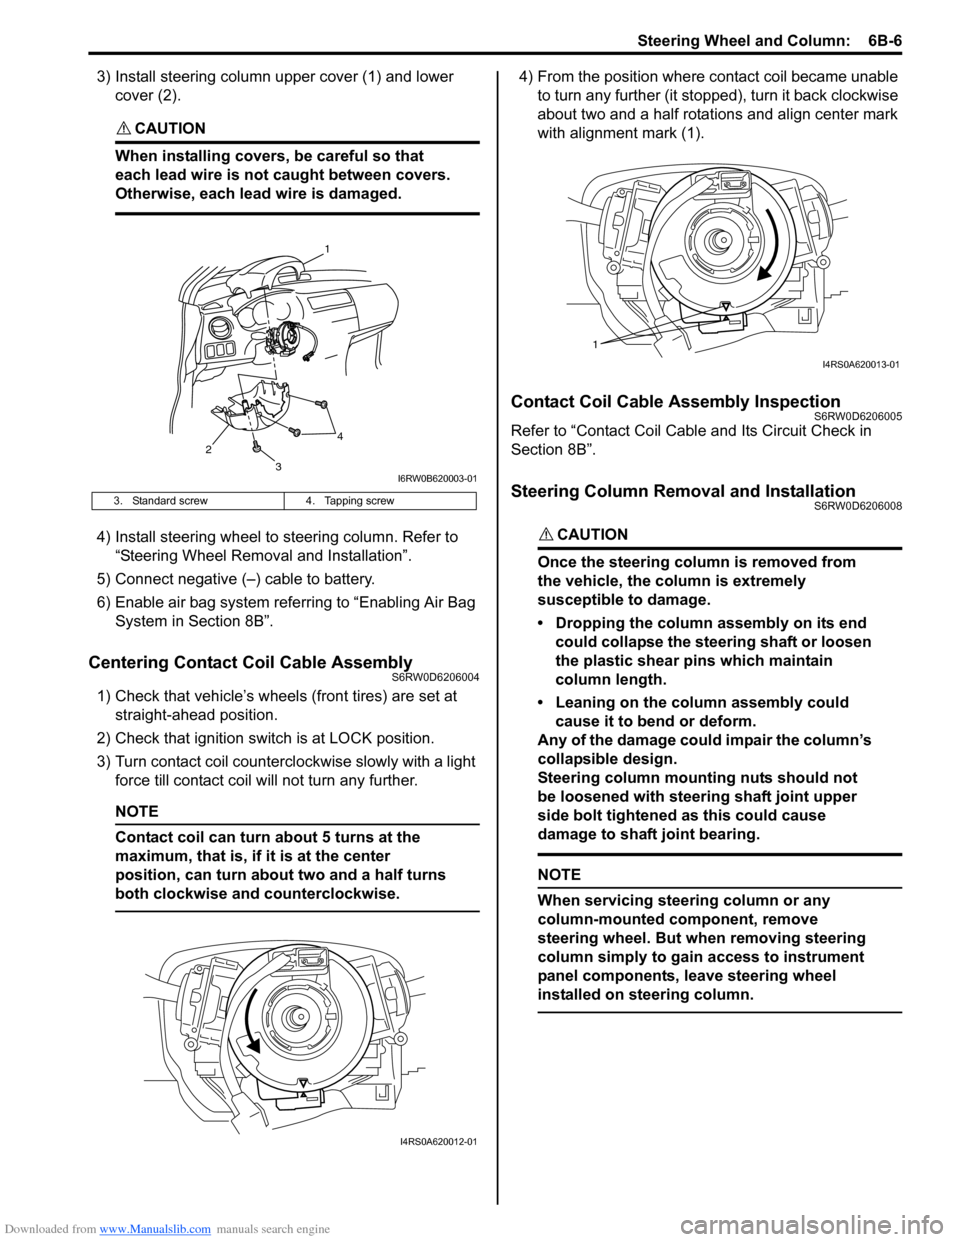
3) Install steering column upper cover (1) and lower
cover (2).
CAUTION!
When installing covers, be careful so that
each lead wire is not caught between covers.
Otherwise, each lead wire is damaged.
4) Install steering wheel to steering column. Refer to
“Steering Wheel Removal and Installation”.
5) Connect negative (–) cable to battery.
6) Enable air bag system referring to “Enabling Air Bag
System in Section 8B”.
Centering Contact Coil Cable AssemblyS6RW0D6206004
1) Check that vehicle’s wheels (front tires) are set at
straight-ahead position.
2) Check that ignition switch is at LOCK position.
3) Turn contact coil counterclockwise slowly with a light
force till contact coil will not turn any further.
NOTE
Contact coil can turn about 5 turns at the
maximum, that is, if it is at the center
position, can turn about two and a half turns
both clockwise and counterclockwise.
4) From the position where contact coil became unable
to turn any further (it stopped), turn it back clockwise
about two and a half rotations and align center mark
with alignment mark (1).
Contact Coil Cable Assembly InspectionS6RW0D6206005
Refer to “Contact Coil Cable and Its Circuit Check in
Section 8B”.
Steering Column Removal and InstallationS6RW0D6206008
CAUTION!
Once the steering column is removed from
the vehicle, the column is extremely
susceptible to damage.
• Dropping the column assembly on its end
could collapse the steering shaft or loosen
the plastic shear pins which maintain
column length.
• Leaning on the column assembly could
cause it to bend or deform.
Any of the damage could impair the column’s
collapsible design.
Steering column mounting nuts should not
be loosened with steering shaft joint upper
side bolt tightened as this could cause
damage to shaft joint bearing.
NOTE
When servicing steering column or any
column-mounted component, remove
steering wheel. But when removing steering
column simply to gain access to instrument
panel components, leave steering wheel
installed on steering column.
3. Standard screw 4. Tapping screw
2
1
3
4
I6RW0B620003-01
I4RS0A620012-01
1
I4RS0A620013-01
Page 876 of 1556
Downloaded from www.Manualslib.com manuals search engine 6B-7 Steering Wheel and Column:
Removal
WARNING!
Never rest a steering column assembly on
the steering wheel with the air bag (inflator)
module face down and column vertical.
Otherwise, personal injury may result.
1) Disconnect negative (–) cable at battery.
2) Disable air bag system. Refer to “Disabling Air Bag
System in Section 8B”.
3) Remove steering wheel and contact coil cable
assembly referring to “Steering Wheel Removal and
Installation” and “Contact Coil Cable Assembly
Removal and Installation”.
4) (Immobilizer model)
Remove immobilizer control module from steering
column, referring to “ICM Removal and Installation in
Section 10C”.
5) Detach lighting switch and wiper switch from steering
column.
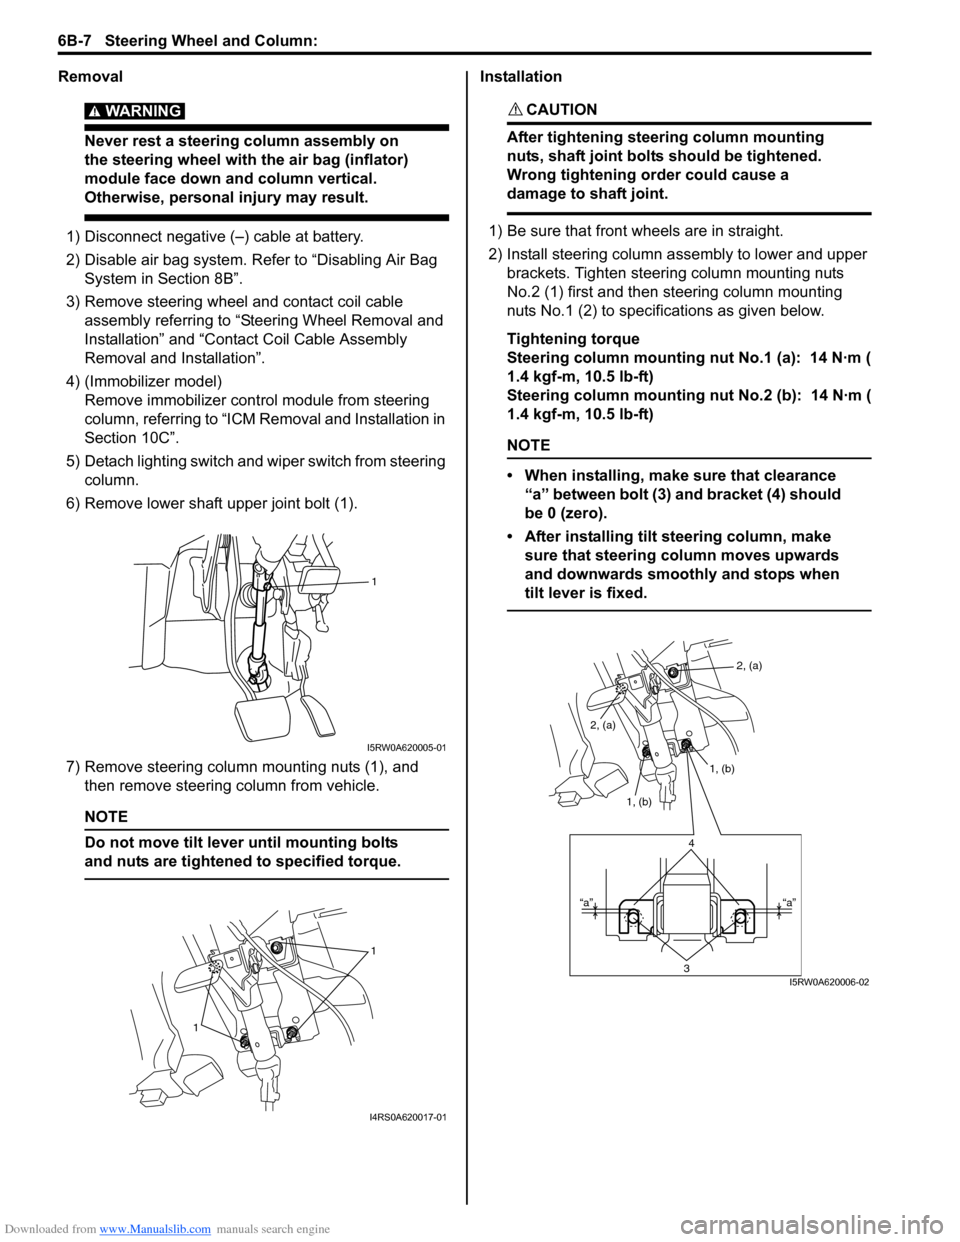
6) Remove lower shaft upper joint bolt (1).
7) Remove steering column mounting nuts (1), and
then remove steering column from vehicle.
NOTE
Do not move tilt lever until mounting bolts
and nuts are tightened to specified torque.
Installation
CAUTION!
After tightening steering column mounting
nuts, shaft joint bolts should be tightened.
Wrong tightening order could cause a
damage to shaft joint.
1) Be sure that front wheels are in straight.
2) Install steering column assembly to lower and upper
brackets. Tighten steering column mounting nuts
No.2 (1) first and then steering column mounting
nuts No.1 (2) to specifications as given below.
Tightening torque
Steering column mounting nut No.1 (a): 14 N·m (
1.4 kgf-m, 10.5 lb-ft)
Steering column mounting nut No.2 (b): 14 N·m (
1.4 kgf-m, 10.5 lb-ft)
NOTE
• When installing, make sure that clearance
“a” between bolt (3) and bracket (4) should
be 0 (zero).
• After installing tilt steering column, make
sure that steering column moves upwards
and downwards smoothly and stops when
tilt lever is fixed.
1
I5RW0A620005-01
1
1
I4RS0A620017-01
2, (a)
1, (b)
1, (b) 2, (a)
4
3“a” “a”
I5RW0A620006-02
Page 884 of 1556
![SUZUKI SX4 2006 1.G Service Owners Manual Downloaded from www.Manualslib.com manuals search engine 6C-4 Power Assisted Steering System:
Schematic and Routing Diagram
EPS System Wiring Circuit DiagramS6RW0D6302001
[A]
123
45
3 21
4
567
8
9 11 SUZUKI SX4 2006 1.G Service Owners Manual Downloaded from www.Manualslib.com manuals search engine 6C-4 Power Assisted Steering System:
Schematic and Routing Diagram
EPS System Wiring Circuit DiagramS6RW0D6302001
[A]
123
45
3 21
4
567
8
9 11](/img/20/7612/w960_7612-883.png)
Downloaded from www.Manualslib.com manuals search engine 6C-4 Power Assisted Steering System:
Schematic and Routing Diagram
EPS System Wiring Circuit DiagramS6RW0D6302001
[A]
123
45
3 21
4
567
8
9 11
10 12 13
141516
17 18 19201
2
[B]
1
2
[C] [D]
10 9 8 7654 3 21
16 15 14 13 12 11
26 25 24 2322 21 20 19 18 17
32 31 30 29 28 27
[F][E]
12
BRN RED/
BLU GRY LT GRN/
BLK
BLK
RED
WHT GRN
BLK
E11-1
E11-5
E11-14
E11-12
[J]:E01-44E01-4
[J]:E01-27E01-26
E12-1
E12-2
E11-10E11-8
E11-9
E11-19
E13-1 GRN
GRY
GRN
WHT
G241-25G241-31
RED/BLK
11
12
1314 3 18
20
21
7 19
4 12
22
12V
E13-2BLK
9V
REDE11-20
12V
12V
E61-2
E61-1
610
55
5V
8
E11-115V
PPL
E11-4
9
23
+BB
BLU/
WHTE04-9
1524YELE11-18E31-5
E31-2
E31-39V
3V
E31-4
E31-1IG11617
C07-25
[H]
[G]
G04-15
[I]:G04-22
25L313-3
[I]
I6RW0D630001-01
[A]: P/S control module connector No.1 “E11” (viewed from harness side) 3. Junction block assembly 15. BCM
[B]: P/S control module connector No.2 “E13” (viewed from harness side) 4. Main fuse 16. Output shaft speed sensor
[C]: P/S control module connector No.3 “E12” (viewed from harness side) 5. Front (left/right) wheel speed sensor 17. TCM
[D]: Combination meter connector “G241” (viewed from harness side) 6. ABS control module 18. Individual circuit fuse box No.1
[E]: Torque sensor connector “E31” (viewed from harness side) 7. Combination meter 19. “IGN” fuse
[F]: Motor connector “E61” (viewed from harness side) 8. “EPS” warning light 20. “P/S” fuse
[G]: M/T model 9. Data link connector (DLC) 21. “IG1 SIG” fuse
[H]: A/T model 10. ECM 22. “MTR” fuse
[I]: Junction block without BCM model (Taiwan model) 11. P/S control module 23. To ABS control module
[J]: M15A engine with 4A/T equipped with slip control model (Hong Kong
model)12. P/S motor 24. To HVAC control module
1. Main fuse box 13. Shield 25. To SDM
2. Ignition switch 14. Torque sensor (built into steering gear case)
Page 911 of 1556
Downloaded from www.Manualslib.com manuals search engine Power Assisted Steering System: 6C-31
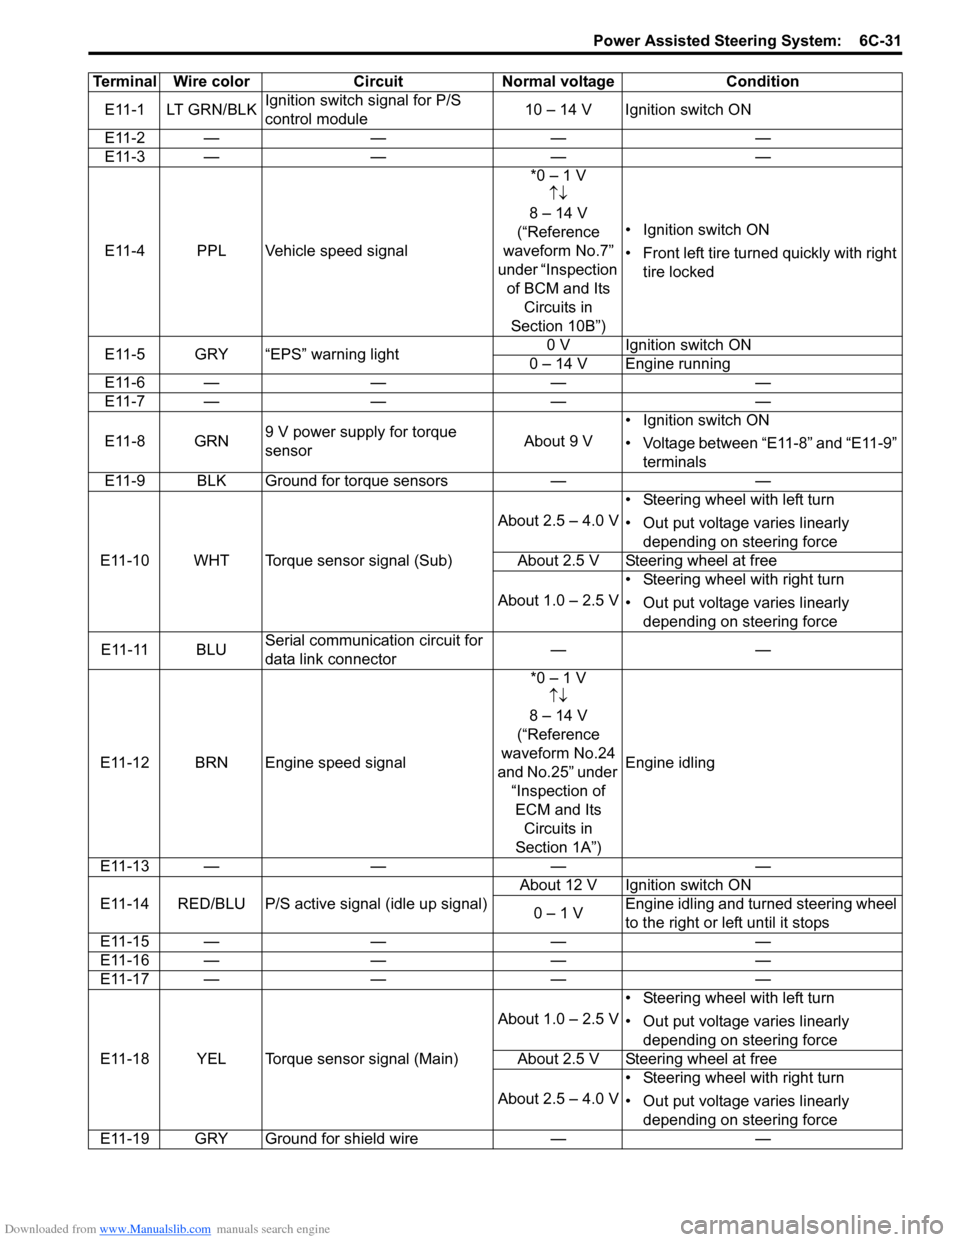
Terminal Wire color Circuit Normal voltage Condition
E11-1 LT GRN/BLKIgnition switch signal for P/S
control module10 – 14 V Ignition switch ON
E11-2 — — — —
E11-3 — — — —
E11-4 PPL Vehicle speed signal*0 – 1 V
↑↓
8 – 14 V
(“Reference
waveform No.7”
under “Inspection
of BCM and Its
Circuits in
Section 10B”)• Ignition switch ON
• Front left tire turned quickly with right
tire locked
E11-5 GRY “EPS” warning light0 V Ignition switch ON
0 – 14 V Engine running
E11-6 — — — —
E11-7 — — — —
E11-8 GRN9 V power supply for torque
sensorAbout 9 V• Ignition switch ON
• Voltage between “E11-8” and “E11-9”
terminals
E11-9 BLK Ground for torque sensors — —
E11-10 WHT Torque sensor signal (Sub)About 2.5 – 4.0 V• Steering wheel with left turn
• Out put voltage varies linearly
depending on steering force
About 2.5 V Steering wheel at free
About 1.0 – 2.5 V• Steering wheel with right turn
• Out put voltage varies linearly
depending on steering force
E11-11 BLUSerial communication circuit for
data link connector——
E11-12 BRN Engine speed signal*0 – 1 V
↑↓
8 – 14 V
(“Reference
waveform No.24
and No.25” under
“Inspection of
ECM and Its
Circuits in
Section 1A”)Engine idling
E11-13 — — — —
E11-14 RED/BLU P/S active signal (idle up signal)About 12 V Ignition switch ON
0 – 1 VEngine idling and turned steering wheel
to the right or left until it stops
E11-15 — — — —
E11-16 — — — —
E11-17 — — — —
E11-18 YEL Torque sensor signal (Main)About 1.0 – 2.5 V• Steering wheel with left turn
• Out put voltage varies linearly
depending on steering force
About 2.5 V Steering wheel at free
About 2.5 – 4.0 V• Steering wheel with right turn
• Out put voltage varies linearly
depending on steering force
E11-19 GRY Ground for shield wire — —
Page 1029 of 1556
Downloaded from www.Manualslib.com manuals search engine Table of Contents 8- i
8
Section 8
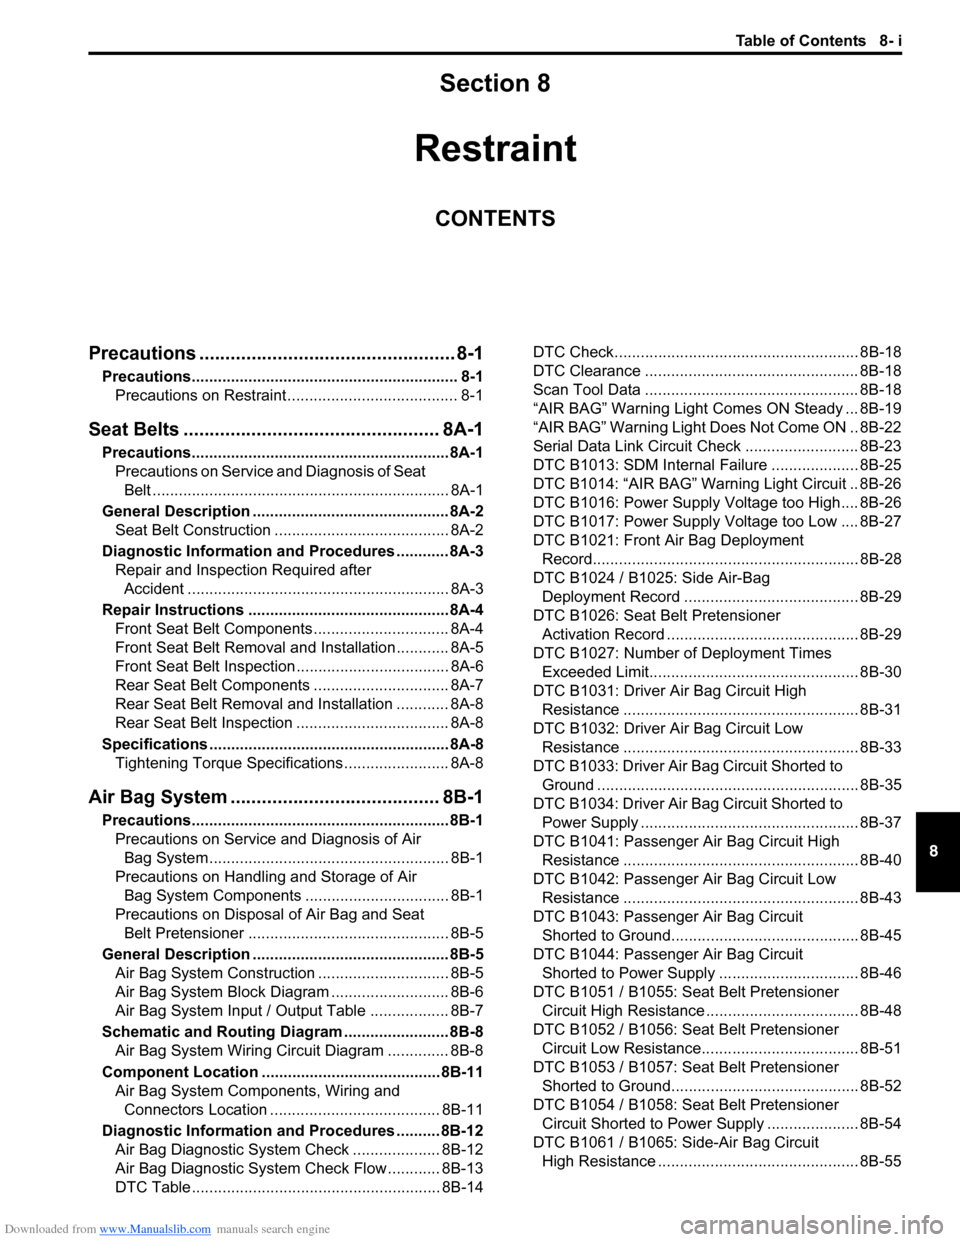
CONTENTS
Restraint
Precautions ................................................. 8-1
Precautions............................................................. 8-1
Precautions on Restraint ....................................... 8-1
Seat Belts ................................................. 8A-1
Precautions........................................................... 8A-1
Precautions on Service and Diagnosis of Seat
Belt .................................................................... 8A-1
General Description ............................................. 8A-2
Seat Belt Construction ........................................ 8A-2
Diagnostic Information and Procedures ............ 8A-3
Repair and Inspection Required after
Accident ............................................................ 8A-3
Repair Instructions .............................................. 8A-4
Front Seat Belt Components ............................... 8A-4
Front Seat Belt Removal and Installation ............ 8A-5
Front Seat Belt Inspection................................... 8A-6
Rear Seat Belt Components ............................... 8A-7
Rear Seat Belt Removal and Installation ............ 8A-8
Rear Seat Belt Inspection ................................... 8A-8
Specifications....................................................... 8A-8
Tightening Torque Specifications ........................ 8A-8
Air Bag System ........................................ 8B-1
Precautions........................................................... 8B-1
Precautions on Service and Diagnosis of Air
Bag System....................................................... 8B-1
Precautions on Handling and Storage of Air
Bag System Components ................................. 8B-1
Precautions on Disposal of Air Bag and Seat
Belt Pretensioner .............................................. 8B-5
General Description ............................................. 8B-5
Air Bag System Construction .............................. 8B-5
Air Bag System Block Diagram ........................... 8B-6
Air Bag System Input / Output Table .................. 8B-7
Schematic and Routing Diagram ........................ 8B-8
Air Bag System Wiring Circuit Diagram .............. 8B-8
Component Location ......................................... 8B-11
Air Bag System Components, Wiring and
Connectors Location ....................................... 8B-11
Diagnostic Information and Procedures .......... 8B-12
Air Bag Diagnostic System Check .................... 8B-12
Air Bag Diagnostic System Check Flow ............ 8B-13
DTC Table ......................................................... 8B-14DTC Check........................................................ 8B-18
DTC Clearance ................................................. 8B-18
Scan Tool Data ................................................. 8B-18
“AIR BAG” Warning Light Comes ON Steady ... 8B-19
“AIR BAG” Warning Light Does Not Come ON .. 8B-22
Serial Data Link Circuit Check .......................... 8B-23
DTC B1013: SDM Internal Failure .................... 8B-25
DTC B1014: “AIR BAG” Warning Light Circuit .. 8B-26
DTC B1016: Power Supply Voltage too High.... 8B-26
DTC B1017: Power Supply Voltage too Low .... 8B-27
DTC B1021: Front Air Bag Deployment
Record............................................................. 8B-28
DTC B1024 / B1025: Side Air-Bag
Deployment Record ........................................ 8B-29
DTC B1026: Seat Belt Pretensioner
Activation Record ............................................ 8B-29
DTC B1027: Number of Deployment Times
Exceeded Limit................................................ 8B-30
DTC B1031: Driver Air Bag Circuit High
Resistance ...................................................... 8B-31
DTC B1032: Driver Air Bag Circuit Low
Resistance ...................................................... 8B-33
DTC B1033: Driver Air Bag Circuit Shorted to
Ground ............................................................ 8B-35
DTC B1034: Driver Air Bag Circuit Shorted to
Power Supply .................................................. 8B-37
DTC B1041: Passenger Air Bag Circuit High
Resistance ...................................................... 8B-40
DTC B1042: Passenger Air Bag Circuit Low
Resistance ...................................................... 8B-43
DTC B1043: Passenger Air Bag Circuit
Shorted to Ground........................................... 8B-45
DTC B1044: Passenger Air Bag Circuit
Shorted to Power Supply ................................ 8B-46
DTC B1051 / B1055: Seat Belt Pretensioner
Circuit High Resistance ................................... 8B-48
DTC B1052 / B1056: Seat Belt Pretensioner
Circuit Low Resistance.................................... 8B-51
DTC B1053 / B1057: Seat Belt Pretensioner
Shorted to Ground........................................... 8B-52
DTC B1054 / B1058: Seat Belt Pretensioner
Circuit Shorted to Power Supply ..................... 8B-54
DTC B1061 / B1065: Side-Air Bag Circuit
High Resistance .............................................. 8B-55
Page 1034 of 1556
Downloaded from www.Manualslib.com manuals search engine 8A-3 Seat Belts:
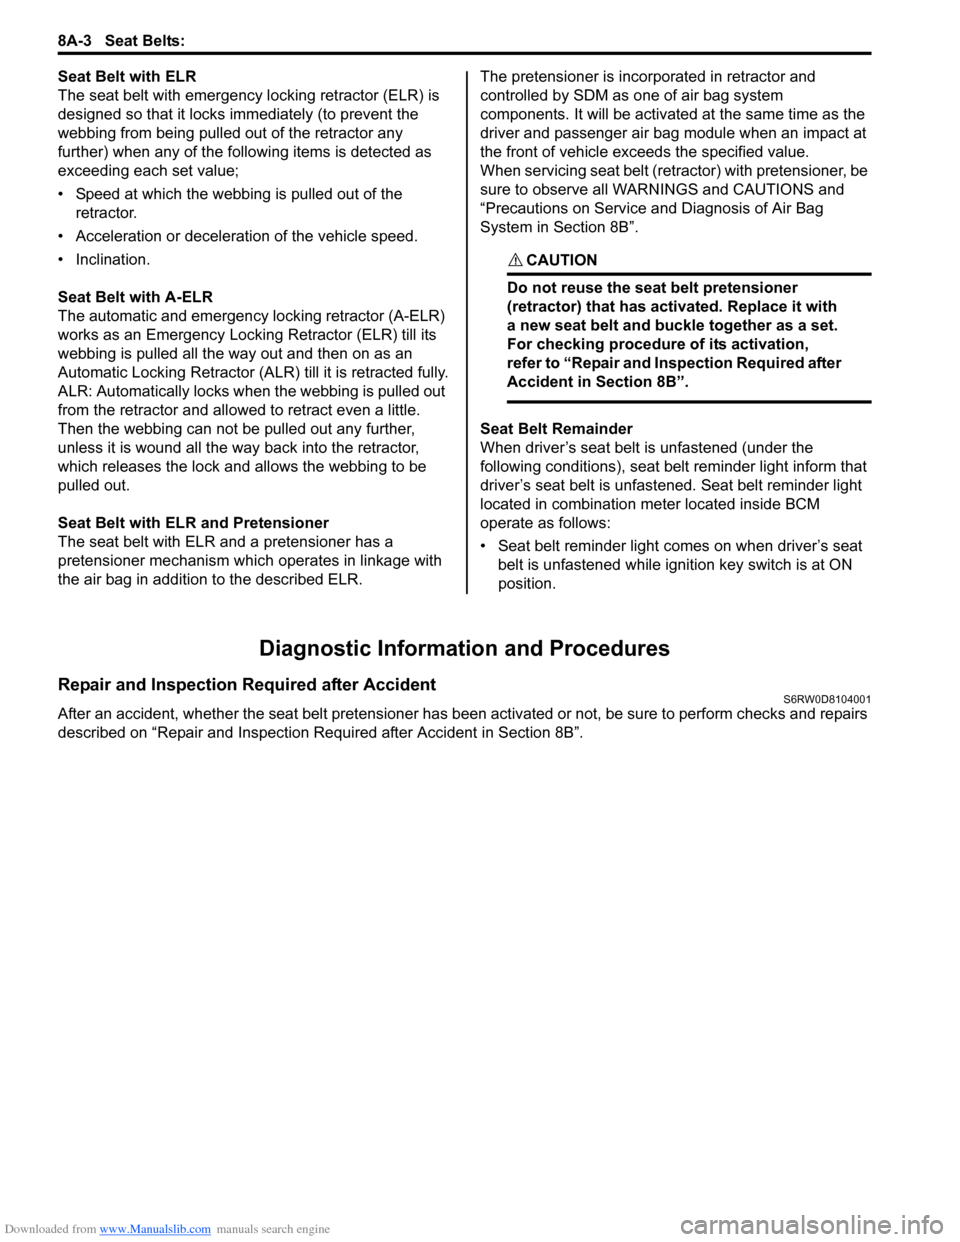
Seat Belt with ELR
The seat belt with emergency locking retractor (ELR) is
designed so that it locks immediately (to prevent the
webbing from being pulled out of the retractor any
further) when any of the following items is detected as
exceeding each set value;
• Speed at which the webbing is pulled out of the
retractor.
• Acceleration or deceleration of the vehicle speed.
• Inclination.
Seat Belt with A-ELR
The automatic and emergency locking retractor (A-ELR)
works as an Emergency Locking Retractor (ELR) till its
webbing is pulled all the way out and then on as an
Automatic Locking Retractor (ALR) till it is retracted fully.
ALR: Automatically locks when the webbing is pulled out
from the retractor and allowed to retract even a little.
Then the webbing can not be pulled out any further,
unless it is wound all the way back into the retractor,
which releases the lock and allows the webbing to be
pulled out.
Seat Belt with ELR and Pretensioner
The seat belt with ELR and a pretensioner has a
pretensioner mechanism which operates in linkage with
the air bag in addition to the described ELR.The pretensioner is incorporated in retractor and
controlled by SDM as one of air bag system
components. It will be activated at the same time as the
driver and passenger air bag module when an impact at
the front of vehicle exceeds the specified value.
When servicing seat belt (retractor) with pretensioner, be
sure to observe all WARNINGS and CAUTIONS and
“Precautions on Service and Diagnosis of Air Bag
System in Section 8B”.
CAUTION!
Do not reuse the seat belt pretensioner
(retractor) that has activated. Replace it with
a new seat belt and buckle together as a set.
For checking procedure of its activation,
refer to “Repair and Inspection Required after
Accident in Section 8B”.
Seat Belt Remainder
When driver’s seat belt is unfastened (under the
following conditions), seat belt reminder light inform that
driver’s seat belt is unfastened. Seat belt reminder light
located in combination meter located inside BCM
operate as follows:
• Seat belt reminder light comes on when driver’s seat
belt is unfastened while ignition key switch is at ON
position.
Diagnostic Information and Procedures
Repair and Inspection Required after AccidentS6RW0D8104001
After an accident, whether the seat belt pretensioner has been activated or not, be sure to perform checks and repairs
described on “Repair and Inspection Required after Accident in Section 8B”.
Page 1040 of 1556
Downloaded from www.Manualslib.com manuals search engine 8B-1 Air Bag System:
Restraint
Air Bag System
Precautions
Precautions on Service and Diagnosis of Air
Bag System
S6RW0D8200004
WARNING!
• If the air bag system and another vehicle
system both need repair, SUZUKI
recommends that the air bag system be
repaired first, to help avoid unintended air
bag system activation.
• Do not modify the steering wheel,
dashboard, both front seat or any other on
or around air bag system components.
Modifications can adversely affect air bag
system performance and lead to injury.
• Be sure to follow the procedures described
in this section. Failure to follow
procedures could result in possible air bag
system activation, personal injury or
unneeded air bag system repairs.
• WARNING / CAUTION labels are attached on each
part of air bag system components (SDM, air bag
(inflator) modules and seat belt pretensioners). Be
sure to follow the instructions.
• Many of service procedures require disconnection of
“A/B” fuse and air bag (inflator) module(s) (driver
module, passenger module, side modules and curtain
modules) from initiator circuit to avoid an accidental
deployment.
• Do not apply power to the air bag system unless all
components are connected or a diagnostic flow
requests it, as this will set a DTC.
• The “Air Bag Diagnostic System Check” must be the
starting point of any air bag diagnostics. The “Air Bag
Diagnostic System Check” will verify proper “AIR
BAG” warning light operation and will lead you to the
correct flow to diagnose any air bag malfunctions.
Bypassing these procedures may result in extended
diagnostic time, incorrect diagnosis, and incorrect
parts replacements.
• Never use air bag component parts from another
vehicle.
• If the vehicle will be exposed to temperatures over 93
°C (200 °F) (for example, during a paint baking
process), remove the air bag system components
beforehand to avoid component damage or
unintended system activation.• When handling the air bag (inflator) modules (driver
module, passenger module, side modules and curtain
modules), seat belt pretensioners (driver module and
passenger module), SDM, forward impact-sensor or
side impact-sensor be careful not to drop it or apply
an impact to it. If an excessive impact was applied
(e.g., SDM, forward impact-sensor are dropped, air
bag (inflator) module is dropped from a height of 90
cm (3 ft) or more, seat belt pretensioner (retractor
assembly) is dropped from a height of 30 cm (1 ft) or
more), never attempt disassembly or repair but
replace it with a new one.
• When using electric welding, be sure to disconnect air
bag (inflator) module connectors (driver module,
passenger module, side modules and curtain
modules) and seat belt pretensioner connectors
(driver module and passenger module) respectively.
• When applying paint around the air bag system
related parts, use care so that the harness or
connector will not be exposed to the paint mist.
• Never expose air bag system component parts
directly to hot air (drying or baking the vehicle after
painting) or flames.
WARNING!
When performing service on or around air
bag system components or air bag wiring,
follow the procedures listed in “Disabling Air
Bag System” to temporarily disable the air
bag system.
Failure to follow procedures could result in
possible air bag system activation, personal
injury or unneeded air bag system repairs.
Precautions on Handling and Storage of Air Bag
System Components
S6RW0D8200002
SDM
WARNING!
Never power up air bag system when SDM is
not rigidly attached to the vehicle. Otherwise,
personal injury may result.
CAUTION!
After detecting one time of such collision as
to meet deployment conditions, SDM must
not be used. Refer to “Air Bag Diagnostic
System Check” when checking SDM.