check engine SUZUKI SX4 2006 1.G Service Workshop Manual
[x] Cancel search | Manufacturer: SUZUKI, Model Year: 2006, Model line: SX4, Model: SUZUKI SX4 2006 1.GPages: 1556, PDF Size: 37.31 MB
Page 520 of 1556

Downloaded from www.Manualslib.com manuals search engine 3B-23 Differential:
DTC Confirmation Procedure
1) Clear DTC using scan tool.
2) Start engine and select 2WD/4WD switch to “LOCK” position.
3) Keep engine running at 2000 rpm for 10 seconds. or more.
4) Stop engine and check DTC.
Troubleshooting
Step Action Yes No
1Was “4WD control system check” performed?Go to Step 2. Go to “4WD Control
System Check”.
2Coupling assembly circuit check
1) Disconnect coupling assembly connector “L102” with
ignition switch turned OFF.
2) Check for proper connection to “L102-1” and “L102-4”
terminals of coupling assembly connector.
3) If connection is OK, measure voltage between “L102-1”
terminal of coupling assembly connector and vehicle
body ground.
Is it 10 – 14 V?Go to Step 3. Go to Step 6.
3Coupling assembly ground circuit check
1) Measure resistance between “L102-4” terminal of
coupling assembly connector and vehicle body ground
with ignition switch turned OFF.
Is resistance below 5
Ω?Go to Step 4. Go to Step 5.
4Coupling assembly check
1) Check coupling assembly referring to “Coupling
Assembly Inspection”.
Is it in good condition?Substitute a known-
good 4WD control
module and recheck.Replace coupling
assembly.
5Coupling assembly circuit check
1) Disconnect connector from 4WD control module
connector “G26” with ignition switch turned OFF.
2) Check for proper connection to “G26-2” and “G26-3”
terminals of 4WD control module connector.
3) If connection is OK, measure resistance between “G26-
2” terminal of 4WD control module connector and
vehicle body ground.
Is resistance below 5
Ω?“YEL” wire is open or
high resistance circuit.Substitute a known-
good 4WD control
module and recheck.
6Coupling assembly circuit check
1) Disconnect connector from 4WD control module
connector “G26” with ignition switch turned OFF.
2) Check for proper connection to “G26-3” terminal of 4WD
control module connector.
3) If connection is OK, measure resistance between “G26-
3” terminal of 4WD control module connector and “L102-
1” terminal of coupling assembly connector.
Is resistance below 5
Ω?Substitute a known-
good 4WD control
module and recheck.“GRY” wire is open or
high resistance circuit.
Page 521 of 1556

Downloaded from www.Manualslib.com manuals search engine Differential: 3B-24
DTC C1253: Coupling Assembly Circuit ShortS6RW0D3204020
Wiring Diagram
DTC Detecting Condition and Trouble Area
DTC Confirmation Procedure
1) Clear DTC using scan tool.
2) Start engine and select 2WD/4WD switch to “LOCK” position.
3) Keep engine running at 2000 rpm for 10 seconds. or more.
4) Stop engine and check DTC.
Troubleshooting
12V
G26-3
YEL GRY
G26-2
L102-1
L102-4 12
1 2 3
4 5
6 7 8 9 10 11
12
13
14 15 16
17 18 19
20
21 22
23
24 25 26
[A]
21
[B]
I7RW01320007-01
[A]: 4WD control module connector “G26” (viewed from harness side) 1. Coupling assembly
[B]: Coupling assembly connector “L102” (viewed from harness side) 2. 4WD control module
DTC detecting condition Trouble area
2WD/4WD switch is changed of 4WD lock position, and then
vehicle is not changed for more than 5 seconds.• Coupling assembly
• Coupling assembly circuit
• 4WD control module
Step Action Yes No
1Was “4WD control system check” performed?Go to Step 2. Go to “4WD Control
System Check”.
2Coupling assembly circuit check
1) Disconnect coupling assembly connector “L102” with
ignition switch turned OFF.
2) Check for proper connection to “L102-1” and “L102-4”
terminals of coupling assembly connector.
3) If connection is OK, measure voltage between “L102-1”
terminal of coupling assembly connector and vehicle
body ground.
Is it 10 – 14 V?Go to Step 3. Go to Step 6.
3Coupling assembly ground circuit check
1) Measure resistance between “L102-4” terminal of
coupling assembly connector and vehicle body ground
with ignition switch turned OFF.
Is resistance below 5
Ω?Go to Step 4. Go to Step 5.
Page 522 of 1556

Downloaded from www.Manualslib.com manuals search engine 3B-25 Differential:
DTC C1254: 2WD/4WD Switch MalfunctionS6RW0D3204021
Wiring Diagram4Coupling assembly check
1) Check coupling assembly referring to “Coupling
Assembly Inspection”.
Is it in good condition?Substitute a known-
good 4WD control
module and recheck.Replace coupling
assembly.
5Coupling assembly circuit check
1) Disconnect connector from 4WD control module
connector “G26” with ignition switch turned OFF.
2) Check for proper connection to “G26-2” and “G26-3”
terminals of 4WD control module connector.
3) If connection is OK, measure resistance between “G26-
2” terminal of 4WD control module connector and
vehicle body ground.
Is resistance above 1 M
Ω?“YEL” wire is shorted to
ground circuit.Substitute a known-
good 4WD control
module and recheck.
6Coupling assembly circuit check
1) Disconnect connector from 4WD control module
connector “G26” with ignition switch turned OFF.
2) Check for proper connection to “G26-3” terminal of 4WD
control module connector.
3) If connection is OK, measure resistance between “G26-
3” terminal of 4WD control module connector and “L102-
1” terminal of coupling assembly connector.
Is resistance above 1 M
Ω?Substitute a known-
good 4WD control
module and recheck.“GRY” wire is shorted to
ground circuit. Step Action Yes No
G26-13
G26-14GRY/YEL
RED/WHT
12V
1
3
4
L174-1
L174-52L174-4BLK/ORN
1 2 3
4 5
6 7 8 9 10 11
12
13
14 15 16
17 18 19
20
21 22
23
24 25 26
[A]
2
64531
[B]
I7RW01320008-01
[A]: 4WD control module connector “G26” (viewed from harness side) 2. 2WD/4WD switch
[B]: 2WD/4WD switch connector “L174” (viewed from harness side) 3. “4WD” switch
1. 4WD control module 4. “4WD-lock” switch
Page 523 of 1556

Downloaded from www.Manualslib.com manuals search engine Differential: 3B-26
DTC Detecting Condition and Trouble Area
DTC Confirmation Procedure
1) Clear DTC using scan tool.
2) Select 2WD/4WD switch to “2WD” position and keep its position for 10 seconds. Similarly select 2WD/4WD switch
to “AUTO” and “LOCK” position.
3) Check DTC.
TroubleshootingDTC detecting condition Trouble area
2WD/4WD switch combination different from specification is
detected for more than 5 seconds.• 2WD/4WD switch
• 2WD/4WD switch circuit
• 4WD control module
Step Action Yes No
1Was “4WD control system check” performed?Go to Step 2. Go to “4WD Control
System Check”.
22WD/4WD switch circuit check
1) Disconnect 2WD/4WD switch connector “L174” with
ignition switch turned OFF.
2) Check for proper connection to “L174-1” and “L174-5”
terminals of 2WD/4WD switch connector.
3) If connection is OK, measure voltage between “L174-1”
terminal or “L174-5” terminal of 2WD/4WD switch
connector and vehicle body ground.
Is it 10 – 14 V?Go to Step 3. Go to Step 5.
32WD/4WD switch ground circuit check
1) Measure resistance between “L174-4” terminal of 2WD/
4WD switch connector and vehicle body ground with
ignition switch turned OFF.
Is resistance below 5
Ω?Go to Step 4. “BLK/ORN” wire is
shorted to ground.
42WD/4WD switch check
1) Check 2WD/4WD switch referring to “2WD/4WD Switch
Inspection”.
Is it in good condition?Substitute a known-
good 4WD control
module and recheck.Replace 2WD/4WD
switch.
52WD/4WD switch circuit check
1) Disconnect connector from 4WD control module
connector “G26” with ignition switch turned OFF.
2) Check for shorted to ground in related circuits.
• Between “G26-13” terminal of 4WD control module
connector and “L174-1” terminal of 2WD/4WD switch
connector.
• Between “G26-14” terminal of 4WD control module
connector and “L174-5” terminal of 2WD/4WD switch
connector.
Are they in good condition?Substitute a known-
good 4WD control
module and recheck.Repair circuit.
Page 524 of 1556

Downloaded from www.Manualslib.com manuals search engine 3B-27 Differential:
DTC U0073: Control Module Communication Bus OffS6RW0D3204022
Refer to “Troubleshooting for CAN-DTC in Section 1A”.
DTC U0100: Lost Communication with ECMS6RW0D3204023
Refer to “Troubleshooting for CAN-DTC in Section 1A”.
DTC U0121: Lost Communication with ABS / ESP® Control ModuleS6RW0D3204024
Refer to “Troubleshooting for CAN-DTC in Section 1A”.
DTC U0155: Lost Communication with Instrument Panel Cluster (IPC) Control ModuleS6RW0D3204025
Refer to “Troubleshooting for CAN-DTC in Section 1A”.
Inspection of 4WD Control Module and Its CircuitsS6RW0D3204026
4WD control module and its circuits can be checked at coupler connected to 4WD control module by measuring
voltage, pulse signal.
CAUTION!
4WD control module cannot be checked by itself. It is strictly prohibited to connect voltmeter or
ohmmeter to 4WD control module with couplers disconnected from it.
Voltage and Signal Check
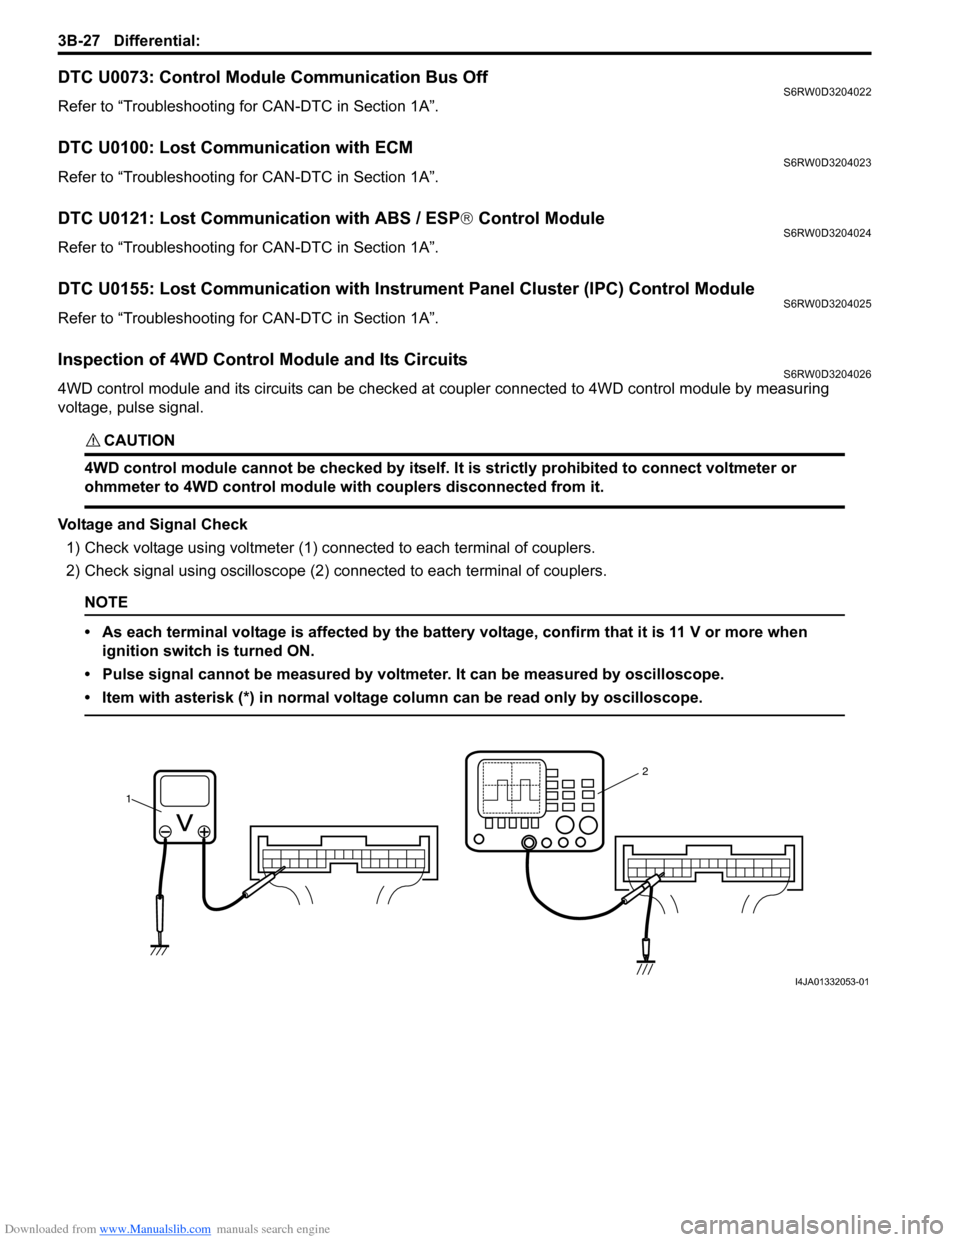
1) Check voltage using voltmeter (1) connected to each terminal of couplers.
2) Check signal using oscilloscope (2) connected to each terminal of couplers.
NOTE
• As each terminal voltage is affected by the battery voltage, confirm that it is 11 V or more when
ignition switch is turned ON.
• Pulse signal cannot be measured by voltmeter. It can be measured by oscilloscope.
• Item with asterisk (*) in normal voltage column can be read only by oscilloscope.
12
I4JA01332053-01
Page 527 of 1556

Downloaded from www.Manualslib.com manuals search engine Differential: 3B-30
Repair Instructions
Rear Differential Oil Level CheckS6RW0D3206001
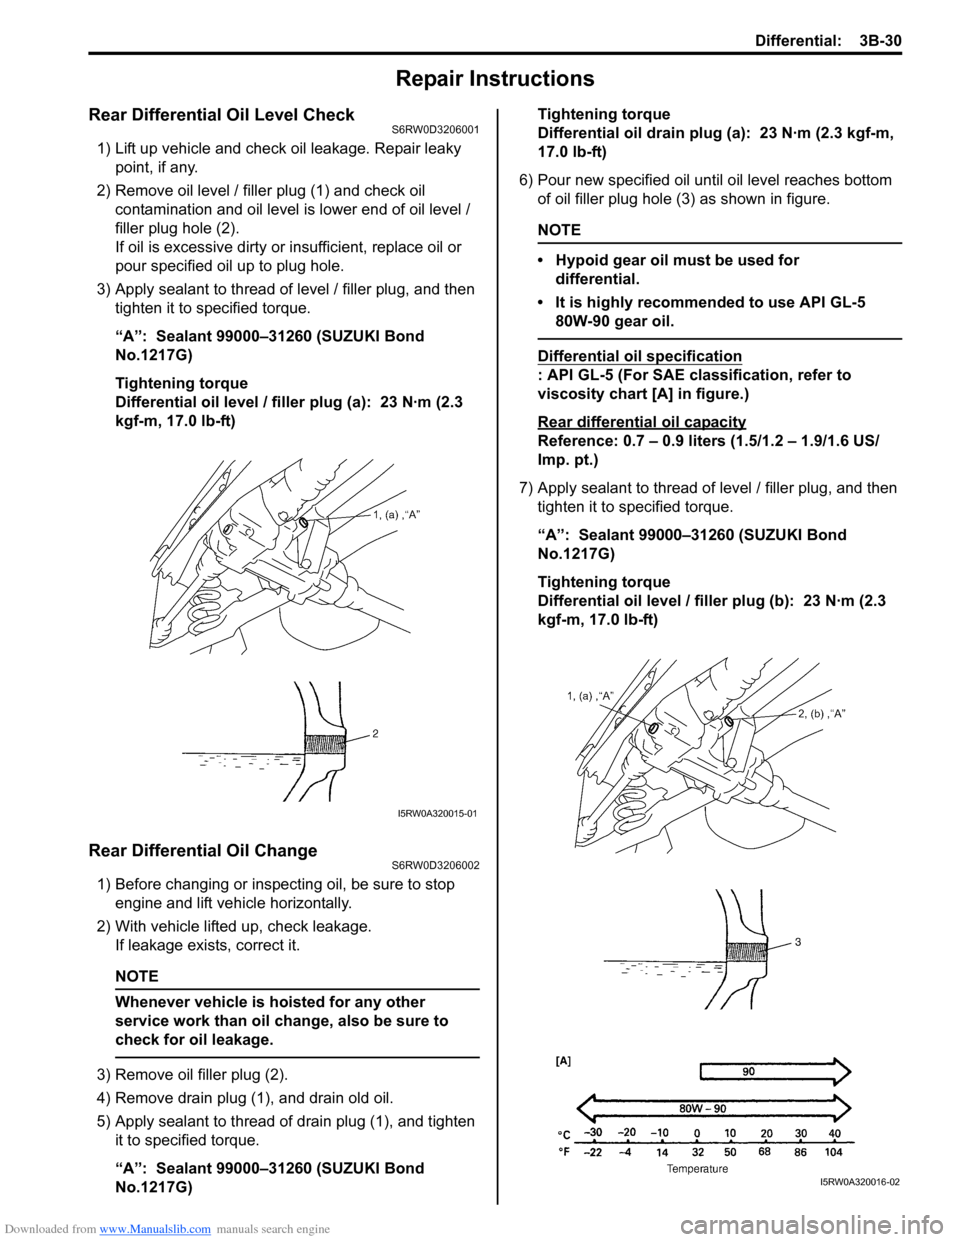
1) Lift up vehicle and check oil leakage. Repair leaky
point, if any.
2) Remove oil level / filler plug (1) and check oil
contamination and oil level is lower end of oil level /
filler plug hole (2).
If oil is excessive dirty or insufficient, replace oil or
pour specified oil up to plug hole.
3) Apply sealant to thread of level / filler plug, and then
tighten it to specified torque.
“A”: Sealant 99000–31260 (SUZUKI Bond
No.1217G)
Tightening torque
Differential oil level / filler plug (a): 23 N·m (2.3
kgf-m, 17.0 lb-ft)
Rear Differential Oil ChangeS6RW0D3206002
1) Before changing or inspecting oil, be sure to stop
engine and lift vehicle horizontally.
2) With vehicle lifted up, check leakage.
If leakage exists, correct it.
NOTE
Whenever vehicle is hoisted for any other
service work than oil change, also be sure to
check for oil leakage.
3) Remove oil filler plug (2).
4) Remove drain plug (1), and drain old oil.
5) Apply sealant to thread of drain plug (1), and tighten
it to specified torque.
“A”: Sealant 99000–31260 (SUZUKI Bond
No.1217G)Tightening torque
Differential oil drain plug (a): 23 N·m (2.3 kgf-m,
17.0 lb-ft)
6) Pour new specified oil until oil level reaches bottom
of oil filler plug hole (3) as shown in figure.
NOTE
• Hypoid gear oil must be used for
differential.
• It is highly recommended to use API GL-5
80W-90 gear oil.
Differential oil specification
: API GL-5 (For SAE classification, refer to
viscosity chart [A] in figure.)
Rear differential oil capacity
Reference: 0.7 – 0.9 liters (1.5/1.2 – 1.9/1.6 US/
Imp. pt.)
7) Apply sealant to thread of level / filler plug, and then
tighten it to specified torque.
“A”: Sealant 99000–31260 (SUZUKI Bond
No.1217G)
Tightening torque
Differential oil level / filler plug (b): 23 N·m (2.3
kgf-m, 17.0 lb-ft)
I5RW0A320015-01
I5RW0A320016-02
Page 528 of 1556

Downloaded from www.Manualslib.com manuals search engine 3B-31 Differential:
2WD/4WD Switch Removal and InstallationS6RW0D3206003
Removal
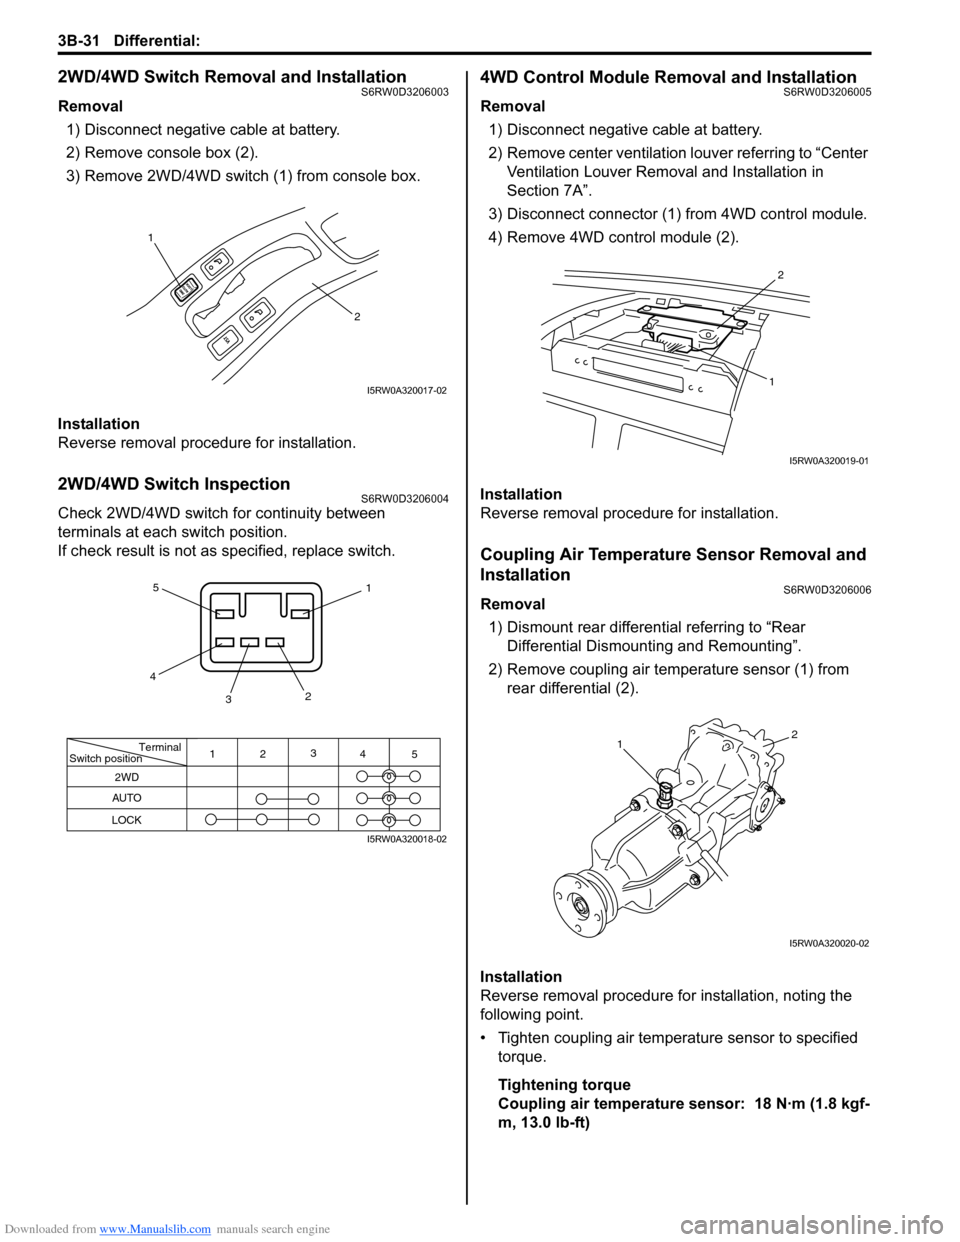
1) Disconnect negative cable at battery.
2) Remove console box (2).
3) Remove 2WD/4WD switch (1) from console box.
Installation
Reverse removal procedure for installation.
2WD/4WD Switch InspectionS6RW0D3206004
Check 2WD/4WD switch for continuity between
terminals at each switch position.
If check result is not as specified, replace switch.
4WD Control Module Removal and InstallationS6RW0D3206005
Removal
1) Disconnect negative cable at battery.
2) Remove center ventilation louver referring to “Center
Ventilation Louver Removal and Installation in
Section 7A”.
3) Disconnect connector (1) from 4WD control module.
4) Remove 4WD control module (2).
Installation
Reverse removal procedure for installation.
Coupling Air Temperature Sensor Removal and
Installation
S6RW0D3206006
Removal
1) Dismount rear differential referring to “Rear
Differential Dismounting and Remounting”.
2) Remove coupling air temperature sensor (1) from
rear differential (2).
Installation
Reverse removal procedure for installation, noting the
following point.
• Tighten coupling air temperature sensor to specified
torque.
Tightening torque
Coupling air temperature sensor: 18 N·m (1.8 kgf-
m, 13.0 lb-ft)
1
2
I5RW0A320017-02
Terminal
Switch position
2WD
AUTO
LOCK
11
22
3 3
4 4
5 5
I5RW0A320018-02
2
1
I5RW0A320019-01
12
I5RW0A320020-02
Page 529 of 1556

Downloaded from www.Manualslib.com manuals search engine Differential: 3B-32
Coupling Air Temperature Sensor InspectionS6RW0D3206007
CAUTION!
Do not heat up coupling air temperature
sensor more than 100 °C (212 °F). Otherwise,
coupling air temperature sensor will be
damaged.
• Blow hot air to temperature sensing part (2) of
coupling air temperature sensor (3) using hot air drier
(4) and measure resistance between sensor terminals
while heating air gradually.
If measured resistance does not show such
characteristic as shown, replace air temperature
sensor.
Coupling Assembly InspectionS6RW0D3206008
• Check coupling assembly for oil leakage. If leakage
exists, replace it.
• Measure resistance between “a” terminal and “b”
terminal of coupling connector (1).
If measured resistance is out of specification, check
harness for open or short.
If OK, replace coupling assembly.
Coupling assembly resistance
: 2 – 3 Ω
[A]: Lower limit [D]: Resistance
[B]: Normal [E]: Temperature
[C]: Upper limit 1. Temperature gauge
020
32 68 17680 (6.00)
(0.34) (2.56)
1
4
23
[D]
[C]
[B]
[A]
[E]
I5RW0A320021-01
1
“a” “b”I5RW0A320064-01
Page 535 of 1556

Downloaded from www.Manualslib.com manuals search engine Differential: 3B-38
14) Using a hammer and brass bar (1), drive out front
bearing outer race (2).
15) Using a hammer and brass bar (1), drive out rear
bearing outer race (2).
Reassembly
Judging from faulty conditions noted before disassembly
and what is found through visual check of bearing and
gear tooth etc. after disassembly, prepare replacing
parts and proceed to reassembly according to
procedures as described in the following.
CAUTION!
• Bevel gear and pinion must be replaced as
a set when either replacement becomes
necessary.
• When replacing taper roller bearing,
replace as inner race & outer race
assembly.
1) Press-fit bevel pinion bearing outer races to
differential carrier (1) by using special tools and
hydraulic press as shown in the figure.
Special tool
(A): 09913–85210
(B): 09913–75510
2) After applying differential oil to differential gears (4),
pinions (5), pinion shaft (3), side washers (1), spring
washers (7) and pinion washers (2), install them in
differential case (6).
For correct installing direction of side washers and
spring washers, refer to figure.
NOTE
Used left and right differential side washers
are not interchangeable.
3) Check pinion gear (1) for smooth rotation.
1
2
I5RW0A320038-01
1
2
I5RW0A320039-01
(B)(A)
1
I5RW0A320040-02
7 6
4
5
3
21
I5RW0A320041-01
I3RH01322031-01
Page 538 of 1556

Downloaded from www.Manualslib.com manuals search engine 3B-41 Differential:
9) Set special tools and make drive bevel pinion
mounting dummy.
Special tool
(A): 09922–76120
(B): 09922–76250
10) Install dial gauge (1) to mounting dummy as shown
in figure.
Special tool set distance
“a”: 38.0 mm (1.496 in.)
“b”: 0 mm (0.000 in.)
11) Set special tools and make drive bevel pinion
dummy.
Special tool
(A): 09922–76140
(B): 09922–76420
(C): 09922–76330
(D): 09922–7634012) Apply gear oil to drive bevel pinion bearings, install
special tools with bearings to differential carrier as
shown in figure.
Special tool
(A): 09922–76140
(B): 09922–76420
(C): 09922–76330
(D): 09922–76340
(E): 09922–76150
(F): 09922–76530
NOTE
This installation requires no spacer or oil
seal.
13) Tighten bevel pinion nut (special tool) (1) so that
specified bearing preload is obtained.
NOTE
Before taking measurement, check for
rotation by hand more than 15 revolutions.
Pinion bearing preload (at 50 r/min)
: 1.3 – 2.6 N⋅m (13.0 – 26.0 kgf-cm, 11.3 – 22.6 lb-
in.)
I5RW0A320047-01
(C)
(D)
(A)
(A)(B)I5RW0A320048-01
(E) (D) (C)(B) (A) (F)I5RW0A320049-01
1
I5RW0A320050-01