cylinder SUZUKI SX4 2006 1.G Service Service Manual
[x] Cancel search | Manufacturer: SUZUKI, Model Year: 2006, Model line: SX4, Model: SUZUKI SX4 2006 1.GPages: 1556, PDF Size: 37.31 MB
Page 289 of 1556
Downloaded from www.Manualslib.com manuals search engine Engine Mechanical: 1D-7
7) Install air cleaner assembly with air suction hose
referring to “Air Cleaner Assembly Removal and
Installation”.
8) Run engine at specified idle speed and read vacuum
gauge. Vacuum should be within specification.
Vacuum specification (at sea level)
59 – 73 kPa (45 – 55 cmHg, 17.7 – 21.6 in.Hg) at
specified idle speed
9) After checking, disconnect special tool (Vacuum
gauge) from PCV valve.
10) Detach blind cap from PCV valve.
11) Install air cleaner assembly with air suction hose
referring to “Air Cleaner Assembly Removal and
Installation”.
Valve Lash (Clearance) InspectionS6RW0D1404003
1) Remove negative cable at battery.
2) Remove cylinder head cover referring to “Cylinder
Head Cover Removal and Installation”.
3) Remove right side engine under cover, if necessary.
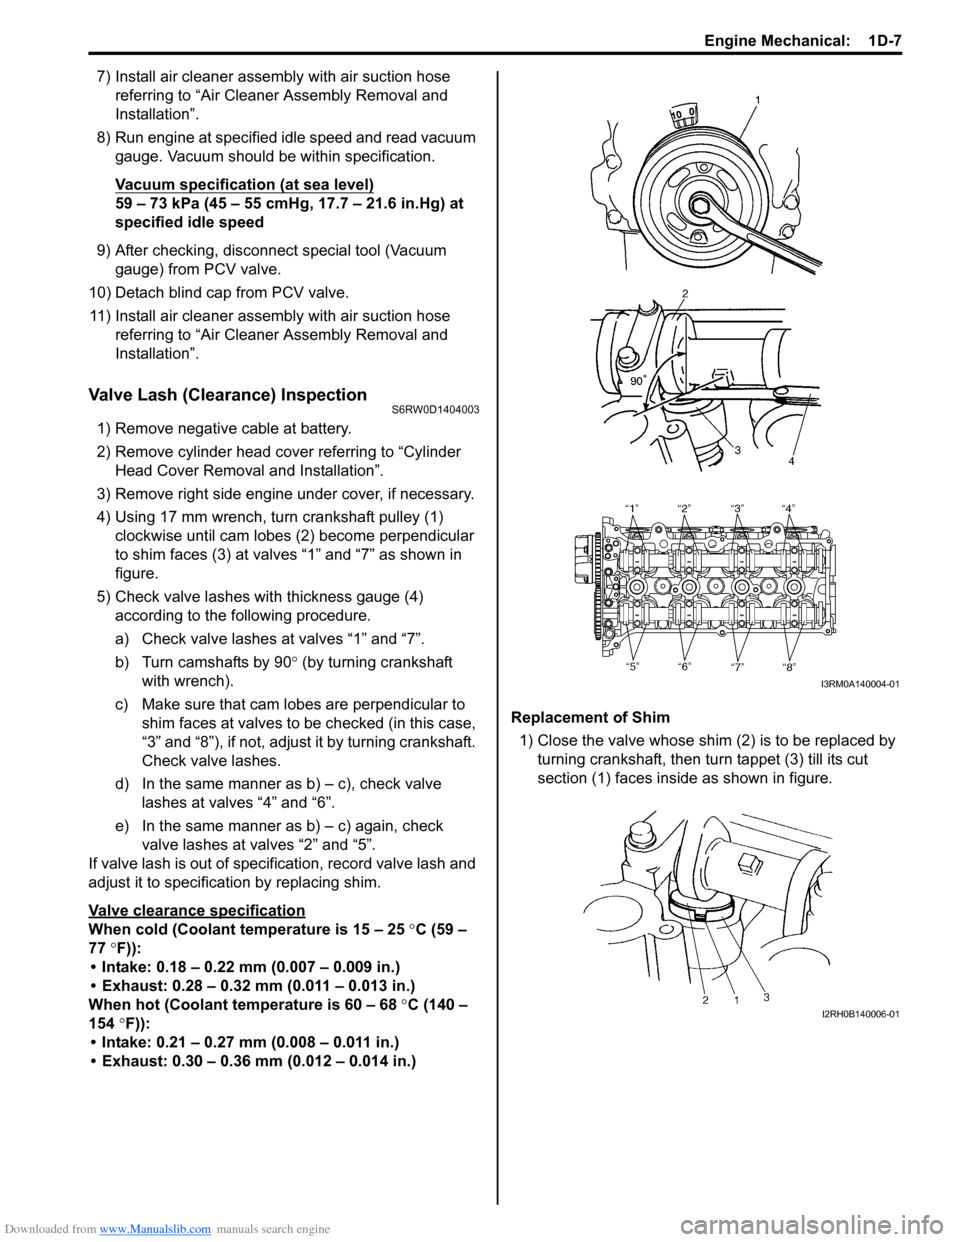
4) Using 17 mm wrench, turn crankshaft pulley (1)
clockwise until cam lobes (2) become perpendicular
to shim faces (3) at valves “1” and “7” as shown in
figure.
5) Check valve lashes with thickness gauge (4)
according to the following procedure.
a) Check valve lashes at valves “1” and “7”.
b) Turn camshafts by 90° (by turning crankshaft
with wrench).
c) Make sure that cam lobes are perpendicular to
shim faces at valves to be checked (in this case,
“3” and “8”), if not, adjust it by turning crankshaft.
Check valve lashes.
d) In the same manner as b) – c), check valve
lashes at valves “4” and “6”.
e) In the same manner as b) – c) again, check
valve lashes at valves “2” and “5”.
If valve lash is out of specification, record valve lash and
adjust it to specification by replacing shim.
Valve clearance specification
When cold (Coolant temperature is 15 – 25 °C (59 –
77 °F)):
• Intake: 0.18 – 0.22 mm (0.007 – 0.009 in.)
• Exhaust: 0.28 – 0.32 mm (0.011 – 0.013 in.)
When hot (Coolant temperature is 60 – 68 °C (140 –
154 °F)):
• Intake: 0.21 – 0.27 mm (0.008 – 0.011 in.)
• Exhaust: 0.30 – 0.36 mm (0.012 – 0.014 in.)Replacement of Shim
1) Close the valve whose shim (2) is to be replaced by
turning crankshaft, then turn tappet (3) till its cut
section (1) faces inside as shown in figure.
I3RM0A140004-01
I2RH0B140006-01
Page 291 of 1556
Downloaded from www.Manualslib.com manuals search engine Engine Mechanical: 1D-9
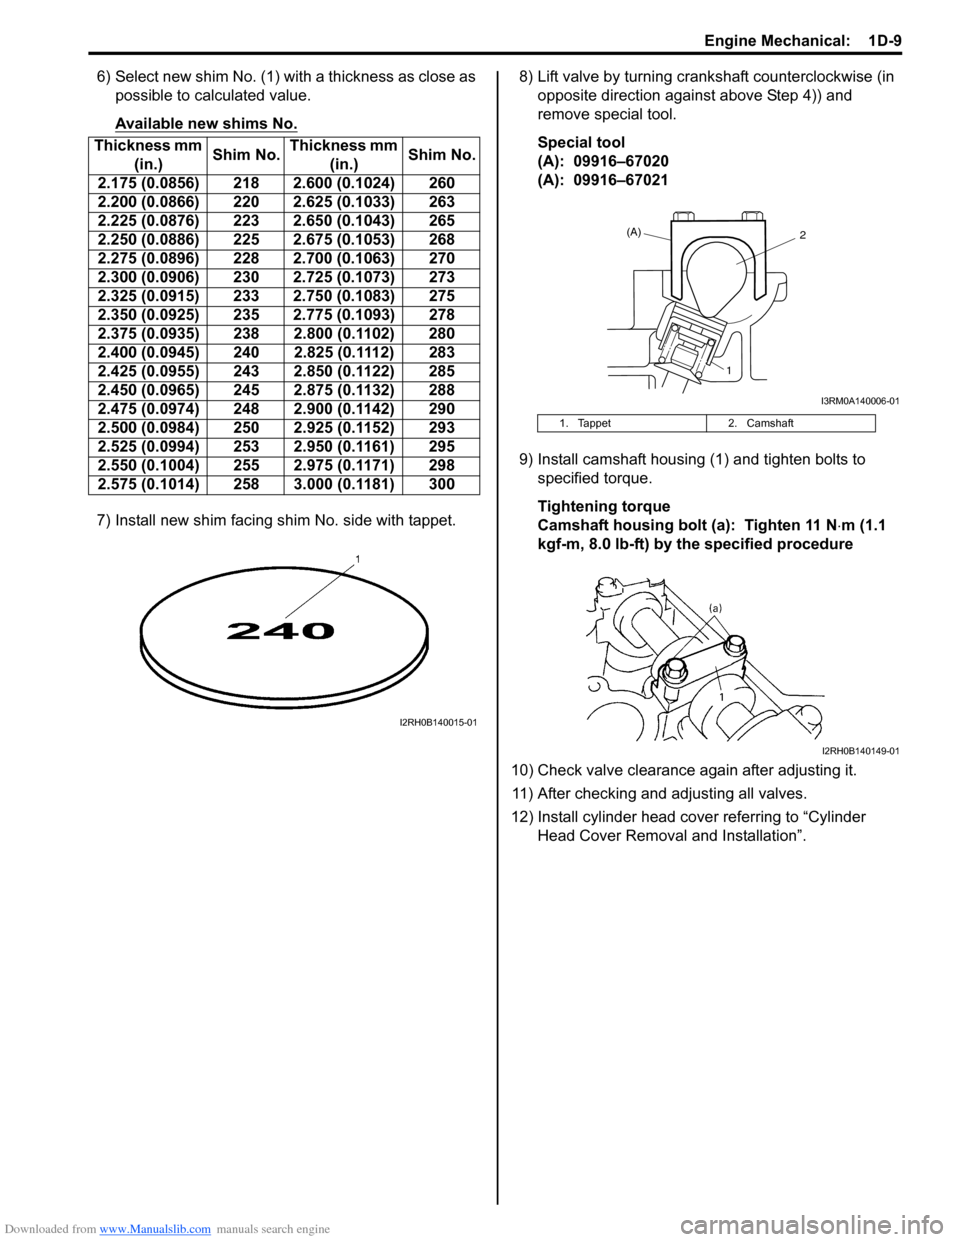
6) Select new shim No. (1) with a thickness as close as
possible to calculated value.
Available new shims No.
7) Install new shim facing shim No. side with tappet.8) Lift valve by turning crankshaft counterclockwise (in
opposite direction against above Step 4)) and
remove special tool.
Special tool
(A): 09916–67020
(A): 09916–67021
9) Install camshaft housing (1) and tighten bolts to
specified torque.
Tightening torque
Camshaft housing bolt (a): Tighten 11 N⋅m (1.1
kgf-m, 8.0 lb-ft) by the specified procedure
10) Check valve clearance again after adjusting it.
11) After checking and adjusting all valves.
12) Install cylinder head cover referring to “Cylinder
Head Cover Removal and Installation”. Thickness mm
(in.)Shim No.Thickness mm
(in.)Shim No.
2.175 (0.0856) 218 2.600 (0.1024) 260
2.200 (0.0866) 220 2.625 (0.1033) 263
2.225 (0.0876) 223 2.650 (0.1043) 265
2.250 (0.0886) 225 2.675 (0.1053) 268
2.275 (0.0896) 228 2.700 (0.1063) 270
2.300 (0.0906) 230 2.725 (0.1073) 273
2.325 (0.0915) 233 2.750 (0.1083) 275
2.350 (0.0925) 235 2.775 (0.1093) 278
2.375 (0.0935) 238 2.800 (0.1102) 280
2.400 (0.0945) 240 2.825 (0.1112) 283
2.425 (0.0955) 243 2.850 (0.1122) 285
2.450 (0.0965) 245 2.875 (0.1132) 288
2.475 (0.0974) 248 2.900 (0.1142) 290
2.500 (0.0984) 250 2.925 (0.1152) 293
2.525 (0.0994) 253 2.950 (0.1161) 295
2.550 (0.1004) 255 2.975 (0.1171) 298
2.575 (0.1014) 258 3.000 (0.1181) 300
I2RH0B140015-01
1. Tappet 2. Camshaft
(A)2
1
I3RM0A140006-01
I2RH0B140149-01
Page 293 of 1556
Downloaded from www.Manualslib.com manuals search engine Engine Mechanical: 1D-11
Air Cleaner Assembly Removal and InstallationS6RW0D1406046
Removal
1) Disconnect negative cable at battery.
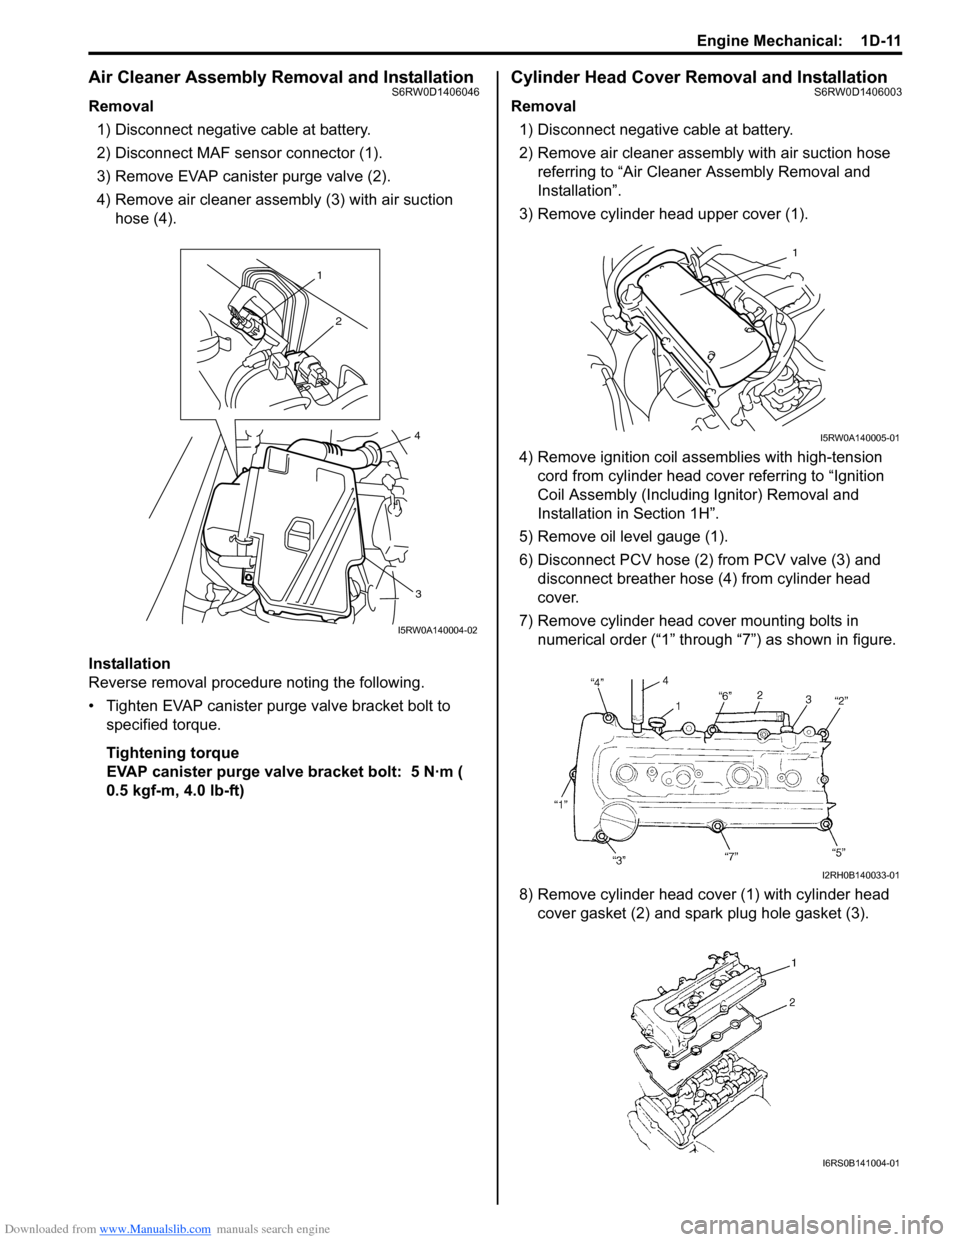
2) Disconnect MAF sensor connector (1).
3) Remove EVAP canister purge valve (2).
4) Remove air cleaner assembly (3) with air suction
hose (4).
Installation
Reverse removal procedure noting the following.
• Tighten EVAP canister purge valve bracket bolt to
specified torque.
Tightening torque
EVAP canister purge valve bracket bolt: 5 N·m (
0.5 kgf-m, 4.0 lb-ft)
Cylinder Head Cover Removal and InstallationS6RW0D1406003
Removal
1) Disconnect negative cable at battery.
2) Remove air cleaner assembly with air suction hose
referring to “Air Cleaner Assembly Removal and
Installation”.
3) Remove cylinder head upper cover (1).
4) Remove ignition coil assemblies with high-tension
cord from cylinder head cover referring to “Ignition
Coil Assembly (Including Ignitor) Removal and
Installation in Section 1H”.
5) Remove oil level gauge (1).
6) Disconnect PCV hose (2) from PCV valve (3) and
disconnect breather hose (4) from cylinder head
cover.
7) Remove cylinder head cover mounting bolts in
numerical order (“1” through “7”) as shown in figure.
8) Remove cylinder head cover (1) with cylinder head
cover gasket (2) and spark plug hole gasket (3).
1
2
3
4
I5RW0A140004-02
1
I5RW0A140005-01
I2RH0B140033-01
I6RS0B141004-01
Page 294 of 1556
Downloaded from www.Manualslib.com manuals search engine 1D-12 Engine Mechanical:
Installation
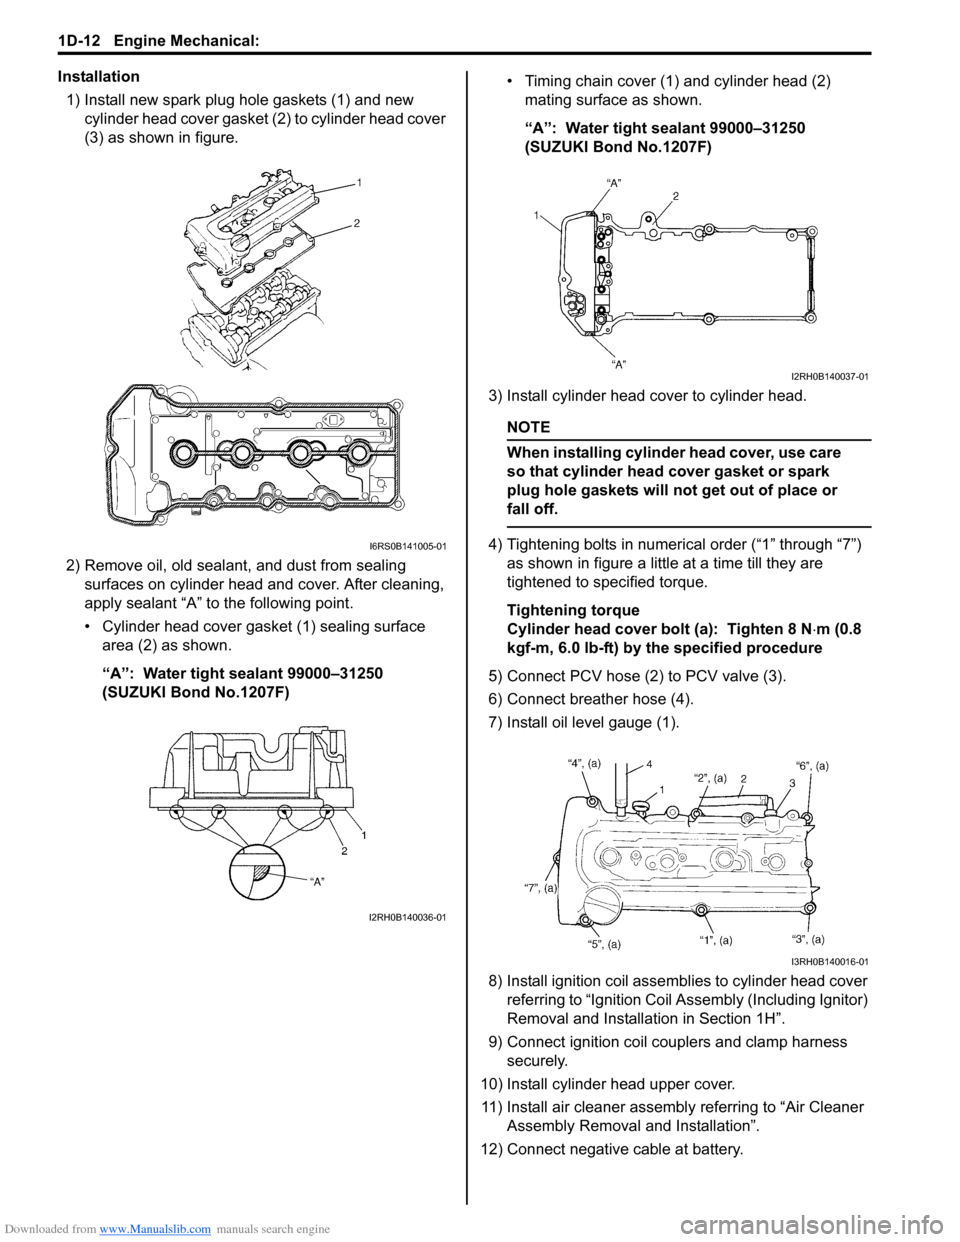
1) Install new spark plug hole gaskets (1) and new
cylinder head cover gasket (2) to cylinder head cover
(3) as shown in figure.
2) Remove oil, old sealant, and dust from sealing
surfaces on cylinder head and cover. After cleaning,
apply sealant “A” to the following point.
• Cylinder head cover gasket (1) sealing surface
area (2) as shown.
“A”: Water tight sealant 99000–31250
(SUZUKI Bond No.1207F)• Timing chain cover (1) and cylinder head (2)
mating surface as shown.
“A”: Water tight sealant 99000–31250
(SUZUKI Bond No.1207F)
3) Install cylinder head cover to cylinder head.
NOTE
When installing cylinder head cover, use care
so that cylinder head cover gasket or spark
plug hole gaskets will not get out of place or
fall off.
4) Tightening bolts in numerical order (“1” through “7”)
as shown in figure a little at a time till they are
tightened to specified torque.
Tightening torque
Cylinder head cover bolt (a): Tighten 8 N⋅m (0.8
kgf-m, 6.0 lb-ft) by the specified procedure
5) Connect PCV hose (2) to PCV valve (3).
6) Connect breather hose (4).
7) Install oil level gauge (1).
8) Install ignition coil assemblies to cylinder head cover
referring to “Ignition Coil Assembly (Including Ignitor)
Removal and Installation in Section 1H”.
9) Connect ignition coil couplers and clamp harness
securely.
10) Install cylinder head upper cover.
11) Install air cleaner assembly referring to “Air Cleaner
Assembly Removal and Installation”.
12) Connect negative cable at battery.I6RS0B141005-01
I2RH0B140036-01
I2RH0B140037-01
I3RH0B140016-01
Page 295 of 1556
Downloaded from www.Manualslib.com manuals search engine Engine Mechanical: 1D-13
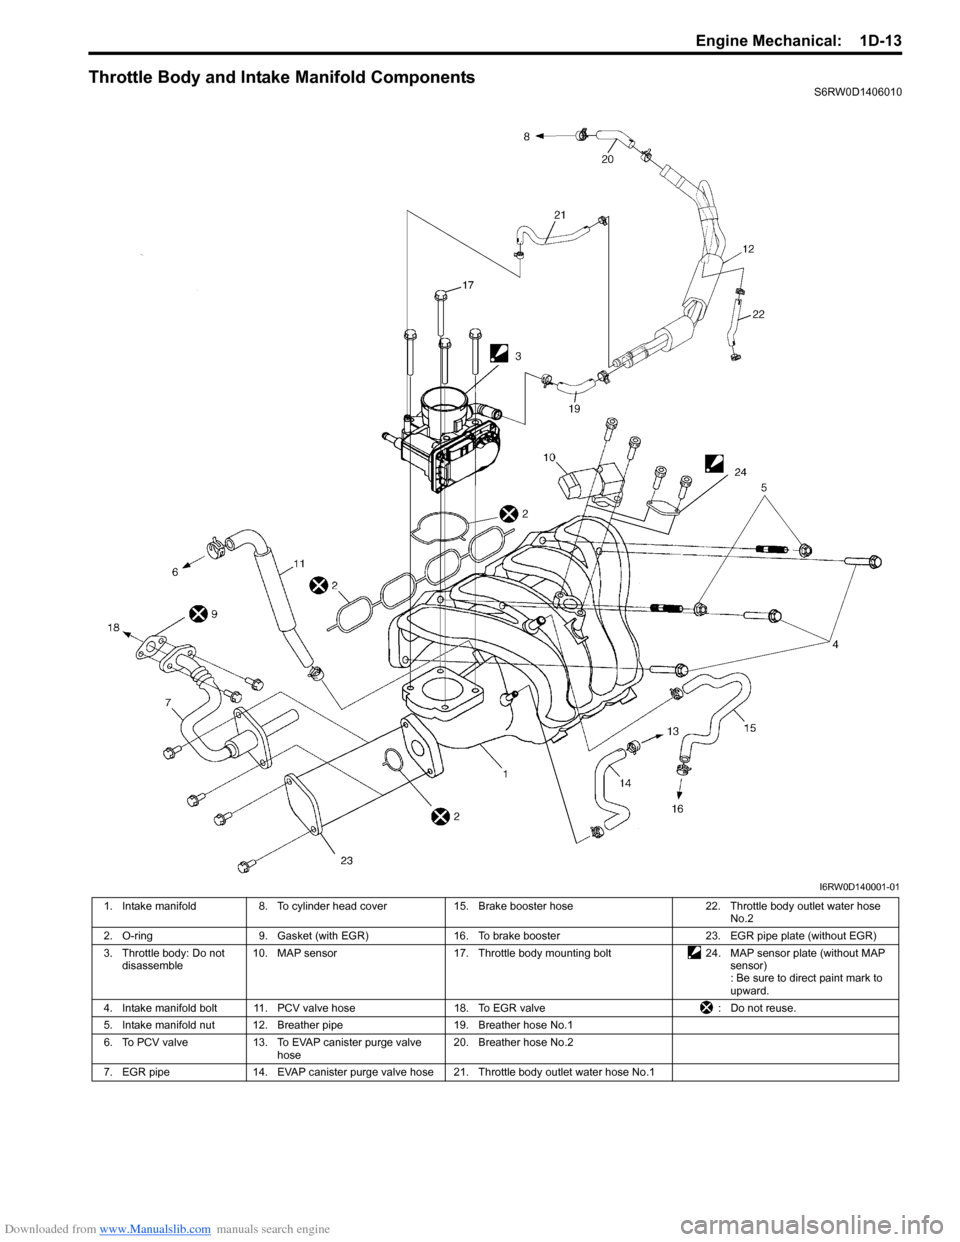
Throttle Body and Intake Manifold ComponentsS6RW0D1406010
I6RW0D140001-01
1. Intake manifold 8. To cylinder head cover 15. Brake booster hose 22. Throttle body outlet water hose
No.2
2. O-ring 9. Gasket (with EGR) 16. To brake booster 23. EGR pipe plate (without EGR)
3. Throttle body: Do not
disassemble10. MAP sensor 17. Throttle body mounting bolt 24. MAP sensor plate (without MAP
sensor)
: Be sure to direct paint mark to
upward.
4. Intake manifold bolt 11. PCV valve hose 18. To EGR valve : Do not reuse.
5. Intake manifold nut 12. Breather pipe 19. Breather hose No.1
6. To PCV valve 13. To EVAP canister purge valve
hose20. Breather hose No.2
7. EGR pipe 14. EVAP canister purge valve hose 21. Throttle body outlet water hose No.1
Page 297 of 1556
Downloaded from www.Manualslib.com manuals search engine Engine Mechanical: 1D-15
Intake Manifold Removal and InstallationS6RW0D1406011
Removal
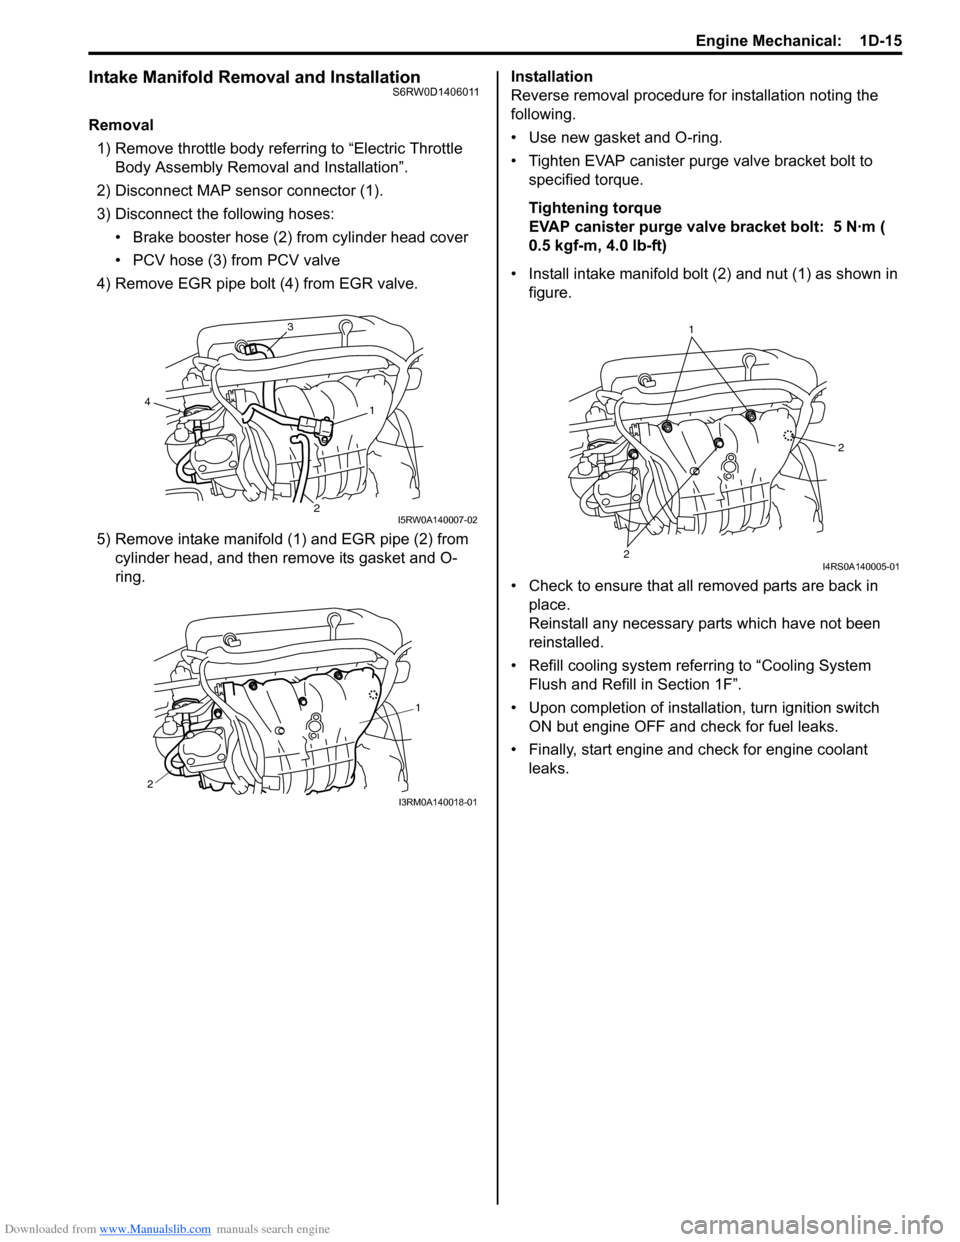
1) Remove throttle body referring to “Electric Throttle
Body Assembly Removal and Installation”.
2) Disconnect MAP sensor connector (1).
3) Disconnect the following hoses:
• Brake booster hose (2) from cylinder head cover
• PCV hose (3) from PCV valve
4) Remove EGR pipe bolt (4) from EGR valve.
5) Remove intake manifold (1) and EGR pipe (2) from
cylinder head, and then remove its gasket and O-
ring.Installation
Reverse removal procedure for installation noting the
following.
• Use new gasket and O-ring.
• Tighten EVAP canister purge valve bracket bolt to
specified torque.
Tightening torque
EVAP canister purge valve bracket bolt: 5 N·m (
0.5 kgf-m, 4.0 lb-ft)
• Install intake manifold bolt (2) and nut (1) as shown in
figure.
• Check to ensure that all removed parts are back in
place.
Reinstall any necessary parts which have not been
reinstalled.
• Refill cooling system referring to “Cooling System
Flush and Refill in Section 1F”.
• Upon completion of installation, turn ignition switch
ON but engine OFF and check for fuel leaks.
• Finally, start engine and check for engine coolant
leaks.
3
1
24
I5RW0A140007-02
1
2
I3RM0A140018-01
1
2
2
I4RS0A140005-01
Page 299 of 1556
Downloaded from www.Manualslib.com manuals search engine Engine Mechanical: 1D-17
Engine Assembly Removal and InstallationS6RW0D1406013
Removal
1) Relieve fuel pressure according to “Fuel Pressure
Relief Procedure in Section 1G”.
2) Disconnect negative and positive cable at battery.
3) Disconnect ECM connectors.
4) Remove battery and battery tray with ECM.
5) Remove right and left side engine under covers.
6) Remove A/C compressor belt by referring to
“Compressor Drive Belt Removal and Installation in
Section 7B” or “Compressor Drive Belt Removal and
Installation in Section 7B”.
7) Drain engine oil referring to “Engine Oil and Filter
Change in Section 0B”.
8) Drain transaxle oil referring to “Manual Transaxle Oil
Change in Section 5B” or “A/T Fluid Change in
Section 5A”.
9) Drain transfer oil referring to “Transfer Oil Change in
Section 3C”.
10) Drain coolant referring to “Cooling System Draining
in Section 1F”
11) Remove air cleaner assembly referring to “Air
Cleaner Assembly Removal and Installation”.
12) With hose connected, detach A/C compressor from
its bracket referring to “Compressor Assembly
Removal and Installation in Section 7B” or
“Compressor Assembly Removal and Installation in
Section 7B”.
CAUTION!
Suspend removed A/C compressor at a place
where no damage will be caused during
removal and installation of engine assembly.
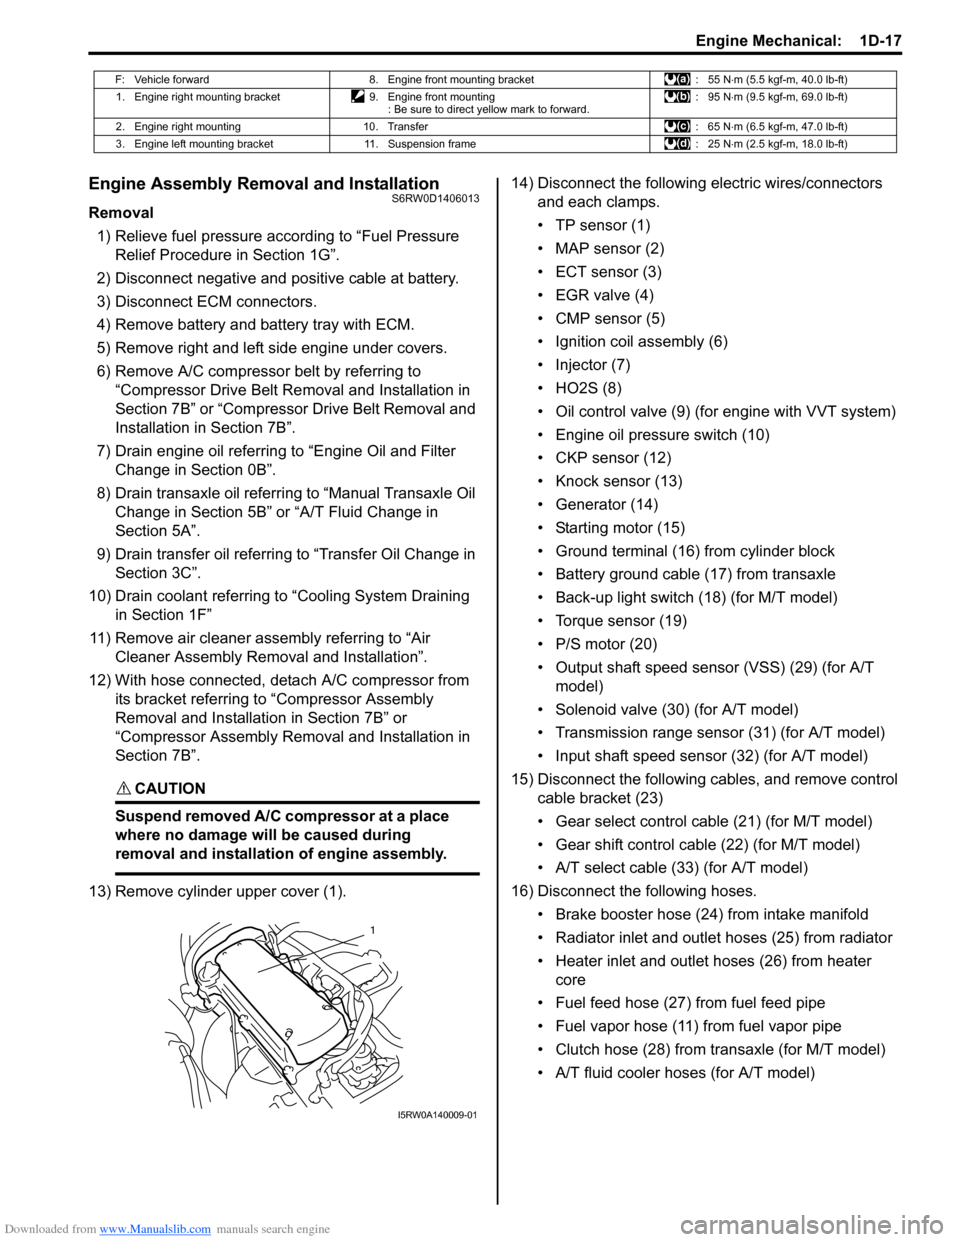
13) Remove cylinder upper cover (1).14) Disconnect the following electric wires/connectors
and each clamps.
• TP sensor (1)
• MAP sensor (2)
• ECT sensor (3)
•EGR valve (4)
• CMP sensor (5)
• Ignition coil assembly (6)
• Injector (7)
•HO2S (8)
• Oil control valve (9) (for engine with VVT system)
• Engine oil pressure switch (10)
• CKP sensor (12)
• Knock sensor (13)
• Generator (14)
• Starting motor (15)
• Ground terminal (16) from cylinder block
• Battery ground cable (17) from transaxle
• Back-up light switch (18) (for M/T model)
• Torque sensor (19)
• P/S motor (20)
• Output shaft speed sensor (VSS) (29) (for A/T
model)
• Solenoid valve (30) (for A/T model)
• Transmission range sensor (31) (for A/T model)
• Input shaft speed sensor (32) (for A/T model)
15) Disconnect the following cables, and remove control
cable bracket (23)
• Gear select control cable (21) (for M/T model)
• Gear shift control cable (22) (for M/T model)
• A/T select cable (33) (for A/T model)
16) Disconnect the following hoses.
• Brake booster hose (24) from intake manifold
• Radiator inlet and outlet hoses (25) from radiator
• Heater inlet and outlet hoses (26) from heater
core
• Fuel feed hose (27) from fuel feed pipe
• Fuel vapor hose (11) from fuel vapor pipe
• Clutch hose (28) from transaxle (for M/T model)
• A/T fluid cooler hoses (for A/T model)
F: Vehicle forward 8. Engine front mounting bracket : 55 N⋅m (5.5 kgf-m, 40.0 lb-ft)
1. Engine right mounting bracket 9. Engine front mounting
: Be sure to direct yellow mark to forward.: 95 N⋅m (9.5 kgf-m, 69.0 lb-ft)
2. Engine right mounting 10. Transfer : 65 N⋅m (6.5 kgf-m, 47.0 lb-ft)
3. Engine left mounting bracket 11. Suspension frame : 25 N⋅m (2.5 kgf-m, 18.0 lb-ft)
1
I5RW0A140009-01
Page 303 of 1556
Downloaded from www.Manualslib.com manuals search engine Engine Mechanical: 1D-21
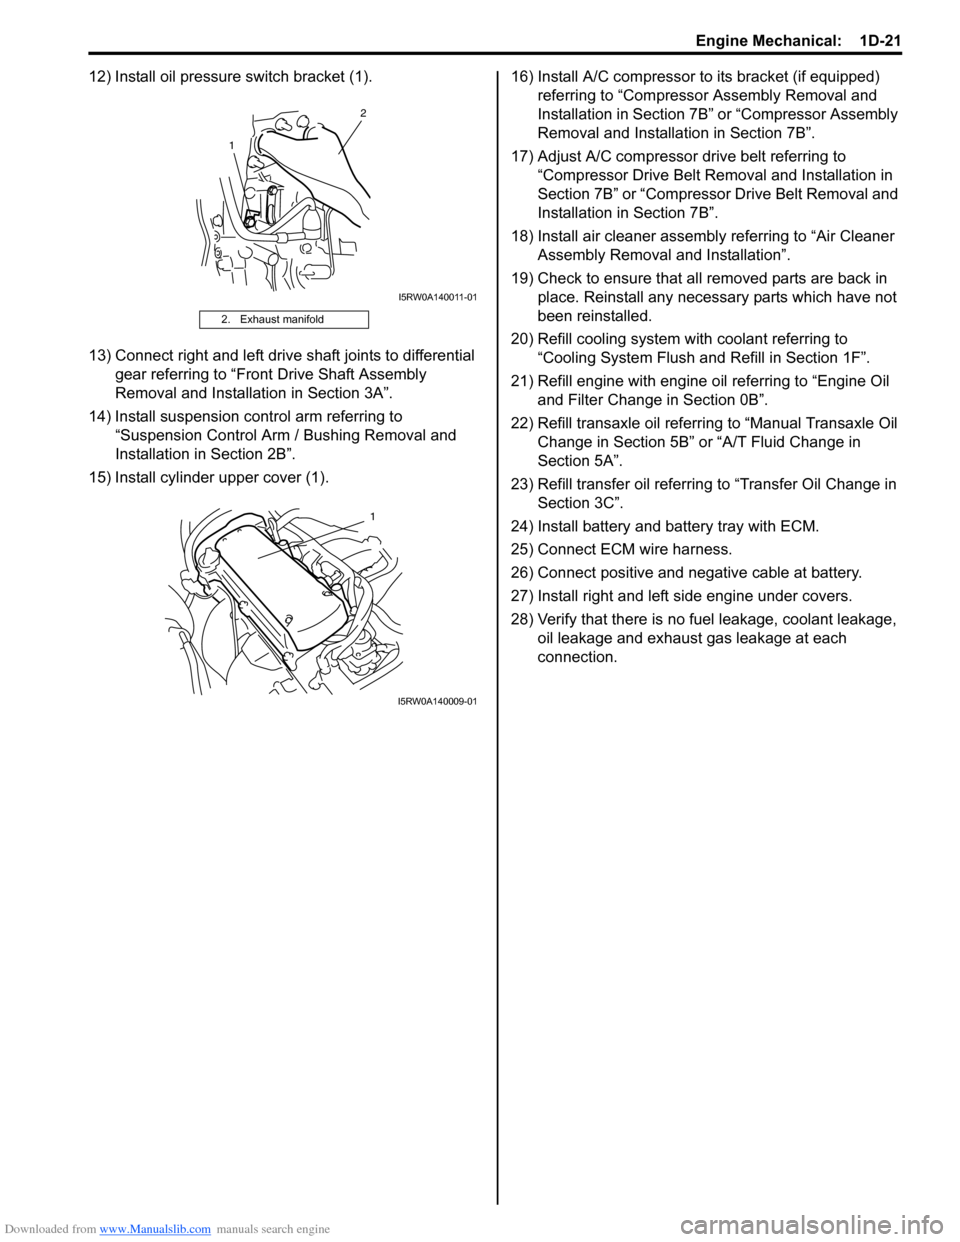
12) Install oil pressure switch bracket (1).
13) Connect right and left drive shaft joints to differential
gear referring to “Front Drive Shaft Assembly
Removal and Installation in Section 3A”.
14) Install suspension control arm referring to
“Suspension Control Arm / Bushing Removal and
Installation in Section 2B”.
15) Install cylinder upper cover (1).16) Install A/C compressor to its bracket (if equipped)
referring to “Compressor Assembly Removal and
Installation in Section 7B” or “Compressor Assembly
Removal and Installation in Section 7B”.
17) Adjust A/C compressor drive belt referring to
“Compressor Drive Belt Removal and Installation in
Section 7B” or “Compressor Drive Belt Removal and
Installation in Section 7B”.
18) Install air cleaner assembly referring to “Air Cleaner
Assembly Removal and Installation”.
19) Check to ensure that all removed parts are back in
place. Reinstall any necessary parts which have not
been reinstalled.
20) Refill cooling system with coolant referring to
“Cooling System Flush and Refill in Section 1F”.
21) Refill engine with engine oil referring to “Engine Oil
and Filter Change in Section 0B”.
22) Refill transaxle oil referring to “Manual Transaxle Oil
Change in Section 5B” or “A/T Fluid Change in
Section 5A”.
23) Refill transfer oil referring to “Transfer Oil Change in
Section 3C”.
24) Install battery and battery tray with ECM.
25) Connect ECM wire harness.
26) Connect positive and negative cable at battery.
27) Install right and left side engine under covers.
28) Verify that there is no fuel leakage, coolant leakage,
oil leakage and exhaust gas leakage at each
connection.
2. Exhaust manifold
1
2
I5RW0A140011-01
1
I5RW0A140009-01
Page 304 of 1556
![SUZUKI SX4 2006 1.G Service Service Manual Downloaded from www.Manualslib.com manuals search engine 1D-22 Engine Mechanical:
Timing Chain Cover ComponentsS6RW0D1406014
I5RW0C140041-01
[A]: For engine with VVT 8. Timing chain cover mounting
n SUZUKI SX4 2006 1.G Service Service Manual Downloaded from www.Manualslib.com manuals search engine 1D-22 Engine Mechanical:
Timing Chain Cover ComponentsS6RW0D1406014
I5RW0C140041-01
[A]: For engine with VVT 8. Timing chain cover mounting
n](/img/20/7612/w960_7612-303.png)
Downloaded from www.Manualslib.com manuals search engine 1D-22 Engine Mechanical:
Timing Chain Cover ComponentsS6RW0D1406014
I5RW0C140041-01
[A]: For engine with VVT 8. Timing chain cover mounting
nut17. Oil control valve
[B]: For engine without VVT 9. Oil gallery pipe No.1 18. Oil control valve mounting nut
1. Crankshaft pulley bolt 10. Copper washer 19. Cap
2. Crankshaft pulley 11. Oil gallery pipe No.1 bolt : 11 N⋅m (1.1 kgf-m, 8.0 lb-ft)
3. Oil seal
: Apply engine oil to oil seal lip.12. Oil gallery pipe No.2 : 25 N⋅m (2.5 kgf-m, 18.0 lb-ft)
4. Timing chain cover
: Apply sealant 99000-31140 to the mating
surface of cylinder and cylinder head.
: Apply sealant 99000-31260 to the mating
surface of timing chain cover referring to the
figure of Step 4) of “Installation” under “Timing
Chain Cover Removal and Installation”.13. Oil gallery pipe No.2 bolt : 30 N⋅m (3.0 kgf-m, 22.0 lb-ft)
5. Pin 14. Oil gallery pipe No.3 : 150 N⋅m (15.0 kgf-m, 108.5 lb-ft)
6. Cap bolt 15. Oil gallery pipe No.3 bolt : Do not reuse.
7. Timing chain cover mounting bolts 16. O-ring
: Apply engine oil.
Page 305 of 1556
Downloaded from www.Manualslib.com manuals search engine Engine Mechanical: 1D-23
Timing Chain Cover Removal and InstallationS6RW0D1406015
CAUTION!
• Keep working table, tools and hands clean
while overhauling.
• Use special care to handle aluminum parts
so as not to damage them.
• Do not expose removed parts to dust.
Keep them always clean.
Removal
1) Remove engine assembly from vehicle referring to
“Engine Assembly Removal and Installation”.
2) Remove water pump / generator drive belt referring
to “Water Pump / Generator Drive Belt Removal and
Installation in Section 1F”.
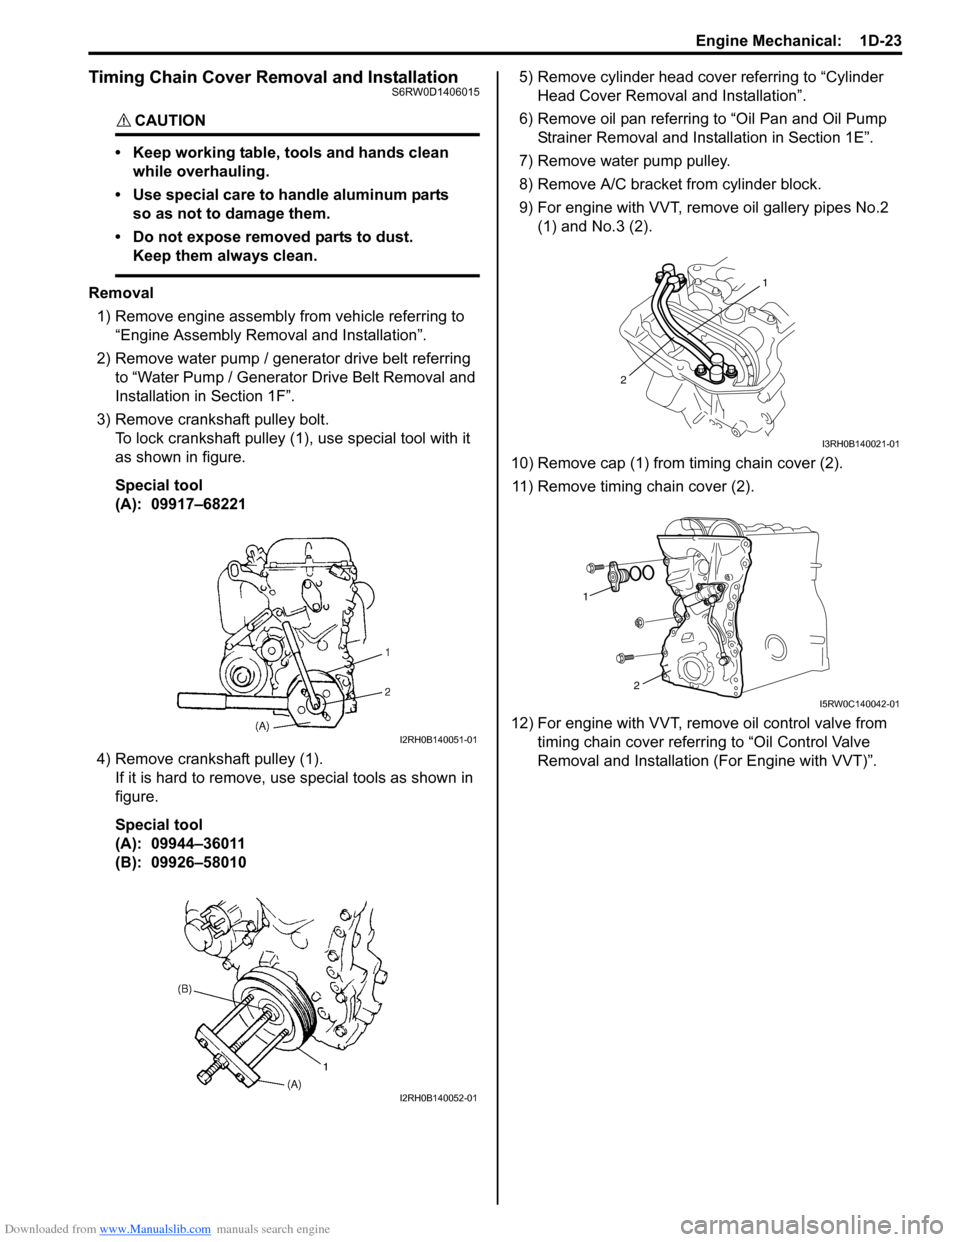
3) Remove crankshaft pulley bolt.
To lock crankshaft pulley (1), use special tool with it
as shown in figure.
Special tool
(A): 09917–68221
4) Remove crankshaft pulley (1).
If it is hard to remove, use special tools as shown in
figure.
Special tool
(A): 09944–36011
(B): 09926–580105) Remove cylinder head cover referring to “Cylinder
Head Cover Removal and Installation”.
6) Remove oil pan referring to “Oil Pan and Oil Pump
Strainer Removal and Installation in Section 1E”.
7) Remove water pump pulley.
8) Remove A/C bracket from cylinder block.
9) For engine with VVT, remove oil gallery pipes No.2
(1) and No.3 (2).
10) Remove cap (1) from timing chain cover (2).
11) Remove timing chain cover (2).
12) For engine with VVT, remove oil control valve from
timing chain cover referring to “Oil Control Valve
Removal and Installation (For Engine with VVT)”.
I2RH0B140051-01
I2RH0B140052-01
1
2
I3RH0B140021-01
1
2
I5RW0C140042-01