SUZUKI SX4 2006 1.G Service Workshop Manual
Manufacturer: SUZUKI, Model Year: 2006, Model line: SX4, Model: SUZUKI SX4 2006 1.GPages: 1556, PDF Size: 37.31 MB
Page 931 of 1556
Downloaded from www.Manualslib.com manuals search engine Heater and Ventilation: 7A-3
Diagnostic Information and Procedures
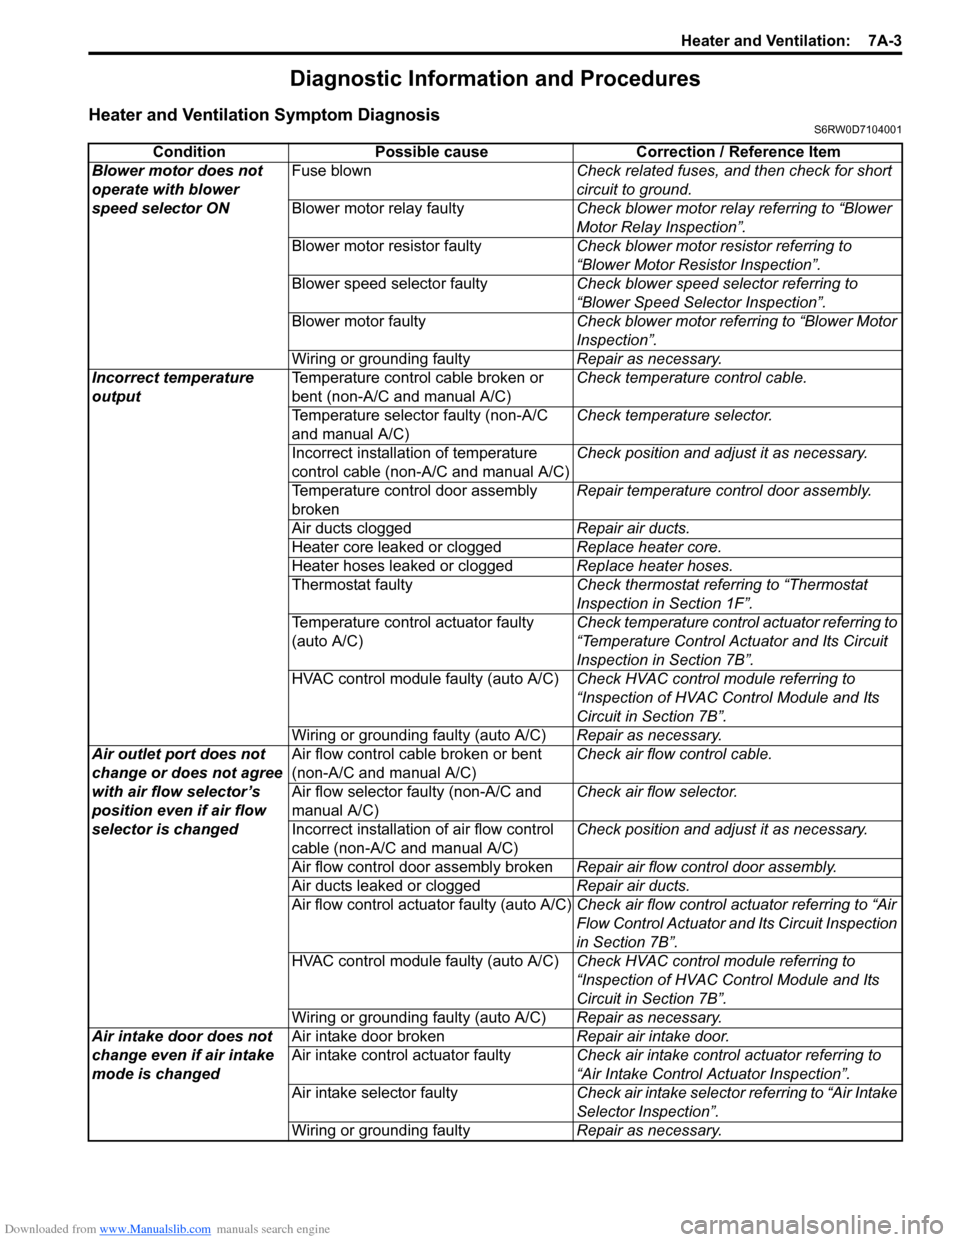
Heater and Ventilation Symptom DiagnosisS6RW0D7104001
Condition Possible cause Correction / Reference Item
Blower motor does not
operate with blower
speed selector ONFuse blownCheck related fuses, and then check for short
circuit to ground.
Blower motor relay faultyCheck blower motor relay referring to “Blower
Motor Relay Inspection”.
Blower motor resistor faultyCheck blower motor resistor referring to
“Blower Motor Resistor Inspection”.
Blower speed selector faultyCheck blower speed selector referring to
“Blower Speed Selector Inspection”.
Blower motor faultyCheck blower motor referring to “Blower Motor
Inspection”.
Wiring or grounding faultyRepair as necessary.
Incorrect temperature
outputTemperature control cable broken or
bent (non-A/C and manual A/C)Check temperature control cable.
Temperature selector faulty (non-A/C
and manual A/C)Check temperature selector.
Incorrect installation of temperature
control cable (non-A/C and manual A/C)Check position and adjust it as necessary.
Temperature control door assembly
brokenRepair temperature control door assembly.
Air ducts cloggedRepair air ducts.
Heater core leaked or cloggedReplace heater core.
Heater hoses leaked or cloggedReplace heater hoses.
Thermostat faultyCheck thermostat referring to “Thermostat
Inspection in Section 1F”.
Temperature control actuator faulty
(auto A/C)Check temperature control actuator referring to
“Temperature Control Actuator and Its Circuit
Inspection in Section 7B”.
HVAC control module faulty (auto A/C)Check HVAC control module referring to
“Inspection of HVAC Control Module and Its
Circuit in Section 7B”.
Wiring or grounding faulty (auto A/C)Repair as necessary.
Air outlet port does not
change or does not agree
with air flow selector’s
position even if air flow
selector is changedAir flow control cable broken or bent
(non-A/C and manual A/C)Check air flow control cable.
Air flow selector faulty (non-A/C and
manual A/C)Check air flow selector.
Incorrect installation of air flow control
cable (non-A/C and manual A/C)Check position and adjust it as necessary.
Air flow control door assembly brokenRepair air flow control door assembly.
Air ducts leaked or cloggedRepair air ducts.
Air flow control actuator faulty (auto A/C)Check air flow control actuator referring to “Air
Flow Control Actuator and Its Circuit Inspection
in Section 7B”.
HVAC control module faulty (auto A/C)Check HVAC control module referring to
“Inspection of HVAC Control Module and Its
Circuit in Section 7B”.
Wiring or grounding faulty (auto A/C)Repair as necessary.
Air intake door does not
change even if air intake
mode is changedAir intake door brokenRepair air intake door.
Air intake control actuator faultyCheck air intake control actuator referring to
“Air Intake Control Actuator Inspection”.
Air intake selector faultyCheck air intake selector referring to “Air Intake
Selector Inspection”.
Wiring or grounding faultyRepair as necessary.
Page 932 of 1556
Downloaded from www.Manualslib.com manuals search engine 7A-4 Heater and Ventilation:
Repair Instructions
HVAC Unit ComponentsS6RW0D7106001
For non-A/C and manual A/C, refer to “HVAC Unit
Components in Section 7B”.
For auto A/C, refer to “HVAC Unit Components in
Section 7B”.
HVAC Unit Removal and Installation (Non-A/C)S6RW0D7106002
For manual A/C and auto A/C, refer to “HVAC Unit
Removal and Installation in Section 7B”.
Removal
1) Drain engine coolant referring to “Cooling System
Draining in Section 1F”, and then disconnect heater
hoses from HVAC unit.
2) Remove cowl top cover from vehicle body referring
to “Cowl Top and Front Lower Crossmember
Components in Section 9K”.
3) Remove instrument panel from vehicle body
referring to “Instrument Panel Removal and
Installation in Section 9C”.
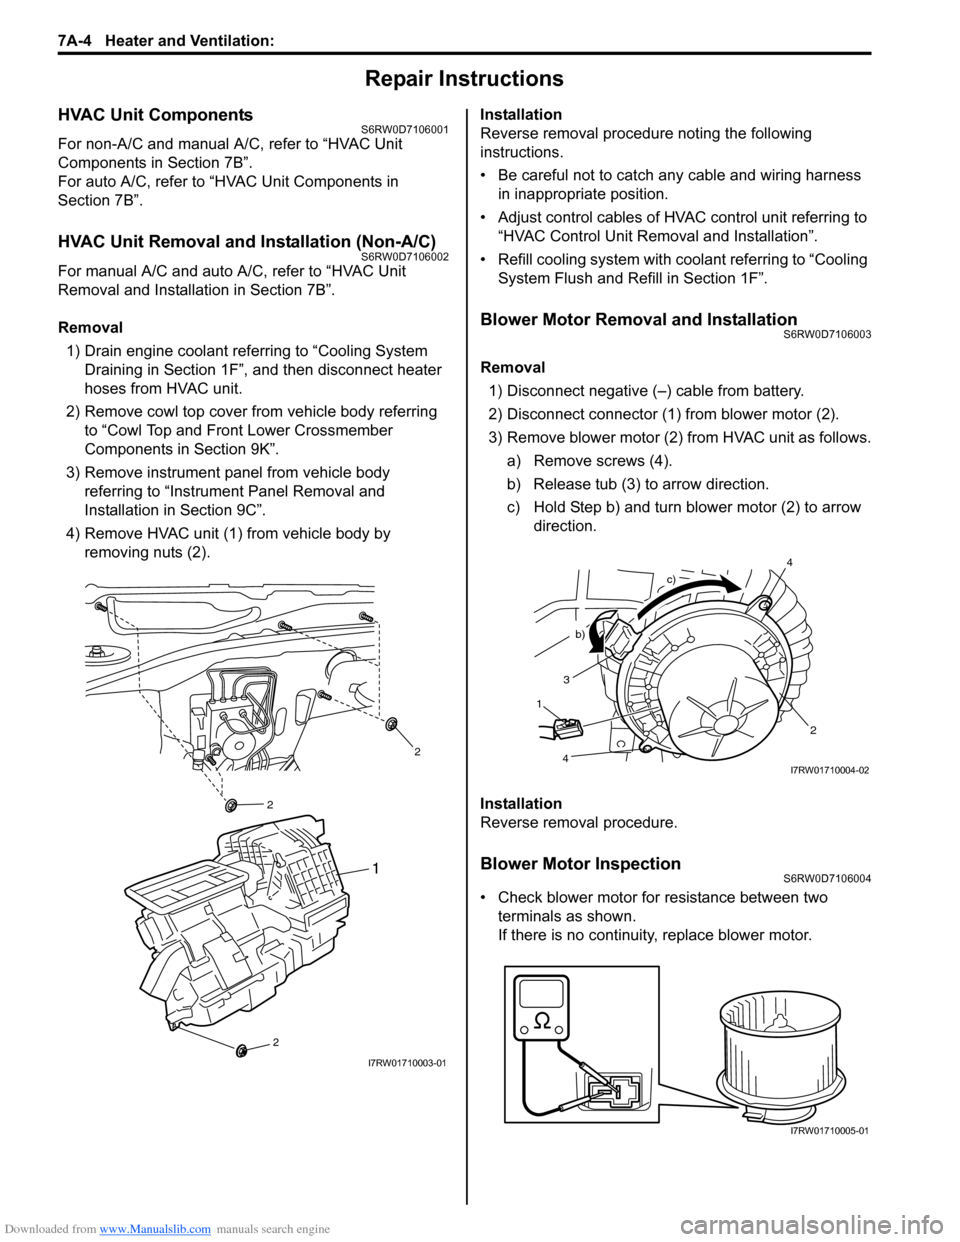
4) Remove HVAC unit (1) from vehicle body by
removing nuts (2).Installation
Reverse removal procedure noting the following
instructions.
• Be careful not to catch any cable and wiring harness
in inappropriate position.
• Adjust control cables of HVAC control unit referring to
“HVAC Control Unit Removal and Installation”.
• Refill cooling system with coolant referring to “Cooling
System Flush and Refill in Section 1F”.
Blower Motor Removal and InstallationS6RW0D7106003
Removal
1) Disconnect negative (–) cable from battery.
2) Disconnect connector (1) from blower motor (2).
3) Remove blower motor (2) from HVAC unit as follows.
a) Remove screws (4).
b) Release tub (3) to arrow direction.
c) Hold Step b) and turn blower motor (2) to arrow
direction.
Installation
Reverse removal procedure.
Blower Motor InspectionS6RW0D7106004
• Check blower motor for resistance between two
terminals as shown.
If there is no continuity, replace blower motor.
2
2
2
1
I7RW01710003-01
3
2
b)
c)
1
4
4I7RW01710004-02
I7RW01710005-01
Page 933 of 1556
Downloaded from www.Manualslib.com manuals search engine Heater and Ventilation: 7A-5
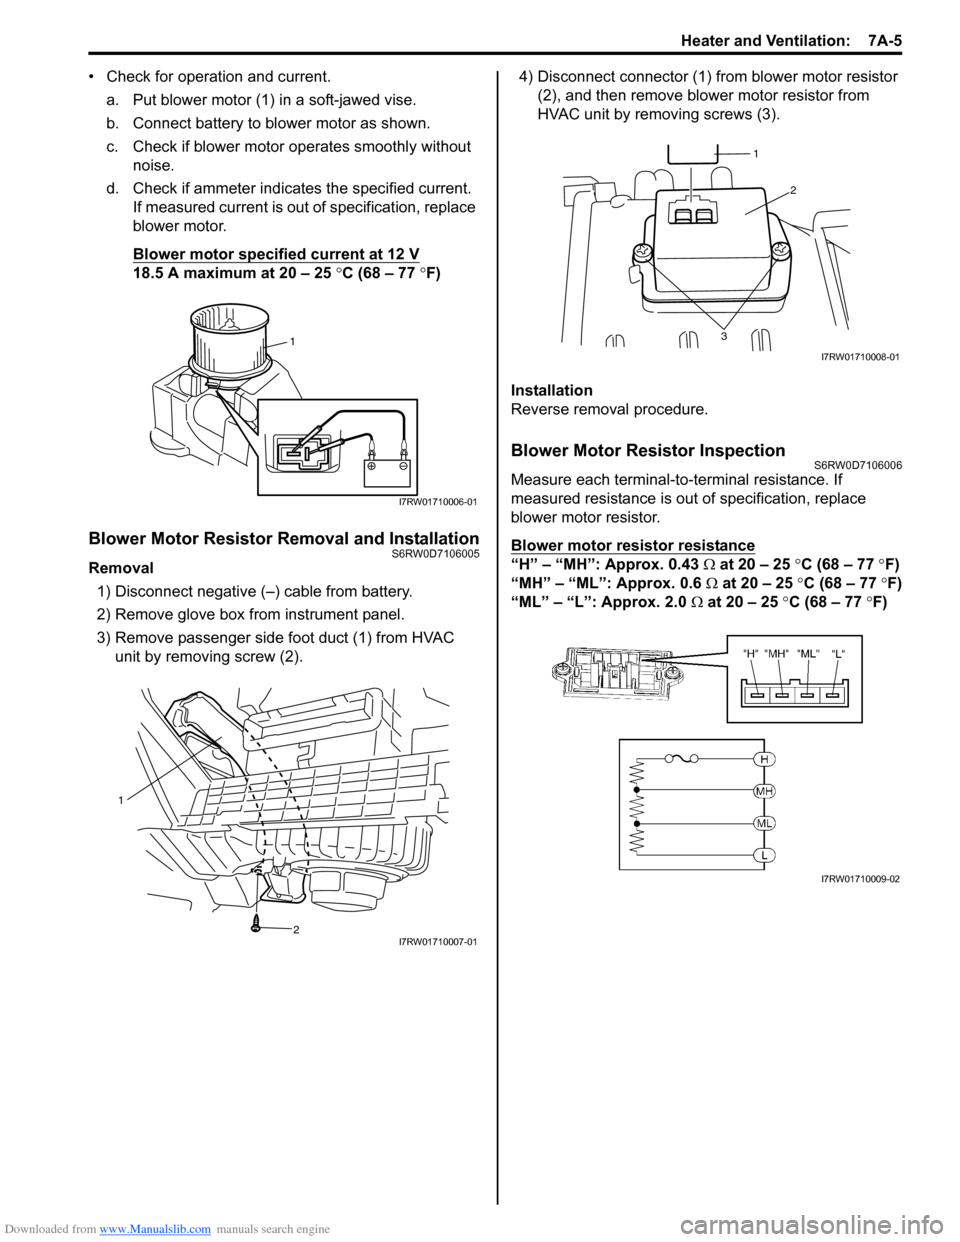
• Check for operation and current.
a. Put blower motor (1) in a soft-jawed vise.
b. Connect battery to blower motor as shown.
c. Check if blower motor operates smoothly without
noise.
d. Check if ammeter indicates the specified current.
If measured current is out of specification, replace
blower motor.
Blower motor specified current at 12 V
18.5 A maximum at 20 – 25 °C (68 – 77 °F)
Blower Motor Resistor Removal and InstallationS6RW0D7106005
Removal
1) Disconnect negative (–) cable from battery.
2) Remove glove box from instrument panel.
3) Remove passenger side foot duct (1) from HVAC
unit by removing screw (2).4) Disconnect connector (1) from blower motor resistor
(2), and then remove blower motor resistor from
HVAC unit by removing screws (3).
Installation
Reverse removal procedure.
Blower Motor Resistor InspectionS6RW0D7106006
Measure each terminal-to-terminal resistance. If
measured resistance is out of specification, replace
blower motor resistor.
Blower motor resistor resistance
“H” – “MH”: Approx. 0.43 Ω at 20 – 25 °C (68 – 77 °F)
“MH” – “ML”: Approx. 0.6 Ω at 20 – 25 °C (68 – 77 °F)
“ML” – “L”: Approx. 2.0 Ω at 20 – 25 °C (68 – 77 °F)
1
I7RW01710006-01
1
2
I7RW01710007-01
2
3
1
I7RW01710008-01
I7RW01710009-02
Page 934 of 1556
Downloaded from www.Manualslib.com manuals search engine 7A-6 Heater and Ventilation:
Blower Motor Relay InspectionS6RW0D7106007
1) Disconnect negative (–) cable at battery.
2) Disable air bag system referring to “Disabling Air
Bag System in Section 8B”.
3) Remove junction block assembly (2).
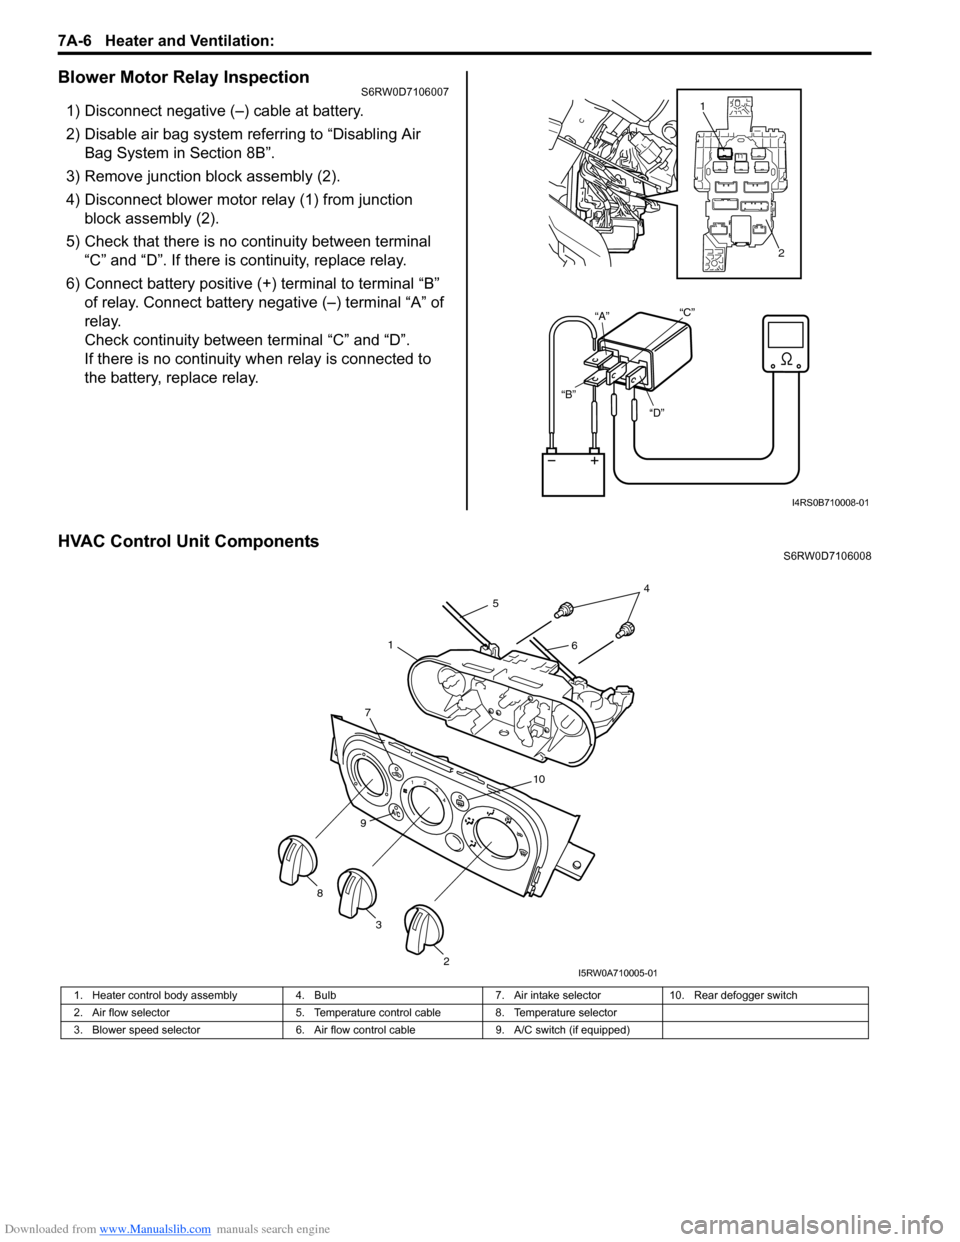
4) Disconnect blower motor relay (1) from junction
block assembly (2).
5) Check that there is no continuity between terminal
“C” and “D”. If there is continuity, replace relay.
6) Connect battery positive (+) terminal to terminal “B”
of relay. Connect battery negative (–) terminal “A” of
relay.
Check continuity between terminal “C” and “D”.
If there is no continuity when relay is connected to
the battery, replace relay.
HVAC Control Unit ComponentsS6RW0D7106008
“D” “B”“A”“C”
1
2
I4RS0B710008-01
1. Heater control body assembly 4. Bulb 7. Air intake selector 10. Rear defogger switch
2. Air flow selector 5. Temperature control cable 8. Temperature selector
3. Blower speed selector 6. Air flow control cable 9. A/C switch (if equipped)
7
10
9
2
3 8
45
61
I5RW0A710005-01
Page 935 of 1556
Downloaded from www.Manualslib.com manuals search engine Heater and Ventilation: 7A-7
HVAC Control Unit Removal and InstallationS6RW0D7106009
Removal
1) Disconnect negative (–) cable at battery.
2) Remove steering column hole cover from instrument
panel.
3) Remove audio unit from instrument panel referring to
“Audio Unit Removal and Installation (If Equipped) in
Section 9C”.
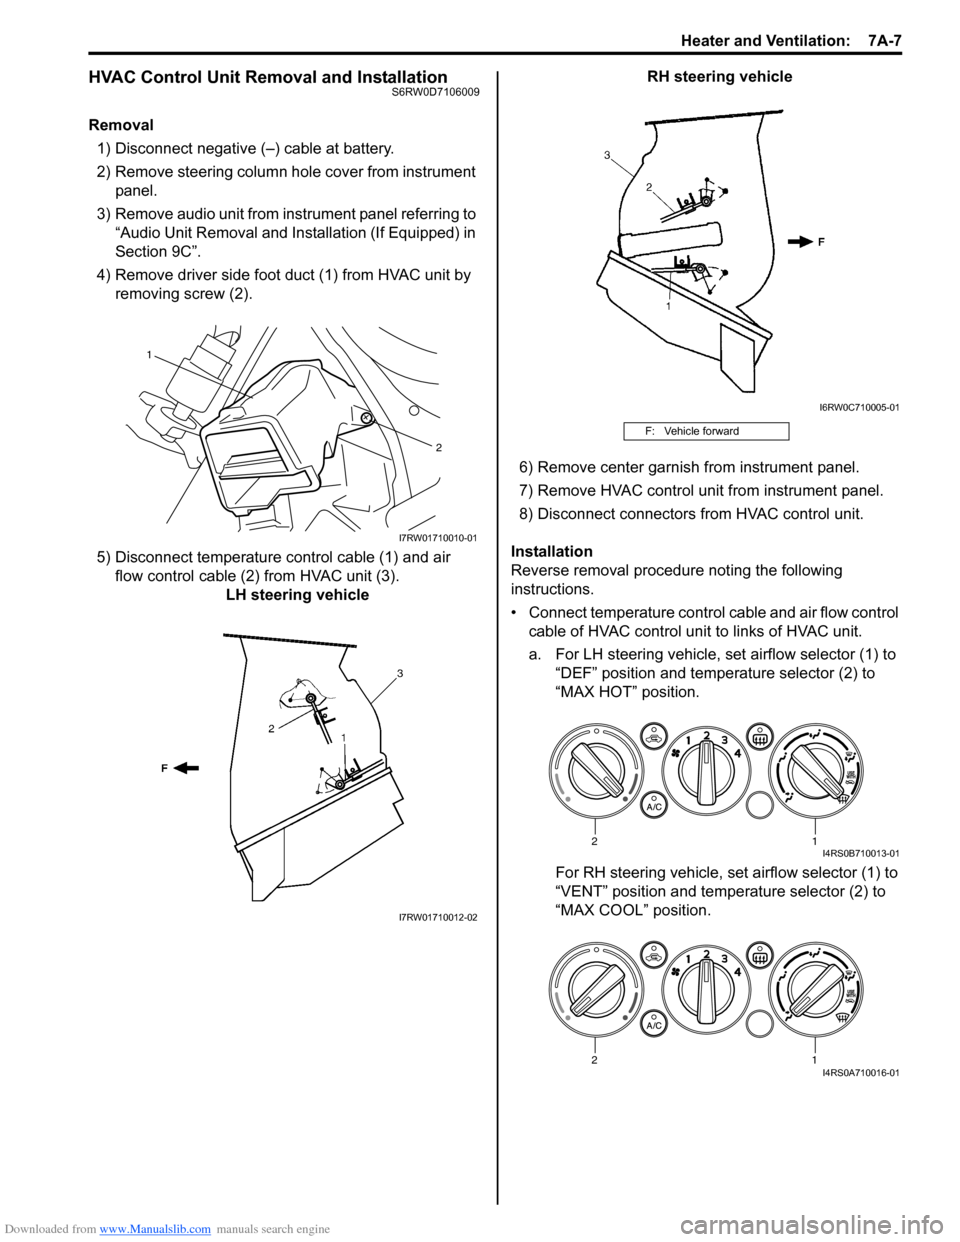
4) Remove driver side foot duct (1) from HVAC unit by
removing screw (2).
5) Disconnect temperature control cable (1) and air
flow control cable (2) from HVAC unit (3).
LH steering vehicleRH steering vehicle
6) Remove center garnish from instrument panel.
7) Remove HVAC control unit from instrument panel.
8) Disconnect connectors from HVAC control unit.
Installation
Reverse removal procedure noting the following
instructions.
• Connect temperature control cable and air flow control
cable of HVAC control unit to links of HVAC unit.
a. For LH steering vehicle, set airflow selector (1) to
“DEF” position and temperature selector (2) to
“MAX HOT” position.
For RH steering vehicle, set airflow selector (1) to
“VENT” position and temperature selector (2) to
“MAX COOL” position.
1
2
I7RW01710010-01
I7RW01710012-02
F: Vehicle forward
I6RW0C710005-01
12I4RS0B710013-01
12I4RS0A710016-01
Page 936 of 1556
Downloaded from www.Manualslib.com manuals search engine 7A-8 Heater and Ventilation:
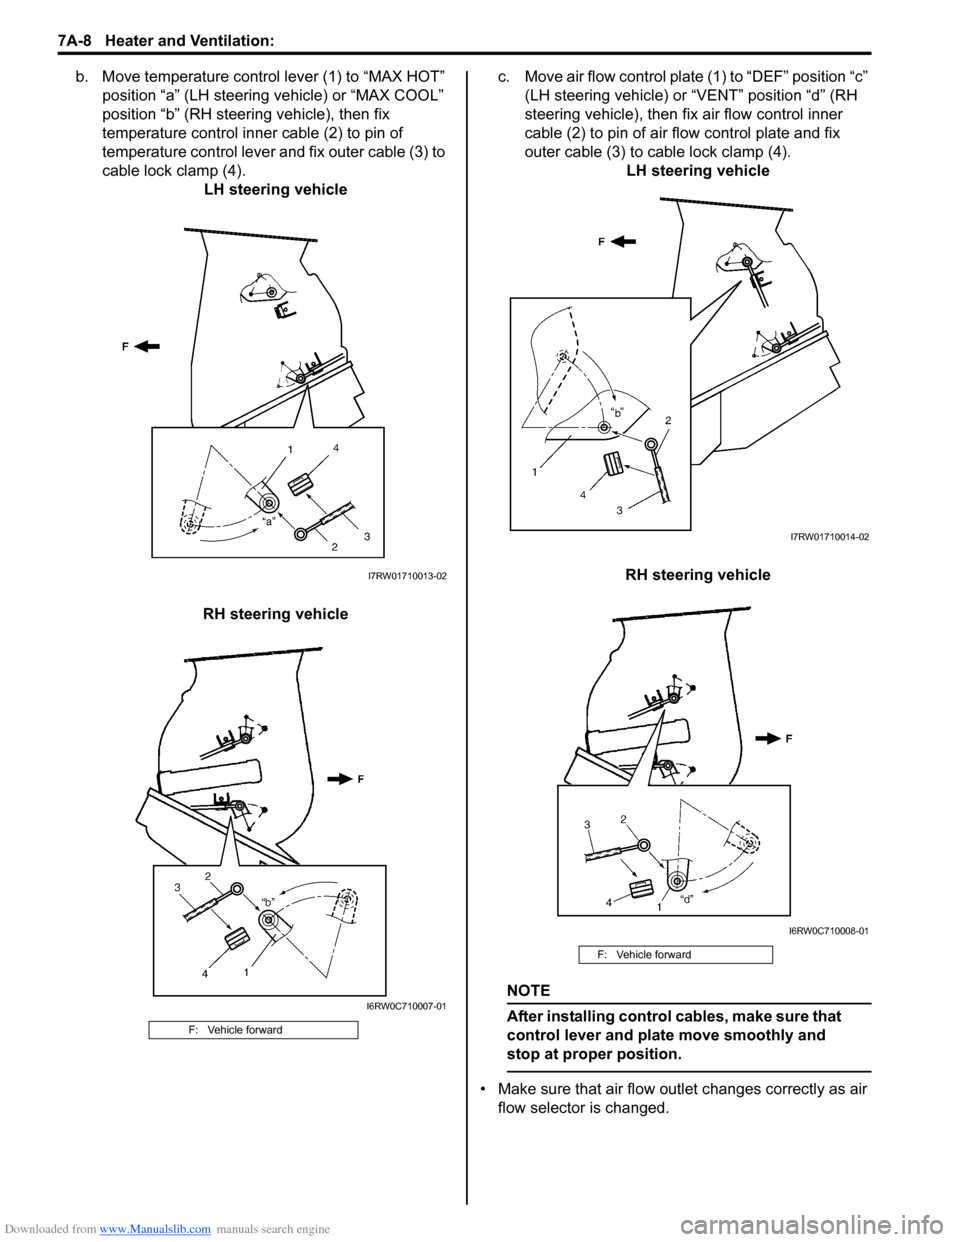
b. Move temperature control lever (1) to “MAX HOT”
position “a” (LH steering vehicle) or “MAX COOL”
position “b” (RH steering vehicle), then fix
temperature control inner cable (2) to pin of
temperature control lever and fix outer cable (3) to
cable lock clamp (4).
LH steering vehicle
RH steering vehiclec. Move air flow control plate (1) to “DEF” position “c”
(LH steering vehicle) or “VENT” position “d” (RH
steering vehicle), then fix air flow control inner
cable (2) to pin of air flow control plate and fix
outer cable (3) to cable lock clamp (4).
LH steering vehicle
RH steering vehicle
NOTE
After installing control cables, make sure that
control lever and plate move smoothly and
stop at proper position.
• Make sure that air flow outlet changes correctly as air
flow selector is changed.
F: Vehicle forward
I7RW01710013-02
I6RW0C710007-01
F: Vehicle forward
I7RW01710014-02
I6RW0C710008-01
Page 937 of 1556
Downloaded from www.Manualslib.com manuals search engine Heater and Ventilation: 7A-9
Blower Speed Selector InspectionS6RW0D7106010
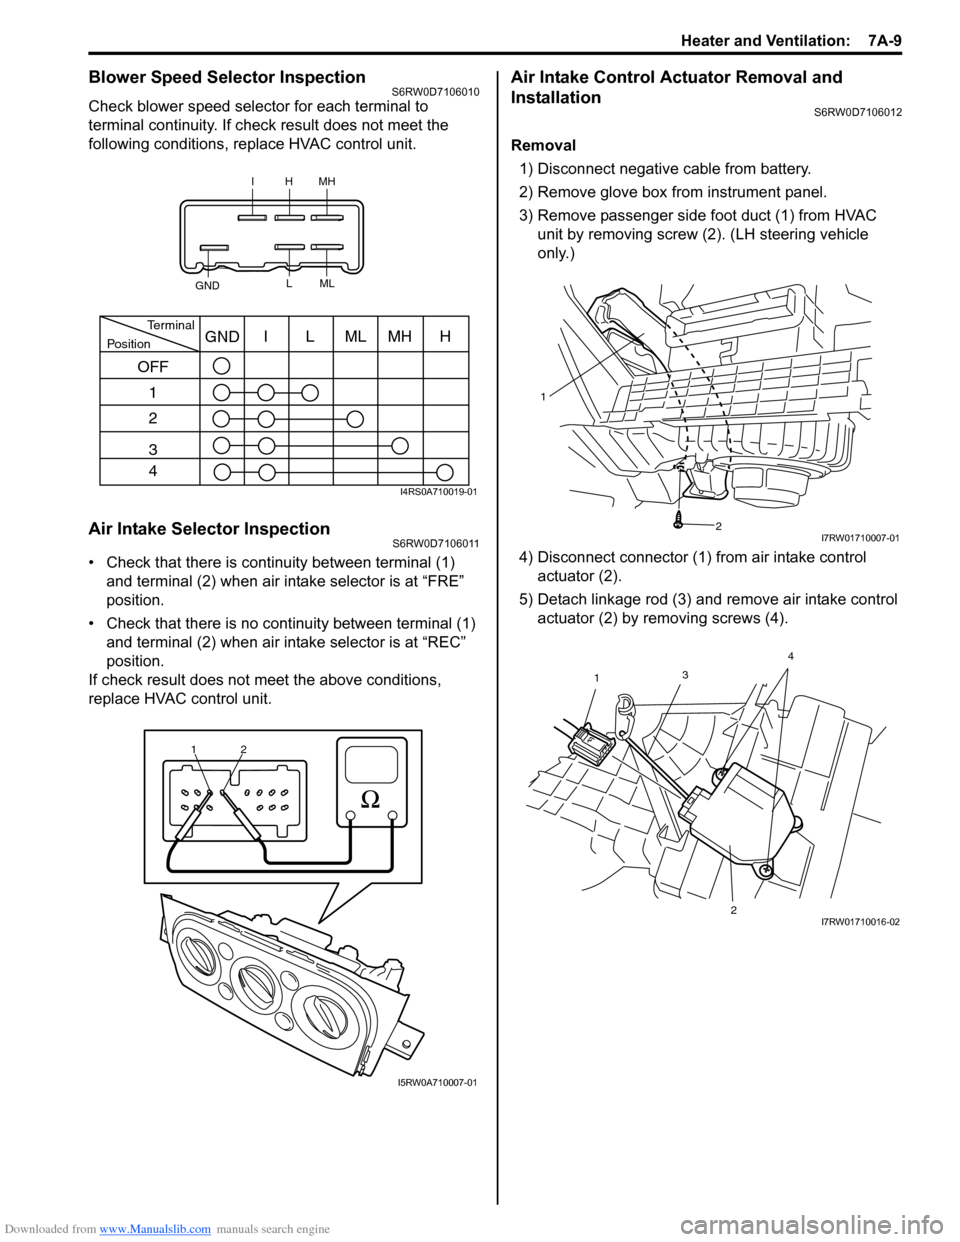
Check blower speed selector for each terminal to
terminal continuity. If check result does not meet the
following conditions, replace HVAC control unit.
Air Intake Selector InspectionS6RW0D7106011
• Check that there is continuity between terminal (1)
and terminal (2) when air intake selector is at “FRE”
position.
• Check that there is no continuity between terminal (1)
and terminal (2) when air intake selector is at “REC”
position.
If check result does not meet the above conditions,
replace HVAC control unit.
Air Intake Control Actuator Removal and
Installation
S6RW0D7106012
Removal
1) Disconnect negative cable from battery.
2) Remove glove box from instrument panel.
3) Remove passenger side foot duct (1) from HVAC
unit by removing screw (2). (LH steering vehicle
only.)
4) Disconnect connector (1) from air intake control
actuator (2).
5) Detach linkage rod (3) and remove air intake control
actuator (2) by removing screws (4).
IHMH
GNDLML
PositionTerminalI
OFF
1
2
3
4LMLMHHGND
I4RS0A710019-01
1
2
I5RW0A710007-01
1
2
I7RW01710007-01
3
1
24I7RW01710016-02
Page 938 of 1556

Downloaded from www.Manualslib.com manuals search engine 7A-10 Heater and Ventilation:
Installation
Reverse removal procedure noting the following
instruction.
• Be sure to insert the linkage rod (1) into the hole (2) of
air intake control actuator.Air Intake Control Actuator InspectionS6RW0D7106013
Check air intake control actuator as follows:
1) Using service wire, connect battery positive terminal
to “d” terminal and battery negative terminal to
terminal “a”. And, check if air intake selector link
operates smoothly and it stops at “FRE” position (1).
2) Using service wire, connect battery positive terminal
to “d” terminal and battery negative terminal to
terminal “c”. And, check if air intake selector link
operates smoothly and it stops at “REC” position (2).
3) For auto A/C model, using service wire, connect
battery positive terminal to “d” terminal and battery
negative terminal to “b” terminal. And, check air
intake selector link operates smoothly and it stops at
MIX position (3).
If malfunction is found, replace air intake control
actuator.
21
I7RW01710017-02
4. Motor rotation direction
“a” “b” “c” “d”
1 3
2
4“a”
“b”
“c” “d”
I7RW01710018-05
Page 939 of 1556
Downloaded from www.Manualslib.com manuals search engine Heater and Ventilation: 7A-11
Center Ventilation Louver Removal and
Installation
S6RW0D7106014
Removal
1) Disconnect negative (–) cable from battery.
2) Remove audio unit from instrument panel referring to
“Audio Unit Removal and Installation (If Equipped) in
Section 9C”.
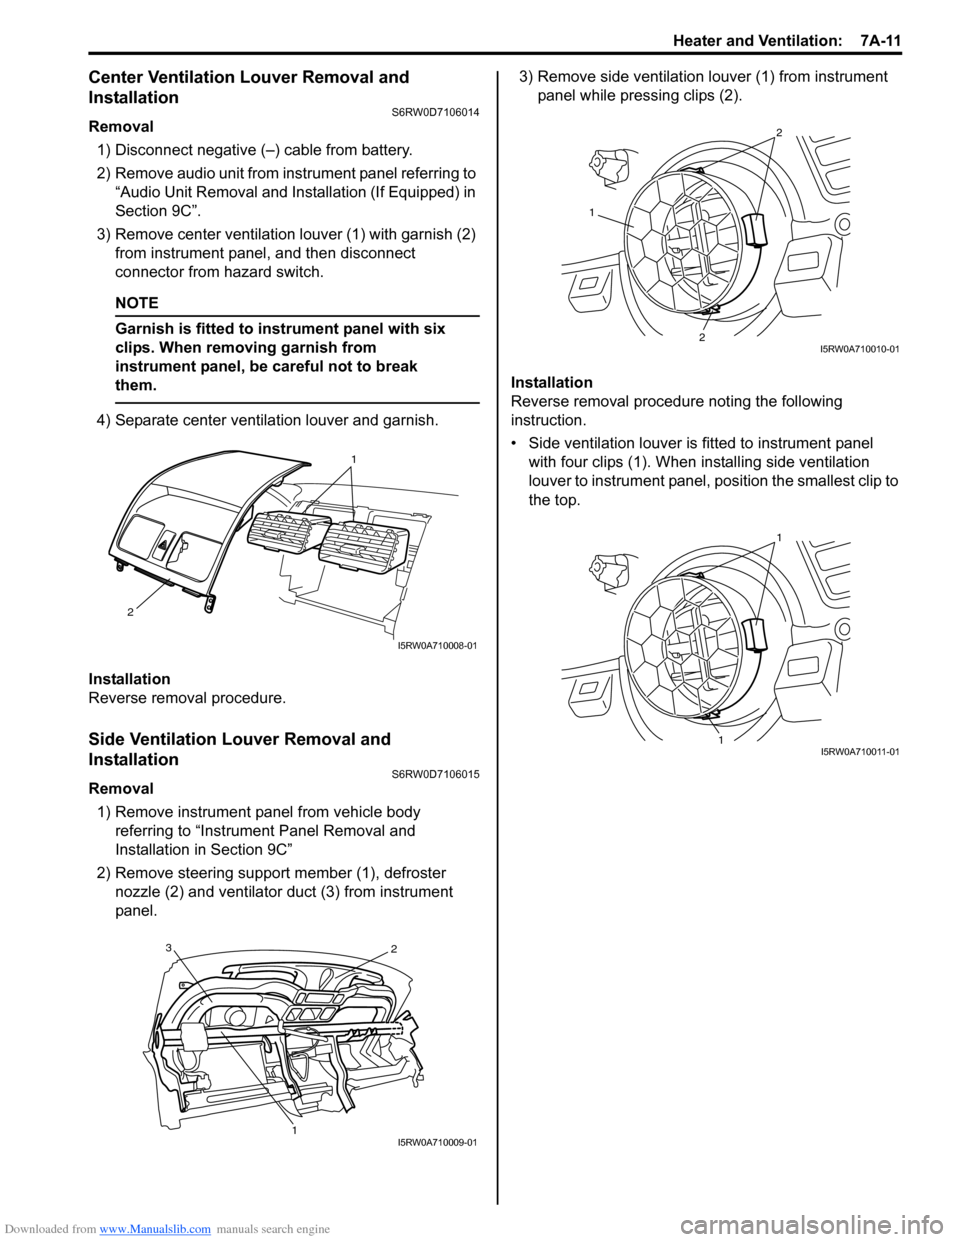
3) Remove center ventilation louver (1) with garnish (2)
from instrument panel, and then disconnect
connector from hazard switch.
NOTE
Garnish is fitted to instrument panel with six
clips. When removing garnish from
instrument panel, be careful not to break
them.
4) Separate center ventilation louver and garnish.
Installation
Reverse removal procedure.
Side Ventilation Louver Removal and
Installation
S6RW0D7106015
Removal
1) Remove instrument panel from vehicle body
referring to “Instrument Panel Removal and
Installation in Section 9C”
2) Remove steering support member (1), defroster
nozzle (2) and ventilator duct (3) from instrument
panel.3) Remove side ventilation louver (1) from instrument
panel while pressing clips (2).
Installation
Reverse removal procedure noting the following
instruction.
• Side ventilation louver is fitted to instrument panel
with four clips (1). When installing side ventilation
louver to instrument panel, position the smallest clip to
the top.
1
2
I5RW0A710008-01
3
12
I5RW0A710009-01
1
2
2
I5RW0A710010-01
1
1
I5RW0A710011-01
Page 940 of 1556
Downloaded from www.Manualslib.com manuals search engine 7A-12 Heater and Ventilation:
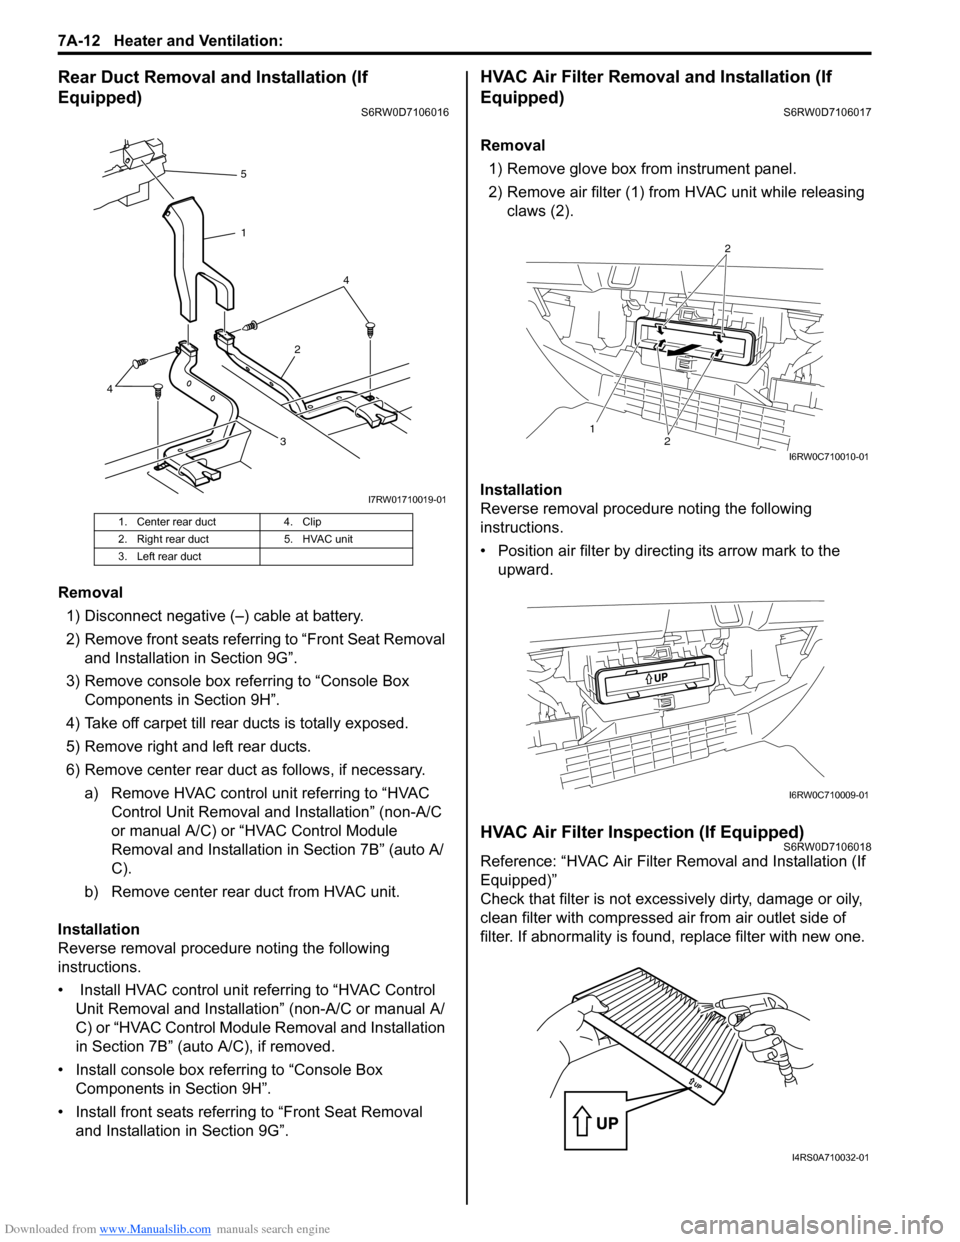
Rear Duct Removal and Installation (If
Equipped)
S6RW0D7106016
Removal
1) Disconnect negative (–) cable at battery.
2) Remove front seats referring to “Front Seat Removal
and Installation in Section 9G”.
3) Remove console box referring to “Console Box
Components in Section 9H”.
4) Take off carpet till rear ducts is totally exposed.
5) Remove right and left rear ducts.
6) Remove center rear duct as follows, if necessary.
a) Remove HVAC control unit referring to “HVAC
Control Unit Removal and Installation” (non-A/C
or manual A/C) or “HVAC Control Module
Removal and Installation in Section 7B” (auto A/
C).
b) Remove center rear duct from HVAC unit.
Installation
Reverse removal procedure noting the following
instructions.
• Install HVAC control unit referring to “HVAC Control
Unit Removal and Installation” (non-A/C or manual A/
C) or “HVAC Control Module Removal and Installation
in Section 7B” (auto A/C), if removed.
• Install console box referring to “Console Box
Components in Section 9H”.
• Install front seats referring to “Front Seat Removal
and Installation in Section 9G”.
HVAC Air Filter Removal and Installation (If
Equipped)
S6RW0D7106017
Removal
1) Remove glove box from instrument panel.
2) Remove air filter (1) from HVAC unit while releasing
claws (2).
Installation
Reverse removal procedure noting the following
instructions.
• Position air filter by directing its arrow mark to the
upward.
HVAC Air Filter Inspection (If Equipped)S6RW0D7106018
Reference: “HVAC Air Filter Removal and Installation (If
Equipped)”
Check that filter is not excessively dirty, damage or oily,
clean filter with compressed air from air outlet side of
filter. If abnormality is found, replace filter with new one.
1. Center rear duct 4. Clip
2. Right rear duct 5. HVAC unit
3. Left rear duct
324 5
1
4
I7RW01710019-01
12
2
I6RW0C710010-01
I6RW0C710009-01
I4RS0A710032-01