SUZUKI SX4 2008 1.G Owners Manual
Manufacturer: SUZUKI, Model Year: 2008, Model line: SX4, Model: SUZUKI SX4 2008 1.GPages: 278, PDF Size: 4.07 MB
Page 131 of 278
4-54
INSTRUMENT PANEL
80J21-03E
Anti-Theft Feature
80J069
(1)
(2)
(3)
(1)
(2)
(3)
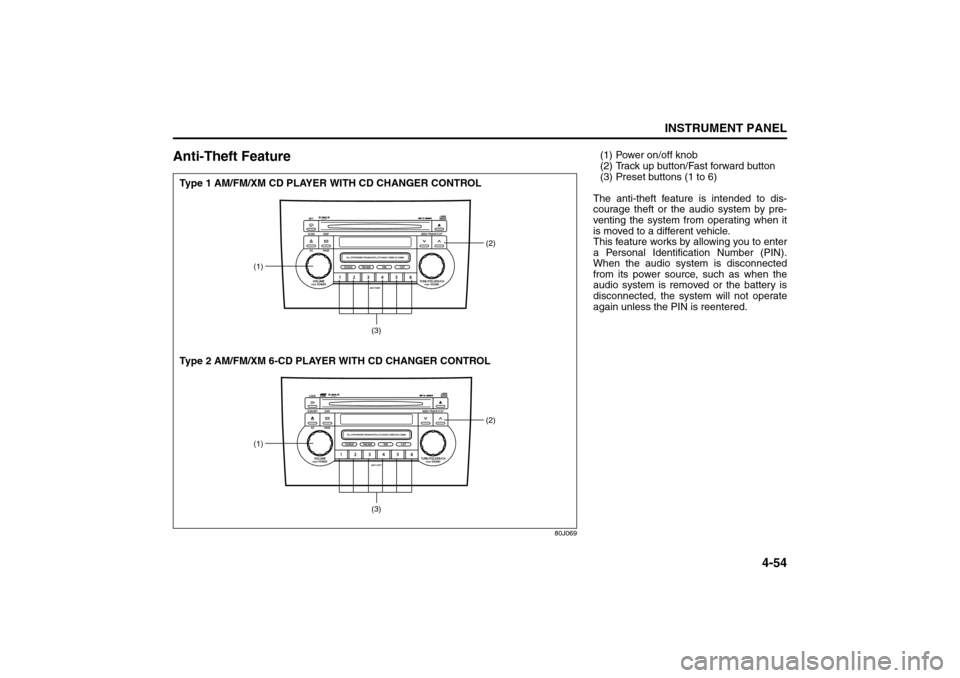
Type 1 AM/FM/XM CD PLAYER WITH CD CHANGER CONTROL
Type 2 AM/FM/XM 6-CD PLAYER WITH CD CHANGER CONTROL
(1) Power on/off knob
(2) Track up button/Fast forward button
(3) Preset buttons (1 to 6)
The anti-theft feature is intended to dis-
courage theft or the audio system by pre-
venting the system from operating when it
is moved to a different vehicle.
This feature works by allowing you to enter
a Personal Identification Number (PIN).
When the audio system is disconnected
from its power source, such as when the
audio system is removed or the battery is
disconnected, the system will not operate
again unless the PIN is reentered.
Page 132 of 278
4-55INSTRUMENT PANEL
80J21-03E
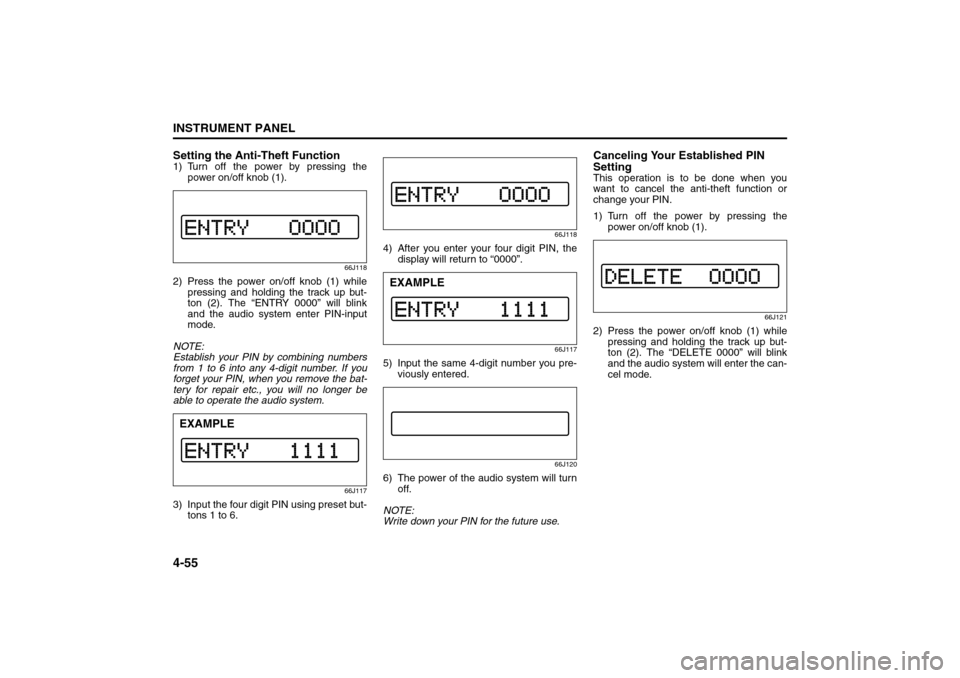
Setting the Anti-Theft Function1) Turn off the power by pressing the
power on/off knob (1).
66J118
2) Press the power on/off knob (1) while
pressing and holding the track up but-
ton (2). The “ENTRY 0000” will blink
and the audio system enter PIN-input
mode.
NOTE:
Establish your PIN by combining numbers
from 1 to 6 into any 4-digit number. If you
forget your PIN, when you remove the bat-
tery for repair etc., you will no longer be
able to operate the audio system.
66J117
3) Input the four digit PIN using preset but-
tons 1 to 6.
66J118
4) After you enter your four digit PIN, the
display will return to “0000”.
66J117
5) Input the same 4-digit number you pre-
viously entered.
66J120
6) The power of the audio system will turn
off.
NOTE:
Write down your PIN for the future use.
Canceling Your Established PIN
SettingThis operation is to be done when you
want to cancel the anti-theft function or
change your PIN.
1) Turn off the power by pressing the
power on/off knob (1).
66J121
2) Press the power on/off knob (1) while
pressing and holding the track up but-
ton (2). The “DELETE 0000” will blink
and the audio system will enter the can-
cel mode.
EXAMPLE
EXAMPLE
Page 133 of 278
4-56
INSTRUMENT PANEL
80J21-03E
66J124
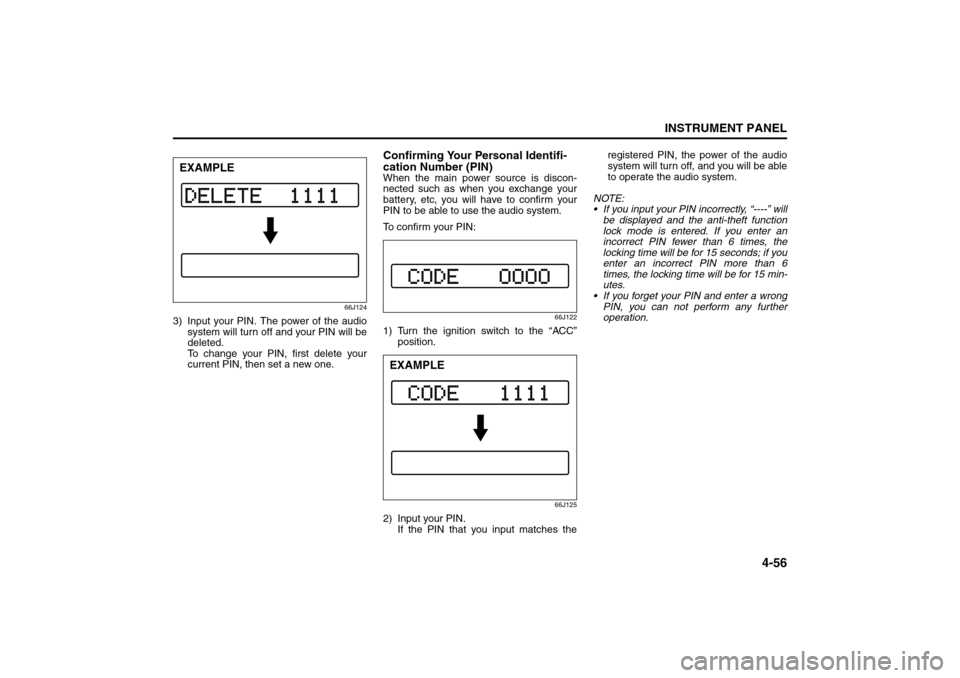
3) Input your PIN. The power of the audio
system will turn off and your PIN will be
deleted.
To change your PIN, first delete your
current PIN, then set a new one.
Confirming Your Personal Identifi-
cation Number (PIN)When the main power source is discon-
nected such as when you exchange your
battery, etc, you will have to confirm your
PIN to be able to use the audio system.
To confirm your PIN:
66J122
1) Turn the ignition switch to the “ACC”
position.
66J125
2) Input your PIN.
If the PIN that you input matches theregistered PIN, the power of the audio
system will turn off, and you will be able
to operate the audio system.
NOTE:
If you input your PIN incorrectly, “----” will
be displayed and the anti-theft function
lock mode is entered. If you enter an
incorrect PIN fewer than 6 times, the
locking time will be for 15 seconds; if you
enter an incorrect PIN more than 6
times, the locking time will be for 15 min-
utes.
If you forget your PIN and enter a wrong
PIN, you can not perform any further
operation.
EXAMPLE
EXAMPLE
Page 134 of 278
4-57INSTRUMENT PANEL
80J21-03E
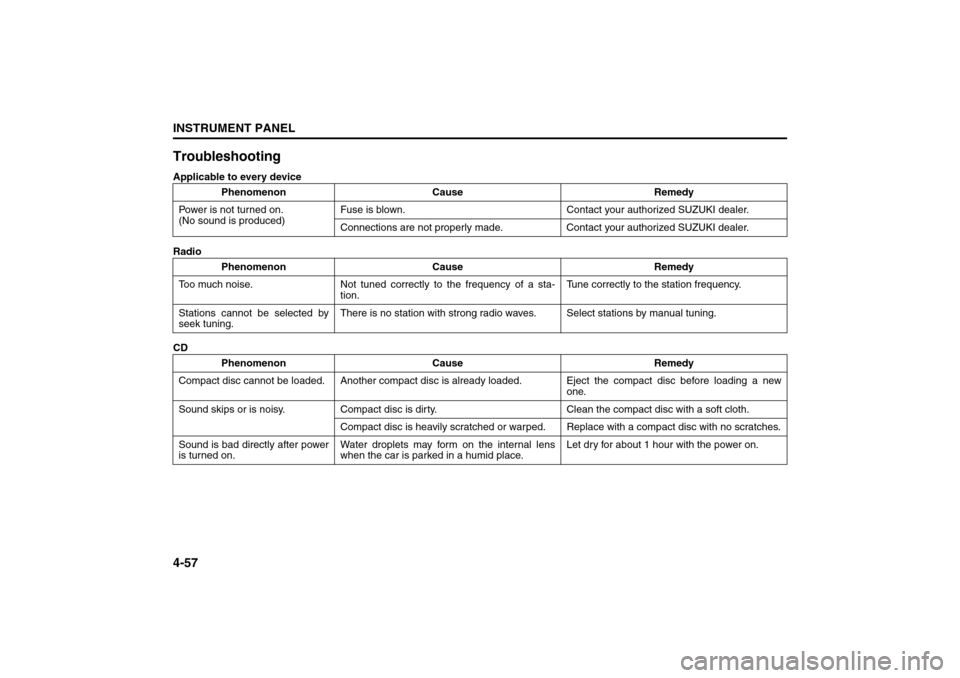
TroubleshootingApplicable to every device
Radio
CDPhenomenon Cause Remedy
Power is not turned on.
(No sound is produced)Fuse is blown. Contact your authorized SUZUKI dealer.
Connections are not properly made. Contact your authorized SUZUKI dealer.
Phenomenon Cause Remedy
Too much noise. Not tuned correctly to the frequency of a sta-
tion.Tune correctly to the station frequency.
Stations cannot be selected by
seek tuning.There is no station with strong radio waves. Select stations by manual tuning.
Phenomenon Cause Remedy
Compact disc cannot be loaded. Another compact disc is already loaded. Eject the compact disc before loading a new
one.
Sound skips or is noisy. Compact disc is dirty. Clean the compact disc with a soft cloth.
Compact disc is heavily scratched or warped. Replace with a compact disc with no scratches.
Sound is bad directly after power
is turned on.Water droplets may form on the internal lens
when the car is parked in a humid place.Let dry for about 1 hour with the power on.
Page 135 of 278
4-58
INSTRUMENT PANEL
80J21-03E
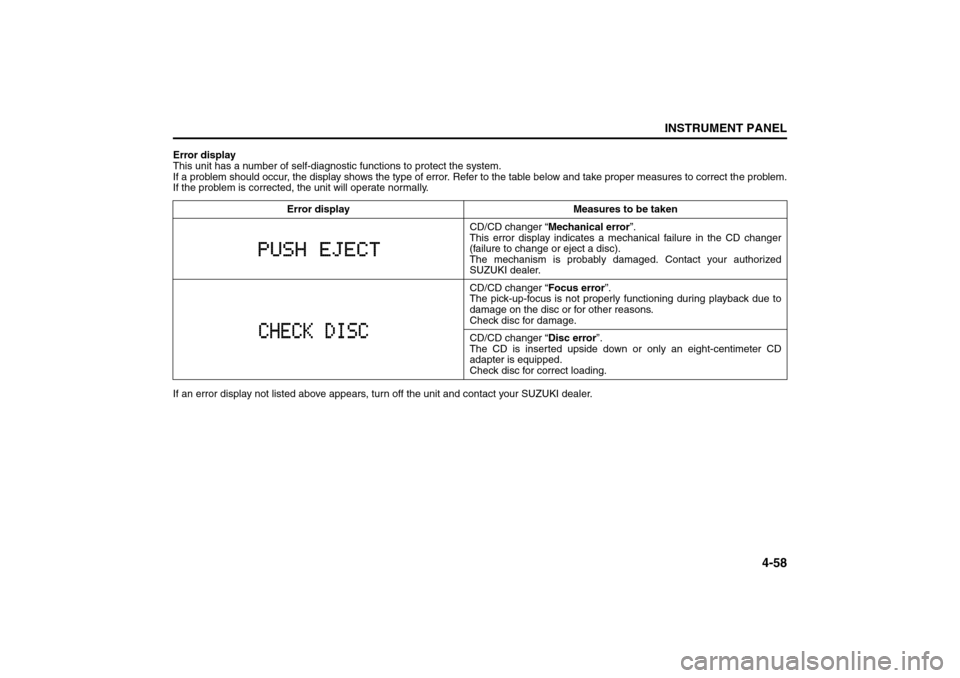
Error display
This unit has a number of self-diagnostic functions to protect the system.
If a problem should occur, the display shows the type of error. Refer to the table below and take proper measures to correct the problem.
If the problem is corrected, the unit will operate normally.
If an error display not listed above appears, turn off the unit and contact your SUZUKI dealer. Error display Measures to be taken
CD/CD changer “Mechanical error”.
This error display indicates a mechanical failure in the CD changer
(failure to change or eject a disc).
The mechanism is probably damaged. Contact your authorized
SUZUKI dealer.
CD/CD changer “Focus error”.
The pick-up-focus is not properly functioning during playback due to
damage on the disc or for other reasons.
Check disc for damage.
CD/CD changer “Disc error”.
The CD is inserted upside down or only an eight-centimeter CD
adapter is equipped.
Check disc for correct loading.
Page 136 of 278
4-59INSTRUMENT PANEL
80J21-03E
MEMO
Page 137 of 278
OTHER CONTROLS AND EQUIPMENT
5
80J21-03E
60G407
OTHER CONTROLS AND EQUIPMENTParking Brake Lever ........................................................... 5-1
Pedals ................................................................................... 5-1
Gearshift Lever .................................................................... 5-2
Fuel Filler Cap ..................................................................... 5-3
Folding Rear Seats (SX4) ................................................... 5-4
Sun Visor ............................................................................. 5-8
Interior Light Switch ........................................................... 5-8
Spot Light ............................................................................ 5-9
Assist Grips (if equipped) .................................................. 5-9
Eyeglasses Holder (if equipped) ........................................ 5-10
Engine Hood ........................................................................ 5-10
Cup Holder and Storage Area (if equipped) ..................... 5-11
Accessory Socket (if equipped) ......................................... 5-11
Frame Hooks ....................................................................... 5-12
Tire Changing Tool ............................................................. 5-13
Luggage Compartment Cover (if equipped) ..................... 5-14
Luggage Compartment Light (SX4) ................................... 5-15
Trunk Light (SX4 SEDAN) ................................................... 5-15
Radio Antenna ..................................................................... 5-16
Roof Rails or Roof Rack Anchors (if equipped) ............... 5-16
Page 138 of 278
5-1OTHER CONTROLS AND EQUIPMENT
80J21-03E
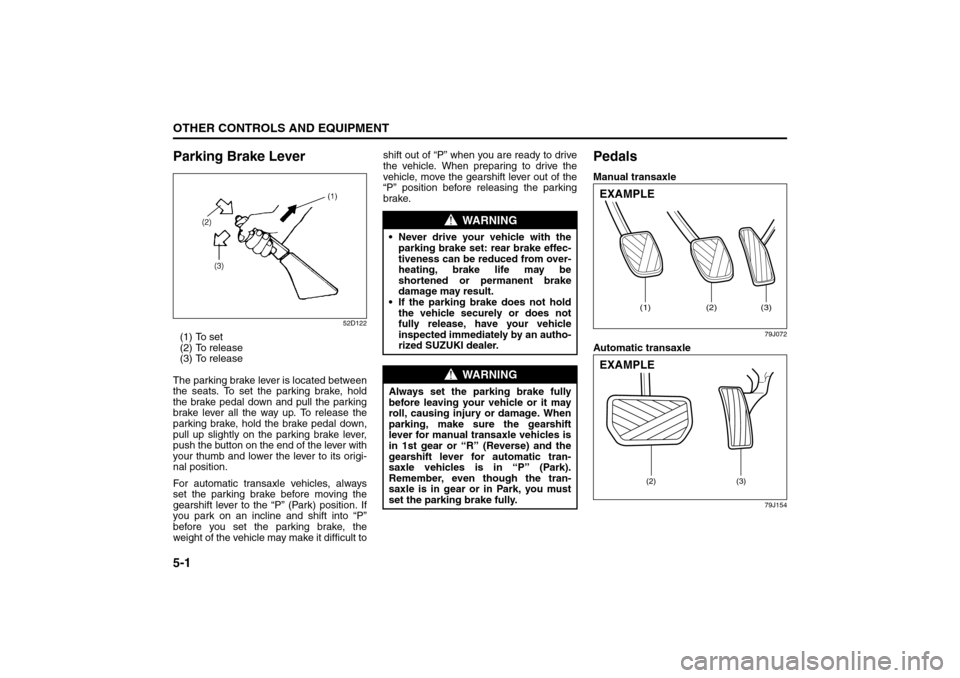
Parking Brake Lever
52D122
(1) To set
(2) To release
(3) To release
The parking brake lever is located between
the seats. To set the parking brake, hold
the brake pedal down and pull the parking
brake lever all the way up. To release the
parking brake, hold the brake pedal down,
pull up slightly on the parking brake lever,
push the button on the end of the lever with
your thumb and lower the lever to its origi-
nal position.
For automatic transaxle vehicles, always
set the parking brake before moving the
gearshift lever to the “P” (Park) position. If
you park on an incline and shift into “P”
before you set the parking brake, the
weight of the vehicle may make it difficult toshift out of “P” when you are ready to drive
the vehicle. When preparing to drive the
vehicle, move the gearshift lever out of the
“P” position before releasing the parking
brake.
PedalsManual transaxle
79J072
Automatic transaxle
79J154
WARNING
Never drive your vehicle with the
parking brake set: rear brake effec-
tiveness can be reduced from over-
heating, brake life may be
shortened or permanent brake
damage may result.
If the parking brake does not hold
the vehicle securely or does not
fully release, have your vehicle
inspected immediately by an autho-
rized SUZUKI dealer.
WARNING
Always set the parking brake fully
before leaving your vehicle or it may
roll, causing injury or damage. When
parking, make sure the gearshift
lever for manual transaxle vehicles is
in 1st gear or “R” (Reverse) and the
gearshift lever for automatic tran-
saxle vehicles is in “P” (Park).
Remember, even though the tran-
saxle is in gear or in Park, you must
set the parking brake fully.
(1)
(2)
(3)
EXAMPLE
(2) (3)
EXAMPLE
Parking Brake Lever: 6
Pedals: 6
Page 139 of 278
5-2
OTHER CONTROLS AND EQUIPMENT
80J21-03E
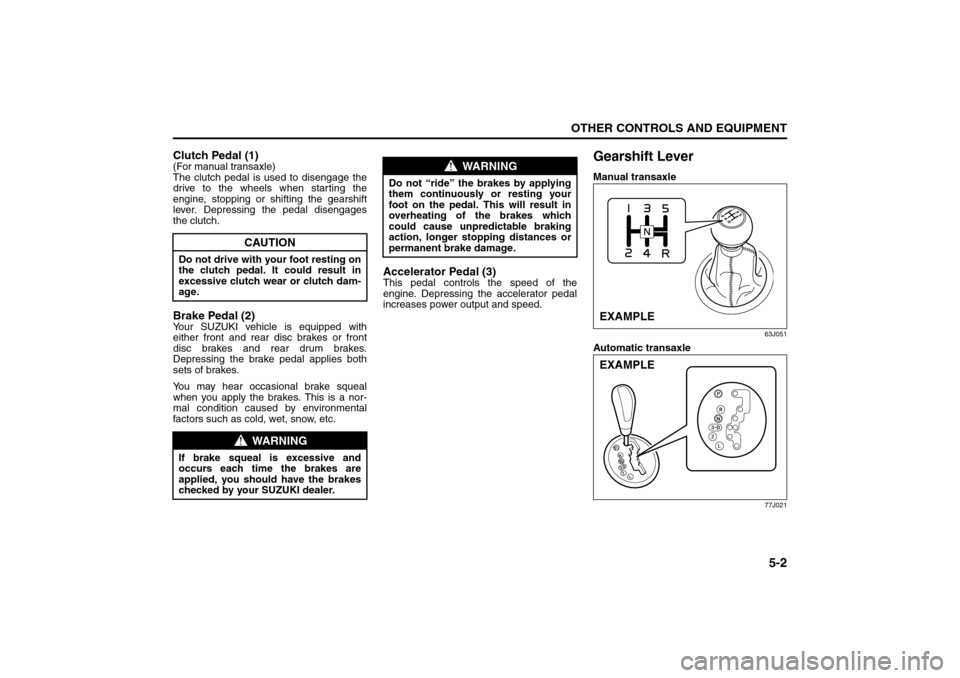
Clutch Pedal (1)(For manual transaxle)
The clutch pedal is used to disengage the
drive to the wheels when starting the
engine, stopping or shifting the gearshift
lever. Depressing the pedal disengages
the clutch.Brake Pedal (2)Your SUZUKI vehicle is equipped with
either front and rear disc brakes or front
disc brakes and rear drum brakes.
Depressing the brake pedal applies both
sets of brakes.
You may hear occasional brake squeal
when you apply the brakes. This is a nor-
mal condition caused by environmental
factors such as cold, wet, snow, etc.
Accelerator Pedal (3)This pedal controls the speed of the
engine. Depressing the accelerator pedal
increases power output and speed.
Gearshift LeverManual transaxle
63J051
Automatic transaxle
77J021
CAUTION
Do not drive with your foot resting on
the clutch pedal. It could result in
excessive clutch wear or clutch dam-
age.
WARNING
If brake squeal is excessive and
occurs each time the brakes are
applied, you should have the brakes
checked by your SUZUKI dealer.
WARNING
Do not “ride” the brakes by applying
them continuously or resting your
foot on the pedal. This will result in
overheating of the brakes which
could cause unpredictable braking
action, longer stopping distances or
permanent brake damage.
EXAMPLEEXAMPLE
Pedals: 6
Gearshift Lever: 10
Page 140 of 278
5-3OTHER CONTROLS AND EQUIPMENT
80J21-03E
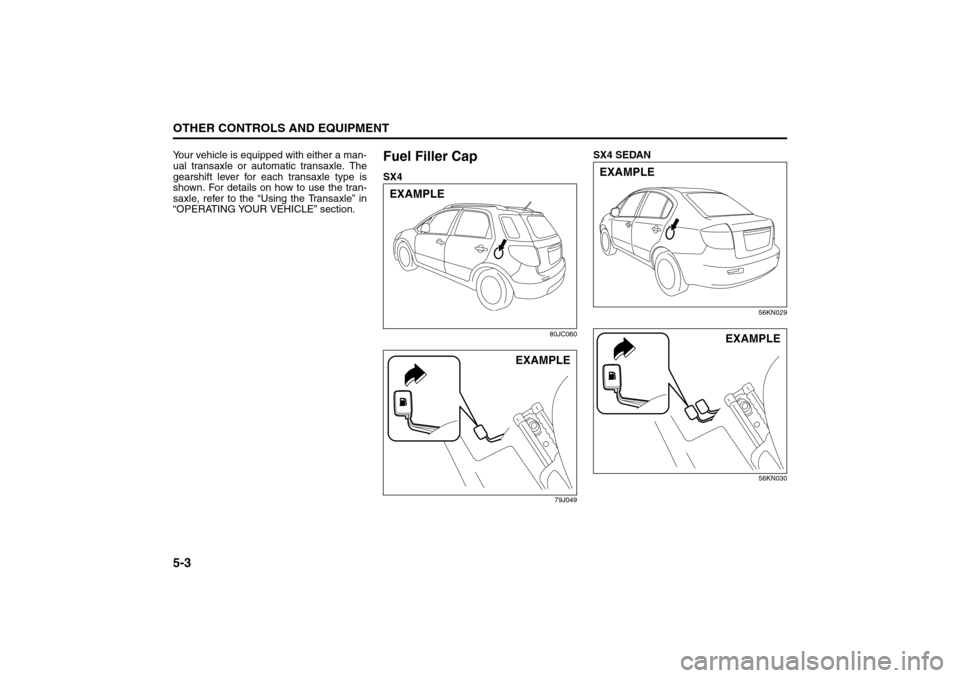
Your vehicle is equipped with either a man-
ual transaxle or automatic transaxle. The
gearshift lever for each transaxle type is
shown. For details on how to use the tran-
saxle, refer to the “Using the Transaxle” in
“OPERATING YOUR VEHICLE” section.
Fuel Filler CapSX4
80JC060
79J049
SX4 SEDAN
56KN029
56KN030
EXAMPLE
EXAMPLE
EXAMPLE
EXAMPLE
Gearshift Lever: 10
Fuel Filler Cap: 5