SUZUKI SX4 2008 1.G Owners Manual
Manufacturer: SUZUKI, Model Year: 2008, Model line: SX4, Model: SUZUKI SX4 2008 1.GPages: 278, PDF Size: 4.07 MB
Page 141 of 278
5-4
OTHER CONTROLS AND EQUIPMENT
80J21-03E
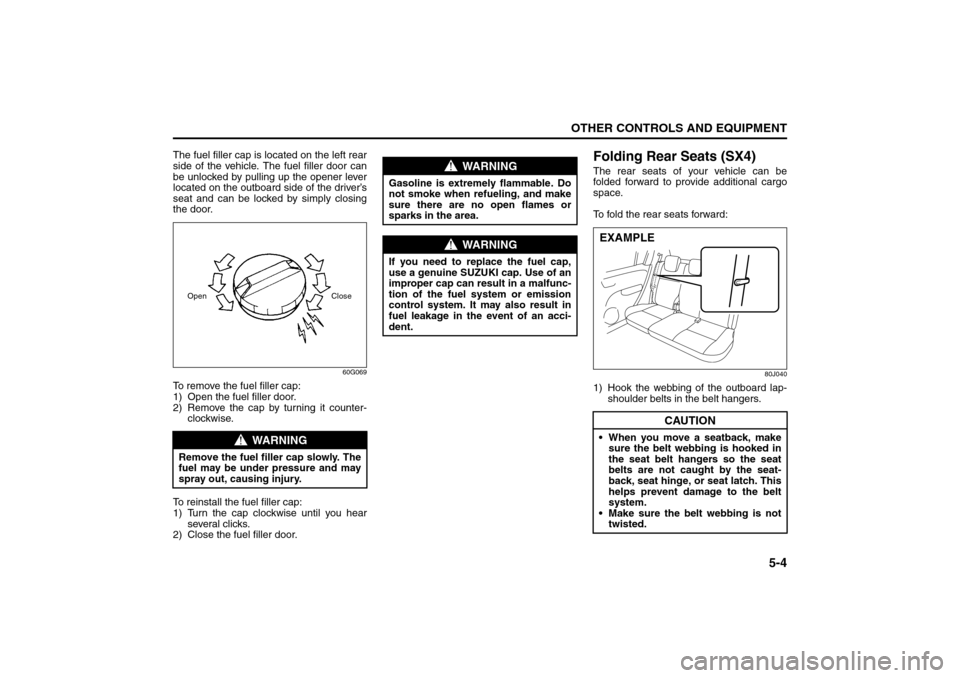
The fuel filler cap is located on the left rear
side of the vehicle. The fuel filler door can
be unlocked by pulling up the opener lever
located on the outboard side of the driver’s
seat and can be locked by simply closing
the door.
60G069
To remove the fuel filler cap:
1) Open the fuel filler door.
2) Remove the cap by turning it counter-
clockwise.
To reinstall the fuel filler cap:
1) Turn the cap clockwise until you hear
several clicks.
2) Close the fuel filler door.
Folding Rear Seats (SX4)The rear seats of your vehicle can be
folded forward to provide additional cargo
space.
To fold the rear seats forward:
80J040
1) Hook the webbing of the outboard lap-
shoulder belts in the belt hangers.
WARNING
Remove the fuel filler cap slowly. The
fuel may be under pressure and may
spray out, causing injury.Open Close
WARNING
Gasoline is extremely flammable. Do
not smoke when refueling, and make
sure there are no open flames or
sparks in the area.
WARNING
If you need to replace the fuel cap,
use a genuine SUZUKI cap. Use of an
improper cap can result in a malfunc-
tion of the fuel system or emission
control system. It may also result in
fuel leakage in the event of an acci-
dent.
CAUTION
When you move a seatback, make
sure the belt webbing is hooked in
the seat belt hangers so the seat
belts are not caught by the seat-
back, seat hinge, or seat latch. This
helps prevent damage to the belt
system.
Make sure the belt webbing is not
twisted.EXAMPLE
Fuel Filler Cap: 5
Folding Rear Seats: 3
Page 142 of 278
5-5OTHER CONTROLS AND EQUIPMENT
80J21-03E
79J213
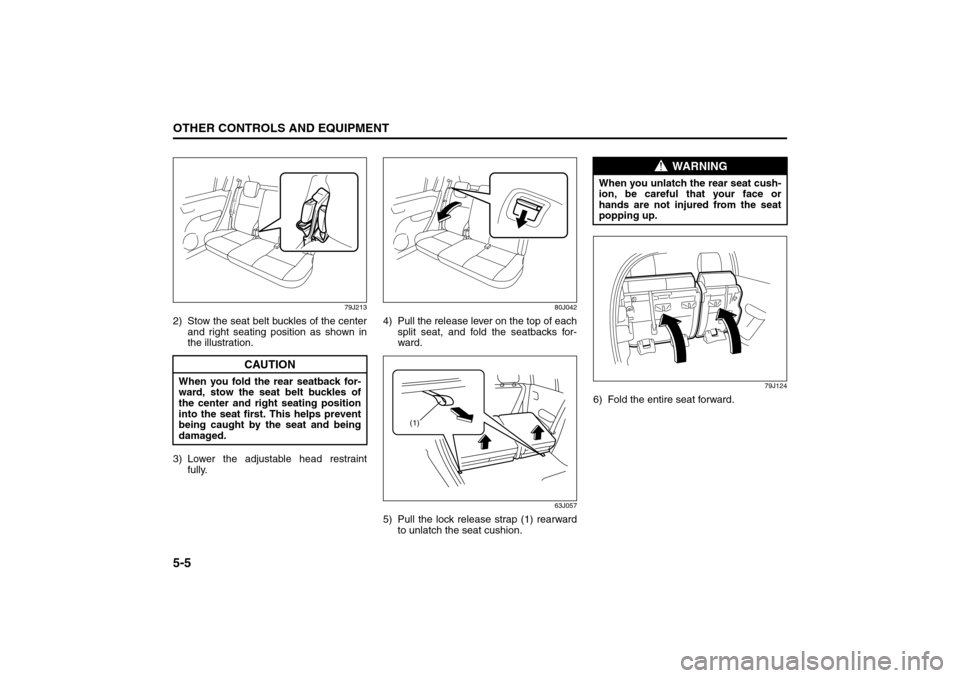
2) Stow the seat belt buckles of the center
and right seating position as shown in
the illustration.
3) Lower the adjustable head restraint
fully.
80J042
4) Pull the release lever on the top of each
split seat, and fold the seatbacks for-
ward.
63J057
5) Pull the lock release strap (1) rearward
to unlatch the seat cushion.
79J124
6) Fold the entire seat forward.
CAUTION
When you fold the rear seatback for-
ward, stow the seat belt buckles of
the center and right seating position
into the seat first. This helps prevent
being caught by the seat and being
damaged.
(1)
WARNING
When you unlatch the rear seat cush-
ion, be careful that your face or
hands are not injured from the seat
popping up.
Folding Rear Seats: 3
Page 143 of 278
5-6
OTHER CONTROLS AND EQUIPMENT
80J21-03E
80J043
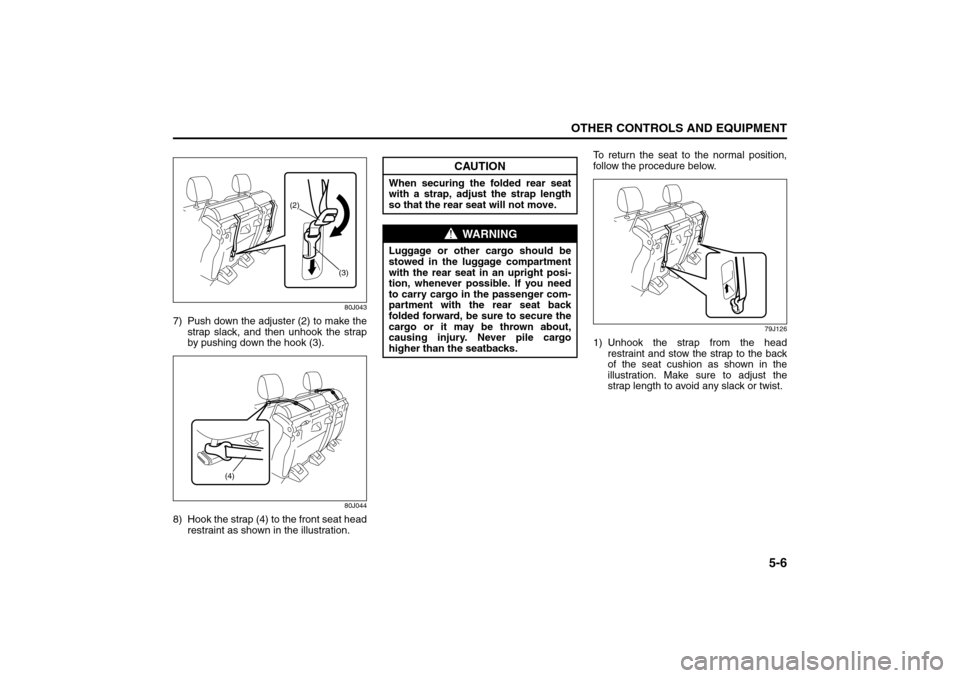
7) Push down the adjuster (2) to make the
strap slack, and then unhook the strap
by pushing down the hook (3).
80J044
8) Hook the strap (4) to the front seat head
restraint as shown in the illustration.To return the seat to the normal position,
follow the procedure below.
79J126
1) Unhook the strap from the head
restraint and stow the strap to the back
of the seat cushion as shown in the
illustration. Make sure to adjust the
strap length to avoid any slack or twist.
(2)
(3)
(4)
CAUTION
When securing the folded rear seat
with a strap, adjust the strap length
so that the rear seat will not move.
WARNING
Luggage or other cargo should be
stowed in the luggage compartment
with the rear seat in an upright posi-
tion, whenever possible. If you need
to carry cargo in the passenger com-
partment with the rear seat back
folded forward, be sure to secure the
cargo or it may be thrown about,
causing injury. Never pile cargo
higher than the seatbacks.
Folding Rear Seats: 3
Page 144 of 278
5-7OTHER CONTROLS AND EQUIPMENT
80J21-03E
79J129
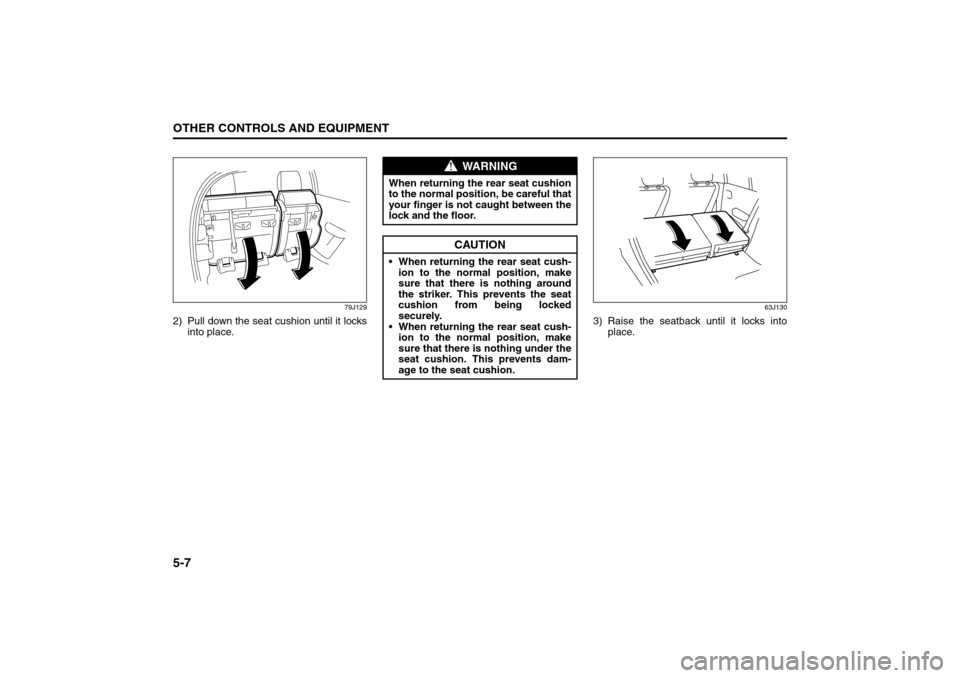
2) Pull down the seat cushion until it locks
into place.
63J130
3) Raise the seatback until it locks into
place.
WARNING
When returning the rear seat cushion
to the normal position, be careful that
your finger is not caught between the
lock and the floor.
CAUTION
When returning the rear seat cush-
ion to the normal position, make
sure that there is nothing around
the striker. This prevents the seat
cushion from being locked
securely.
When returning the rear seat cush-
ion to the normal position, make
sure that there is nothing under the
seat cushion. This prevents dam-
age to the seat cushion.
Folding Rear Seats: 3
Page 145 of 278
5-8
OTHER CONTROLS AND EQUIPMENT
80J21-03E
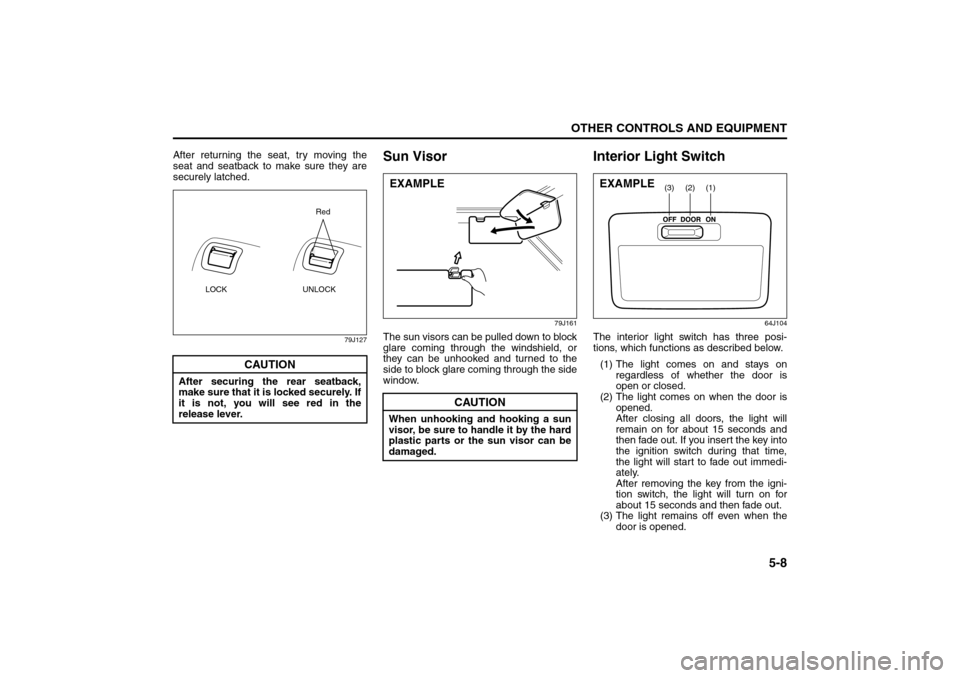
After returning the seat, try moving the
seat and seatback to make sure they are
securely latched.
79J127
Sun Visor
79J161
The sun visors can be pulled down to block
glare coming through the windshield, or
they can be unhooked and turned to the
side to block glare coming through the side
window.
Interior Light Switch
64J104
The interior light switch has three posi-
tions, which functions as described below.
(1) The light comes on and stays on
regardless of whether the door is
open or closed.
(2) The light comes on when the door is
opened.
After closing all doors, the light will
remain on for about 15 seconds and
then fade out. If you insert the key into
the ignition switch during that time,
the light will start to fade out immedi-
ately.
After removing the key from the igni-
tion switch, the light will turn on for
about 15 seconds and then fade out.
(3) The light remains off even when the
door is opened.
CAUTION
After securing the rear seatback,
make sure that it is locked securely. If
it is not, you will see red in the
release lever.
LOCK UNLOCKRed
CAUTION
When unhooking and hooking a sun
visor, be sure to handle it by the hard
plastic parts or the sun visor can be
damaged.EXAMPLE
(1)
(2)
(3)
EXAMPLE
Folding Rear Seats: 3
Page 146 of 278
5-9OTHER CONTROLS AND EQUIPMENT
80J21-03E
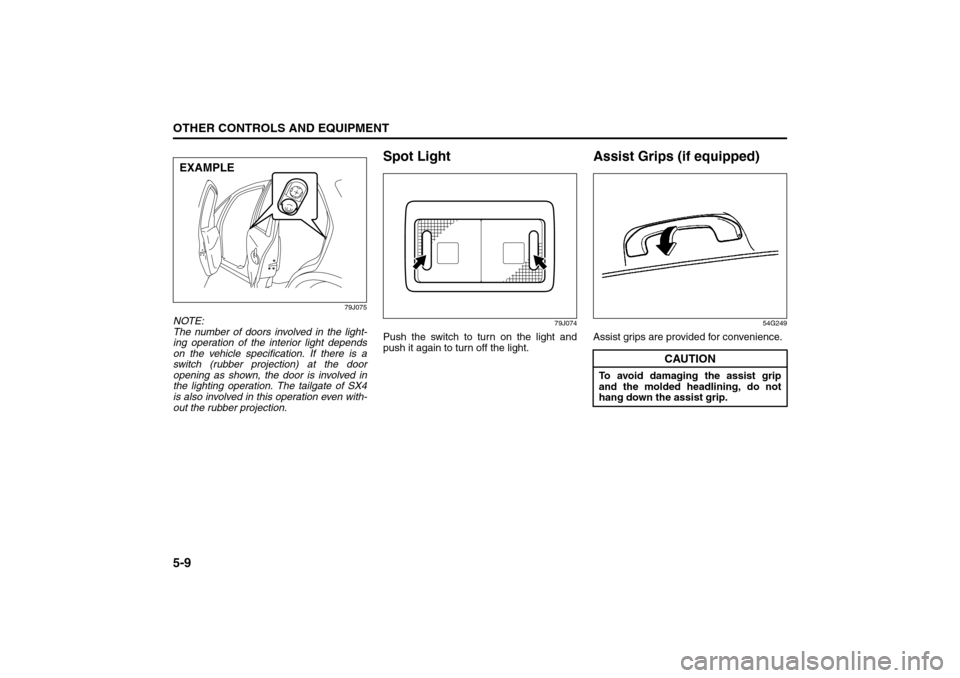
79J075
NOTE:
The number of doors involved in the light-
ing operation of the interior light depends
on the vehicle specification. If there is a
switch (rubber projection) at the door
opening as shown, the door is involved in
the lighting operation. The tailgate of SX4
is also involved in this operation even with-
out the rubber projection.
Spot Light
79J074
Push the switch to turn on the light and
push it again to turn off the light.
Assist Grips (if equipped)
54G249
Assist grips are provided for convenience.
EXAMPLE
CAUTION
To avoid damaging the assist grip
and the molded headlining, do not
hang down the assist grip.
Folding Rear Seats: 3
Armrest: 3
Page 147 of 278
5-10
OTHER CONTROLS AND EQUIPMENT
80J21-03E
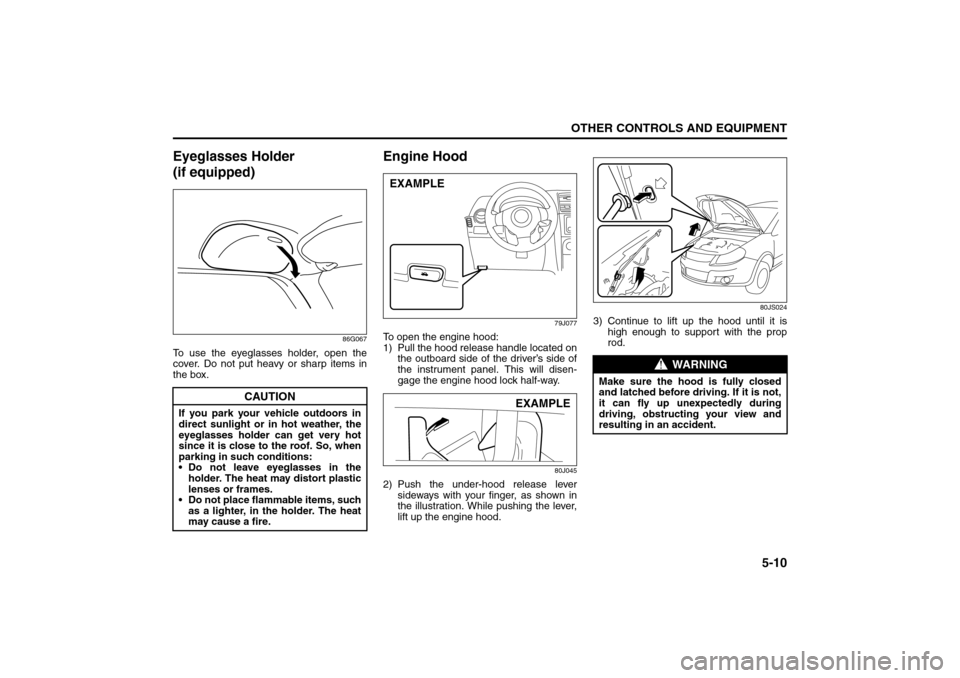
Eyeglasses Holder
(if equipped)
86G067
To use the eyeglasses holder, open the
cover. Do not put heavy or sharp items in
the box.
Engine Hood
79J077
To open the engine hood:
1) Pull the hood release handle located on
the outboard side of the driver’s side of
the instrument panel. This will disen-
gage the engine hood lock half-way.
80J045
2) Push the under-hood release lever
sideways with your finger, as shown in
the illustration. While pushing the lever,
lift up the engine hood.
80JS024
3) Continue to lift up the hood until it is
high enough to support with the prop
rod.
CAUTION
If you park your vehicle outdoors in
direct sunlight or in hot weather, the
eyeglasses holder can get very hot
since it is close to the roof. So, when
parking in such conditions:
Do not leave eyeglasses in the
holder. The heat may distort plastic
lenses or frames.
Do not place flammable items, such
as a lighter, in the holder. The heat
may cause a fire.
EXAMPLE
EXAMPLE
WARNING
Make sure the hood is fully closed
and latched before driving. If it is not,
it can fly up unexpectedly during
driving, obstructing your view and
resulting in an accident.
Sun Visor: 5
Interior Light Switch: 7
Page 148 of 278
5-11OTHER CONTROLS AND EQUIPMENT
80J21-03E
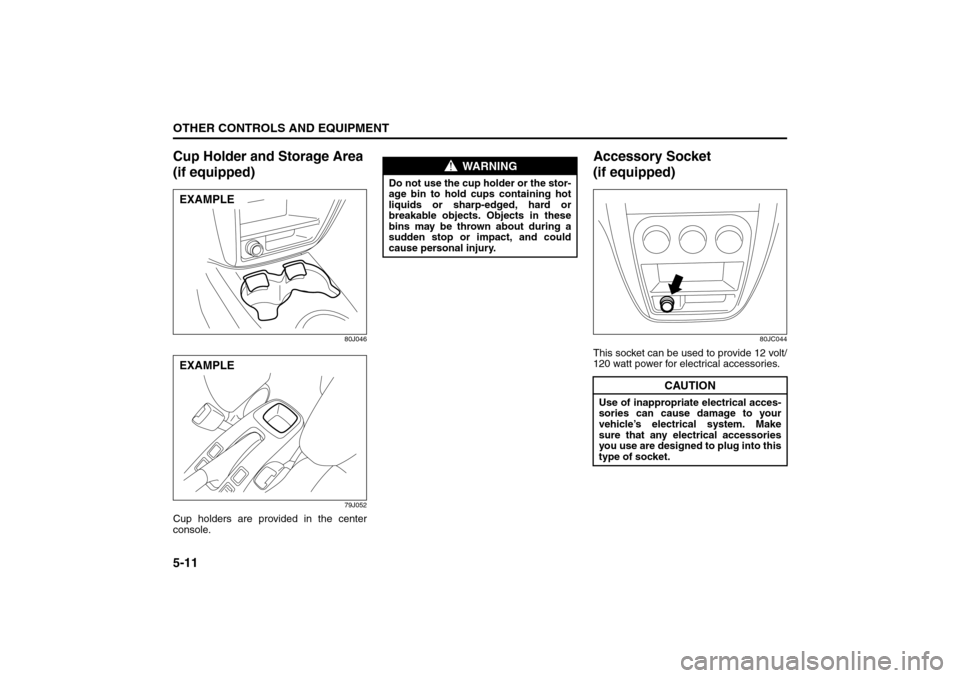
Cup Holder and Storage Area
(if equipped)
80J046
79J052
Cup holders are provided in the center
console.
Accessory Socket
(if equipped)
80JC044
This socket can be used to provide 12 volt/
120 watt power for electrical accessories.
EXAMPLEEXAMPLE
WARNING
Do not use the cup holder or the stor-
age bin to hold cups containing hot
liquids or sharp-edged, hard or
breakable objects. Objects in these
bins may be thrown about during a
sudden stop or impact, and could
cause personal injury.
CAUTION
Use of inappropriate electrical acces-
sories can cause damage to your
vehicle’s electrical system. Make
sure that any electrical accessories
you use are designed to plug into this
type of socket.
Spot Light: 7
Assist Grips: 3
Coat Hooks:
Page 149 of 278
5-12
OTHER CONTROLS AND EQUIPMENT
80J21-03E
Frame HooksSX4
Front (1)
80JC048
SX4 SEDAN
Front (1)
80JC049
SX4
Rear (2)
80JC061
SX4 SEDAN
Rear (2)
56KN033
Side (3)
80JC062
79J132
(1)
EXAMPLE
(1)
EXAMPLE
(2)
EXAMPLE
(2)
EXAMPLE
(3)
EXAMPLE(3)
EXAMPLE
Eyeglasses Holder:
Engine Hood: 5
Page 150 of 278
5-13OTHER CONTROLS AND EQUIPMENT
80J21-03E
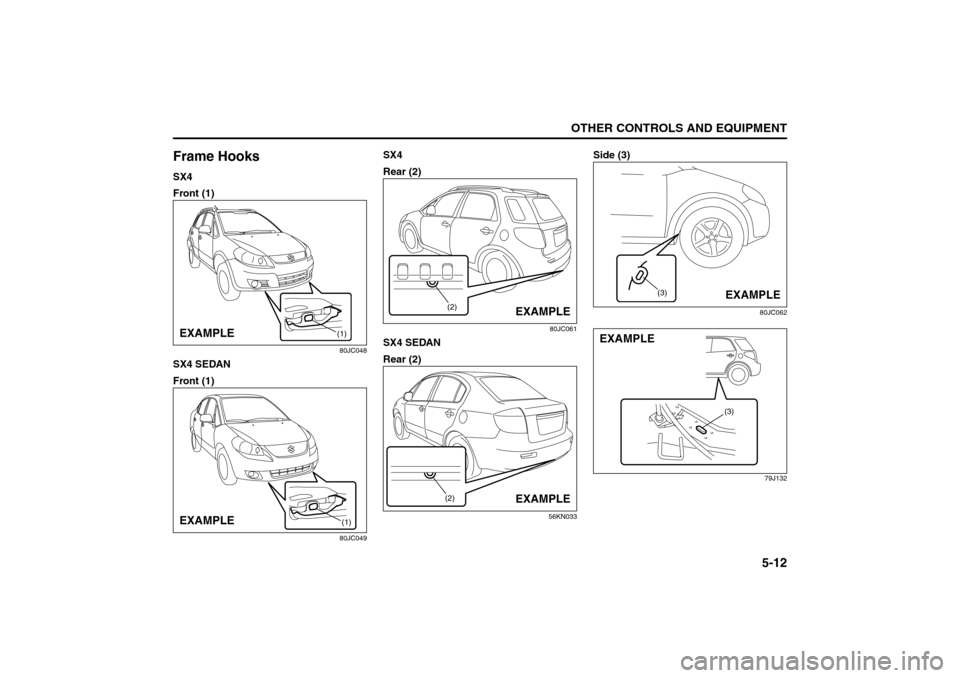
Frame hooks are provided on the front (1),
rear (2) and side (3) of the vehicle. The
hooks (1) and (2) are used for emergency
situations. The hooks (3) are used for
trailer/train shipping purposes.
To tow your vehicle on the road or highway,
follow the instruction of “Towing” in “EMER-
GENCY SERVICE” or “VEHICLE LOAD-
ING AND TOWING” section.
Tire Changing ToolSX4
80JC014
SX4 SEDAN
80JC045
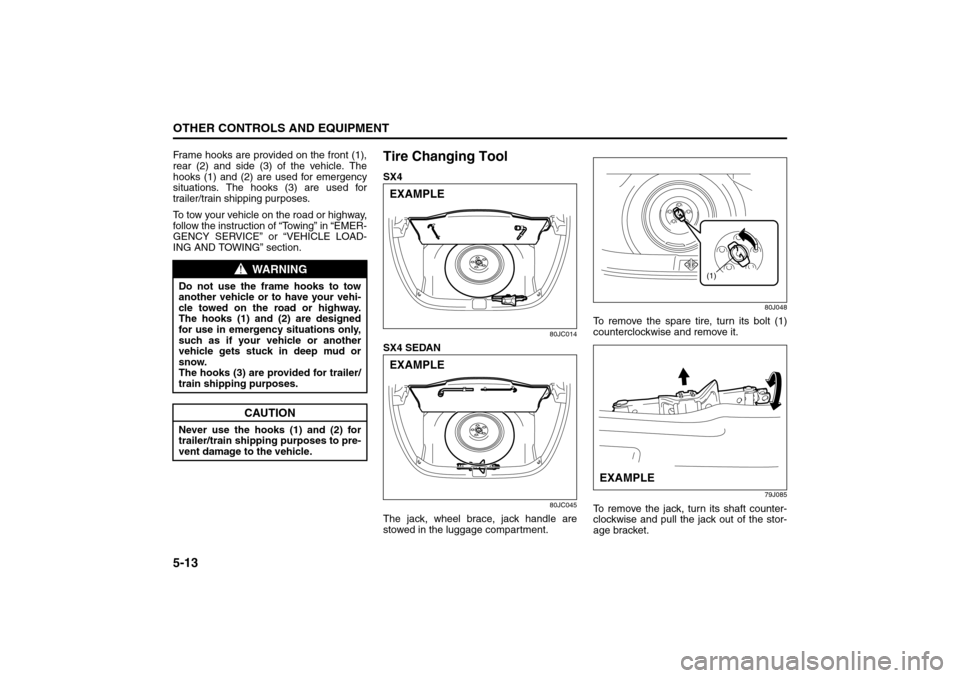
The jack, wheel brace, jack handle are
stowed in the luggage compartment.
80J048
To remove the spare tire, turn its bolt (1)
counterclockwise and remove it.
79J085
To remove the jack, turn its shaft counter-
clockwise and pull the jack out of the stor-
age bracket.
WARNING
Do not use the frame hooks to tow
another vehicle or to have your vehi-
cle towed on the road or highway.
The hooks (1) and (2) are designed
for use in emergency situations only,
such as if your vehicle or another
vehicle gets stuck in deep mud or
snow.
The hooks (3) are provided for trailer/
train shipping purposes.
CAUTION
Never use the hooks (1) and (2) for
trailer/train shipping purposes to pre-
vent damage to the vehicle.
EXAMPLEEXAMPLE
(1)
EXAMPLE
Cup Holder and Storage Area: 3