engine TATA SAFARI 2015 User Guide
[x] Cancel search | Manufacturer: TATA, Model Year: 2015, Model line: SAFARI, Model: TATA SAFARI 2015Pages: 161, PDF Size: 2.55 MB
Page 49 of 161
49
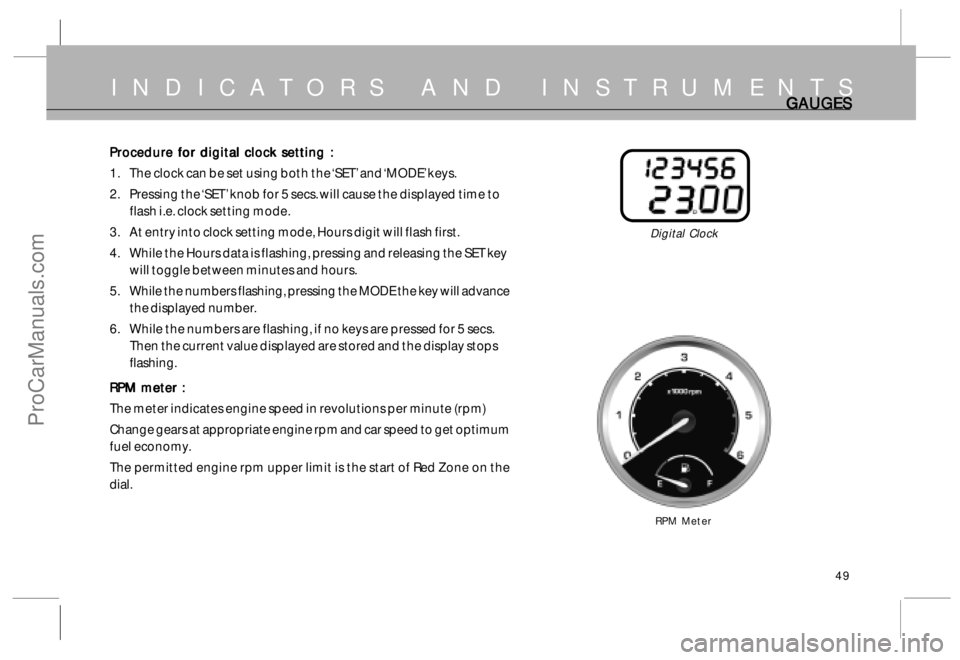
Procedure for digital clock setting : Procedure for digital clock setting :Procedure for digital clock setting : Procedure for digital clock setting :
Procedure for digital clock setting :
1. The clock can be set using both the ‘SET’ and ‘MODE’ keys.
2. Pressing the ‘SET’ knob for 5 secs. will cause the displayed time to
flash i.e. clock setting mode.
3. At entry into clock setting mode, Hours digit will flash first.
4. While the Hours data is flashing, pressing and releasing the SET key
will toggle between minutes and hours.
5. While the numbers flashing, pressing the MODE the key will advance
the displayed number.
6. While the numbers are flashing, if no keys are pressed for 5 secs.
Then the current value displayed are stored and the display stops
flashing.
RPM meter : RPM meter :RPM meter : RPM meter :
RPM meter :
The meter indicates engine speed in revolutions per minute (rpm)
Change gears at appropriate engine rpm and car speed to get optimum
fuel economy.
The permitted engine rpm upper limit is the start of Red Zone on the
dial.
INDICATORS AND INSTRUMENTSGA GAGA GA
GA
UGES UGESUGES UGES
UGES
RPM Meter
Digital Clock
ProCarManuals.com
Page 50 of 161
50
T TT T
T
emp empemp emp
emp
er erer er
er
a aa a
a
tur turtur tur
tur
e G e Ge G e G
e G
auge augeauge auge
auge
High
Temperature
Warning
T TT T
T
emp empemp emp
emp
er erer er
er
a aa a
a
tur turtur tur
tur
e G e Ge G e G
e G
auge augeauge auge
auge
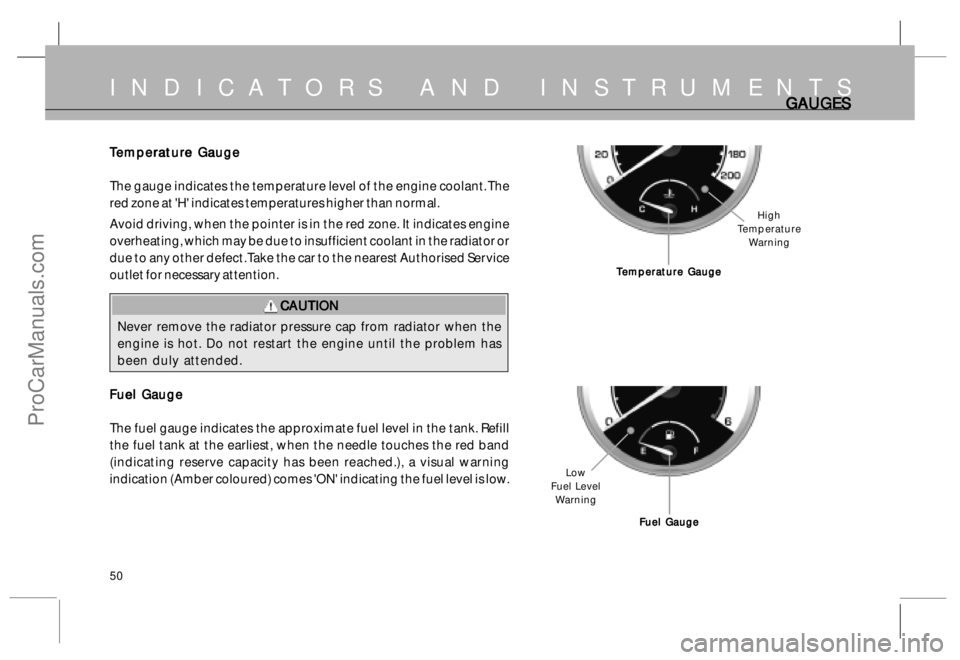
The gauge indicates the temperature level of the engine coolant. The
red zone at 'H' indicates temperatures higher than normal.
Avoid driving, when the pointer is in the red zone. It indicates engine
overheating, which may be due to insufficient coolant in the radiator or
due to any other defect. Take the car to the nearest Authorised Service
outlet for necessary attention.
CAUTION CAUTIONCAUTION CAUTION
CAUTION
Never remove the radiator pressure cap from radiator when the
engine is hot. Do not restart the engine until the problem has
been duly attended.
Fuel Gauge Fuel GaugeFuel Gauge Fuel Gauge
Fuel Gauge
The fuel gauge indicates the approximate fuel level in the tank. Refill
the fuel tank at the earliest, when the needle touches the red band
(indicating reserve capacity has been reached.), a visual warning
indication (Amber coloured) comes 'ON' indicating the fuel level is low.
INDICATORS AND INSTRUMENTSGA GAGA GA
GA
UGES UGESUGES UGES
UGES
Fuel Gauge Fuel GaugeFuel Gauge Fuel Gauge
Fuel Gauge Low
Fuel Level
Warning
ProCarManuals.com
Page 53 of 161
53
COMFORT AND CONVENIENCER RR R
R
OOF MOUNTED A.C. OOF MOUNTED A.C.OOF MOUNTED A.C. OOF MOUNTED A.C.
OOF MOUNTED A.C.
UNIT UNIT UNIT UNIT
UNIT
The air mix control switch is on the LH side of the panel. By rotating
the control switch clockwise (towards red segment) the air temperature
from vents will increase. Rotate anticlockwise (towards blue segment)
to reduce the air temperature. The switch on the top centre is for the
4 speed blower. Any of the blower speed could be chosen as per
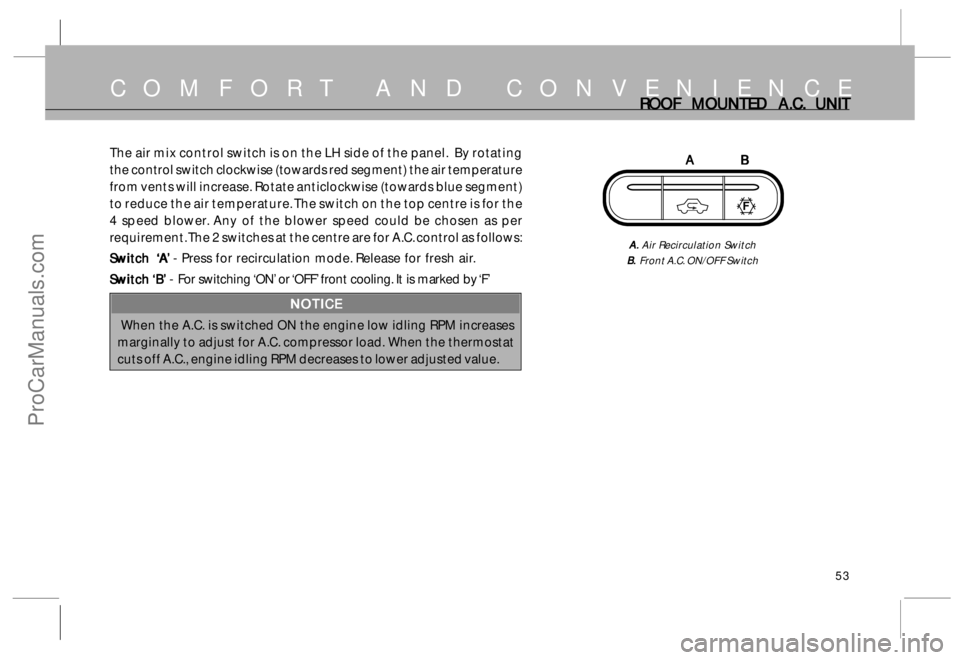
requirement. The 2 switches at the centre are for A.C. control as follows:
S SS S
S
wit witwit wit
wit
ch ch ch ch
ch
‘‘ ‘‘
‘
A AA A
A
’’ ’’
’
- Press for recirculation mode. Release for fresh air.
S SS S
S
wit witwit wit
wit
ch ch ch ch
ch
‘B ‘B‘B ‘B
‘B
’’ ’’
’
- For switching ‘ON’ or ‘OFF’ front cooling. It is marked by ‘F’
NOTICE NOTICENOTICE NOTICE
NOTICE
When the A.C. is switched ON the engine low idling RPM increases
marginally to adjust for A.C. compressor load. When the thermostat
cuts off A.C., engine idling RPM decreases to lower adjusted value.
A AA A
A
B BB B
B
A. A.A. A.
A. Air Recirculation Switch
B. B.B. B.
B. Front A.C. ON/OFF Switch
F
ProCarManuals.com
Page 54 of 161
54
ROOF MOUNTED A.C. ROOF MOUNTED A.C.ROOF MOUNTED A.C. ROOF MOUNTED A.C.
ROOF MOUNTED A.C.
AND FR AND FR AND FR AND FR
AND FR
ONT ONT ONT ONT
ONT
WINDSHIELD WINDSHIELDWINDSHIELD WINDSHIELD
WINDSHIELD
,, ,,
,
DOOR GL DOOR GL DOOR GL DOOR GL
DOOR GL
ASS DEMISTER ASS DEMISTERASS DEMISTER ASS DEMISTER
ASS DEMISTER
Roof Mounted A.C. Unit (if fitted) Roof Mounted A.C. Unit (if fitted)Roof Mounted A.C. Unit (if fitted) Roof Mounted A.C. Unit (if fitted)
Roof Mounted A.C. Unit (if fitted)
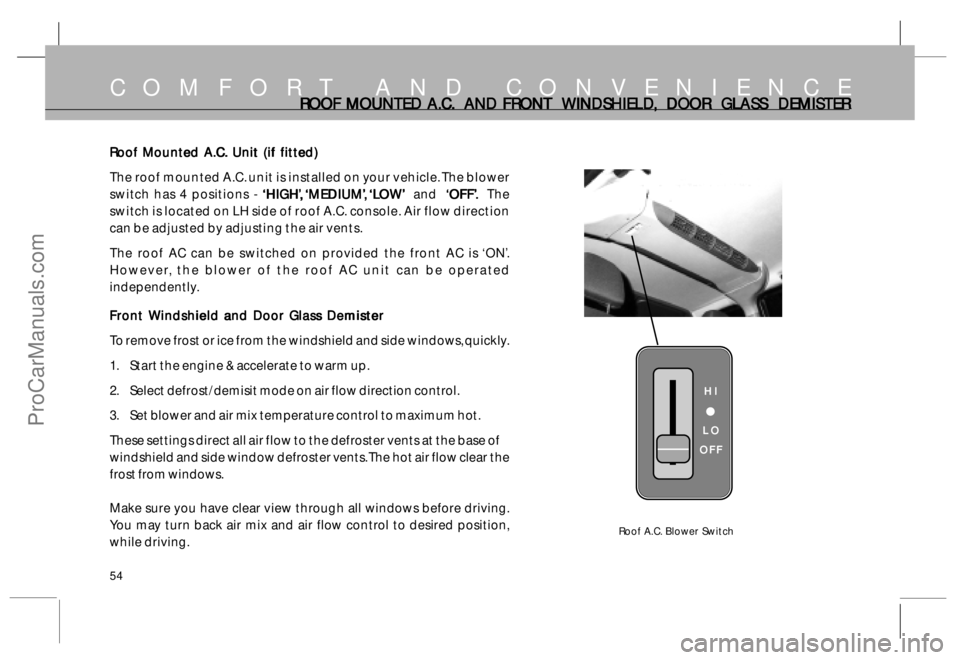
The roof mounted A.C. unit is installed on your vehicle. The blower
switch has 4 positions -
‘HIGH ‘HIGH‘HIGH ‘HIGH
‘HIGH
’’ ’’
’
,, ,,
,
‘‘ ‘‘
‘
MEDIUM MEDIUMMEDIUM MEDIUM
MEDIUM
’’ ’’
’
,, ,,
,
‘L ‘L‘L ‘L
‘L
O OO O
O
W WW W
W
’’ ’’
’
and
‘‘ ‘‘
‘
OFF’ OFF’OFF’ OFF’
OFF’
.. ..
. The
switch is located on LH side of roof A.C. console. Air flow direction
can be adjusted by adjusting the air vents.
The roof AC can be switched on provided the front AC is ‘ON’.
However, the blower of the roof AC unit can be operated
independently.
Front Windshield and Door Glass Demister Front Windshield and Door Glass DemisterFront Windshield and Door Glass Demister Front Windshield and Door Glass Demister
Front Windshield and Door Glass Demister
To remove frost or ice from the windshield and side windows, quickly.
1. Start the engine & accelerate to warm up.
2. Select defrost/demisit mode on air flow direction control.
3. Set blower and air mix temperature control to maximum hot.
These settings direct all air flow to the defroster vents at the base of
windshield and side window defroster vents. The hot air flow clear the
frost from windows.
Make sure you have clear view through all windows before driving.
You may turn back air mix and air flow control to desired position,
while driving.
COMFORT AND CONVENIENCE
Roof A.C. Blower Switch
HI HIHI HI
HI
LO LOLO LO
LO
OFF OFFOFF OFF
OFF
ProCarManuals.com
Page 69 of 161
69
PRIOR TO DRIVING
• •• •
•Opening bonnet Opening bonnetOpening bonnet Opening bonnet
Opening bonnet
• •• •
•Fuel level check Fuel level checkFuel level check Fuel level check
Fuel level check
• •• •
•Engine oil level check Engine oil level checkEngine oil level check Engine oil level check
Engine oil level check
• •• •
•Engine coolant check Engine coolant checkEngine coolant check Engine coolant check
Engine coolant check
Before you start driving you should carry out important checks on
your Safari. Please read this section carefully to know the procedure
for carrying out important checks.
ProCarManuals.com
Page 71 of 161
71
P R I O R T O D R I V I N GCHECKS CHECKSCHECKS CHECKS
CHECKS
CHECK CHECKCHECK CHECK
CHECK
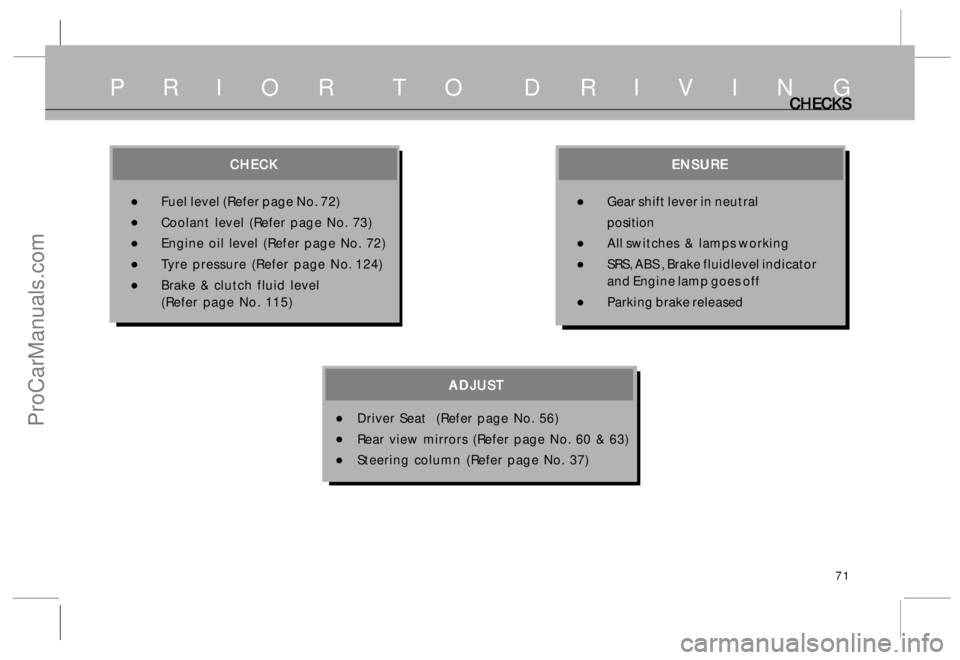
•Fuel level (Refer page No. 72)
•Coolant level (Refer page No. 73)
•Engine oil level (Refer page No. 72)
•Tyre pressure (Refer page No. 124)
•Brake & clutch fluid level
(Refer page No. 115)
ENSURE ENSUREENSURE ENSURE
ENSURE
•Gear shift lever in neutral
position
•All switches & lamps working
•SRS, ABS , Brake fluidlevel indicator
and Engine lamp goes off
•Parking brake released
ADJUST ADJUSTADJUST ADJUST
ADJUST
•Driver Seat (Refer page No. 56)
•Rear view mirrors (Refer page No. 60 & 63)
•Steering column (Refer page No. 37)
ProCarManuals.com
Page 72 of 161
72
FUEL AND ENGINE OIL LEVEL CHECK FUEL AND ENGINE OIL LEVEL CHECKFUEL AND ENGINE OIL LEVEL CHECK FUEL AND ENGINE OIL LEVEL CHECK
FUEL AND ENGINE OIL LEVEL CHECK
Fuel Level Check Fuel Level CheckFuel Level Check Fuel Level Check
Fuel Level Check
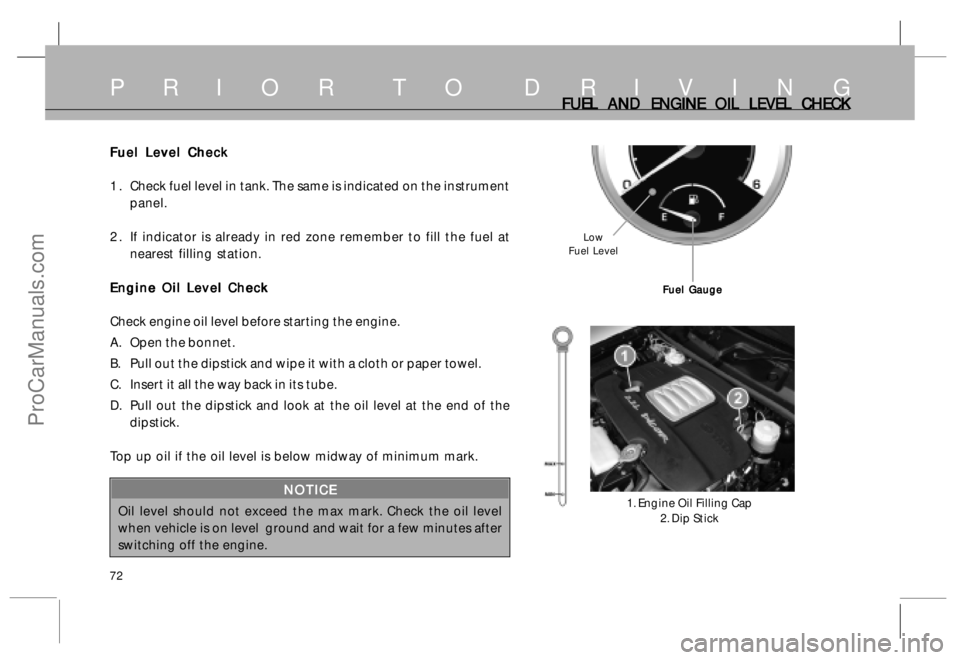
1 . Check fuel level in tank. The same is indicated on the instrument
panel.
2 . If indicator is already in red zone remember to fill the fuel at
nearest filling station.
Engine Oil Level Check Engine Oil Level CheckEngine Oil Level Check Engine Oil Level Check
Engine Oil Level Check
Check engine oil level before starting the engine.
A. Open the bonnet.
B. Pull out the dipstick and wipe it with a cloth or paper towel.
C. Insert it all the way back in its tube.
D. Pull out the dipstick and look at the oil level at the end of the
dipstick.
Top up oil if the oil level is below midway of minimum mark.
NOTICE NOTICENOTICE NOTICE
NOTICE
Oil level should not exceed the max mark. Check the oil level
when vehicle is on level ground and wait for a few minutes after
switching off the engine.1. Engine Oil Filling Cap
2. Dip Stick
P R I O R T O D R I V I N G
Fuel Gauge Fuel GaugeFuel Gauge Fuel Gauge
Fuel Gauge
Low
Fuel Level
ProCarManuals.com
Page 73 of 161
73
Engine Coolant Check Engine Coolant CheckEngine Coolant Check Engine Coolant Check
Engine Coolant Check
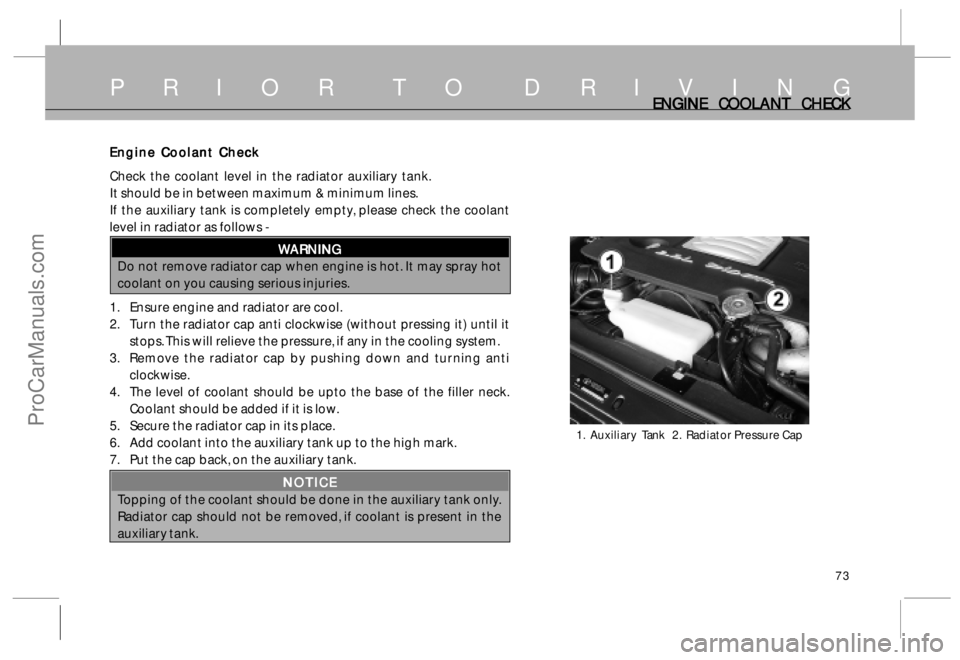
Check the coolant level in the radiator auxiliary tank.
It should be in between maximum & minimum lines.
If the auxiliary tank is completely empty, please check the coolant
level in radiator as follows -
W WW W
W
ARNING ARNINGARNING ARNING
ARNING
Do not remove radiator cap when engine is hot. It may spray hot
coolant on you causing serious injuries.
1. Ensure engine and radiator are cool.
2. Turn the radiator cap anti clockwise (without pressing it) until it
stops. This will relieve the pressure, if any in the cooling system.
3. Remove the radiator cap by pushing down and turning anti
clockwise.
4. The level of coolant should be upto the base of the filler neck.
Coolant should be added if it is low.
5. Secure the radiator cap in its place.
6. Add coolant into the auxiliary tank up to the high mark.
7. Put the cap back, on the auxiliary tank.
NOTICE NOTICENOTICE NOTICE
NOTICE
Topping of the coolant should be done in the auxiliary tank only.
Radiator cap should not be removed, if coolant is present in the
auxiliary tank.
ENGINE C ENGINE CENGINE C ENGINE C
ENGINE C
OOL OOLOOL OOL
OOL
ANT CHECK ANT CHECKANT CHECK ANT CHECK
ANT CHECK
1. Auxiliary Tank 2. Radiator Pressure Cap
P R I O R T O D R I V I N G
ProCarManuals.com
Page 75 of 161
75
D R I V I N G
• •• •
•S SS S
S
tar tartar tar
tar
ting & st ting & stting & st ting & st
ting & st
opping the engine opping the engineopping the engine opping the engine
opping the engine
• •• •
•Preparing to drive Preparing to drivePreparing to drive Preparing to drive
Preparing to drive
• •• •
•Running-in period Running-in periodRunning-in period Running-in period
Running-in period
• •• •
•Gear change Gear changeGear change Gear change
Gear change
• •• •
•Brakes (Anti-lock brake system) Brakes (Anti-lock brake system)Brakes (Anti-lock brake system) Brakes (Anti-lock brake system)
Brakes (Anti-lock brake system)
• •• •
•T TT T
T
r rr r
r
ansf ansfansf ansf
ansf
er c er cer c er c
er c
ase asease ase
ase
• •• •
•Fuel economy Fuel economyFuel economy Fuel economy
Fuel economy
• •• •
•Four wheel driving system Four wheel driving systemFour wheel driving system Four wheel driving system
Four wheel driving system
• •• •
•Limited slip differential Limited slip differentialLimited slip differential Limited slip differential
Limited slip differential
• •• •
•Driving in adverse conditions Driving in adverse conditionsDriving in adverse conditions Driving in adverse conditions
Driving in adverse conditions
• •• •
•Driving Safety Driving SafetyDriving Safety Driving Safety
Driving Safety
This section gives you important tips on how to start the engine, how
to take care of turbo charger, operation of transmission and transfer
case. It also includes important tips on safe driving in adverse
conditions and difficult terrains.
The information on topics listed above would certainly help you in
safe and carefree driving.
ProCarManuals.com
Page 76 of 161
76
D R I V I N GST STST ST
ST
AR ARAR AR
AR
TING AND ST TING AND STTING AND ST TING AND ST
TING AND ST
OPPING OPPING OPPING OPPING
OPPING
THE ENGINE THE ENGINETHE ENGINE THE ENGINE
THE ENGINE
Starting the Engine Starting the EngineStarting the Engine Starting the Engine
Starting the Engine
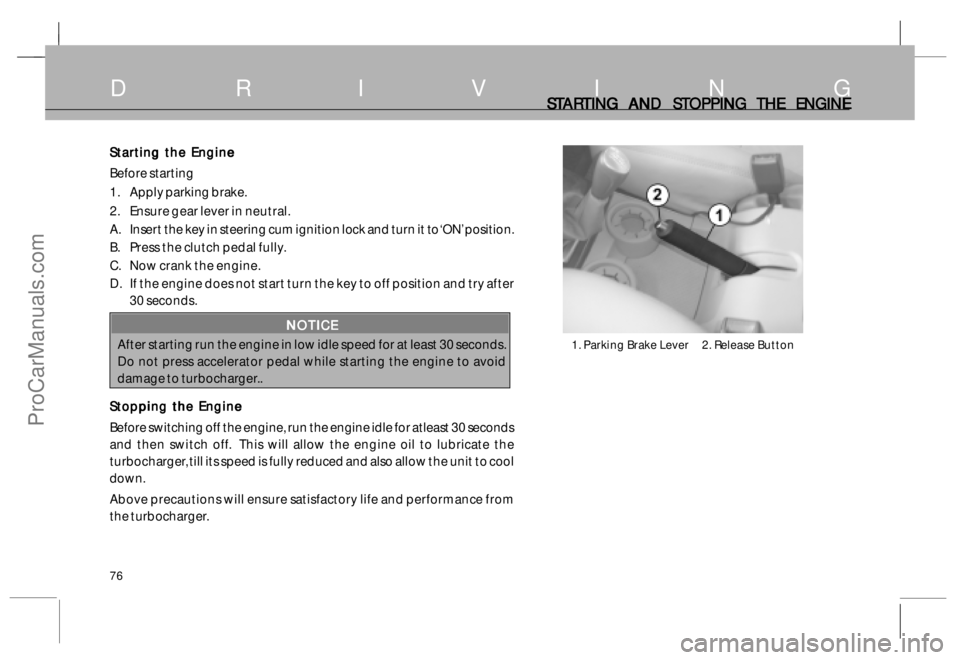
Before starting
1. Apply parking brake.
2. Ensure gear lever in neutral.
A. Insert the key in steering cum ignition lock and turn it to ‘ON’ position.
B. Press the clutch pedal fully.
C. Now crank the engine.
D. If the engine does not start turn the key to off position and try after
30 seconds.
NOTICE NOTICENOTICE NOTICE
NOTICE
After starting run the engine in low idle speed for at least 30 seconds.
Do not press accelerator pedal while starting the engine to avoid
damage to turbocharger..
Stopping the Engine Stopping the EngineStopping the Engine Stopping the Engine
Stopping the Engine
Before switching off the engine, run the engine idle for atleast 30 seconds
and then switch off. This will allow the engine oil to lubricate the
turbocharger, till its speed is fully reduced and also allow the unit to cool
down.
Above precautions will ensure satisfactory life and performance from
the turbocharger.1. Parking Brake Lever 2. Release Button
ProCarManuals.com