engine TATA SAFARI 2015 Owner's Manual
[x] Cancel search | Manufacturer: TATA, Model Year: 2015, Model line: SAFARI, Model: TATA SAFARI 2015Pages: 161, PDF Size: 2.55 MB
Page 77 of 161
77
D R I V I N GPREP PREPPREP PREP
PREP
ARING ARING ARING ARING
ARING
T TT T
T
O DRIVE & R O DRIVE & RO DRIVE & R O DRIVE & R
O DRIVE & R
UNNING IN PERIOD UNNING IN PERIODUNNING IN PERIOD UNNING IN PERIOD
UNNING IN PERIOD
Preparing to Drive Preparing to DrivePreparing to Drive Preparing to Drive
Preparing to Drive
The following checks and adjustments should be done
before you start driving the vehicle.
1 . Ensure all mirrors, windows and outside lights are clean
and unobstructed. Remove dust, frost, snow or ice if
any, on these.
2 . Ensure bonnet is fully closed.
3 . Check that any items you may be carrying inside with
you are stored properly or fastened down securely.
4 . Check adjustment of seat. If required adjust to your
convenience.
5 . Check adjustment of all rear view mirrors.
6 . Check adjustment of steering wheel.
7 . If the doors are not properly closed you will get a audio
warning/indicator light as soon as you insert the ignition
key in the switch. Make sure all doors are properly closed
and locked.
8 . If the seat belts of driver & co-driver are not fastened you
will get an audio warning as soon as you turn the key to
ignition position. Fasten your seat belt, ensure co-driver
seat passenger has also fastened the seat belt (see
Your Safety).9 . Check and ensure that all the gauges and indicator lights
in the instrument panel are working.
Running-in Period Running-in PeriodRunning-in Period Running-in Period
Running-in Period
Avoid rapid acceleration and prolonged high speed running
of the engine while using the new vehicle for the first 1500-
1800 km of operation.
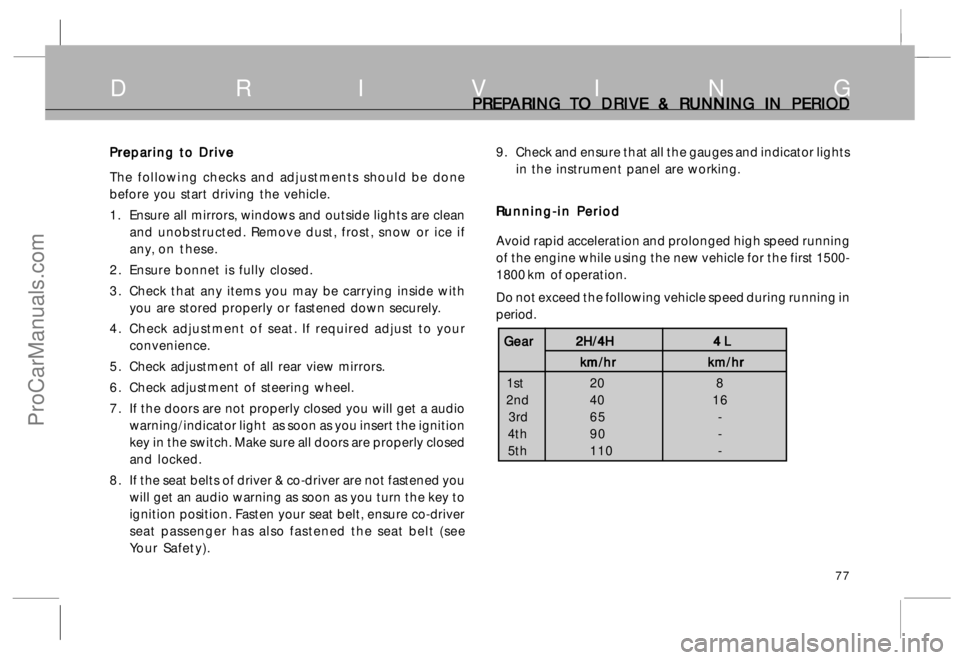
Do not exceed the following vehicle speed during running in
period.
Gear GearGear Gear
Gear
2H/4H 2H/4H 2H/4H 2H/4H
2H/4H
4 L 4 L 4 L 4 L
4 L
km/hr km/hr km/hr km/hr
km/hr
km/hr km/hr km/hr km/hr
km/hr
1st 20 8
2nd 40 16
3rd 65 -
4th 90 -
5th 110 -
ProCarManuals.com
Page 78 of 161
78
D R I V I N GGEAR BOX AND GEAR CHANGE SPEEDS GEAR BOX AND GEAR CHANGE SPEEDSGEAR BOX AND GEAR CHANGE SPEEDS GEAR BOX AND GEAR CHANGE SPEEDS
GEAR BOX AND GEAR CHANGE SPEEDS
Gear box Gear boxGear box Gear box
Gear box
Gear box has all synchromesh gears including reverse. The 5th gear is
an over drive.
When shifting the gear up or down make sure you press the clutch
pedal fully and shift to the next gear and then release the clutch pedal
gradually.
NOTICE NOTICENOTICE NOTICE
NOTICE
Do not rest your foot on the clutch pedal during driving. This can
cause clutch wear and damage.
Before shifting in to reverse gear bring your vehicle to a complete stop
and depress the clutch pedal fully.
Do not shift into reverse gear with vehicle moving forward. While
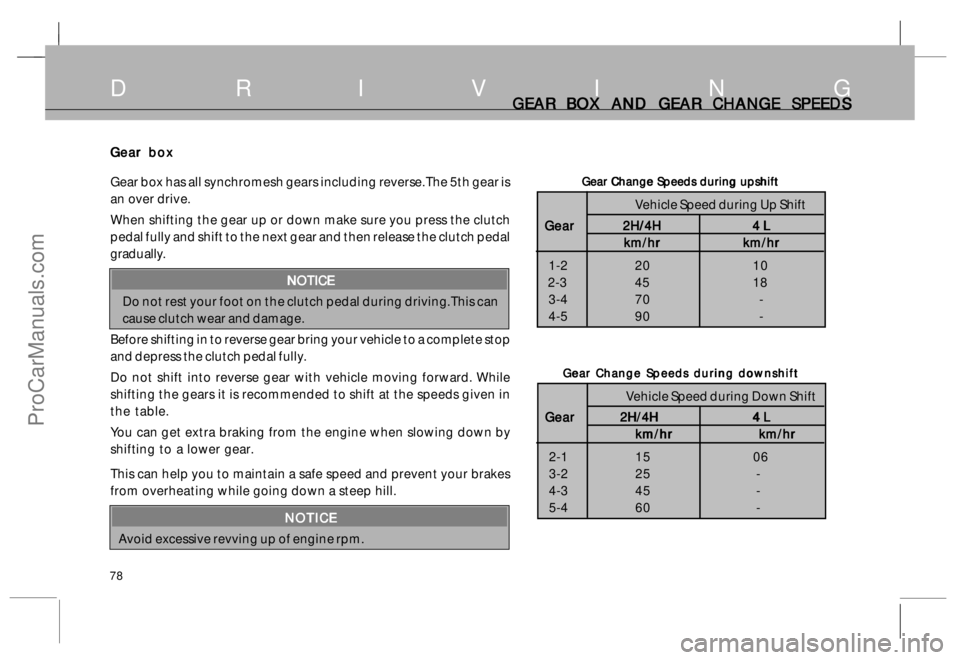
shifting the gears it is recommended to shift at the speeds given in
the table.
You can get extra braking from the engine when slowing down by
shifting to a lower gear.
This can help you to maintain a safe speed and prevent your brakes
from overheating while going down a steep hill.
NOTICE NOTICENOTICE NOTICE
NOTICE
Avoid excessive revving up of engine rpm.
Vehicle Speed during Up Shift
Gear GearGear Gear
Gear
2H/4H 2H/4H 2H/4H 2H/4H
2H/4H
4 L 4 L 4 L 4 L
4 L
km/hr km/hr km/hr km/hr
km/hr
km/hr km/hr km/hr km/hr
km/hr
1-2 20 10
2-3 45 18
3-4 70 -
4-5 90 -
Gear Change Speeds during upshift Gear Change Speeds during upshiftGear Change Speeds during upshift Gear Change Speeds during upshift
Gear Change Speeds during upshift
Vehicle Speed during Down Shift
Gear GearGear Gear
Gear
2H/4H 2H/4H 2H/4H 2H/4H
2H/4H
4 L 4 L 4 L 4 L
4 L
km/hr km/hr km/hr km/hr
km/hr
km/hr km/hr km/hr km/hr
km/hr
2-1 15 06
3-2 25 -
4-3 45 -
5-4 60 -
Gear Change Speeds during downshift Gear Change Speeds during downshiftGear Change Speeds during downshift Gear Change Speeds during downshift
Gear Change Speeds during downshift
ProCarManuals.com
Page 79 of 161
79
D R I V I N G BRAKES AND ABS (IF FITTED) BRAKES AND ABS (IF FITTED) BRAKES AND ABS (IF FITTED) BRAKES AND ABS (IF FITTED)
BRAKES AND ABS (IF FITTED)
Have your vehicle attended immediately.
Put your foot on brake pedal to apply brake. Do not ride
the brakes as they may overheat and the performance may
be impaired. The brake lights may confuse the drivers
behind you.
Use engine to assist the brakes by shifting to a lower gear
and lifting your foot from accelerator pedal.
Constant application of brakes while going down the hill
builds heat and reduces braking efficiency.
Check your brakes after driving through deep water. Apply
the brakes moderately to feel that they are normal. If not,
apply them gently and frequently until they do. With wet
brakes you should be extra cautious and alert in your driving.
Anti Lock Brake System (ABS) – if fitted Anti Lock Brake System (ABS) – if fittedAnti Lock Brake System (ABS) – if fitted Anti Lock Brake System (ABS) – if fitted
Anti Lock Brake System (ABS) – if fitted
ABS combined with the traditional hydraulic brake system pre-
vents the wheel from locking while braking by make use of
most of road to tyre grip. It also ensures better control and
stability of car while braking.
How ABS works How ABS worksHow ABS works How ABS works
How ABS works
ABS essentially consists of an Electronic Control Unit (ECU)
which reads signals from the sensors fitted to each wheel and
identifies the one which is likely to lock. ( Wheels will tend toBrakes BrakesBrakes Brakes
Brakes
Tata Safari is equipped with ventilated disc brakes on front
and drum brakes on rear wheels.
Braking system is vacuum assisted to reduce effort needed
on the brake pedal. It is a dual circuit service brake system
designed in such a way that one circuit will always work, even
if other circuit fails.
If this happens you will immediately notice that the brake
pedal goes down much farther and you need to press the
pedal harder. In such an event the stopping distance may be
longer.
In case of failure of vacuum the vehicle can still be stopped
with a higher pedal effort.
In case of vacuum failure or brake circuit failure, slow down
the vehicle by shifting to lower gear and lifting your foot
from the accelerator pedal. Pull to the side of the road as
soon as it is safe.
CAUTION CAUTIONCAUTION CAUTION
CAUTION
Brake system failure is very hazardous. It is best to have
your vehicle towed, but if you drive the vehicle in this
condition, be extremely cautious.
ProCarManuals.com
Page 80 of 161
80
D R I V I N GANTI-LOCK BRAKE SYSTEM ANTI-LOCK BRAKE SYSTEMANTI-LOCK BRAKE SYSTEM ANTI-LOCK BRAKE SYSTEM
ANTI-LOCK BRAKE SYSTEM
lock when the speed of rotation of any one wheel becomes
too low in relation to the vehicle speed.) It actuates
an
Electro Hydraulic Control Unit (HU) to reduce, maintain or
increase the pressure on the brake control cylinder in order
to prevent the wheel from locking. The ABS comes into play
when the car is braked heavily during emergency.
The driver feels the effort of the ABS through the The driver feels the effort of the ABS through theThe driver feels the effort of the ABS through the The driver feels the effort of the ABS through the
The driver feels the effort of the ABS through the
pulsating of the brake pedal and audible noise in the pulsating of the brake pedal and audible noise in thepulsating of the brake pedal and audible noise in the pulsating of the brake pedal and audible noise in the
pulsating of the brake pedal and audible noise in the
brake system. brake system.brake system. brake system.
brake system.
T TT T
T
his is absolut his is absoluthis is absolut his is absolut
his is absolut
ely N ely Nely N ely N
ely N
or oror or
or
mal. mal.mal. mal.
mal.
T TT T
T
his should not b his should not bhis should not b his should not b
his should not b
e ee e
e
in inin in
in
t tt t
t
er erer er
er
pr prpr pr
pr
et etet et
et
ed as a fault in the br ed as a fault in the bred as a fault in the br ed as a fault in the br
ed as a fault in the br
ak akak ak
ak
es eses es
es
.. ..
.
On the c On the c On the c On the c
On the c
on onon on
on
tr trtr tr
tr
ar arar ar
ar
y it y ity it y it
y it
’’ ’’
’
s ss s
s
the indic the indicthe indic the indic
the indic
a aa a
a
tion tha tion thation tha tion tha
tion tha
t the ABS is w t the ABS is wt the ABS is w t the ABS is w
t the ABS is w
or oror or
or
k kk k
k
ing inging ing
ing
.. ..
. This is an intentional
warning to the driver that a wheel or wheels are tending to lock
up due to the limit of tyre to road adhesion.
In this situation it is important to keep the brake pedal In this situation it is important to keep the brake pedalIn this situation it is important to keep the brake pedal In this situation it is important to keep the brake pedal
In this situation it is important to keep the brake pedal
depressed fully so that the ABS can regulate the brake depressed fully so that the ABS can regulate the brakedepressed fully so that the ABS can regulate the brake depressed fully so that the ABS can regulate the brake
depressed fully so that the ABS can regulate the brake
application. On No account pump the brake pedal application. On No account pump the brake pedalapplication. On No account pump the brake pedal application. On No account pump the brake pedal
application. On No account pump the brake pedal
The ABS is addition to the basic brake system.
It is activated It is activated It is activated It is activated
It is activated
automatically every time the engine is started. automatically every time the engine is started. automatically every time the engine is started. automatically every time the engine is started.
automatically every time the engine is started. If there is a
malfunction the system turns off automatically indicated by a
‘(ABS)’ ‘(ABS)’ ‘(ABS)’ ‘(ABS)’
‘(ABS)’ warning lamp on the dash board, still the ordinary brake
system continues to work.ABS Activation ABS ActivationABS Activation ABS Activation
ABS Activation
ABS activation varies with various road surfaces i.e. the
amount of traction your tyre have on a particular surface.
On dry surface you will need more pedal effort to activate
ABS. However you may feel ABS activates immediately if you
try to stop on snow, ice or slippery surface.
ABS Indicators ABS IndicatorsABS Indicators ABS Indicators
ABS Indicators
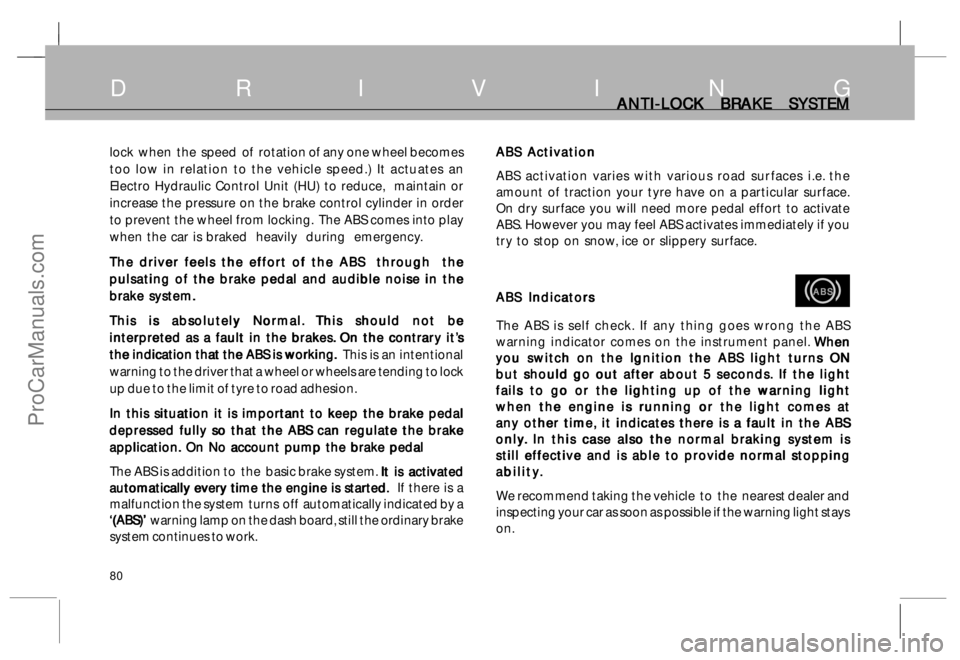
The ABS is self check. If any thing goes wrong the ABS
warning indicator comes on the instrument panel.
W WW W
W
hen henhen hen
hen
you switch on the Ignition the ABS light turns ON you switch on the Ignition the ABS light turns ONyou switch on the Ignition the ABS light turns ON you switch on the Ignition the ABS light turns ON
you switch on the Ignition the ABS light turns ON
but should go out after about 5 seconds. but should go out after about 5 seconds.but should go out after about 5 seconds. but should go out after about 5 seconds.
but should go out after about 5 seconds.
If the light If the lightIf the light If the light
If the light
fails to go or the lighting up of the warning light fails to go or the lighting up of the warning lightfails to go or the lighting up of the warning light fails to go or the lighting up of the warning light
fails to go or the lighting up of the warning light
when the engine is running or the light comes at when the engine is running or the light comes atwhen the engine is running or the light comes at when the engine is running or the light comes at
when the engine is running or the light comes at
any other time, it indicates there is a fault in the ABS any other time, it indicates there is a fault in the ABSany other time, it indicates there is a fault in the ABS any other time, it indicates there is a fault in the ABS
any other time, it indicates there is a fault in the ABS
only onlyonly only
only
.. ..
.
In this c In this c In this c In this c
In this c
ase also the nor ase also the norase also the nor ase also the nor
ase also the nor
mal br mal brmal br mal br
mal br
ak akak ak
ak
ing sy ing sying sy ing sy
ing sy
st stst
st
st
em is em isem is em is
em is
still effective and is able to provide normal stopping still effective and is able to provide normal stoppingstill effective and is able to provide normal stopping still effective and is able to provide normal stopping
still effective and is able to provide normal stopping
abilit abilitabilit abilit
abilit
y yy y
y
.. ..
.
We recommend taking the vehicle to the nearest dealer and
inspecting your car as soon as possible if the warning light stays
on.
ABS ABSABS ABS
ABS
ProCarManuals.com
Page 83 of 161
83
D R I V I N GLIMITED SLIP DIFFERENTIAL AND FOUR LIMITED SLIP DIFFERENTIAL AND FOUR LIMITED SLIP DIFFERENTIAL AND FOUR LIMITED SLIP DIFFERENTIAL AND FOUR
LIMITED SLIP DIFFERENTIAL AND FOUR
WHEEL DRIVING WHEEL DRIVINGWHEEL DRIVING WHEEL DRIVING
WHEEL DRIVING
Thus unnecessary spinning of one wheel is avoided and torque
is transmitted to both wheels, thus assisting the vehicle to traverse
loose terrain. However during normal driving, the differential
action takes place in the same manner as in a standard differential.
1. 1.1. 1.
1.
Four Wheel Drive Operation Four Wheel Drive OperationFour Wheel Drive Operation Four Wheel Drive Operation
Four Wheel Drive Operation
In 2-H mode, only the rear two wheels of the vehicle are
powered by the engine and the front wheels are merely
pushed. By shifting to four wheel drive mode (4H or 4L)
the rear as well as the front axles get geared to the engine
through transfer case and transmit the engine power to all
four wheels. This gives the vehicle increased traction.
In 4H mode, the transmitted engine torque and vehicle
speed remain the same as in 2H. However, when you shift
to 4L mode engine torque is multiplied and vehicle moves
at low speed in the same gears with increased traction. 4L
mode is provided for negotiating sharp gradients or driving
through loose soil/sand.
2. 2.2. 2.
2.
Shifting from 2H to 4H Shifting from 2H to 4HShifting from 2H to 4H Shifting from 2H to 4H
Shifting from 2H to 4H
Turn the selector knob from 2H to 4H position. 4H indicator
on instrument panel will light up. Changing from 2H to 4H
can be done at any speed upto 65 km/h (40 mph). No
pressing of clutch pedal is required.3. 3.3. 3.
3.
Shifting from 4H to 2H Shifting from 4H to 2HShifting from 4H to 2H Shifting from 4H to 2H
Shifting from 4H to 2H
Turn the selector knob from 4H to 2H position. 4H indicator
on instrument panel will go off. Changing from 4H to 2H
can be done at any speed upto 65 km/h (40 mph). No
pressing of clutch pedal is required.
Free Wheeling of Front Hub Free Wheeling of Front HubFree Wheeling of Front Hub Free Wheeling of Front Hub
Free Wheeling of Front Hub
After shifting from 4H to 2H, for effecting free wheeling of front
wheels, direction of vehicle motion needs to be changed. If
the vehicle was moving forward in 4H then bring it to halt and
engage reverse gear of main gear box. (If it was moving reverse
in 4H mode then stop it, and then engage forward gear of
main gear box.) After stopping and changing the gear the
vehicle must travel in opposite direction for a minimum of three
meters, before free wheeling takes place.
4. 4.4. 4.
4.
Shifting from 4H to 4L Shifting from 4H to 4LShifting from 4H to 4L Shifting from 4H to 4L
Shifting from 4H to 4L
Stop the vehicle. Press clutch pedal. Turn the selector knob
from 4H to 4L position. 4L indicator light on instrument panel
will blink few times and remain on.
5. 5.5. 5.
5.
Shifting from 4L to 4H Shifting from 4L to 4HShifting from 4L to 4H Shifting from 4L to 4H
Shifting from 4L to 4H
Stop the vehicle. Press clutch pedal. Turn the selector knob
from 4L to 4H position. 4H indicator light on instrument panel
will blink few times and will remain on.
ProCarManuals.com
Page 84 of 161
84
D R I V I N GFUEL ECONOMY FUEL ECONOMYFUEL ECONOMY FUEL ECONOMY
FUEL ECONOMY
NOTICE NOTICENOTICE NOTICE
NOTICE
Do not engage four wheel drive mode (4H or 4L)
continuously on dry and hard road surface. It can cause
expensive damage to the vehicle transmission and the
tyres.
Four wheel drive facility is a powerful tool which enables
the vehicle to traverse terrain which is otherwise
inaccessible to two wheel drive vehicles. However, it must
be used judiciously and carefully. Do not take unnecessary
risks and attempt the impossible. Familiarise yourself
thoroughly with the vehicle and its abilities before
attempting serious off road driving.
With ignition ‘ON’ 4H & 4L indicator lamp on panel should
glow for a few seconds only & then go off. Continuous
illumination of 4L & 4H lamps indicates electrical fault.
F FF F
F
uel E uel Euel E uel E
uel E
c cc c
c
onom onomonom onom
onom
y yy y
y
A. A.A. A.
A . Drive smoothly, accelerate gradually and anticipate stops.
B. B.B. B.
B . Best fuel consumption is achieved at low engine speeds, the
highest possible gear without labouring the engine.
C. C.C. C.
C . Driving with accelerator pedal fully depressed means using
excessive fuel.
D DD D
D
.. ..
. Do not allow engine to labour. Change to lower gear when
engine no longer runs smoothly.
E. E.E. E.
E . If possible, do not idle the engine for more than 2 minutes.
Switch off the engine.
F FF F
F
.. ..
. Do not ride the clutch OR brake pedal while driving. Do not
use clutch pedal as foot rest.
G* G*G* G*
G*.When changing from 4H/4L to 2H of transfer case, 2H free
wheeling should be done.
If 2H free wheeling is not done the hub locks of front hub
remain locked causing unnecessary rotation of front drive
components and this consumes more fuel and causes wear
and tear of front axle components.
H. H.H. H.
H . Depending on traffic conditions, a constant speed should
be maintained.
The vehicle uses more fuel, every time you speed up or slow
down.
I. I.I. I.
I . Hard braking, abrupt cornering and rapid acceleration use
more fuel. Avoid these.
J. J.J. J.
J . Do not carry unnecessary weight in the vehicle.
K. K.K. K.
K . Maintain moderate speed limits, while driving.
L. L.L. L.
L . Always ensure that front wheel alignment is proper.
(*F (*F(*F (*F
(*F
or 4 or 4 or 4 or 4
or 4
WD mo WD moWD mo WD mo
WD mo
del only del onlydel only del only
del only
.) .).) .)
.)
ProCarManuals.com
Page 85 of 161
85
D R I V I N GDRIVING IN ADVERSE CONDITIONS DRIVING IN ADVERSE CONDITIONSDRIVING IN ADVERSE CONDITIONS DRIVING IN ADVERSE CONDITIONS
DRIVING IN ADVERSE CONDITIONS
Driving on Snowy or Icy Roads Driving on Snowy or Icy RoadsDriving on Snowy or Icy Roads Driving on Snowy or Icy Roads
Driving on Snowy or Icy Roads
Set the selector knob to 4H position. Gently release the clutch
and apply the accelerator for a smooth start and to avoid wheel
spin.
CAUTION CAUTIONCAUTION CAUTION
CAUTION
Use of snow tyres and / or tyre chain is recommended.
Maintain a safe distance between vehicles to avoid sudden
braking and slow down by shifting down the gears.
Avoid sudden acceleration, braking or turning. Such sharp
manoeuvers can cause loss of traction and thereby loss of vehicle
control.
Driving on Sandy or Muddy Roads Driving on Sandy or Muddy RoadsDriving on Sandy or Muddy Roads Driving on Sandy or Muddy Roads
Driving on Sandy or Muddy Roads
In case the traction on the wheels is sufficient, you may be
able to proceed in 4H mode. However in case change in
road conditions are anticipated, it is better to select the 4L
mode. Shift the selector knob to 4L position by following
the correct procedure and proceed in the normal manner.
Your vehicle will move at a slower pace with higher engine
RPM in the same gear because of the 4L mode. To match
your power and speed requirements, you can shift up in
any of the 5 forward gears or the reverse gear.NOTICE NOTICENOTICE NOTICE
NOTICE
You may choose to reduce the tyre pressure marginally for
additional grip on loose surfaces, though with a slight loss of
ground clearance.
•Try to maintain a constant engine speed and avoid sudden
acceleration which can cause wheel spin and loss of traction,
possibly leading to bogging down of the vehicle.
•If the vehicle gets stuck in loose sand, do not keep on
accelerating as the wheel spin will only result in the
wheels sinking deeper.
•The extent of muddy / sandy, conditions and the traction
available is difficult to judge and the vehicle can get
bogged down deeply. Operation should be done at slow
speed only. If possible, get down and check the path
conditions before proceeding.
ProCarManuals.com
Page 86 of 161
86
D R I V I N GDRIVING IN ADVERSE CONDITIONS DRIVING IN ADVERSE CONDITIONSDRIVING IN ADVERSE CONDITIONS DRIVING IN ADVERSE CONDITIONS
DRIVING IN ADVERSE CONDITIONS
Driving Through Water Driving Through WaterDriving Through Water Driving Through Water
Driving Through Water
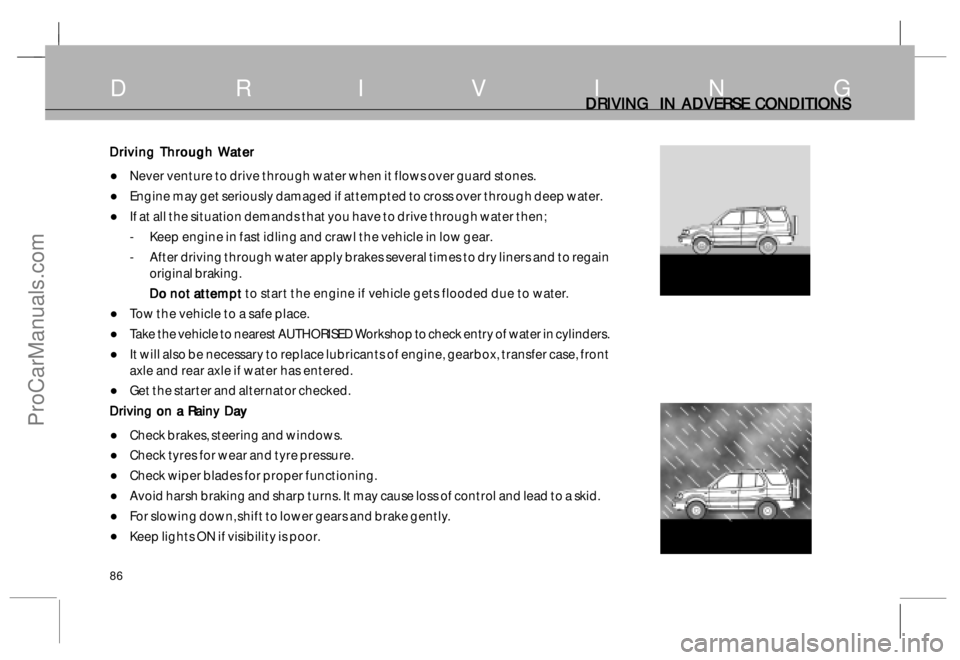
•Never venture to drive through water when it flows over guard stones.
•Engine may get seriously damaged if attempted to cross over through deep water.
•If at all the situation demands that you have to drive through water then;
- Keep engine in fast idling and crawl the vehicle in low gear.
- After driving through water apply brakes several times to dry liners and to regain
original braking.
D DD D
D
o not a o not ao not a o not a
o not a
tt tttt tt
tt
empt emptempt empt
empt to start the engine if vehicle gets flooded due to water.
•Tow the vehicle to a safe place.
•Take the vehicle to nearest AUTHORISED Workshop to check entry of water in cylinders.
•It will also be necessary to replace lubricants of engine, gearbox, transfer case, front
axle and rear axle if water has entered.
•Get the starter and alternator checked.
Driving on a Rainy Day Driving on a Rainy DayDriving on a Rainy Day Driving on a Rainy Day
Driving on a Rainy Day
•Check brakes, steering and windows.
•Check tyres for wear and tyre pressure.
•Check wiper blades for proper functioning.
•Avoid harsh braking and sharp turns. It may cause loss of control and lead to a skid.
•For slowing down, shift to lower gears and brake gently.
•Keep lights ON if visibility is poor.
ProCarManuals.com
Page 87 of 161
87
Night Driving Night DrivingNight Driving Night Driving
Night Driving
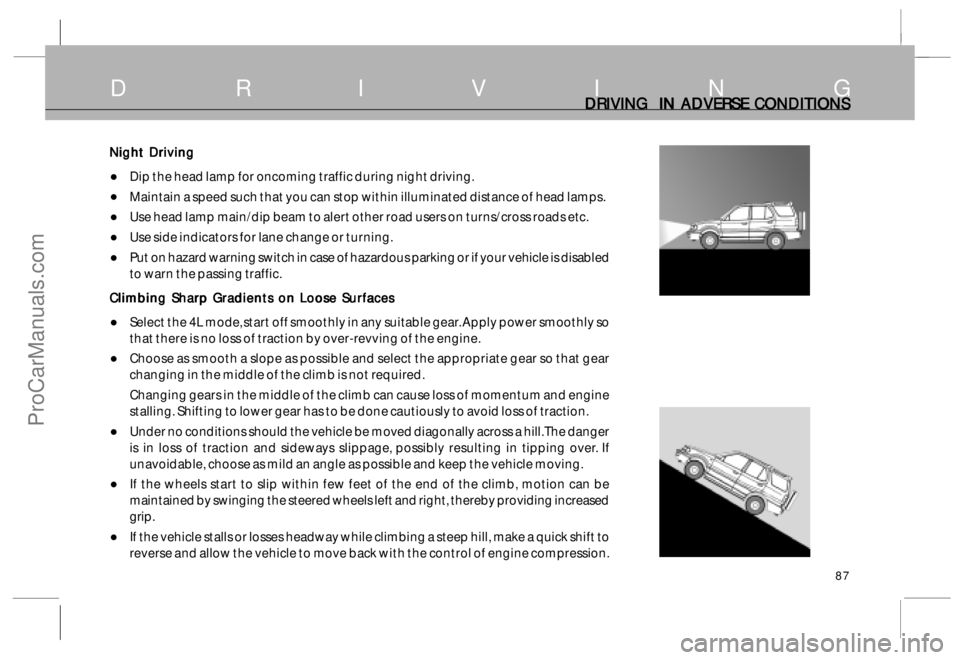
•Dip the head lamp for oncoming traffic during night driving.
•Maintain a speed such that you can stop within illuminated distance of head lamps.
•Use head lamp main/dip beam to alert other road users on turns/cross roads etc.
•Use side indicators for lane change or turning.
•Put on hazard warning switch in case of hazardous parking or if your vehicle is disabled
to warn the passing traffic.
Climbing Sharp Gradients on Loose Surfaces Climbing Sharp Gradients on Loose SurfacesClimbing Sharp Gradients on Loose Surfaces Climbing Sharp Gradients on Loose Surfaces
Climbing Sharp Gradients on Loose Surfaces
•Select the 4L mode, start off smoothly in any suitable gear. Apply power smoothly so
that there is no loss of traction by over-revving of the engine.
•Choose as smooth a slope as possible and select the appropriate gear so that gear
changing in the middle of the climb is not required.
Changing gears in the middle of the climb can cause loss of momentum and engine
stalling. Shifting to lower gear has to be done cautiously to avoid loss of traction.
•Under no conditions should the vehicle be moved diagonally across a hill. The danger
is in loss of traction and sideways slippage, possibly resulting in tipping over. If
unavoidable, choose as mild an angle as possible and keep the vehicle moving.
•If the wheels start to slip within few feet of the end of the climb, motion can be
maintained by swinging the steered wheels left and right, thereby providing increased
grip.
•If the vehicle stalls or losses headway while climbing a steep hill, make a quick shift to
reverse and allow the vehicle to move back with the control of engine compression.
D R I V I N GDRIVING IN ADVERSE CONDITIONS DRIVING IN ADVERSE CONDITIONSDRIVING IN ADVERSE CONDITIONS DRIVING IN ADVERSE CONDITIONS
DRIVING IN ADVERSE CONDITIONS
ProCarManuals.com
Page 88 of 161
88
Descending Sharp Gradients Descending Sharp GradientsDescending Sharp Gradients Descending Sharp Gradients
Descending Sharp Gradients
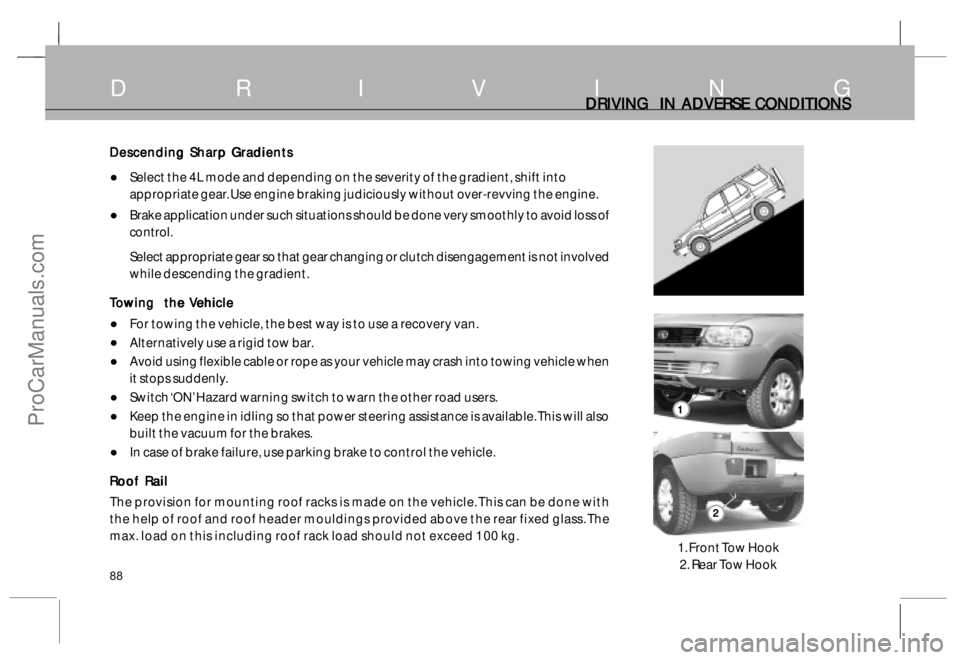
•Select the 4L mode and depending on the severity of the gradient, shift into
appropriate gear. Use engine braking judiciously without over-revving the engine.
•Brake application under such situations should be done very smoothly to avoid loss of
control.
Select appropriate gear so that gear changing or clutch disengagement is not involved
while descending the gradient.
T TT T
T
o oo o
o
wing the wing the wing the wing the
wing the
V VV V
V
ehicle ehicleehicle ehicle
ehicle
•For towing the vehicle, the best way is to use a recovery van.
•Alternatively use a rigid tow bar.
•Avoid using flexible cable or rope as your vehicle may crash into towing vehicle when
it stops suddenly.
•Switch ‘ON’ Hazard warning switch to warn the other road users.
•Keep the engine in idling so that power steering assistance is available. This will also
built the vacuum for the brakes.
•In case of brake failure, use parking brake to control the vehicle.
Roof Rail Roof RailRoof Rail Roof Rail
Roof Rail
The provision for mounting roof racks is made on the vehicle. This can be done with
the help of roof and roof header mouldings provided above the rear fixed glass. The
max. load on this including roof rack load should not exceed 100 kg.
D R I V I N GDRIVING IN ADVERSE CONDITIONS DRIVING IN ADVERSE CONDITIONSDRIVING IN ADVERSE CONDITIONS DRIVING IN ADVERSE CONDITIONS
DRIVING IN ADVERSE CONDITIONS
1 11 1
1
2 22 2
2
1. Front Tow Hook
2. Rear Tow Hook
ProCarManuals.com