engine TATA SAFARI 2015 Workshop Manual
[x] Cancel search | Manufacturer: TATA, Model Year: 2015, Model line: SAFARI, Model: TATA SAFARI 2015Pages: 161, PDF Size: 2.55 MB
Page 130 of 161
130
M A I N T E N A N C EFUSES FUSESFUSES FUSES
FUSES
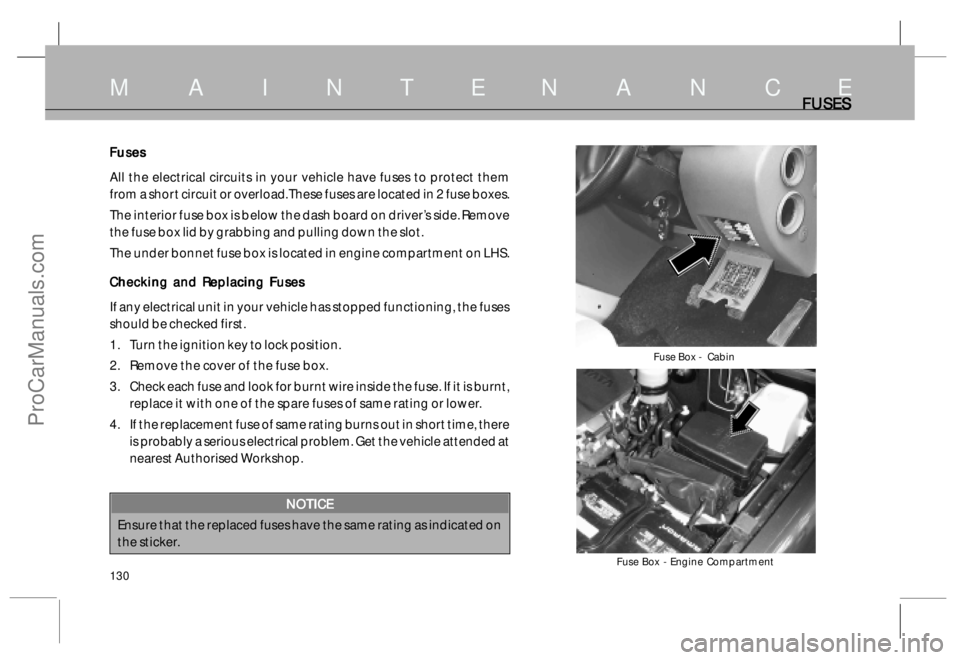
Fuse Box - Cabin
Fuse Box - Engine Compartment
Fuses FusesFuses Fuses
Fuses
All the electrical circuits in your vehicle have fuses to protect them
from a short circuit or overload. These fuses are located in 2 fuse boxes.
The interior fuse box is below the dash board on driver’s side. Remove
the fuse box lid by grabbing and pulling down the slot.
The under bonnet fuse box is located in engine compartment on LHS.
Checking and Replacing Fuses Checking and Replacing FusesChecking and Replacing Fuses Checking and Replacing Fuses
Checking and Replacing Fuses
If any electrical unit in your vehicle has stopped functioning, the fuses
should be checked first.
1. Turn the ignition key to lock position.
2. Remove the cover of the fuse box.
3. Check each fuse and look for burnt wire inside the fuse. If it is burnt,
replace it with one of the spare fuses of same rating or lower.
4. If the replacement fuse of same rating burns out in short time, there
is probably a serious electrical problem. Get the vehicle attended at
nearest Authorised Workshop.
NOTICE NOTICENOTICE NOTICE
NOTICE
Ensure that the replaced fuses have the same rating as indicated on
the sticker.
ProCarManuals.com
Page 131 of 161
131
M A I N T E N A N C E
R RR R
R
ela elaela ela
ela
y yy y
y
s and s and s and s and
s and
T TT T
T
r rr r
r
ansf ansfansf ansf
ansf
er C er Cer C er C
er C
ase ECU ase ECUase ECU ase ECU
ase ECU
Relays are fitted to protect the voltage drawing units from low
voltage.
Relays are fitted in 2 locations :
1 . In the fuse box situated inside engine compartment.
2 . Behind glove box.
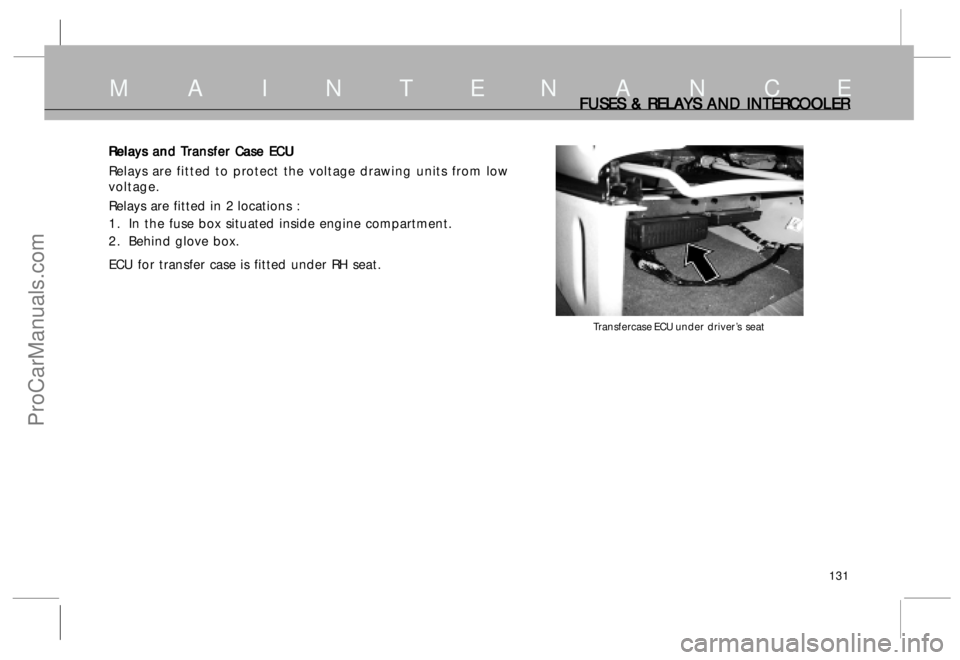
ECU for transfer case is fitted under RH seat.
FUSES & REL FUSES & RELFUSES & REL FUSES & REL
FUSES & REL
A AA A
A
Y YY Y
Y
S AND INTER S AND INTERS AND INTER S AND INTER
S AND INTER
C CC C
C
OOLER OOLEROOLER OOLER
OOLER
Transfercase ECU under driver’s seat
ProCarManuals.com
Page 132 of 161
132
M A I N T E N A N C EEGR SYSTEM EGR SYSTEMEGR SYSTEM EGR SYSTEM
EGR SYSTEM
T TT T
T
AKING C AKING CAKING C AKING C
AKING C
ARE OF ENVIR ARE OF ENVIRARE OF ENVIR ARE OF ENVIR
ARE OF ENVIR
ONMENT : ONMENT :ONMENT : ONMENT :
ONMENT :
Your vehicle is equipped with the EGR ( Exhaust Gas
Recirculation) System to reduce exhaust pollution.
EGR SYSTEM : EGR SYSTEM :EGR SYSTEM : EGR SYSTEM :
EGR SYSTEM :
The engine is fitted with EGR valve, EGR pipe, vacuum
modulator and associated electrical circuitry. With this,
controlled amount of exhaust gas is mixed with intake air of
the engine, in part load and speed conditions. This helps in
reducing harmful pollutants.
Close Couple Catalytic Converter : Close Couple Catalytic Converter :Close Couple Catalytic Converter : Close Couple Catalytic Converter :
Close Couple Catalytic Converter :
Tata Safari is fitted with Diesel Oxidation Catalytic Converter
to reduce exhaust pollution. The two way Catalytic
Converter has coating of precious metals which enables
conversion of pollutants.
Care of the Catalytic Converter Care of the Catalytic ConverterCare of the Catalytic Converter Care of the Catalytic Converter
Care of the Catalytic Converter
The Catalytic Converter does not require any special
maintenance however, following precautions should be
taken for the effective functioning of the converter and to
avoid damage to the converter.
1 It is mandatory to use Diesel fuel with low sulphur
content (Refer recommended fuels). Use of any other
diesel fuel can increase the pollutants.
2 Avoid parking the vehicle over inflammable materials,such as dry leaves, grass, etc., as the exhaust system
is hot enough to initiate “FIRE”.
Maintenance of Catalytic Converter Maintenance of Catalytic ConverterMaintenance of Catalytic Converter Maintenance of Catalytic Converter
Maintenance of Catalytic Converter
Catalytic Converter should be flushed by giving full throttle
(4 to 5 times) in standing condition of vehicle on daily basis.
In addition to this it is recommended to run the vehicle at
high speeds (80 to 100 kmph) for few km as this will help to
flush the carbon soot deposits from exhaust system and
catalytic converter. High speed running of the vehicle may
be done periodically to avoid chocking of catalytic converter.
Alternatively flushing operation for cleaning the catalytic
converter can be done by dry compressed air draft (3 to 4
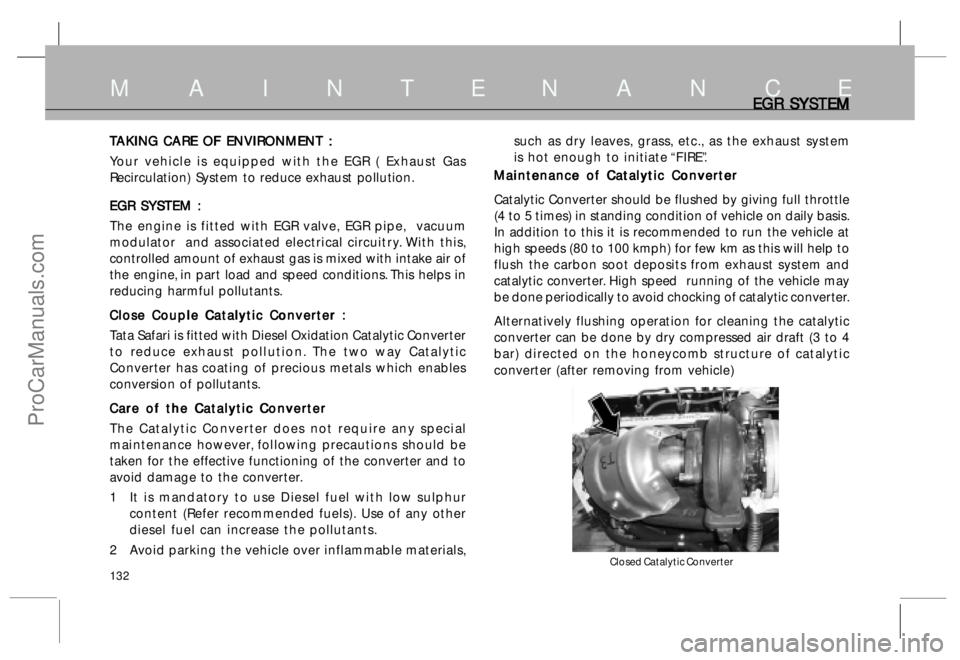
bar) directed on the honeycomb structure of catalytic
converter (after removing from vehicle)
Closed Catalytic Converter
ProCarManuals.com
Page 133 of 161
133
TURBO CHARGER (IF FITTED) TURBO CHARGER (IF FITTED)TURBO CHARGER (IF FITTED) TURBO CHARGER (IF FITTED)
TURBO CHARGER (IF FITTED)
V VV V
V
ar arar ar
ar
iable iable iable iable
iable
T TT T
T
urbine urbine urbine urbine
urbine
T TT T
T
echnolo echnoloechnolo echnolo
echnolo
g gg g
g
y- y- y- y-
y-
VT VTVT VT
VT
T T T T
T
T TT T
T
urb urburb urb
urb
o oo o
o
char charchar char
char
ger : ger :ger : ger :
ger :
Your vehicle is fitted with a turbocharger having variable
turbine technology ( VTT ). Turbocharger is an efficient
supercharging device used in our engine. It makes optimal
use of thermal energy of engine exhaust gases to run a
turbine which in turn drives a compressor to force air under
pressure into the inlet manifold. This turbocharger is
optimized for higher power output flat torque across large
engine speed range and better fuel consumption.
L LL L
L
ubr ubrubr ubr
ubr
ic icic
ic
ic
a aa a
a
tion of tion of tion of tion of
tion of
T TT T
T
urb urburb urb
urb
o oo o
o
char charchar char
char
ger : ger :ger : ger :
ger :
The turbocharger rotor assembly is supported by two fully
floating bearing bushes in the bearing housing. These
bearing bushes are lubricated with finely filtered engine
oil from the lubrication system of the engine.
Idle the engine for a while (30 seconds) after starting the
engine and before stopping the engine to ensure adequate
lubricating oil supply to the turbocharger.
T TT T
T
urb urburb urb
urb
o oo o
o
char charchar char
char
ger C ger Cger C ger C
ger C
onnec onneconnec onnec
onnec
tions : tions :tions : tions :
tions :
All turbocharger connections must be leak-proof. Check air
inlet, air outlet, exhaust gas inlet and exhaust outlet
connections as well as oil inlet and outlet connections to
the turbocharger and tighten the connections where
required.Proper maintenance of air filter, oil filter as well as use of
correct grade of oil and adherence to oil change intervals is
essential for proper functioning of the turbocharger.
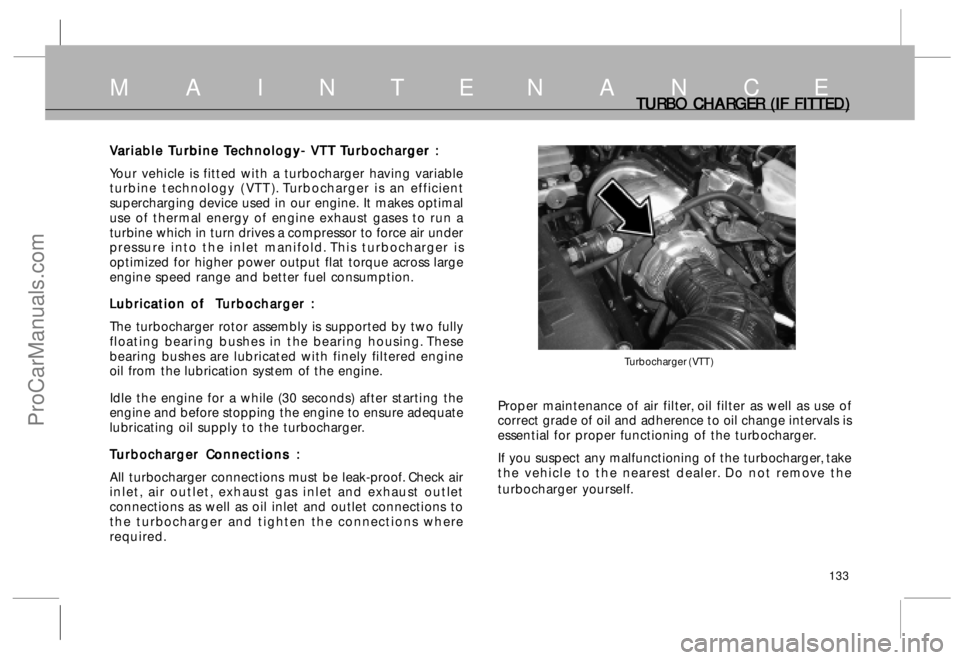
If you suspect any malfunctioning of the turbocharger, take
the vehicle to the nearest dealer. Do not remove the
turbocharger yourself.
M A I N T E N A N C E
Turbocharger ( VTT )
ProCarManuals.com
Page 134 of 161
134
AIR CONDITIONING AIR CONDITIONING AIR CONDITIONING AIR CONDITIONING
AIR CONDITIONING
Air Conditioning Air ConditioningAir Conditioning Air Conditioning
Air Conditioning
The Air Conditioning is a sealed system. Any major maintenance
should be done by Authorised Workshop.
There are couple of things which can be done by you to ensure proper
working of Air conditioning / Heating.
Periodically check the engine’s radiator and air conditioning
condensers for leaves, insects and dirt stuck in front surface.
These block the air flow and reduce the cooling efficiency. Use a light
water spray from a hose or a soft brush to remove them.
NO NONO NO
NO
TICE TICETICE TICE
TICE
Use only low pressure spray or soft bristle brush to clean condenser
and radiator fins.
Run the air conditioning at least once a week during winter season.
Run it at least for ten minutes with vehicle at steady speed and engine
at normal operating condition. This circulates lubrication oil in the
compressor.
For any complaint on A.C. and Heating get it attended at Authorised
Workshop.
NO NONO NO
NO
TICE TICETICE TICE
TICE
The system is charged with R 134 (a) - ‘Non C.F.C.’ refrigerant. Do
not top up with any other refrigerant.
M A I N T E N A N C E
ProCarManuals.com
Page 135 of 161
135
BEL BELBEL BEL
BEL
T T T T
T
TENSION TENSIONTENSION TENSION
TENSIONM A I N T E N A N C E
B BB B
B
elt elt elt elt
elt
T TT T
T
ension : ension :ension : ension :
ension :
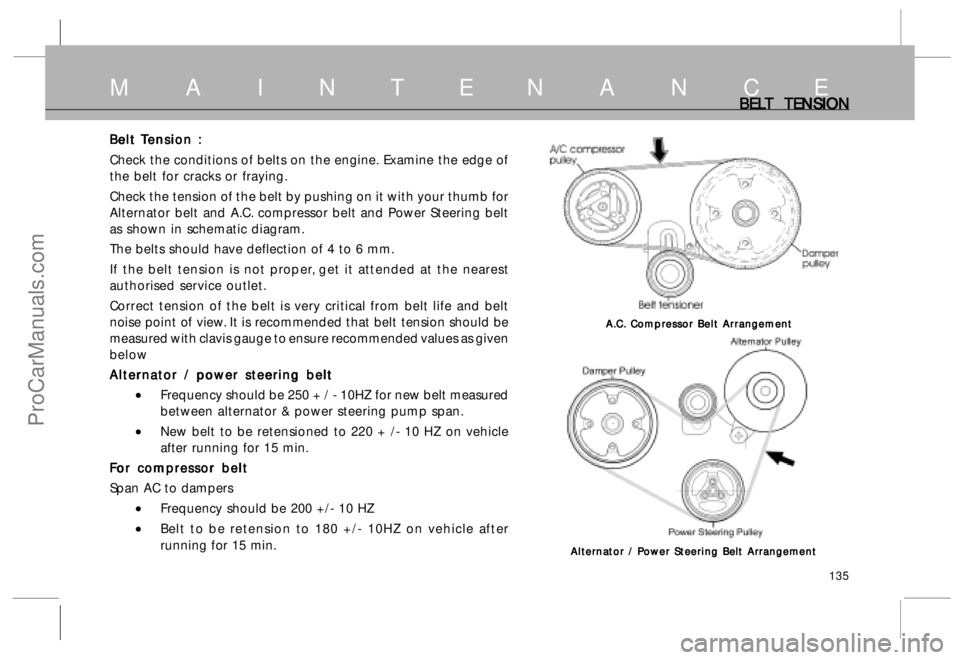
Check the conditions of belts on the engine. Examine the edge of
the belt for cracks or fraying.
Check the tension of the belt by pushing on it with your thumb for
Alternator belt and A.C. compressor belt and Power Steering belt
as shown in schematic diagram.
The belts should have deflection of 4 to 6 mm.
If the belt tension is not proper, get it attended at the nearest
authorised service outlet.
Correct tension of the belt is very critical from belt life and belt
noise point of view. It is recommended that belt tension should be
measured with clavis gauge to ensure recommended values as given
below
Alternator / power steering belt Alternator / power steering beltAlternator / power steering belt Alternator / power steering belt
Alternator / power steering belt
•Frequency should be 250 + / - 10HZ for new belt measured
between alternator & power steering pump span.
•New belt to be retensioned to 220 + /- 10 HZ on vehicle
after running for 15 min.
F FF F
F
or c or cor c or c
or c
ompr omprompr ompr
ompr
essor b essor bessor b essor b
essor b
elt eltelt elt
elt
Span AC to dampers
•Frequency should be 200 +/- 10 HZ
•Belt to be retension to 180 +/- 10HZ on vehicle after
running for 15 min.
Alternator / Power Steering Belt Arrangement Alternator / Power Steering Belt ArrangementAlternator / Power Steering Belt Arrangement Alternator / Power Steering Belt Arrangement
Alternator / Power Steering Belt Arrangement
A.C. Compressor Belt Arrangement A.C. Compressor Belt ArrangementA.C. Compressor Belt Arrangement A.C. Compressor Belt Arrangement
A.C. Compressor Belt Arrangement
ProCarManuals.com
Page 136 of 161
136
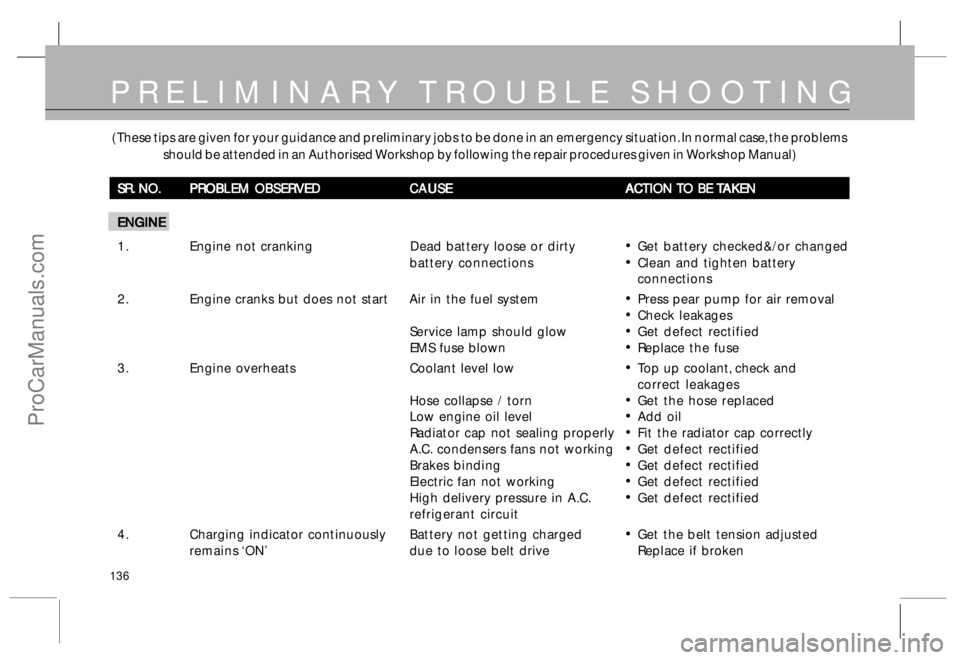
( These tips are given for your guidance and preliminary jobs to be done in an emergency situation. In normal case, the problems
should be attended in an Authorised Workshop by following the repair procedures given in Workshop Manual)
SR. NO. SR. NO.SR. NO. SR. NO.
SR. NO.
PROBLEM OBSERVED PROBLEM OBSERVEDPROBLEM OBSERVED PROBLEM OBSERVED
PROBLEM OBSERVED
CAUSE CAUSECAUSE CAUSE
CAUSE
A AA A
A
CTION CTION CTION CTION
CTION
T TT T
T
O BE O BE O BE O BE
O BE
T TT T
T
AKEN AKENAKEN AKEN
AKEN
ENGINE ENGINEENGINE ENGINE
ENGINE
1 . Engine not cranking Dead battery loose or dirty
•Get battery checked&/or changed
battery connections
•Clean and tighten battery
connections
2 . Engine cranks but does not start Air in the fuel system
•Press pear pump for air removal
•Check leakages
Service lamp should glow
•Get defect rectified
EMS fuse blown
•Replace the fuse
3. Engine overheatsCoolant level low
•Top up coolant, check and
correct leakages
Hose collapse / torn
•Get the hose replaced
Low engine oil level
•Add oil
Radiator cap not sealing properly
•Fit the radiator cap correctly
A.C. condensers fans not working
•Get defect rectified
Brakes binding
•Get defect rectified
Electric fan not working
•Get defect rectified
High delivery pressure in A.C.
•Get defect rectified
refrigerant circuit
4 . Charging indicator continuouslyBattery not getting charged
•Get the belt tension adjusted
remains ‘ON’due to loose belt drive Replace if broken
PRELIMINARY TROUBLE SHOOTING
ProCarManuals.com
Page 146 of 161
146
S E R V I C E S C H E D U L ESERVICE SCHEDULE SERVICE SCHEDULESERVICE SCHEDULE SERVICE SCHEDULE
SERVICE SCHEDULE
SR SRSR SR
SR
x 1000 km x 1000 kmx 1000 km x 1000 km
x 1000 km
NO NONO NO
NO
OPER OPEROPER OPER
OPER
A AA A
A
TIONS TIONSTIONS TIONS
TIONS
FREQUENCY FREQUENCYFREQUENCY FREQUENCY
FREQUENCY
1-1.5 1-1.51-1.5 1-1.5
1-1.5
15 1515 15
15
30 3030 30
30
45 4545 45
45
60 6060 60
60
75 7575 75
75
90 9090 90
90
105 105105 105
105
GENERAL GENERALGENERAL GENERAL
GENERAL
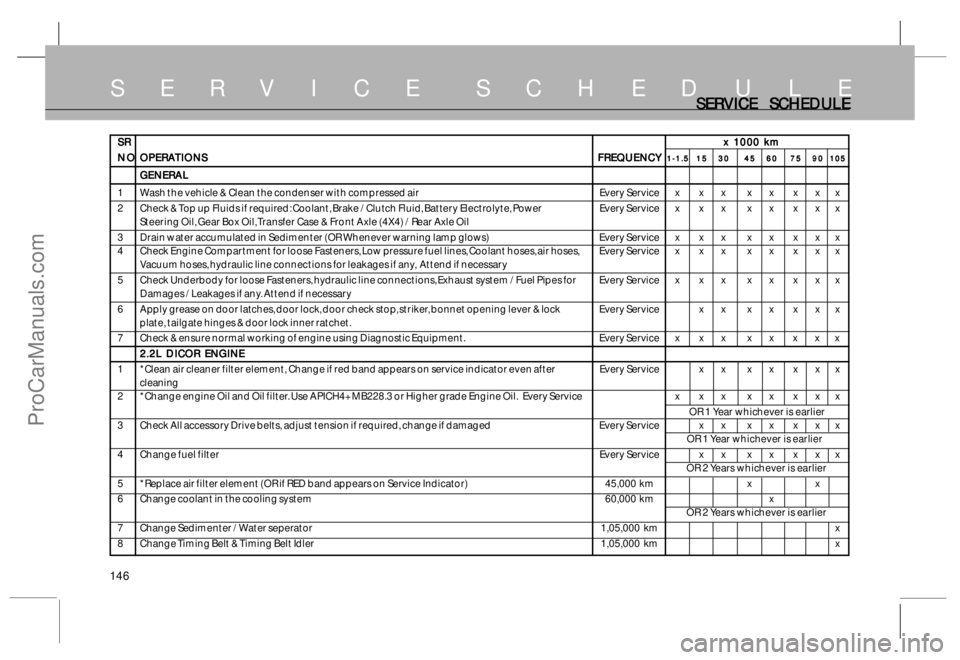
1 Wash the vehicle & Clean the condenser with compressed air Every Service x x x x x x x x
2 Check & Top up Fluids if required: Coolant, Brake / Clutch Fluid, Battery Electrolyte, Power Every Service x x x x x x x x
Steering Oil, Gear Box Oil, Transfer Case & Front Axle (4X4) / Rear Axle Oil
3 Drain water accumulated in Sedimenter (OR Whenever warning lamp glows) Every Service x x x x x x x x
4 Check Engine Compartment for loose Fasteners, Low pressure fuel lines, Coolant hoses, air hoses, Every Service x x x x x x x x
Vacuum hoses, hydraulic line connections for leakages if any, Attend if necessary
5 Check Underbody for loose Fasteners, hydraulic line connections, Exhaust system / Fuel Pipes for Every Service x x x x x x x x
Damages / Leakages if any. Attend if necessary
6 Apply grease on door latches, door lock, door check stop, striker, bonnet opening lever & lock Every Service x x x x x x x
plate, tailgate hinges & door lock inner ratchet.
7 Check & ensure normal working of engine using Diagnostic Equipment. Every Service x x x x x x x x
2.2L DICOR ENGINE 2.2L DICOR ENGINE2.2L DICOR ENGINE 2.2L DICOR ENGINE
2.2L DICOR ENGINE
1 *Clean air cleaner filter element, Change if red band appears on service indicator even after Every Service x x x x x x x
cleaning
2 *Change engine Oil and Oil filter. Use APICH4+MB228.3 or Higher grade Engine Oil.Every Service x x x x x x x x
OR 1 Year whichever is earlier
3 Check All accessory Drive belts, adjust tension if required, change if damaged Every Service x x x x x x x
OR 1 Year whichever is earlier
4 Change fuel filterEvery Service x x x x x x x
OR 2 Years whichever is earlier
5 *Replace air filter element (OR if RED band appears on Service Indicator) 45,000 km x x
6 Change coolant in the cooling system 60,000 km x
OR 2 Years whichever is earlier
7 Change Sedimenter / Water seperator1,05,000 km x
8 Change Timing Belt & Timing Belt Idler1,05,000 km x
ProCarManuals.com
Page 148 of 161
148
S E R V I C E S C H E D U L ESER SERSER SER
SER
VICE SCHEDULE VICE SCHEDULEVICE SCHEDULE VICE SCHEDULE
VICE SCHEDULE
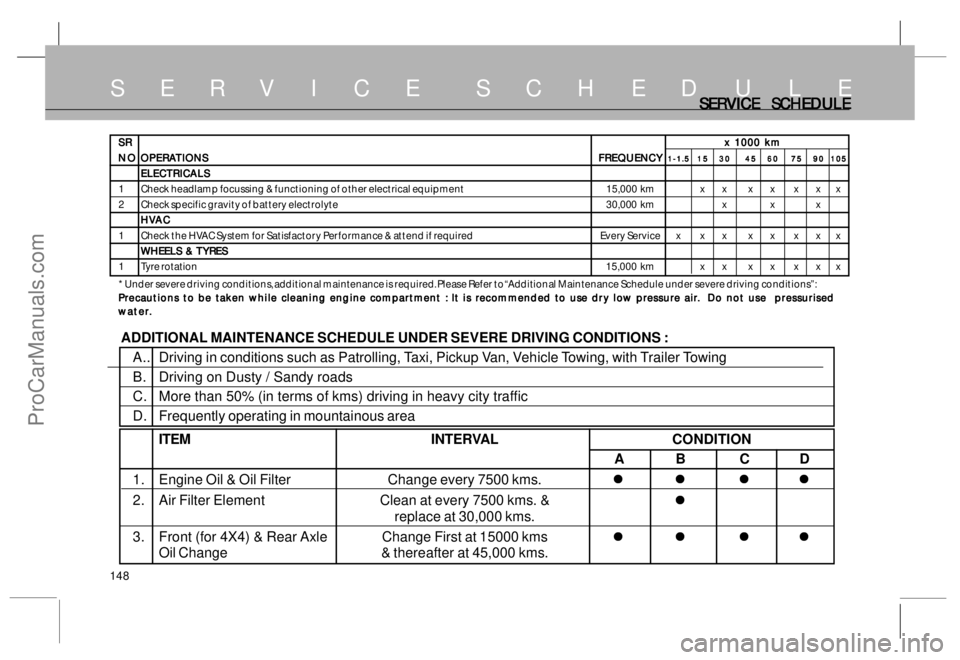
ADDITIONAL MAINTENANCE SCHEDULE UNDER SEVERE DRIVING CONDITIONS :
A.. Driving in conditions such as Patrolling, Taxi, Pickup Van, Vehicle Towing, with Trailer Towing
B. Driving on Dusty / Sandy roads
C. More than 50% (in terms of kms) driving in heavy city traffic
D. Frequently operating in mountainous area
ITEMINTERVAL CONDITION
AB CD
1. Engine Oil & Oil Filter Change every 7500 kms.
�z �z�z �z
�z
�z �z�z �z
�z
�z �z�z �z
�z
�z �z�z �z
�z
2. Air Filter Element Clean at every 7500 kms. &
�z �z�z �z
�z
replace at 30,000 kms.
3. Front (for 4X4) & Rear Axle Change First at 15000 kms
�z �z�z �z
�z
�z �z�z �z
�z
�z �z�z �z
�z
�z �z�z �z
�z
Oil Change & thereafter at 45,000 kms.
SR SRSR SR
SR
x 1000 km x 1000 kmx 1000 km x 1000 km
x 1000 km
NO NONO NO
NO
OPER OPEROPER OPER
OPER
A AA A
A
TIONS TIONSTIONS TIONS
TIONS
FREQUENCY FREQUENCYFREQUENCY FREQUENCY
FREQUENCY
1-1.5 1-1.51-1.5 1-1.5
1-1.5
15 1515 15
15
30 3030 30
30
45 4545 45
45
60 6060 60
60
75 7575 75
75
90 9090 90
90
105 105105 105
105
ELECTRICALS ELECTRICALSELECTRICALS ELECTRICALS
ELECTRICALS
1 Check headlamp focussing & functioning of other electrical equipment 15,000 km x x x x x x x
2 Check specific gravity of battery electrolyte 30,000 km x x x
HV HVHV HV
HV
A AA A
A
C CC C
C
1 Check the HVAC System for Satisfactory Performance & attend if required Every Service x x x x x x x x
WHEELS & WHEELS & WHEELS & WHEELS &
WHEELS &
T TT T
T
YRES YRESYRES YRES
YRES
1 Tyre rotation15,000 km x x x x x x x
* Under severe driving conditions, additional maintenance is required. Please Refer to “Additional Maintenance Schedule under severe driving conditions”:
P PP P
P
r rr r
r
ec ecec ec
ec
autions t autions tautions t autions t
autions t
o b o bo b o b
o b
e tak e take tak e tak
e tak
en while cleaning engine c en while cleaning engine cen while cleaning engine c en while cleaning engine c
en while cleaning engine c
ompar omparompar ompar
ompar
tmen tmentmen tmen
tmen
t : t :t : t :
t :
I I I I
I
t is r t is rt is r t is r
t is r
ec ecec ec
ec
ommended t ommended tommended t ommended t
ommended t
o use dr o use dro use dr o use dr
o use dr
y lo y loy lo y lo
y lo
w pr w prw pr w pr
w pr
essur essuressur essur
essur
e air e aire air e air
e air
.. ..
.
D D D D
D
o not use pr o not use pro not use pr o not use pr
o not use pr
essur essuressur essur
essur
ised isedised ised
ised
w ww w
w
a aa a
a
t tt t
t
er erer er
er
.. ..
.
ProCarManuals.com
Page 155 of 161
155
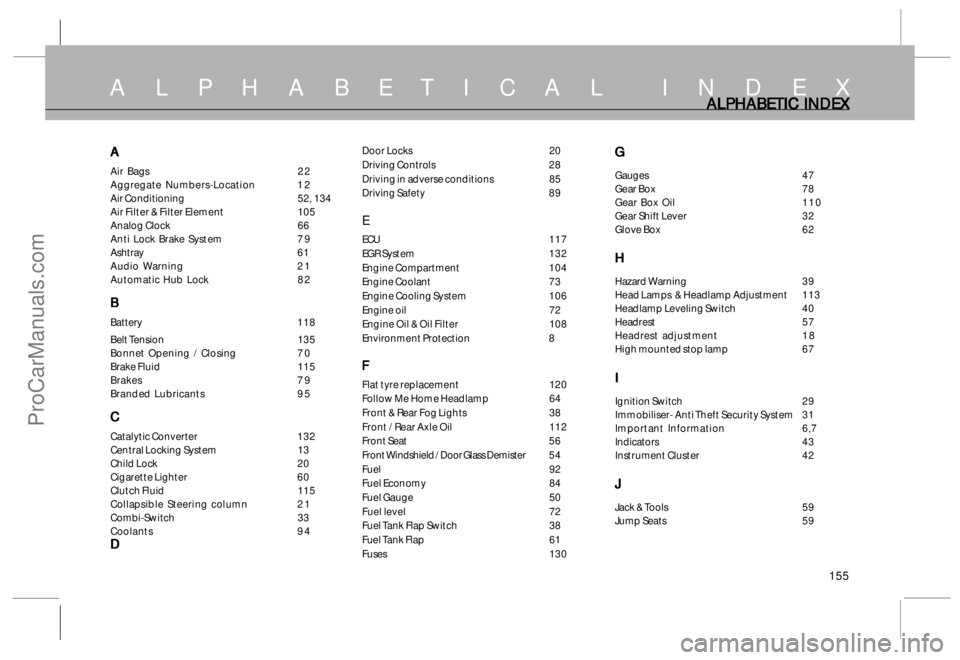
A L P H A B E T I C A L I N D E X ALPHABETIC INDEX ALPHABETIC INDEX ALPHABETIC INDEX ALPHABETIC INDEX
ALPHABETIC INDEX
A AA A
A
Air Bags 2 2
Aggregate Numbers-Location 1 2
Air Conditioning52, 134
Air Filter & Filter Element 105
Analog Clock 66
Anti Lock Brake System 7 9
Ashtray 6 1
Audio Warning 2 1
Automatic Hub Lock 8 2
B BB B
B
Battery 118
Belt Tension 135
Bonnet Opening / Closing 7 0
Brake Fluid 115
Brakes 7 9
Branded Lubricants 9 5
C CC C
C
Catalytic Converter 132
Central Locking System 13
Child Lock 20
Cigarette Lighter 60
Clutch Fluid 115
Collapsible Steering column 2 1
Combi-Switch 33
Coolants 9 4
D DD D
D
Door Locks 20
Driving Controls 28
Driving in adverse conditions 85
Driving Safety 89
E
ECU 1 1 7
EGR System 132
Engine Compartment 104
Engine Coolant 73
Engine Cooling System 106
Engine oil 72
Engine Oil & Oil Filter 108
Environment Protection 8
F FF F
F
Flat tyre replacement 120
Follow Me Home Headlamp 64
Front & Rear Fog Lights 38
Front / Rear Axle Oil 112
Front Seat 56
Front Windshield / Door Glass Demister 5 4
Fuel 92
Fuel Economy 84
Fuel Gauge 50
Fuel level 72
Fuel Tank Flap Switch 38
Fuel Tank Flap 61
Fuses 130
G GG G
G
Gauges 4 7
Gear Box 78
Gear Box Oil 1 1 0
Gear Shift Lever 32
Glove Box 62
H HH H
H
Hazard Warning 39
Head Lamps & Headlamp Adjustment 113
Headlamp Leveling Switch 40
Headrest 57
Headrest adjustment 1 8
High mounted stop lamp 67
I II I
I
Ignition Switch 29
Immobiliser- Anti Theft Security System 31
Important Information 6,7
Indicators 43
Instrument Cluster 42
J JJ J
J
Jack & Tools 59
Jump Seats 59
ProCarManuals.com