key TATA SAFARI 2015 User Guide
[x] Cancel search | Manufacturer: TATA, Model Year: 2015, Model line: SAFARI, Model: TATA SAFARI 2015Pages: 161, PDF Size: 2.55 MB
Page 49 of 161
49
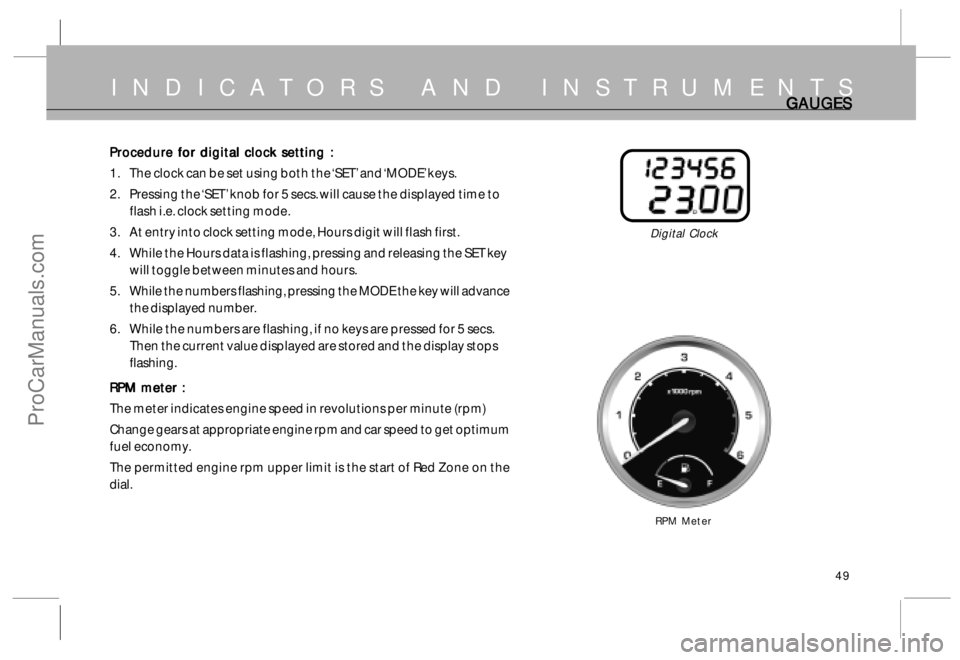
Procedure for digital clock setting : Procedure for digital clock setting :Procedure for digital clock setting : Procedure for digital clock setting :
Procedure for digital clock setting :
1. The clock can be set using both the ‘SET’ and ‘MODE’ keys.
2. Pressing the ‘SET’ knob for 5 secs. will cause the displayed time to
flash i.e. clock setting mode.
3. At entry into clock setting mode, Hours digit will flash first.
4. While the Hours data is flashing, pressing and releasing the SET key
will toggle between minutes and hours.
5. While the numbers flashing, pressing the MODE the key will advance
the displayed number.
6. While the numbers are flashing, if no keys are pressed for 5 secs.
Then the current value displayed are stored and the display stops
flashing.
RPM meter : RPM meter :RPM meter : RPM meter :
RPM meter :
The meter indicates engine speed in revolutions per minute (rpm)
Change gears at appropriate engine rpm and car speed to get optimum
fuel economy.
The permitted engine rpm upper limit is the start of Red Zone on the
dial.
INDICATORS AND INSTRUMENTSGA GAGA GA
GA
UGES UGESUGES UGES
UGES
RPM Meter
Digital Clock
ProCarManuals.com
Page 55 of 161
55
PO POPO PO
PO
WER WER WER WER
WER
WINDO WINDOWINDO WINDO
WINDO
W WW W
W
S SS S
SCOMFORT AND CONVENIENCE
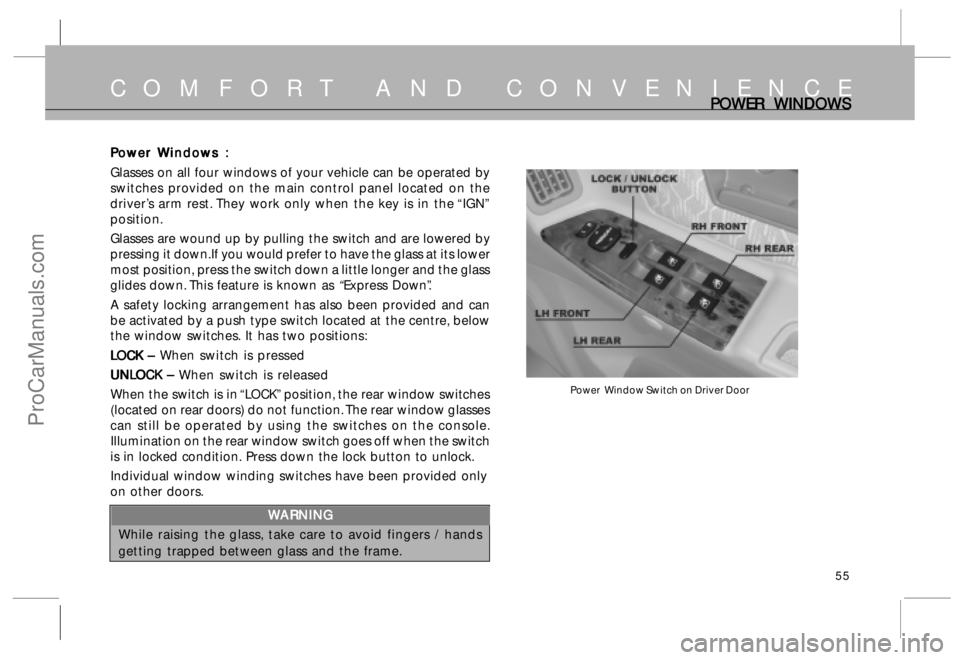
Power Window Switch on Driver Door
P PP P
P
o oo o
o
w ww w
w
er er er er
er
W WW W
W
indo indoindo indo
indo
w ww w
w
s : s :s : s :
s :
Glasses on all four windows of your vehicle can be operated by
switches provided on the main control panel located on the
driver’s arm rest. They work only when the key is in the “IGN”
position.
Glasses are wound up by pulling the switch and are lowered by
pressing it down.If you would prefer to have the glass at its lower
most position, press the switch down a little longer and the glass
glides down. This feature is known as
“Express Down”.
A safety locking arrangement has also been provided and can
be activated by a push type switch located at the centre, below
the window switches. It has two positions:
L LL L
L
OCK – OCK – OCK – OCK –
OCK – When switch is pressed
UNL UNLUNL UNL
UNL
OCK – OCK – OCK – OCK –
OCK – When switch is released
When the switch is in “LOCK” position, the rear window switches
(located on rear doors) do not function. The rear window glasses
can still be operated by using the switches on the console.
Illumination on the rear window switch goes off when the switch
is in locked condition. Press down the lock button to unlock.
Individual window winding switches have been provided only
on other doors.
W WW W
W
ARNING ARNINGARNING ARNING
ARNING
While raising the glass, take care to avoid fingers / hands
getting trapped between glass and the frame.
ProCarManuals.com
Page 62 of 161
62
Mechanically operated fuel tank flap (if fitted) Mechanically operated fuel tank flap (if fitted)Mechanically operated fuel tank flap (if fitted) Mechanically operated fuel tank flap (if fitted)
Mechanically operated fuel tank flap (if fitted)
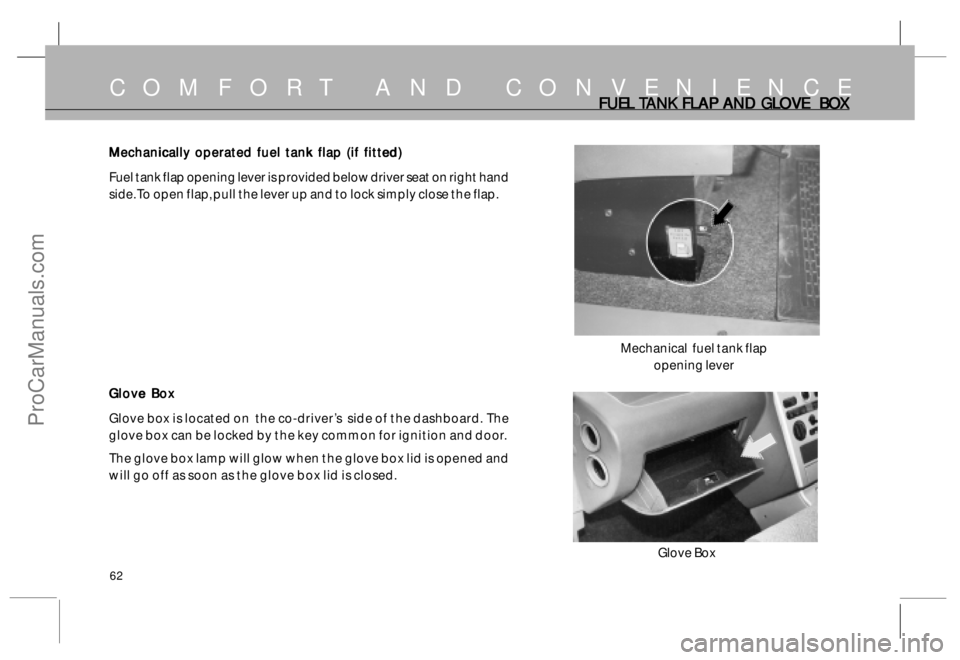
Fuel tank flap opening lever is provided below driver seat on right hand
side. To open flap, pull the lever up and to lock simply close the flap.
Glove Box Glove BoxGlove Box Glove Box
Glove Box
Glove box is located on the co-driver’s side of the dashboard. The
glove box can be locked by the key common for ignition and door.
The glove box lamp will glow when the glove box lid is opened and
will go off as soon as the glove box lid is closed.
COMFORT AND CONVENIENCE
Glove Box
Mechanical fuel tank flap
opening lever
FUEL FUEL FUEL FUEL
FUEL
T TT T
T
ANK FL ANK FLANK FL ANK FL
ANK FL
AP AND GL AP AND GLAP AND GL AP AND GL
AP AND GL
OVE BO OVE BOOVE BO OVE BO
OVE BO
X XX X
X
ProCarManuals.com
Page 63 of 161
63
INSIDE REAR INSIDE REAR INSIDE REAR INSIDE REAR
INSIDE REAR
VIE VIEVIE VIE
VIE
W MIRR W MIRRW MIRR W MIRR
W MIRR
OR AND INTERIOR R OR AND INTERIOR ROR AND INTERIOR R OR AND INTERIOR R
OR AND INTERIOR R
OOF LIGHT OOF LIGHTOOF LIGHT OOF LIGHT
OOF LIGHT
S SS S
S
Inside Rear View Mirror Inside Rear View MirrorInside Rear View Mirror Inside Rear View Mirror
Inside Rear View Mirror
An additional antiglare rear view mirror is fitted inside the cab.
Use antiglare position only when necessary because it reduces rear
view clarity.
Sun Visors Sun VisorsSun Visors Sun Visors
Sun Visors
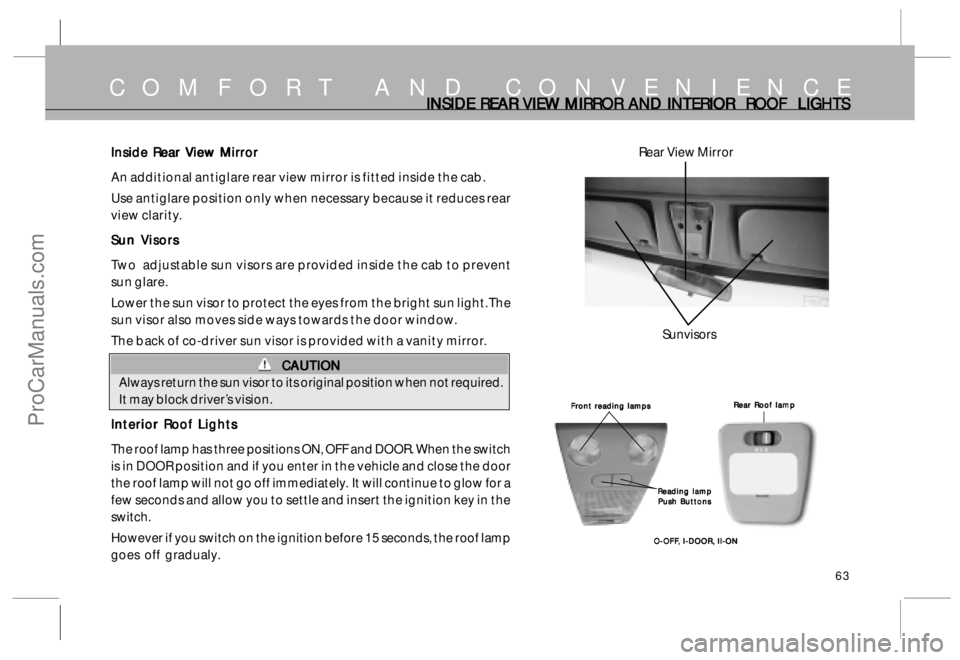
Two adjustable sun visors are provided inside the cab to prevent
sun glare.
Lower the sun visor to protect the eyes from the bright sun light. The
sun visor also moves side ways towards the door window.
The back of co-driver sun visor is provided with a vanity mirror.
CAUTION CAUTIONCAUTION CAUTION
CAUTION
Always return the sun visor to its original position when not required.
It may block driver’s vision.
Interior Roof Lights Interior Roof LightsInterior Roof Lights Interior Roof Lights
Interior Roof Lights
The roof lamp has three positions ON, OFF and DOOR. When the switch
is in DOOR position and if you enter in the vehicle and close the door
the roof lamp will not go off immediately. It will continue to glow for a
few seconds and allow you to settle and insert the ignition key in the
switch.
However if you switch on the ignition before 15 seconds, the roof lamp
goes off gradualy.
COMFORT AND CONVENIENCE
Front reading lamps Front reading lampsFront reading lamps Front reading lamps
Front reading lamps
Reading lamp Reading lampReading lamp Reading lamp
Reading lamp
Push Buttons Push ButtonsPush Buttons Push Buttons
Push Buttons
O-OFF O-OFFO-OFF O-OFF
O-OFF
,, ,,
,
I-DOOR, I-DOOR, I-DOOR, I-DOOR,
I-DOOR,
II-ON II-ON II-ON II-ON
II-ONRear Roof lamp Rear Roof lampRear Roof lamp Rear Roof lamp
Rear Roof lamp
Sunvisors Rear View Mirror
ProCarManuals.com
Page 64 of 161
64
COMFORT AND CONVENIENCE‘FOLL ‘FOLL‘FOLL ‘FOLL
‘FOLL
O OO O
O
W ME HOME’ W ME HOME’W ME HOME’ W ME HOME’
W ME HOME’
HEADL HEADL HEADL HEADL
HEADL
AMPS AMPSAMPS AMPS
AMPS
“Follow me home” Headlamps :
After closing the door, your car’s headlights remain ON for
approximately 30 seconds to help you reach your destination
in the dark.
If the car’s headlamps remain ON for five minutes or more and
when switched off, ignition key removed and the door locked
or kept open, the headlamp’s Low-beam comes ON
automatically for approximately 30 seconds to help the car
occupant reach his / her destination safely. If, within 15 minutes,
the car is locked using a remote key, the headlamp will come
ON for a further 30 seconds. If the remote key is used again
within 15 minutes, this procedure is repeated. If the occupant
returns to the car within 15 minutes after last switching it off,
the headlamp again comes ON when the door is unlocked.
(P (P(P (P
(P
lease not lease notlease not lease not
lease not
e – e – e – e –
e –
T TT T
T
he r he rhe r he r
he r
ep epep ep
ep
ea eaea ea
ea
tabilit tabilittabilit tabilit
tabilit
y func y funcy func y func
y func
tion of the tion of thetion of the tion of the
tion of the
Headlamps coming ON again within 15 minutes is not Headlamps coming ON again within 15 minutes is notHeadlamps coming ON again within 15 minutes is not Headlamps coming ON again within 15 minutes is not
Headlamps coming ON again within 15 minutes is not
available for the LX version) available for the LX version)available for the LX version) available for the LX version)
available for the LX version)
ProCarManuals.com
Page 65 of 161
65
COMFORT AND CONVENIENCE
Reverse Guiding System (if fitted) Reverse Guiding System (if fitted)Reverse Guiding System (if fitted) Reverse Guiding System (if fitted)
Reverse Guiding System (if fitted)
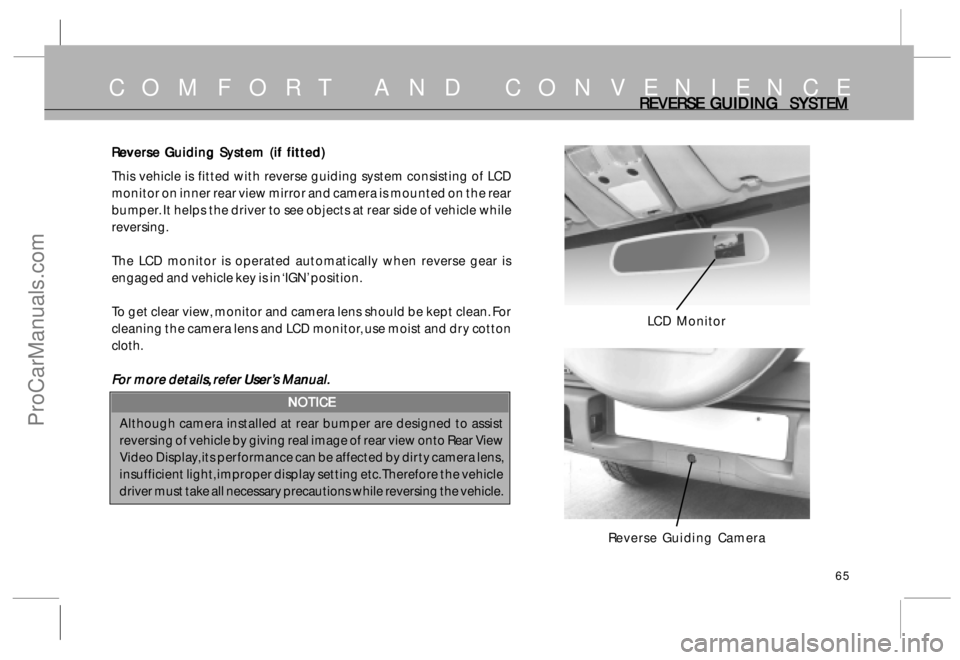
This vehicle is fitted with reverse guiding system consisting of LCD
monitor on inner rear view mirror and camera is mounted on the rear
bumper. It helps the driver to see objects at rear side of vehicle while
reversing.
The LCD monitor is operated automatically when reverse gear is
engaged and vehicle key is in ‘IGN’ position.
To get clear view, monitor and camera lens should be kept clean. For
cleaning the camera lens and LCD monitor, use moist and dry cotton
cloth.
F FF F
F
or mor or moror mor or mor
or mor
e details e detailse details e details
e details
,, ,,
,
r r r r
r
ef efef ef
ef
er U er Uer U er U
er U
ser serser ser
ser
’’ ’’
’
s M s Ms M s M
s M
anual. anual.anual. anual.
anual.
NOTICE NOTICENOTICE NOTICE
NOTICE
Although camera installed at rear bumper are designed to assist
reversing of vehicle by giving real image of rear view onto Rear View
Video Display, its performance can be affected by dirty camera lens,
insufficient light, improper display setting etc. Therefore the vehicle
driver must take all necessary precautions while reversing the vehicle.
REVERSE GUIDING SYSTEM REVERSE GUIDING SYSTEMREVERSE GUIDING SYSTEM REVERSE GUIDING SYSTEM
REVERSE GUIDING SYSTEM
LCD Monitor
Reverse Guiding Camera
ProCarManuals.com
Page 76 of 161
76
D R I V I N GST STST ST
ST
AR ARAR AR
AR
TING AND ST TING AND STTING AND ST TING AND ST
TING AND ST
OPPING OPPING OPPING OPPING
OPPING
THE ENGINE THE ENGINETHE ENGINE THE ENGINE
THE ENGINE
Starting the Engine Starting the EngineStarting the Engine Starting the Engine
Starting the Engine
Before starting
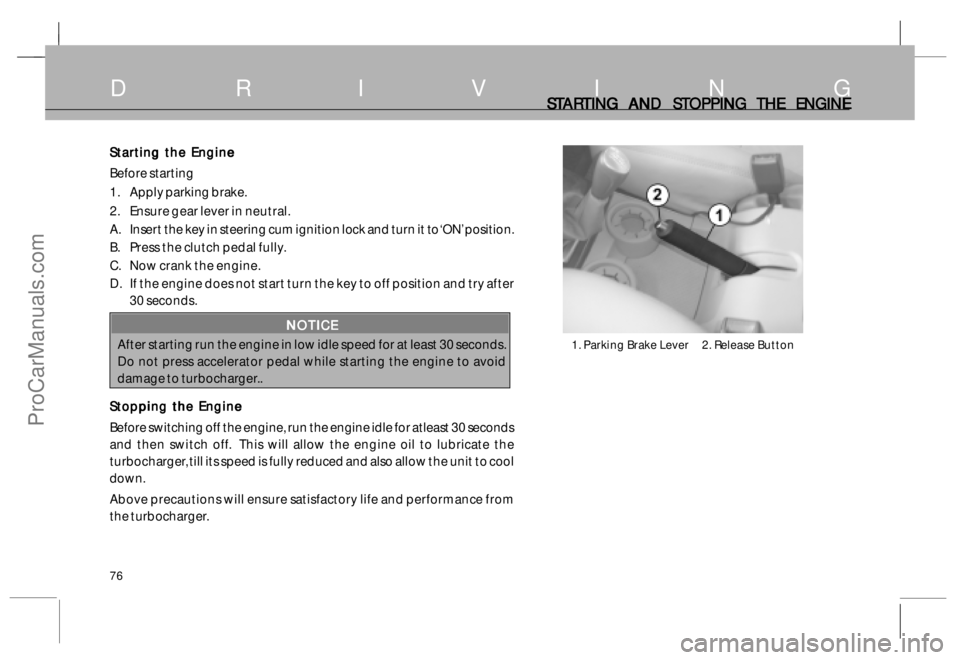
1. Apply parking brake.
2. Ensure gear lever in neutral.
A. Insert the key in steering cum ignition lock and turn it to ‘ON’ position.
B. Press the clutch pedal fully.
C. Now crank the engine.
D. If the engine does not start turn the key to off position and try after
30 seconds.
NOTICE NOTICENOTICE NOTICE
NOTICE
After starting run the engine in low idle speed for at least 30 seconds.
Do not press accelerator pedal while starting the engine to avoid
damage to turbocharger..
Stopping the Engine Stopping the EngineStopping the Engine Stopping the Engine
Stopping the Engine
Before switching off the engine, run the engine idle for atleast 30 seconds
and then switch off. This will allow the engine oil to lubricate the
turbocharger, till its speed is fully reduced and also allow the unit to cool
down.
Above precautions will ensure satisfactory life and performance from
the turbocharger.1. Parking Brake Lever 2. Release Button
ProCarManuals.com
Page 77 of 161
77
D R I V I N GPREP PREPPREP PREP
PREP
ARING ARING ARING ARING
ARING
T TT T
T
O DRIVE & R O DRIVE & RO DRIVE & R O DRIVE & R
O DRIVE & R
UNNING IN PERIOD UNNING IN PERIODUNNING IN PERIOD UNNING IN PERIOD
UNNING IN PERIOD
Preparing to Drive Preparing to DrivePreparing to Drive Preparing to Drive
Preparing to Drive
The following checks and adjustments should be done
before you start driving the vehicle.
1 . Ensure all mirrors, windows and outside lights are clean
and unobstructed. Remove dust, frost, snow or ice if
any, on these.
2 . Ensure bonnet is fully closed.
3 . Check that any items you may be carrying inside with
you are stored properly or fastened down securely.
4 . Check adjustment of seat. If required adjust to your
convenience.
5 . Check adjustment of all rear view mirrors.
6 . Check adjustment of steering wheel.
7 . If the doors are not properly closed you will get a audio
warning/indicator light as soon as you insert the ignition
key in the switch. Make sure all doors are properly closed
and locked.
8 . If the seat belts of driver & co-driver are not fastened you
will get an audio warning as soon as you turn the key to
ignition position. Fasten your seat belt, ensure co-driver
seat passenger has also fastened the seat belt (see
Your Safety).9 . Check and ensure that all the gauges and indicator lights
in the instrument panel are working.
Running-in Period Running-in PeriodRunning-in Period Running-in Period
Running-in Period
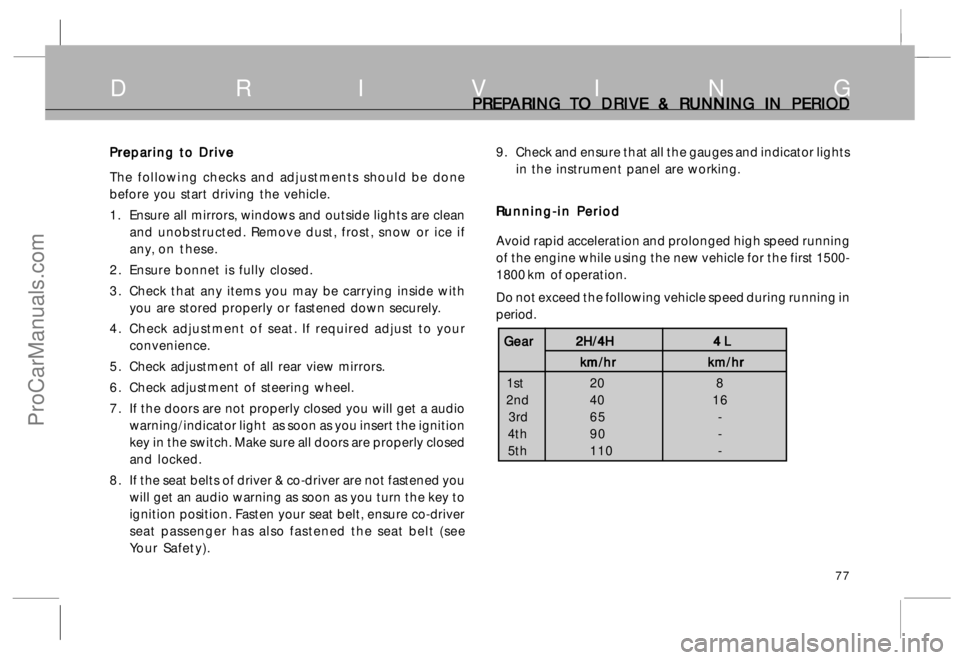
Avoid rapid acceleration and prolonged high speed running
of the engine while using the new vehicle for the first 1500-
1800 km of operation.
Do not exceed the following vehicle speed during running in
period.
Gear GearGear Gear
Gear
2H/4H 2H/4H 2H/4H 2H/4H
2H/4H
4 L 4 L 4 L 4 L
4 L
km/hr km/hr km/hr km/hr
km/hr
km/hr km/hr km/hr km/hr
km/hr
1st 20 8
2nd 40 16
3rd 65 -
4th 90 -
5th 110 -
ProCarManuals.com
Page 130 of 161
130
M A I N T E N A N C EFUSES FUSESFUSES FUSES
FUSES
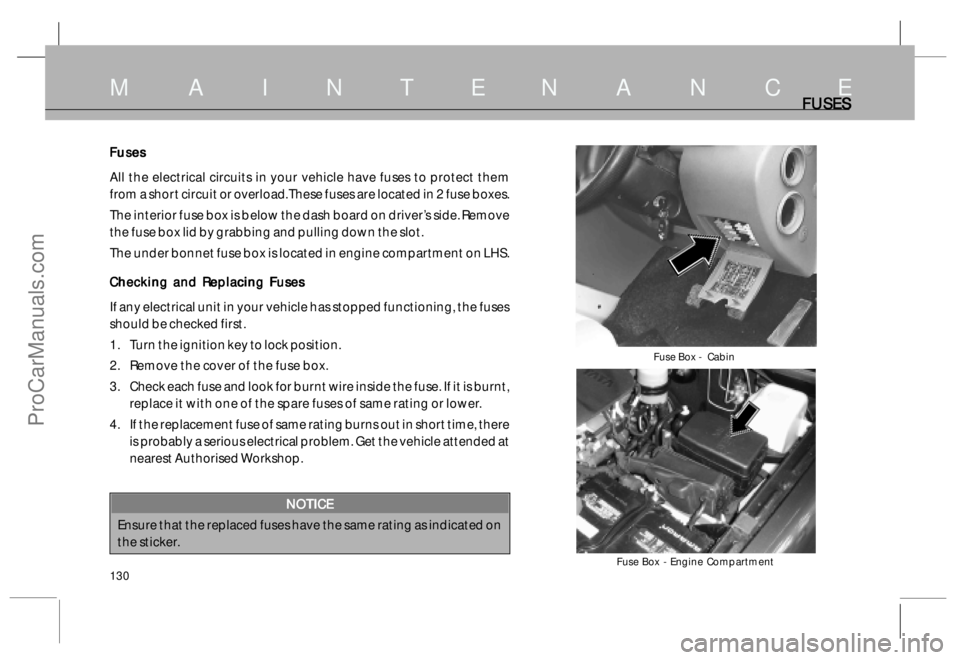
Fuse Box - Cabin
Fuse Box - Engine Compartment
Fuses FusesFuses Fuses
Fuses
All the electrical circuits in your vehicle have fuses to protect them
from a short circuit or overload. These fuses are located in 2 fuse boxes.
The interior fuse box is below the dash board on driver’s side. Remove
the fuse box lid by grabbing and pulling down the slot.
The under bonnet fuse box is located in engine compartment on LHS.
Checking and Replacing Fuses Checking and Replacing FusesChecking and Replacing Fuses Checking and Replacing Fuses
Checking and Replacing Fuses
If any electrical unit in your vehicle has stopped functioning, the fuses
should be checked first.
1. Turn the ignition key to lock position.
2. Remove the cover of the fuse box.
3. Check each fuse and look for burnt wire inside the fuse. If it is burnt,
replace it with one of the spare fuses of same rating or lower.
4. If the replacement fuse of same rating burns out in short time, there
is probably a serious electrical problem. Get the vehicle attended at
nearest Authorised Workshop.
NOTICE NOTICENOTICE NOTICE
NOTICE
Ensure that the replaced fuses have the same rating as indicated on
the sticker.
ProCarManuals.com
Page 141 of 161
141
PRELIMINAR PRELIMINARPRELIMINAR PRELIMINAR
PRELIMINAR
Y Y Y Y
Y
TR TRTR TR
TR
OUBLE SHOO OUBLE SHOOOUBLE SHOO OUBLE SHOO
OUBLE SHOO
TING TINGTING TING
TING
SR. NO. SR. NO.SR. NO. SR. NO.
SR. NO.
PROBLEM OBSERVED PROBLEM OBSERVEDPROBLEM OBSERVED PROBLEM OBSERVED
PROBLEM OBSERVED
PROBABLE CAUSE PROBABLE CAUSEPROBABLE CAUSE PROBABLE CAUSE
PROBABLE CAUSE
A AA A
A
CTION CTION CTION CTION
CTION
T TT T
T
O BE O BE O BE O BE
O BE
T TT T
T
AKEN AKENAKEN AKEN
AKEN
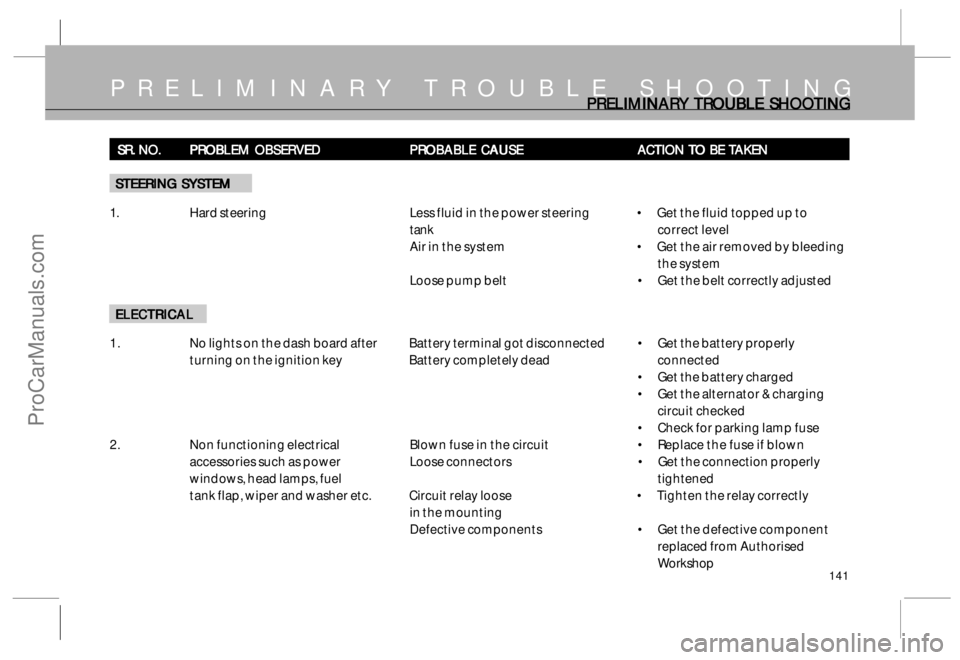
STEERING SYSTEM STEERING SYSTEMSTEERING SYSTEM STEERING SYSTEM
STEERING SYSTEM
1. Hard steeringLess fluid in the power steering • Get the fluid topped up to
tankcorrect level
Air in the system • Get the air removed by bleeding
the system
Loose pump belt • Get the belt correctly adjusted
ELECTRICAL ELECTRICALELECTRICAL ELECTRICAL
ELECTRICAL
1. No lights on the dash board after Battery terminal got disconnected• Get the battery properly
turning on the ignition key Battery completely dead connected
• Get the battery charged
• Get the alternator & charging
circuit checked
• Check for parking lamp fuse
2. Non functioning electricalBlown fuse in the circuit • Replace the fuse if blown
accessories such as powerLoose connectors • Get the connection properly
windows, head lamps, fueltightened
tank flap, wiper and washer etc. Circuit relay loose • Tighten the relay correctly
in the mounting
Defective components • Get the defective component
replaced from Authorised
Workshop
PRELIMINARY TROUBLE SHOOTING
ProCarManuals.com