TATA SAFARI 2015 Owner's Guide
Manufacturer: TATA, Model Year: 2015, Model line: SAFARI, Model: TATA SAFARI 2015Pages: 161, PDF Size: 2.55 MB
Page 31 of 161
31
D R I V I N G C O N T R O L SIMMOBILISER IMMOBILISERIMMOBILISER IMMOBILISER
IMMOBILISER
Anti-theft security system - Immobiliser (If fitted) Anti-theft security system - Immobiliser (If fitted)Anti-theft security system - Immobiliser (If fitted) Anti-theft security system - Immobiliser (If fitted)
Anti-theft security system - Immobiliser (If fitted)
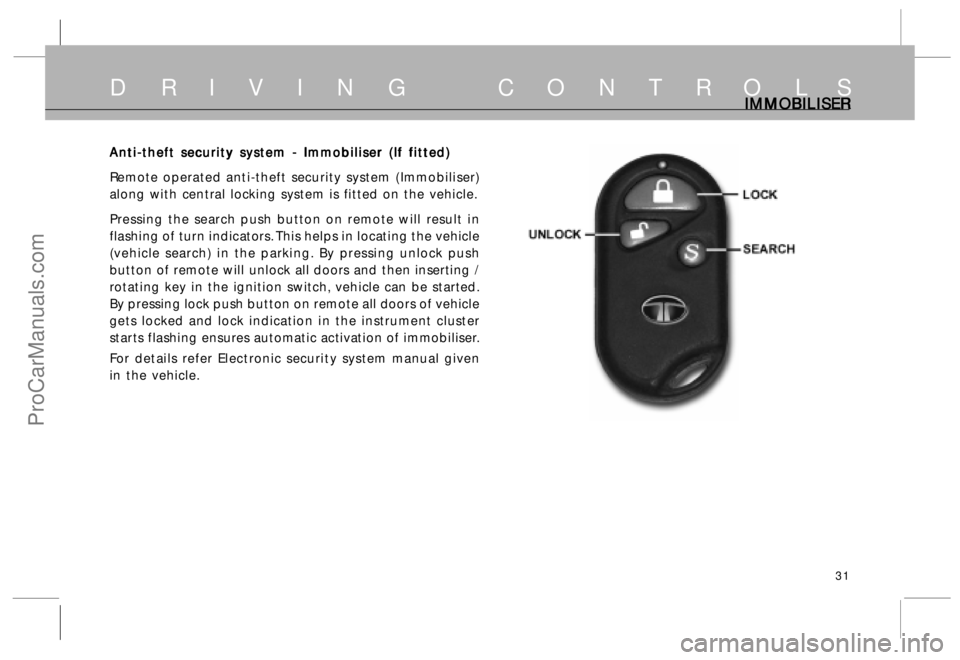
Remote operated anti-theft security system (Immobiliser)
along with central locking system is fitted on the vehicle.
Pressing the search push button on remote will result in
flashing of turn indicators. This helps in locating the vehicle
(vehicle search) in the parking. By pressing unlock push
button of remote will unlock all doors and then inserting /
rotating key in the ignition switch, vehicle can be started.
By pressing lock push button on remote all doors of vehicle
gets locked and lock indication in the instrument cluster
starts flashing ensures automatic activation of immobiliser.
For details refer Electronic security system manual given
in the vehicle.
ProCarManuals.com
Page 32 of 161
32
D R I V I N G C O N T R O L SP PP P
P
ARKING BR ARKING BRARKING BR ARKING BR
ARKING BR
AKE AND GEAR SHIFT LE AKE AND GEAR SHIFT LEAKE AND GEAR SHIFT LE AKE AND GEAR SHIFT LE
AKE AND GEAR SHIFT LE
VER VERVER VER
VER
Parking Brake Parking BrakeParking Brake Parking Brake
Parking Brake
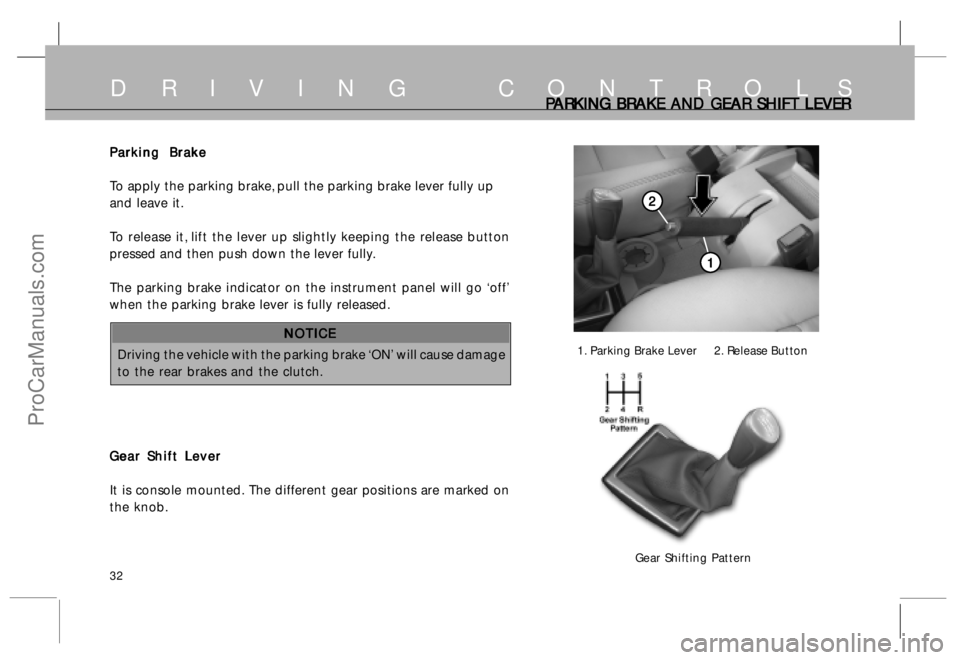
To apply the parking brake, pull the parking brake lever fully up
and leave it.
To release it, lift the lever up slightly keeping the release button
pressed and then push down the lever fully.
The parking brake indicator on the instrument panel will go ‘off’
when the parking brake lever is fully released.
NOTICE NOTICENOTICE NOTICE
NOTICE
Driving the vehicle with the parking brake ‘ON’ will cause damage
to the rear brakes and the clutch.
Gear Shift Lever Gear Shift LeverGear Shift Lever Gear Shift Lever
Gear Shift Lever
It is console mounted. The different gear positions are marked on
the knob.
1. Parking Brake Lever 2. Release Button
Gear Shifting Pattern
1 11 1
1
2 22 2
2
ProCarManuals.com
Page 33 of 161
33
C CC C
C
OMBI SWIT OMBI SWITOMBI SWIT OMBI SWIT
OMBI SWIT
CH CHCH CH
CH
SCHEMA SCHEMASCHEMA SCHEMA
SCHEMA
TIC DIA TIC DIATIC DIA TIC DIA
TIC DIA
GR GRGR GR
GR
AM OF C AM OF CAM OF C AM OF C
AM OF C
OMBI SWIT OMBI SWITOMBI SWIT OMBI SWIT
OMBI SWIT
CH FUNCTIONS CH FUNCTIONSCH FUNCTIONS CH FUNCTIONS
CH FUNCTIONS
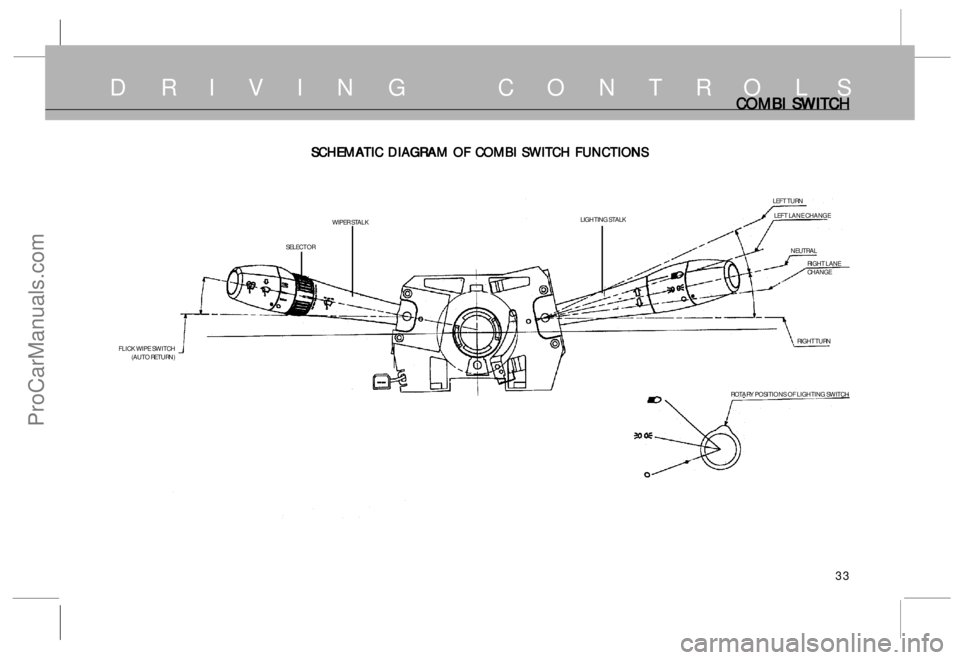
ROTARY POSITIONS OF LIGHTING SWITCHLEFT TURN
LEFT LANE CHANGE
NEUTRAL
RIGHT LANE
CHANGE
RIGHT TURN
FLICK WIPE SWITCH
(AUTO RETURN)LIGHTING STALK
WIPER STALK
SELECTOR
D R I V I N G C O N T R O L S
ProCarManuals.com
Page 34 of 161
34
D R I V I N G C O N T R O L SWIPER CONTROL COMBI-SWITCH LEVER - LEFT WIPER CONTROL COMBI-SWITCH LEVER - LEFTWIPER CONTROL COMBI-SWITCH LEVER - LEFT WIPER CONTROL COMBI-SWITCH LEVER - LEFT
WIPER CONTROL COMBI-SWITCH LEVER - LEFT
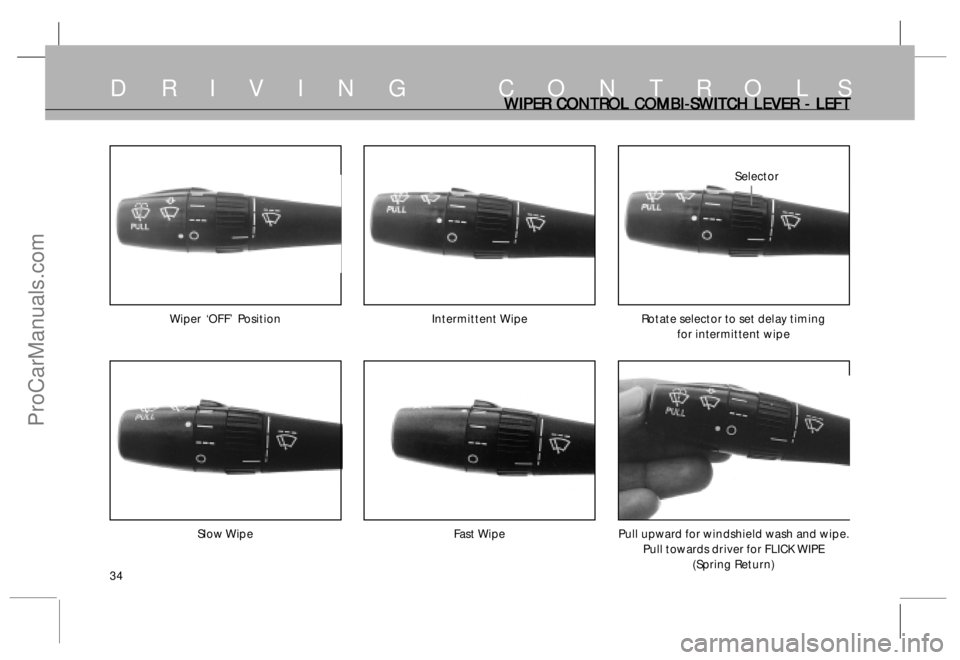
Wiper ‘OFF’ Position Intermittent Wipe Rotate selector to set delay timing
for intermittent wipe
Slow Wipe Fast Wipe Pull upward for windshield wash and wipe.
Pull towards driver for FLICK WIPE
(Spring Return)
Selector
ProCarManuals.com
Page 35 of 161
35
D R I V I N G C O N T R O L SHEADL HEADLHEADL HEADL
HEADL
AMP/INDIC AMP/INDICAMP/INDIC AMP/INDIC
AMP/INDIC
A AA A
A
T TT T
T
OR C OR COR C OR C
OR C
OMBI-SWIT OMBI-SWITOMBI-SWIT OMBI-SWIT
OMBI-SWIT
CH LE CH LECH LE CH LE
CH LE
VER - RIGHT VER - RIGHTVER - RIGHT VER - RIGHT
VER - RIGHT
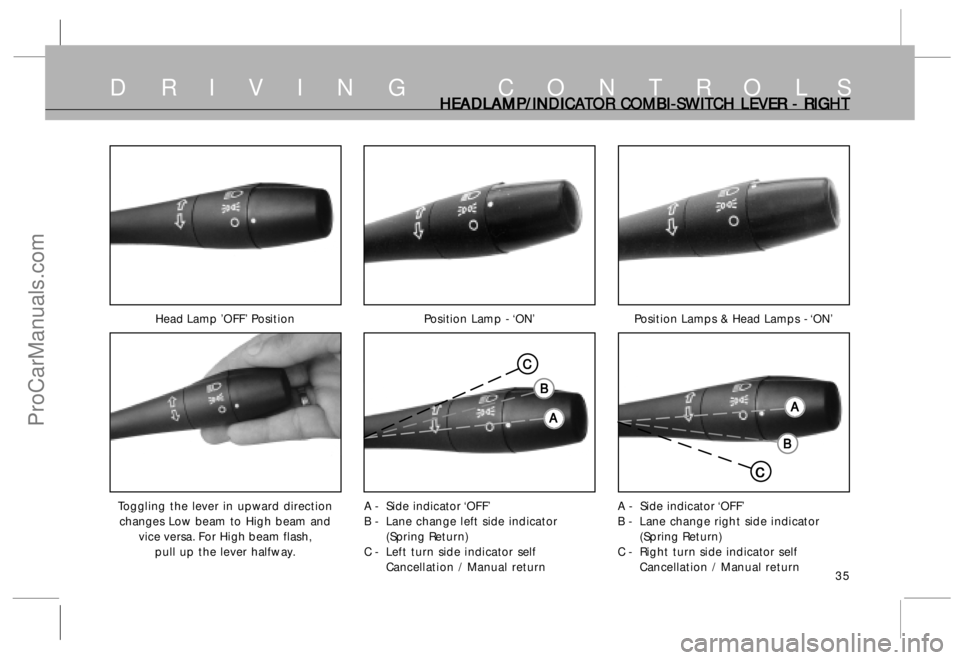
Head Lamp ’OFF’ Position Position Lamp - ‘ON’ Position Lamps & Head Lamps - ‘ON’
Toggling the lever in upward direction
changes Low beam to High beam and
vice versa. For High beam flash,
pull up the lever halfway.A - Side indicator ‘OFF’
B - Lane change left side indicator
(Spring Return)
C - Left turn side indicator self
Cancellation / Manual returnA - Side indicator ‘OFF’
B - Lane change right side indicator
(Spring Return)
C - Right turn side indicator self
Cancellation / Manual return
A AA A
A B BB B
B C CC C
CA AA A
A
B BB B
B
C CC C
C
ProCarManuals.com
Page 36 of 161
36
D R I V I N G C O N T R O L S
T TT T
T
r rr r
r
ansf ansfansf ansf
ansf
er C er Cer C er C
er C
ase E ase Ease E ase E
ase E
lec leclec lec
lec
tr trtr tr
tr
ic S ic Sic S ic S
ic S
hif hifhif hif
hif
t S t St S t S
t S
wit witwit wit
wit
ch : ch :ch : ch :
ch :
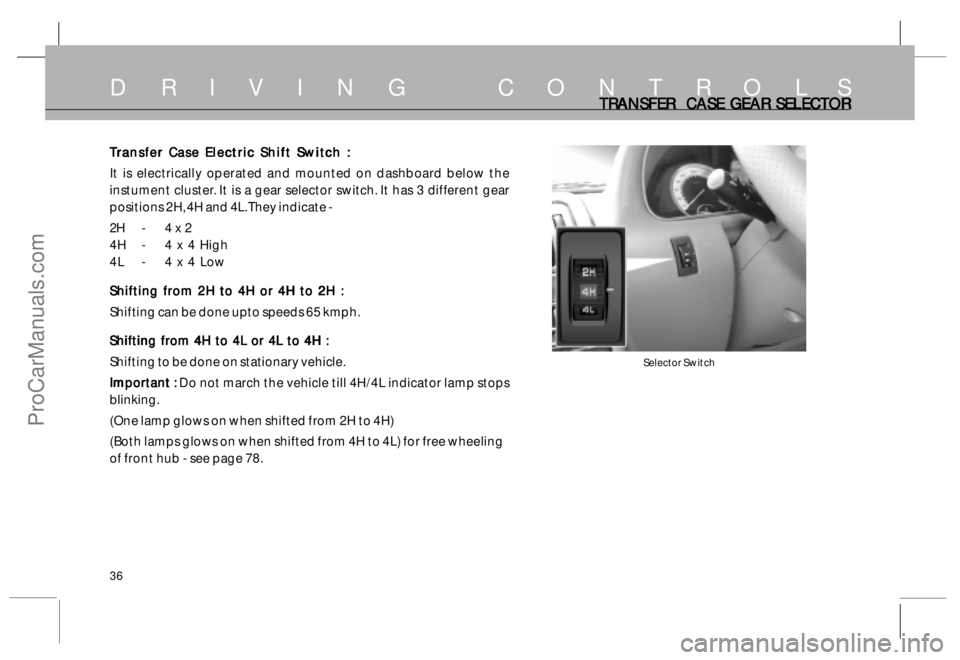
It is electrically operated and mounted on dashboard below the
instument cluster. It is a gear selector switch. It has 3 different gear
positions 2H, 4H and 4L. They indicate -
2H - 4 x 2
4H - 4 x 4 High
4L - 4 x 4 Low
Shifting from 2H to 4H or 4H to 2H : Shifting from 2H to 4H or 4H to 2H :Shifting from 2H to 4H or 4H to 2H : Shifting from 2H to 4H or 4H to 2H :
Shifting from 2H to 4H or 4H to 2H :
Shifting can be done upto speeds 65 kmph.
Shifting from 4H to 4L or 4L to 4H : Shifting from 4H to 4L or 4L to 4H :Shifting from 4H to 4L or 4L to 4H : Shifting from 4H to 4L or 4L to 4H :
Shifting from 4H to 4L or 4L to 4H :
Shifting to be done on stationary vehicle.
Important : Important :Important : Important :
Important : Do not march the vehicle till 4H/4L indicator lamp stops
blinking.
(One lamp glows on when shifted from 2H to 4H)
(Both lamps glows on when shifted from 4H to 4L) for free wheeling
of front hub - see page 78.
Selector Switch
TRANSFER CASE GEAR SELECTOR TRANSFER CASE GEAR SELECTORTRANSFER CASE GEAR SELECTOR TRANSFER CASE GEAR SELECTOR
TRANSFER CASE GEAR SELECTOR
ProCarManuals.com
Page 37 of 161
37
D R I V I N G C O N T R O L SSTEERING STEERING STEERING STEERING
STEERING
WHEEL POSITION ADJUST WHEEL POSITION ADJUSTWHEEL POSITION ADJUST WHEEL POSITION ADJUST
WHEEL POSITION ADJUST
MENT MENTMENT MENT
MENT
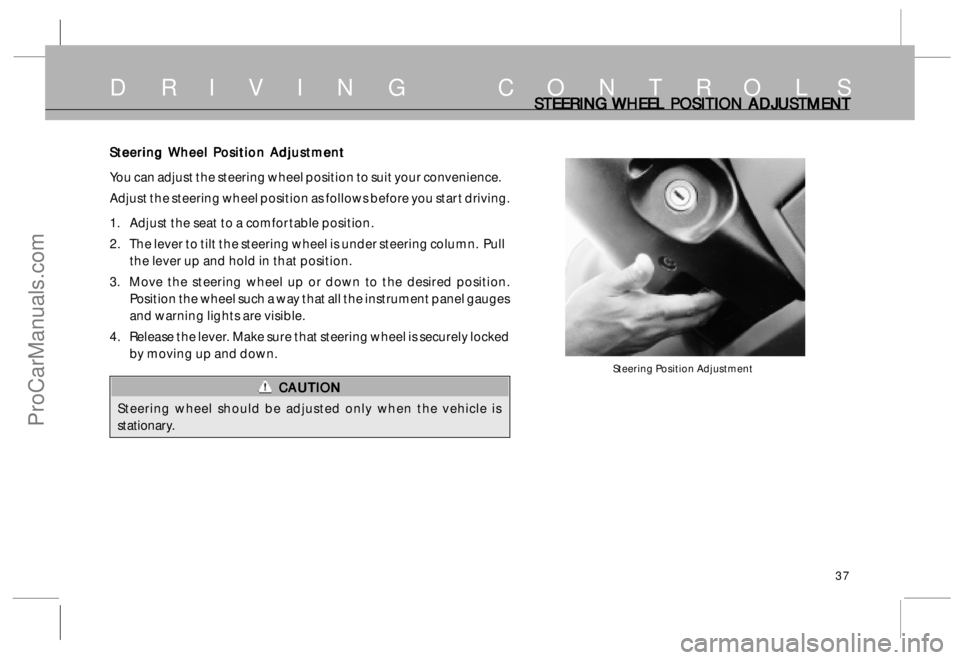
Steering Position Adjustment
Steering Wheel Position Adjustment Steering Wheel Position AdjustmentSteering Wheel Position Adjustment Steering Wheel Position Adjustment
Steering Wheel Position Adjustment
You can adjust the steering wheel position to suit your convenience.
Adjust the steering wheel position as follows before you start driving.
1. Adjust the seat to a comfortable position.
2. The lever to tilt the steering wheel is under steering column. Pull
the lever up and hold in that position.
3. Move the steering wheel up or down to the desired position.
Position the wheel such a way that all the instrument panel gauges
and warning lights are visible.
4. Release the lever. Make sure that steering wheel is securely locked
by moving up and down.
CAUTION CAUTIONCAUTION CAUTION
CAUTION
Steering wheel should be adjusted only when the vehicle is
stationary.
ProCarManuals.com
Page 38 of 161
38
D R I V I N G C O N T R O L SOPER OPEROPER OPER
OPER
A AA A
A
TING SWIT TING SWITTING SWIT TING SWIT
TING SWIT
CHES, CHES,CHES, CHES,
CHES,
FOG L FOG L FOG L FOG L
FOG L
AMPS AND FUEL AMPS AND FUEL AMPS AND FUEL AMPS AND FUEL
AMPS AND FUEL
T TT T
T
ANK FL ANK FLANK FL ANK FL
ANK FL
AP APAP AP
AP
Operating Switches Operating SwitchesOperating Switches Operating Switches
Operating Switches
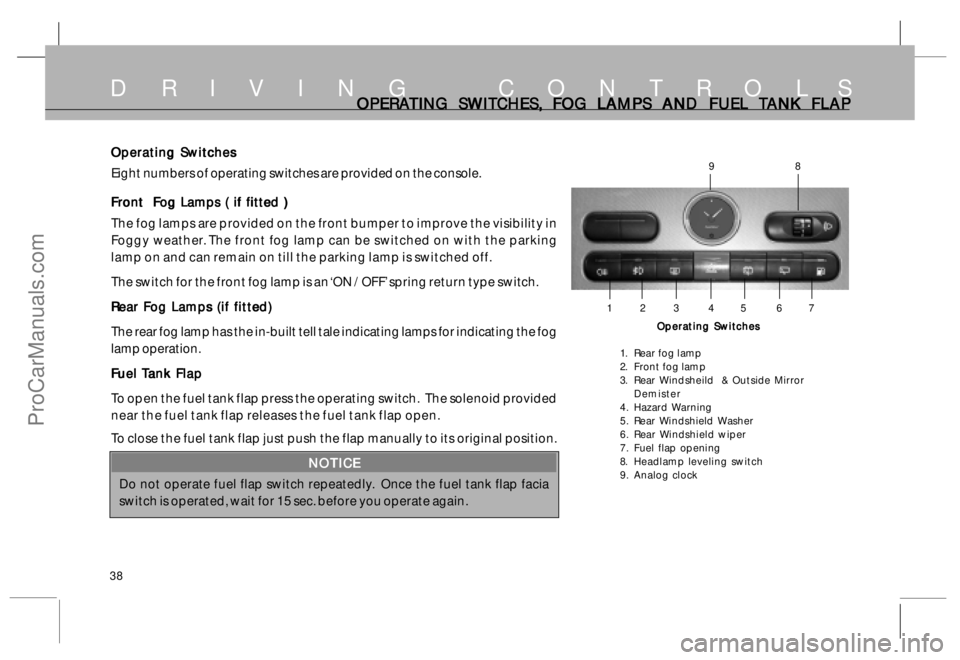
Eight numbers of operating switches are provided on the console.
Front Fog Lamps ( if fitted ) Front Fog Lamps ( if fitted )Front Fog Lamps ( if fitted ) Front Fog Lamps ( if fitted )
Front Fog Lamps ( if fitted )
The fog lamps are provided on the front bumper to improve the visibility in
Foggy weather. The front fog lamp can be switched on with the parking
lamp on and can remain on till the parking lamp is switched off.
The switch for the front fog lamp is an ‘ON / OFF’ spring return type switch.
Rear Fog Lamps (if fitted) Rear Fog Lamps (if fitted)Rear Fog Lamps (if fitted) Rear Fog Lamps (if fitted)
Rear Fog Lamps (if fitted)
The rear fog lamp has the in-built tell tale indicating lamps for indicating the fog
lamp operation.
F FF F
F
uel uel uel uel
uel
T TT T
T
ank F ank Fank F ank F
ank F
lap laplap lap
lap
To open the fuel tank flap press the operating switch. The solenoid provided
near the fuel tank flap releases the fuel tank flap open.
To close the fuel tank flap just push the flap manually to its original position.
NOTICE NOTICENOTICE NOTICE
NOTICE
Do not operate fuel flap switch repeatedly. Once the fuel tank flap facia
switch is operated, wait for 15 sec. before you operate again.
Operating Switches Operating SwitchesOperating Switches Operating Switches
Operating Switches
1. Rear fog lamp
2. Front fog lamp
3. Rear Windsheild & Outside Mirror
Demister
4. Hazard Warning
5. Rear Windshield Washer
6. Rear Windshield wiper
7. Fuel flap opening
8. Headlamp leveling switch
9. Analog clock
1 2 3 4 5 6 7
98
ProCarManuals.com
Page 39 of 161
39
D R I V I N G C O N T R O L SREAR REAR REAR REAR
REAR
WINDSHIELD DEMISTER AND HAZARD WINDSHIELD DEMISTER AND HAZARD WINDSHIELD DEMISTER AND HAZARD WINDSHIELD DEMISTER AND HAZARD
WINDSHIELD DEMISTER AND HAZARD
W WW W
W
ARNING ARNINGARNING ARNING
ARNING
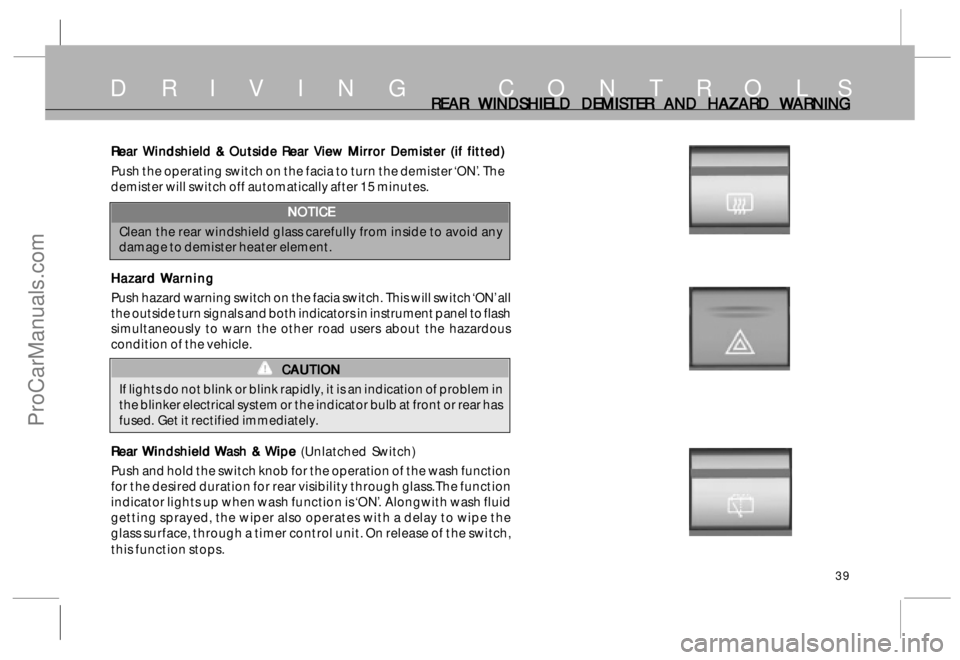
Rear Windshield & Outside Rear View Mirror Demister (if fitted) Rear Windshield & Outside Rear View Mirror Demister (if fitted)Rear Windshield & Outside Rear View Mirror Demister (if fitted) Rear Windshield & Outside Rear View Mirror Demister (if fitted)
Rear Windshield & Outside Rear View Mirror Demister (if fitted)
Push the operating switch on the facia to turn the demister ‘ON’. The
demister will switch off automatically after 15 minutes.
NOTICE NOTICENOTICE NOTICE
NOTICE
Clean the rear windshield glass carefully from inside to avoid any
damage to demister heater element.
Hazar HazarHazar Hazar
Hazar
d d d d
d
W WW W
W
ar arar ar
ar
ning ningning ning
ning
Push hazard warning switch on the facia switch. This will switch ‘ON’ all
the outside turn signals and both indicators in instrument panel to flash
simultaneously to warn the other road users about the hazardous
condition of the vehicle.
CAUTION CAUTIONCAUTION CAUTION
CAUTION
If lights do not blink or blink rapidly, it is an indication of problem in
the blinker electrical system or the indicator bulb at front or rear has
fused. Get it rectified immediately.
R RR R
R
ear ear ear ear
ear
W WW W
W
indshield indshield indshield indshield
indshield
W WW W
W
ash & ash & ash & ash &
ash &
W WW W
W
ip ipip ip
ip
e e e e
e (Unlatched Switch)
Push and hold the switch knob for the operation of the wash function
for the desired duration for rear visibility through glass. The function
indicator lights up when wash function is ‘ON’. Alongwith wash fluid
getting sprayed, the wiper also operates with a delay to wipe the
glass surface, through a timer control unit. On release of the switch,
this function stops.
ProCarManuals.com
Page 40 of 161
40
D R I V I N G C O N T R O L SREAR REAR REAR REAR
REAR
WINDSHIELD WINDSHIELD WINDSHIELD WINDSHIELD
WINDSHIELD
WASH & WASH & WASH & WASH &
WASH &
WIPE AND HEAD L WIPE AND HEAD LWIPE AND HEAD L WIPE AND HEAD L
WIPE AND HEAD L
AMP LE AMP LEAMP LE AMP LE
AMP LE
VELLING SWIT VELLING SWITVELLING SWIT VELLING SWIT
VELLING SWIT
CH CHCH CH
CH
Rear Windshield Wiper Rear Windshield Wiper Rear Windshield Wiper Rear Windshield Wiper
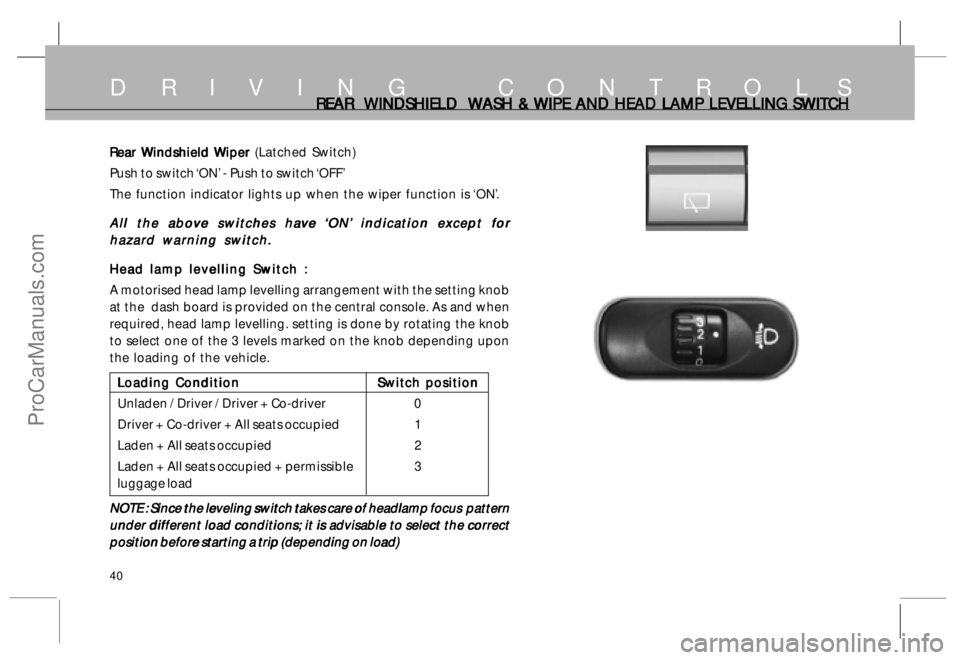
Rear Windshield Wiper (Latched Switch)
Push to switch ‘ON’ - Push to switch ‘OFF’
The function indicator lights up when the wiper function is ‘ON’.
A AA A
A
ll the ab ll the abll the ab ll the ab
ll the ab
o oo o
o
v vv v
v
e swit e swite swit e swit
e swit
ches ha ches haches ha ches ha
ches ha
v vv v
v
e e e e
e
‘‘ ‘‘
‘
ON’ ON’ON’ ON’
ON’
indic indic indic indic
indic
a aa a
a
tion e tion etion e tion e
tion e
x xx x
x
c cc c
c
ept f ept fept f ept f
ept f
or oror or
or
hazard warning switch. hazard warning switch.hazard warning switch. hazard warning switch.
hazard warning switch.
Head lamp levelling Switch Head lamp levelling Switch Head lamp levelling Switch Head lamp levelling Switch
Head lamp levelling Switch
:: ::
:
A motorised head lamp levelling arrangement with the setting knob
at the dash board is provided on the central console. As and when
required, head lamp levelling. setting is done by rotating the knob
to select one of the 3 levels marked on the knob depending upon
the loading of the vehicle.
Loading Condition Loading ConditionLoading Condition Loading Condition
Loading Condition
Switch position Switch positionSwitch position Switch position
Switch position
Unladen / Driver / Driver + Co-driver 0
Driver + Co-driver + All seats occupied 1
Laden + All seats occupied 2
Laden + All seats occupied + permissible 3
luggage load
NOTE : Since the leveling switch takes care of headlamp focus pattern NOTE : Since the leveling switch takes care of headlamp focus patternNOTE : Since the leveling switch takes care of headlamp focus pattern NOTE : Since the leveling switch takes care of headlamp focus pattern
NOTE : Since the leveling switch takes care of headlamp focus pattern
under different load conditions; it is advisable to select the correct under different load conditions; it is advisable to select the correctunder different load conditions; it is advisable to select the correct under different load conditions; it is advisable to select the correct
under different load conditions; it is advisable to select the correct
position before starting a trip (depending on load) position before starting a trip (depending on load)position before starting a trip (depending on load) position before starting a trip (depending on load)
position before starting a trip (depending on load)
ProCarManuals.com