TATA SAFARI 2015 Workshop Manual
Manufacturer: TATA, Model Year: 2015, Model line: SAFARI, Model: TATA SAFARI 2015Pages: 161, PDF Size: 2.55 MB
Page 51 of 161
51
COMFORT AND CONVENIENCE
• •• •
•Air conditioning and heating Air conditioning and heatingAir conditioning and heating Air conditioning and heating
Air conditioning and heating
• •• •
•Front windshield and door glass demister Front windshield and door glass demisterFront windshield and door glass demister Front windshield and door glass demister
Front windshield and door glass demister
• •• •
•Power windows Power windowsPower windows Power windows
Power windows
• •• •
•Front seat Front seatFront seat Front seat
Front seat
• •• •
•Headrestraint HeadrestraintHeadrestraint Headrestraint
Headrestraint
• •• •
•Middle seat Middle seatMiddle seat Middle seat
Middle seat
• •• •
•Armrest cum cup holder Armrest cum cup holderArmrest cum cup holder Armrest cum cup holder
Armrest cum cup holder
• •• •
•Jump seats (if fitted) Jump seats (if fitted)Jump seats (if fitted) Jump seats (if fitted)
Jump seats (if fitted)
• •• •
•Jack & tools Jack & toolsJack & tools Jack & tools
Jack & tools
• •• •
•Motorised rear view mirrors Motorised rear view mirrorsMotorised rear view mirrors Motorised rear view mirrors
Motorised rear view mirrors
• •• •
•Cigarette lighter and ash tray Cigarette lighter and ash trayCigarette lighter and ash tray Cigarette lighter and ash tray
Cigarette lighter and ash tray
• •• •
•Fuel filler flap Fuel filler flapFuel filler flap Fuel filler flap
Fuel filler flap
• •• •
•M MM M
M
echanic echanicechanic echanic
echanic
ally Op ally Opally Op ally Op
ally Op
er erer er
er
a aa a
a
t tt t
t
ed F ed Fed F ed F
ed F
uel uel uel uel
uel
T TT T
T
ank F ank Fank F ank F
ank F
lap laplap lap
lap
• •• •
•Glove box Glove boxGlove box Glove box
Glove box
• •• •
•Inside rear view mirror Inside rear view mirrorInside rear view mirror Inside rear view mirror
Inside rear view mirror
• •• •
•Sun visors Sun visorsSun visors Sun visors
Sun visors
• •• •
•Interior roof lights Interior roof lightsInterior roof lights Interior roof lights
Interior roof lights
• •• •
•Reverse guiding system Reverse guiding systemReverse guiding system Reverse guiding system
Reverse guiding system
• •• •
•Analog Clock Analog ClockAnalog Clock Analog Clock
Analog Clock
• •• •
•Music System Music SystemMusic System Music System
Music System
• •• •
•MP3 / DVD Player MP3 / DVD PlayerMP3 / DVD Player MP3 / DVD Player
MP3 / DVD Player
• •• •
•T TT T
T
ail Lamp ail Lampail Lamp ail Lamp
ail Lamp
• •• •
•High Mounted Stop Lamp High Mounted Stop LampHigh Mounted Stop Lamp High Mounted Stop Lamp
High Mounted Stop Lamp
This section gives you information on the different comfort
and convenience features provided in your vehicle.
There are many features as listed alongside in TATA SAFARI.
To get the maximum benefit from these features, please
read information in this section.
ProCarManuals.com
Page 52 of 161
52
COMFORT AND CONVENIENCEAIR C AIR CAIR C AIR C
AIR C
ONDITIONING / HEA ONDITIONING / HEAONDITIONING / HEA ONDITIONING / HEA
ONDITIONING / HEA
TING TINGTING TING
TING
Air Conditioning / Heating Air Conditioning / HeatingAir Conditioning / Heating Air Conditioning / Heating
Air Conditioning / Heating
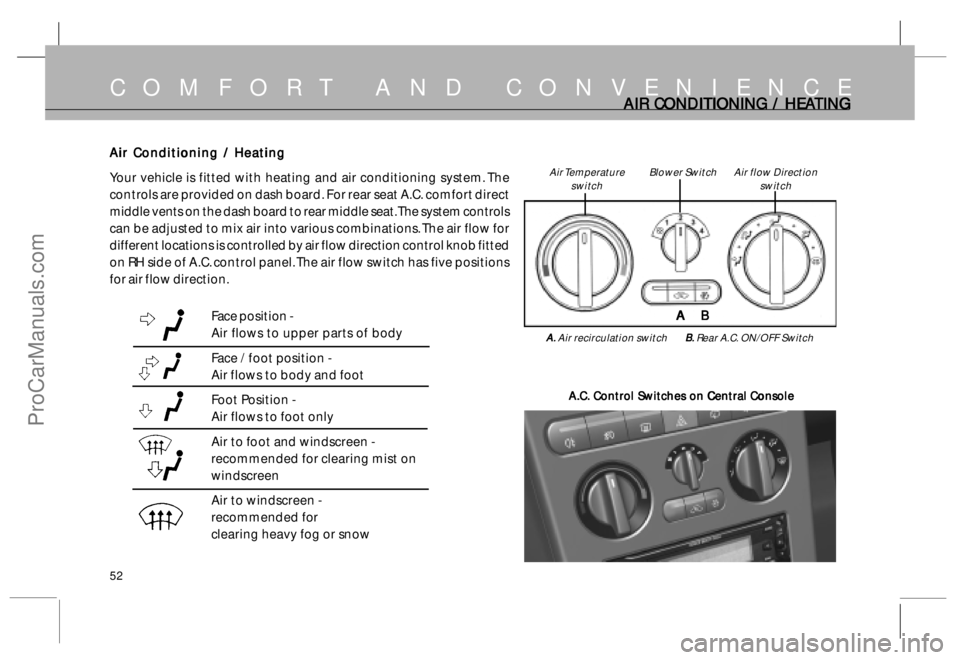
Your vehicle is fitted with heating and air conditioning system. The
controls are provided on dash board. For rear seat A.C. comfort direct
middle vents on the dash board to rear middle seat. The system controls
can be adjusted to mix air into various combinations. The air flow for
different locations is controlled by air flow direction control knob fitted
on RH side of A.C. control panel. The air flow switch has five positions
for air flow direction.
Face position -
Air flows to upper parts of body
Face / foot position -
Air flows to body and foot
Foot Position -
Air flows to foot only
Air to foot and windscreen -
recommended for clearing mist on
windscreen
Air to windscreen -
recommended for
clearing heavy fog or snow
A.C. Control Switches on Central Console A.C. Control Switches on Central ConsoleA.C. Control Switches on Central Console A.C. Control Switches on Central Console
A.C. Control Switches on Central Console
A AA A
A
B BB B
B
Air flow Direction
switchAir Temperature
switchBlower Switch
A. A.A. A.
A. Air recirculation switch
B. B.B. B.
B. Rear A.C. ON/OFF Switch
ProCarManuals.com
Page 53 of 161
53
COMFORT AND CONVENIENCER RR R
R
OOF MOUNTED A.C. OOF MOUNTED A.C.OOF MOUNTED A.C. OOF MOUNTED A.C.
OOF MOUNTED A.C.
UNIT UNIT UNIT UNIT
UNIT
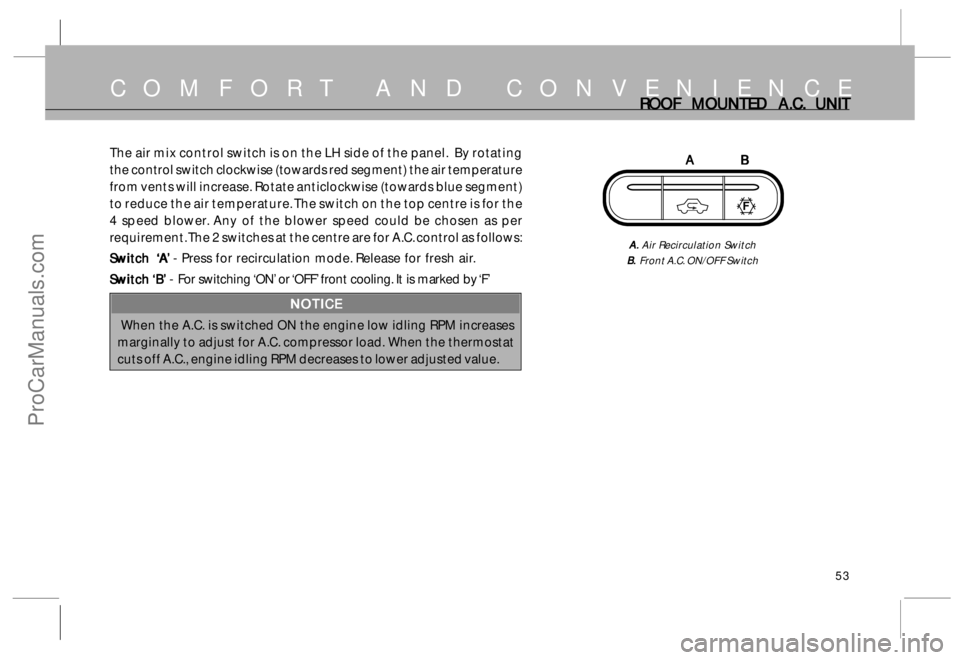
The air mix control switch is on the LH side of the panel. By rotating
the control switch clockwise (towards red segment) the air temperature
from vents will increase. Rotate anticlockwise (towards blue segment)
to reduce the air temperature. The switch on the top centre is for the
4 speed blower. Any of the blower speed could be chosen as per
requirement. The 2 switches at the centre are for A.C. control as follows:
S SS S
S
wit witwit wit
wit
ch ch ch ch
ch
‘‘ ‘‘
‘
A AA A
A
’’ ’’
’
- Press for recirculation mode. Release for fresh air.
S SS S
S
wit witwit wit
wit
ch ch ch ch
ch
‘B ‘B‘B ‘B
‘B
’’ ’’
’
- For switching ‘ON’ or ‘OFF’ front cooling. It is marked by ‘F’
NOTICE NOTICENOTICE NOTICE
NOTICE
When the A.C. is switched ON the engine low idling RPM increases
marginally to adjust for A.C. compressor load. When the thermostat
cuts off A.C., engine idling RPM decreases to lower adjusted value.
A AA A
A
B BB B
B
A. A.A. A.
A. Air Recirculation Switch
B. B.B. B.
B. Front A.C. ON/OFF Switch
F
ProCarManuals.com
Page 54 of 161
54
ROOF MOUNTED A.C. ROOF MOUNTED A.C.ROOF MOUNTED A.C. ROOF MOUNTED A.C.
ROOF MOUNTED A.C.
AND FR AND FR AND FR AND FR
AND FR
ONT ONT ONT ONT
ONT
WINDSHIELD WINDSHIELDWINDSHIELD WINDSHIELD
WINDSHIELD
,, ,,
,
DOOR GL DOOR GL DOOR GL DOOR GL
DOOR GL
ASS DEMISTER ASS DEMISTERASS DEMISTER ASS DEMISTER
ASS DEMISTER
Roof Mounted A.C. Unit (if fitted) Roof Mounted A.C. Unit (if fitted)Roof Mounted A.C. Unit (if fitted) Roof Mounted A.C. Unit (if fitted)
Roof Mounted A.C. Unit (if fitted)
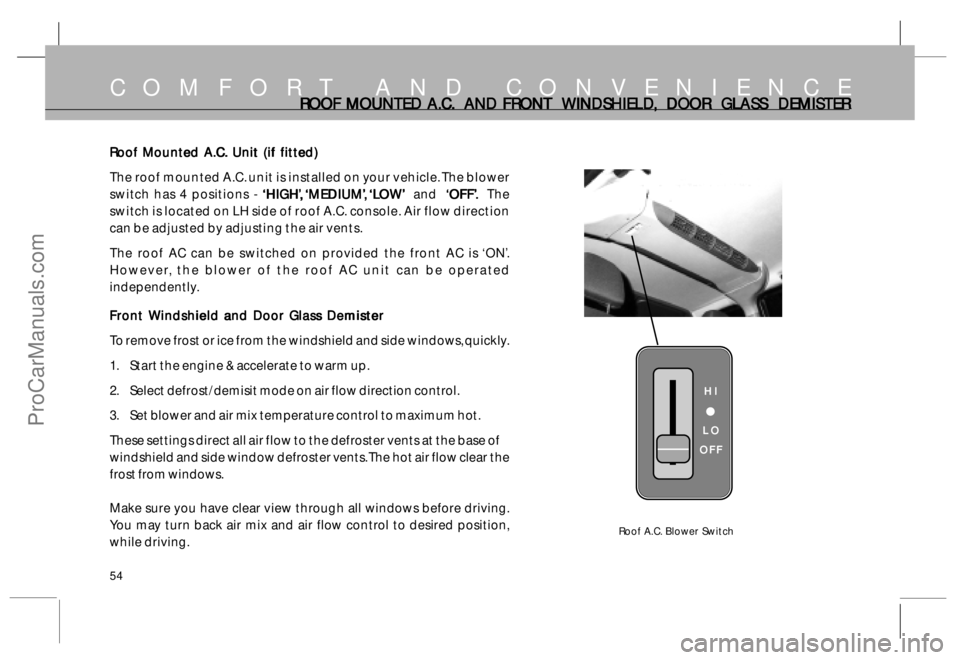
The roof mounted A.C. unit is installed on your vehicle. The blower
switch has 4 positions -
‘HIGH ‘HIGH‘HIGH ‘HIGH
‘HIGH
’’ ’’
’
,, ,,
,
‘‘ ‘‘
‘
MEDIUM MEDIUMMEDIUM MEDIUM
MEDIUM
’’ ’’
’
,, ,,
,
‘L ‘L‘L ‘L
‘L
O OO O
O
W WW W
W
’’ ’’
’
and
‘‘ ‘‘
‘
OFF’ OFF’OFF’ OFF’
OFF’
.. ..
. The
switch is located on LH side of roof A.C. console. Air flow direction
can be adjusted by adjusting the air vents.
The roof AC can be switched on provided the front AC is ‘ON’.
However, the blower of the roof AC unit can be operated
independently.
Front Windshield and Door Glass Demister Front Windshield and Door Glass DemisterFront Windshield and Door Glass Demister Front Windshield and Door Glass Demister
Front Windshield and Door Glass Demister
To remove frost or ice from the windshield and side windows, quickly.
1. Start the engine & accelerate to warm up.
2. Select defrost/demisit mode on air flow direction control.
3. Set blower and air mix temperature control to maximum hot.
These settings direct all air flow to the defroster vents at the base of
windshield and side window defroster vents. The hot air flow clear the
frost from windows.
Make sure you have clear view through all windows before driving.
You may turn back air mix and air flow control to desired position,
while driving.
COMFORT AND CONVENIENCE
Roof A.C. Blower Switch
HI HIHI HI
HI
LO LOLO LO
LO
OFF OFFOFF OFF
OFF
ProCarManuals.com
Page 55 of 161
55
PO POPO PO
PO
WER WER WER WER
WER
WINDO WINDOWINDO WINDO
WINDO
W WW W
W
S SS S
SCOMFORT AND CONVENIENCE
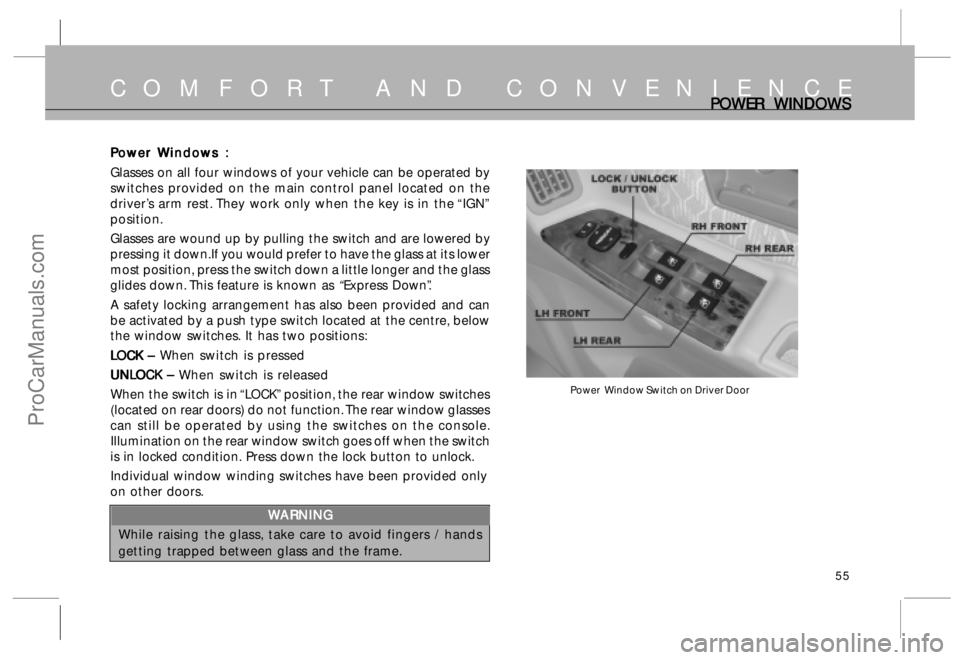
Power Window Switch on Driver Door
P PP P
P
o oo o
o
w ww w
w
er er er er
er
W WW W
W
indo indoindo indo
indo
w ww w
w
s : s :s : s :
s :
Glasses on all four windows of your vehicle can be operated by
switches provided on the main control panel located on the
driver’s arm rest. They work only when the key is in the “IGN”
position.
Glasses are wound up by pulling the switch and are lowered by
pressing it down.If you would prefer to have the glass at its lower
most position, press the switch down a little longer and the glass
glides down. This feature is known as
“Express Down”.
A safety locking arrangement has also been provided and can
be activated by a push type switch located at the centre, below
the window switches. It has two positions:
L LL L
L
OCK – OCK – OCK – OCK –
OCK – When switch is pressed
UNL UNLUNL UNL
UNL
OCK – OCK – OCK – OCK –
OCK – When switch is released
When the switch is in “LOCK” position, the rear window switches
(located on rear doors) do not function. The rear window glasses
can still be operated by using the switches on the console.
Illumination on the rear window switch goes off when the switch
is in locked condition. Press down the lock button to unlock.
Individual window winding switches have been provided only
on other doors.
W WW W
W
ARNING ARNINGARNING ARNING
ARNING
While raising the glass, take care to avoid fingers / hands
getting trapped between glass and the frame.
ProCarManuals.com
Page 56 of 161
56
FR FRFR FR
FR
ONT SEA ONT SEAONT SEA ONT SEA
ONT SEA
T AND SEA T AND SEAT AND SEA T AND SEA
T AND SEA
T ADJUST T ADJUSTT ADJUST T ADJUST
T ADJUST
MENT MENTMENT MENT
MENT
S SS S
SCOMFORT AND CONVENIENCE
Front Seats Front SeatsFront Seats Front Seats
Front Seats
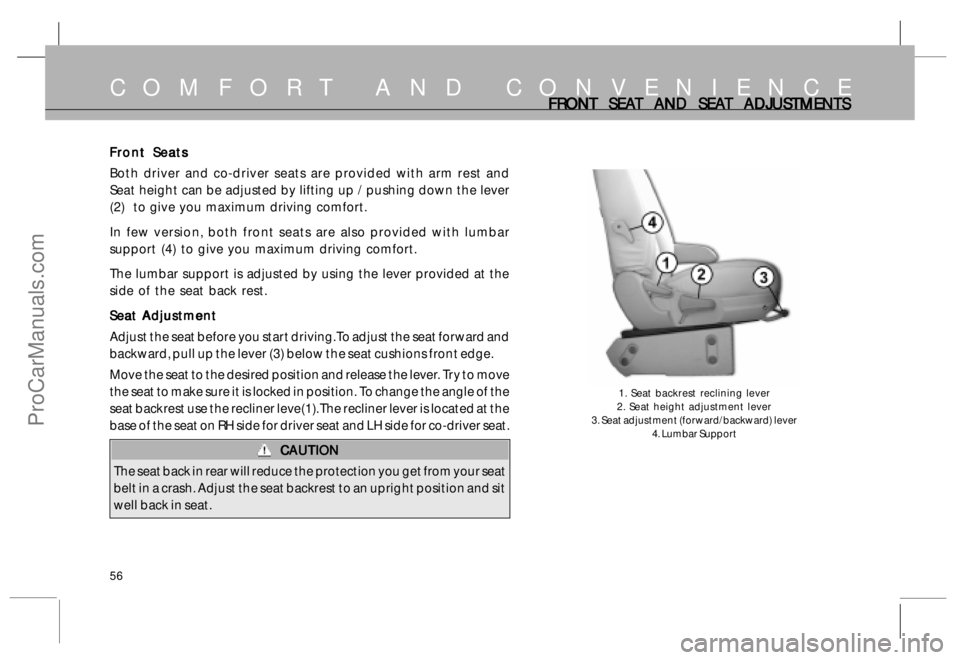
Both driver and co-driver seats are provided with arm rest and
Seat height can be adjusted by lifting up / pushing down the lever
(2) to give you maximum driving comfort.
In few version, both front seats are also provided with lumbar
support (4) to give you maximum driving comfort.
The lumbar support is adjusted by using the lever provided at the
side of the seat back rest.
Seat Adjustment Seat AdjustmentSeat Adjustment Seat Adjustment
Seat Adjustment
Adjust the seat before you start driving. To adjust the seat forward and
backward, pull up the lever (3) below the seat cushions front edge.
Move the seat to the desired position and release the lever. Try to move
the seat to make sure it is locked in position. To change the angle of the
seat backrest use the recliner leve(1). The recliner lever is located at the
base of the seat on RH side for driver seat and LH side for co-driver seat.
CAUTION CAUTIONCAUTION CAUTION
CAUTION
The seat back in rear will reduce the protection you get from your seat
belt in a crash. Adjust the seat backrest to an upright position and sit
well back in seat.
1. Seat backrest reclining lever
2. Seat height adjustment lever
3. Seat adjustment (forward/backward) lever
4. Lumbar Support
ProCarManuals.com
Page 57 of 161
57
Headrestraint HeadrestraintHeadrestraint Headrestraint
Headrestraint
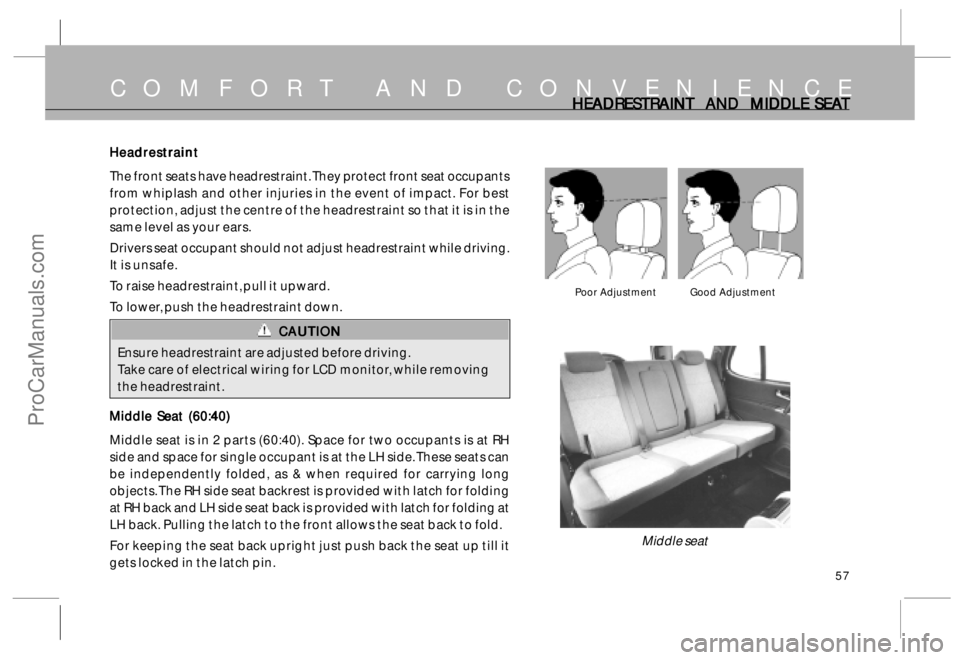
The front seats have headrestraint. They protect front seat occupants
from whiplash and other injuries in the event of impact. For best
protection, adjust the centre of the headrestraint so that it is in the
same level as your ears.
Drivers seat occupant should not adjust headrestraint while driving.
It is unsafe.
To raise headrestraint, pull it upward.
To lower, push the headrestraint down.
CAUTION CAUTIONCAUTION CAUTION
CAUTION
Ensure headrestraint are adjusted before driving.
Take care of electrical wiring for LCD monitor, while removing
the headrestraint.
Middle Seat (60:40) Middle Seat (60:40)Middle Seat (60:40) Middle Seat (60:40)
Middle Seat (60:40)
Middle seat is in 2 parts (60:40). Space for two occupants is at RH
side and space for single occupant is at the LH side. These seats can
be independently folded, as & when required for carrying long
objects. The RH side seat backrest is provided with latch for folding
at RH back and LH side seat back is provided with latch for folding at
LH back. Pulling the latch to the front allows the seat back to fold.
For keeping the seat back upright just push back the seat up till it
gets locked in the latch pin.
COMFORT AND CONVENIENCE
Middle seat
HEADRESTR HEADRESTRHEADRESTR HEADRESTR
HEADRESTR
AINT AND MIDDLE SEA AINT AND MIDDLE SEAAINT AND MIDDLE SEA AINT AND MIDDLE SEA
AINT AND MIDDLE SEA
T TT T
T
Poor Adjustment Good Adjustment
ProCarManuals.com
Page 58 of 161
58
Folding of Middle Seat Folding of Middle SeatFolding of Middle Seat Folding of Middle Seat
Folding of Middle Seat
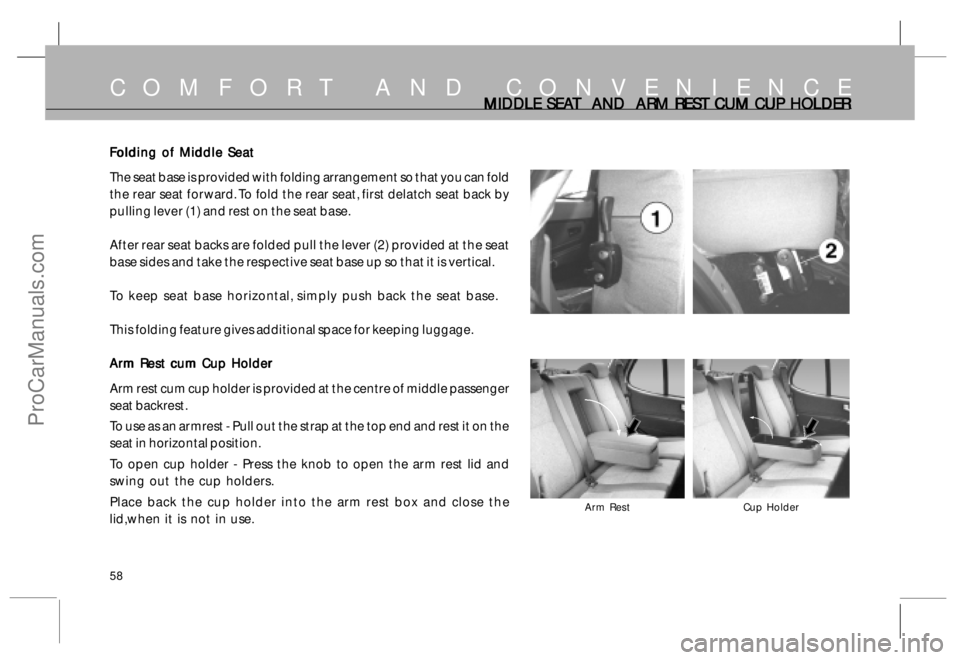
The seat base is provided with folding arrangement so that you can fold
the rear seat forward. To fold the rear seat, first delatch seat back by
pulling lever (1) and rest on the seat base.
After rear seat backs are folded pull the lever (2) provided at the seat
base sides and take the respective seat base up so that it is vertical.
To keep seat base horizontal, simply push back the seat base.
This folding feature gives additional space for keeping luggage.
Arm Rest cum Cup Holder Arm Rest cum Cup HolderArm Rest cum Cup Holder Arm Rest cum Cup Holder
Arm Rest cum Cup Holder
Arm rest cum cup holder is provided at the centre of middle passenger
seat backrest.
To use as an armrest - Pull out the strap at the top end and rest it on the
seat in horizontal position.
To open cup holder - Press the knob to open the arm rest lid and
swing out the cup holders.
Place back the cup holder into the arm rest box and close the
lid,when it is not in use.
COMFORT AND CONVENIENCEMIDDLE SEA MIDDLE SEAMIDDLE SEA MIDDLE SEA
MIDDLE SEA
T AND ARM REST CUM CUP HOLDER T AND ARM REST CUM CUP HOLDERT AND ARM REST CUM CUP HOLDER T AND ARM REST CUM CUP HOLDER
T AND ARM REST CUM CUP HOLDER
Arm RestCup Holder
ProCarManuals.com
Page 59 of 161
59
Jump Seat (if fitted) Jump Seat (if fitted)Jump Seat (if fitted) Jump Seat (if fitted)
Jump Seat (if fitted)
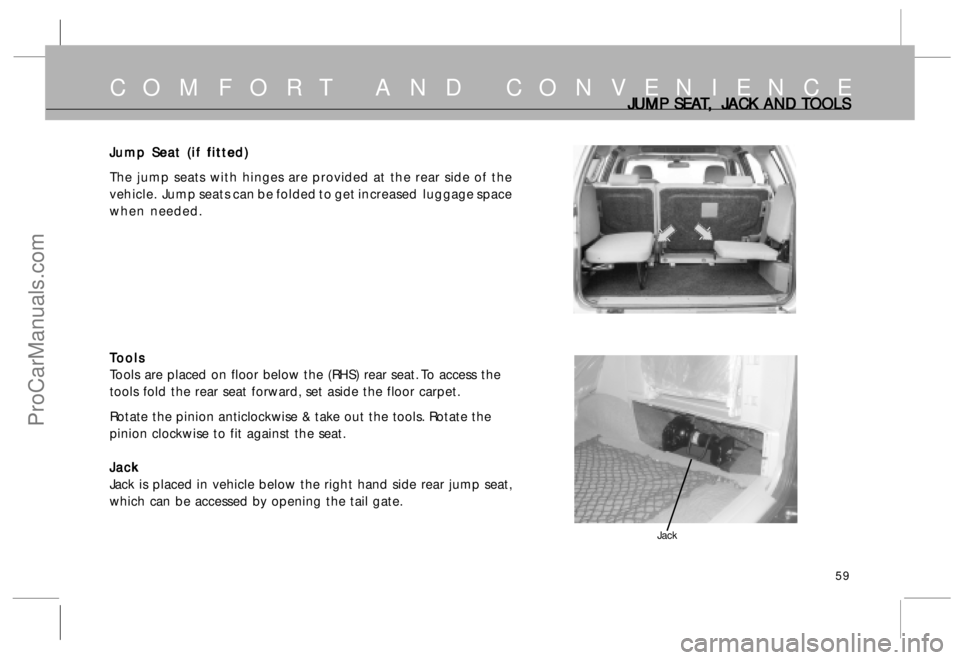
The jump seats with hinges are provided at the rear side of the
vehicle. Jump seats can be folded to get increased luggage space
when needed.
T TT T
T
o oo o
o
ols olsols ols
ols
Tools are placed on floor below the (RHS) rear seat. To access the
tools fold the rear seat forward, set aside the floor carpet.
Rotate the pinion anticlockwise & take out the tools. Rotate the
pinion clockwise to fit against the seat.
Jack JackJack Jack
Jack
Jack is placed in
vehicle below the right hand side rear jump seat,
which can be accessed by opening the tail gate.
Jack
COMFORT AND CONVENIENCEJUMP SEA JUMP SEAJUMP SEA JUMP SEA
JUMP SEA
T TT T
T
,, ,,
,
JA JA JA JA
JA
CK AND CK AND CK AND CK AND
CK AND
T TT T
T
OOLS OOLSOOLS OOLS
OOLS
ProCarManuals.com
Page 60 of 161
60
COMFORT AND CONVENIENCE
Motorised Rear View Mirror Motorised Rear View MirrorMotorised Rear View Mirror Motorised Rear View Mirror
Motorised Rear View Mirror
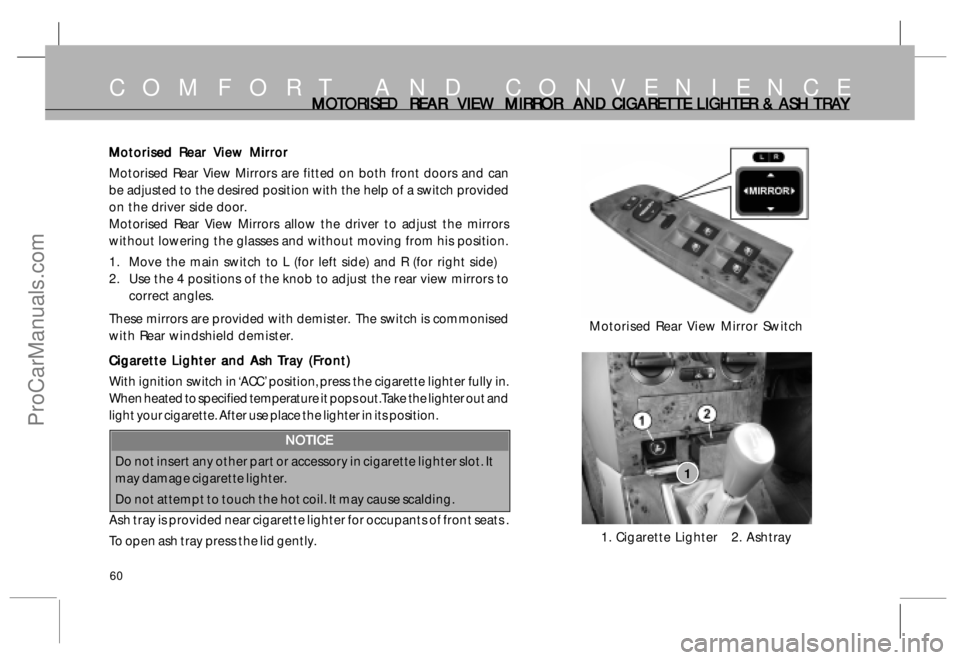
Motorised Rear View Mirrors are fitted on both front doors and can
be adjusted to the desired position with the help of a switch provided
on the driver side door.
Motorised Rear View Mirrors allow the driver to adjust the mirrors
without lowering the glasses and without moving from his position.
1. Move the main switch to L (for left side) and R (for right side)
2. Use the 4 positions of the knob to adjust the rear view mirrors to
correct angles.
These mirrors are provided with demister. The switch is commonised
with Rear windshield demister.
C CC C
C
igar igarigar igar
igar
ett ettett ett
ett
e Ligh e Lighe Ligh e Ligh
e Ligh
t tt t
t
er and A er and Aer and A er and A
er and A
sh sh sh sh
sh
T TT T
T
r rr r
r
a aa a
a
y (F y (Fy (F y (F
y (F
r rr r
r
on onon on
on
t) t)t) t)
t)
With ignition switch in ‘ACC’ position, press the cigarette lighter fully in.
When heated to specified temperature it pops out. Take the lighter out and
light your cigarette. After use place the lighter in its position.
NOTICE NOTICENOTICE NOTICE
NOTICE
Do not insert any other part or accessory in cigarette lighter slot. It
may damage cigarette lighter.
Do not attempt to touch the hot coil. It may cause scalding.
Ash tray is provided near cigarette lighter for occupants of front seats .
To open ash tray press the lid gently.1. Cigarette Lighter 2. Ashtray1
MO MOMO MO
MO
T TT T
T
ORISED REAR ORISED REAR ORISED REAR ORISED REAR
ORISED REAR
VIE VIEVIE VIE
VIE
W MIRR W MIRRW MIRR W MIRR
W MIRR
OR AND CIGARET OR AND CIGARETOR AND CIGARET OR AND CIGARET
OR AND CIGARET
TE LIGHTER & ASH TE LIGHTER & ASH TE LIGHTER & ASH TE LIGHTER & ASH
TE LIGHTER & ASH
TR TRTR TR
TR
A AA A
A
Y YY Y
Y
Motorised Rear View Mirror Switch
ProCarManuals.com