TESLA MODEL 3 2018 Owner's Manual
Manufacturer: TESLA, Model Year: 2018, Model line: MODEL 3, Model: TESLA MODEL 3 2018Pages: 165, PDF Size: 8.63 MB
Page 111 of 165
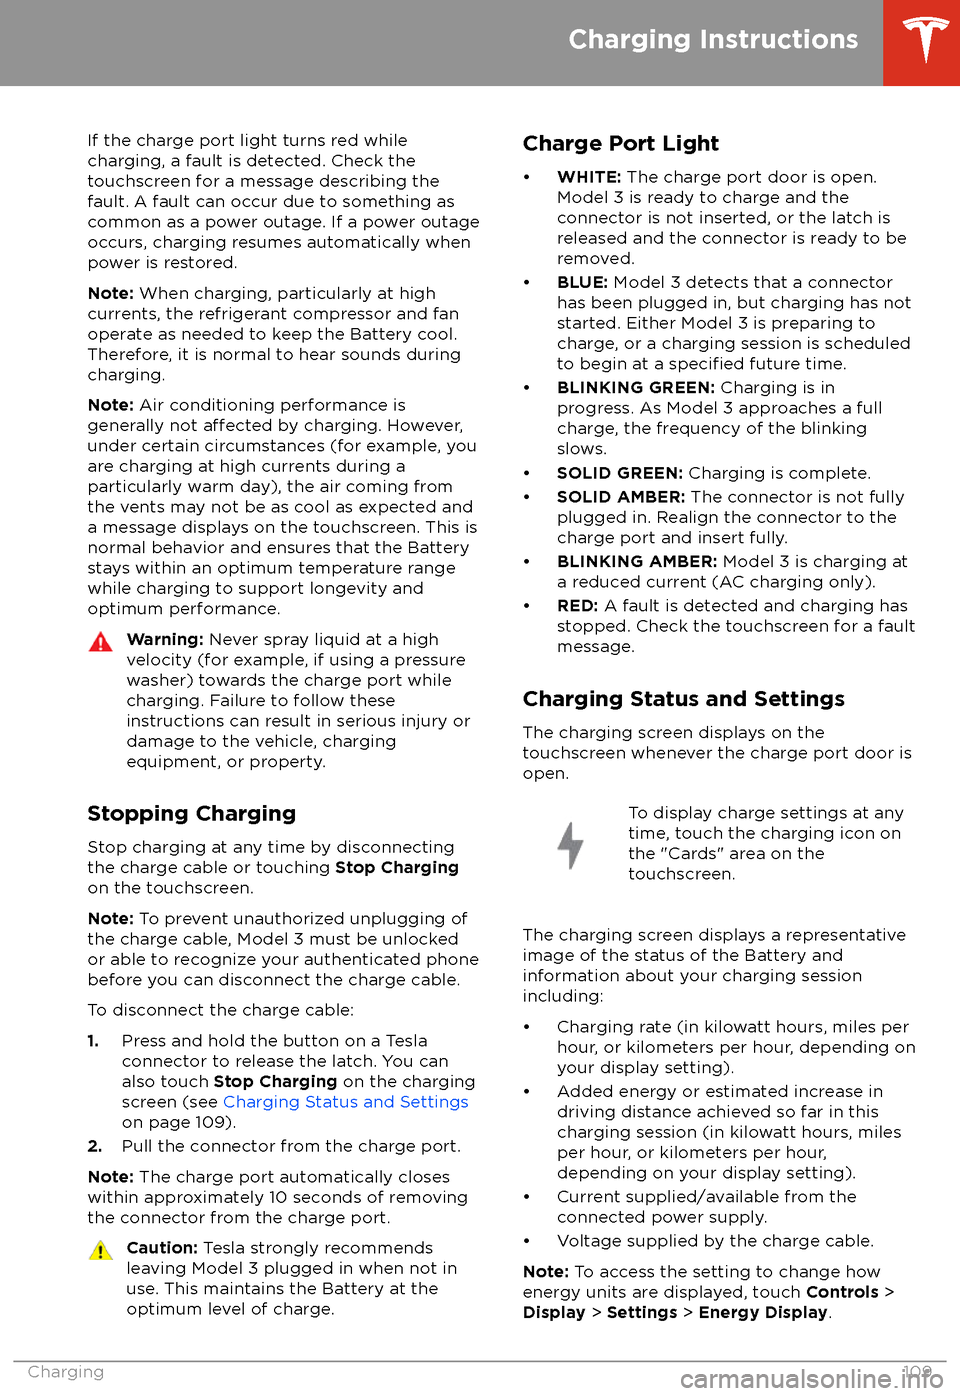
If the charge port light turns red while
charging, a fault is detected. Check the touchscreen for a message describing the
fault. A fault can occur due to something as
common as a power outage. If a power outage
occurs, charging resumes automatically when power is restored.
Note: When charging, particularly at high
currents, the refrigerant compressor and fan
operate as needed to keep the Battery cool.
Therefore, it is normal to hear sounds during charging.
Note: Air conditioning performance is
generally not
affected by charging. However,
under certain circumstances (for example, you
are charging at high currents during a
particularly warm day), the air coming from
the vents may not be as cool as expected and
a message displays on the touchscreen. This is
normal behavior and ensures that the Battery stays within an optimum temperature range
while charging to support longevity and optimum performance.
Warning: Never spray liquid at a high
velocity (for example, if using a pressure
washer) towards the charge port while
charging. Failure to follow these
instructions can result in serious injury or
damage to the vehicle, charging
equipment, or property.
Stopping Charging
Stop charging at any time by disconnecting
the charge cable or touching Stop Charging
on the touchscreen.
Note: To prevent unauthorized unplugging of
the charge cable, Model 3 must be unlocked
or able to recognize your authenticated phone before you can disconnect the charge cable.
To disconnect the charge cable:
1. Press and hold the button on a Tesla
connector to release the latch. You can
also touch Stop Charging on the charging
screen (see Charging Status and Settings
on page 109).
2. Pull the connector from the charge port.
Note: The charge port automatically closes
within approximately 10 seconds of removing
the connector from the charge port.
Caution: Tesla strongly recommends
leaving Model 3 plugged in when not in use. This maintains the Battery at the
optimum level of charge.Charge Port Light
Page 112 of 165
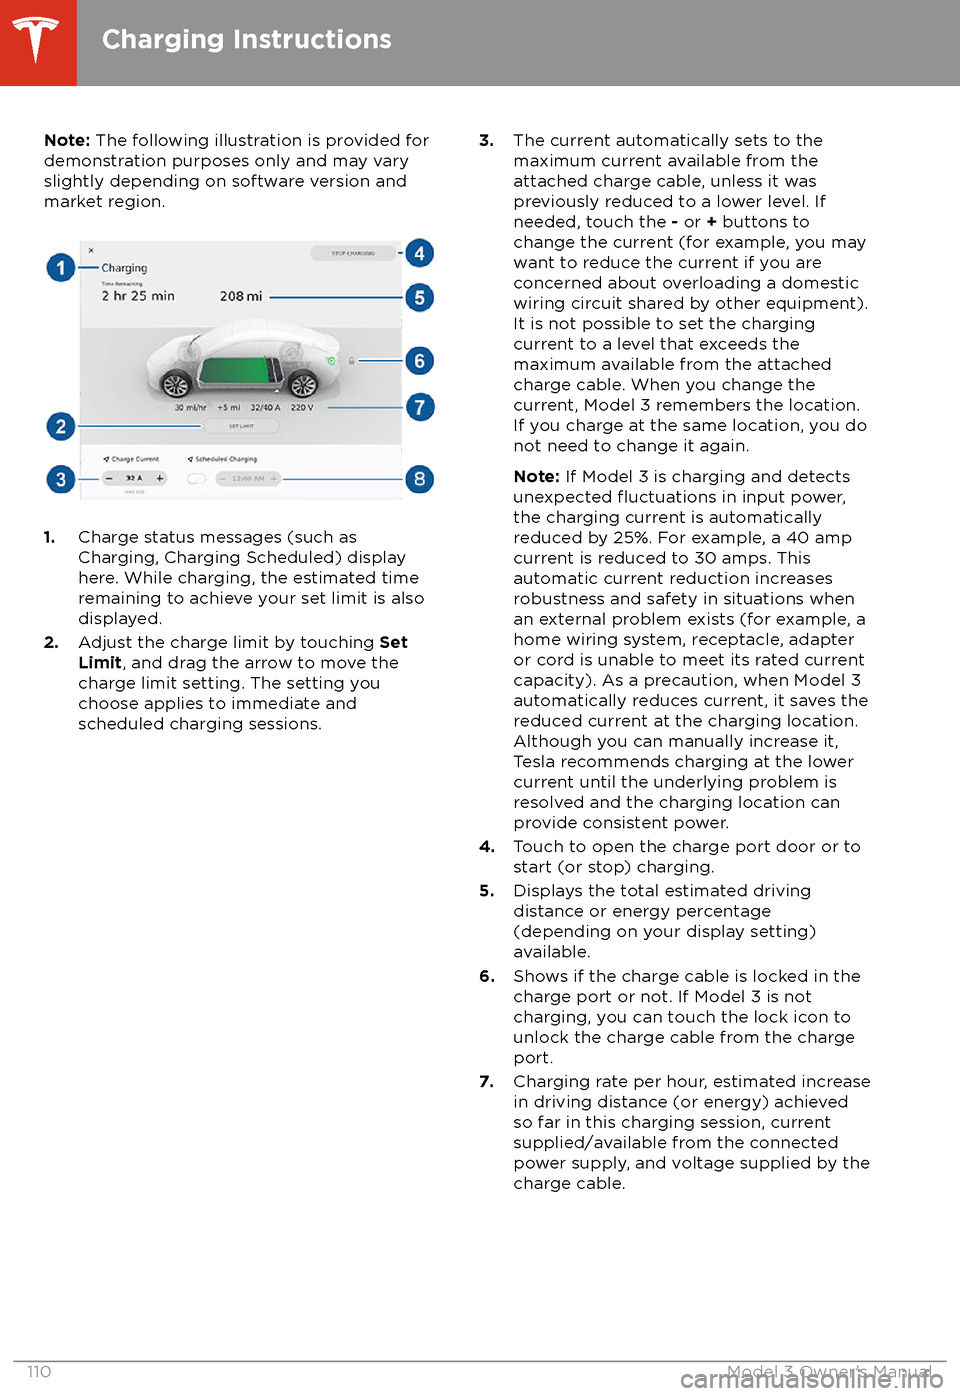
Note: The following illustration is provided for
demonstration purposes only and may vary
slightly depending on software version and
market region.
1. Charge status messages (such as
Charging, Charging Scheduled) display
here. While charging, the estimated time
remaining to achieve your set limit is also
displayed.
2. Adjust the charge limit by touching Set
Limit , and drag the arrow to move the
charge limit setting. The setting you
choose applies to immediate and
scheduled charging sessions.
3. The current automatically sets to the
maximum current available from the
attached charge cable, unless it was
previously reduced to a lower level. If
needed, touch the - or + buttons to
change the current (for example, you may
want to reduce the current if you are
concerned about overloading a domestic
wiring circuit shared by other equipment).
It is not possible to set the charging current to a level that exceeds the
maximum available from the attached
charge cable. When you change the
current, Model 3 remembers the location.
If you charge at the same location, you do
not need to change it again.
Note: If Model 3 is charging and detects
unexpected
Page 113 of 165
8.Set a recurring charging schedule for the
location. When you set a scheduled
charging time, Model 3 displays the set
time when you are parked at the
scheduled location. If, at the scheduled
time, Model 3 is not plugged in at the location, charging starts as soon as you
plug it in, provided you plug it in within six
hours of the scheduled time. If plugged in
after six hours, charging does not start
until the scheduled time on the next day.
To override this setting, touch Start
Charging or Stop Charging (see item 4).
Note: If charging at a Tesla Supercharger, the
charging screen also displays information
about your previous or current Supercharger session (see Supercharger Usage Fees and
Idle Fees on page 111).
Supercharger Usage Fees and Idle Fees
When charging using a Tesla supercharger,
PAID SUPERCHARGING information displays
at the bottom of the charging screen. This
information includes the location, the time
that charging started, and an estimate of how
much the session will cost. When you stop
charging, the
final cost displays until a new
Supercharging session begins.
When charging at a Tesla supercharger, you
are subject to idle fees. Idle fees are designed to encourage drivers to move their vehiclefrom the Supercharger when charging iscomplete and are in
effect whenever at least
half of the Superchargers at a site are
occupied. The Tesla mobile app
notifies you
when charging nears completion, and again when charging is complete. Additional
notifications are sent if idle fees are incurred.
Idle fees are waived if you move your vehicle
within
five minutes of charging completion.
Log into your Tesla Account to view fees and
details about Supercharger sessions, set up a payment method, and make payments. Once a
payment method is saved, fees are
automatically paid from your account.
Charging Instructions
Charging111
Page 114 of 165
Service Intervals
Regular maintenance is the key to ensuring
the continued reliability and
efficiency of your
Model 3.
Rotate the tires every 6,250 miles
(10,000 km). Maintain the correct tire
pressures. It is also important to perform the
daily and monthly checks described below.
Note: View tire pressures in the "Cards" area,
located toward the bottom on the left side of the touchscreen, as described in Touchscreen
Overview on page 4.
Model 3 should be serviced by
Tesla-certifiedtechnicians. Damages or failures caused by
maintenance or repairs performed by non-
Tesla
certified technicians are not covered by
the warranty.
Daily Checks
Page 115 of 165
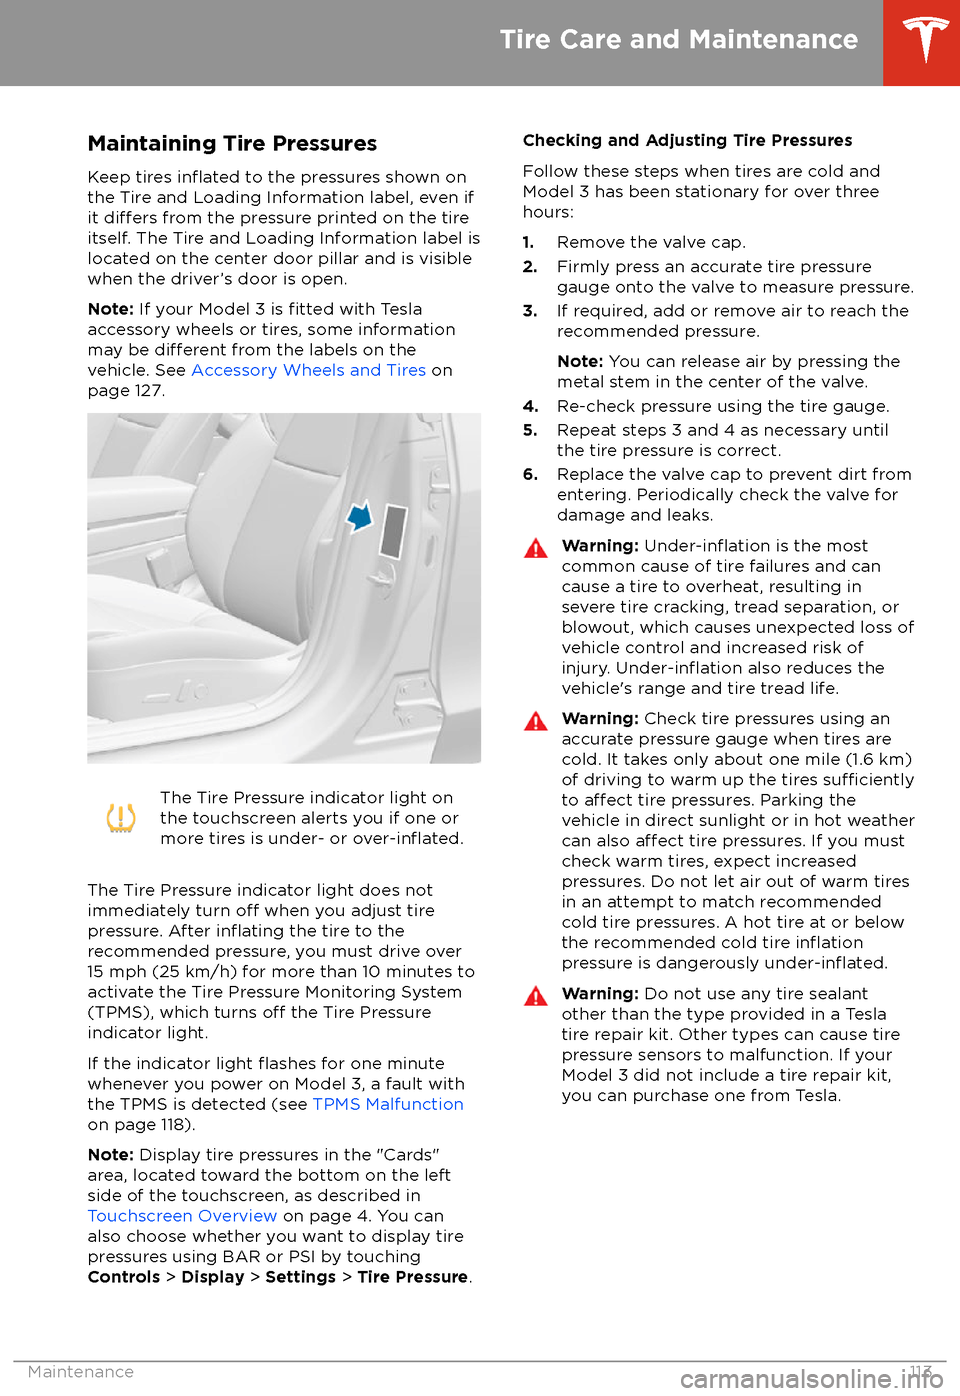
Maintaining Tire Pressures
Keep tires
inflated to the pressures shown on
the Tire and Loading Information label, even if
it
differs from the pressure printed on the tire
itself. The Tire and Loading Information label is
located on the center door pillar and is visible
when the driver
Page 116 of 165
Inspecting and Maintaining TiresRegularly inspect the tread and side walls for
any sign of distortion (bulges), foreign objects,
cuts or wear.Warning: Do not drive Model 3 if a tire is
damaged, excessively worn, or inflated to
an incorrect pressure. Check tires
regularly for wear, and ensure there are
no cuts, bulges or exposure of the ply/
cord structure.
Tire Wear
Adequate tread depth is important for proper
tire performance. Tires with a tread depth less
than 4/32” (3 mm) are more likely to
hydroplane in wet conditions and should not be used. Tires with a tread depth less than5/32” (4 mm) do not perform well in snow andslush and should not be used when driving inwinter conditions.
Model 3 is originally
fitted with tires that have
wear indicators molded into the tread pattern.
When the tread has been worn down to 4/32”
(3 mm), the indicators start to appear at the surface of the tread pattern, producing the
effect of a continuous band of rubber across
the width of the tire. For optimal performance
and safety, Tesla recommends replacing tires
before the wear indicators are visible.
Tire Rotation, Balance, and Wheel Alignment
Tesla recommends rotating the tires every
6,250 miles (10,000 km).
Unbalanced wheels (sometimes noticeable as
vibration through the steering wheel)
affectvehicle handling and tire life. Even with regular
use, wheels can get out of balance. Therefore,
they should be balanced as required.
If tire wear is uneven (on one side of the tire
only) or becomes abnormally excessive, check
the alignment of wheels.
Note: When replacing only two tires, always
install the new tires on the rear.
Punctured Tires
A puncture eventually causes the tire to lose
pressure, which is why it is important to check
tire pressures frequently. Permanently repair
or replace punctured or damaged tires as
soon as possible.
Your tubeless tires may not leak when
penetrated, provided the object remains in the tire. If, however, you feel a sudden vibration or
ride disturbance while driving, or you suspect a tire is damaged, immediately reduce your
speed. Drive slowly, while avoiding heavy
braking or sharp steering and, when safe to do so, stop the vehicle. Arrange to have Model 3
transported to a Tesla Service Center, or to a nearby tire repair center.
Note: In some cases, you can temporarily
repair small tire punctures (under 1/4” (6
mm)) using an optional tire repair kit available
from Tesla. This allows you to slowly drive
Model 3 to Tesla or to a nearby tire repair
facility.Warning: Do not drive with a punctured
tire, even if the puncture has not caused the tire to
deflate. A punctured tire candeflate suddenly at any time.
Flat Spots
If Model 3 is stationary for a long period in
high temperatures, tires can form
flat spots.
When Model 3 is driven, these flat spots cause
a vibration which gradually disappears as the
tires warm up and regain their original shape.
To minimize
flat spots during storage, inflatetires to the maximum pressure indicated on the tire wall. Then, before driving, release airto adjust tire pressure to the recommendedlevels.
Improving Tire Mileage
To improve the mileage you get from your
tires, maintain tires at the recommended tire
pressures, observe speed limits and advisory
speeds, and avoid:
Page 117 of 165
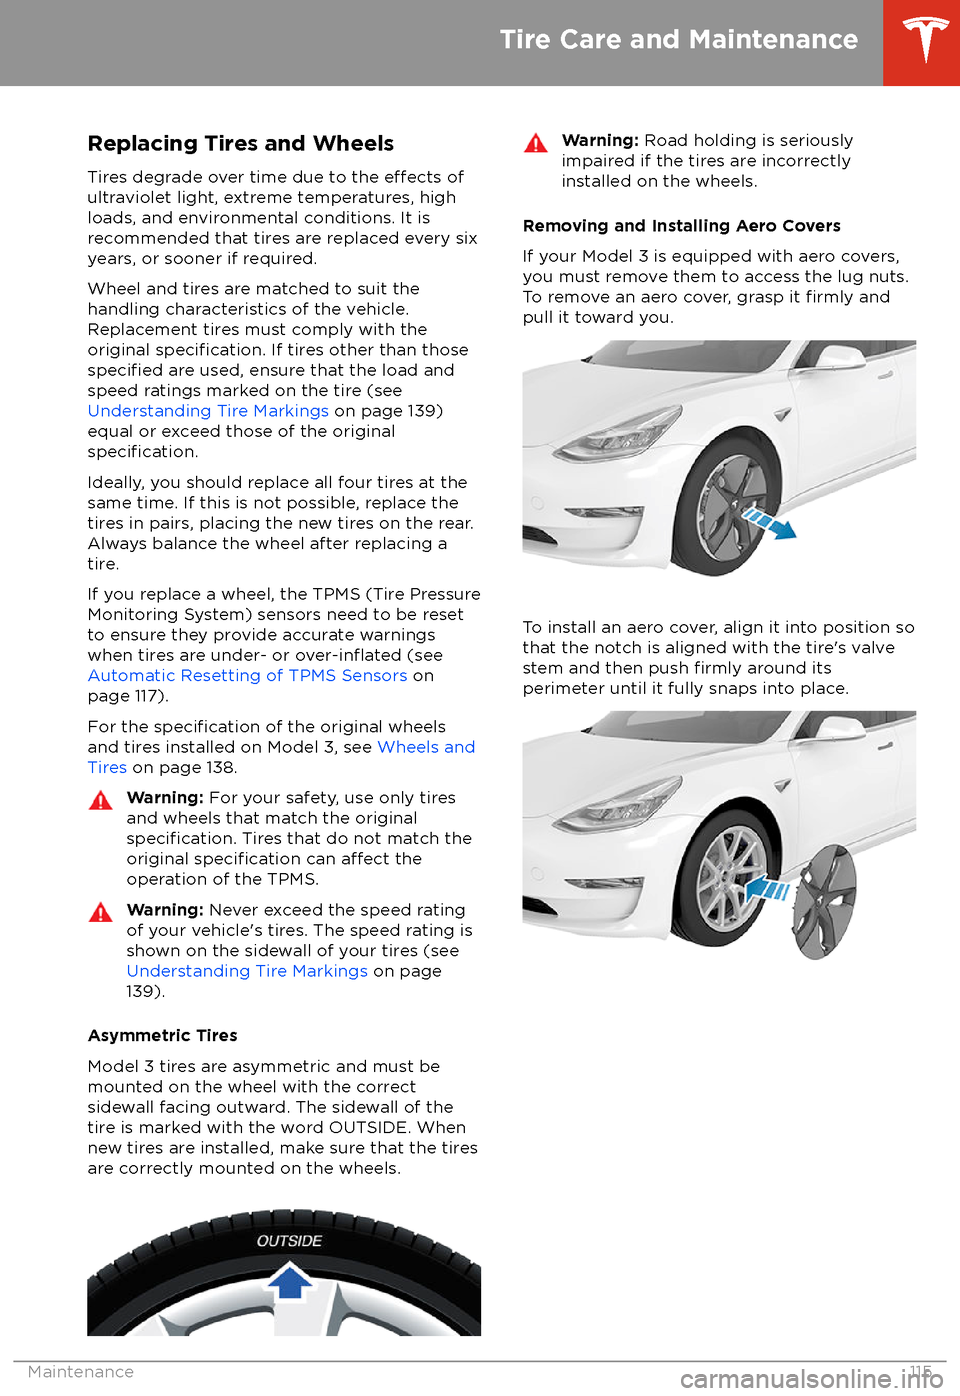
Replacing Tires and Wheels
Tires degrade over time due to the
effects of
ultraviolet light, extreme temperatures, high
loads, and environmental conditions. It is
recommended that tires are replaced every six
years, or sooner if required.
Wheel and tires are matched to suit thehandling characteristics of the vehicle.
Replacement tires must comply with the
original
specification. If tires other than thosespecified are used, ensure that the load and
speed ratings marked on the tire (see Understanding Tire Markings on page 139)
equal or exceed those of the original
specification.
Ideally, you should replace all four tires at the same time. If this is not possible, replace the
tires in pairs, placing the new tires on the rear.
Always balance the wheel after replacing a
tire.
If you replace a wheel, the TPMS (Tire Pressure
Monitoring System) sensors need to be reset to ensure they provide accurate warnings
when tires are under- or
over-inflated (see
Automatic Resetting of TPMS Sensors on
page 117).
For the
specification of the original wheels
and tires installed on Model 3, see Wheels and
Tires on page 138.
Warning:
For your safety, use only tires
and wheels that match the original
specification. Tires that do not match the
original specification can affect the
operation of the TPMS.
Warning: Never exceed the speed rating
of your vehicle
Page 118 of 165
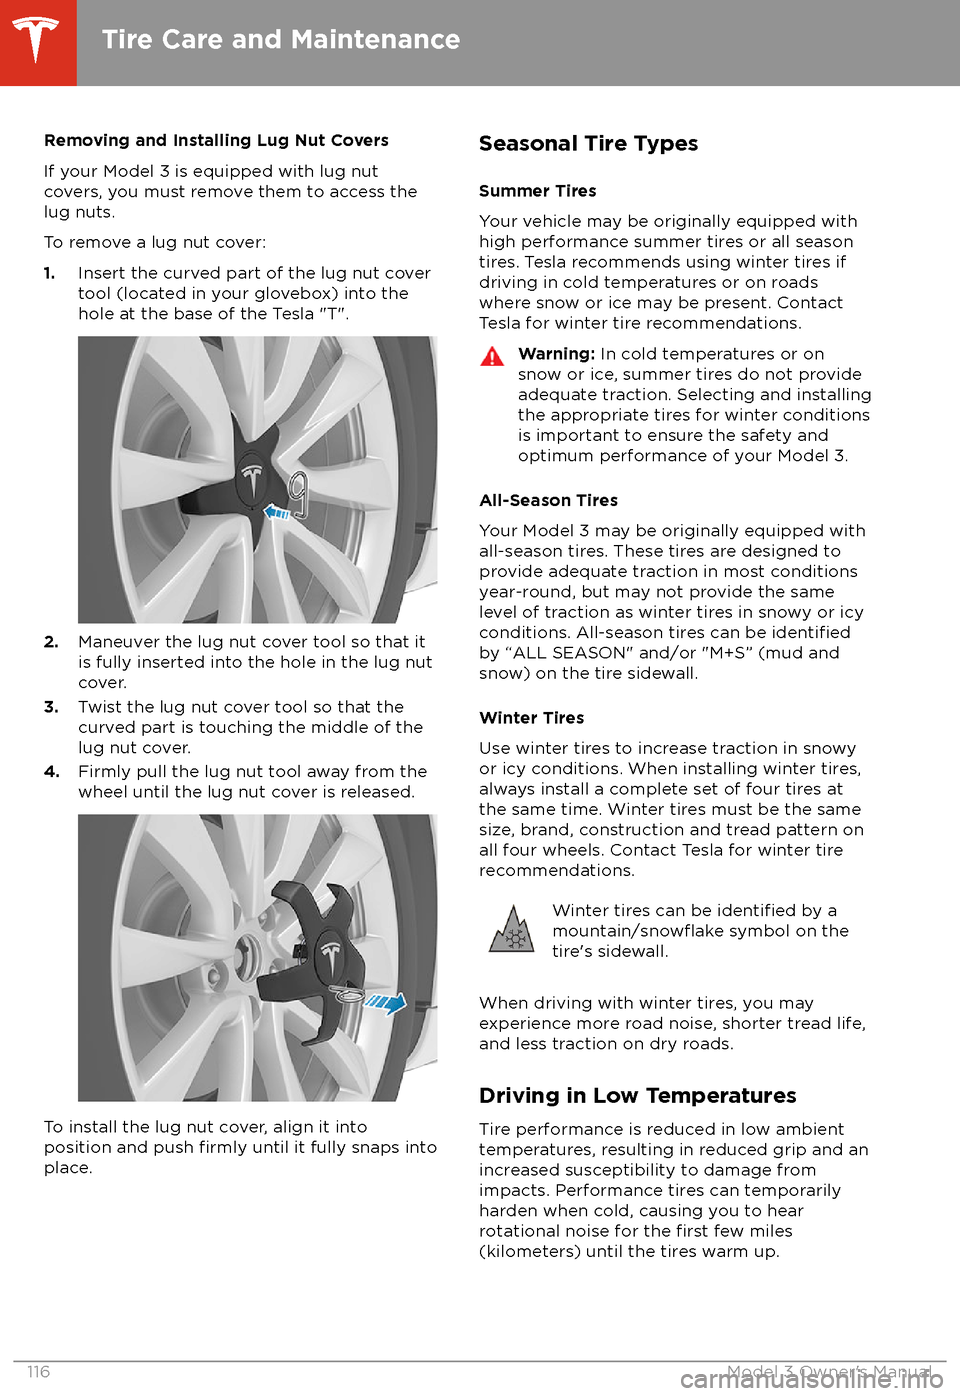
Removing and Installing Lug Nut Covers
If your Model 3 is equipped with lug nut covers, you must remove them to access the
lug nuts.
To remove a lug nut cover:
1. Insert the curved part of the lug nut cover
tool (located in your glovebox) into the hole at the base of the Tesla "T".
2. Maneuver the lug nut cover tool so that it
is fully inserted into the hole in the lug nut
cover.
3. Twist the lug nut cover tool so that the
curved part is touching the middle of the
lug nut cover.
4. Firmly pull the lug nut tool away from the
wheel until the lug nut cover is released.
To install the lug nut cover, align it into
position and push firmly until it fully snaps into
place.
Seasonal Tire Types
Summer Tires
Your vehicle may be originally equipped with high performance summer tires or all season
tires. Tesla recommends using winter tires if
driving in cold temperatures or on roads
where snow or ice may be present. Contact Tesla for winter tire recommendations.Warning: In cold temperatures or on
snow or ice, summer tires do not provide adequate traction. Selecting and installingthe appropriate tires for winter conditions
is important to ensure the safety and
optimum performance of your Model 3.
All-Season Tires
Your Model 3 may be originally equipped with
all-season tires. These tires are designed to provide adequate traction in most conditions
year-round, but may not provide the same level of traction as winter tires in snowy or icy
conditions. All-season tires can be
identifiedby “ALL SEASON" and/or "M+S” (mud and
snow) on the tire sidewall.
Winter Tires
Use winter tires to increase traction in snowy
or icy conditions. When installing winter tires,
always install a complete set of four tires at
the same time. Winter tires must be the same
size, brand, construction and tread pattern on all four wheels. Contact Tesla for winter tire
recommendations.
Winter tires can be identified by amountain/snowflake symbol on the
tire
Page 119 of 165
Using Tire Chains
Tesla has tested and approved the following tire chains to increase traction in snowy
conditions. Tire chains should only be installed
on the rear tires.Tire SizeRecommended
Chain18"PEWAG SERVO
SPORT RSS 7619"PEWAG SERVO RS
77Caution: If your Model 3 is equipped with
aero covers, you must remove them before installing tire chains (see
Removing and Installing Aero Covers on
page 115). Failure to do so can cause
damage not covered by the warranty.
When installing tire chains, follow the instructions provided by the tire chain
manufacturer. Mount them as tightly as possible.
When using tire chains:
Page 120 of 165
driven 15 mph (25 km/h) for longer than 10
minutes.
Replacing a Tire Sensor
If the Tire Pressure warning indicator displays frequently, contact Tesla to determine if a tire
sensor needs to be replaced. If a non-Tesla Service Center repairs or replaces a tire, the
tire sensor may not work until Tesla performs
the setup procedure.
TPMS Malfunction
Model 3 has also been equipped with a TPMS
malfunction indicator to indicate when the
system is not operating properly.The TPMS malfunction indicator is
combined with the tire pressure
indicator light. When the system
detects a malfunction, the indicator
flashes for approximately one minute
after Model 3 powers on, and then
remains continuously lit. This
sequence continues upon
subsequent vehicle start-ups as long
as the malfunction exists. When the
TPMS malfunction indicator is on,
the system might not be able to
detect or signal under- and
over-
inflated tires as intended.
TPMS malfunctions can occur for a variety of
reasons, including installing replacement or
alternate tires or wheels that prevent the
TPMS from functioning properly. Always check
the TPMS malfunction indicator light after replacing one or more tires or wheels on yourvehicle to ensure that the replacement tires or
wheels allow the TPMS to continue to function
properly.
Note: If a tire has been replaced or repaired
using a
different tire sealant than the one
available from Tesla, and a low tire pressure is
detected, it is possible that the tire sensor has been damaged. Contact Tesla to have the fault
repaired as soon as possible.
Tire Care and Maintenance
118Model 3 Owner