TESLA MODEL 3 2018 Manual Online
Manufacturer: TESLA, Model Year: 2018, Model line: MODEL 3, Model: TESLA MODEL 3 2018Pages: 165, PDF Size: 8.63 MB
Page 81 of 165
How Speed Assist Works
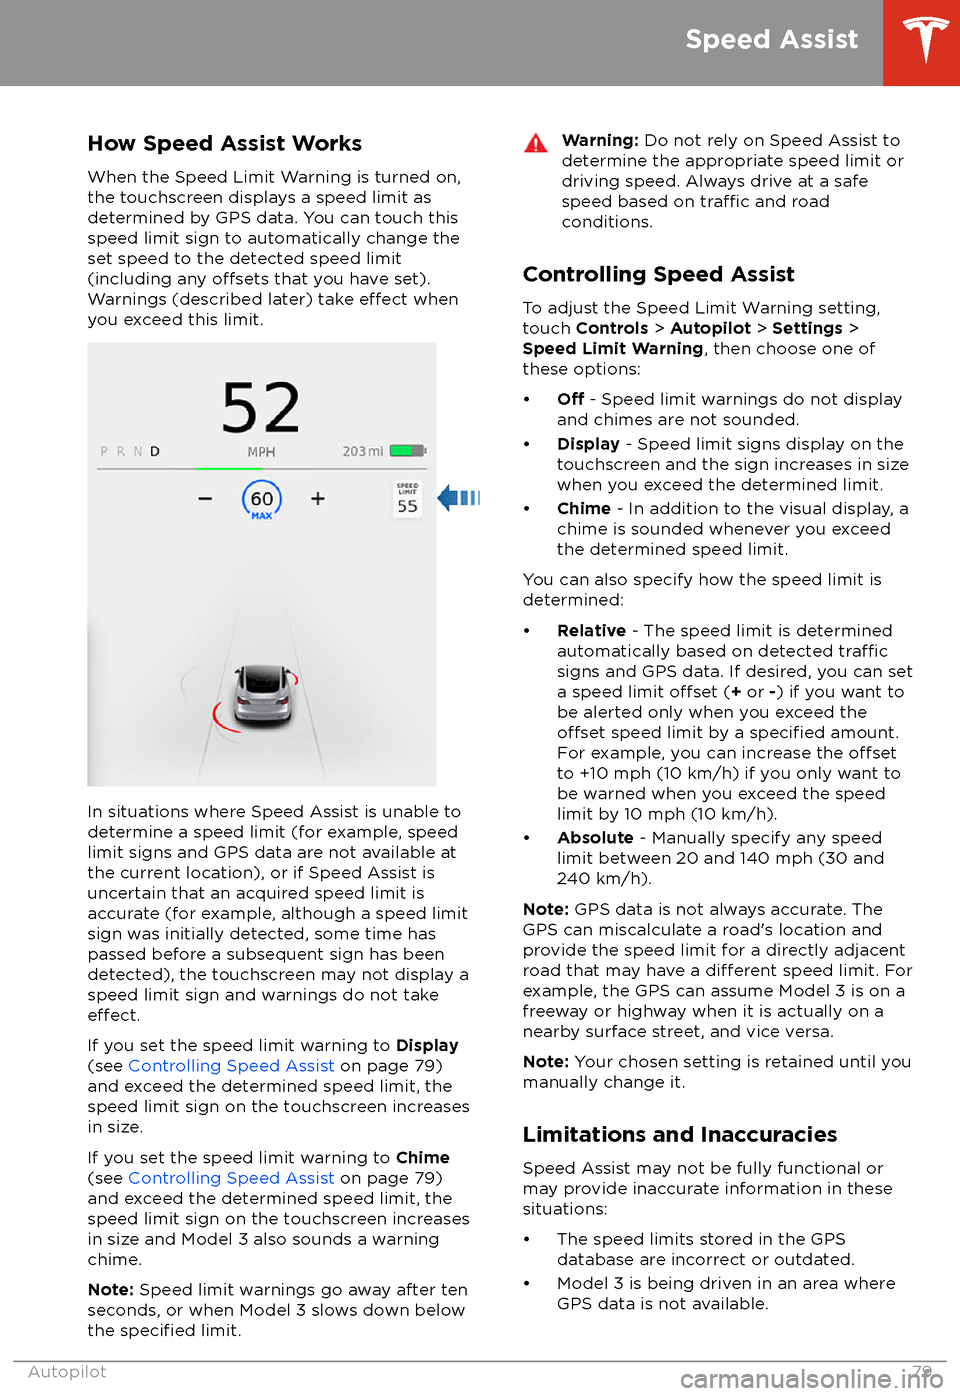
When the Speed Limit Warning is turned on,
the touchscreen displays a speed limit as determined by GPS data. You can touch this
speed limit sign to automatically change the
set speed to the detected speed limit
(including any
offsets that you have set).
Warnings (described later) take effect when
you exceed this limit.
In situations where Speed Assist is unable to
determine a speed limit (for example, speed
limit signs and GPS data are not available at the current location), or if Speed Assist is
uncertain that an acquired speed limit is
accurate (for example, although a speed limit sign was initially detected, some time has
passed before a subsequent sign has been
detected), the touchscreen may not display a
speed limit sign and warnings do not take
effect.
If you set the speed limit warning to Display
(see Controlling Speed Assist on page 79)
and exceed the determined speed limit, the
speed limit sign on the touchscreen increases
in size.
If you set the speed limit warning to Chime
(see Controlling Speed Assist on page 79)
and exceed the determined speed limit, the
speed limit sign on the touchscreen increases
in size and Model 3 also sounds a warning
chime.
Note: Speed limit warnings go away after ten
seconds, or when Model 3 slows down below
the
specified limit.
Warning: Do not rely on Speed Assist to
determine the appropriate speed limit or driving speed. Always drive at a safe
speed based on
traffic and road
conditions.
Controlling Speed Assist
To adjust the Speed Limit Warning setting,
touch Controls > Autopilot > Settings >
Speed Limit Warning , then choose one of
these options:
Page 82 of 165

Page 83 of 165
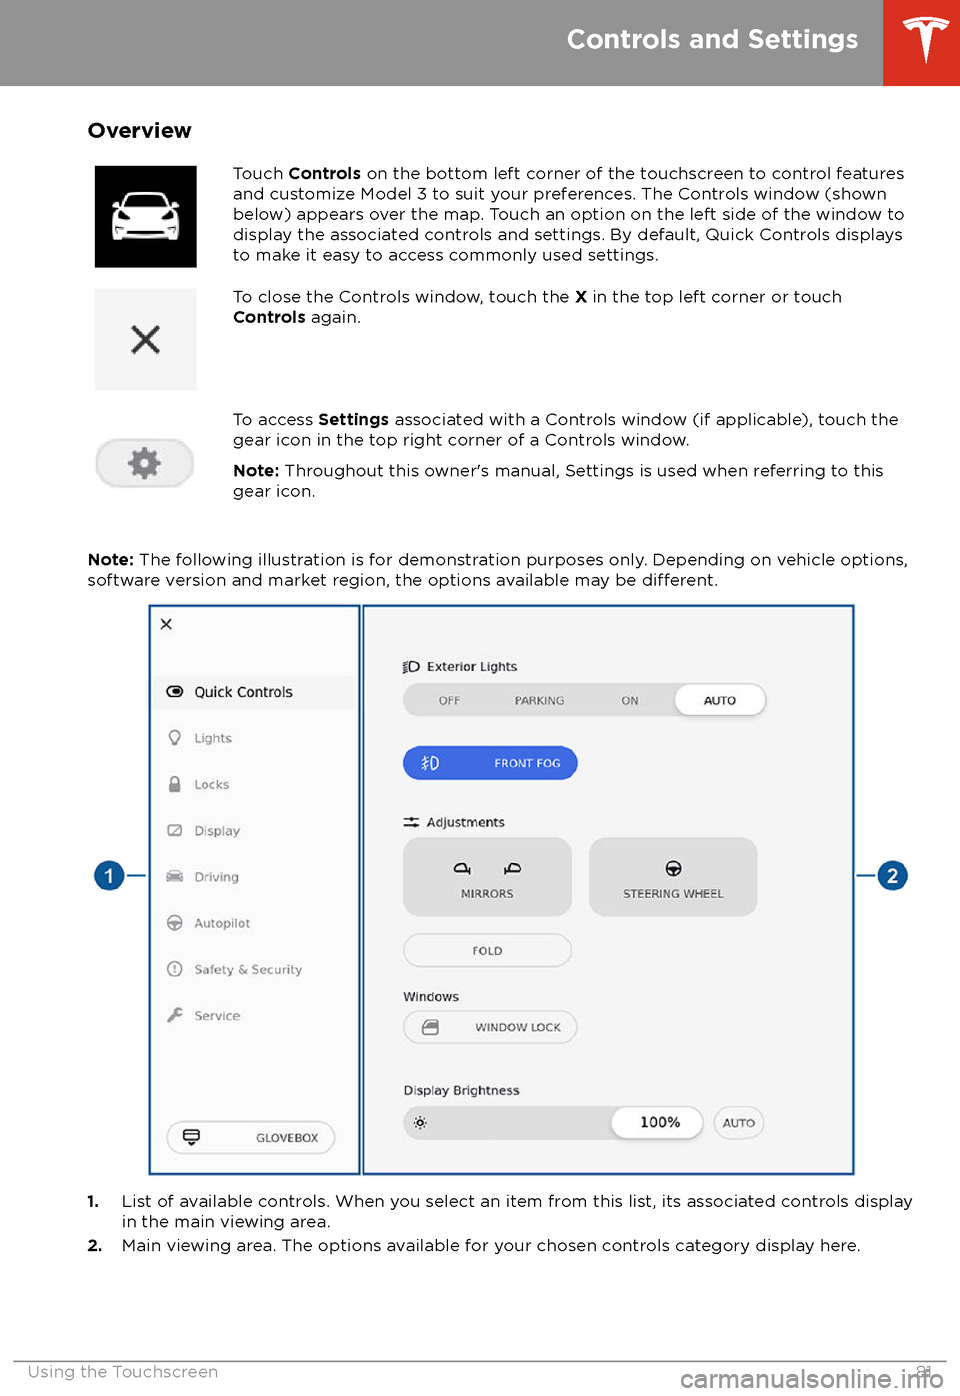
OverviewTouch Controls on the bottom left corner of the touchscreen to control features
and customize Model 3 to suit your preferences. The Controls window (shown
below) appears over the map. Touch an option on the left side of the window to
display the associated controls and settings. By default, Quick Controls displays
to make it easy to access commonly used settings.To close the Controls window, touch the X in the top left corner or touch
Controls again.To access Settings associated with a Controls window (if applicable), touch the
gear icon in the top right corner of a Controls window.
Note: Throughout this owner
Page 84 of 165
Quick
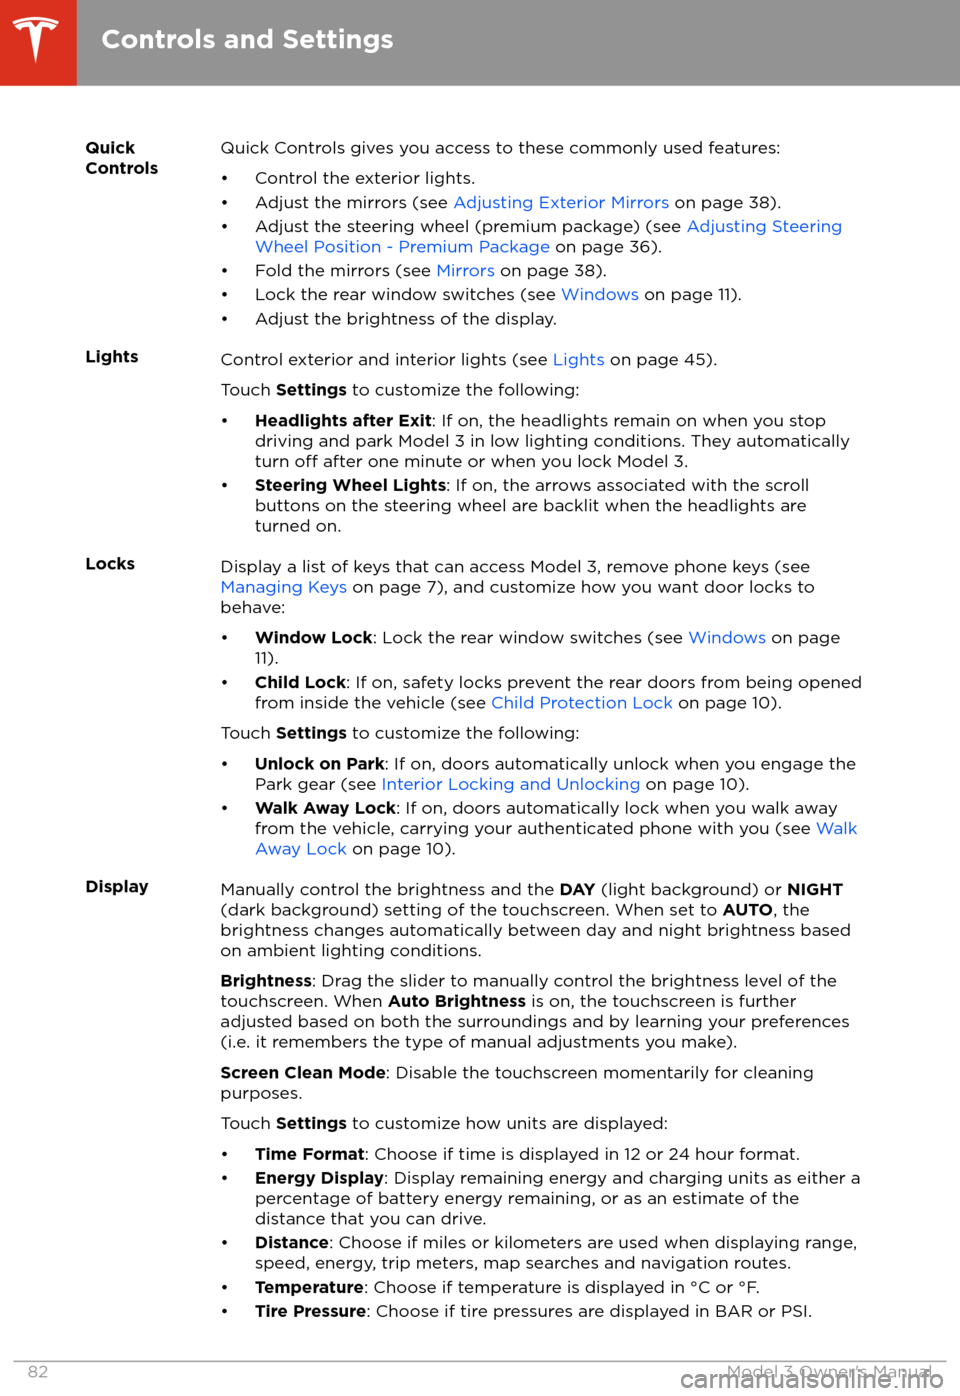
ControlsQuick Controls gives you access to these commonly used features:
Page 85 of 165
DrivingAcceleration: Adjust the amount of acceleration. Chill limits acceleration for
a slightly smoother and gentler ride, whereas Standard provides the normal
level of acceleration.
Note: When Chill is selected, Chill displays on the touchscreen above the
driving speed.
Steering Mode : Adjust the amount of
effort required to turn the steering
wheel. Sport feels more responsive whereas Comfort feels easier to drive
and park (see Adjusting Steering
Effort on page 36).
Regenerative Braking : When you release the accelerator when driving,
regenerative braking slows Model 3 and feeds any surplus energy back to
the Battery. If set to LOW, Model 3 does not slow down as quickly, but also
feeds less energy back to the Battery (see Regenerative Braking on page
49).
Note: Regardless of the setting selected, the energy gained by regenerative
braking is reduced if the Battery is full, or is extremely cold or hot (in which
case, surplus energy is used to heat or cool it).
Traction Control : Turn slip start on to allow wheels to spin (see Traction
Control on page 51).
Creep : When on, Model 3 applies forward torque in Drive and backwards
torque in Reverse when you release the brake pedal (similar to a conventional vehicle with an automatic transmission). The torque moves the
vehicle slowly on
flat roads, but may require you to press the accelerator
pedal in some situations (for example, when on a steep hill or driveway).
When
off, Model 3 is free rolling when you let your foot off the brake pedal
and the motor does not apply torque until the accelerator pedal is pressed.
You can adjust this setting only when Model 3 is in Park.
Warning: Never rely on Creep to apply enough torque to prevent your
vehicle from rolling down a hill. Always apply brakes to remain stopped
or the accelerator to proceed up the hill. Failure can result in property
damage and/or a collision.
Controls and Settings
Using the Touchscreen83
Page 86 of 165
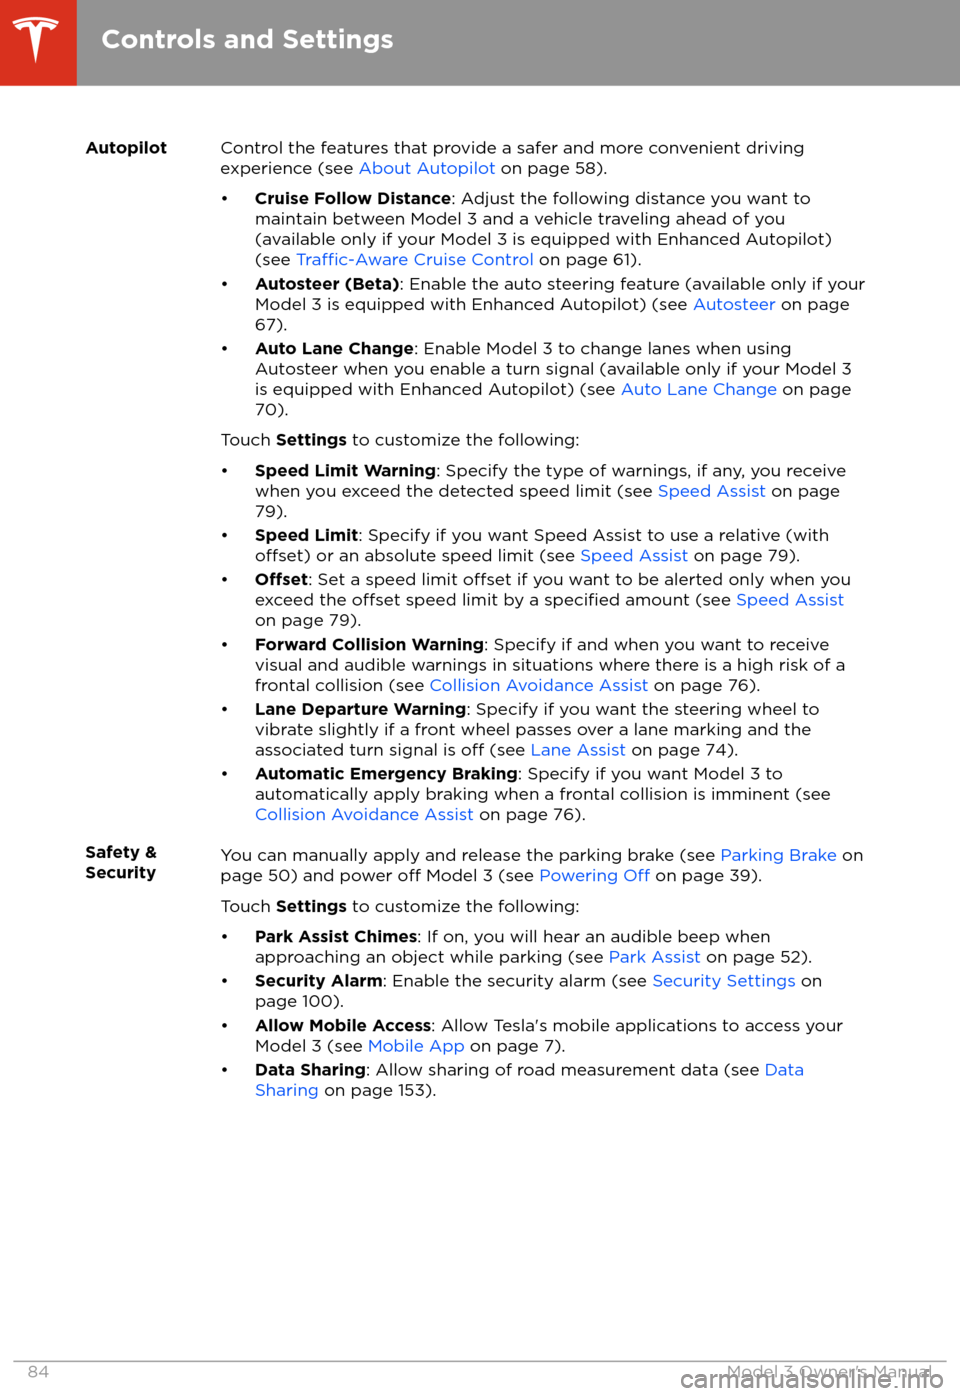
AutopilotControl the features that provide a safer and more convenient driving
experience (see About Autopilot on page 58).
Page 87 of 165
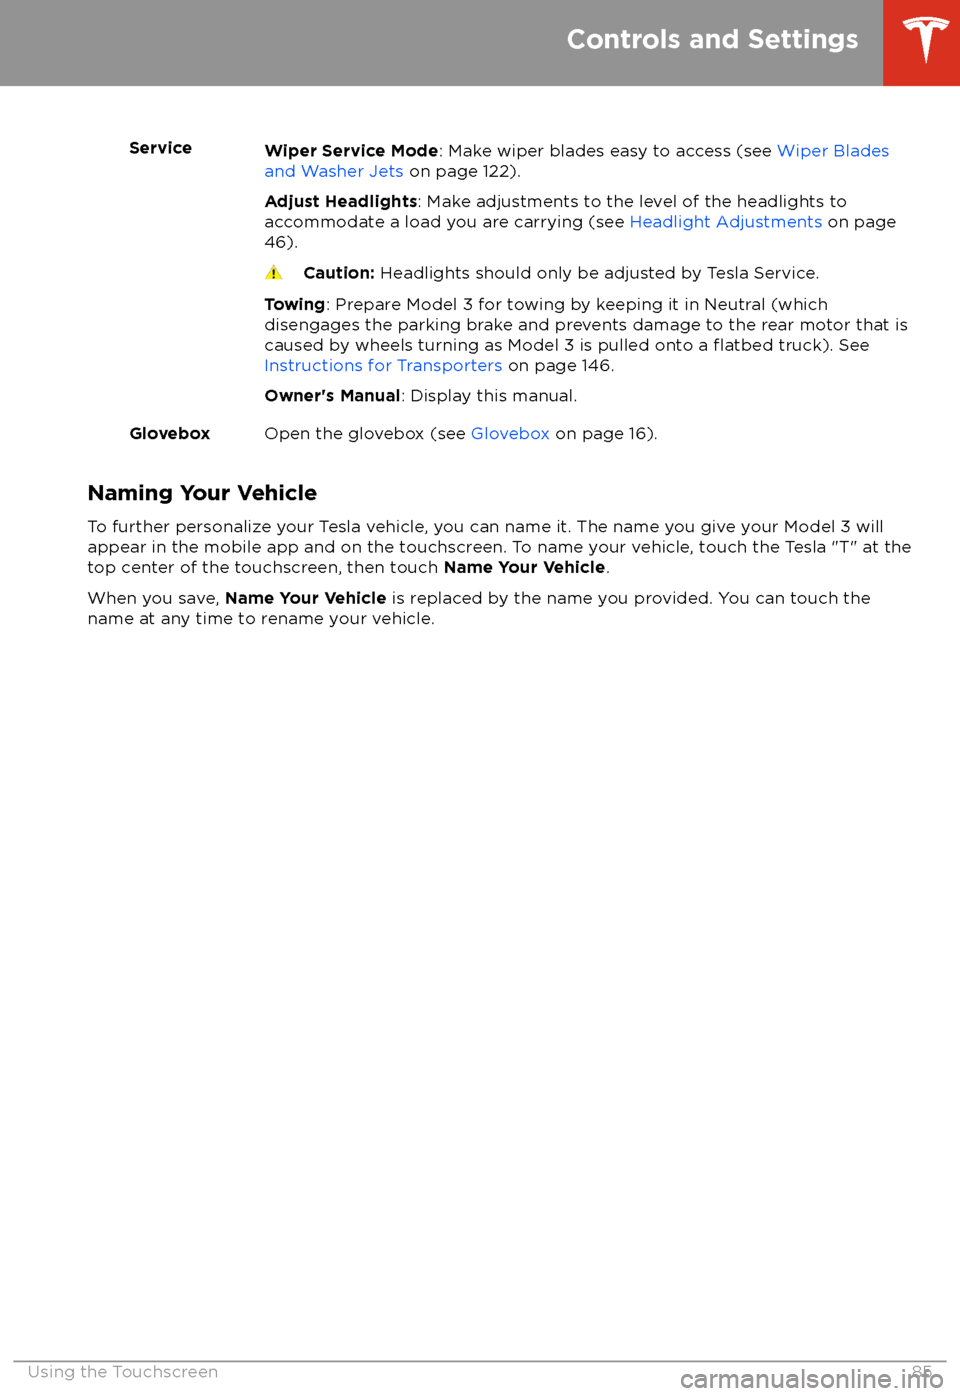
ServiceWiper Service Mode: Make wiper blades easy to access (see Wiper Blades
and Washer Jets on page 122).
Adjust Headlights : Make adjustments to the level of the headlights to
accommodate a load you are carrying (see Headlight Adjustments on page
46).Caution: Headlights should only be adjusted by Tesla Service.
Towing: Prepare Model 3 for towing by keeping it in Neutral (which
disengages the parking brake and prevents damage to the rear motor that is
caused by wheels turning as Model 3 is pulled onto a
flatbed truck). See
Instructions for Transporters on page 146.
Owner
Page 88 of 165
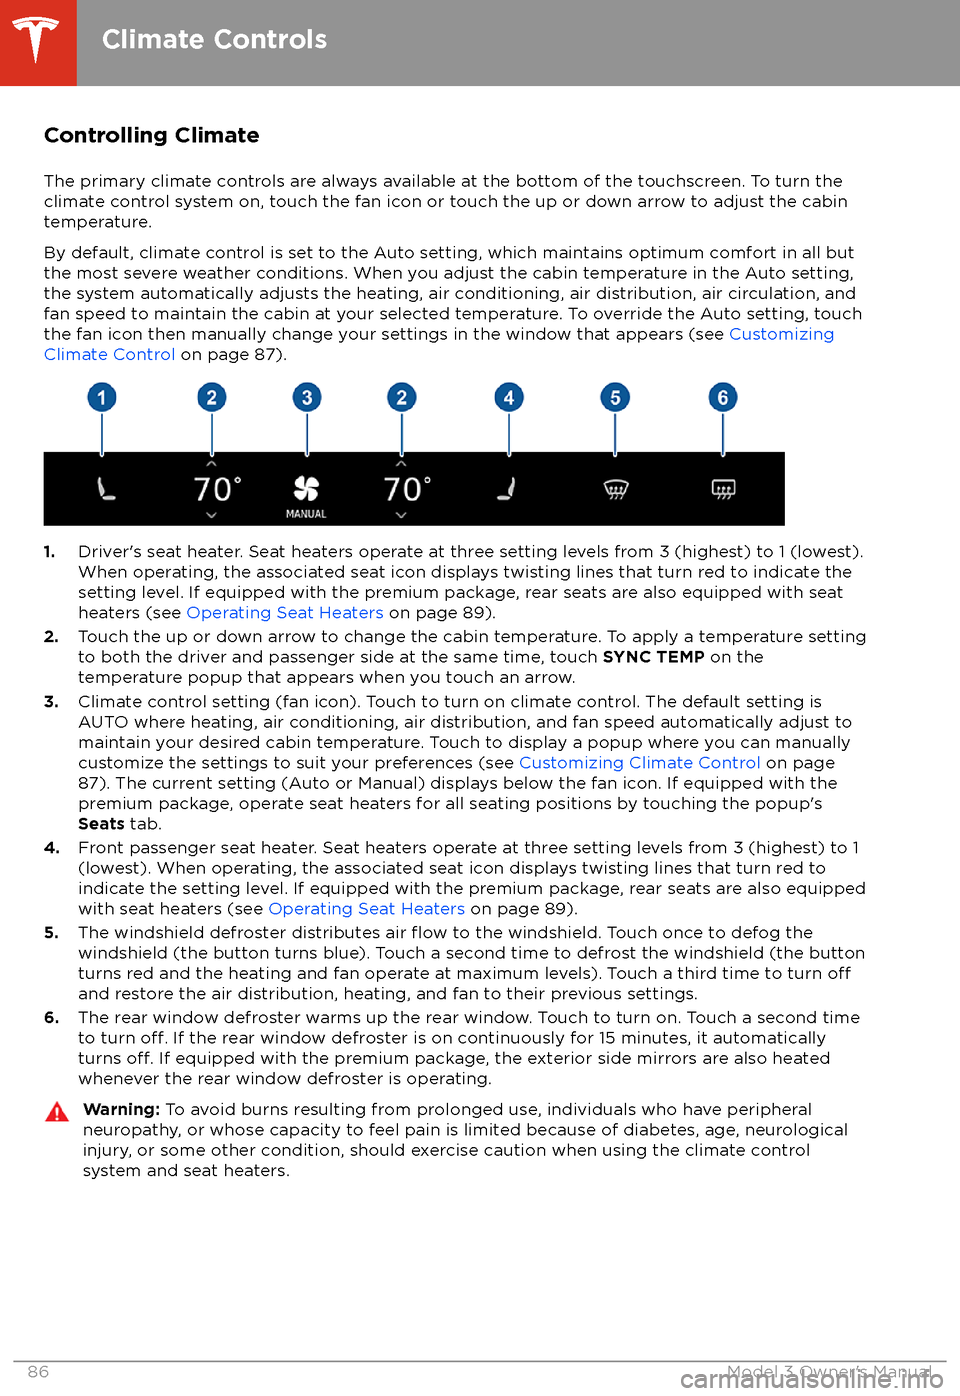
Controlling Climate
The primary climate controls are always available at the bottom of the touchscreen. To turn the
climate control system on, touch the fan icon or touch the up or down arrow to adjust the cabin
temperature.
By default, climate control is set to the Auto setting, which maintains optimum comfort in all but
the most severe weather conditions. When you adjust the cabin temperature in the Auto setting,
the system automatically adjusts the heating, air conditioning, air distribution, air circulation, and fan speed to maintain the cabin at your selected temperature. To override the Auto setting, touch
the fan icon then manually change your settings in the window that appears (see Customizing
Climate Control on page 87).
1.Driver
Page 89 of 165
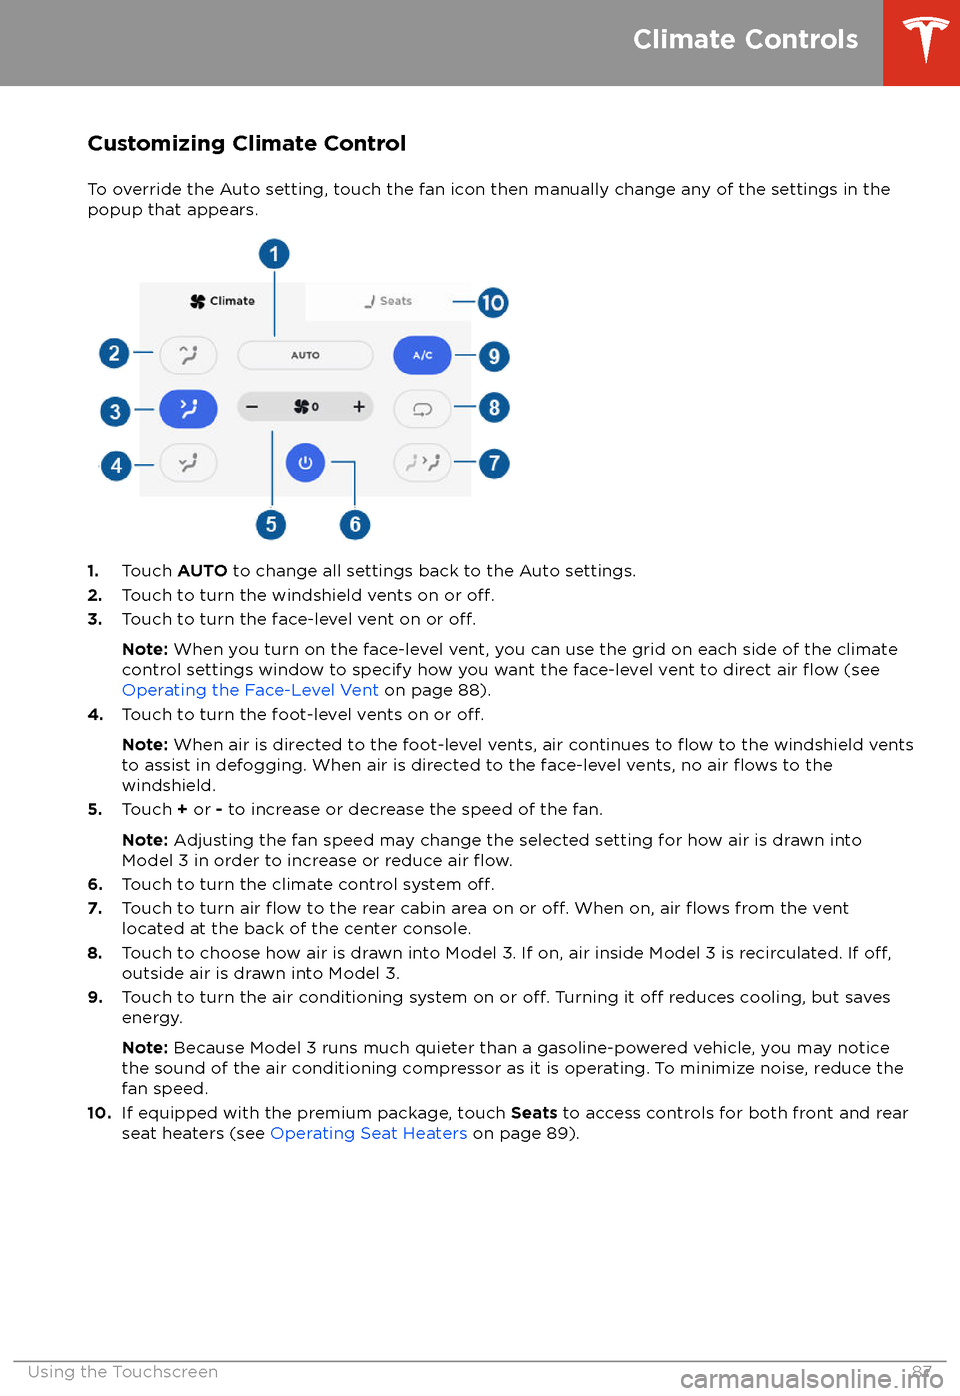
Customizing Climate ControlTo override the Auto setting, touch the fan icon then manually change any of the settings in thepopup that appears.
1. Touch AUTO to change all settings back to the Auto settings.
2. Touch to turn the windshield vents on or off.3.Touch to turn the face-level vent on or off.
Note: When you turn on the face-level vent, you can use the grid on each side of the climate
control settings window to specify how you want the face-level vent to direct air flow (see
Operating the Face-Level Vent on page 88).
4. Touch to turn the foot-level vents on or
off.
Note: When air is directed to the foot-level vents, air continues to flow to the windshield vents
to assist in defogging. When air is directed to the face-level vents, no air flows to the
windshield.
5. Touch + or - to increase or decrease the speed of the fan.
Note: Adjusting the fan speed may change the selected setting for how air is drawn into
Model 3 in order to increase or reduce air
flow.6. Touch to turn the climate control system off.7. Touch to turn air flow to the rear cabin area on or off. When on, air flows from the vent
located at the back of the center console.
8. Touch to choose how air is drawn into Model 3. If on, air inside Model 3 is recirculated. If
off,outside air is drawn into Model 3.
9. Touch to turn the air conditioning system on or off. Turning it off reduces cooling, but saves
energy.
Note: Because Model 3 runs much quieter than a gasoline-powered vehicle, you may notice
the sound of the air conditioning compressor as it is operating. To minimize noise, reduce the fan speed.
10. If equipped with the premium package, touch Seats to access controls for both front and rear
seat heaters (see Operating Seat Heaters on page 89).
Climate Controls
Using the Touchscreen87
Page 90 of 165
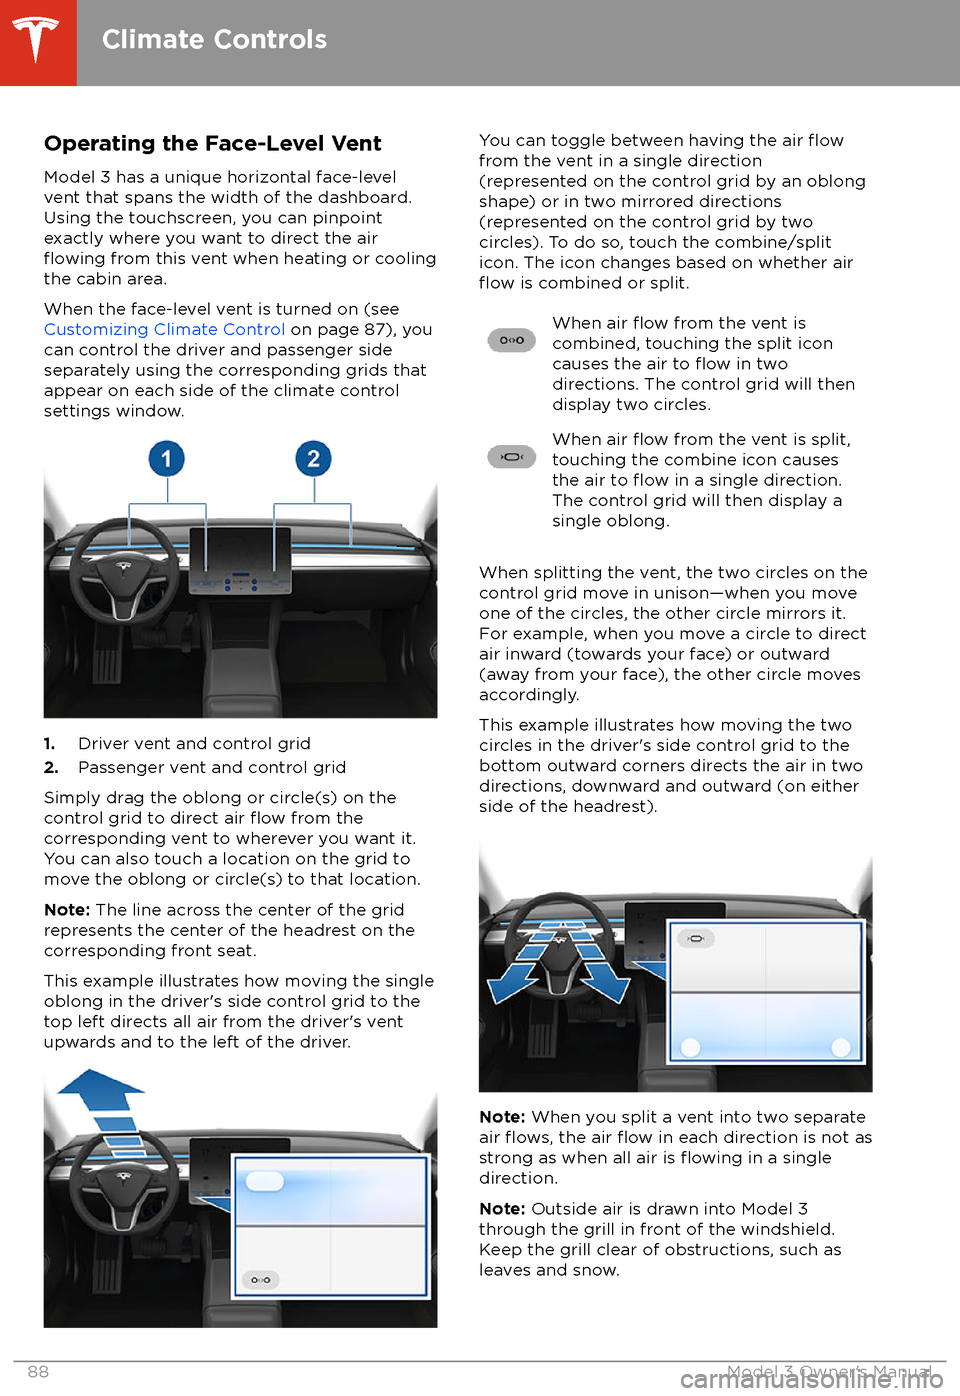
Operating the Face-Level Vent
Model 3 has a unique horizontal face-level
vent that spans the width of the dashboard.
Using the touchscreen, you can pinpoint
exactly where you want to direct the air
flowing from this vent when heating or cooling
the cabin area.
When the face-level vent is turned on (see
Customizing Climate Control on page 87), you
can control the driver and passenger side
separately using the corresponding grids that
appear on each side of the climate control
settings window.
1. Driver vent and control grid
2. Passenger vent and control grid
Simply drag the oblong or circle(s) on the control grid to direct air
flow from the
corresponding vent to wherever you want it. You can also touch a location on the grid tomove the oblong or circle(s) to that location.
Note: The line across the center of the grid
represents the center of the headrest on the
corresponding front seat.
This example illustrates how moving the single
oblong in the driver