charging TESLA MODEL S 2015 User Guide
[x] Cancel search | Manufacturer: TESLA, Model Year: 2015, Model line: MODEL S, Model: TESLA MODEL S 2015Pages: 164, PDF Size: 4.78 MB
Page 100 of 164
Model S Mobile AppThe Tesla Model S mobile app allows you tocommunicate with Model S remotely using
your iPhone ®
or Android ™
phone. With this app,
you can:
• Check charging progress and receive notifications when charging has started,
has been interrupted, or is complete.
• Heat or cool Model S before driving (even if it's in a garage).
• Locate Model S with directions, or track its movement across a map.
• Flash lights or honk the horn to find Model S when parked.
• Vent or close the sunroof.
• Lock or unlock Model S from afar. • Start Model S.
• Support the Model S Calendar app by allowing the mobile app to send your
phone's calendar data to Model S.
• Receive notifications when the car alarm has been triggered, or a new Model S
software update is available.
Simply download the Tesla Model S mobile
app to your phone and enter your MY TESLA
login credentials. You must also ensure that Model S is ready to communicate with the
mobile app by turning on its remote access
setting. Touch Controls > Settings > Safety &
Security > Remote Access > On (see Settings
on page 77).
Mobile App
100Model S Owner's Manual
Page 101 of 164

High Voltage Components1.Battery
2. DC-DC converter and junction box
3. High voltage cabling (colored orange)
4. 10 kW on-board master charger
5. OPTIONAL: 10 kW on-board charger
6. Charge port
7. Drive unitWarning: The high voltage system has no
user serviceable parts. Do not
disassemble, remove or replace high
voltage components, cables or
connectors. High voltage cables are
colored orange for easy identification.Warning: Read and follow all instructions
provided on the labels that are attached to Model S. These labels are there for
your safetyWarning: In the unlikely event that a fire
occurs, immediately contact your local
fire emergency responders.
Electric Vehicle Components
Charging101
Page 102 of 164

Charging Equipment
Charging equipment designed specifically to charge your Model S is available from Tesla. ATesla Wall Connector, which installs in your
garage, is the fastest way to charge Model S at home.
In several market regions, Model S is equipped
with a Mobile Connector and the adapter(s)
you need to plug into commonly used power outlets. When using the Mobile Connector,
first plug the Mobile Connector into the power
outlet, then plug in Model S. For more information about your Mobile Connector, see
the Mobile Connector Owner’s Manual.
Additional adapters can be purchased from
Tesla.
Tesla also provides various types of adapters
(including J1772, Mennekes Type 2, and CHAdeMO) that allow you to plug Model S
into the most commonly used public charging
stations in your region. Connect the adapter
to the charging station’s charge cable, open the charge port door using the touchscreen
(see Charging Model S on page 104), then
plug in Model S.
For more information on the charging
equipment available for your region, go to
www.teslamotors.com, choose your region, then view the available charging options.
Electric Vehicle Components
102Model S Owner's Manual
Page 103 of 164
About the Battery
Model S has one of the most sophisticated
battery systems in the world. The most important way to preserve the Battery is to
LEAVE YOUR MODEL S PLUGGED IN when
you are not using it. This is particularly
important if you are not planning to drive
Model S for several weeks. When plugged in,
Model S wakes up when needed to
automatically maintain a charge level that
maximizes the lifetime of the Battery.
There is no advantage to waiting until the
Battery’s level is low before charging. In fact,
the Battery performs best when charged
regularly.
Note: If the Model S Battery becomes
completely discharged in a situation in which
towing is required, the owner is responsible for towing expenses. Discharge-related
towing expenses are not covered under the
Roadside Assistance policy.
Battery Care
Never allow the Battery to fully discharge.
Even when Model S is not being driven, its
Battery discharges very slowly to power the
onboard electronics. On average, the Battery discharges at a rate of 1% per day. Situations
can arise in which you must leave Model S
unplugged for an extended period of time (for
example, at an airport when traveling). In these situations, keep the 1% in mind to ensure
that you leave the Battery with a sufficient
charge level. For example, over a two week
period (14 days), the Battery discharges by
approximately 14%.
Discharging the Battery to 0% may
permanently damage the Battery. To protect against a complete discharge, Model S enters
a low-power consumption mode when the
charge level drops to 5%. In this mode, the
Battery stops supporting the onboard electronics to slow the discharge rate to
approximately 4% per month. Once this low-
power consumption mode is active, it is
important to plug in Model S within two
months to avoid Battery damage.
Note: When the low-power consumption
mode is active, the auxiliary 12V battery is no
longer being charged and can completely
discharge within 12 hours. In the unlikely event
that this occurs, you may need to jump start
or replace the 12V battery before you can
charge. In this situation, contact Tesla.Temperature Limits
For better long-term performance, avoid
exposing Model S to ambient temperatures above 140° F (60° C) or below -22° F (-30° C)
for more than 24 hours at a time.
Energy Saving Feature
Model S has an energy-saving feature that
reduces the amount of energy being consumed when Model S is not in use. Touch
Controls > Displays > Energy Saving . For more
information on maximizing range and saving
energy, see Getting Maximum Range on page
70.
Battery Warnings and CautionsWarning: The Battery has no parts that an
owner or a non-Tesla authorized service technician can service. Under no
circumstances should you open or
tamper with the Battery. Always contact Tesla to arrange for Battery servicing.Caution: If the Battery’s charge level falls
to 0%, you must plug it in. If you leave it
unplugged for an extended period, it may
not be possible to charge Model S or use
the vehicle without jump starting or
replacing the 12V battery. Leaving Model S unplugged for an extendedperiod can also result in permanent
Battery damage. If you are unable to
charge Model S, contact Tesla
immediately.Caution: The Battery requires no owner
maintenance. Do not remove the filler cap
and do not add fluid. If the instrument
panel warns you that the fluid level is low, contact Tesla immediately.
Battery Information
Charging103
Page 104 of 164
Opening the Charge Port
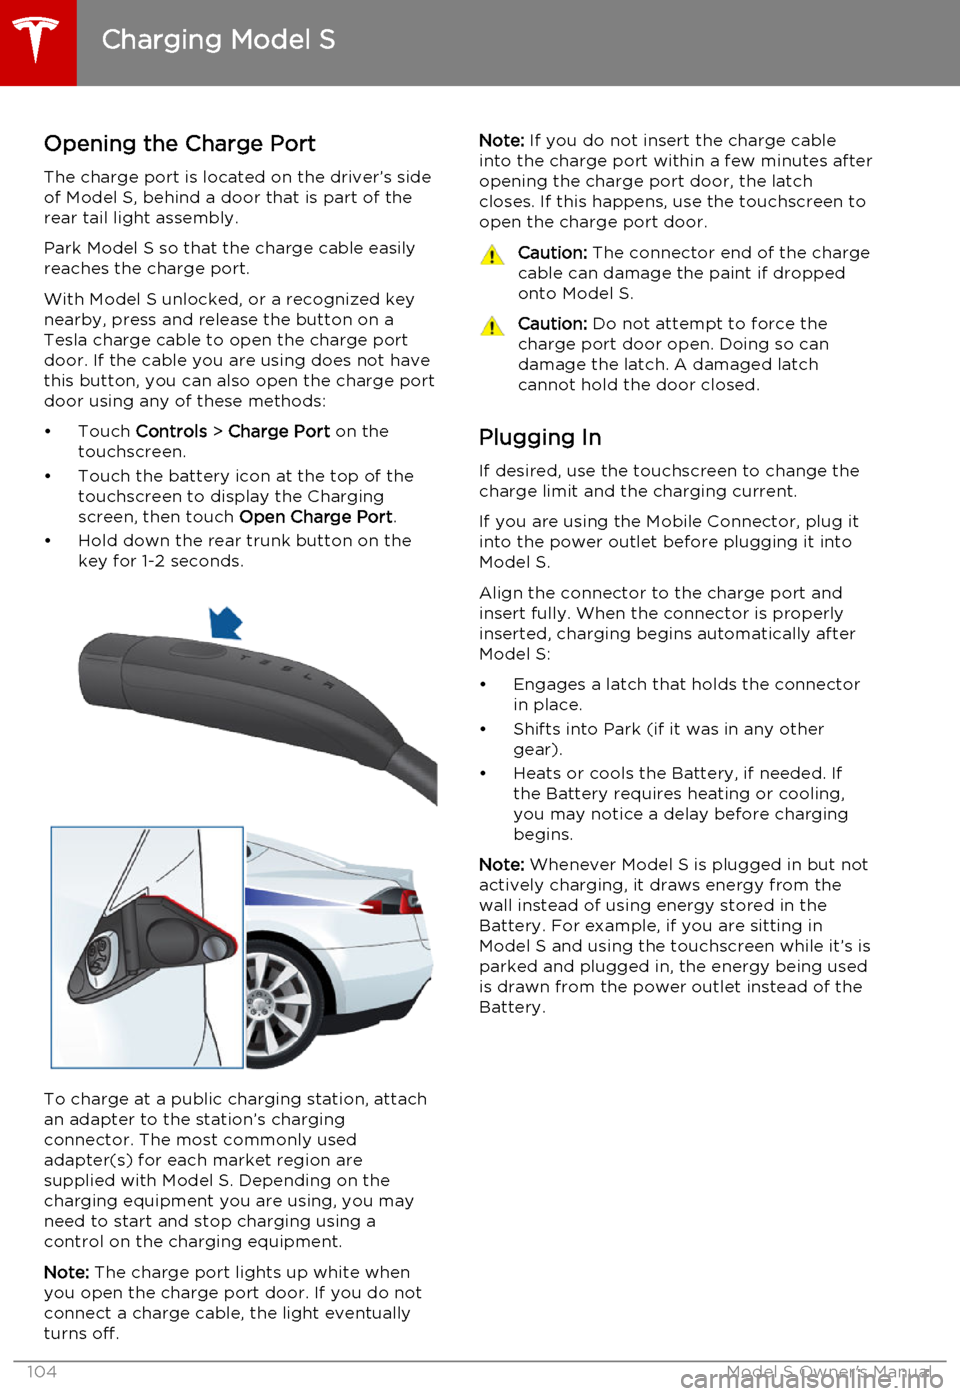
The charge port is located on the driver’s side of Model S, behind a door that is part of therear tail light assembly.
Park Model S so that the charge cable easily
reaches the charge port.
With Model S unlocked, or a recognized key
nearby, press and release the button on a
Tesla charge cable to open the charge port door. If the cable you are using does not havethis button, you can also open the charge portdoor using any of these methods:
• Touch Controls > Charge Port on the
touchscreen.
• Touch the battery icon at the top of the touchscreen to display the Charging
screen, then touch Open Charge Port.
• Hold down the rear trunk button on the key for 1-2 seconds.
To charge at a public charging station, attach
an adapter to the station’s chargingconnector. The most commonly usedadapter(s) for each market region aresupplied with Model S. Depending on thecharging equipment you are using, you may
need to start and stop charging using a control on the charging equipment.
Note: The charge port lights up white when
you open the charge port door. If you do not
connect a charge cable, the light eventually
turns off.
Note: If you do not insert the charge cable
into the charge port within a few minutes after
opening the charge port door, the latch
closes. If this happens, use the touchscreen to
open the charge port door.Caution: The connector end of the charge
cable can damage the paint if dropped onto Model S.Caution: Do not attempt to force the
charge port door open. Doing so can
damage the latch. A damaged latch
cannot hold the door closed.
Plugging In
If desired, use the touchscreen to change the
charge limit and the charging current.
If you are using the Mobile Connector, plug it into the power outlet before plugging it intoModel S.
Align the connector to the charge port and
insert fully. When the connector is properly
inserted, charging begins automatically after Model S:
• Engages a latch that holds the connector in place.
• Shifts into Park (if it was in any other gear).
• Heats or cools the Battery, if needed. If the Battery requires heating or cooling,
you may notice a delay before charging begins.
Note: Whenever Model S is plugged in but not
actively charging, it draws energy from the wall instead of using energy stored in the
Battery. For example, if you are sitting in
Model S and using the touchscreen while it’s is
parked and plugged in, the energy being used
is drawn from the power outlet instead of the
Battery.
Charging Model S
104Model S Owner's Manual
Page 105 of 164
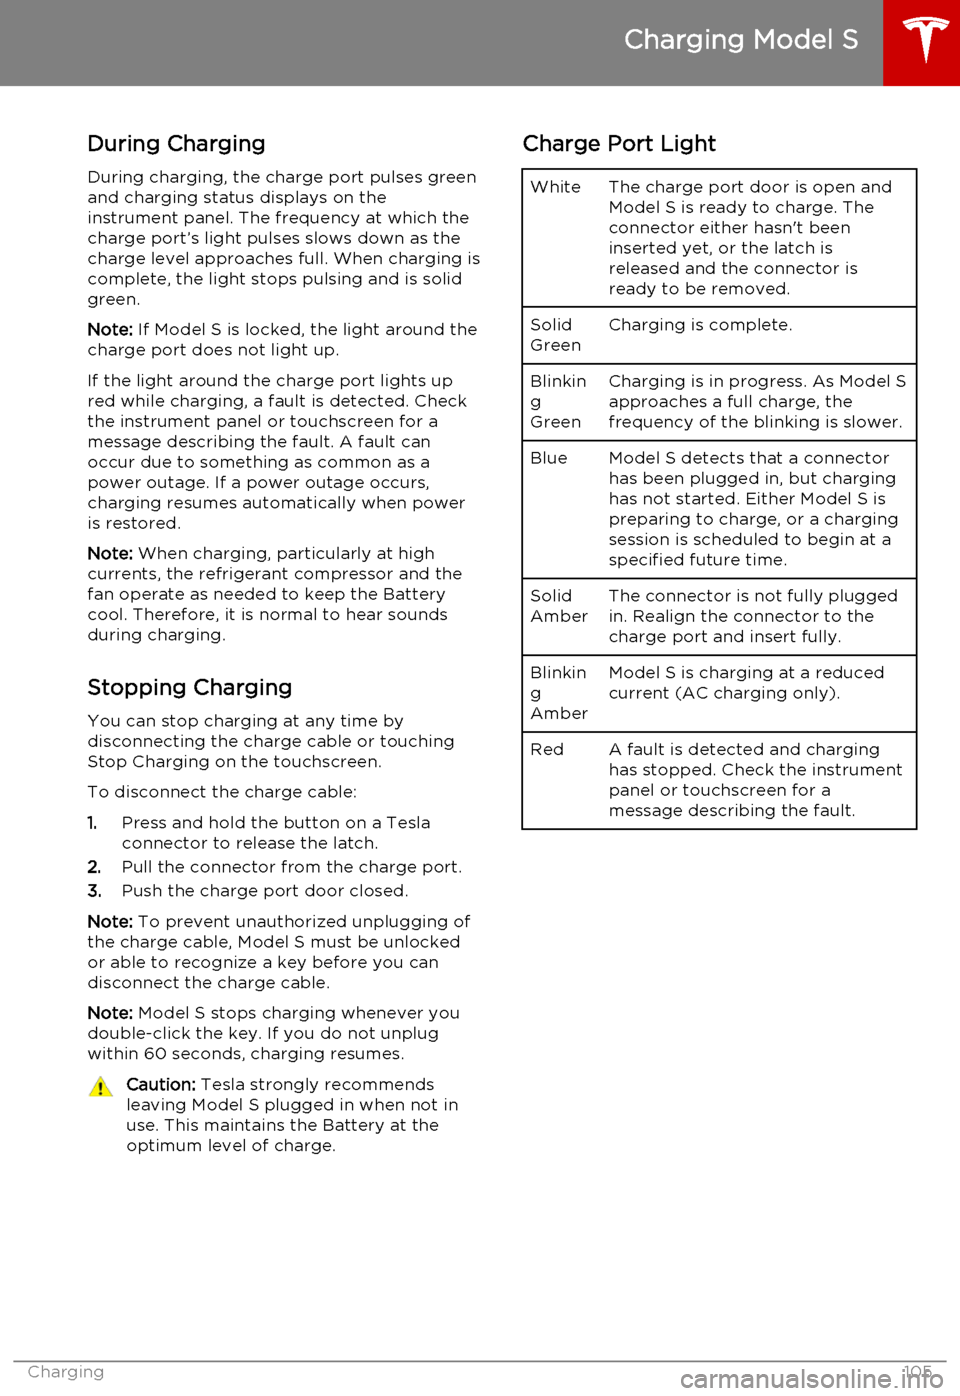
During ChargingDuring charging, the charge port pulses green
and charging status displays on the instrument panel. The frequency at which thecharge port’s light pulses slows down as thecharge level approaches full. When charging iscomplete, the light stops pulsing and is solid
green.
Note: If Model S is locked, the light around the
charge port does not light up.
If the light around the charge port lights up
red while charging, a fault is detected. Check
the instrument panel or touchscreen for a
message describing the fault. A fault can
occur due to something as common as a
power outage. If a power outage occurs,
charging resumes automatically when power
is restored.
Note: When charging, particularly at high
currents, the refrigerant compressor and the
fan operate as needed to keep the Battery cool. Therefore, it is normal to hear sounds
during charging.
Stopping Charging You can stop charging at any time by
disconnecting the charge cable or touching
Stop Charging on the touchscreen.
To disconnect the charge cable:
1. Press and hold the button on a Tesla
connector to release the latch.
2. Pull the connector from the charge port.
3. Push the charge port door closed.
Note: To prevent unauthorized unplugging of
the charge cable, Model S must be unlocked
or able to recognize a key before you can
disconnect the charge cable.
Note: Model S stops charging whenever you
double-click the key. If you do not unplug
within 60 seconds, charging resumes.Caution: Tesla strongly recommends
leaving Model S plugged in when not in
use. This maintains the Battery at the optimum level of charge.Charge Port LightWhiteThe charge port door is open and
Model S is ready to charge. The
connector either hasn't been
inserted yet, or the latch is
released and the connector is
ready to be removed.Solid
GreenCharging is complete.Blinkin
g
GreenCharging is in progress. As Model S approaches a full charge, the
frequency of the blinking is slower.BlueModel S detects that a connector has been plugged in, but charging
has not started. Either Model S is
preparing to charge, or a charging
session is scheduled to begin at a
specified future time.Solid
AmberThe connector is not fully plugged
in. Realign the connector to the
charge port and insert fully.Blinkin
g
AmberModel S is charging at a reduced
current (AC charging only).RedA fault is detected and charging
has stopped. Check the instrument
panel or touchscreen for a
message describing the fault.
Charging Model S
Charging105
Page 106 of 164
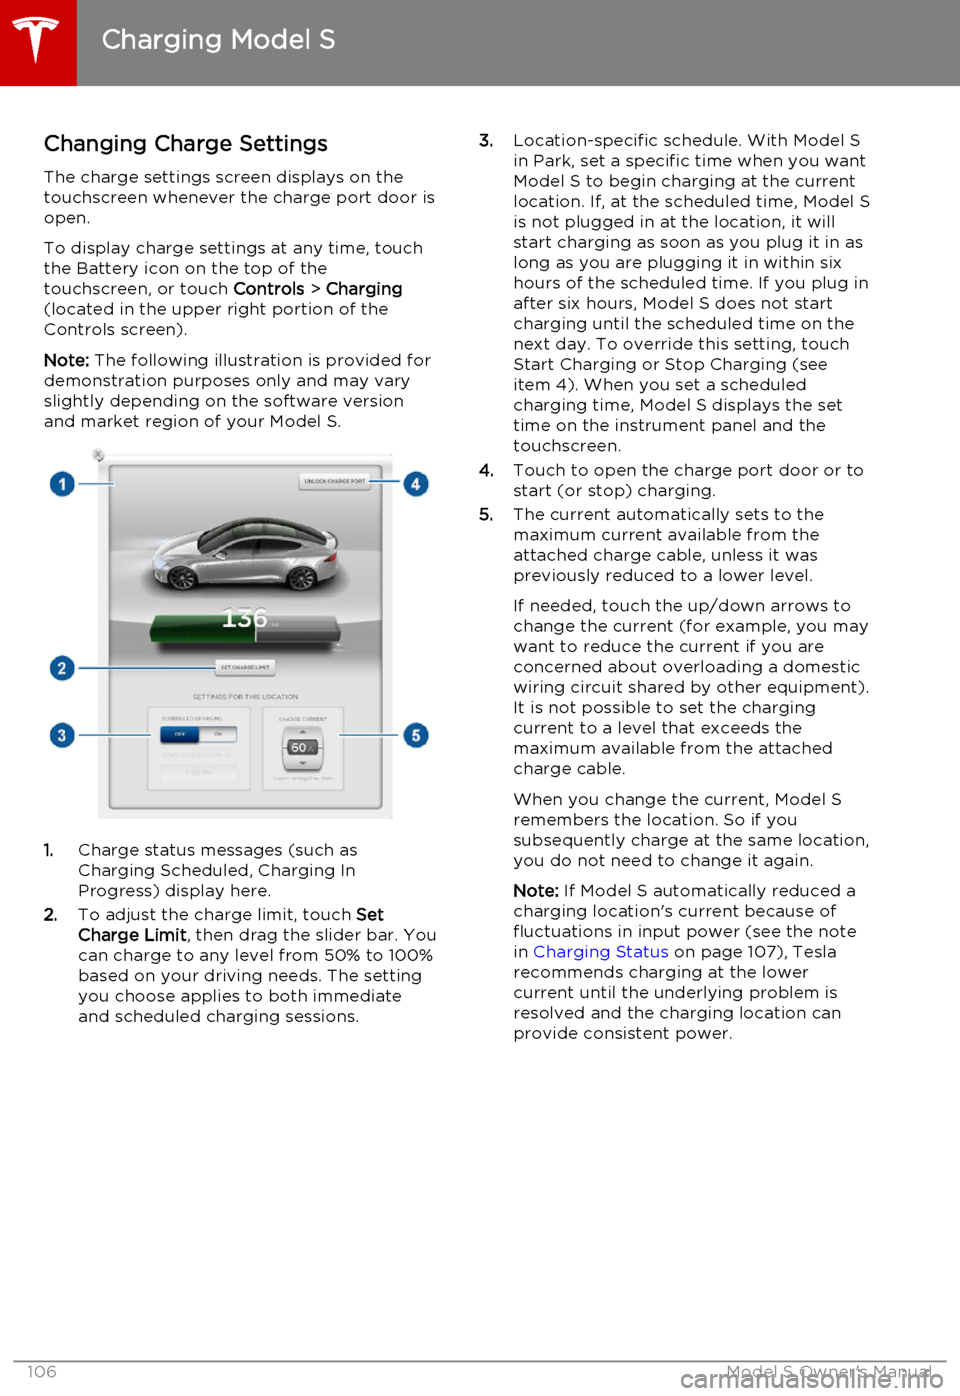
Changing Charge SettingsThe charge settings screen displays on the
touchscreen whenever the charge port door is
open.
To display charge settings at any time, touch
the Battery icon on the top of the
touchscreen, or touch Controls > Charging
(located in the upper right portion of the
Controls screen).
Note: The following illustration is provided for
demonstration purposes only and may vary
slightly depending on the software version
and market region of your Model S.
1. Charge status messages (such as
Charging Scheduled, Charging In
Progress) display here.
2. To adjust the charge limit, touch Set
Charge Limit , then drag the slider bar. You
can charge to any level from 50% to 100%
based on your driving needs. The setting
you choose applies to both immediate
and scheduled charging sessions.
3. Location-specific schedule. With Model S
in Park, set a specific time when you want
Model S to begin charging at the current
location. If, at the scheduled time, Model S
is not plugged in at the location, it will
start charging as soon as you plug it in as
long as you are plugging it in within six hours of the scheduled time. If you plug in
after six hours, Model S does not start
charging until the scheduled time on the next day. To override this setting, touch
Start Charging or Stop Charging (see
item 4). When you set a scheduled
charging time, Model S displays the set time on the instrument panel and the
touchscreen.
4. Touch to open the charge port door or to
start (or stop) charging.
5. The current automatically sets to the
maximum current available from the
attached charge cable, unless it was
previously reduced to a lower level.
If needed, touch the up/down arrows to change the current (for example, you may
want to reduce the current if you are
concerned about overloading a domestic
wiring circuit shared by other equipment).
It is not possible to set the charging
current to a level that exceeds the maximum available from the attached
charge cable.
When you change the current, Model S
remembers the location. So if you
subsequently charge at the same location, you do not need to change it again.
Note: If Model S automatically reduced a
charging location's current because of
fluctuations in input power (see the note
in Charging Status on page 107), Tesla
recommends charging at the lower
current until the underlying problem is
resolved and the charging location can provide consistent power.
Charging Model S
106Model S Owner's Manual
Page 107 of 164
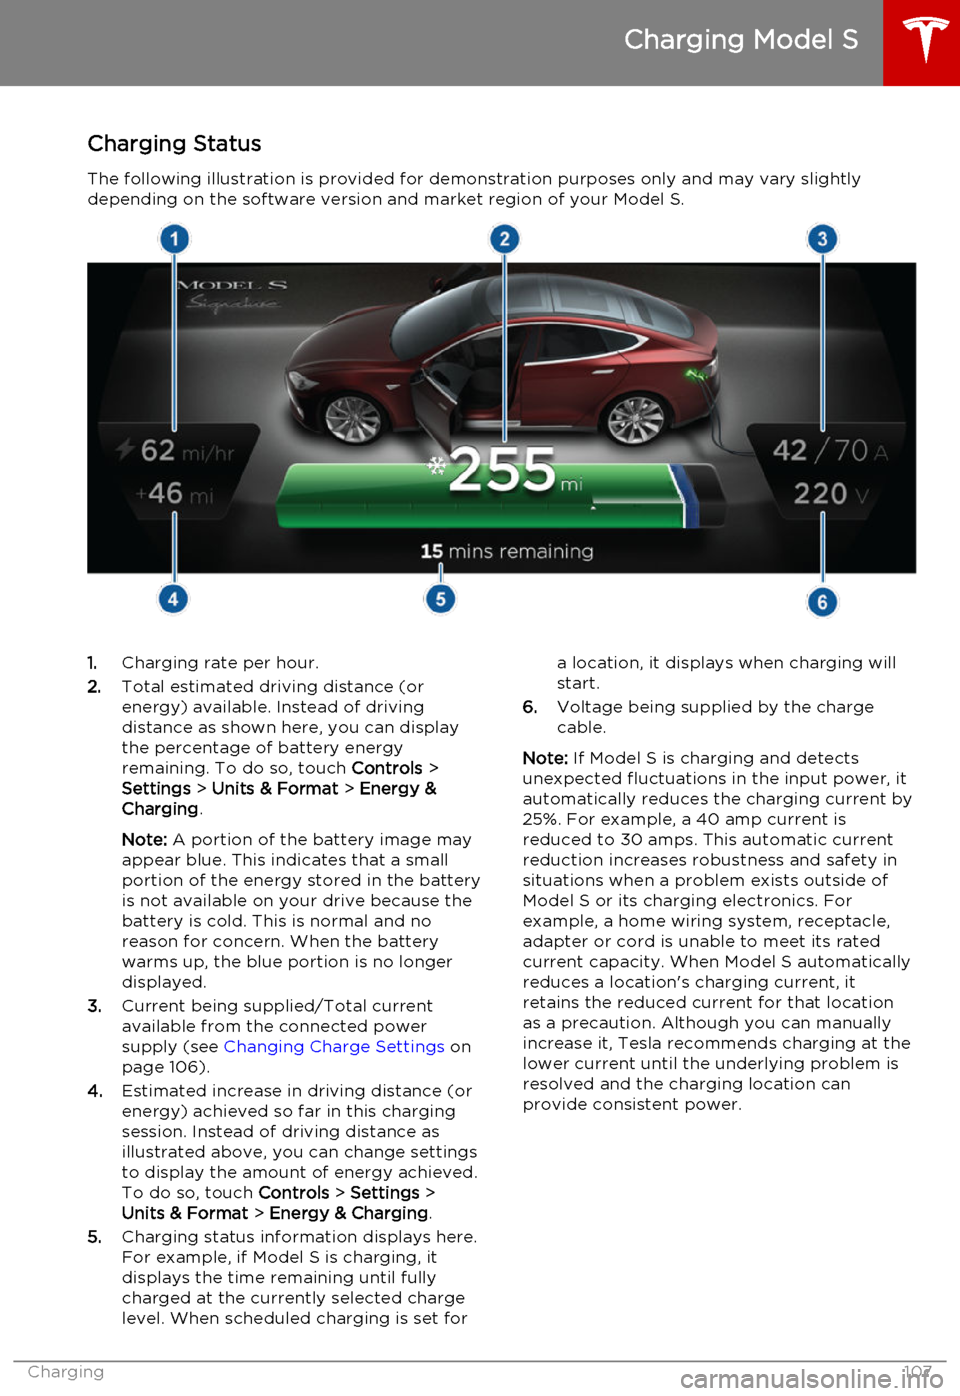
Charging StatusThe following illustration is provided for demonstration purposes only and may vary slightlydepending on the software version and market region of your Model S.1. Charging rate per hour.
2. Total estimated driving distance (or
energy) available. Instead of driving distance as shown here, you can display
the percentage of battery energy
remaining. To do so, touch Controls >
Settings > Units & Format > Energy &
Charging .
Note: A portion of the battery image may
appear blue. This indicates that a small
portion of the energy stored in the battery
is not available on your drive because the battery is cold. This is normal and no
reason for concern. When the battery warms up, the blue portion is no longer
displayed.
3. Current being supplied/Total current
available from the connected power
supply (see Changing Charge Settings on
page 106).
4. Estimated increase in driving distance (or
energy) achieved so far in this charging session. Instead of driving distance as
illustrated above, you can change settings
to display the amount of energy achieved.
To do so, touch Controls > Settings >
Units & Format > Energy & Charging .
5. Charging status information displays here.
For example, if Model S is charging, it displays the time remaining until fully
charged at the currently selected charge
level. When scheduled charging is set fora location, it displays when charging will
start.
6. Voltage being supplied by the charge
cable.
Note: If Model S is charging and detects
unexpected fluctuations in the input power, it automatically reduces the charging current by25%. For example, a 40 amp current isreduced to 30 amps. This automatic currentreduction increases robustness and safety in
situations when a problem exists outside of
Model S or its charging electronics. For
example, a home wiring system, receptacle,
adapter or cord is unable to meet its rated
current capacity. When Model S automatically
reduces a location's charging current, it
retains the reduced current for that location
as a precaution. Although you can manually
increase it, Tesla recommends charging at the
lower current until the underlying problem is
resolved and the charging location can
provide consistent power.
Charging Model S
Charging107
Page 108 of 164
Service Intervals
Regular maintenance is the key to ensuring
the continued reliability and efficiency of your
Model S.
Rotate the tires every 5000 miles (8000 km),
maintain the correct tire pressures, and take Model S to Tesla at the regularly scheduledmaintenance intervals of every 12 months, orevery 12,500 miles (20,000 km), whichever
comes first. It is also important to perform the
daily and monthly checks described below.
Model S must be serviced by Tesla-certified
technicians. Damages or failures caused by
maintenance or repairs performed by non-
Tesla certified technicians are not covered by
the warranty.
Daily Checks • Check the Battery’s charge level, displayed on the instrument panel.
• Check that all exterior lights, horn, turn signals, and wipers and washers are
working.
• Check the operation of the brakes, including the parking brake.
• Check the operation of the seat belts (see Seat Belts on page 20).
• Look for fluid deposits underneath Model S that might indicate a leak. It is
normal for a small pool of water to form
(caused by the air conditioning system’s dehumidifying process).
Monthly Checks • Check the mileage to determine if the tires need to be rotated (every
5000 miles/8000 km), and check the
condition and pressure of each tire (see
Tire Care and Maintenance on page 109).
• Check washer fluid level and top up if necessary (see Topping Up Washer Fluid
on page 125).
• Check that the air conditioning system is operating (see Climate Controls on page
80).Warning: Contact Tesla immediately if
you notice any significant or sudden drop in fluid levels or uneven tire wear.Fluid Replacement Intervals
Do not change or top up Battery coolant and
brake fluid yourself. Tesla service technicians replace fluids at the regularly scheduled
service intervals:
• Brake fluid. Every 2 years or 25,000 miles (40,000 km), whichever comes first.
• Battery coolant. Every 5 years or 62,500 miles (100,000 km), whichever
comes first.
Note: Any damage from opening the Battery
coolant reservoir is excluded from the warranty.
High Voltage Safety Your Model S has been designed and built
with safety as a priority. However, be aware of these precautions to protect yourself from the
risk of injury inherent in all high-voltage
systems:
• Read and follow all instructions provided on the labels that are attached to Model S.These labels are there for your safety.
• The high voltage system has no user- serviceable parts. Do not disassemble,
remove or replace high voltage components, cables or connectors. High
voltage cables are colored orange for
easy identification.
• If an accident occurs, do not touch any high voltage wiring, connectors, or
components connected to the wiring.
• In the unlikely event that a fire occurs, immediately contact your local fire
emergency responders.Warning: Always disconnect the charge
cable before working underneath Model S, even if charging is not in
progress.Warning: Keep your hands and clothing
away from cooling fans. Some fans
operate even when Model S is powered
off.Caution: Some fluids (battery acid,
Battery coolant, brake fluid, windshield
washer additives, etc.) used in motor
vehicles are poisonous and should not be
inhaled, swallowed, or brought into contact with open wounds. For your
safety, always read and follow
instructions printed on fluid containers.
Maintenance Schedule
108Model S Owner's Manual
Page 120 of 164

Polishing, Touch Up, and Body
Repair
To preserve the cosmetic appearance of the
body, you can occasionally treat the paint
surfaces with an approved polish containing:
• Very mild abrasive to remove surface contamination without removing or
damaging the paint.
• Filling compounds that fill scratches and reduce their visibility.
• Wax to provide a protective coating between the paint and environmental
elements.
Regularly inspect the exterior paint for
damage. Treat minor chips and scratches
using a paint touch up pen (available for
purchase from Tesla). Use the touch-up pen
after washing but before polishing or waxing.
Repair rock chips, fractures or scratches. Body
repairs should be performed only by a Tesla approved body shop. Contact Tesla for a listof approved body shops.Caution: Do not use cutting pastes, color
restoration compounds, or polishes
containing harsh abrasives. These can
scour the surface and permanently
damage the paint.Caution: Do not use chrome polish or
other abrasive cleaners.Using a Car Cover
To preserve the cosmetic appearance of the
body when Model S is not being used, use a
genuine Tesla car cover. Car covers can be purchased from Tesla.Caution: Use only a Tesla-approved car
cover when Model S is plugged in. Using
a non-Tesla car cover can prevent the
Battery from being adequately cooled
during charging.
Floor Mats
To extend the life of your carpet and make
them easier to clean, use genuine Tesla floor mats. Maintain mats by cleaning them
regularly and replacing them if they become
excessively worn.
Warning: To avoid potential interference
with a foot pedal, ensure that the driver’s
floor mat is securely fastened, and never place an additional floor mat on top of it.
Cleaning
120Model S Owner's Manual