ECO mode TESLA MODEL S 2015 Owner's Guide
[x] Cancel search | Manufacturer: TESLA, Model Year: 2015, Model line: MODEL S, Model: TESLA MODEL S 2015Pages: 164, PDF Size: 4.78 MB
Page 78 of 164
1.Adjust settings associated with installed
apps (applications). Settings associated with apps that are either unavailable on
your Model , or have no settings that you
can adjust at this time, are grayed out.
2. Manage driver profiles (see Driver Profiles
on page 36).
3. Units & Format
Adjust how Model S displays:
• Distance: Miles or km can be shown on the range display, speedometer,
energy chart, trip meters, Google map searches and navigation routes.
• Time Format: 12 or 24 hour.
• Temperature: o
C or o
F.
• Energy & Charging: Display remaining energy and charging units as either a
percentage of battery energy
remaining, or as an estimate of the
distance that you can drive. When you choose Distance, you can display
mileage based on either:
• Rated - based on EPA testing.
• Ideal - assumes ideal driving conditions based on driving at a
steady speed of 55 mph
(89 km/h) on a flat road, and using no additional energy (seat
heaters, air conditioning, etc).
Note: When anticipating when you
need to charge, use range estimates as a general guideline only.
4. Vehicle
• Drive-away Door Lock: If on, all doors automatically lock whenever you
drive Model S over 5 mph (8 km/h)
(see Drive-away Locking on page 7).
• Walk-away Door Lock: If on, all doors automatically lock when you walkaway from Model S, carrying the key with you (see Walk-away Locking on
page 7). Available only if Model S is
equipped with the optional tech
package.
• Child-Protection Lock: If on, safety locks prevent the rear doors and theliftgate from being opened from
inside Model S.• Auto-Present Handles: If on, door handles extend automatically
whenever you approach Model S carrying a key, whether locked orunlocked (see Using Exterior Door
Handles on page 6). Note that to
preserve battery life, Model is
designed to temporarily disable the
Auto-Present Handles feature when
the key has been out of range for
more than 48 hours, or if the key
remains within range for five minutes
after all doors have been closed.
• Headlights After Exit: If on, headlights stay on for two minutes after you exit,
or until you lock Model S (see
Headlights After Exit on page 50).
• Mirror Auto-Tilt: If on, exterior mirrors tilt downward when reversing (see Mirrors on page 40). Available only if
Model S is equipped with the optional tech package.
• Mirror Auto-Fold: If on, exterior mirrors fold when you lock Model S
with the key or walk-away locking. They extend automatically when you
return to Model S. Available only if
Model S is equipped with both folding mirrors (newer models) and the
optional tech package. For newer
Model S vehicles, you can also fold
mirrors manually by touching the
center mirror control button (see
Mirrors on page 40).
• Ionizer: If on, the air ionizer freshens the air in the cabin.
• Smart Preconditioning: If on, Model S predicts your driving schedule and
adjusts the temperature of the cabin and the Battery so the vehicle is
comfortable and ready to drive. It may take some time for Model S to
learn your driving habits.
5. Safety & Security
Turn various safety and security features
on and off:
• Active safety devices Model S is equipped with, such as Park Assist
Chimes (see Park Assist on page 66).
• Alarm, and security options Model S is equipped with (see Security Settings
on page 95).
• Remote access by Tesla’s mobile applications (see Mobile App on page
100).
6. Displays
Settings
78Model S Owner's Manual
Page 80 of 164
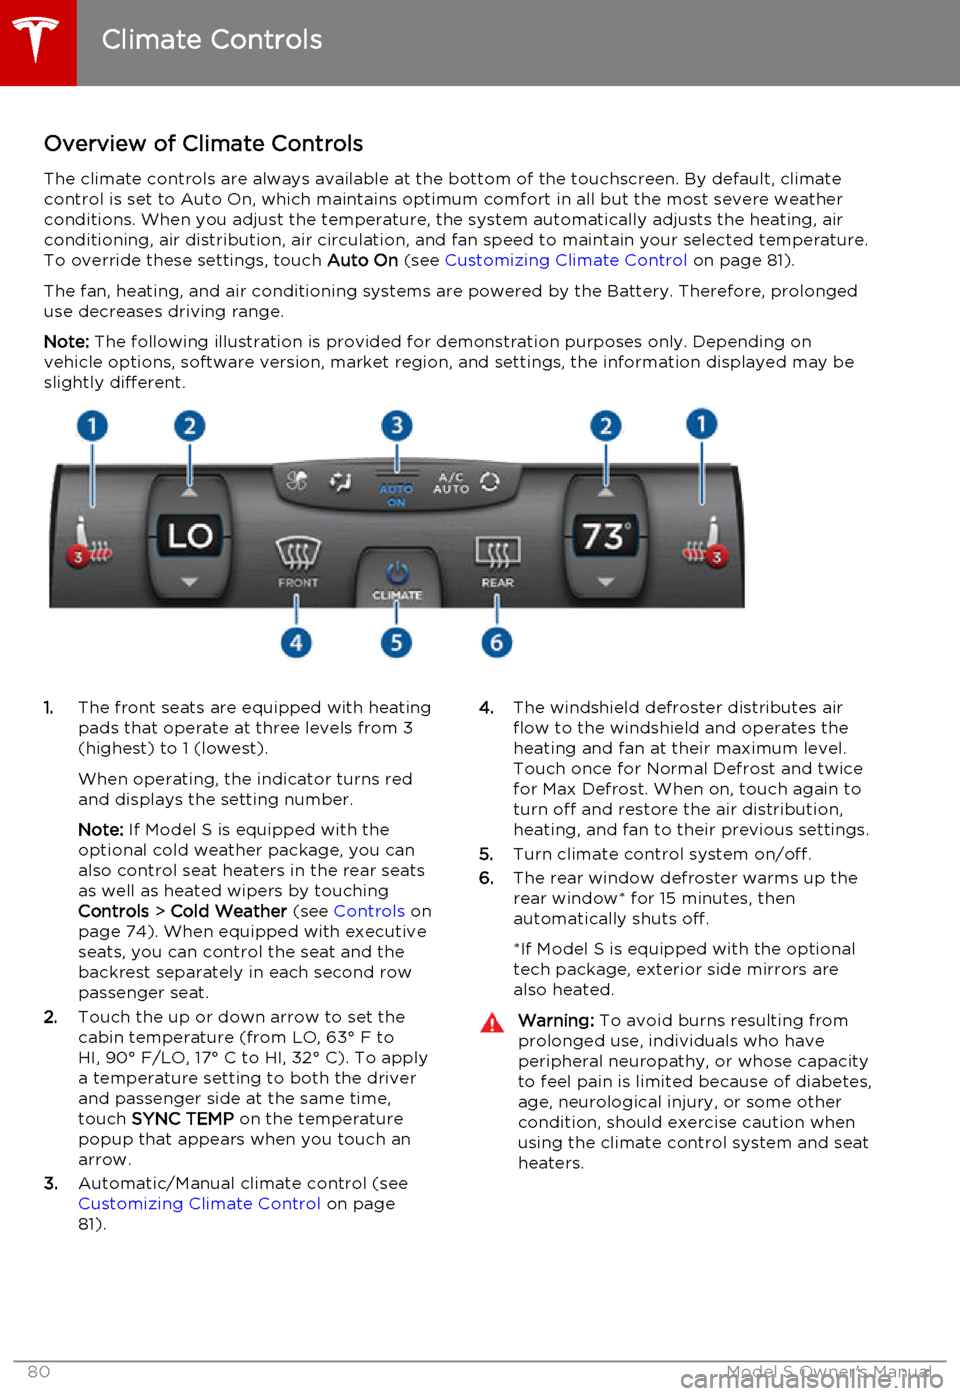
Overview of Climate ControlsThe climate controls are always available at the bottom of the touchscreen. By default, climate
control is set to Auto On, which maintains optimum comfort in all but the most severe weather conditions. When you adjust the temperature, the system automatically adjusts the heating, air
conditioning, air distribution, air circulation, and fan speed to maintain your selected temperature.
To override these settings, touch Auto On (see Customizing Climate Control on page 81).
The fan, heating, and air conditioning systems are powered by the Battery. Therefore, prolonged use decreases driving range.
Note: The following illustration is provided for demonstration purposes only. Depending on
vehicle options, software version, market region, and settings, the information displayed may be
slightly different.1. The front seats are equipped with heating
pads that operate at three levels from 3
(highest) to 1 (lowest).
When operating, the indicator turns red
and displays the setting number.
Note: If Model S is equipped with the
optional cold weather package, you can
also control seat heaters in the rear seats
as well as heated wipers by touching
Controls > Cold Weather (see Controls on
page 74). When equipped with executive seats, you can control the seat and the
backrest separately in each second row
passenger seat.
2. Touch the up or down arrow to set the
cabin temperature (from LO, 63° F to
HI, 90° F/LO, 17° C to HI, 32° C). To apply
a temperature setting to both the driver
and passenger side at the same time,
touch SYNC TEMP on the temperature
popup that appears when you touch an
arrow.
3. Automatic/Manual climate control (see
Customizing Climate Control on page
81).4. The windshield defroster distributes air
flow to the windshield and operates the
heating and fan at their maximum level.
Touch once for Normal Defrost and twice
for Max Defrost. When on, touch again to
turn off and restore the air distribution,
heating, and fan to their previous settings.
5. Turn climate control system on/off.
6. The rear window defroster warms up the
rear window* for 15 minutes, then
automatically shuts off.
*If Model S is equipped with the optional
tech package, exterior side mirrors are
also heated.Warning: To avoid burns resulting from
prolonged use, individuals who have
peripheral neuropathy, or whose capacity to feel pain is limited because of diabetes,
age, neurological injury, or some other
condition, should exercise caution when using the climate control system and seat
heaters.
Climate Controls
80Model S Owner's Manual
Page 81 of 164
Customizing Climate ControlThe climate control system is designed to automatically provide optimum comfort in most
situations. All you need to do is set the desired temperature, and the air conditioning, air
recirculation, air distribution, and fan speed automatically maintain your selected temperature.
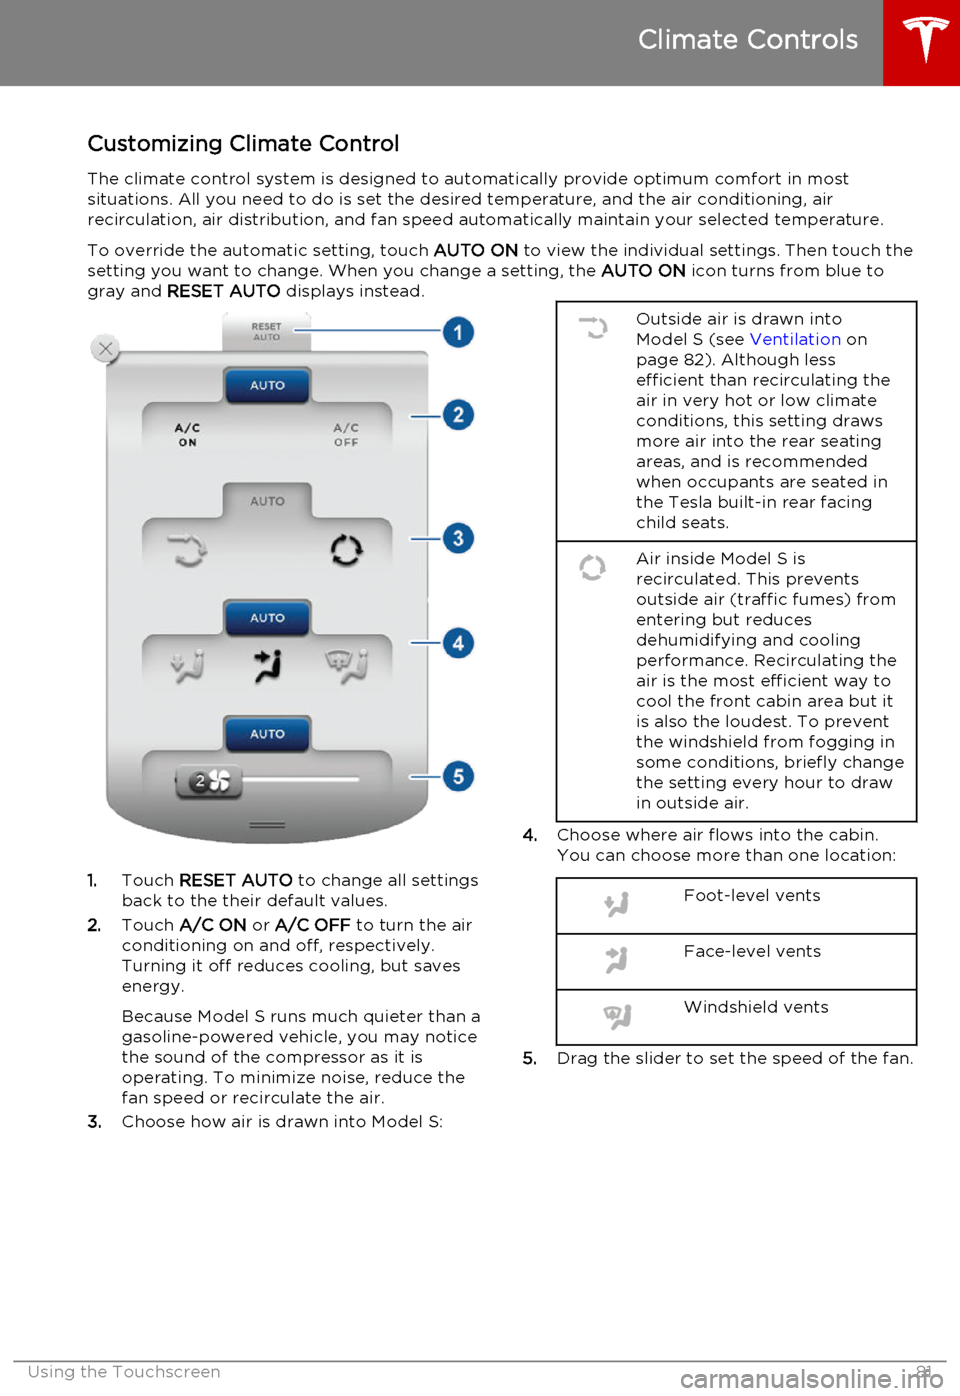
To override the automatic setting, touch AUTO ON to view the individual settings. Then touch the
setting you want to change. When you change a setting, the AUTO ON icon turns from blue to
gray and RESET AUTO displays instead.
1.Touch RESET AUTO to change all settings
back to the their default values.
2. Touch A/C ON or A/C OFF to turn the air
conditioning on and off, respectively. Turning it off reduces cooling, but saves
energy.
Because Model S runs much quieter than a gasoline-powered vehicle, you may notice
the sound of the compressor as it is
operating. To minimize noise, reduce the
fan speed or recirculate the air.
3. Choose how air is drawn into Model S:
Outside air is drawn into
Model S (see Ventilation on
page 82). Although less
efficient than recirculating the
air in very hot or low climate
conditions, this setting draws
more air into the rear seating
areas, and is recommended
when occupants are seated in
the Tesla built-in rear facing
child seats.Air inside Model S is
recirculated. This prevents
outside air (traffic fumes) from
entering but reduces
dehumidifying and cooling
performance. Recirculating the
air is the most efficient way to
cool the front cabin area but it
is also the loudest. To prevent
the windshield from fogging in
some conditions, briefly change
the setting every hour to draw
in outside air.
4. Choose where air flows into the cabin.
You can choose more than one location:
Foot-level ventsFace-level ventsWindshield vents
5. Drag the slider to set the speed of the fan.
Climate Controls
Using the Touchscreen81
Page 82 of 164
Ventilation
Outside air is drawn into Model S through the
grill in front of the windshield. Keep the grill
clear of obstructions such as leaves and snow.
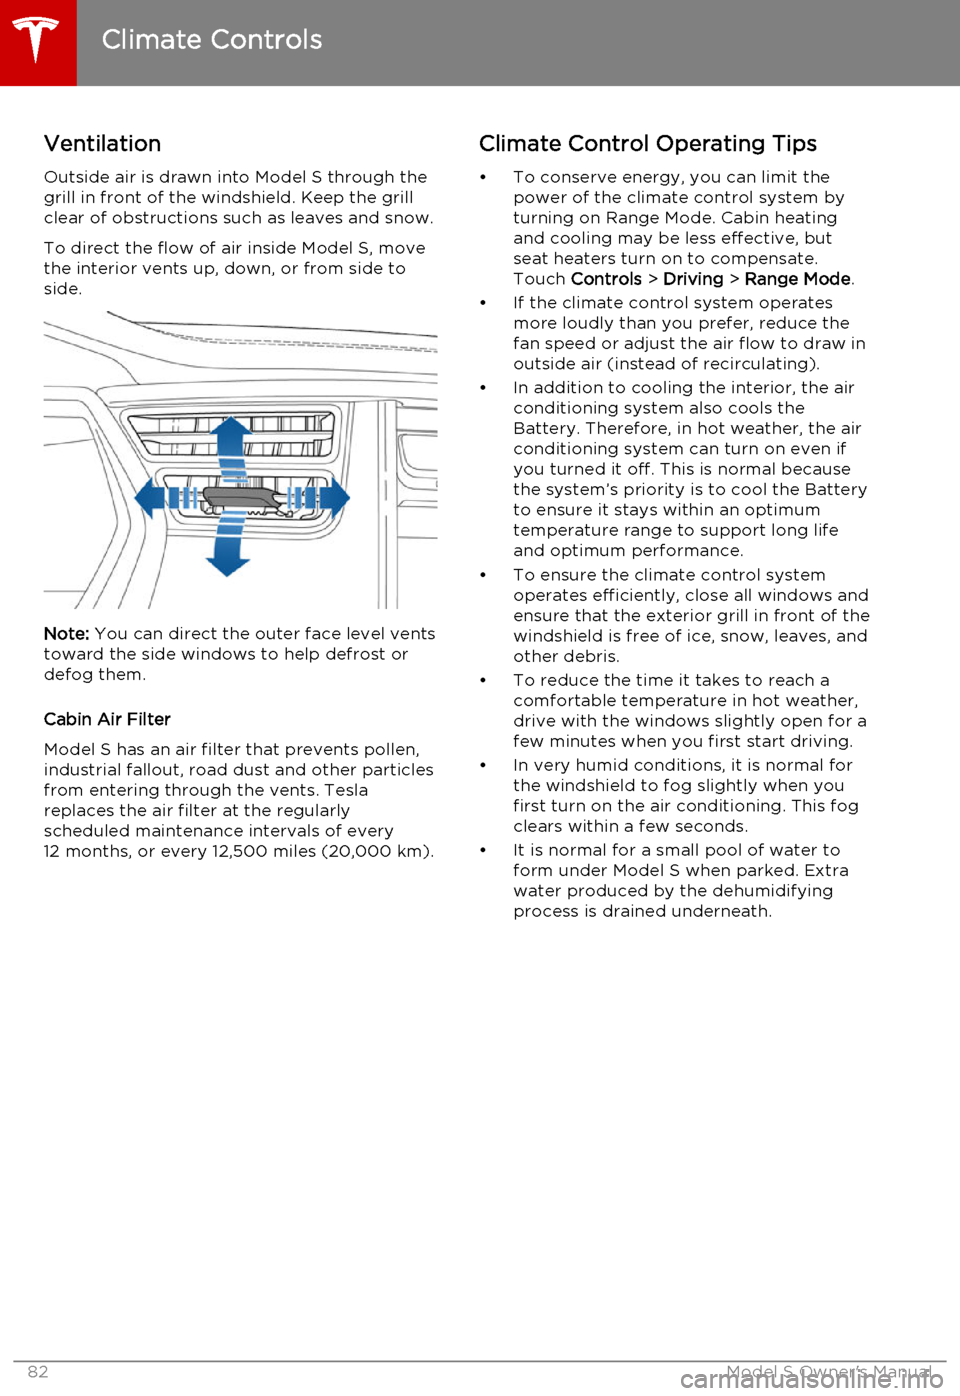
To direct the flow of air inside Model S, move
the interior vents up, down, or from side to
side.
Note: You can direct the outer face level vents
toward the side windows to help defrost or defog them.
Cabin Air Filter
Model S has an air filter that prevents pollen,
industrial fallout, road dust and other particles
from entering through the vents. Tesla replaces the air filter at the regularly
scheduled maintenance intervals of every 12 months, or every 12,500 miles (20,000 km).
Climate Control Operating Tips
• To conserve energy, you can limit the power of the climate control system by
turning on Range Mode. Cabin heating and cooling may be less effective, butseat heaters turn on to compensate.
Touch Controls > Driving > Range Mode .
• If the climate control system operates more loudly than you prefer, reduce thefan speed or adjust the air flow to draw in
outside air (instead of recirculating).
• In addition to cooling the interior, the air conditioning system also cools the
Battery. Therefore, in hot weather, the air
conditioning system can turn on even if
you turned it off. This is normal because the system’s priority is to cool the Battery
to ensure it stays within an optimum
temperature range to support long life and optimum performance.
• To ensure the climate control system operates efficiently, close all windows and
ensure that the exterior grill in front of the
windshield is free of ice, snow, leaves, and
other debris.
• To reduce the time it takes to reach a comfortable temperature in hot weather,
drive with the windows slightly open for a
few minutes when you first start driving.
• In very humid conditions, it is normal for the windshield to fog slightly when you
first turn on the air conditioning. This fog
clears within a few seconds.
• It is normal for a small pool of water to form under Model S when parked. Extra
water produced by the dehumidifying
process is drained underneath.
Climate Controls
82Model S Owner's Manual
Page 86 of 164
Media SettingsTo adjust settings for your radio stations, and
to log into your Internet radio account(s),
touch Controls > Settings > Apps > Media
Player .
FavoritesTo add a currently playing radio
station or audio file to your Favorites
list, touch the Favorites icon on the
Now Playing screen. The icon turns
blue to show that it is a favorite. To
remove a favorite, touch the icon
again.
Note: Adding a radio station to your Favorites
list also assigns it to one of the six presets, if an empty preset is available.
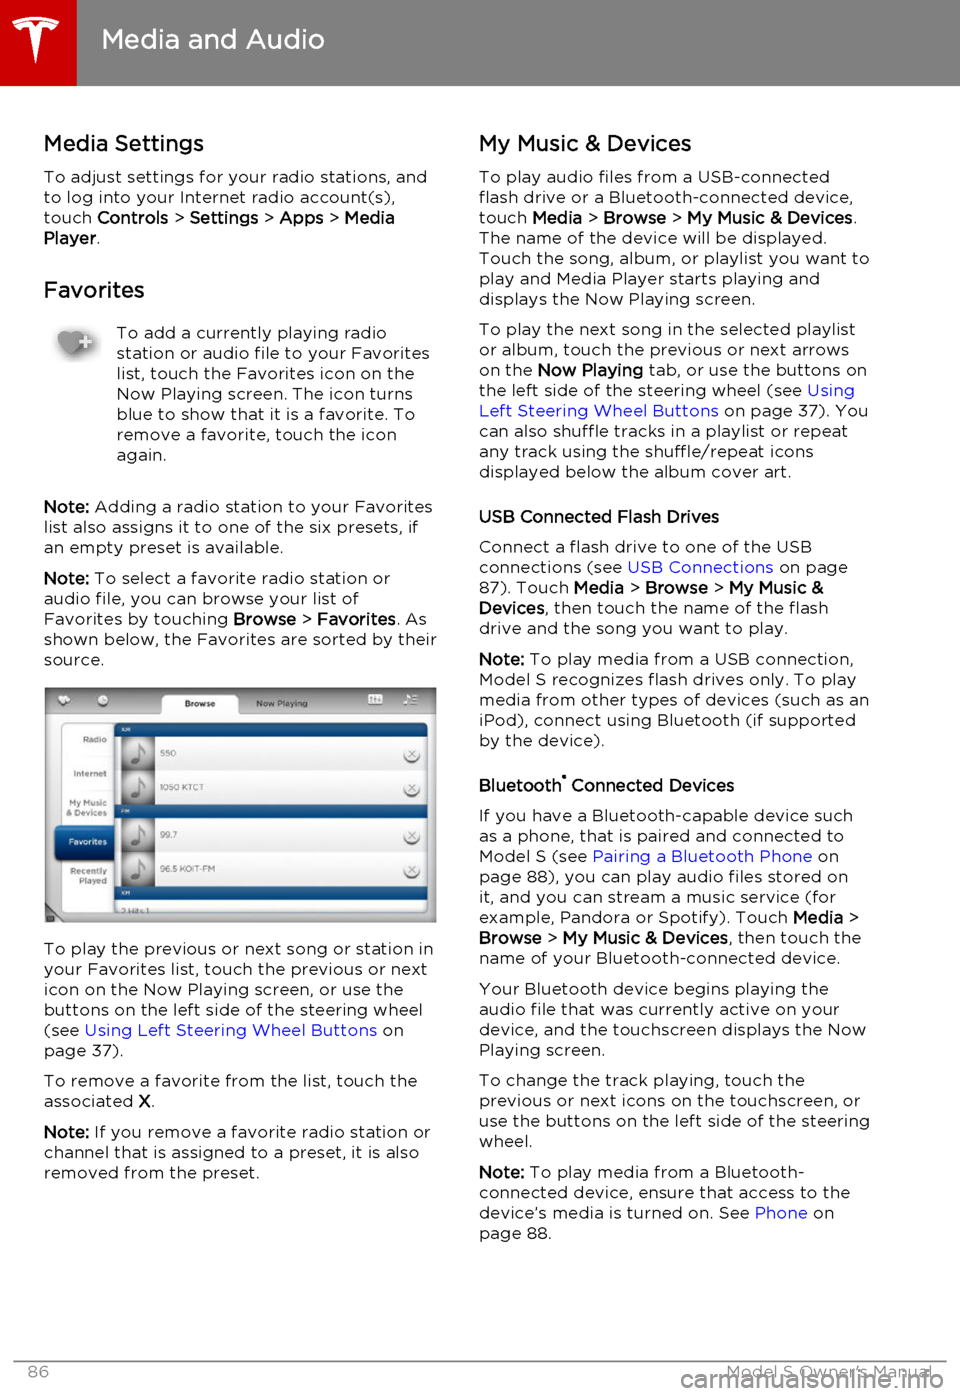
Note: To select a favorite radio station or
audio file, you can browse your list of Favorites by touching Browse > Favorites . As
shown below, the Favorites are sorted by their
source.
To play the previous or next song or station in
your Favorites list, touch the previous or next icon on the Now Playing screen, or use thebuttons on the left side of the steering wheel(see Using Left Steering Wheel Buttons on
page 37).
To remove a favorite from the list, touch the associated X.
Note: If you remove a favorite radio station or
channel that is assigned to a preset, it is also
removed from the preset.
My Music & Devices
To play audio files from a USB-connected
flash drive or a Bluetooth-connected device,
touch Media > Browse > My Music & Devices .
The name of the device will be displayed. Touch the song, album, or playlist you want to
play and Media Player starts playing and
displays the Now Playing screen.
To play the next song in the selected playlist or album, touch the previous or next arrowson the Now Playing tab, or use the buttons on
the left side of the steering wheel (see Using
Left Steering Wheel Buttons on page 37). You
can also shuffle tracks in a playlist or repeat
any track using the shuffle/repeat icons
displayed below the album cover art.
USB Connected Flash Drives
Connect a flash drive to one of the USB
connections (see USB Connections on page
87). Touch Media > Browse > My Music &
Devices , then touch the name of the flash
drive and the song you want to play.
Note: To play media from a USB connection,
Model S recognizes flash drives only. To play
media from other types of devices (such as an
iPod), connect using Bluetooth (if supported
by the device).
Bluetooth ®
Connected Devices
If you have a Bluetooth-capable device such
as a phone, that is paired and connected to
Model S (see Pairing a Bluetooth Phone on
page 88), you can play audio files stored on
it, and you can stream a music service (for example, Pandora or Spotify). Touch Media >
Browse > My Music & Devices , then touch the
name of your Bluetooth-connected device.
Your Bluetooth device begins playing theaudio file that was currently active on your
device, and the touchscreen displays the Now
Playing screen.
To change the track playing, touch the previous or next icons on the touchscreen, oruse the buttons on the left side of the steering
wheel.
Note: To play media from a Bluetooth-
connected device, ensure that access to the device’s media is turned on. See Phone on
page 88.
Media and Audio
86Model S Owner's Manual
Page 87 of 164
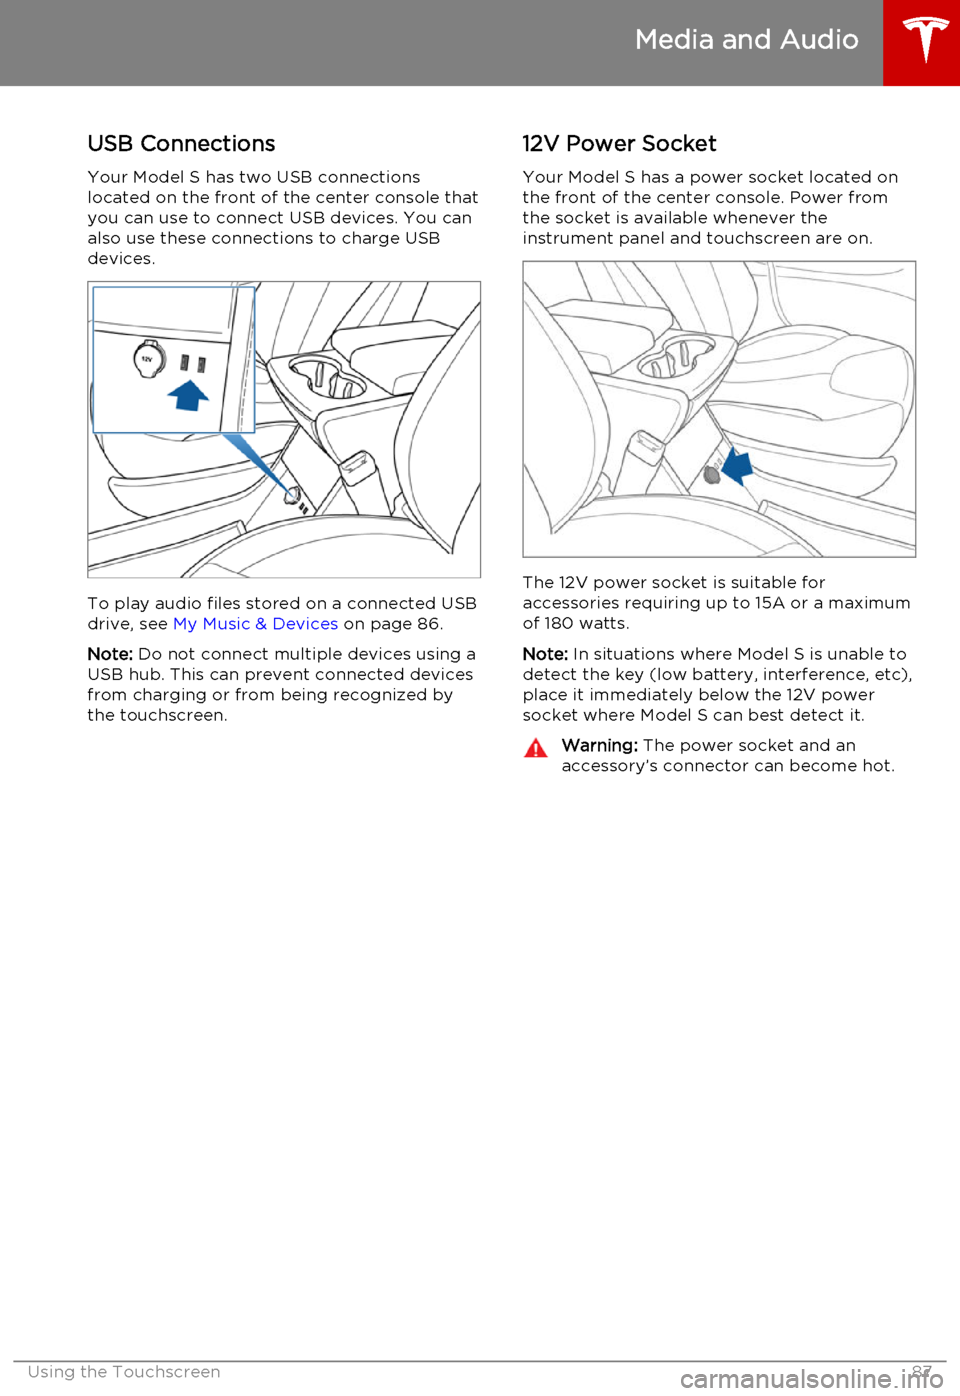
USB Connections
Your Model S has two USB connections
located on the front of the center console that
you can use to connect USB devices. You can
also use these connections to charge USB devices.
To play audio files stored on a connected USBdrive, see My Music & Devices on page 86.
Note: Do not connect multiple devices using a
USB hub. This can prevent connected devices from charging or from being recognized bythe touchscreen.
12V Power Socket
Your Model S has a power socket located on
the front of the center console. Power from
the socket is available whenever the
instrument panel and touchscreen are on.
The 12V power socket is suitable for
accessories requiring up to 15A or a maximum
of 180 watts.
Note: In situations where Model S is unable to
detect the key (low battery, interference, etc), place it immediately below the 12V power
socket where Model S can best detect it.
Warning: The power socket and an
accessory’s connector can become hot.
Media and Audio
Using the Touchscreen87
Page 88 of 164
Bluetooth®
Compatibility
You can use your Bluetooth-capable phone
hands-free in Model S provided your phone is within operating range. Although Bluetooth
typically supports wireless communication
over distances of up to approximately 30 feet
(9 meters), performance can vary based on
the phone you are using.
Before using your phone with Model S, you
must pair it. Pairing sets up Model S to work
with your Bluetooth-capable phone (see Pairing a Bluetooth Phone on page 88).
You can pair up to ten Bluetooth phones.
Model S always automatically connects to the
last phone that was used (provided it is within
range). If you want to connect to a different phone, see Connecting to a Paired Phone on
page 89.
Note: On many phones, Bluetooth turns off if
the phone’s battery is low.
Note: In addition to phones, you can also pair
Bluetooth-enabled devices with Model S. For example, you can pair an iPod Touch or an
iPad or Android tablet to stream music.
Pairing a Bluetooth Phone
Pairing sets up Model S to work with your
Bluetooth-capable phone. Once a phone is paired, Model S can connect to it wheneverthe phone is within range.
To pair a phone, follow these steps while
sitting inside Model S:
1. Ensure both the touchscreen and the
phone are powered on.
2. On the touchscreen’s status bar, touch the
Bluetooth icon.
3. On your phone, enable Bluetooth and set
it to discoverable.
4. On the Model S touchscreen, touch Start
Search. The touchscreen searches then
displays the list of all available Bluetooth devices within operating distance.
5. On the Model S touchscreen, touch the
phone with which you want to pair. Within
a few seconds, the touchscreen displays a
randomly generated number, and your
phone should display the same number.
6. Check that the number displayed on your
phone matches the number displayed on
the touchscreen. Then, on your phone,
confirm that you want to pair.When paired, Model S automatically connects to the phone, and the touchscreen displays
the Bluetooth symbol next to the phone’s name to show that the connection is active.
Importing Contacts
Once paired, you can use the Bluetooth
settings screen to specify whether you want
to allow access to your phone’s contacts and recent calls.
If access is turned on, you can see your list of contacts on the Model S touchscreen. Touch
Phone > Contacts . You can then touch a
contact to dial its phone number or navigate
to its address.
Note: Before contacts can be imported, you
may need to either set your phone to allow syncing, or respond to a popup on your phone
to confirm that it is OK to sync contacts. This
varies depending on the type of phone you are using. For details, refer to the owner
documentation provided with your phone.
If access is turned on, imported information is
displayed when you touch the contacts tab on
the Phone app.
Unpairing a Bluetooth Phone
If you want to disconnect your phone and use it again later, simply touch Disconnect on the
Bluetooth settings screen. If you do not want
to use your phone with Model S again, touch
Forget This Device. Once you forget a device,
you need to pair it again if you want to use it
with Model S (see Pairing a Bluetooth Phone
on page 88).
Note: Your phone automatically disconnects
whenever you leave Model S.
Phone
88Model S Owner's Manual
Page 92 of 164
Favorite DestinationsAdd any destination to your list of
Favorites by either touching its flag
while navigating to it, or by
displaying it on the map then
touching its pin. Then, in the popup
dialog that appears, touch the
Favorites icon. When a destination is
on your Favorites list, the icon is
blue. To remove a favorite
destination, touch the Favorites icon
again.
If you frequently navigate to a destination,
you may want to add it as a Favorite to avoid having to enter the location's name or address
each time. When you add a destination as a
Favorite, you can easily navigate to it by touching PLACES, then selecting it from the
list of Favorites. The Favorites list has placeholders for your Home and Worklocations. In fact, Model S may prompt you to
save a current location as Home or Work
based on your usage pattern.
Updated Maps To receive updated maps, periodically
connect Model S to a Wi-Fi network (see
Connecting to Wi-Fi on page 98). As
updated maps become available, they are sent
to Model S over Wi-Fi only. The touchscreen displays a message informing you when newmaps have been installed.
Maps and Navigation
92Model S Owner's Manual
Page 95 of 164

About the Security System
If Model S does not detect a key nearby and a locked door or trunk is opened, an alarmsounds and headlights and turn signals flash.
To deactivate the alarm, press any button on
the key.
To manually enable or disable the alarm
system, touch Controls > Settings > Safety &
Security > Alarm . When set to on, Model S
activates its alarm one minute after the doors
lock and a recognized key is no longer
detected nearby.
Security Settings
Using the Touchscreen95
Page 96 of 164
About HomeLinkIf Model S is equipped with the optional tech
package, you can program the HomeLink ®
Universal Transceiver to operate up to three
garage doors, gates, lights, and security
systems that can transmit Radio Frequency
(RF) signals.
Programming HomeLink
1. Park Model S in front of the device you
want to program, and have the device’s
remote control ready.
2. Touch Controls > Settings > HomeLink on
the touchscreen.
3. Touch Add New HomeLink , then use the
onscreen keyboard to enter a name for
your HomeLink device.
4. Touch Program .
5. Follow the onscreen instructions.
Once programmed, you can operate the device by touching its corresponding
HomeLink icon on the touchscreen’s status bar. HomeLink remembers the location of
your programmed devices. When you approach a known location, the HomeLink
control on the touchscreen automatically
drops down. When you drive away, it
disappears.
Note: For security reasons, erase your
HomeLink settings if you sell Model S.Warning: Your device might open or
close during programming. Before
programming, make sure that the device is clear of any people or objects.Warning: Do not use the HomeLink
Universal Transceiver with a garage door that does not meet safety standards. Agarage door opener that cannot detectan object in its path and then
automatically stop and reverse, does not
meet these standards. Using a garage
door opener without these features
increases the risk of injury or death.
Troubleshooting HomeLink
When programming a HomeLink device, the touchscreen steps you through a two-part
programming process:
• First, Model S records the signal from the remote. The touchscreen instructs you to
stand in front of the car, point the remote
at the front bumper and press and hold
the button until the headlights flash.
When headlights flash, Model S has
learned the remote and you can touch
Continue on the touchscreen . If the
headlights do not flash, refer to the
guidelines below.
• Next, the device's receiver learns Model S. The touchscreen instructs you to press
the LEARN button on the garage door or
gate's receiver. If training the receiver
does not work, refer to the guidelines
below.
NOTE: Only devices that are equipped
with a “rolling code” remote need to learn
Model S. If you have a very old device that
is not equipped with a rolling code
remote, the device does not need to learn
Model S and you can skip this part. You
can also skip this step if your receiver is
Quick-Train compatible. The opener
should work.
Headlights do not flash
• Check the batteries in the remote. It is a good idea to replace the batteries before
you start programming.
• Hold the remote against the nose cone, with the button pressed, about 6 inches to
the left of the Tesla emblem. In some
cases you must hold the remote for up to
three minutes.
• Check compatibility of the remote by contacting the HomeLink manufacturer
( www.homelink.com ).
After programming, the device does not work
• Park Model S with its front bumper as close as possible to the HomeLink device
(garage door, gate, etc).
• Make sure you haven’t reached the device receiver's limit of learned remotes/cars.
Most receivers can learn up to five
remotes/cars. If the receiver's memory is
full, you must clear the memory and
restart the programming process. For
instructions on how to clear the receiver's
memory, refer to the owner
documentation provided with the
HomeLink device.
• Make sure you are pressing the receiver's LEARN button. Most receivers have twobuttons and a LED. One button is a RESET
button and the other is a LEARN button.
Pressing the LEARN button usually causes the LED to flash. For instructions on how
to put the receiver into learning mode, refer to the owner documentation
provided with the HomeLink device.
HomeLink ®
Universal Transceiver
96Model S Owner's Manual