ECO mode TESLA MODEL S 2015 User Guide
[x] Cancel search | Manufacturer: TESLA, Model Year: 2015, Model line: MODEL S, Model: TESLA MODEL S 2015Pages: 164, PDF Size: 4.78 MB
Page 23 of 164

Guidelines for Seating ChildrenYour Model S seat belts in the front and second row seats are designed for adults and largerchildren. You must restrain infants and small children in the second row seats only, and you must use a suitable child safety seat appropriate for the child’s age, weight, and size. Never use child
safety seats in the front row passenger seat. Carefully follow the instructions provided by the manufacturer of the child safety seat.
If your Model S is equipped with the optional Tesla built-in rear facing child seats, these seats arechild safety seats and are designed only for children within a specific height and weight range
(see Tesla Built-In Rear Facing Child Seats on page 28).
Child Safety Seats
Seating and Safety Restraints23
Page 24 of 164
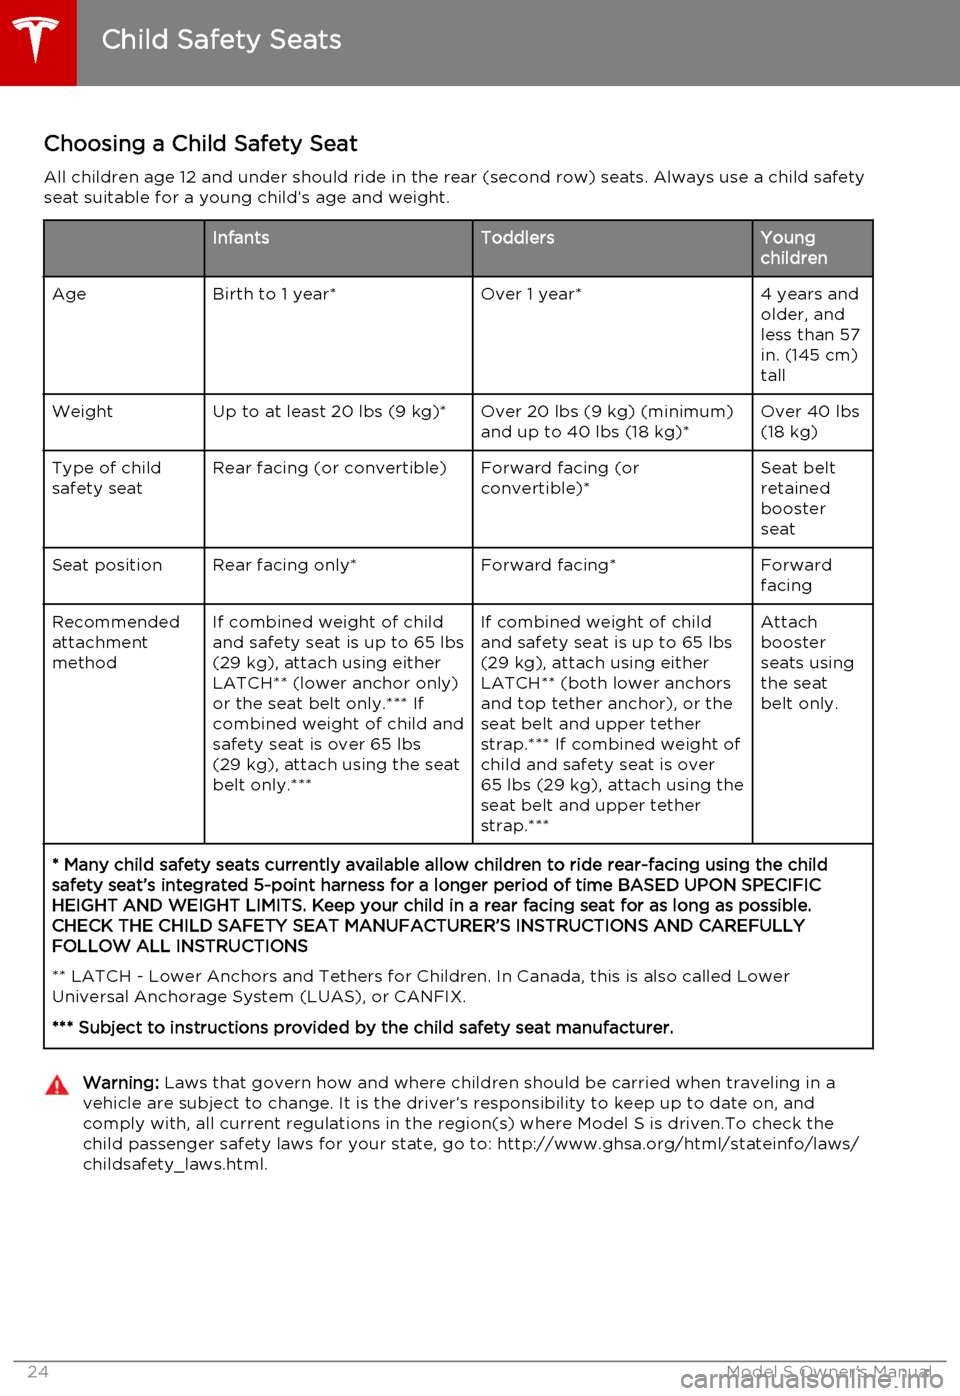
Choosing a Child Safety Seat
All children age 12 and under should ride in the rear (second row) seats. Always use a child safety seat suitable for a young child’s age and weight.InfantsToddlersYoung
childrenAgeBirth to 1 year*Over 1 year*4 years and
older, and
less than 57
in. (145 cm)
tallWeightUp to at least 20 lbs (9 kg)*Over 20 lbs (9 kg) (minimum)
and up to 40 lbs (18 kg)*Over 40 lbs
(18 kg)Type of child
safety seatRear facing (or convertible)Forward facing (or
convertible)*Seat belt
retained
booster
seatSeat positionRear facing only*Forward facing*Forward
facingRecommended
attachment
methodIf combined weight of child
and safety seat is up to 65 lbs
(29 kg), attach using either
LATCH** (lower anchor only)
or the seat belt only.*** If
combined weight of child and
safety seat is over 65 lbs
(29 kg), attach using the seat
belt only.***If combined weight of child
and safety seat is up to 65 lbs
(29 kg), attach using either
LATCH** (both lower anchors
and top tether anchor), or the
seat belt and upper tether
strap.*** If combined weight of
child and safety seat is over
65 lbs (29 kg), attach using the
seat belt and upper tether
strap.***Attach
booster
seats using
the seat
belt only.* Many child safety seats currently available allow children to ride rear-facing using the child
safety seat’s integrated 5-point harness for a longer period of time BASED UPON SPECIFIC HEIGHT AND WEIGHT LIMITS. Keep your child in a rear facing seat for as long as possible.CHECK THE CHILD SAFETY SEAT MANUFACTURER’S INSTRUCTIONS AND CAREFULLYFOLLOW ALL INSTRUCTIONS
** LATCH - Lower Anchors and Tethers for Children. In Canada, this is also called Lower Universal Anchorage System (LUAS), or CANFIX.
*** Subject to instructions provided by the child safety seat manufacturer.Warning: Laws that govern how and where children should be carried when traveling in a
vehicle are subject to change. It is the driver’s responsibility to keep up to date on, and
comply with, all current regulations in the region(s) where Model S is driven.To check the child passenger safety laws for your state, go to: http://www.ghsa.org/html/stateinfo/laws/childsafety_laws.html.
Child Safety Seats
24Model S Owner's Manual
Page 26 of 164

Installing LATCH Child SeatsLower LATCH anchor positions are providedin the second-row outboard seating positions
and are located between the seat's back rest
and rear cushion. The exact location of each
anchor is identified by a child safety seat
identification button, illustrated below. The button is located on the seat back, directlyabove its associated anchor.
Install LATCH seats in the outboard seating
positions only. Use only a seat belt retained
seat in the center position.
To install a LATCH retained child safety seat,
slide the safety seat latches onto the anchorbars until they click into place. Carefully read
and follow the instructions provided by the child safety seat manufacturer.
Once installed, test the security of the
installation before seating a child. Attempt to
twist the child safety seat from side to side and try to pull it away from the seat, then
check that the anchors are still securely in place.
Attaching Upper Tether Straps
If an upper tether strap is provided, attach its
hook to the anchor point located on the back
of the rear seats. Always position single-strap
tethers so that it runs over the center of the
Model S head support. Tighten dual-strap
tethers to run on each side of the head
support. Tighten according to the child safety
seat manufacturer’s instructions.
Note: To prevent single-strap tethers from
moving from side to side, the top of the head
support deforms.
Child Safety Seats
26Model S Owner's Manual
Page 27 of 164

Testing a Child Safety SeatBefore seating a child, always make sure thechild safety seat is not loose:
1. Hold the child safety seat by the belt path
and try to slide the safety seat from side
to side and front to back.
2. If the seat moves more than one inch
(2.5 cm), it is too loose. Tighten the belt
or reconnect the LATCH retained child
safety seat.
3. If you are unable to reduce slack, try a
different seat location or try another child
safety seat.
Warnings - Child Safety SeatsWarning: Extreme hazard! Do not seat a
child on the front passenger seat even if
you are using a child safety seat. This seat has an airbag in front of it. Although this
airbag is disabled when Model S detects a lightweight passenger, do not rely on
technology to protect your child.Warning: Do not use a forward facing
child safety seat until your child weighs
over 20 lbs (9 kg) and can sit
independently. Up to the age of two, a child's spine and neck are not sufficientlydeveloped to avoid injury in a frontal
impact.Warning: Do not allow a baby or infant to
be held on a lap. All children should be
restrained in an appropriate child safety
seat at all times.Warning: To ensure children are safely
seated, follow all instructions provided in this document and by the manufacturerof the child safety seat.Warning: Children should ride in a rear
facing child safety seat using the seat’s
integrated 5-point harness for as long as
possible.Warning: Do not use seat belt extenders
when installing a child safety seat or booster seat.Warning: When seating larger children,
make sure the child's head is supported and the child’s seat belt is properlyadjusted and fastened. The shoulder
portion of the belt must be away from the face and neck, and the lap portion mustnot be over the stomach.Warning: Never attach two child safety
seats to one anchor point. In a collision,one anchor point may be incapable of
securing both seats.Warning: Child restraint anchorages are
designed to withstand only those loads imposed by correctly fitted child
restraints. Under no circumstances are
they to be used for adult seatbelts,
harnesses, or for attaching other items or equipment to the vehicle.Warning: Always check harnesses and
tether straps for damage and wear.Warning: Do not use seat belt extenders
on a seat belt that is being used to install
a child safety seat or booster seat.Warning: Never leave a child unattended,
even if the child is secured in a child
safety seat.Warning: Never use a child safety seat
that has been involved in an accident.
Have the seat inspected or replaced as a
described in the child safety seat
manufacturer’s instructions.
Child Safety Seats
Seating and Safety Restraints27
Page 28 of 164
Usage Restrictions
The optional Tesla built-in rear facing child
seats are child restraint systems and must
only be used for children over 37" (94 cm) tall
and weighing between 35 and 77 lbs (16.2 to
35.2 kg).
Always ensure the top of the child’s head
cannot contact the vehicle and that the child
is seated comfortably with the seat belts positioned and latched correctly. The child’spelvis must be held securely in place by thelap belt. Follow all instructions provided anddo not use supplemental child safety seats inthese seats.
Note: Whenever a child is seated in the Tesla
built-in rear facing child seats, it is
recommended that you set the climate control
system to draw outside air into Model S
instead of recirculating the air. This draws
more air into the rear seating areas.
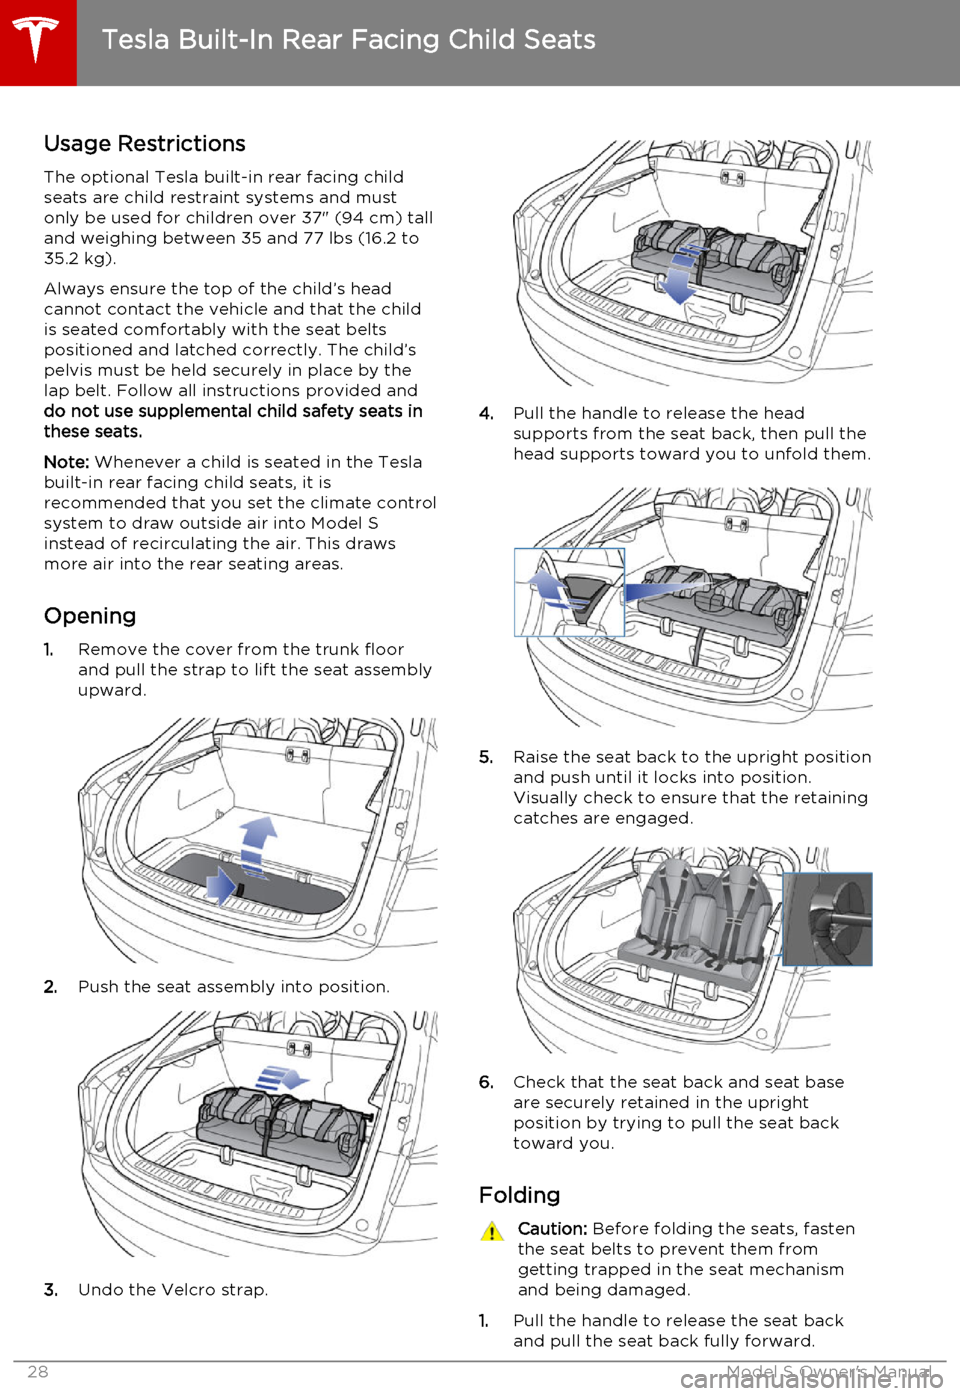
Opening 1. Remove the cover from the trunk floor
and pull the strap to lift the seat assembly
upward.
2. Push the seat assembly into position.
3.Undo the Velcro strap.
4.Pull the handle to release the head
supports from the seat back, then pull the
head supports toward you to unfold them.
5. Raise the seat back to the upright position
and push until it locks into position.
Visually check to ensure that the retaining catches are engaged.
6. Check that the seat back and seat base
are securely retained in the upright
position by trying to pull the seat back toward you.
Folding
Caution: Before folding the seats, fasten
the seat belts to prevent them from
getting trapped in the seat mechanism and being damaged.
1. Pull the handle to release the seat back
and pull the seat back fully forward.
Tesla Built-In Rear Facing Child Seats
28Model S Owner's Manual
Page 30 of 164
Seating a ChildThe Tesla built-in rear facing child seats arechild restraint systems and must only be used
for children over 37" (94 cm) tall and
weighing between 35 and 77 lbs (16.2 to 35.2
kg).
Always ensure the top of the child’s head
cannot contact the vehicle and that the child
is seated comfortably with the seat belts positioned and latched correctly. The child’spelvis must be held securely in place by thelap belt. Follow all instructions provided anddo not use supplemental child safety seats inthese seats.
Note: Whenever a child is seated in the Tesla
built-in rear facing child seats, it is
recommended that you set the climate control
system to draw outside air into Model S
instead of recirculating the air. This draws
more air into the rear seating areas.
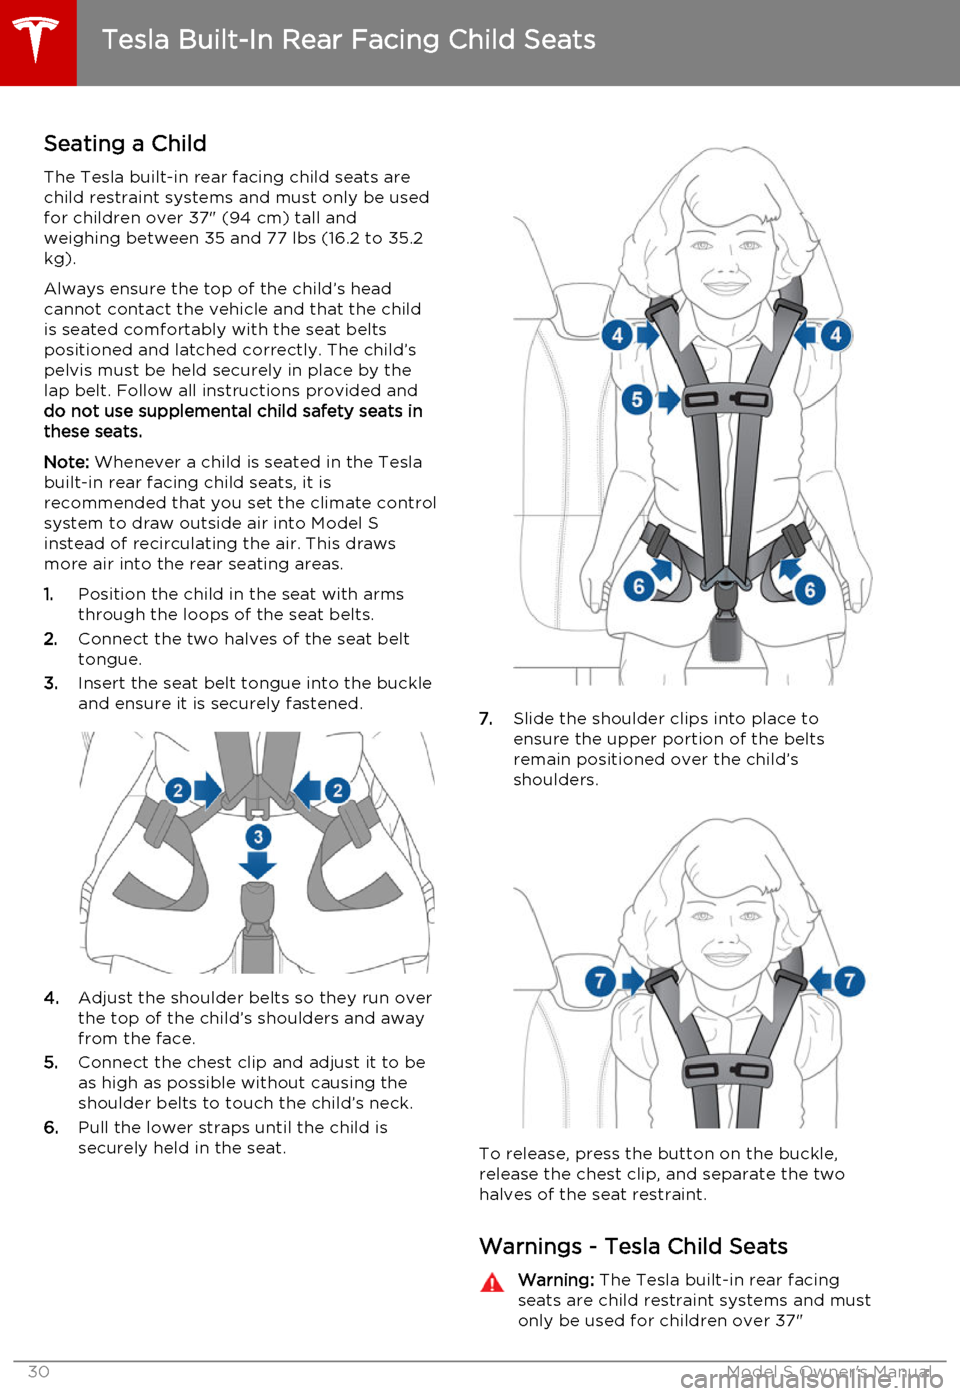
1. Position the child in the seat with arms
through the loops of the seat belts.
2. Connect the two halves of the seat belt
tongue.
3. Insert the seat belt tongue into the buckle
and ensure it is securely fastened.
4. Adjust the shoulder belts so they run over
the top of the child’s shoulders and away
from the face.
5. Connect the chest clip and adjust it to be
as high as possible without causing the
shoulder belts to touch the child’s neck.
6. Pull the lower straps until the child is
securely held in the seat.
7. Slide the shoulder clips into place to
ensure the upper portion of the belts
remain positioned over the child’s
shoulders.
To release, press the button on the buckle,
release the chest clip, and separate the two
halves of the seat restraint.
Warnings - Tesla Child Seats
Warning: The Tesla built-in rear facing
seats are child restraint systems and must
only be used for children over 37"
Tesla Built-In Rear Facing Child Seats
30Model S Owner's Manual
Page 35 of 164
Inflation Effects
When airbags inflate, a fine powder is
released. This powder can irritate the skin and should be thoroughly flushed from the eyes
and from any cuts or abrasions.
After inflation, the airbags deflate to provide a
gradual cushioning effect for the occupants and to ensure the driver’s forward vision is notobscured.
If airbags have inflated, or if your vehicle has been in an accident, always have the airbags,
seat belt pre-tensioners and any associated
components checked and, if necessary,
replaced by Tesla.
In a collision, in addition to the airbags
inflating:
• Doors unlock and the door handles extend.
• Hazard warning lights turn on.
• Interior lights turn on.
• High voltage is disabled.
To restore Battery power, use the touchscreen
to manually power off Model S, then press the
brake to power it back on again.
Airbag Warning IndicatorThe airbag indicator on the
instrument panel remains lit if the
airbag system is malfunctioning. The
only time this indicator should light
up is briefly when Model S first starts
up, in which case it turns off within a few seconds. If it remains lit, contact
Tesla immediately and do not drive.
Airbag Warnings
Warning: All occupants, including the
driver, should always wear their seat
belts, whether or not an airbag is also
provided at their seating position, to
minimize the risk of severe injury or death
in the event of a collision.Warning: Front seat occupants should
not place their arms over the airbag
module, as an inflating bag can cause
fractures or other injuries.Warning: Do not use seat covers on
Model S. Doing so could restrict
deployment of the side air bags if an
accident occurs. It can also reduce theaccuracy of the occupant detection
system.Warning: Airbags inflate with
considerable speed and force, which can
cause injury. To limit injuries, ensure that
occupants are wearing seat belts and are
correctly seated, with the seat positioned
as far back as possible. The National
Highway Traffic Safety Administration (NHTSA) recommends a minimum
distance of 10" (25 cm) between an occupant’s chest and an airbag.Warning: Do not use a child safety seat or
seat young children on a seat with an operational airbag in front of it. Doing socan cause injury or death if the airbaginflates.Warning: To ensure correct inflation of
the side airbags, maintain an
unobstructed gap between an occupant’s
torso and the side of Model S.Warning: Passengers should not lean their
heads against the doors. Doing so can cause injury if a curtain airbag inflates.Warning: Do not allow passengers to
obstruct the operation of an airbag by
placing feet, knees or any other part of the body on or near an airbag.Warning: Do not attach or place objects
on or near the front airbags, the side of
the front seats, the headliner at the side of the vehicle, or any other airbag coverthat could interfere with inflation of an
airbag. Objects can cause serious injury if the vehicle is in a collision severe enoughto cause the airbag to inflate.Warning: Following inflation, some airbag
components are hot. Do not touch until
they have cooled.
Airbags
Seating and Safety Restraints35
Page 39 of 164
• To search for, or navigate to, a location,say “Where is,” “Drive,” or “Navigate,”
followed by an address, business name,
business category, or landmark. For
example, “Drive to Tesla in Menlo Park,”
“Drive to Starbucks on Homestead in
Cupertino,” or “Where is Stanford
University?” If you have defined a navigation address for your home or work
locations, you can use a voice command to "Navigate home" or "Navigate to work."
• To listen to an Internet music service, say “Listen to,” or “Play,” followed by the
name of the song, album, artist or
combination. To improve voice
recognition accuracy, provide multiple
cues in your command, such as artist plus
song (for example, “Play Honky Chateau
by Elton John” or “Listen to Boogie
Wonderland”).
Note: You can also use voice commands to
provide feedback to Tesla. Say "Note", "Report", "Bug note", or "Bug report" followed
by your brief comments. Model S takes a snapshot of its systems, including screen
captures of the touchscreen and instrument
panel. Tesla periodically reviews these notes
and uses them to continue improving Model S.
Heated Steering Wheel If Model S is equipped with the optional cold
weather package, you can also control a
heater in the steering wheel by touching Controls > Cold Weather > . When turned on,
a heater in the steering wheel keeps it at a
comfortable temperature.
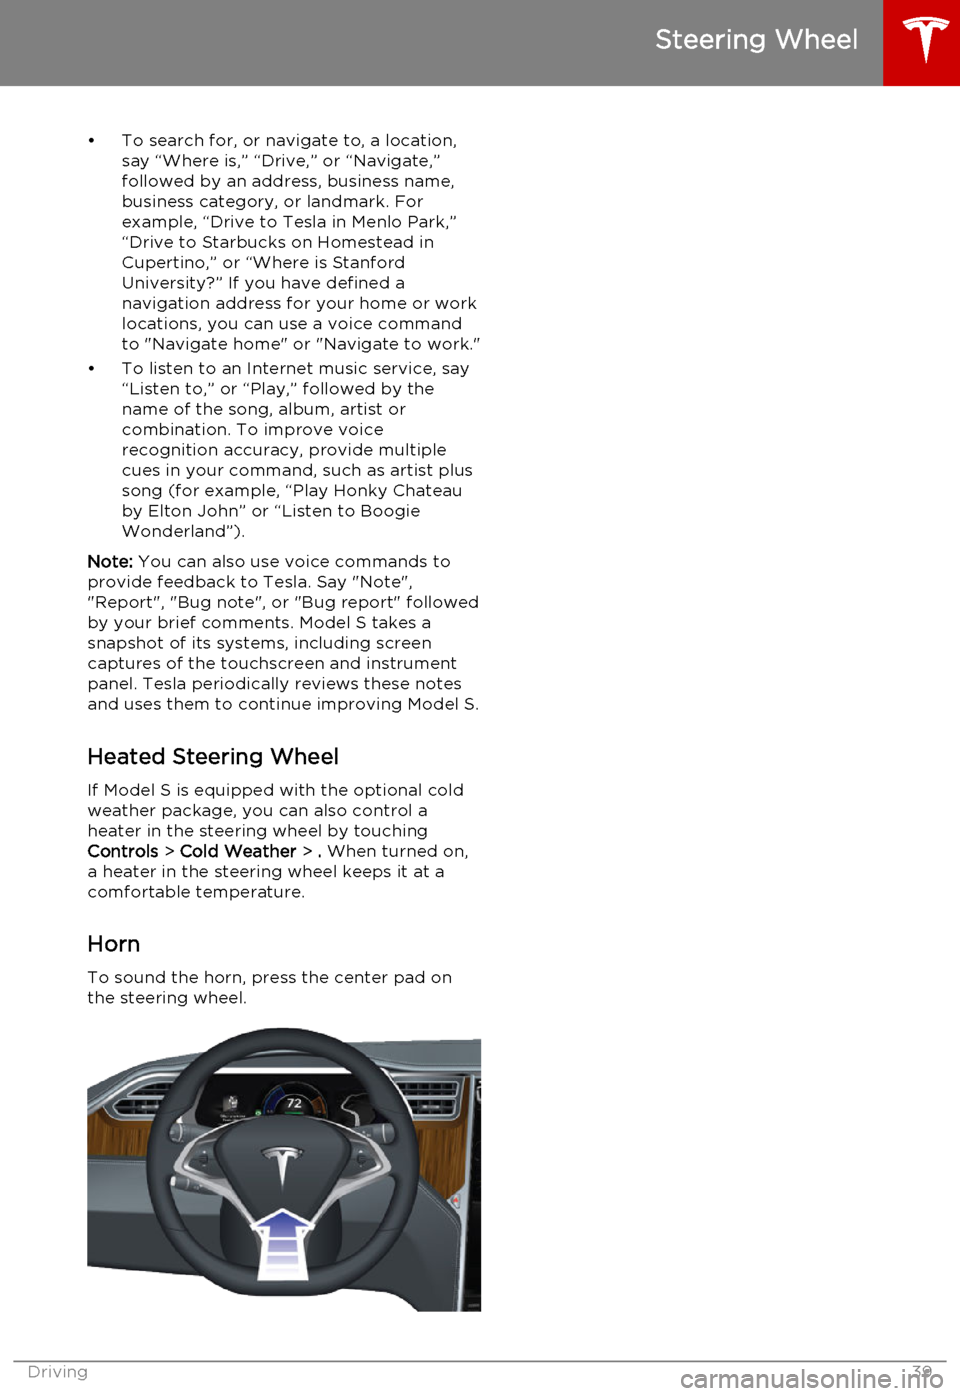
Horn
To sound the horn, press the center pad on
the steering wheel.
Steering Wheel
Driving39
Page 43 of 164
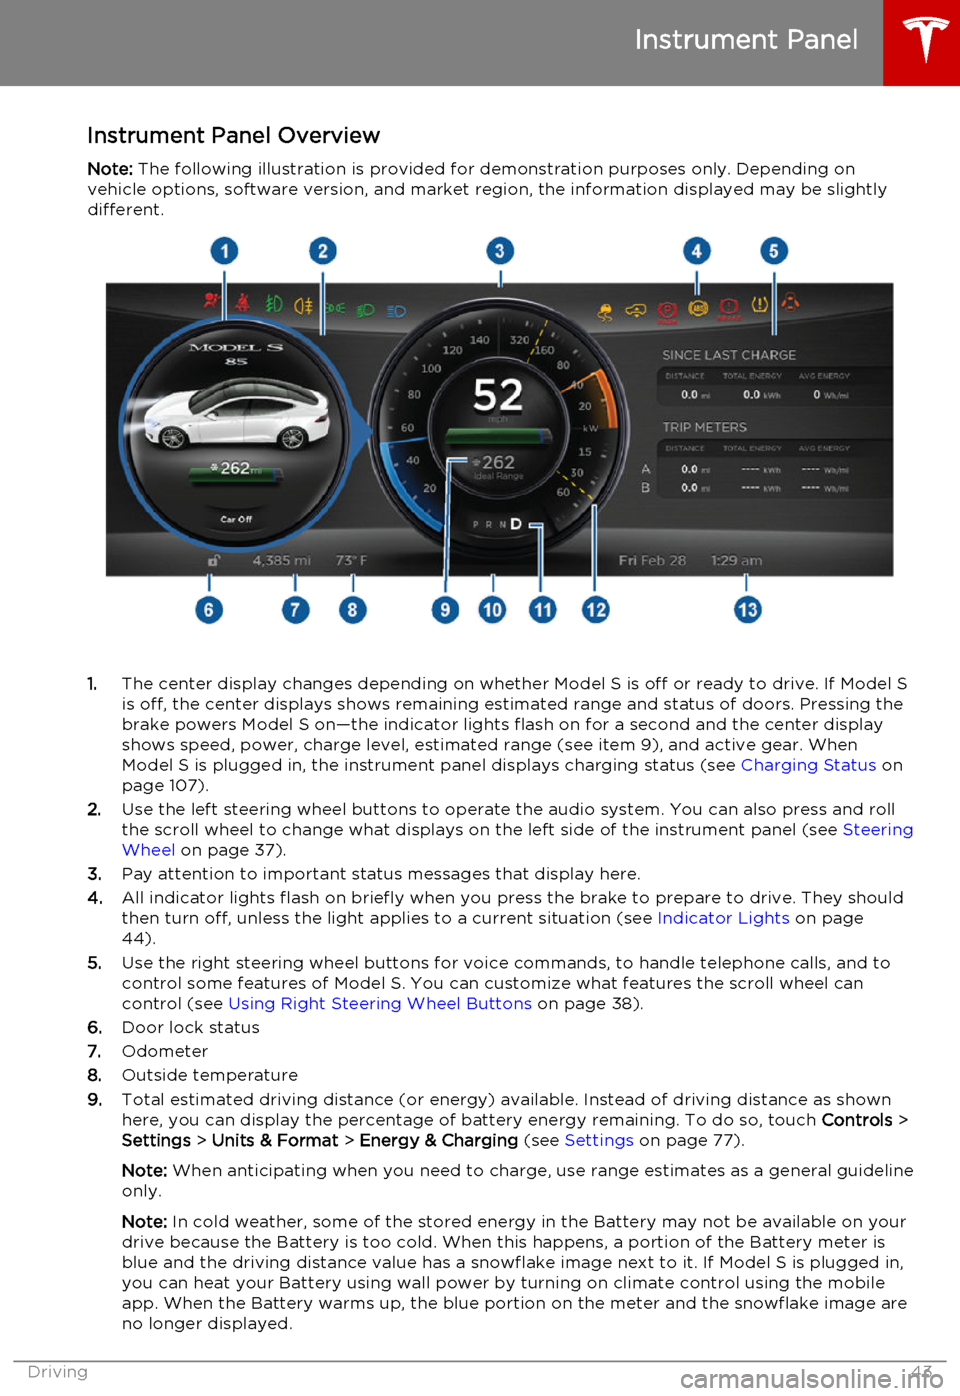
Instrument Panel OverviewNote: The following illustration is provided for demonstration purposes only. Depending on
vehicle options, software version, and market region, the information displayed may be slightly different.
1. The center display changes depending on whether Model S is off or ready to drive. If Model S
is off, the center displays shows remaining estimated range and status of doors. Pressing thebrake powers Model S on—the indicator lights flash on for a second and the center display
shows speed, power, charge level, estimated range (see item 9), and active gear. When
Model S is plugged in, the instrument panel displays charging status (see Charging Status on
page 107).
2. Use the left steering wheel buttons to operate the audio system. You can also press and roll
the scroll wheel to change what displays on the left side of the instrument panel (see Steering
Wheel on page 37).
3. Pay attention to important status messages that display here.
4. All indicator lights flash on briefly when you press the brake to prepare to drive. They should
then turn off, unless the light applies to a current situation (see Indicator Lights on page
44).
5. Use the right steering wheel buttons for voice commands, to handle telephone calls, and to
control some features of Model S. You can customize what features the scroll wheel can control (see Using Right Steering Wheel Buttons on page 38).
6. Door lock status
7. Odometer
8. Outside temperature
9. Total estimated driving distance (or energy) available. Instead of driving distance as shown
here, you can display the percentage of battery energy remaining. To do so, touch Controls >
Settings > Units & Format > Energy & Charging (see Settings on page 77).
Note: When anticipating when you need to charge, use range estimates as a general guideline
only.
Note: In cold weather, some of the stored energy in the Battery may not be available on your
drive because the Battery is too cold. When this happens, a portion of the Battery meter is
blue and the driving distance value has a snowflake image next to it. If Model S is plugged in,
you can heat your Battery using wall power by turning on climate control using the mobile
app. When the Battery warms up, the blue portion on the meter and the snowflake image are
no longer displayed.
Instrument Panel
Driving43
Page 48 of 164
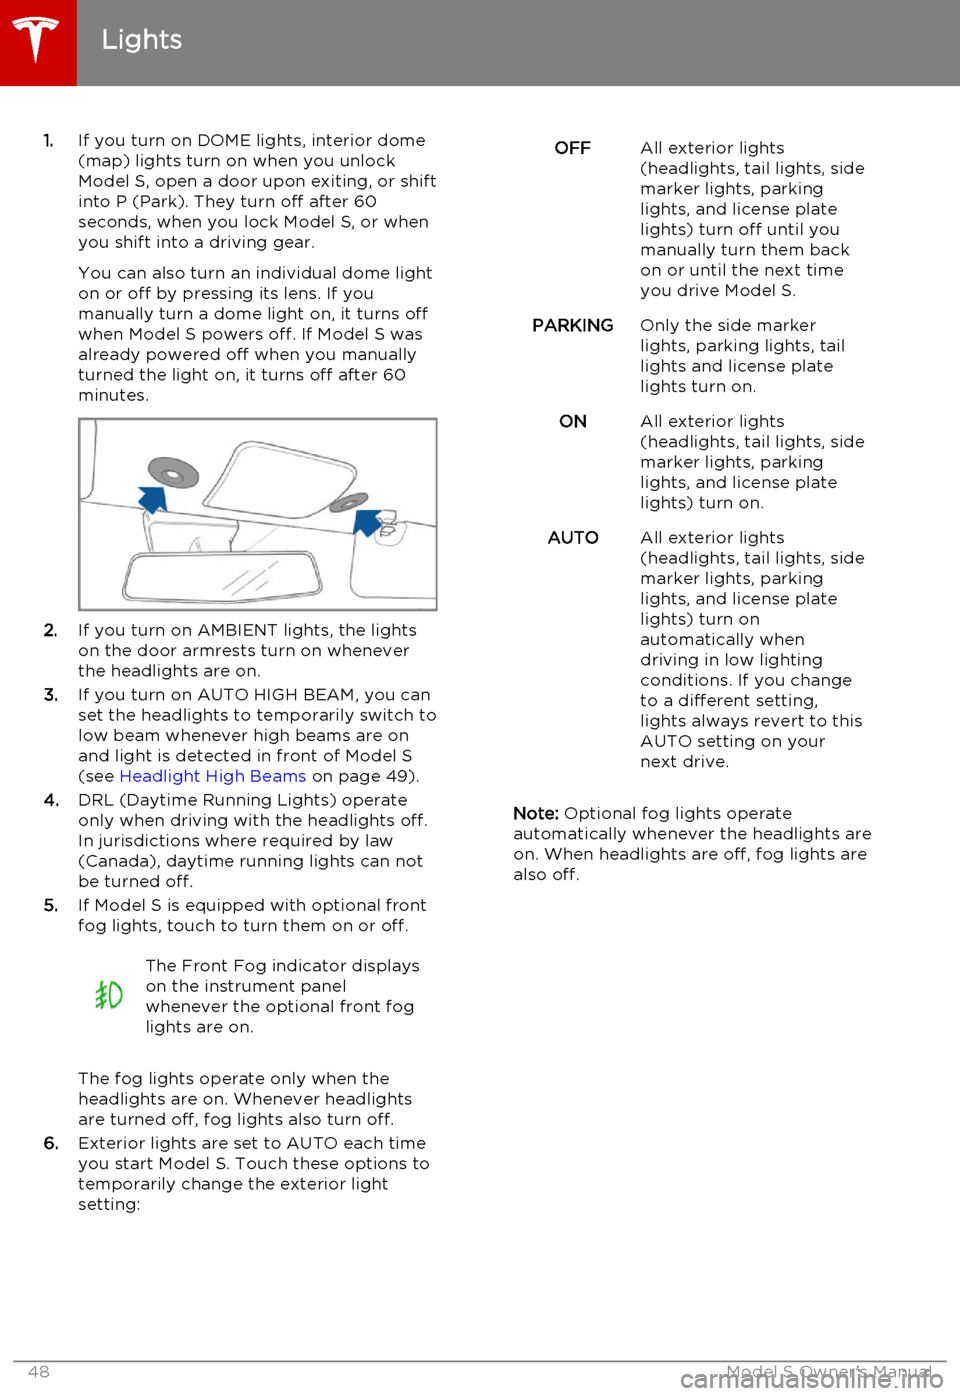
1.If you turn on DOME lights, interior dome
(map) lights turn on when you unlock
Model S, open a door upon exiting, or shift into P (Park). They turn off after 60
seconds, when you lock Model S, or when you shift into a driving gear.
You can also turn an individual dome light
on or off by pressing its lens. If you
manually turn a dome light on, it turns off
when Model S powers off. If Model S was
already powered off when you manually
turned the light on, it turns off after 60
minutes.
2. If you turn on AMBIENT lights, the lights
on the door armrests turn on whenever
the headlights are on.
3. If you turn on AUTO HIGH BEAM, you can
set the headlights to temporarily switch to
low beam whenever high beams are on
and light is detected in front of Model S
(see Headlight High Beams on page 49).
4. DRL (Daytime Running Lights) operate
only when driving with the headlights off.
In jurisdictions where required by law (Canada), daytime running lights can not
be turned off.
5. If Model S is equipped with optional front
fog lights, touch to turn them on or off.
The Front Fog indicator displays
on the instrument panel
whenever the optional front fog
lights are on.
The fog lights operate only when the
headlights are on. Whenever headlights
are turned off, fog lights also turn off.
6. Exterior lights are set to AUTO each time
you start Model S. Touch these options to
temporarily change the exterior light
setting:
OFFAll exterior lights
(headlights, tail lights, side
marker lights, parking
lights, and license plate
lights) turn off until you
manually turn them back
on or until the next time
you drive Model S.PARKINGOnly the side marker
lights, parking lights, tail
lights and license plate
lights turn on.ONAll exterior lights
(headlights, tail lights, side
marker lights, parking
lights, and license plate
lights) turn on.AUTOAll exterior lights
(headlights, tail lights, side
marker lights, parking
lights, and license plate
lights) turn on
automatically when
driving in low lighting
conditions. If you change
to a different setting,
lights always revert to this
AUTO setting on your
next drive.
Note: Optional fog lights operate
automatically whenever the headlights are
on. When headlights are off, fog lights are
also off.
Lights
48Model S Owner's Manual