ECO mode TESLA MODEL S 2015 Workshop Manual
[x] Cancel search | Manufacturer: TESLA, Model Year: 2015, Model line: MODEL S, Model: TESLA MODEL S 2015Pages: 164, PDF Size: 4.78 MB
Page 112 of 164

Winter Tires
Your Model S is not originally equipped with
winter tires. In snowy and icy conditions, consider installing winter tires. Winter tires are
designed to increase traction in snowy or icy
conditions. When installing winter tires, always install a complete set of four tires at the sametime. Winter tires must be the same size,brand, construction and tread pattern on allfour wheels. Contact Tesla for winter tire
recommendations.Winter tires can be identified by a
mountain/snowflake symbol on the
tire's sidewall.
When driving with winter tires, you may
experience more road noise, shorter tread life, and less traction on dry roads.
Driving in Low Temperatures Tire performance is reduced in low ambient
temperatures, resulting in reduced grip and an
increased susceptibility to damage from
impacts. Performance tires can temporarily
harden when cold, causing you to hear
rotational noise for the first few miles (kms)
until the tires warm up.
Using Tire Chains Tesla has tested and approved Security Chain
Company (SCC) Model Z-563 chains for use
on the rear wheels. These chains must only be
used if your Model S has 245/45R19 rear tires
installed. Do not use chains on 21 inch tires.
When installing tire chains, follow the
instructions provided by the tire chain
manufacturer. Mount them as tightly as
possible.
When using tire chains:
• Drive slowly. Do not exceed 30 mph (48 km/h).
• Avoid heavily loading Model S (heavy loads can reduce the clearance between
the tires and the body).
• Remove the tire chains as soon as conditions allow.
Note: Tire chains are prohibited in some
jurisdictions. Check local laws before installing
tire chains.
Caution: Using non-recommended tire
chains, or using tire chains on other sized tires, can damage the suspension, body,wheels, and/or brake lines. Damagecaused by using non-recommended tire
chains is not covered by the warranty.Caution: Ensure that tire chains cannot
touch suspension components or brake
lines. If you hear the chains making
unusual noises that would indicate
contact with Model S, stop and
investigate immediately.
Tire Pressure Monitoring
Each tire should be checked monthly when
cold and inflated to the recommended pressures that are printed on the Tire and
Loading Information label located on the
driver’s door pillar (see Maintaining Tire
Pressures on page 109). If your vehicle has
tires of a different size than the size indicated
on the vehicle placard or tire inflation pressure
label, determine the proper tire inflation
pressure for those tires.
As an added safety feature, your vehicle has
been equipped with a tire pressure monitoring
system (TPMS) that displays a tire pressure
telltale (Tire Pressure Warning) on the
instrument panel when one or more of your
tires is significantly under- or over-inflated.
Accordingly, when the Tire Pressure indicator
light displays on the instrument panel alerting
of tire pressure, stop and check your tires as
soon as possible, and inflate them to the
proper pressure (see Maintaining Tire
Pressures on page 109). Driving on a
significantly under-inflated tire causes the tire
to overheat and can lead to tire failure. Under-
inflation also reduces fuel efficiency and tire
tread life, and may affect the vehicle's
handling and stopping ability.
If Model S detects a fault with the
Tire Pressure Monitoring System
(TPMS), this indicator flashes for one
minute whenever you power on
Model S.
Note: Installing accessories that are not
approved by Tesla can interfere with the TPMS system.
Warning: The TPMS is not a substitute for
proper tire maintenance, including
manually checking tire pressures and
regularly inspecting the condition of tires.
It is the driver's responsibility to maintain
correct tire pressure, even if under- or
over-inflation has not reached the level
Tire Care and Maintenance
112Model S Owner's Manual
Page 113 of 164
for the TPMS to trigger the Tire PressureWarning on the instrument panel.
Resetting the TPMS Sensors
After replacing one or more wheels, the TPMS sensors must be reset to ensure tire pressurewarnings are accurate. However, note that theTPMS sensors do not need to be reset after
replacing a tire or rotating wheels.
Note: When changing to 21" wheels
(Performance Plus models), the TPMS may
generate false tire pressure warnings. Bring
Model S to a Tesla Service center for further
adjustment.
Note: Do not reset the TPMS sensors in an
attempt to clear tire pressure warnings.
To reset TPMS sensors:
1. Inflate all tires to their recommend
pressures, as indicated on the Tire and Loading Information label located on the
driver’s door pillar.
2. Get ready to drive for ten minutes, then,
on the Model S touchscreen, touch
Controls > Settings > Service & Reset >
Tire Pressure Monitor > Reset Sensors .
3. Follow the onscreen instructions.
Replacing a Tire Sensor
If the Tire Pressure warning indicator displays frequently, contact Tesla to determine if a tiresensor needs to be replaced. Tire sensors
must be replaced by a Tesla service technician
who can perform a brief setup procedure. If a non-Tesla service center repairs or replaces atire, the tire sensor will not work until Tesla
performs the setup procedure.
TPMS Malfunction
Model S has also been equipped with a TPMS
malfunction indicator to indicate when the
system is not operating properly.
The TPMS malfunction indicator is
combined with the tire pressure
indicator light. When the system
detects a malfunction, the indicator
flashes for approximately one
minute after Model S powers on, and
then remains continuously lit. This
sequence continues upon
subsequent vehicle start-ups as long
as the malfunction exists. When the
TPMS malfunction indicator is on,
the system might not be able to
detect or signal under- and over-
inflated tires as intended.
TPMS malfunctions can occur for a variety of reasons, including installing replacement oralternate tires or wheels that prevent theTPMS from functioning properly. Alwayscheck the TPMS malfunction indicator light
after replacing one or more tires or wheels on
your vehicle to ensure that the replacement
tires or wheels allow the TPMS to continue to
function properly.
Note: If a tire has been replaced or repaired
using a different tire sealant than the one
available from Tesla, and a low tire pressure is
detected, it is possible that the tire sensor has
been damaged. Contact Tesla to have the
fault repaired as soon as possible.
Tire Care and Maintenance
Maintenance113
Page 115 of 164

Inflating with Sealant and AirIf you have a Tesla tire repair kit, follow these
steps to temporarily repair a small tire
puncture (less than 1/4” (6 mm)).
1. Stop Model S in a safe place away from
traffic and ask passengers to wait in a safe area.
2. Turn on the hazard warning flashers to
alert other road users.
3. If possible, position the wheel with the
puncture at the bottom.
4. Detach the power supply connector from
the back of the compressor and plug it
into the 12V power socket located on the front of center console.
5. Release the clear plastic hose from the
tire compressor.
6. Remove the red cap and screw the end of
the hose onto the tire’s valve.
7. Attach the sealant kit’s black air hose to
the sealant valve and press the lever
down to secure it in place.
8. Ensure the compressor is lying on a level
surface with the pressure gauge facing to the side as shown in Step 5.
9. Turn on the compressor.
10. Inflate the tire to the recommended
pressure.
11. Turn off the compressor and disconnect
the hose from the tire’s valve. Wipe any
excess sealant from the tire valve and wheel rim.
12. Immediately drive for 5 miles (8 km) to
distribute the sealant around the tire. Donot exceed 30 mph (48 km/h).
13. Stop and check the tire’s pressure. If
necessary, inflate using the black air hose.
14. Have the tire repaired or replaced as soon
as possible.
15. Replace the tire repair sealant canister
(see Replacing the Sealant Canister on
page 117).
Temporary Tire Repair
Maintenance115
Page 116 of 164

Inflating with Air Only
If you have a Tesla tire repair kit, follow these steps to inflate a tire with air:
1. Detach the power supply connector from
the rear of the compressor and plug it into
the 12V power socket located in Model S
on the front of center console.
2. Release the black air hose from the
compressor.
3. Attach the air hose to the valve and press
the lever down to secure it in place.
4. Ensure the compressor is lying on a level
surface with the pressure gauge facing to the side where you can read it.
5. To add air, turn on the compressor and
inflate until the desired pressure is
reached.
6. To release air, turn off the compressor,
then press and hold the red button until the desired pressure is reached.
Note: For your convenience, the tire repair kit
includes a selection of adapters that allow you to inflate other items. These adapters arelocated in a compartment on the back of thecompressor.
Caution: To avoid overheating, do not use
the compressor continuously for more than eight minutes. Allow the compressorto cool for 15 minutes between uses.Caution: The compressor runs slowly
when overheated from excessive use.
Turn it off and allow it to cool.
Temporary Tire Repair
116Model S Owner's Manual
Page 119 of 164
Cleaning the InteriorFrequently inspect and clean the interior to
maintain its appearance and to prevent premature wear. If possible, immediately wipe
up spills and remove marks. For general
cleaning, wipe interior surfaces using a soft cloth (such as micro fiber) dampened with amixture of warm water and mild non-detergent cleaner (test all cleaners on a
concealed area before use). To avoid streaks,
dry immediately with a soft lint-free cloth.
Interior Glass
Do not scrape, or use any abrasive cleaning
fluid on glass or mirrored surfaces. This can
damage the reflective surface of the mirror
and the heating elements in the rear window.
Airbags
Do not allow any substance to enter an airbag
cover. This could affect correct operation.
Dashboard and Plastic Surfaces
Do not polish the upper surfaces of the
dashboard. Polished surfaces are reflective
and could interfere with your driving view.
Leather Seats
Leather is prone to dye-transfer which can cause discoloration, particularly on light
colored leather. White and tan leather is
coated with an anti-soiling treatment. Wipe
spills as soon as possible using a soft cloth
moistened with warm water and non-
detergent soap. Wipe gently in a circular
motion. Then wipe dry using a soft, lint-free
cloth. Using detergents or commercially
available leather cleaners and conditioners is
not recommended because they can discolor or dry out the leather.
Cloth Seats
Wipe spills as soon as possible using a soft cloth moistened with warm water and non-
detergent soap. Wipe gently in a circular motion. Then wipe dry using a soft, lint-free
cloth. Vacuum the seats as needed to remove
any loose dirt.
Carpets
Avoid over-wetting carpets. For heavily soiled
areas, use a diluted upholstery cleaner.Seat Belts
Extend the belts to wipe. Do not use any type
of detergent or chemical cleaning agent. Allow the belts to dry naturally while
extended, preferably away from direct sunlight.
Tesla Built-In Rear Facing Child Seats
Vacuum the seats to remove any loose dirt.
Wipe the seats with a soft cloth dampened
with warm water. You can also use an
upholstery cleaner designed for automotive use. Extend the belts to wipe. Allow the belts
to dry naturally, preferably away from direct
sunlight.
Touchscreen and Instrument Panel
Clean the touchscreen and instrument panel using a soft lint-free cloth specificallydesigned to clean monitors and displays. Donot use cleaners (such as a glass cleaner) and
do not use a wet wipe or a dry statically- charged cloth (such as a recently washed
microfiber). To wipe the touchscreen without
activating buttons and changing settings, you
can enable clean mode. Touch Controls >
Displays > Clean Mode . The display darkens to
make it easy to see dust and smudges.
Chrome and Metal Surfaces
Polish, abrasive cleaners or hard cloths can
damage the finish on chrome and metal
surfaces.
Cautions for Interior CleaningWarning: If you notice any damage on an
airbag or seat belt, contact Tesla
immediately.Warning: Do not allow any water,
cleaners, or fabric to enter a seat belt
mechanism.Caution: Using solvents (including
alcohol), bleach, citrus, naphtha, or
silicone-based products or additives on
interior components can cause damage.
Cleaning
Maintenance119
Page 120 of 164

Polishing, Touch Up, and Body
Repair
To preserve the cosmetic appearance of the
body, you can occasionally treat the paint
surfaces with an approved polish containing:
• Very mild abrasive to remove surface contamination without removing or
damaging the paint.
• Filling compounds that fill scratches and reduce their visibility.
• Wax to provide a protective coating between the paint and environmental
elements.
Regularly inspect the exterior paint for
damage. Treat minor chips and scratches
using a paint touch up pen (available for
purchase from Tesla). Use the touch-up pen
after washing but before polishing or waxing.
Repair rock chips, fractures or scratches. Body
repairs should be performed only by a Tesla approved body shop. Contact Tesla for a listof approved body shops.Caution: Do not use cutting pastes, color
restoration compounds, or polishes
containing harsh abrasives. These can
scour the surface and permanently
damage the paint.Caution: Do not use chrome polish or
other abrasive cleaners.Using a Car Cover
To preserve the cosmetic appearance of the
body when Model S is not being used, use a
genuine Tesla car cover. Car covers can be purchased from Tesla.Caution: Use only a Tesla-approved car
cover when Model S is plugged in. Using
a non-Tesla car cover can prevent the
Battery from being adequately cooled
during charging.
Floor Mats
To extend the life of your carpet and make
them easier to clean, use genuine Tesla floor mats. Maintain mats by cleaning them
regularly and replacing them if they become
excessively worn.
Warning: To avoid potential interference
with a foot pedal, ensure that the driver’s
floor mat is securely fastened, and never place an additional floor mat on top of it.
Cleaning
120Model S Owner's Manual
Page 121 of 164
Checking and Replacing Wiper
BladesCaution: Wiper blades do not lock into a
lifted position. When cleaning or
replacing a wiper blade, lift the wiper arm
only a short distance from the windshield,
just far enough to access the blade. Do not lift a wiper arm beyond its intendedposition. Doing so can cause damage thatis not covered by the warranty.
To make wiper blades easy to access, turn offthe wipers, shift Model S into Park, then use
the touchscreen to move them to the service
position. Touch Controls > Settings > Service
& Reset > Service Mode > ON .
Note: Wipers automatically return to their
normal position when you shift Model S out of
Park.
Periodically check and clean the edge of the wiper blade and check the rubber for cracks,
splits and roughness. If damaged, replace the
blade immediately to prevent damage to the glass.
Contaminants on the windshield, or on the wiper blades, can reduce the effectiveness of
the wiper blades. Contaminants include ice,
wax spray from car washes, washer fluid with
bug and/or water repellent, bird droppings,
tree sap, and other organic substances.
Follow these guidelines for cleaning:
• Clean the windshield using non-abrasive glass cleaner.
• Lift the wiper arm a short distance away from the windshield, just far enough toaccess the wiper blade, then wipe the
blade clean using isopropyl (rubbing)
alcohol or washer fluid.
If the wipers remain ineffective after cleaning,
replace the wiper blades.
For optimum performance, replace wiper
blades at least once a year.
To replace wiper blades:
1. Turn off the wipers, shift Model S into
Park, then use the touchscreen to move
the wipers to the service position. Touch
Controls > Settings > Service & Reset >
Service Mode > ON .
Note: Wipers must be OFF to turn on
Service Mode.
2. Lift the wiper arm a short distance away
from the windshield, just far enough to
access the wiper blade.
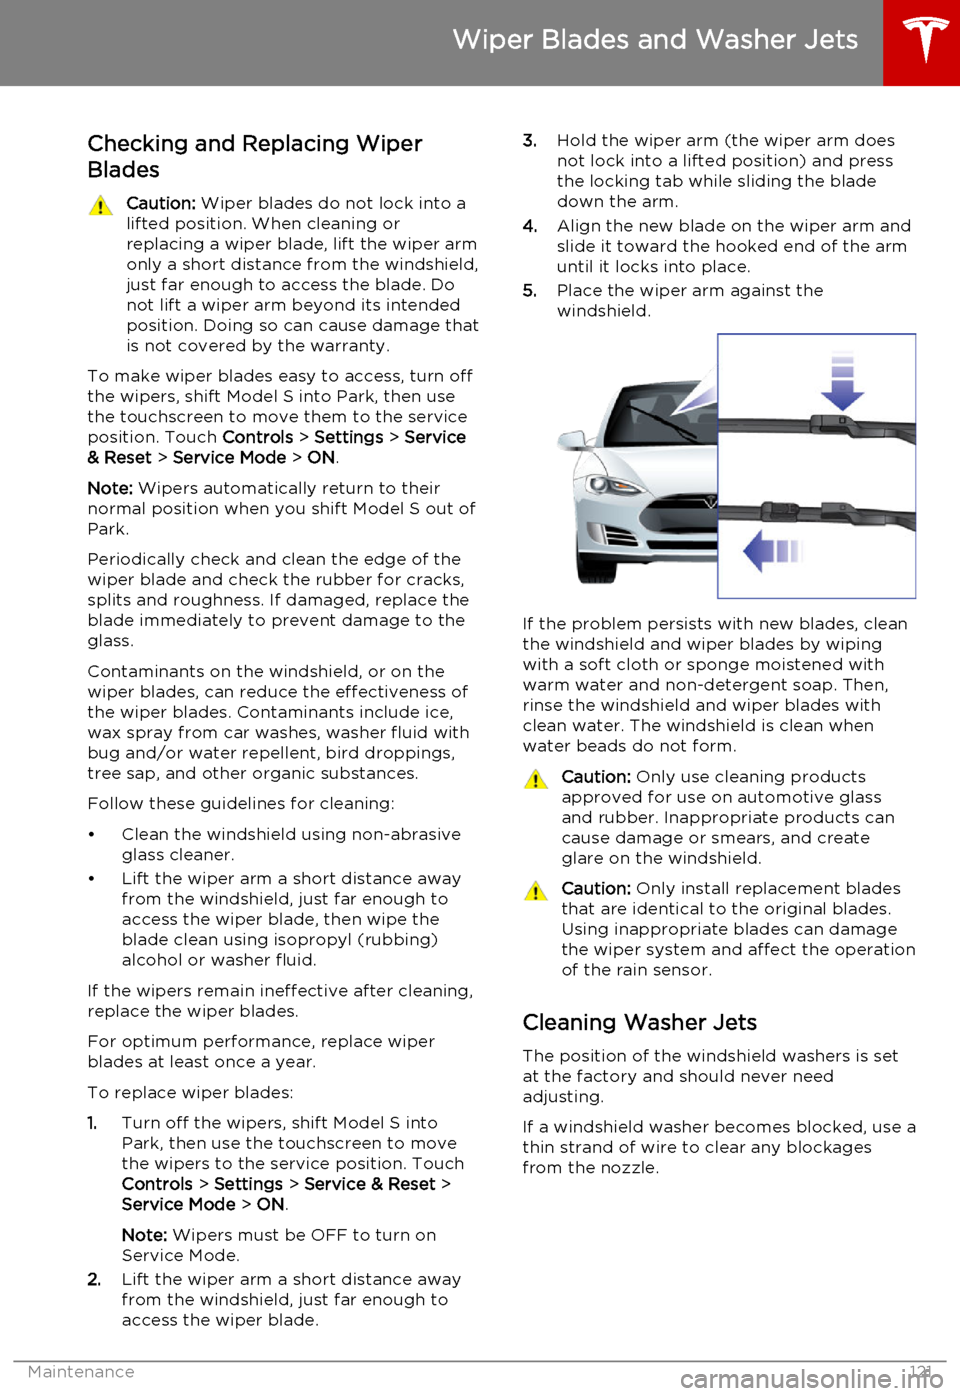
3. Hold the wiper arm (the wiper arm does
not lock into a lifted position) and press
the locking tab while sliding the blade
down the arm.
4. Align the new blade on the wiper arm and
slide it toward the hooked end of the arm
until it locks into place.
5. Place the wiper arm against the
windshield.
If the problem persists with new blades, clean
the windshield and wiper blades by wiping
with a soft cloth or sponge moistened with
warm water and non-detergent soap. Then,
rinse the windshield and wiper blades with clean water. The windshield is clean when
water beads do not form.
Caution: Only use cleaning products
approved for use on automotive glass and rubber. Inappropriate products can
cause damage or smears, and create
glare on the windshield.Caution: Only install replacement blades
that are identical to the original blades.
Using inappropriate blades can damage
the wiper system and affect the operation of the rain sensor.
Cleaning Washer Jets
The position of the windshield washers is set
at the factory and should never need adjusting.
If a windshield washer becomes blocked, use a
thin strand of wire to clear any blockages
from the nozzle.
Wiper Blades and Washer Jets
Maintenance121
Page 123 of 164
Removing the Maintenance Panel
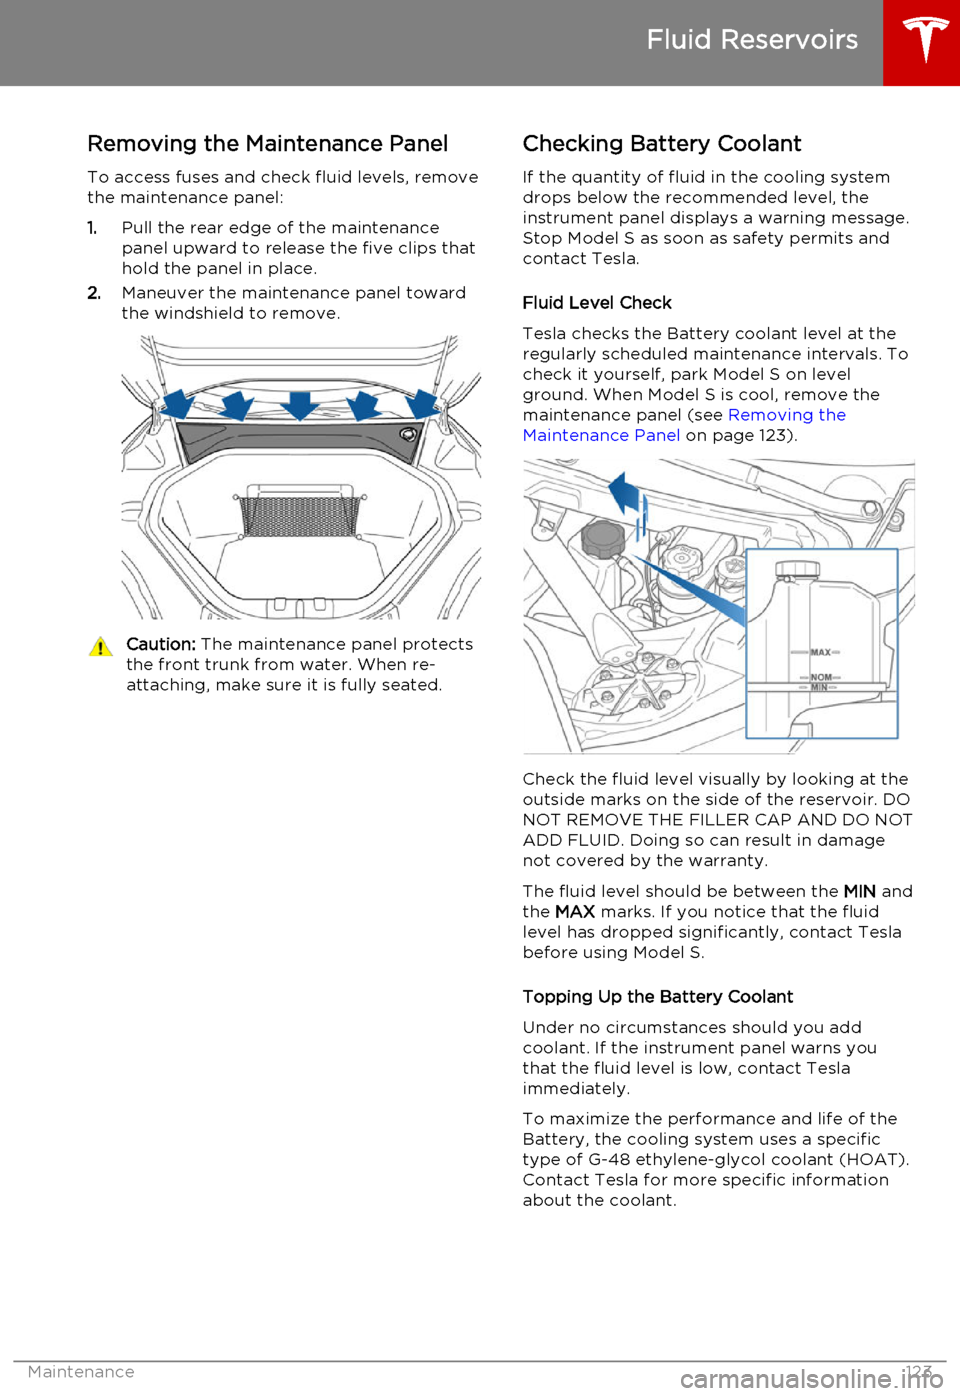
To access fuses and check fluid levels, remove the maintenance panel:
1. Pull the rear edge of the maintenance
panel upward to release the five clips that
hold the panel in place.
2. Maneuver the maintenance panel toward
the windshield to remove.Caution: The maintenance panel protects
the front trunk from water. When re- attaching, make sure it is fully seated.Checking Battery Coolant
If the quantity of fluid in the cooling system
drops below the recommended level, the
instrument panel displays a warning message.
Stop Model S as soon as safety permits and
contact Tesla.
Fluid Level Check
Tesla checks the Battery coolant level at the
regularly scheduled maintenance intervals. To
check it yourself, park Model S on level
ground. When Model S is cool, remove the
maintenance panel (see Removing the
Maintenance Panel on page 123).
Check the fluid level visually by looking at the
outside marks on the side of the reservoir. DO
NOT REMOVE THE FILLER CAP AND DO NOT ADD FLUID. Doing so can result in damage
not covered by the warranty.
The fluid level should be between the MIN and
the MAX marks. If you notice that the fluid
level has dropped significantly, contact Tesla before using Model S.
Topping Up the Battery Coolant
Under no circumstances should you add coolant. If the instrument panel warns youthat the fluid level is low, contact Teslaimmediately.
To maximize the performance and life of the Battery, the cooling system uses a specific
type of G-48 ethylene-glycol coolant (HOAT).
Contact Tesla for more specific information
about the coolant.
Fluid Reservoirs
Maintenance123
Page 124 of 164

Checking Brake FluidWarning: Contact Tesla immediately if
you notice increased movement of the
brake pedal or a significant loss of brake
fluid. Driving under these conditions can result in extended stopping distances orcomplete brake failure.The Brake indicator on the
instrument panel alerts you if the
quantity of fluid in the brake
reservoir drops below the
recommended level. If it displays
while driving, stop as soon as safety
permits by gently applying the
brakes. Do not continue driving.
Contact Tesla immediately.
Fluid Level Check
Tesla checks the brake fluid level at the
regularly scheduled maintenance intervals. To check it yourself, park Model S on level
ground. When Model S is cool, remove the maintenance panel (see Removing the
Maintenance Panel on page 123).
Check the fluid level visually by looking at the
outside marks on the side of the reservoir
without removing the filler cap.
The brake fluid level should always be
between the MIN and the MAX marks.
Note: Although brake fluid level drops slightly
during normal use as a result of brake pad wear, it should not drop below the MIN mark.
Topping Up the Brake Fluid
Do not top up your brake fluid. Tesla service does this when you bring Model S in for
regular servicing. The following instructions are provided for information purposes andfuture reference only:
1. Clean the filler cap before removing to
prevent dirt from entering the reservoir.
2. Unscrew the cap and remove.
3. Top up the reservoir to the MAX mark
using brake fluid meeting DOT3 or DOT4 specifications.
4. Replace the filler cap.Warning: Only use new fluid from a
sealed air-tight container. Never use previously used fluid or fluid from apreviously opened container—fluid
absorbs moisture which decreases
braking performance.Warning: Brake fluid is highly toxic. Keep
containers sealed and out of the reach of children. In the event of accidentalconsumption, seek medical attention
immediately.Caution: Brake fluid damages painted
surfaces. Immediately soak up any spills
with an absorbent cloth and wash the
area with a mixture of car shampoo and
water.
Fluid Reservoirs
124Model S Owner's Manual
Page 135 of 164
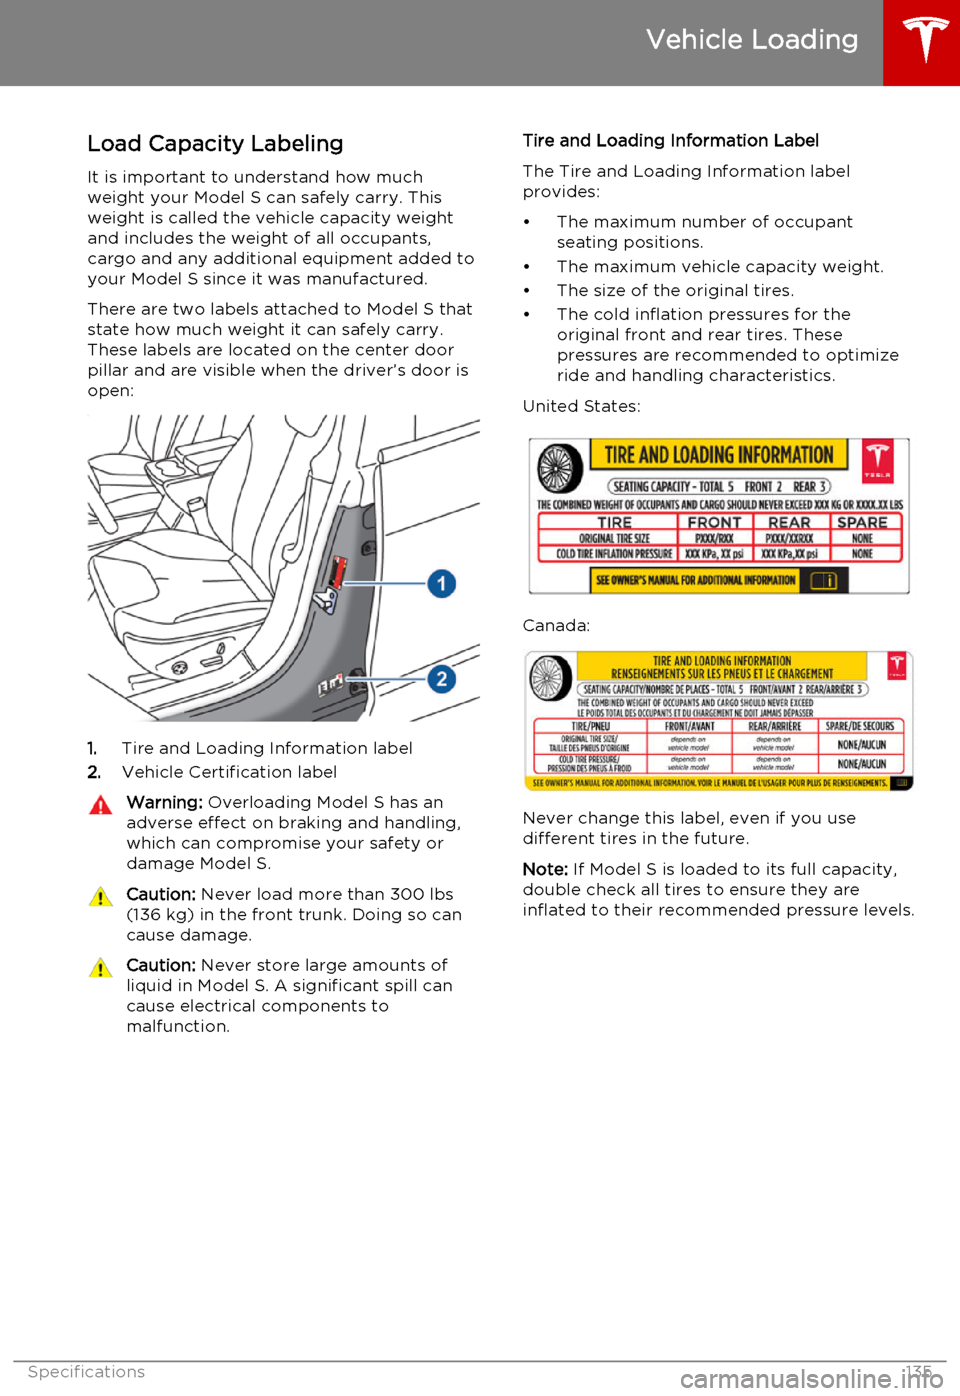
Load Capacity LabelingIt is important to understand how much
weight your Model S can safely carry. This
weight is called the vehicle capacity weight
and includes the weight of all occupants,
cargo and any additional equipment added to
your Model S since it was manufactured.
There are two labels attached to Model S that
state how much weight it can safely carry.
These labels are located on the center door
pillar and are visible when the driver’s door is open:
1. Tire and Loading Information label
2. Vehicle Certification label
Warning:
Overloading Model S has an
adverse effect on braking and handling,
which can compromise your safety or
damage Model S.Caution: Never load more than 300 lbs
(136 kg) in the front trunk. Doing so can
cause damage.Caution: Never store large amounts of
liquid in Model S. A significant spill can
cause electrical components to
malfunction.Tire and Loading Information Label
The Tire and Loading Information label provides:
• The maximum number of occupant seating positions.
• The maximum vehicle capacity weight.
• The size of the original tires.
• The cold inflation pressures for the original front and rear tires. These
pressures are recommended to optimize
ride and handling characteristics.
United States:
Canada:
Never change this label, even if you use different tires in the future.
Note: If Model S is loaded to its full capacity,
double check all tires to ensure they are
inflated to their recommended pressure levels.
Vehicle Loading
Specifications135