lock TESLA MODEL S 2023 Owners Manual
[x] Cancel search | Manufacturer: TESLA, Model Year: 2023, Model line: MODEL S, Model: TESLA MODEL S 2023Pages: 276, PDF Size: 7.88 MB
Page 15 of 276
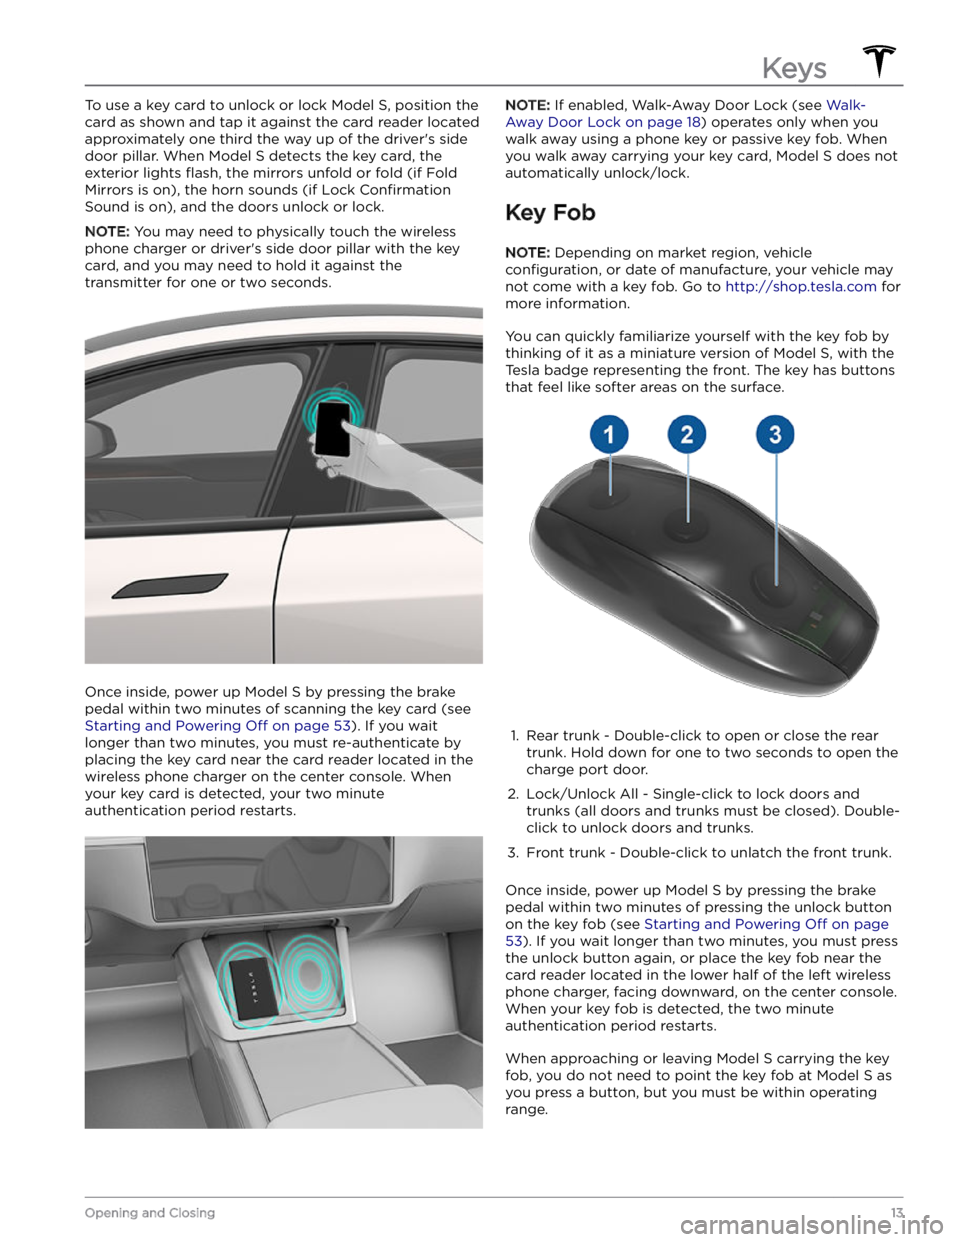
To use a key card to unlock or lock Model S, position the
card as shown and tap it against the card reader located approximately one third the way up of the driver
Page 18 of 276

4. When complete, the key list includes the new key.
Touch the associated pencil icon to customize the name of the key.
Removing a key:
When you no longer want a key to access Model S (for
example, you lost your phone or key card, etc.), follow these steps to remove it.
1.
On the touchscreen, touch Controls > Locks.
2.
In the key list, find the key that you would like to
delete and touch its associated trash icon.
3.
When prompted, scan an authenticated key card or key fob on the card reader to
confirm the deletion.
When complete, the key list no longer includes the deleted key.
NOTE: Model S requires at least one authenticated key
card or key fob at all times. If only one key card remains on the key list, you cannot delete it.
Keys
16MODEL S Owner
Page 19 of 276
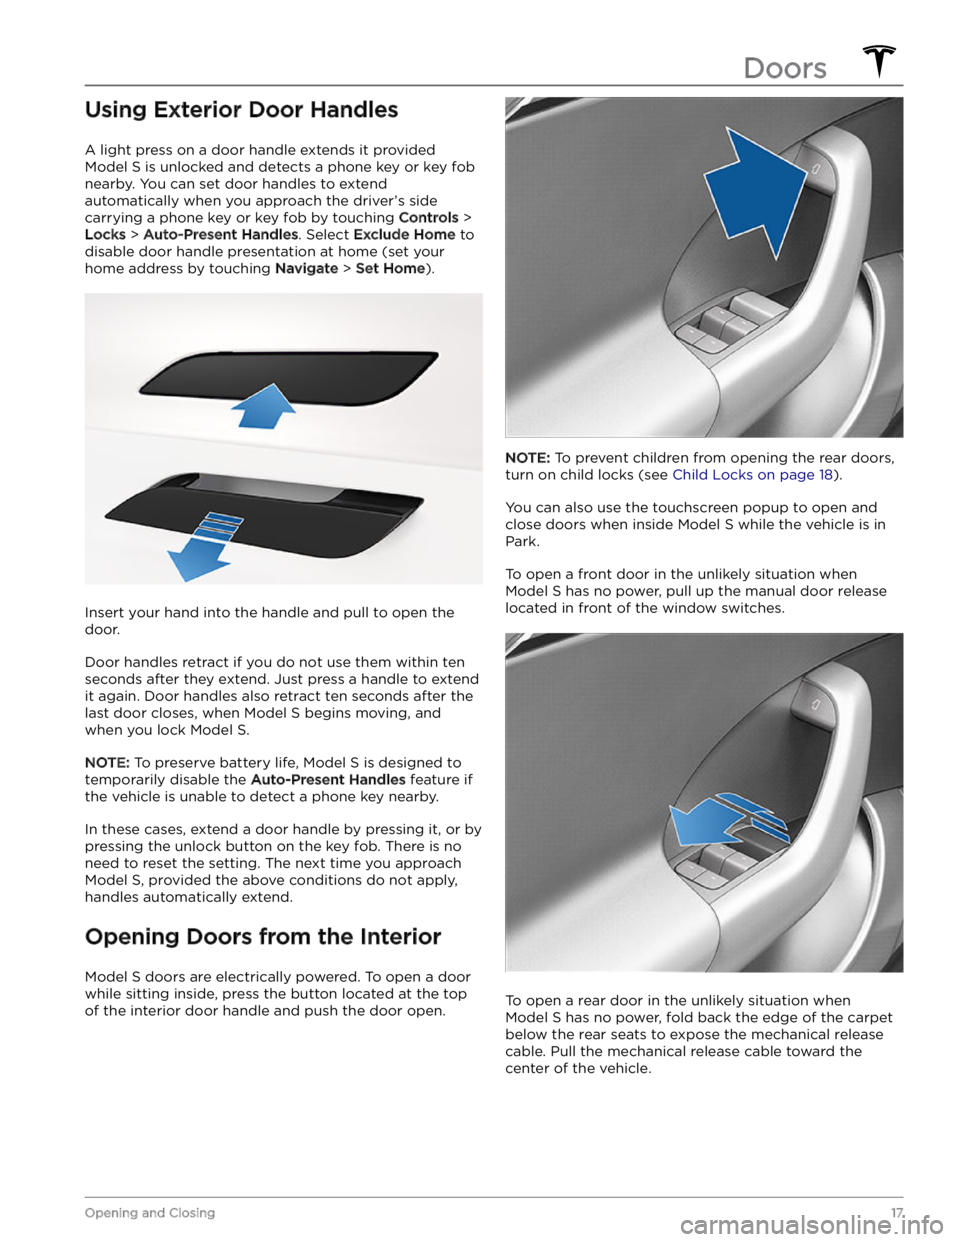
Using Exterior Door Handles
A light press on a door handle extends it provided
Model S is unlocked and detects a phone key or key fob
nearby. You can set door handles to extend automatically when you approach the driver
Page 20 of 276
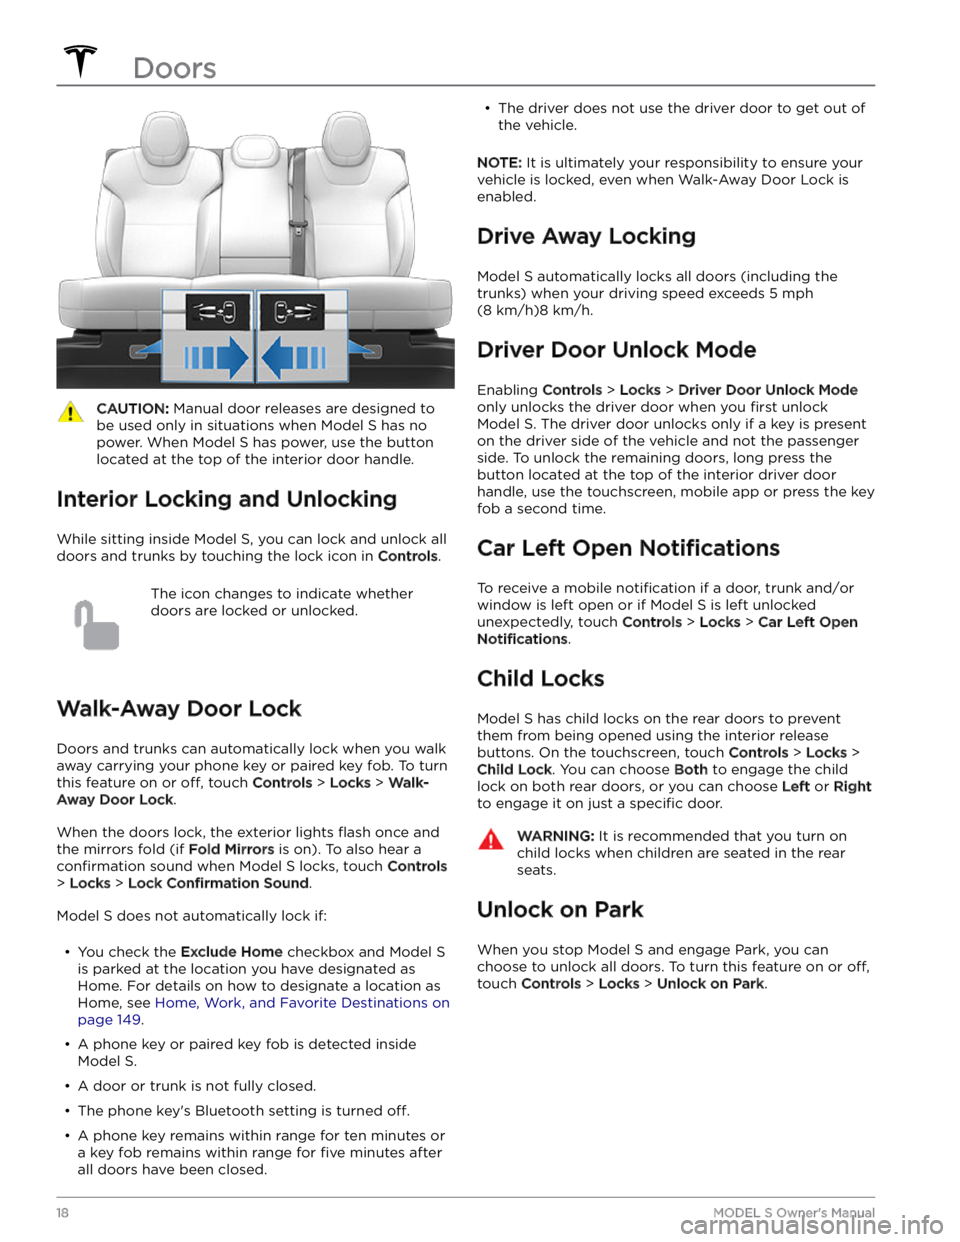
CAUTION: Manual door releases are designed to
be used only in situations when Model S has no
power. When Model S has power, use the button
located at the top of the interior door handle.
Interior Locking and Unlocking
While sitting inside Model S, you can lock and unlock all
doors and trunks by touching the lock icon
in Controls.
The icon changes to indicate whether
doors are locked or unlocked.
Walk-Away Door Lock
Doors and trunks can automatically lock when you walk away carrying your phone key or paired key fob. To turn
this feature on or
off, touch Controls > Locks > Walk-
Away Door Lock.
When the doors lock, the exterior lights flash once and
the mirrors fold (if
Fold Mirrors is on). To also hear a
confirmation sound when Model S locks, touch Controls
> Locks > Lock Confirmation Sound.
Model S does not automatically lock if:
Page 21 of 276
Opening and Closing
NOTE: It is your responsibility to ensure windows are
closed after locking the vehicle.
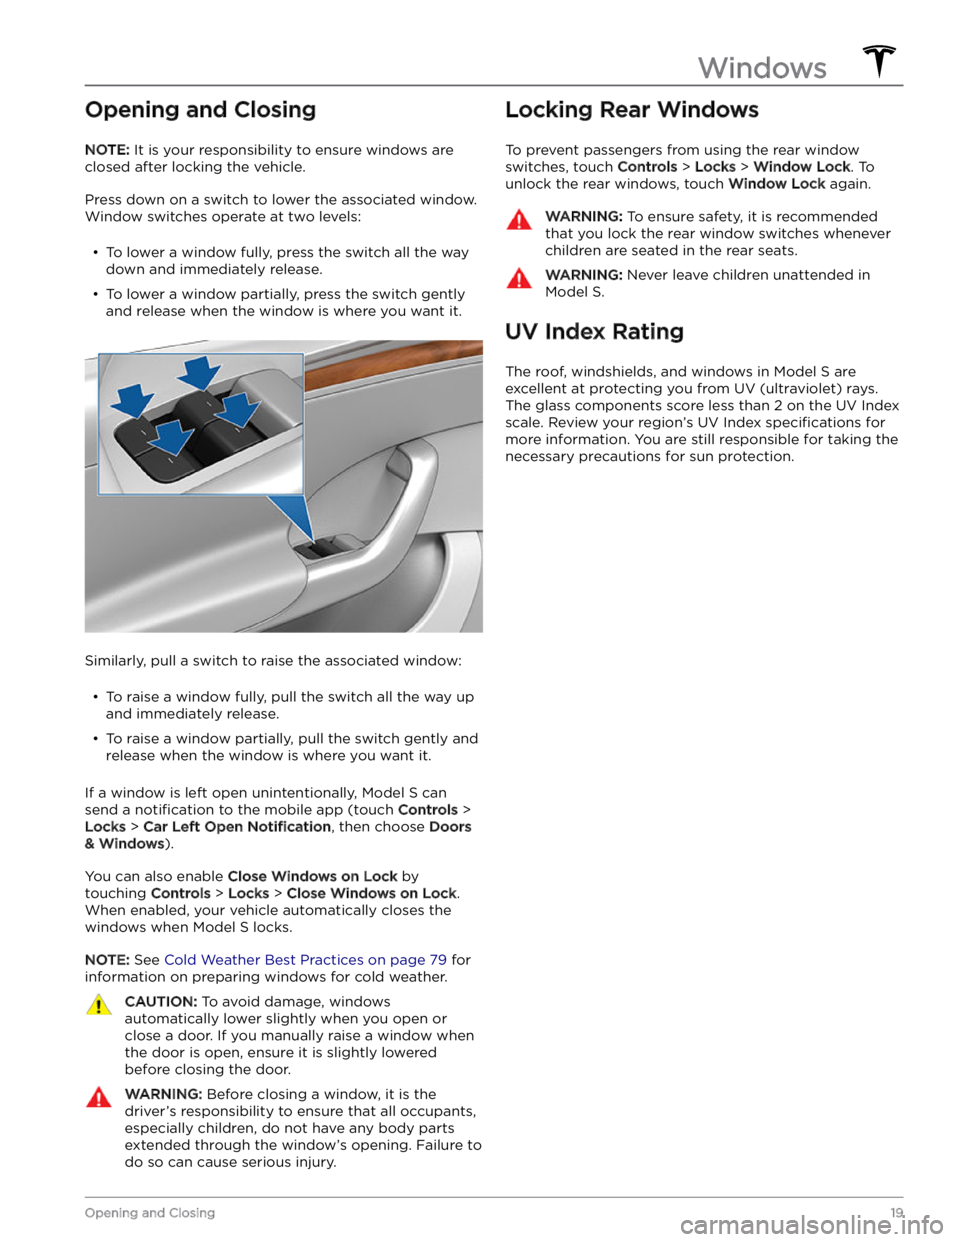
Press down on a switch to lower the associated window.
Window switches operate at two levels:
Page 27 of 276
Center Console
In addition to housing an RFID transmitter that reads key fobs and key cards (see
Keys on page 12), the center
console includes cup holders, two storage
compartments, wireless phone chargers, and a rear
touchscreen.
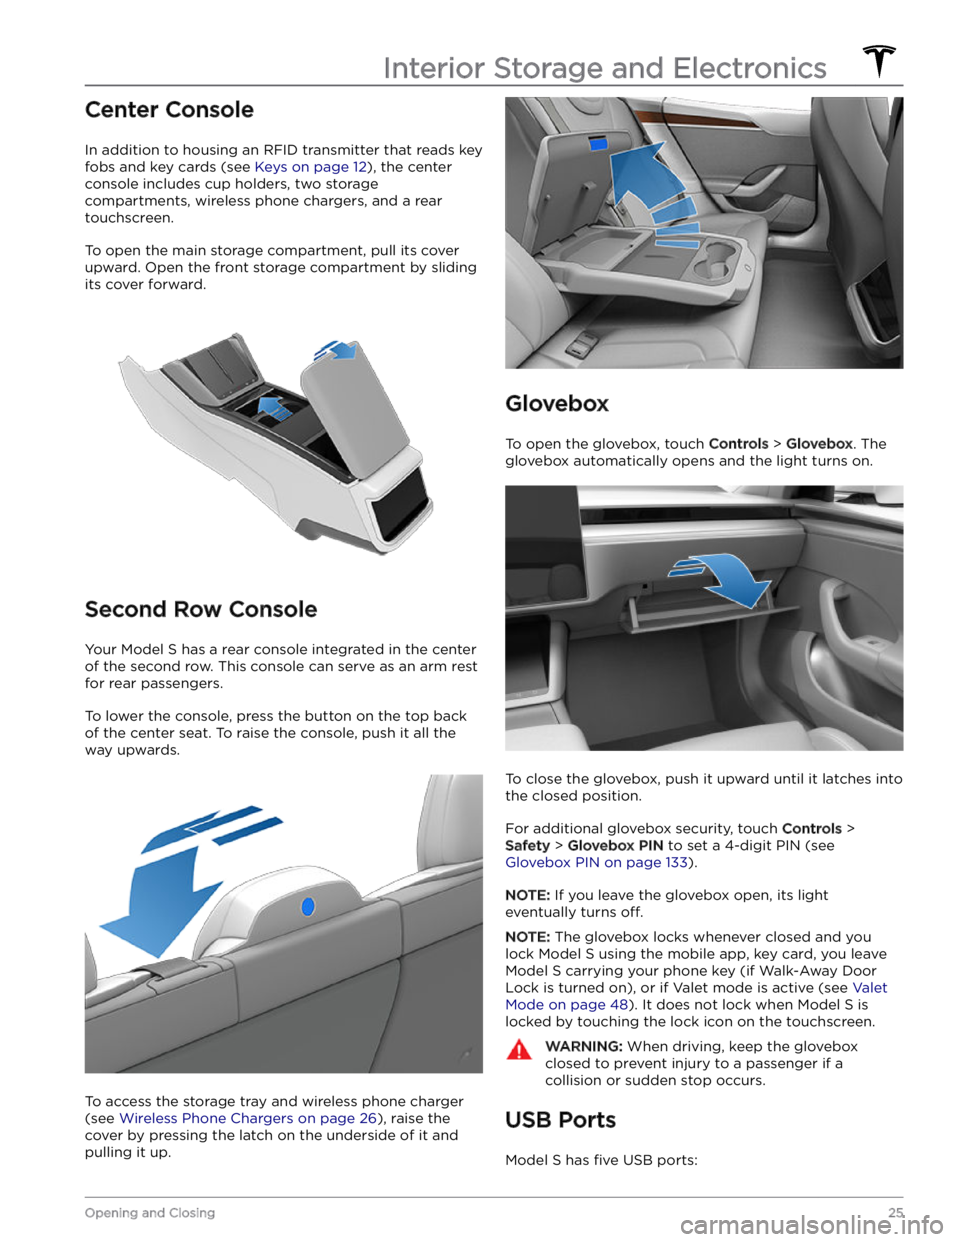
To open the main storage compartment, pull its cover upward. Open the front storage compartment by sliding its cover forward.
Second Row Console
Your Model S has a rear console integrated in the center
of the second row. This console can serve as an arm rest for rear passengers.
To lower the console, press the button on the top back of the center seat. To raise the console, push it all the way upwards.
To access the storage tray and wireless phone charger (see
Wireless Phone Chargers on page 26), raise the
cover by pressing the latch on the underside of it and pulling it up.
Glovebox
To open the glovebox, touch Controls > Glovebox. The
glovebox automatically opens and the light turns on.
To close the glovebox, push it upward until it latches into the closed position.
For additional glovebox security, touch Controls >
Safety > Glovebox PIN to set a 4-digit PIN (see
Glovebox PIN on page 133).
NOTE: If you leave the glovebox open, its light
eventually turns
off.
NOTE: The glovebox locks whenever closed and you
lock
Model S using the mobile app, key card, you leave
Model S carrying your phone key (if Walk-Away Door
Lock is turned on), or if Valet mode is active (see
Valet
Mode on page 48). It does not lock when Model S is
locked by touching the lock icon on the touchscreen.
WARNING: When driving, keep the glovebox
closed to prevent injury to a passenger if a
collision or sudden stop occurs.
USB Ports
Model S has five USB ports:
Interior Storage and Electronics
25Opening and Closing
Page 32 of 276
Calibrating Seats
(If equipped) You can calibrate the driver seat. This is useful if you
find your seat range limited or your driver
profile does not automatically adjust the seat for you.
Navigate to
Controls > Service > Driver Seat, Steering &
Mirrors Calibration and follow the instructions on the
touchscreen.
WARNING: Ensure nothing is behind or
underneath the driver seat during calibration.
Failure to do so may cause serious injury.
Folding Rear Seats
Model S has a split rear seat that can fold forward.
Before folding, remove items from the seats and the rear footwell. To allow the rear seats to fold completely
flat,
you may need to move the front seats forward. To fold a
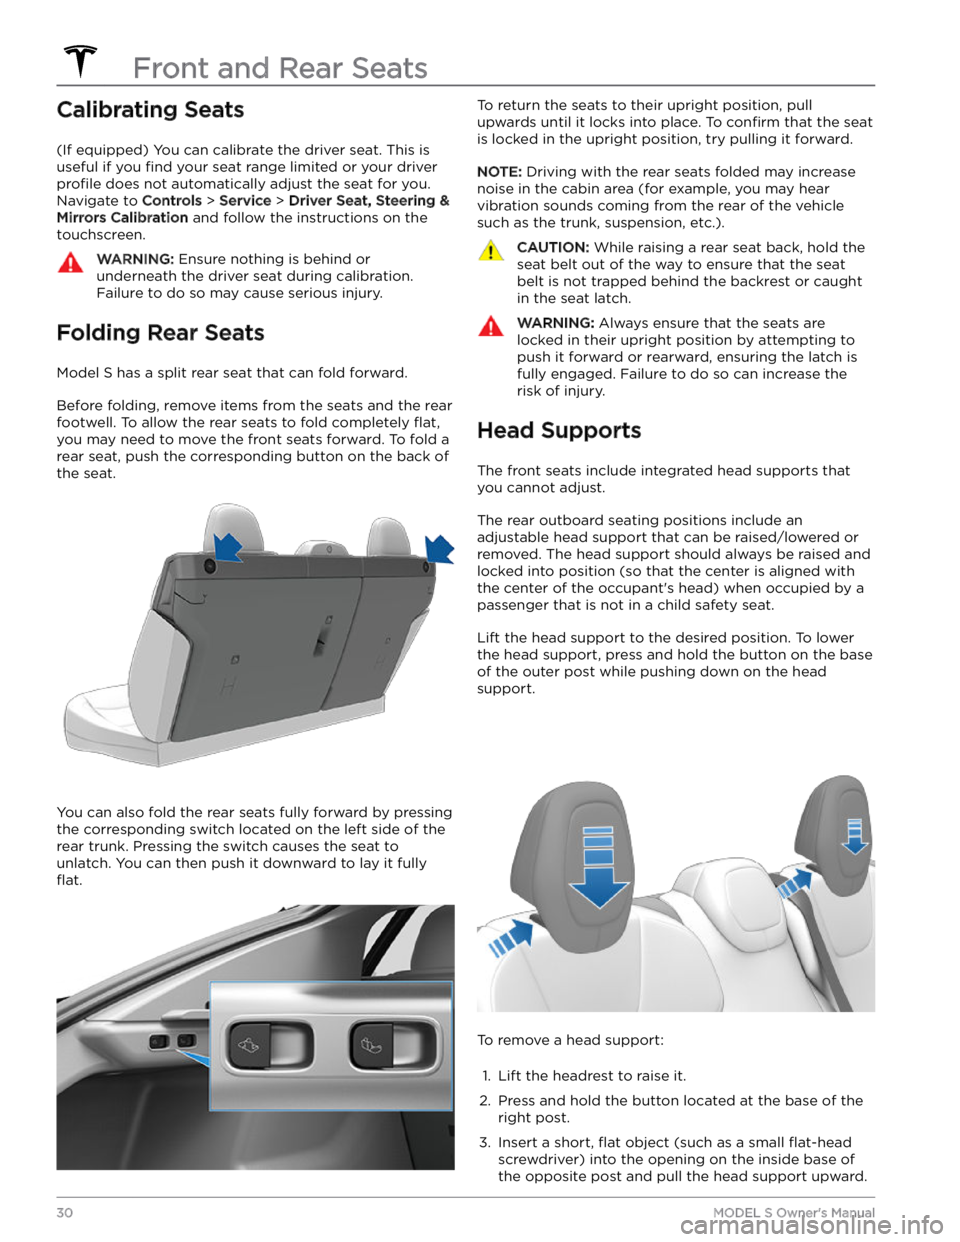
rear seat, push the corresponding button on the back of the seat.
You can also fold the rear seats fully forward by pressing the corresponding switch located on the left side of the rear trunk. Pressing the switch causes the seat to unlatch. You can then push it downward to lay it fully
flat.
To return the seats to their upright position, pull
upwards until it locks into place. To
confirm that the seat
is locked in the upright position, try pulling it forward.
NOTE: Driving with the rear seats folded may increase
noise in the cabin area (for example, you may hear vibration sounds coming from the rear of the vehicle
such as the trunk, suspension, etc.).
CAUTION: While raising a rear seat back, hold the
seat belt out of the way to ensure that the seat
belt is not trapped behind the backrest or caught
in the seat latch.
WARNING: Always ensure that the seats are
locked in their upright position by attempting to
push it forward or rearward, ensuring the latch is
fully engaged. Failure to do so can increase the
risk of injury.
Head Supports
The front seats include integrated head supports that you cannot adjust.
The rear outboard seating positions include an
adjustable head support that can be raised/lowered or
removed. The head support should always be raised and locked into position (so that the center is aligned with the center of the occupant
Page 34 of 276
Wearing Seat Belts
Using seat belts and child safety seats is the most
effective way to protect occupants if a collision occurs.
Therefore, wearing a seat belt is required by law in most jurisdictions.
Both the driver and passenger seats are equipped with three-point inertia reel seat belts. Inertia reel belts are automatically tensioned to allow occupants to move
comfortably during normal driving conditions.
To
securely hold child safety seats, all passenger seating
positions are equipped with an automatic locking
retractor (ALR) feature that, by fully extracting the seat
belt (beyond the length needed for a typical adult
occupant), locks the belt into place until the seat belt is
unbuckled.
The seat belt reel automatically locks to prevent
movement of occupants if
Model S experiences a force
associated with hard acceleration, braking, cornering, or
an impact in a collision.
Seat Belt Reminders
The seat belt reminder on the instrument
panel alerts you if a seat belt for an
occupied driver or passenger seat is unbuckled. If all occupants are buckled up and the reminder stays on, re-buckle seat
belts to ensure they are correctly latched.
Also remove any heavy objects (such as a briefcase) from an unoccupied seat. If the reminder light continues to stay on,
contact Tesla.
You can temporarily disable a seat belt reminder
associated with a rear seating position. This is useful when you are carrying an object in a rear seat that triggers the seat belt reminder alert. To disable the
reminder, touch the associated seat on the seat belt reminder popup message that displays on the touchscreen when a seat belt reminder is active. When a
reminder is disabled, the seat belt reminder icon is
replaced by a seat icon, for the current drive only. Touch the seat again to re-enable the reminder.
WARNING: Seat belts must be worn by passengers
in all seating positions. Do not disable a seat belt
reminder when the seating position is occupied by
a passenger.
To Fasten a Belt
1.
Ensure correct positioning of the seat (see Correct
Driving Position on page 29).
2.
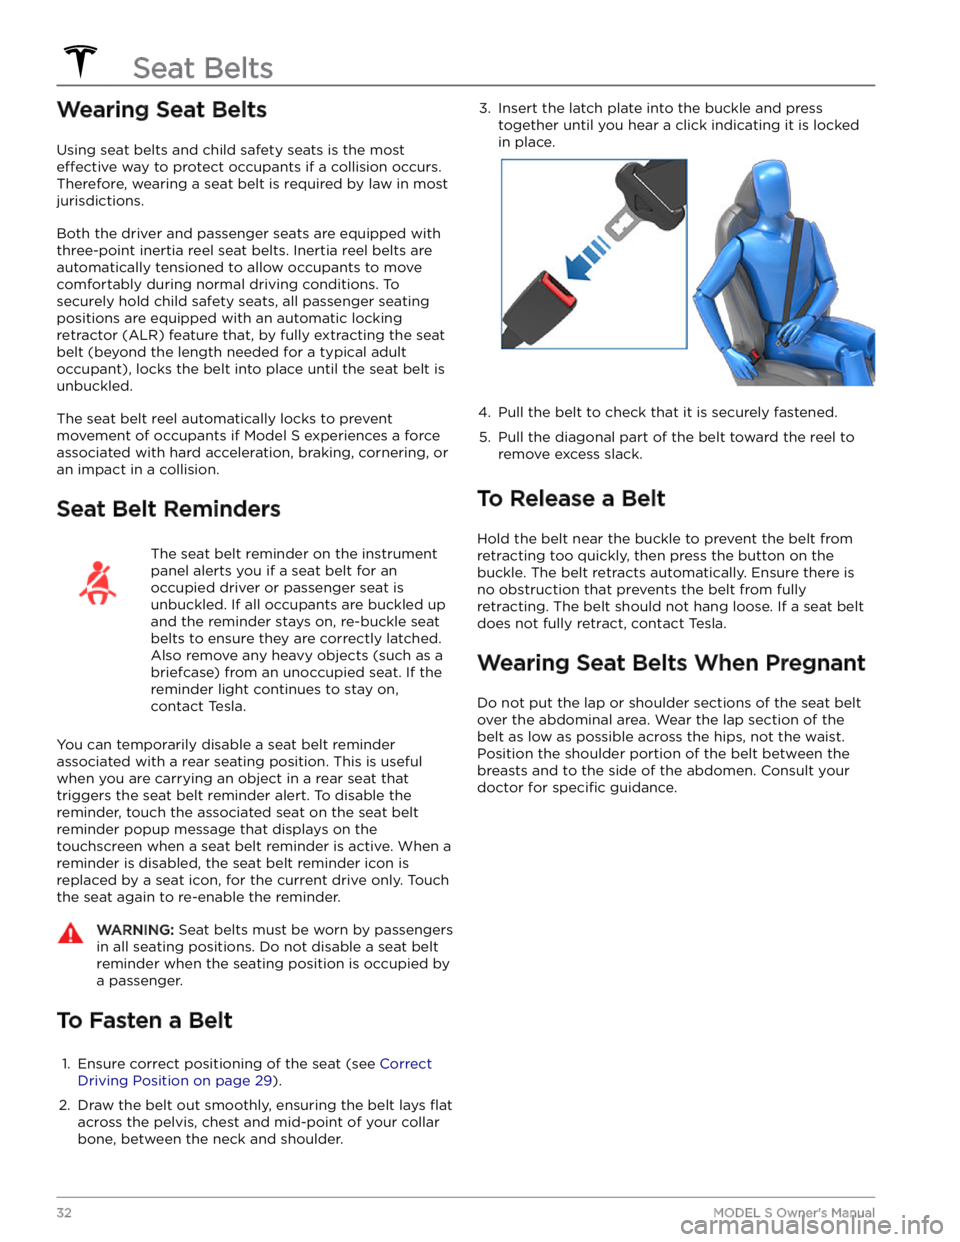
Draw the belt out smoothly, ensuring the belt lays flat
across the pelvis, chest and mid-point of your collar
bone, between the neck and shoulder.
3. Insert the latch plate into the buckle and press
together until you hear a click indicating it is locked
in place.4.
Pull the belt to check that it is securely fastened.
5.
Pull the diagonal part of the belt toward the reel to
remove excess slack.
To Release a Belt
Hold the belt near the buckle to prevent the belt from
retracting too quickly, then press the button on the
buckle. The belt retracts automatically. Ensure there is no obstruction that prevents the belt from fully retracting. The belt should not hang loose. If a seat belt does not fully retract, contact Tesla.
Wearing Seat Belts When Pregnant
Do not put the lap or shoulder sections of the seat belt over the abdominal area. Wear the lap section of the
belt as low as possible across the hips, not the waist.
Position the shoulder portion of the belt between the
breasts and to the side of the abdomen. Consult your doctor for
specific guidance.
Seat Belts
32MODEL S Owner
Page 60 of 276
Controlling Lights
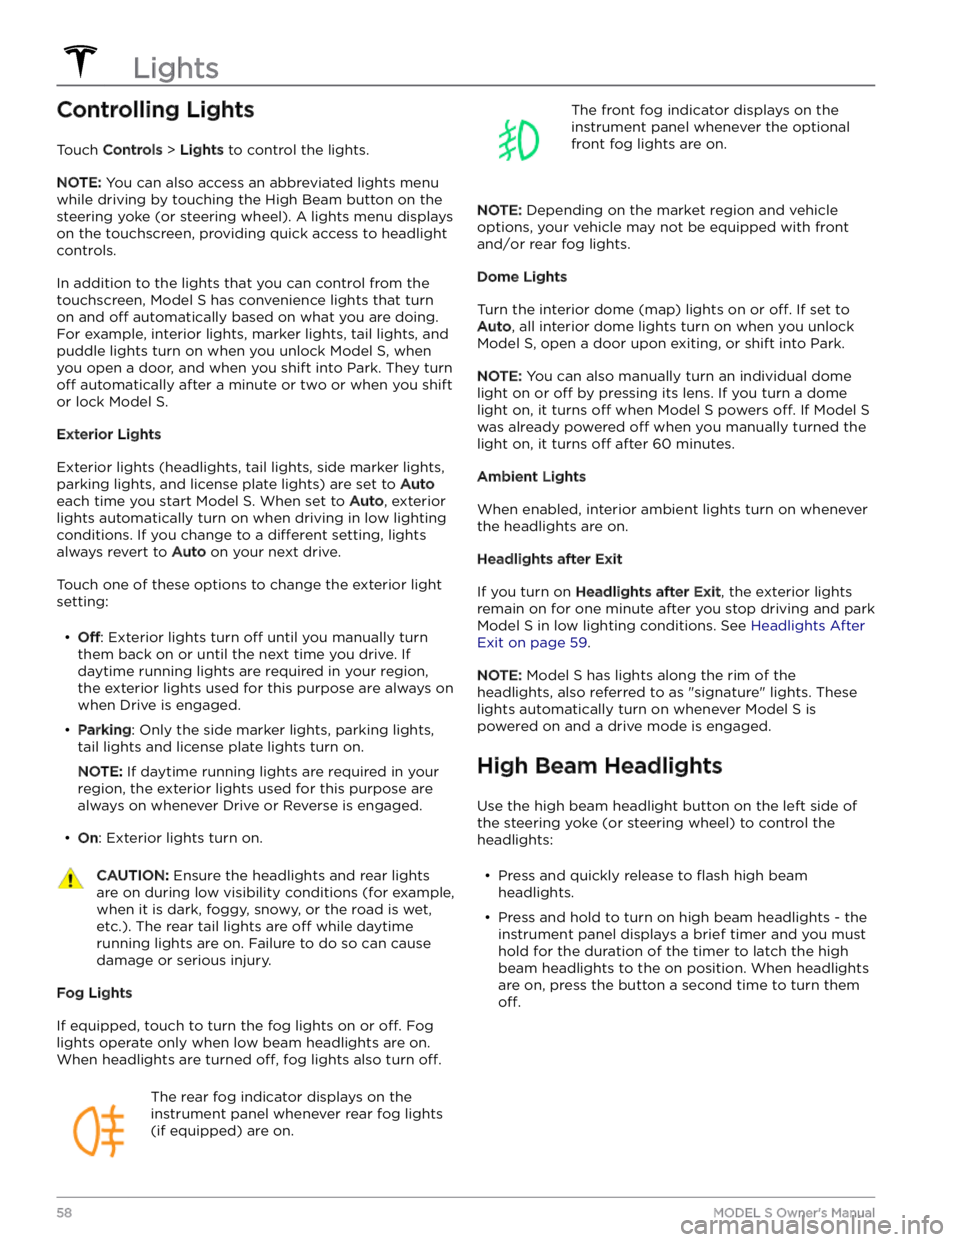
Touch Controls > Lights to control the lights.
NOTE: You can also access an abbreviated lights menu
while driving by touching the High Beam button on the
steering yoke (or steering wheel). A lights menu displays
on the touchscreen, providing quick access to headlight controls.
In addition to the lights that you can control from the
touchscreen,
Model S has convenience lights that turn
on and
off automatically based on what you are doing.
For example, interior lights, marker lights, tail lights, and
puddle lights turn on when you unlock
Model S, when
you open a door, and when you shift into Park. They turn
off automatically after a minute or two or when you shift
or lock
Model S.
Exterior Lights
Exterior lights (headlights, tail lights, side marker lights,
parking lights, and license plate lights) are set to
Auto
each time you start Model S. When set to Auto, exterior
lights automatically turn on when driving in low lighting
conditions. If you change to a
different setting, lights
always revert to
Auto on your next drive.
Touch one of these options to change the exterior light setting:
Page 65 of 276
10. The power meter displays real-time power usage. During acceleration, the bar fills to the right with a gray color
(or white if the display is dark) to represent power being used. During deceleration (when
Model S is moving and
you release your foot from the accelerator pedal), the bar
fills to the left with a green color to represent power
being fed back to the Battery by regenerative braking (see
Regenerative Braking on page 67).
11.
When Autosteer is active and detects the driving lane, it is highlighted in blue (see Autosteer on page 88).
Depending on the current driving scenario, you may see neighboring lanes.
NOTE: In situations where Autosteer is unable to detect lane markings, the driving lane is determined based on
the vehicle you are following.
NOTE: If Navigate on Autopilot is active, the driving lane displays as a single blue line in front of Model S (see
Navigate on Autopilot on page 93).
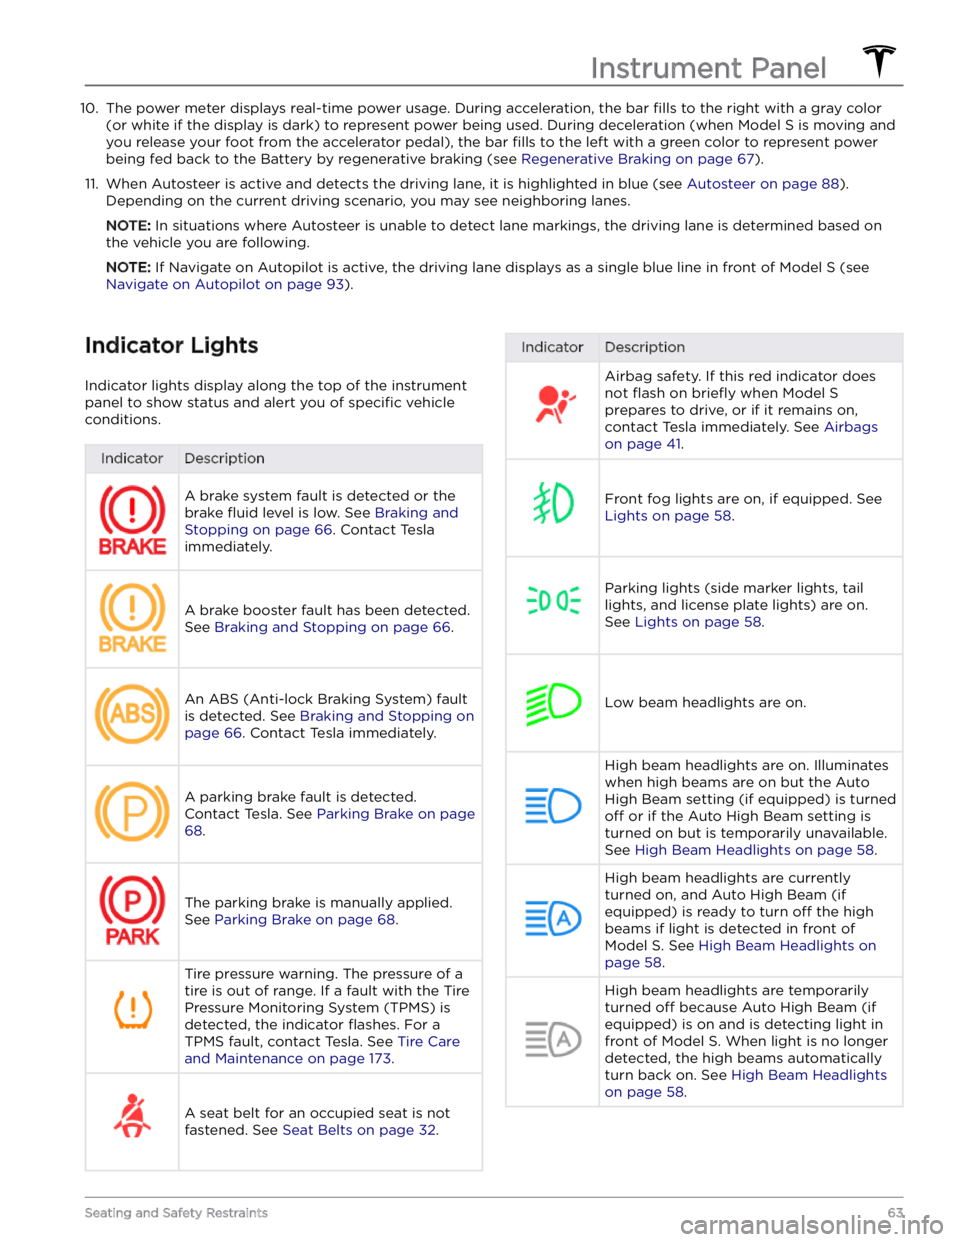
Indicator Lights
Indicator lights display along the top of the instrument panel to show status and alert you of
specific vehicle
conditions.
IndicatorDescriptionA brake system fault is detected or the brake
fluid level is low. See Braking and
Stopping on page 66. Contact Tesla
immediately.
A brake booster fault has been detected. See
Braking and Stopping on page 66.
An ABS (Anti-lock Braking System) fault is detected. See
Braking and Stopping on
page 66. Contact Tesla immediately.
A parking brake fault is detected. Contact Tesla. See
Parking Brake on page
68.
The parking brake is manually applied.
See
Parking Brake on page 68.
Tire pressure warning. The pressure of a tire is out of range. If a fault with the Tire Pressure Monitoring System (TPMS) is
detected, the indicator
flashes. For a
TPMS fault, contact Tesla. See
Tire Care
and Maintenance on page 173.
A seat belt for an occupied seat is not
fastened. See
Seat Belts on page 32.
IndicatorDescriptionAirbag safety. If this red indicator does not
flash on briefly when Model S
prepares to drive, or if it remains on, contact Tesla immediately. See
Airbags
on page 41.
Front fog lights are on, if equipped. See
Lights on page 58.
Parking lights (side marker lights, tail
lights, and license plate lights) are on. See
Lights on page 58.
Low beam headlights are on.
High beam headlights are on. Illuminates when high beams are on but the Auto High Beam setting (if equipped) is turned
off or if the Auto High Beam setting is
turned on but is temporarily unavailable.
See
High Beam Headlights on page 58.
High beam headlights are currently
turned on, and Auto High Beam (if equipped) is ready to turn
off the high
beams if light is detected in front of
Model S. See High Beam Headlights on
page 58.
High beam headlights are temporarily
turned
off because Auto High Beam (if
equipped) is on and is detecting light in
front of
Model S. When light is no longer
detected, the high beams automatically turn back on. See
High Beam Headlights
on page 58.
Instrument Panel
63Seating and Safety Restraints