display TOYOTA 4RUNNER 2009 N280 / 5.G Owner's Manual
[x] Cancel search | Manufacturer: TOYOTA, Model Year: 2009, Model line: 4RUNNER, Model: TOYOTA 4RUNNER 2009 N280 / 5.GPages: 520, PDF Size: 10.74 MB
Page 259 of 520
259
3-2. Using the audio system
3
Interior features
■
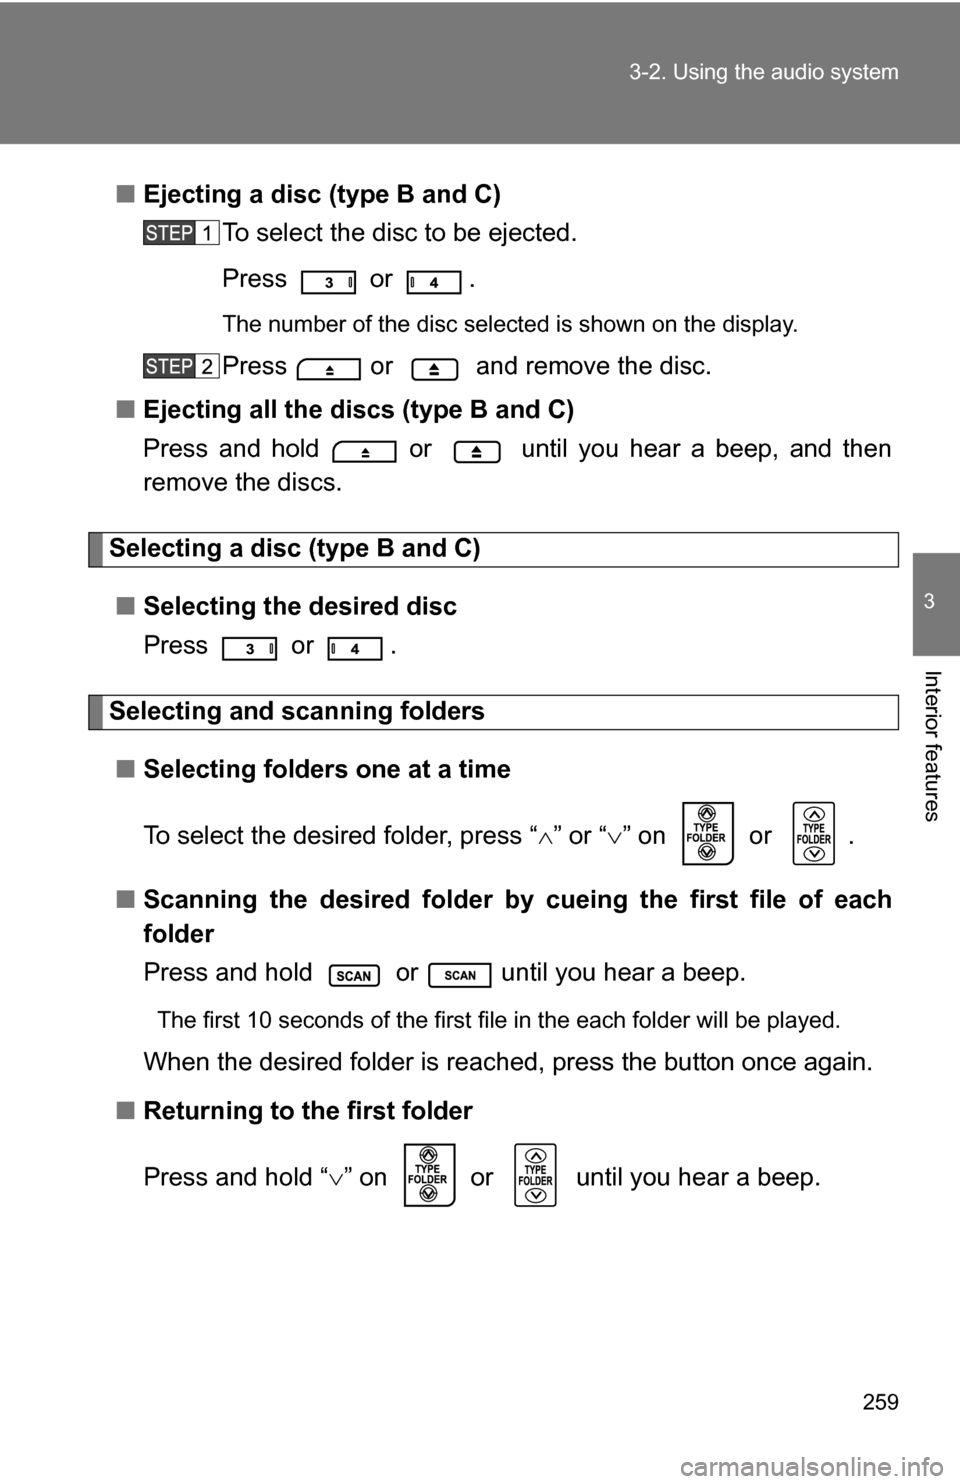
Ejecting a disc (type B and C)
To select the disc to be ejected.
Press or .
The number of the disc selected is shown on the display.
Press or and remove the disc.
■ Ejecting all the discs (type B and C)
Press and hold or until you hear a beep, and then
remove the discs.
Selecting a disc (type B and C)
■ Selecting the desired disc
Press or .
Selecting and scanning folders
■ Selecting folders one at a time
To select the desired folder, press “ ” or “ ” on or .
■ Scanning the desired folder by cueing the first file of each
folder
Press and hold or until you hear a beep.
The first 10 seconds of the first file in the each folder will be played.
When the desired folder is reached, press the button once again.
■ Returning to the first folder
Press and hold “ ” on or until you hear a beep.
Page 261 of 520
261
3-2. Using the audio system
3
Interior features
Switching the display
Press or .
Each time the button is pressed, the display changes in the order of
Folder no./File no./Elapsed time Folder nameFile nameAlbum title
(MP3 only) Track title Artist name.
■Display
Up to 12 characters can be displayed at a time.
If there are 13 characters or more, pressing and holding or for
1 second or more will display the remaining characters.
A maximum of 24 characters can be displayed.
If or is pressed for 1 second or more again or has not been
pressed for 6 seconds or more, the display will return to the first 12 charac-
ters.
Depending on the contents recorded, the characters may not be displayed
properly or may not be displayed at all.
■ Canceling random playback
Press again.
■ Canceling repeat play
Press again.
■ Error messages
ERROR: This indicates a problem either with the CD or inside the player.
The CD may be dirty, damaged or inserted up-side down.
WAIT: Operation has stopped due to a high temperature inside the player. Wait for a while and then press or . Con-
tact your Toyota dealer if the CD still cannot be played.
NO MUSIC: This indicates that the MP3/WMA file is not included in the CD.
Page 263 of 520
263
3-2. Using the audio system
3
Interior features
●
MP3 file compatibility
• Compatible standards
MP3 (MPEG1 LAYER3, MPEG2 LSF LAYER3)
• Compatible sampling frequencies MPEG1 LAYER3: 32, 44.1, 48 (kHz)
MPEG2 LSF LAYER3: 16, 22.05, 24 (kHz)
• Compatible bit rates (compatible with VBR) MPEG1 LAYER3: 64, 80, 96, 112, 128, 160, 192, 224, 256, 320 (kbps)
MPEG2 LSF LAYER3: 64, 80, 96, 112, 128, 144, 160 (kbps)
• Compatible channel modes: stereo, joint stereo, dual channel and monaural
● WMA file compatibility
• Compatible standards
WMA Ver. 7, 8, 9
• Compatible sampling frequencies 32, 44.1, 48 (kHz)
• Compatible bit rates (only compatible with 2-channel playback) Ver. 7, 8: CBR 48, 64, 80, 96, 128, 160, 192 (kbps)
Ver. 9: CBR 48, 64, 80, 96, 128, 160, 192, 256, 320 (kbps)
● Compatible media
Media that can be used for MP3 and WMA playback are CD-Rs and CD-
RWs.
Playback in some instances may not be possible, depending on the status
of the CD-R or CD-RW. Playback may not be possible or the audio may
jump if the disc is scratched or marked with fingerprints.
● Compatible disc formats
The following disc formats can be used.
• Disc formats: CD-ROM Mode 1 and Mode 2
CD-ROM XA Mode 2, Form 1 and Form 2
• File formats: ISO9660 Level 1, Level 2, (Romeo, Joliet) MP3 and WMA files written in any format other than those listed above
may not play correctly, and their file names and folder names may not
be displayed correctly.
Page 266 of 520
266
3-2. Using the audio system
Optimal use of the audio system
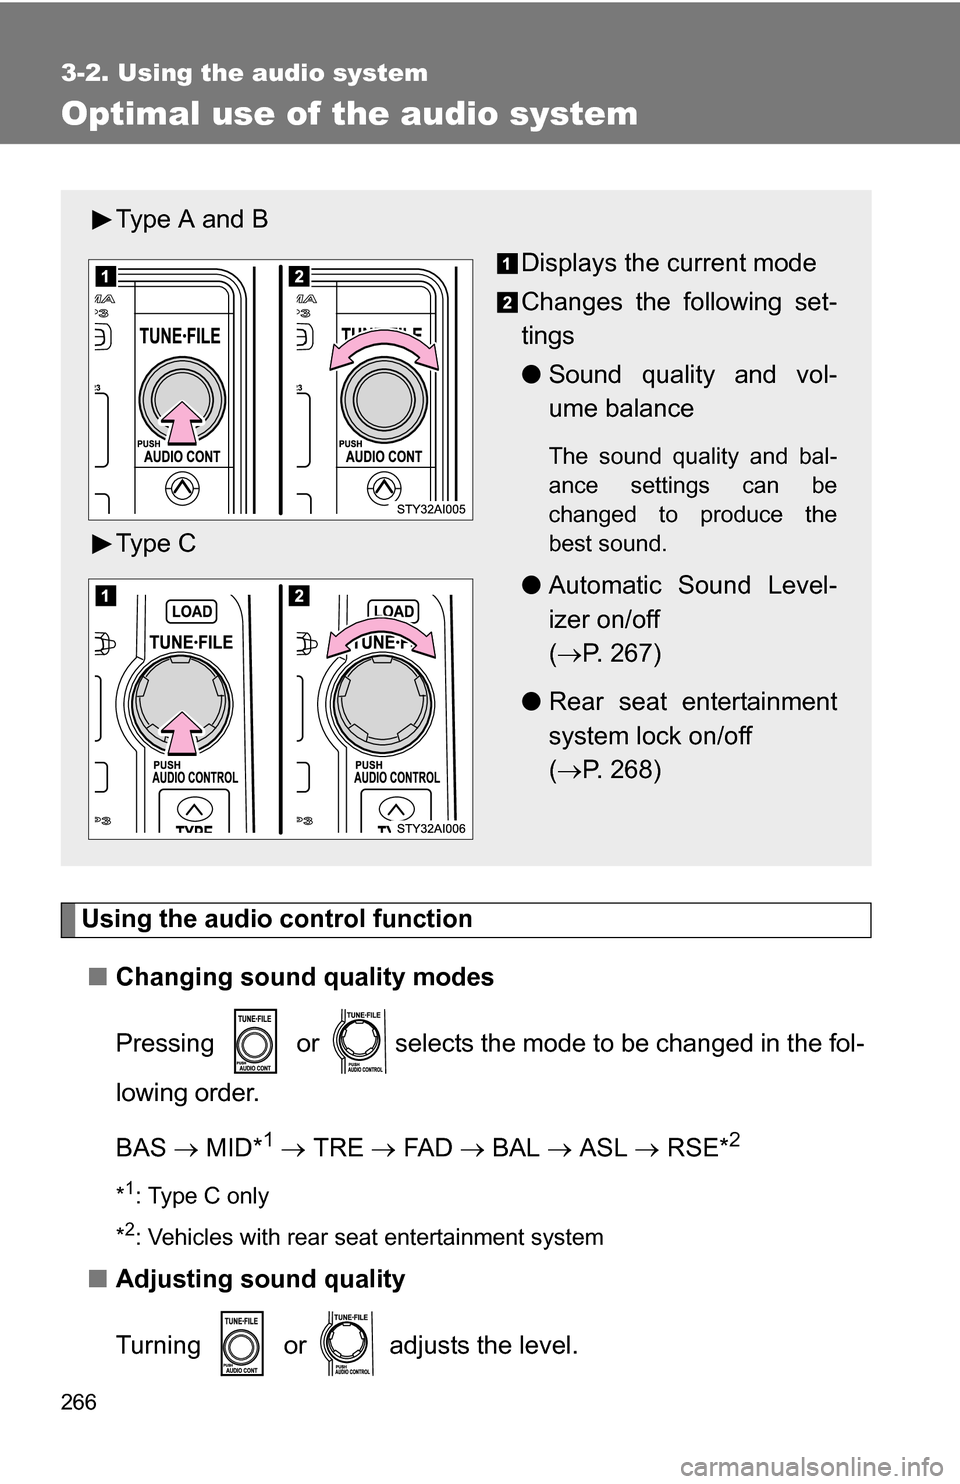
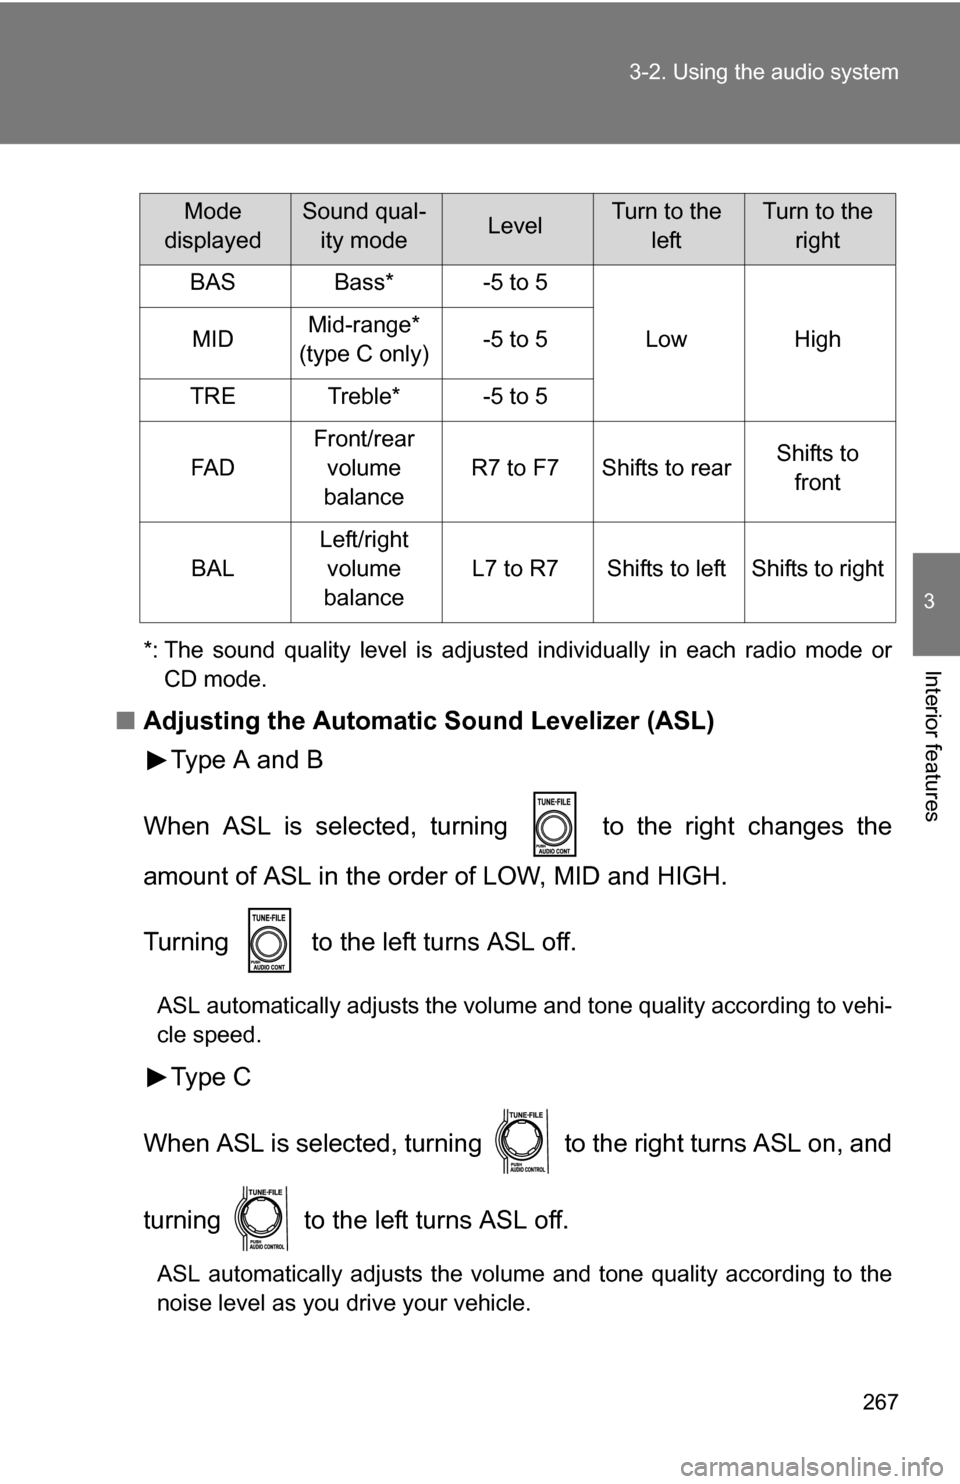
Using the audio control function■ Changing sound quality modes
Pressing or selects the mode to be changed in the fol-
lowing order.
BAS MID*
1 TRE FA D BAL ASL RSE*2
*1: Type C only
*
2: Vehicles with rear seat entertainment system
■ Adjusting sound quality
Turning or adjusts the level.
Type A and B
Displays the current mode
Changes the following set-
tings
●Sound quality and vol-
ume balance
The sound quality and bal-
ance settings can be
changed to produce the
best sound.
●Automatic Sound Level-
izer on/off
( P. 267)
● Rear seat entertainment
system lock on/off
( P. 268)
Type C
Page 267 of 520
267
3-2. Using the audio system
3
Interior features*: The sound quality level is adjusted individually in each radio mode or
CD mode.
■ Adjusting the Automatic Sound Levelizer (ASL)
Type A and B
When ASL is selected, turning to the right changes the
amount of ASL in the order of LOW, MID and HIGH.
Turning to the left turns ASL off.
ASL automatically adjusts the volume and tone quality according to vehi-
cle speed.
Type C
When ASL is selected, turning to the right turns ASL on, and
turning to the left turns ASL off.
ASL automatically adjusts the volume and tone quality according to the
noise level as you drive your vehicle.
Mode
displayedSound qual- ity modeLevelTurn to the leftTurn to the right
BASBass*-5 to 5
LowHighMIDMid-range*
(type C only)-5 to 5
TRETreble*-5 to 5
FA D
Front/rear volume
balance
R7 to F7Shifts to rearShifts to front
BAL
Left/right volume
balance
L7 to R7Shifts to leftShifts to right
Page 268 of 520
268 3-2. Using the audio system
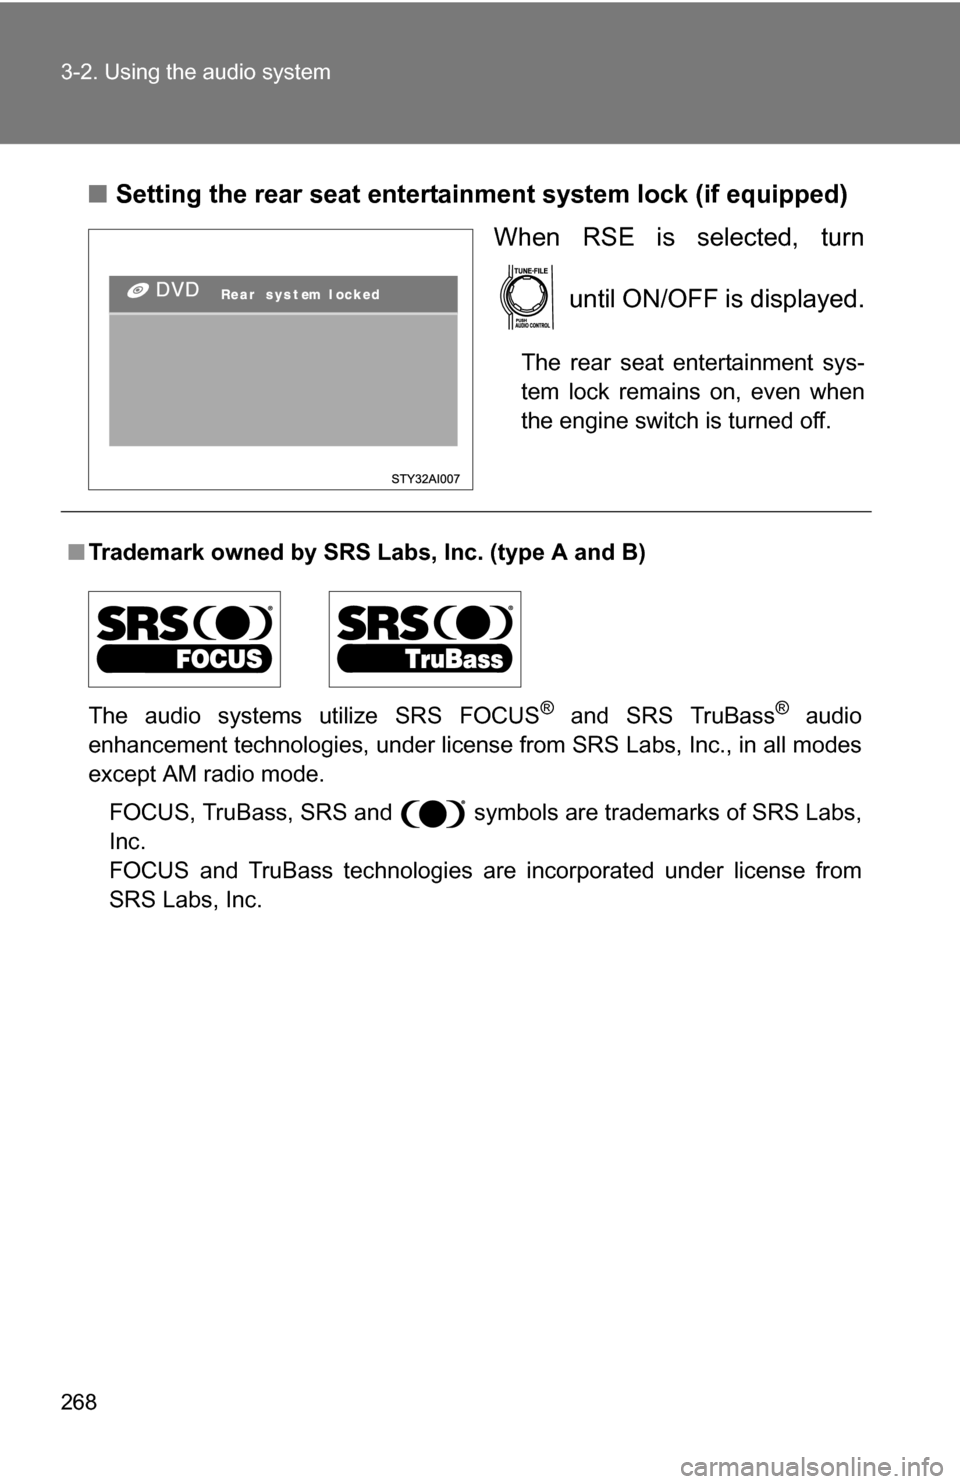
■Setting the rear seat entertainment system lock (if equipped)
When RSE is selected, turn
until ON/OFF is displayed.
The rear seat entertainment sys-
tem lock remains on, even when
the engine switch is turned off.
■Trademark owned by SRS Labs, Inc. (type A and B)
The audio systems utilize SRS FOCUS
® and SRS TruBass® audio
enhancement technologies, under license from SRS Labs, Inc., in all modes
except AM radio mode.
FOCUS, TruBass, SRS and symbols are trademarks of SRS Labs,
Inc.
FOCUS and TruBass technologies are incorporated under license from
SRS Labs, Inc.
Page 274 of 520
274
3-3. Using the rear audio/video system
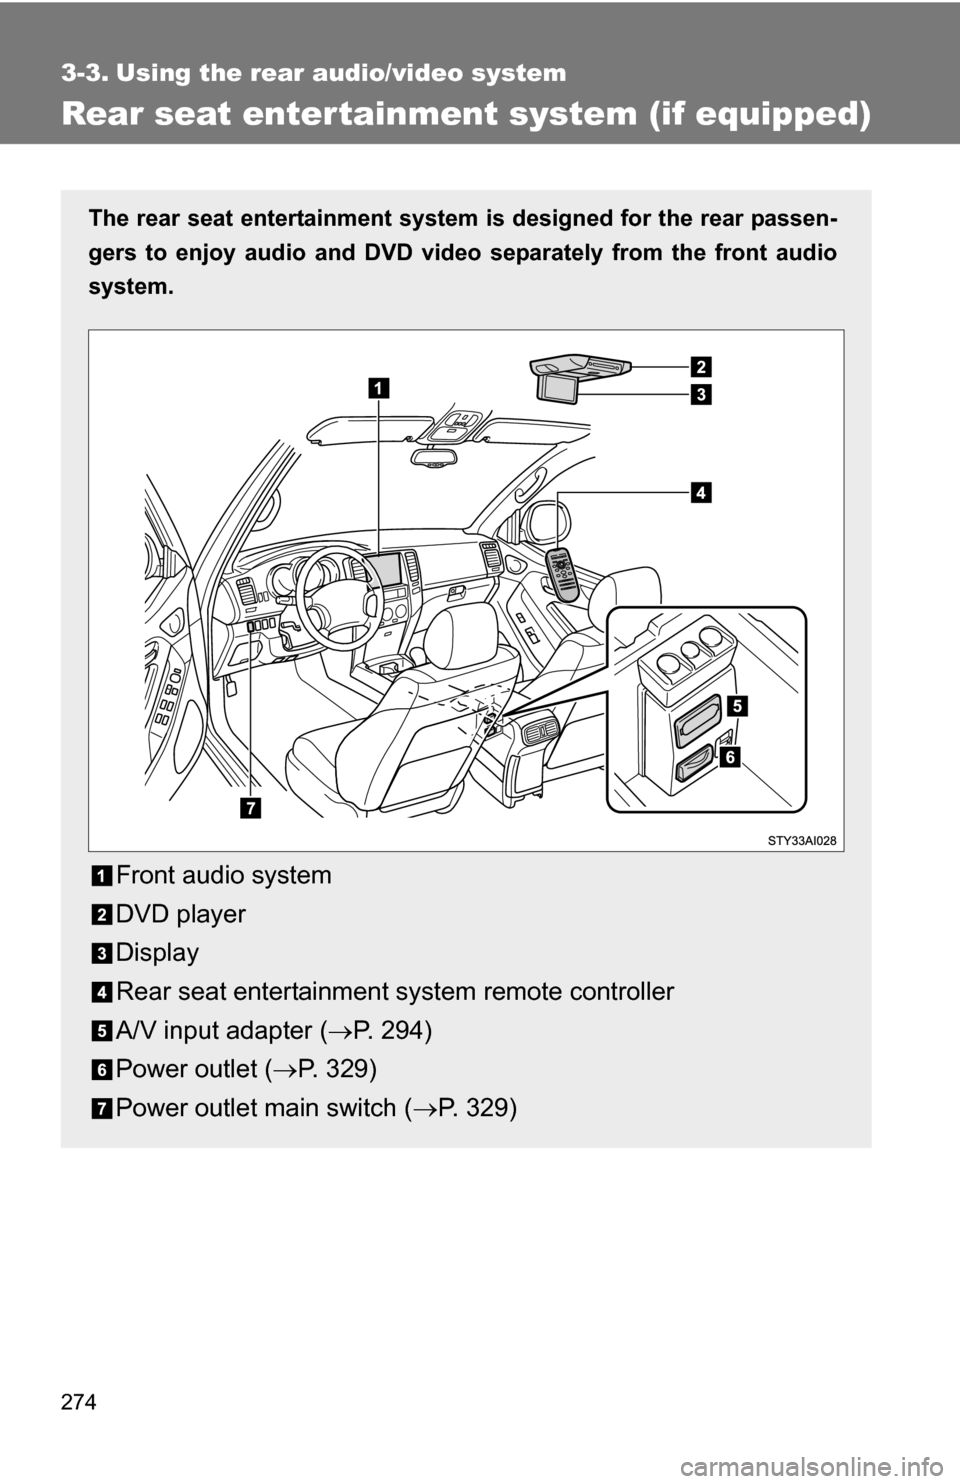
Rear seat enter tainment system (if equipped)
The rear seat entertainment system is designed for the rear passen-
gers to enjoy audio and DVD vide o separately from the front audio
system.
Front audio system
DVD player
Display
Rear seat entertainment system remote controller
A/V input adapter ( P. 294)
Power outlet ( P. 329)
Power outlet main switch ( P. 329)
Page 275 of 520
275
3-3. Using the rear audio/video system
3
Interior features
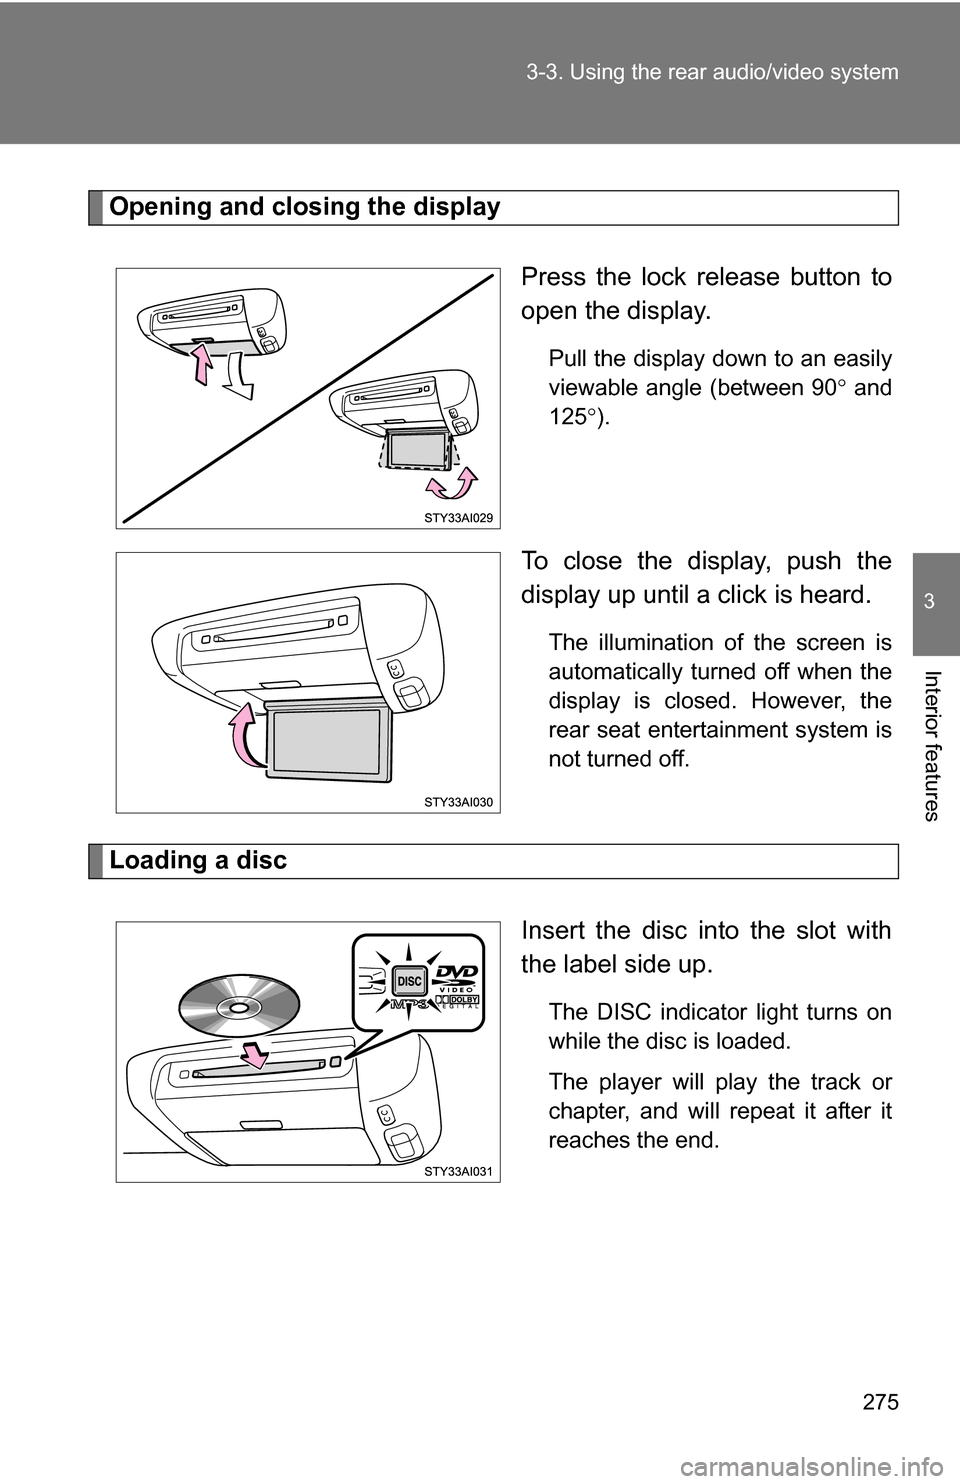
Opening and closing the display
Press the lock release button to
open the display.
Pull the display down to an easily
viewable angle (between 90 and
125 ).
To close the display, push the
display up until a click is heard.
The illumination of the screen is
automatically turned off when the
display is closed. However, the
rear seat entertainment system is
not turned off.
Loading a disc
Insert the disc into the slot with
the label side up.
The DISC indicator light turns on
while the disc is loaded.
The player will play the track or
chapter, and will repeat it after it
reaches the end.
Page 279 of 520
279
3-3. Using the rear audio/video system
3
Interior features
CAUTION
■
While driving
Do not use headphones.
Doing so may cause an accident, resulting in death or serious injury.
■ When the rear seat entert ainment system is not used
Keep the display closed.
In the event of an accident or sudden braking, the opened display may hit an
occupant’s body, resulting in injury.
■ To prevent accidents and electric shock
Do not disassemble or modify the remote controller.
■ When the remote controller is not used
Stow the remote controller.
Injuries may result in the event of an accident or sudden braking.
■ Removed batteries and other parts
Keep away from children.
These parts are small and if swallowed by a child they can cause choking.
NOTICE
■For normal operation after replacing the batteries
Observe the following precautions to prevent accidents.
●Always work with dry hands.
Moisture may cause the battery to rust.
● Do not touch or move any other components inside the remote controller.
● Do not bend any of the battery terminals.
Page 281 of 520
281
3-3. Using the rear audio/video system
3
Interior features
■
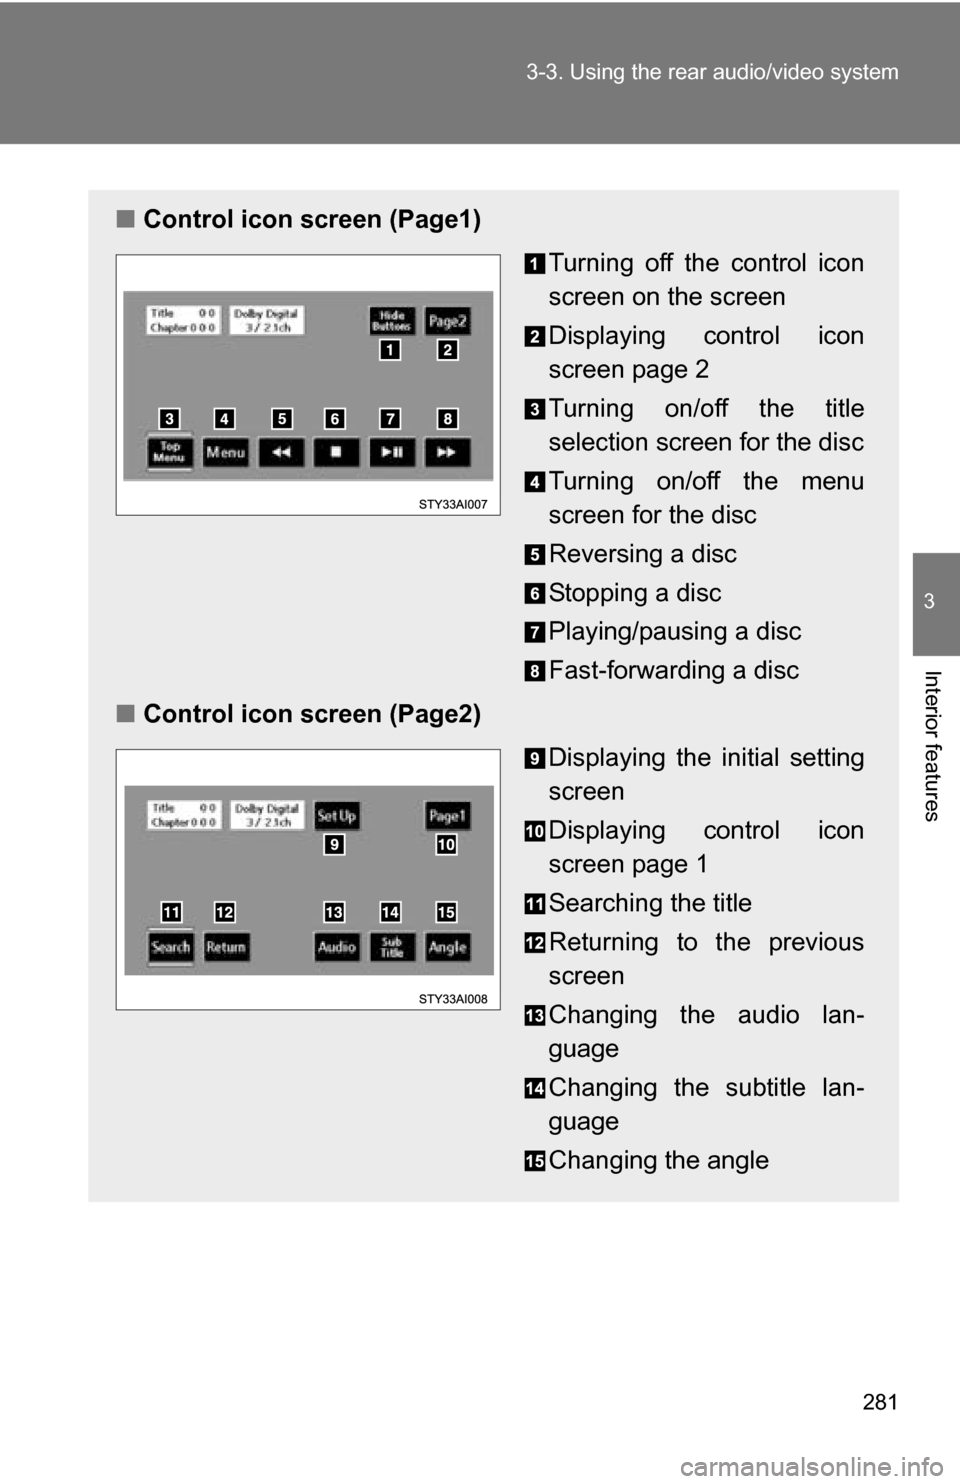
Control icon screen (Page1)
Turning off the control icon
screen on the screen
Displaying control icon
screen page 2
Turning on/off the title
selection screen for the disc
Turning on/off the menu
screen for the disc
Reversing a disc
Stopping a disc
Playing/pausing a disc
Fast-forwarding a disc
■ Control icon screen (Page2)
Displaying the initial setting
screen
Displaying control icon
screen page 1
Searching the title
Returning to the previous
screen
Changing the audio lan-
guage
Changing the subtitle lan-
guage
Changing the angle