seat adjustment TOYOTA 4RUNNER 2009 N280 / 5.G Owners Manual
[x] Cancel search | Manufacturer: TOYOTA, Model Year: 2009, Model line: 4RUNNER, Model: TOYOTA 4RUNNER 2009 N280 / 5.GPages: 520, PDF Size: 10.74 MB
Page 41 of 520
41
1
Before driving
1-3. Adjustable components (seats, mirrors, steering wheel)
Front seats
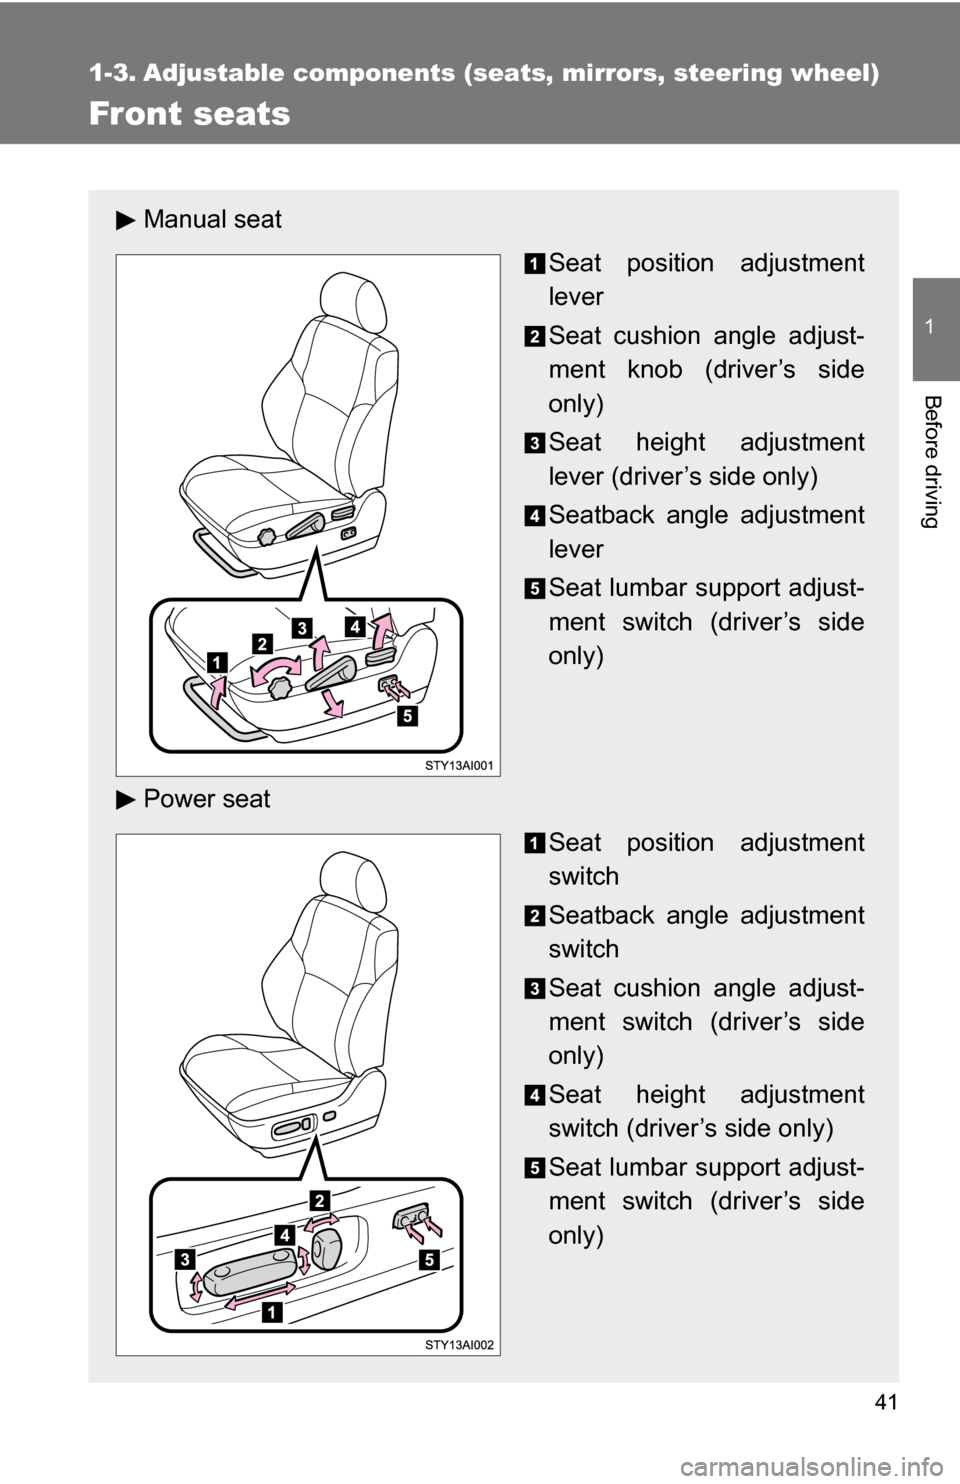
Manual seat
Seat position adjustment
lever
Seat cushion angle adjust-
ment knob (driver’s side
only)
Seat height adjustment
lever (driver’s side only)
Seatback angle adjustment
lever
Seat lumbar support adjust-
ment switch (driver’s side
only)
Power seat Seat position adjustment
switch
Seatback angle adjustment
switch
Seat cushion angle adjust-
ment switch (driver’s side
only)
Seat height adjustment
switch (driver’s side only)
Seat lumbar support adjust-
ment switch (driver’s side
only)
Page 43 of 520
43
1-3. Adjustable components (s
eats, mirrors, steering wheel)
1
Before driving
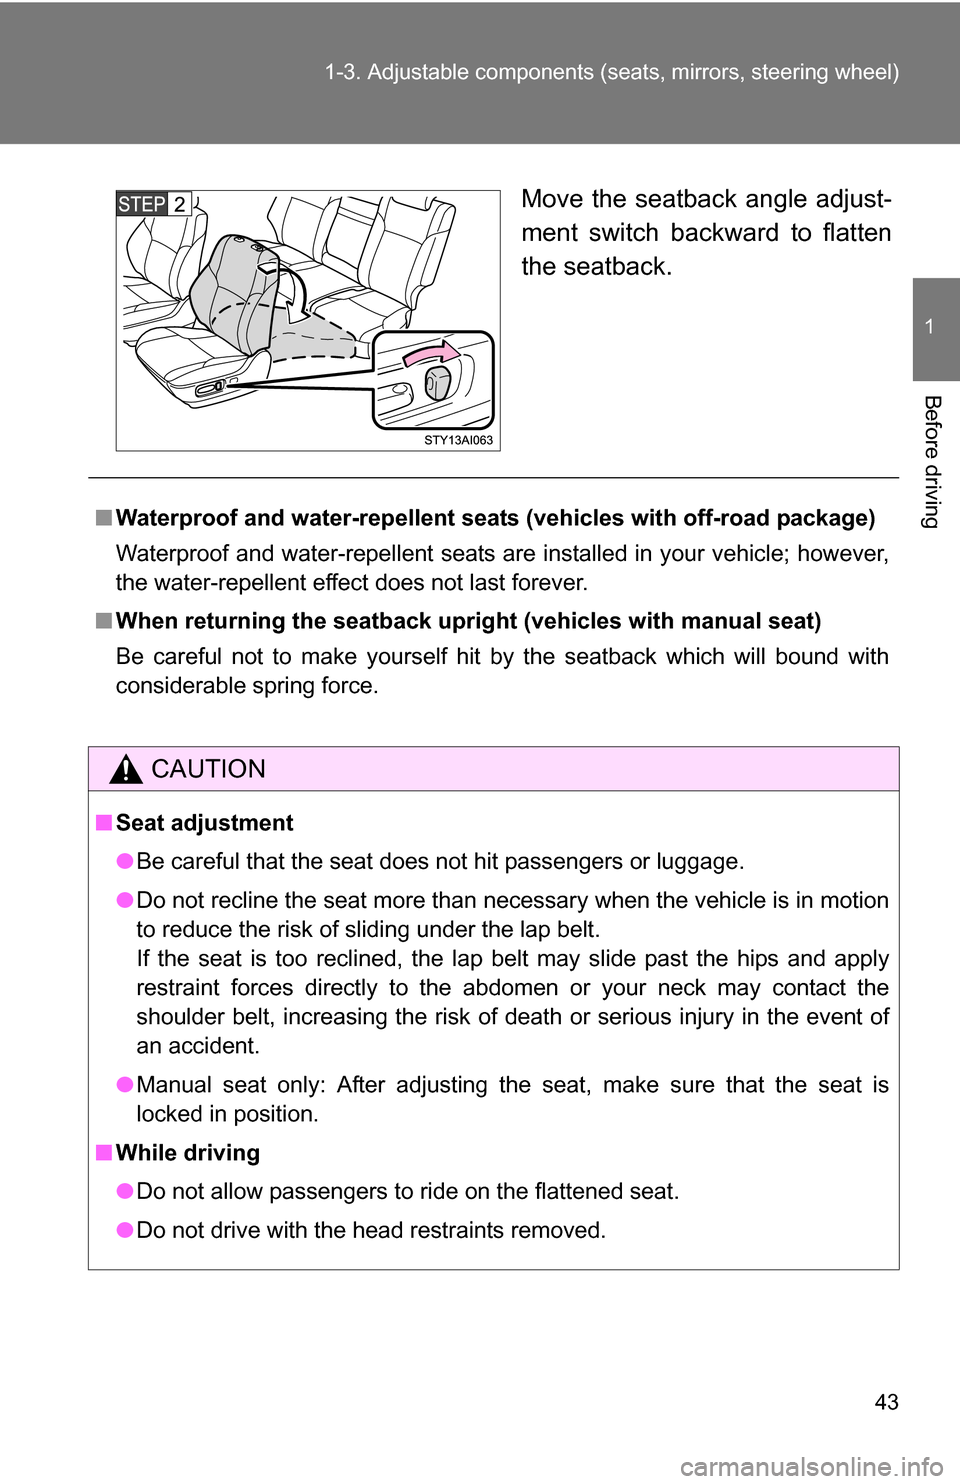
Move the seatback angle adjust-
ment switch backward to flatten
the seatback.
■Waterproof and water-repellent seat s (vehicles with off-road package)
Waterproof and water-repellent seats are installed in your vehicle; however,
the water-repellent effect does not last forever.
■ When returning the seatback uprigh t (vehicles with manual seat)
Be careful not to make yourself hit by the seatback which will bound with
considerable spring force.
CAUTION
■ Seat adjustment
●Be careful that the seat does not hit passengers or luggage.
● Do not recline the seat more than necessary when the vehicle is in motion
to reduce the risk of sliding under the lap belt.
If the seat is too reclined, the lap belt may slide past the hips and apply
restraint forces directly to the abdomen or your neck may contact the
shoulder belt, increasing the risk of death or serious injury in the event of
an accident.
● Manual seat only: After adjusting the seat, make sure that the seat is
locked in position.
■ While driving
●Do not allow passengers to ride on the flattened seat.
● Do not drive with the head restraints removed.
Page 44 of 520
44
1-3. Adjustable components (seats, mirrors, steering wheel)
Rear seats
■Second seats (vehicles without third seats)
The second seats do not have a seat adjustment function.
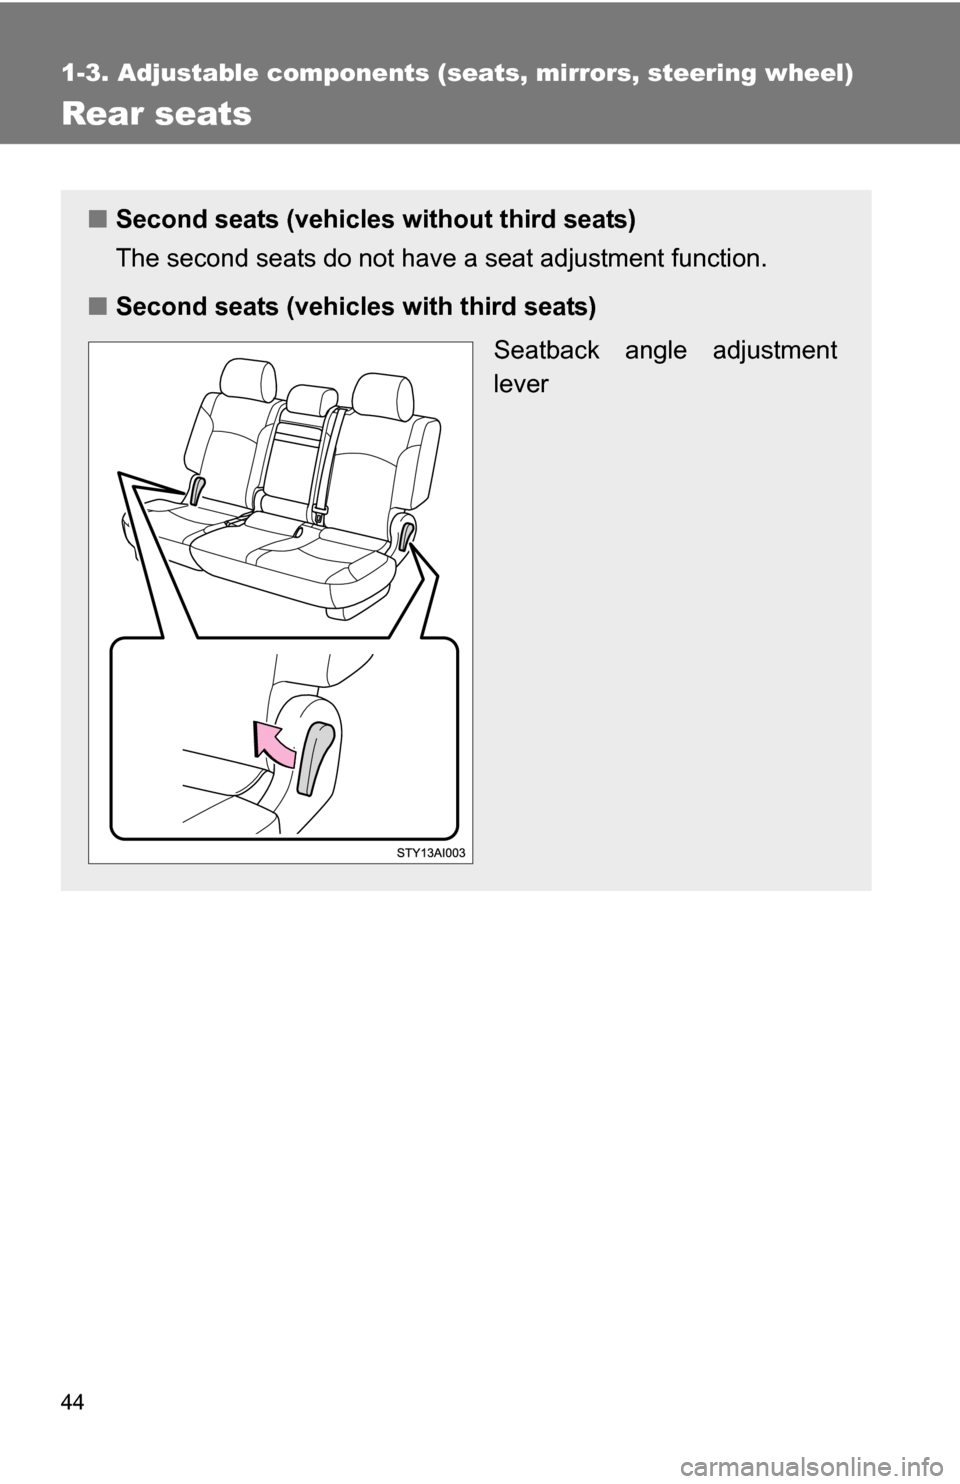
■ Second seats (vehicl es with third seats)
Seatback angle adjustment
lever
Page 45 of 520
45
1-3. Adjustable components (s
eats, mirrors, steering wheel)
1
Before driving
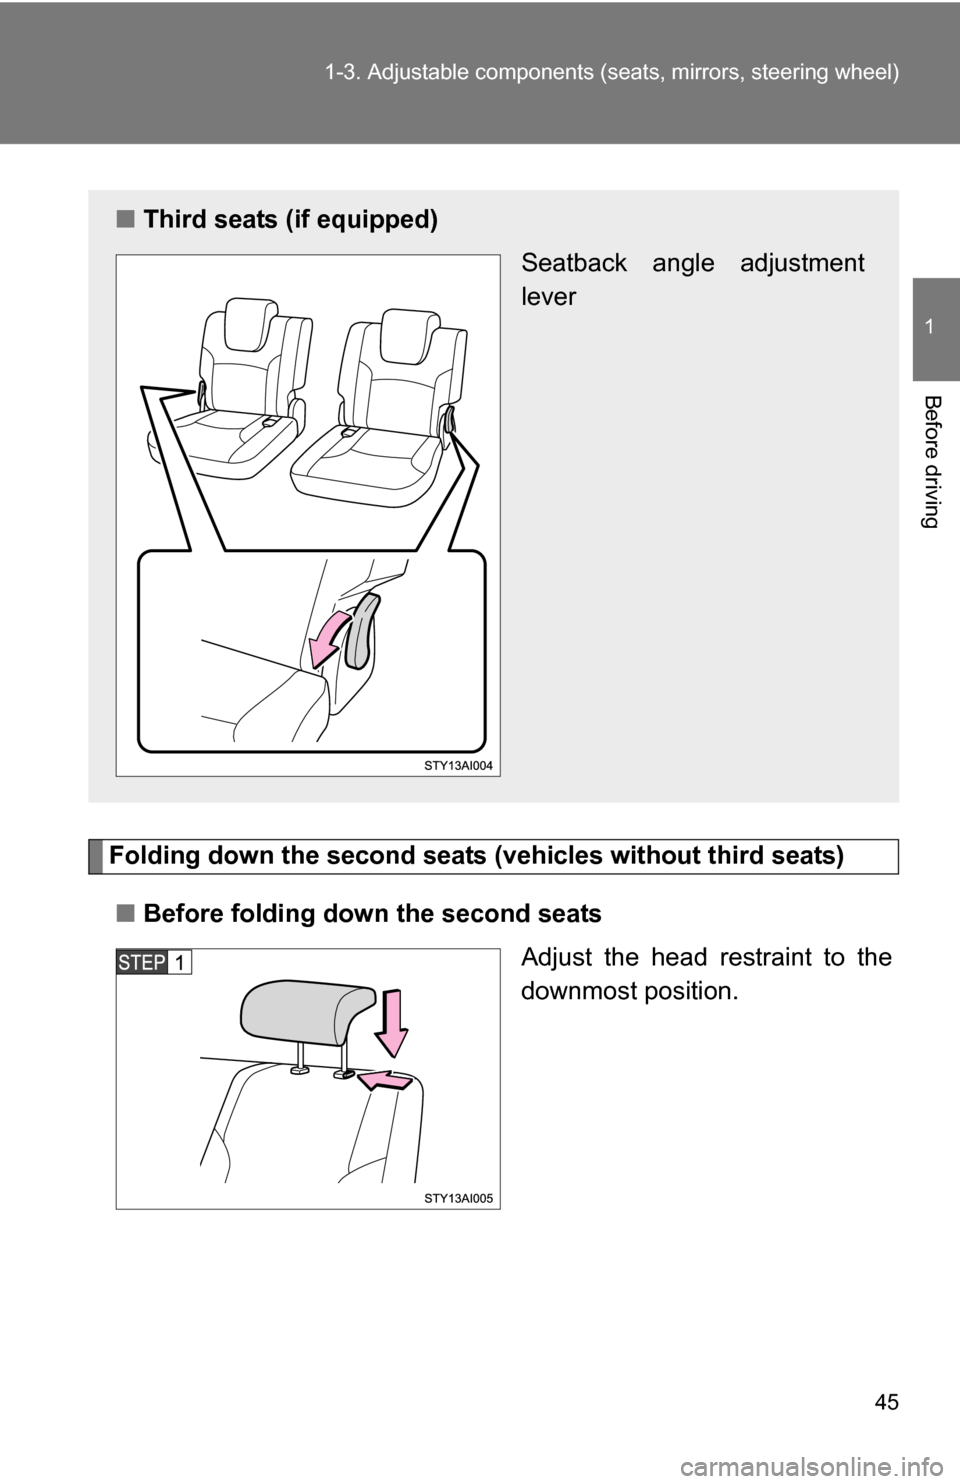
Folding down the second seats (v ehicles without third seats)
■ Before folding down the second seats
Adjust the head restraint to the
downmost position.
■Third seats (if equipped)
Seatback angle adjustment
lever
Page 55 of 520
55
1-3. Adjustable components (s
eats, mirrors, steering wheel)
1
Before driving
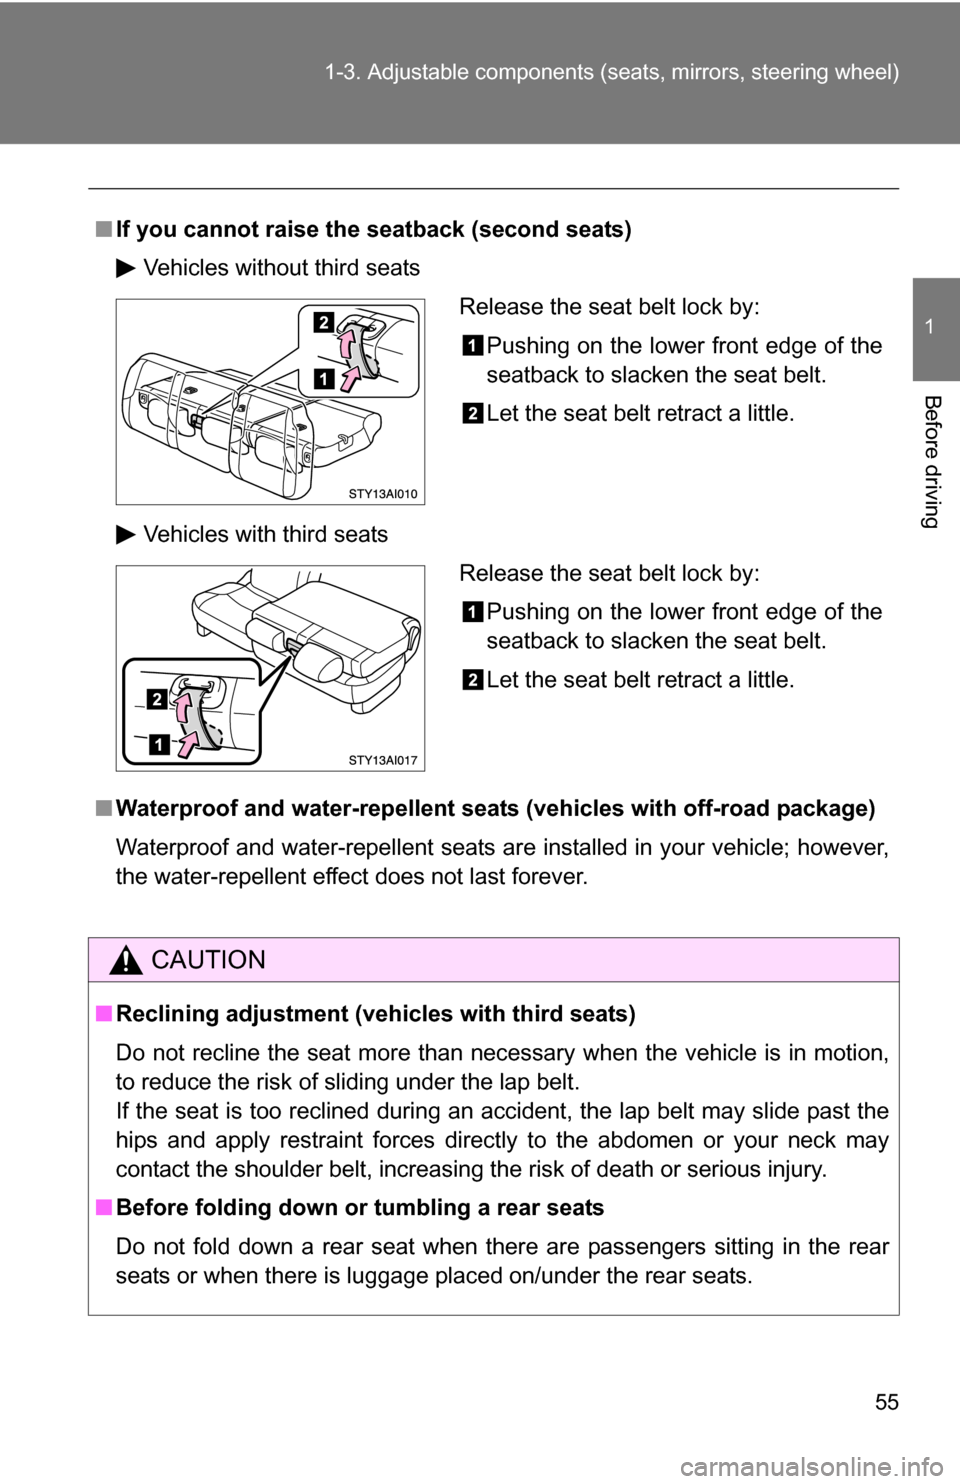
■If you cannot raise th e seatback (second seats)
Vehicles without third seats
Vehicles with third seats
■ Waterproof and water-repellent seat s (vehicles with off-road package)
Waterproof and water-repellent seats are installed in your vehicle; however,
the water-repellent effect does not last forever.
CAUTION
■ Reclining adjustment (vehicles with third seats)
Do not recline the seat more than necessary when the vehicle is in motion,
to reduce the risk of sliding under the lap belt.
If the seat is too reclined during an accident, the lap belt may slide past the
hips and apply restraint forces directly to the abdomen or your neck may
contact the shoulder belt, increasing the risk of death or serious injury.
■ Before folding down or tumbling a rear seats
Do not fold down a rear seat when there are passengers sitting in the rear
seats or when there is luggage placed on/under the rear seats.
Release the seat belt lock by: Pushing on the lower front edge of the
seatback to slacken the seat belt.
Let the seat belt retract a little.
Release the seat belt lock by:Pushing on the lower front edge of the
seatback to slacken the seat belt.
Let the seat belt retract a little.
Page 59 of 520
59
1-3. Adjustable components (s
eats, mirrors, steering wheel)
1
Before driving
■Retained accessory power
Each memorized position can be activated within 30 seconds after the
driver’s door is opened, even if the key is not in the engine switch.
■ If any position memory button is pushed while the adjustments are
being made
The operation will stop. To reactivate the system, push the button (“1” or “2”)
again.
■ If the battery is disconnected
The memorized positions must be reset because the computer’s memory is
erased when the battery is disconnected.
CAUTION
■Seat adjustment caution
Take care during seat adjustment that the seat does not strike the rear pas-
senger or squeeze your body against the steering wheel.
If this happens, you can stop the movement by pressing another seat posi-
tion memory button.
Page 60 of 520
60
1-3. Adjustable components (seats, mirrors, steering wheel)
Head restraints
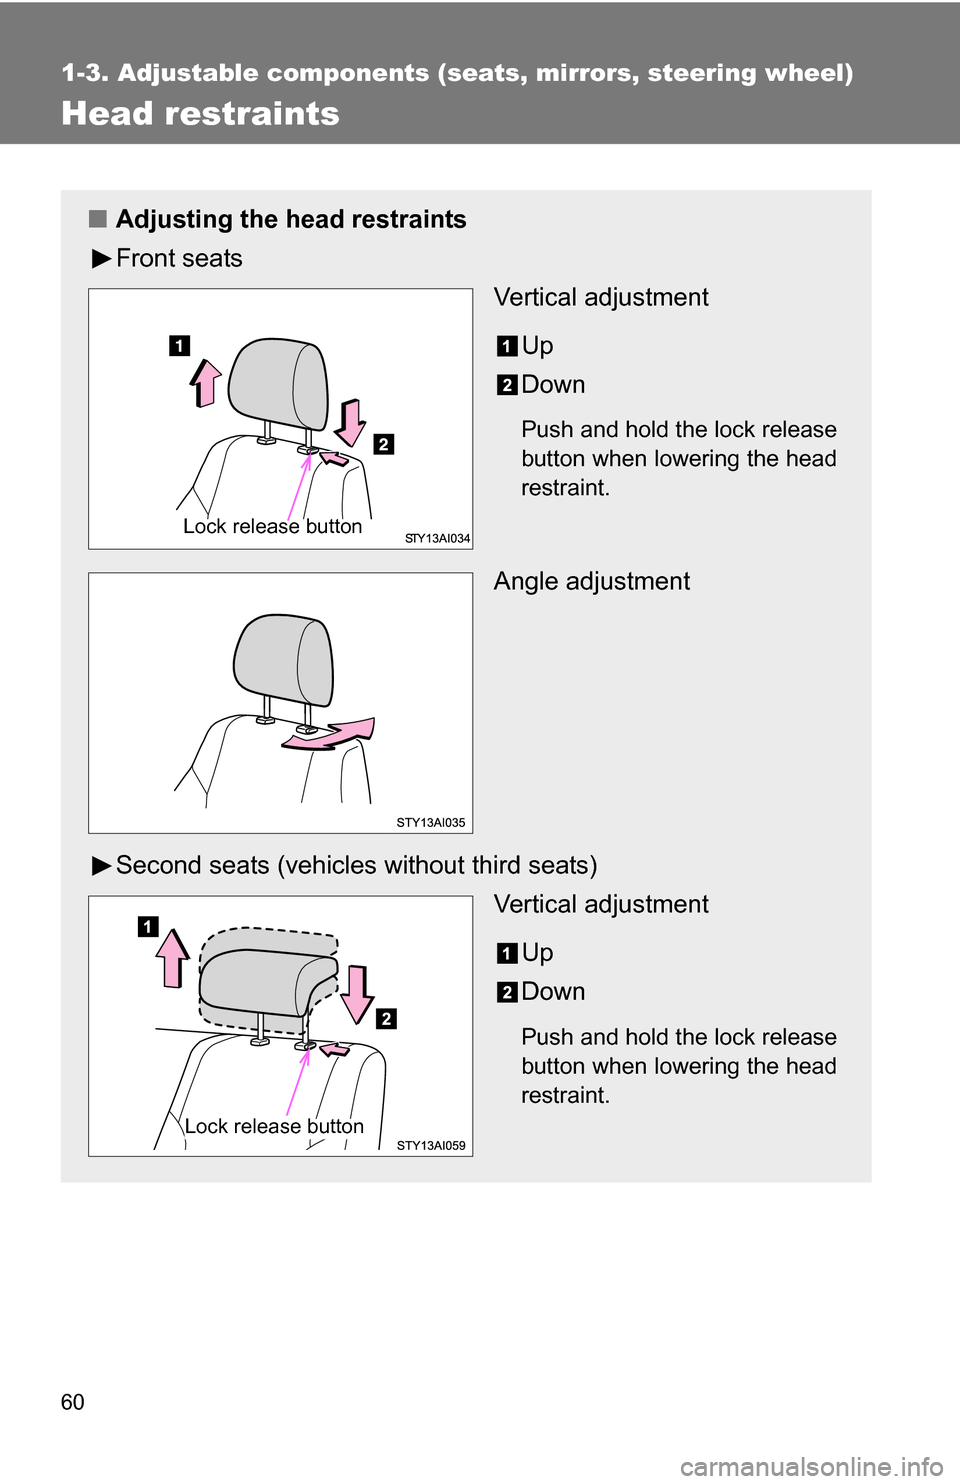
■Adjusting the head restraints
Front seats
Vertical adjustment
Up
Down
Push and hold the lock release
button when lowering the head
restraint.
Angle adjustment
Second seats (vehicles without third seats) Vertical adjustment
Up
Down
Push and hold the lock release
button when lowering the head
restraint.
Lock release button
Lock release button
Page 61 of 520
61
1-3. Adjustable components (s
eats, mirrors, steering wheel)
1
Before driving
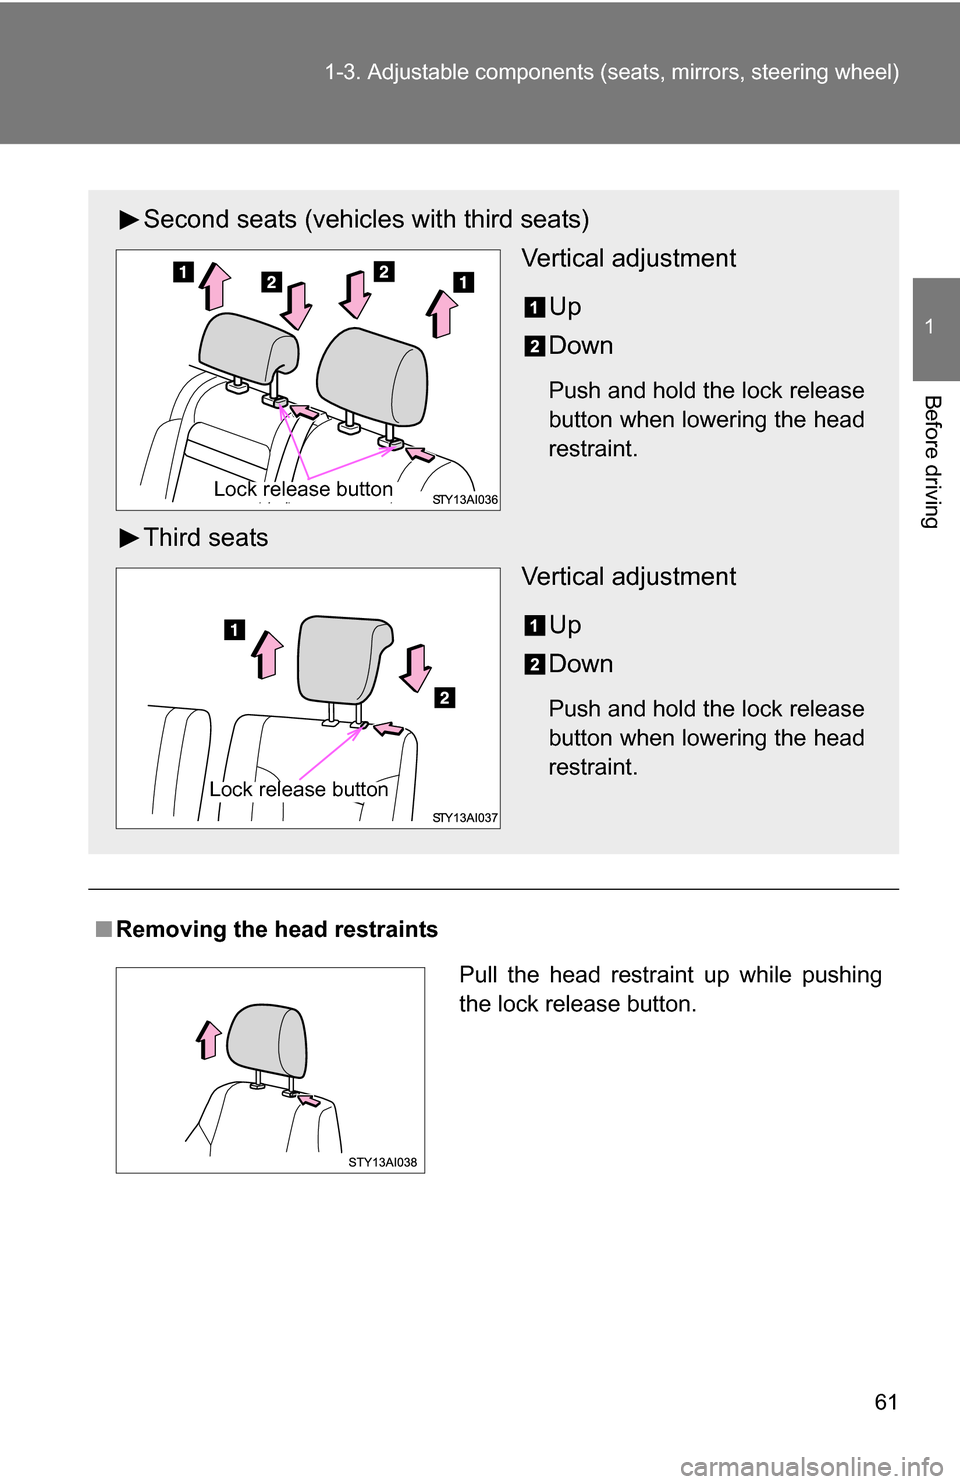
■Removing the head restraints
Second seats (vehicles with third seats)
Vertical adjustment
Up
Down
Push and hold the lock release
button when lowering the head
restraint.
Third seats Vertical adjustment
Up
Down
Push and hold the lock release
button when lowering the head
restraint.
Lock release button
Lock release button
Pull the head restraint up while pushing
the lock release button.
Page 94 of 520
94 1-7. Safety information
CAUTION
■While driving
●Do not adjust the position of the driver’s seat while driving.
Doing so could cause the driver to lose control of the vehicle.
● Do not place a cushion between the driver or passenger and the seatback.
A cushion may prevent correct posture from being achieved, and reduce
the effectiveness of the seat belt and head restraint, increasing the risk of
death or serious injury to the driver or passenger.
● Do not place anything under the front seats.
Objects placed under the front seats may become jammed in the seat
tracks and stop the seat from locking in place. This may lead to an acci-
dent. The adjustment mechanism may also be damaged.
■ Adjusting the seat position
●Take care when adjusting the seat position to ensure that other passen-
gers are not injured by the moving seat.
● Do not put your hands under the seat or near the moving parts to avoid
injury.
Fingers or hands may become jammed in the seat mechanism.
Page 508 of 520
508 Alphabetical index
Downhill Assist Control .......... 186
Driver’s seat belt reminder buzzer ..................................... 439
Driver's seat belt reminder light ......................................... 439
Driving Break-in tips .......................... 133
Correct posture .......................93
Driving assist systems........... 188
Procedures ............................ 140
Winter driving tips.................. 213
Driving position memory...........58
DVD player ................................ 280
Electronically modulated air suspension............................. 169
Emergency, in case of If a warning buzzer sounds ................................ 436
If a warning light turns on ...... 436
If the engine will not start ...... 456
If the shift lever cannot be shifted from P...................... 457
If the vehicle battery is discharged .......................... 459
If the vehicle becomes stuck ................................... 466
If you have a flat tire ............. 445
If you lose your keys ............. 458
If you think something is wrong .................................. 432
If your vehicle needs to be towed .................................. 427
If your vehicle overheats ....... 463
Emergency flashers Switch.................................... 426
Engine
Compartment ........................ 373
Engine switch ........................ 140
Hood...................................... 372
How to start the engine ......... 140
Identification number ............. 472
If the engine will not start ...... 456 Ignition switch ....................... 140
Immobilizer system ................. 88
Overheating .......................... 463
Engine coolant Capacity ................................ 475
Checking ............................... 380
Preparing and checking before winter ....................... 213
Temperature gauge .............. 148
Engine coolan t temperature
gauge ...................................... 148
Engine immobilizer system ...... 88
Engine oil Capacity ................................ 474
Checking ............................... 375
Preparing and checking before winter .................................. 213
Warning light ................. 437, 439
Engine oil maintenance data ......................................... 378
Engine switch........................... 140
Event data recorder ................. 434
Floor mat .................................. 337
Fluid Brake..................................... 381
Washer.................................. 387
Fog lights
Replacing light bulbs ............. 417
Switch ................................... 162
Wattage................................. 480
Four-wheel drive system Four-wheel drive control switch.................................. 177
Front passenger occupant classification system ............ 108
Front passenger's seat belt
reminder light ........................ 439
Front passenger’s seat belt warning buzzer ...................... 439
Front seats Adjustment .............................. 41
E
F