manual transmission TOYOTA 86 2017 User Guide
[x] Cancel search | Manufacturer: TOYOTA, Model Year: 2017, Model line: 86, Model: TOYOTA 86 2017Pages: 428, PDF Size: 5.25 MB
Page 143 of 428
1432-1. Driving procedures
2
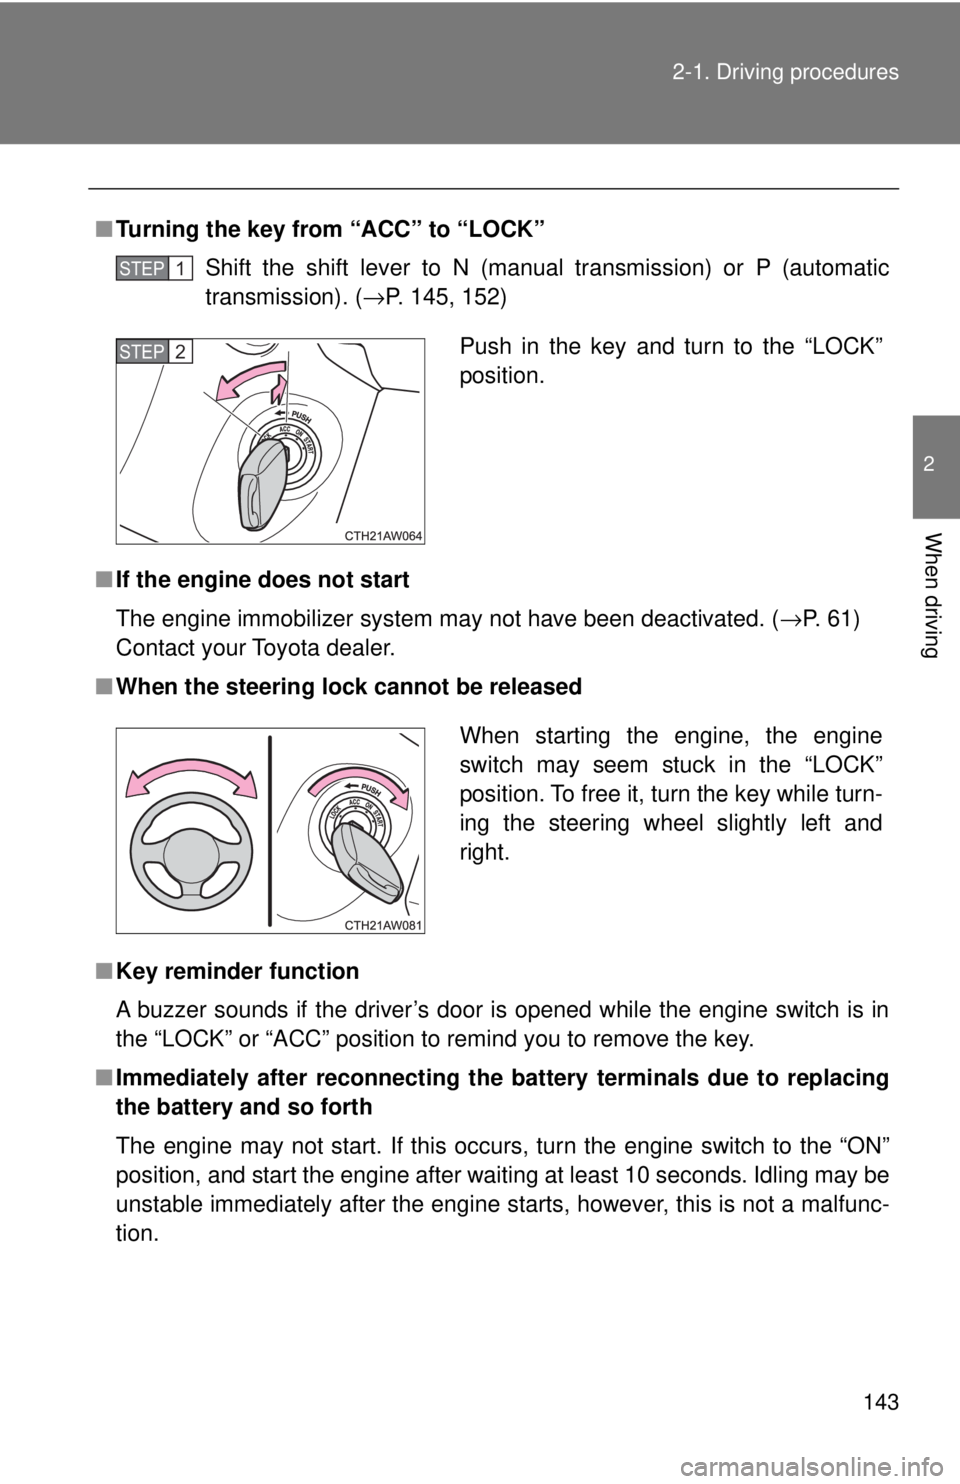
When driving ■ Turning the key from “ACC” to “LOCK”
Shift the shift lever to N (manual transmission) or P (automatic
transmission). ( → P. 145, 152)
■ If the engine does not start
The engine immobilizer system may not have been deactivated. ( → P. 61)
Contact your Toyota dealer.
■ When the steering lock cannot be released
■ Key reminder function
A buzzer sounds if the driver’s door is opened while the engine switch is in
the “LOCK” or “ACC” position to remind you to remove the key.
■ Immediately after reconnecting the battery terminals due to replacing
the battery and so forth
The engine may not start. If this occurs, turn the engine switch to the “ON”
position, and start the engine after waiting at least 10 seconds. Idling may be
unstable immediately after the engine starts, however, this is not a malfunc-
tion. STEP 1
Push in the key and turn to the “LOCK”
position.STEP 2
When starting the engine, the engine
switch may seem stuck in the “LOCK”
position. To free it, turn the key while turn-
ing the steering wheel slightly left and
right.
Page 150 of 428
1502-1. Driving procedures
■ Automatic gear selection when the vehicle is stopped
When the vehicle is idling at high rpm in order to warm up, and the vehicle is
on a slippery road, the transmission may automatically shift to 2 nd
gear for
stopping and starting off.
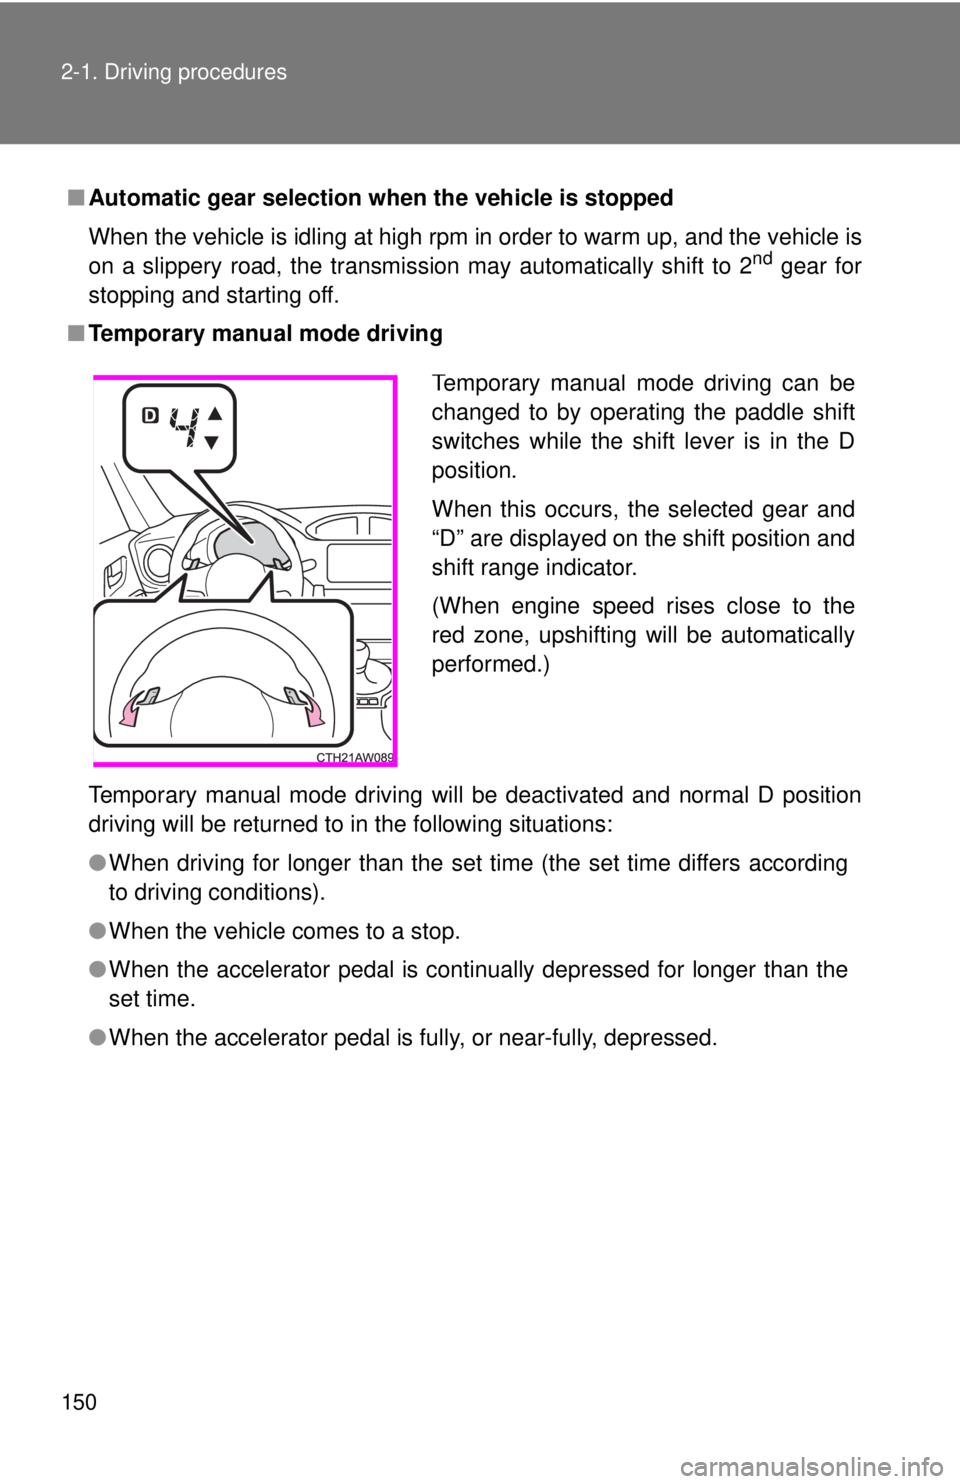
■ Temporary manual mode driving
Temporary manual mode driving will be deactivated and normal D position
driving will be returned to in the following situations:
● When driving for longer than the set time (the set time differs according
to driving conditions).
● When the vehicle comes to a stop.
● When the accelerator pedal is continually depressed for longer than the
set time.
● When the accelerator pedal is fully, or near-fully, depressed. Temporary manual mode driving can be
changed to by operating the paddle shift
switches while the shift lever is in the D
position.
When this occurs, the selected gear and
“D” are displayed on the shift position and
shift range indicator.
(When engine speed rises close to the
red zone, upshifting will be automatically
performed.)
Page 152 of 428
1522-1. Driving procedures
Manual Transmission ∗
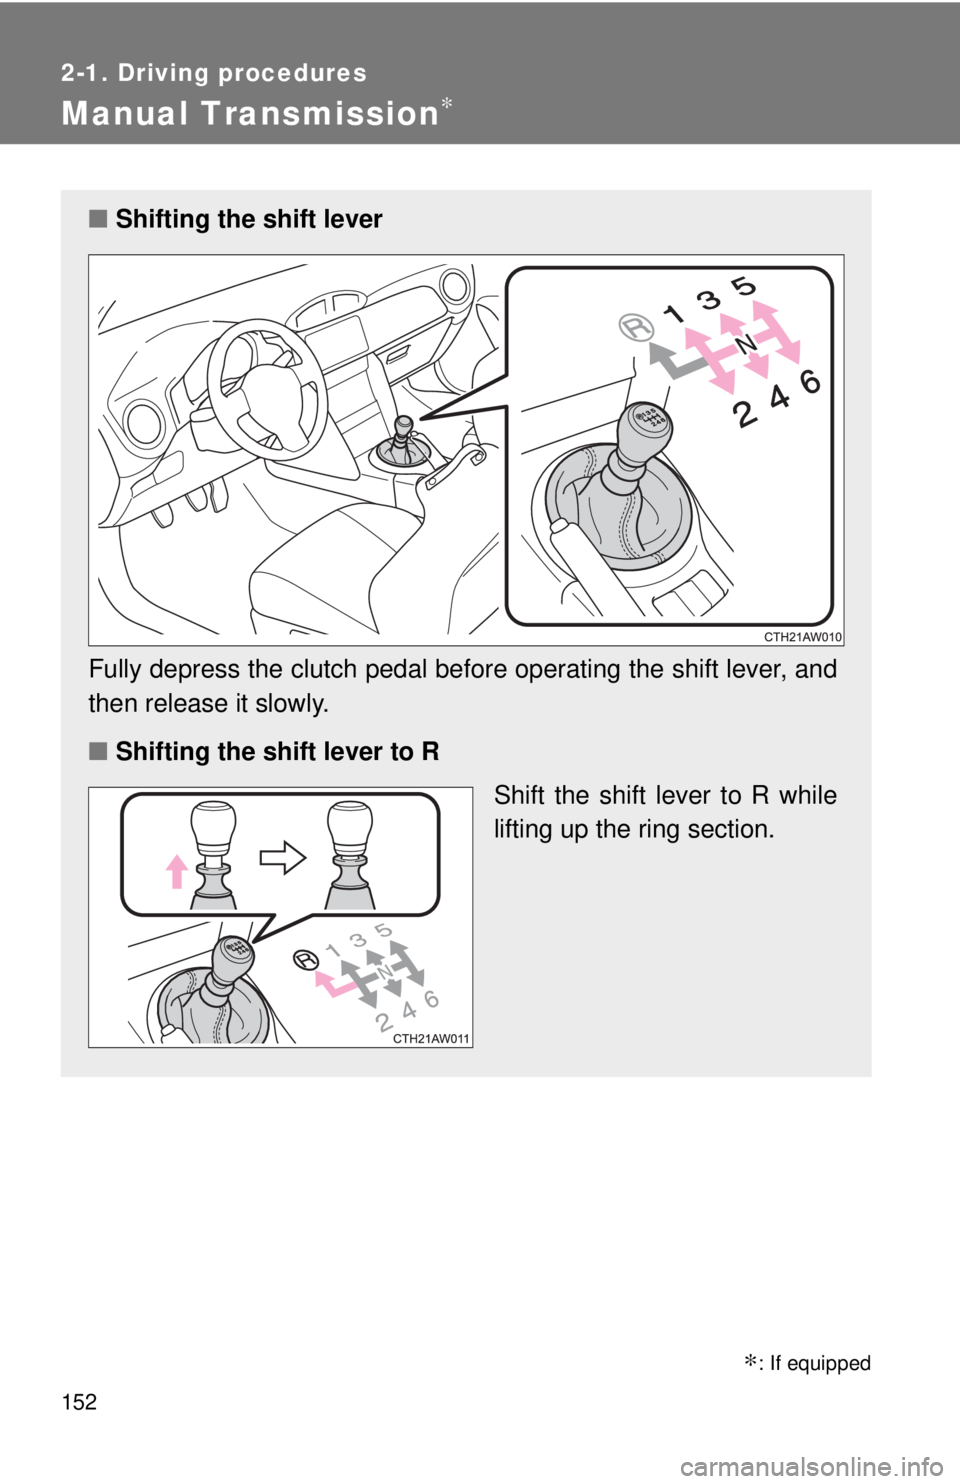
∗ : If equipped■ Shifting the shift lever
Fully depress the clutch pedal before operating the shift lever, and
then release it slowly.
■ Shifting the shift lever to R
Shift the shift lever to R while
lifting up the ring section.
Page 162 of 428
1622-2. Instrument cluster
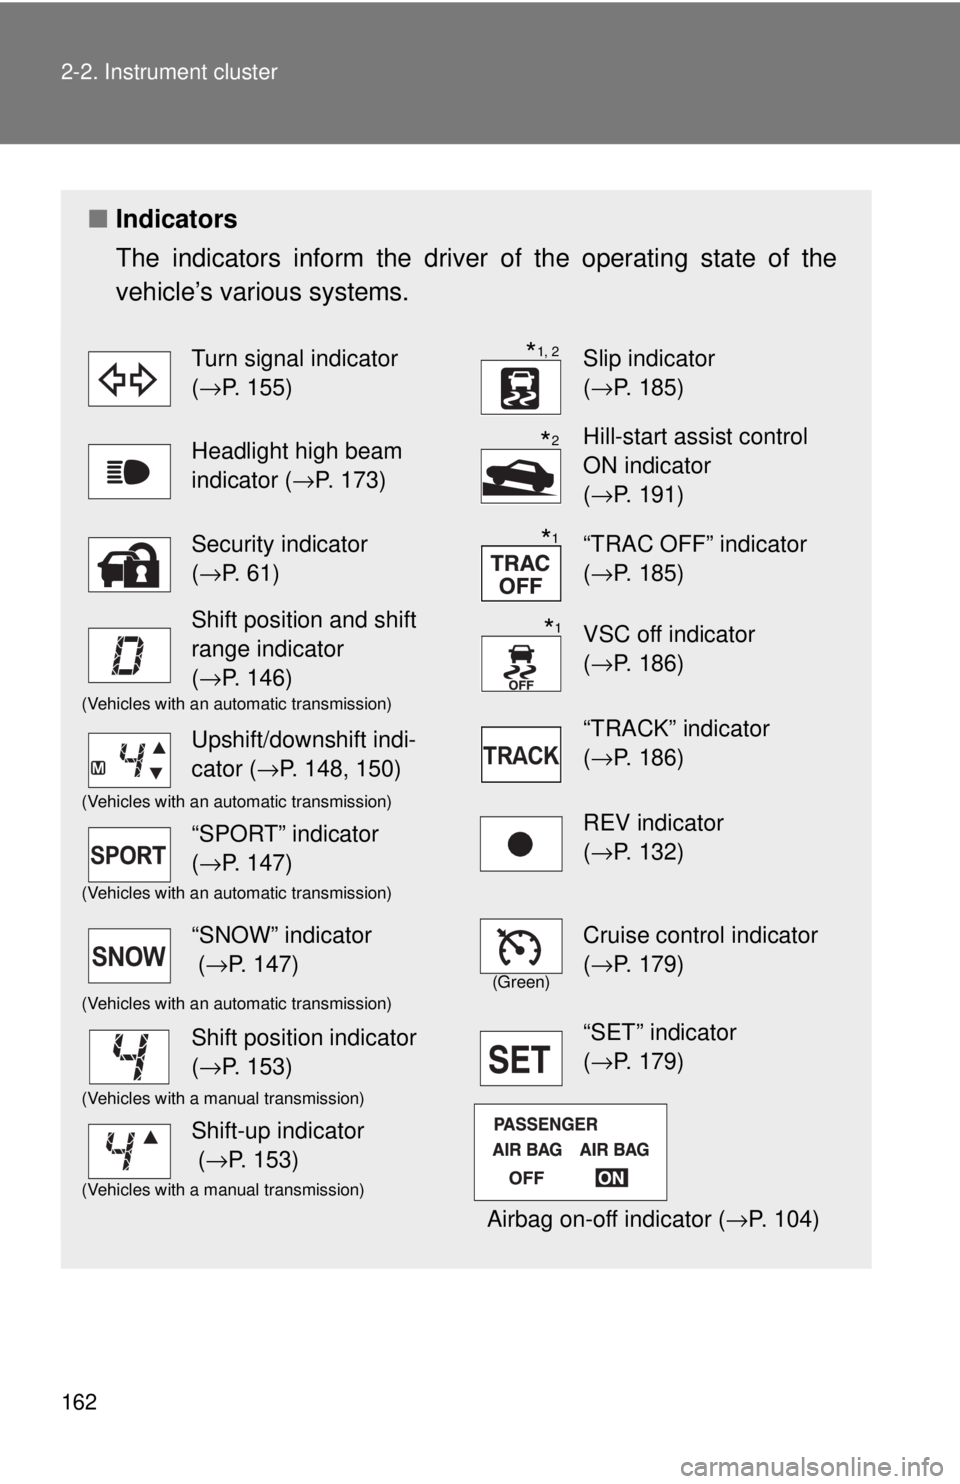
■ Indicators
The indicators inform the driver of the operating state of the
vehicle’s various systems. Turn signal indicator
( → P. 155) Slip indicator
( → P. 185)
Headlight high beam
indicator ( → P. 173) Hill-start assist control
ON indicator
( → P. 191)
Security indicator
( → P. 61) “TRAC OFF” indicator
( → P. 185)
Shift position and shift
range indicator
( → P. 146) VSC off indicator
( → P. 186)(Vehicles with an automatic transmission)
“TRACK” indicator
( → P. 186)Upshift/downshift indi-
cator ( → P. 148, 150)(Vehicles with an automatic transmission)
REV indicator
( → P. 132)“SPORT” indicator
( → P. 147)(Vehicles with an automatic transmission)
“SNOW” indicator
( → P. 147) (Green)
Cruise control indicator
( → P. 179)(Vehicles with an automatic transmission)
Shift position indicator
( → P. 153) “SET” indicator
( → P. 179)(Vehicles with a manual transmission)
Airbag on-off indicator ( → P. 104)Shift-up indicator
( → P. 153)(Vehicles with a manual transmission) * 1, 2
* 2
* 1
* 1
Page 165 of 428
1652-2. Instrument cluster
2
When driving
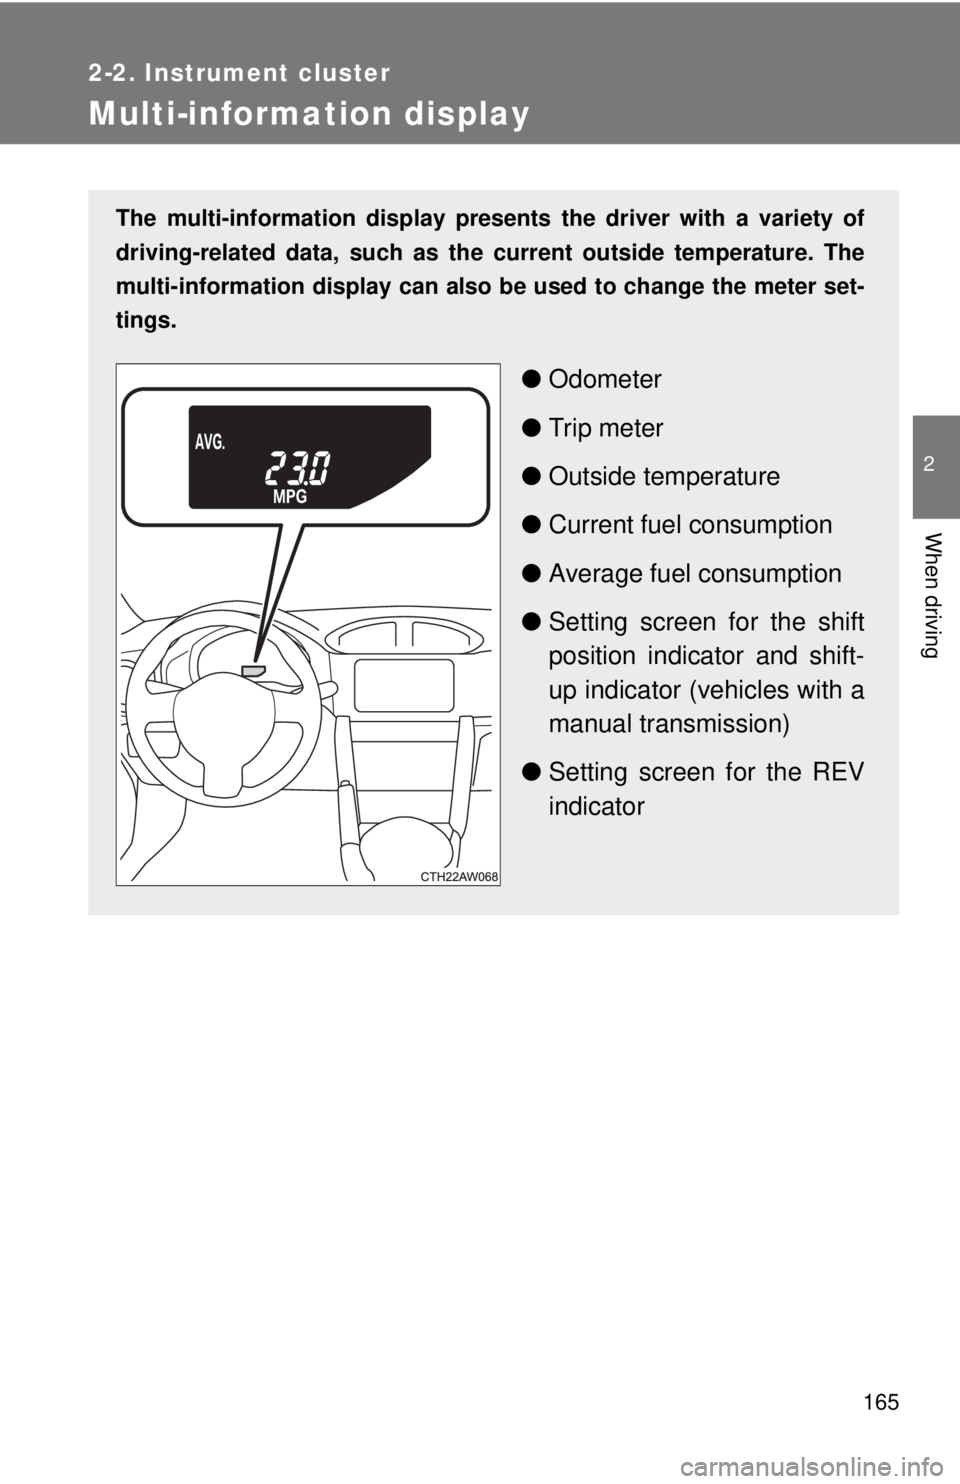
Multi-information display The multi-information display presen ts the driver with a variety of
driving-related data, such as the current outside temperature. The
multi-information display can also be used to change the meter set-
tings.
● Odometer
● Trip meter
● Outside temperature
● Current fuel consumption
● Average fuel consumption
● Setting screen for the shift
position indicator and shift-
up indicator (vehicles with a
manual transmission)
● Setting screen for the REV
indicator
Page 166 of 428
1662-2. Instrument cluster
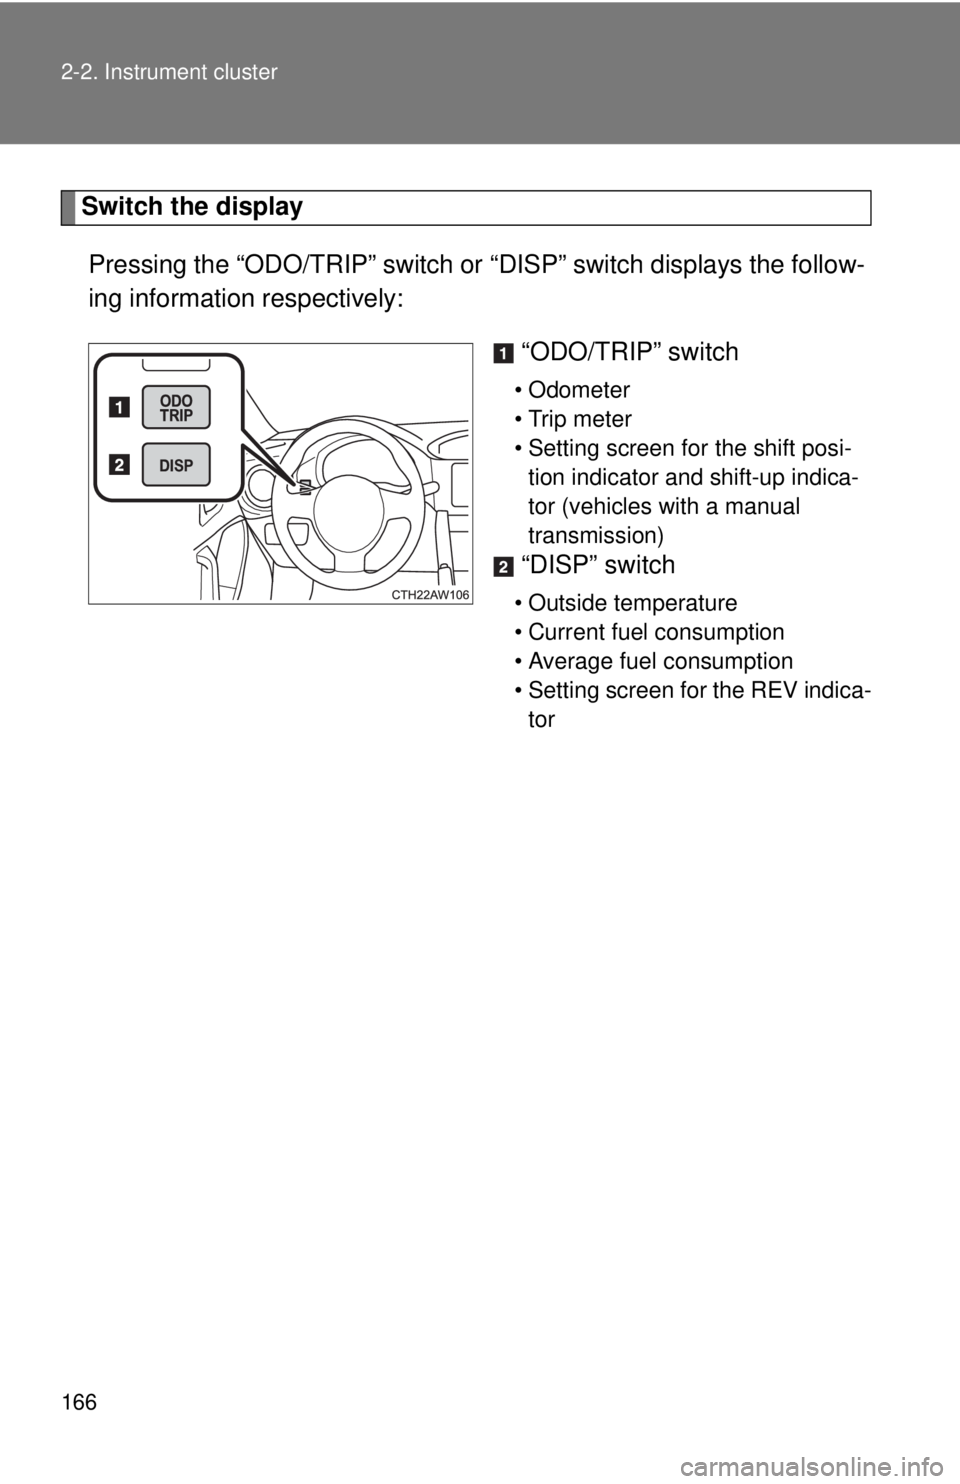
Switch the display
Pressing the “ODO/TRIP” switch or “DISP” switch displays the follow-
ing information respectively:
“ODO/TRIP” switch • Odometer
• Trip meter
• Setting screen for the shift posi-
tion indicator and shift-up indica-
tor (vehicles with a manual
transmission)
“DISP” switch • Outside temperature
• Current fuel consumption
• Average fuel consumption
• Setting screen for the REV indica-
tor
Page 167 of 428
1672-2. Instrument cluster
2
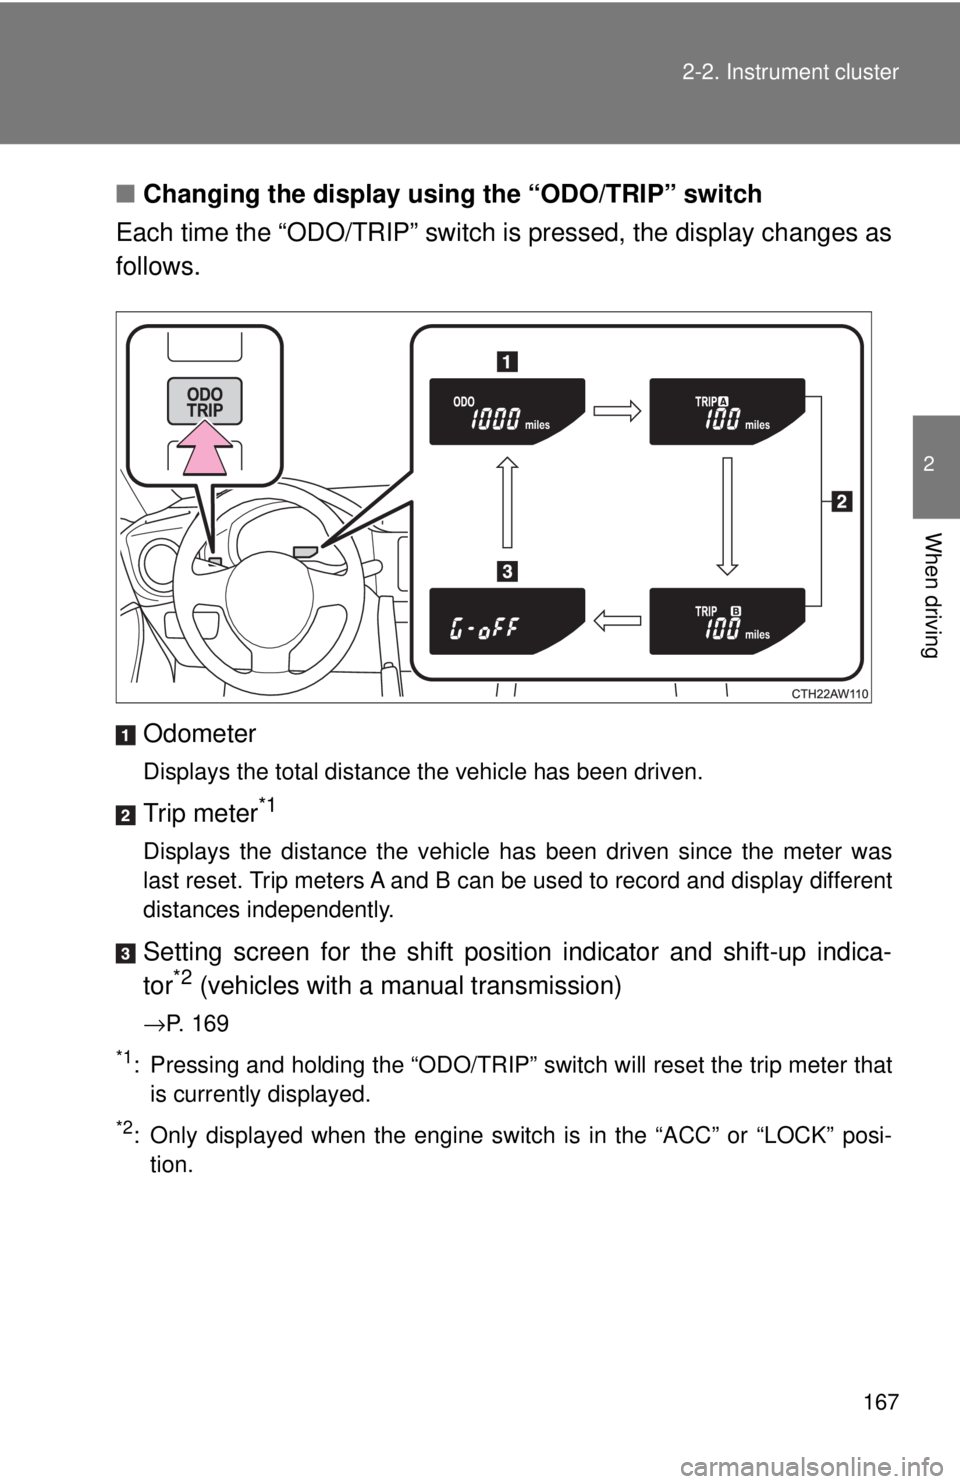
When driving ■ Changing the display using the “ODO/TRIP” switch
Each time the “ODO/TRIP” switch is pressed, the display changes as
follows.
Odometer Displays the total distance the vehicle has been driven.
Trip meter *1
Displays the distance the vehicle has been driven since the meter was
last reset. Trip meters A and B can be used to record and display different
distances independently.
Setting screen for the shift position indicator and shift-up indica-
tor *2
(vehicles with a manual transmission)→ P. 169*1
: Pressing and holding the “ODO/TRIP” switch will reset the trip meter that
is currently displayed.*2
: Only displayed when the engine switch is in the “ACC” or “LOCK” posi-
tion.
Page 169 of 428
1692-2. Instrument cluster
2
When driving Setting the shift position indi cator and shift-up indicator
(vehicles with a manual transmission)
Displaying of the shift position indicator and shift-up indicator can be
turned on/off.
Press the “ODO/TRIP” switch repeatedly until the setting
screen is displayed. ( → P. 167)
Each time the switch is pressed and held, the display changes
between on/off.
“G-on”: Display on
“G-oFF”: Display off
Setting the REV indicator
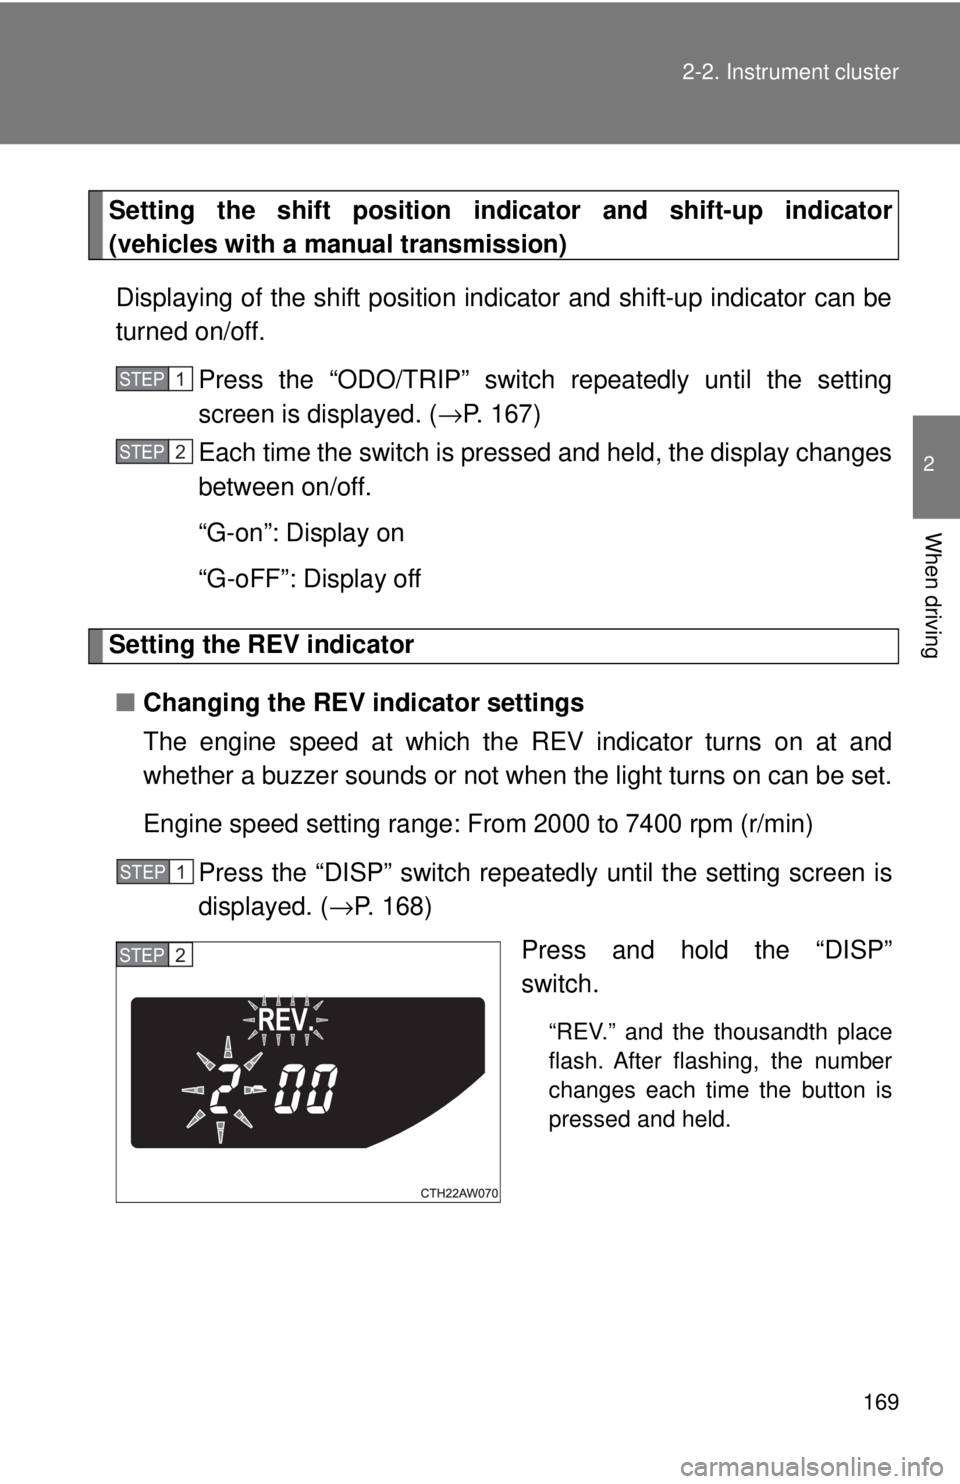
■ Changing the REV indicator settings
The engine speed at which the REV indicator turns on at and
whether a buzzer sounds or not when the light turns on can be set.
Engine speed setting range: From 2000 to 7400 rpm (r/min)
Press the “DISP” switch repeatedly until the setting screen is
displayed. ( → P. 168)
Press and hold the “DISP”
switch. “REV.” and the thousandth place
flash. After flashing, the number
changes each time the button is
pressed and held.STEP 1
STEP 2
STEP 1
STEP 2
Page 173 of 428
1732-3. Operating the lights and windshield wipers
2
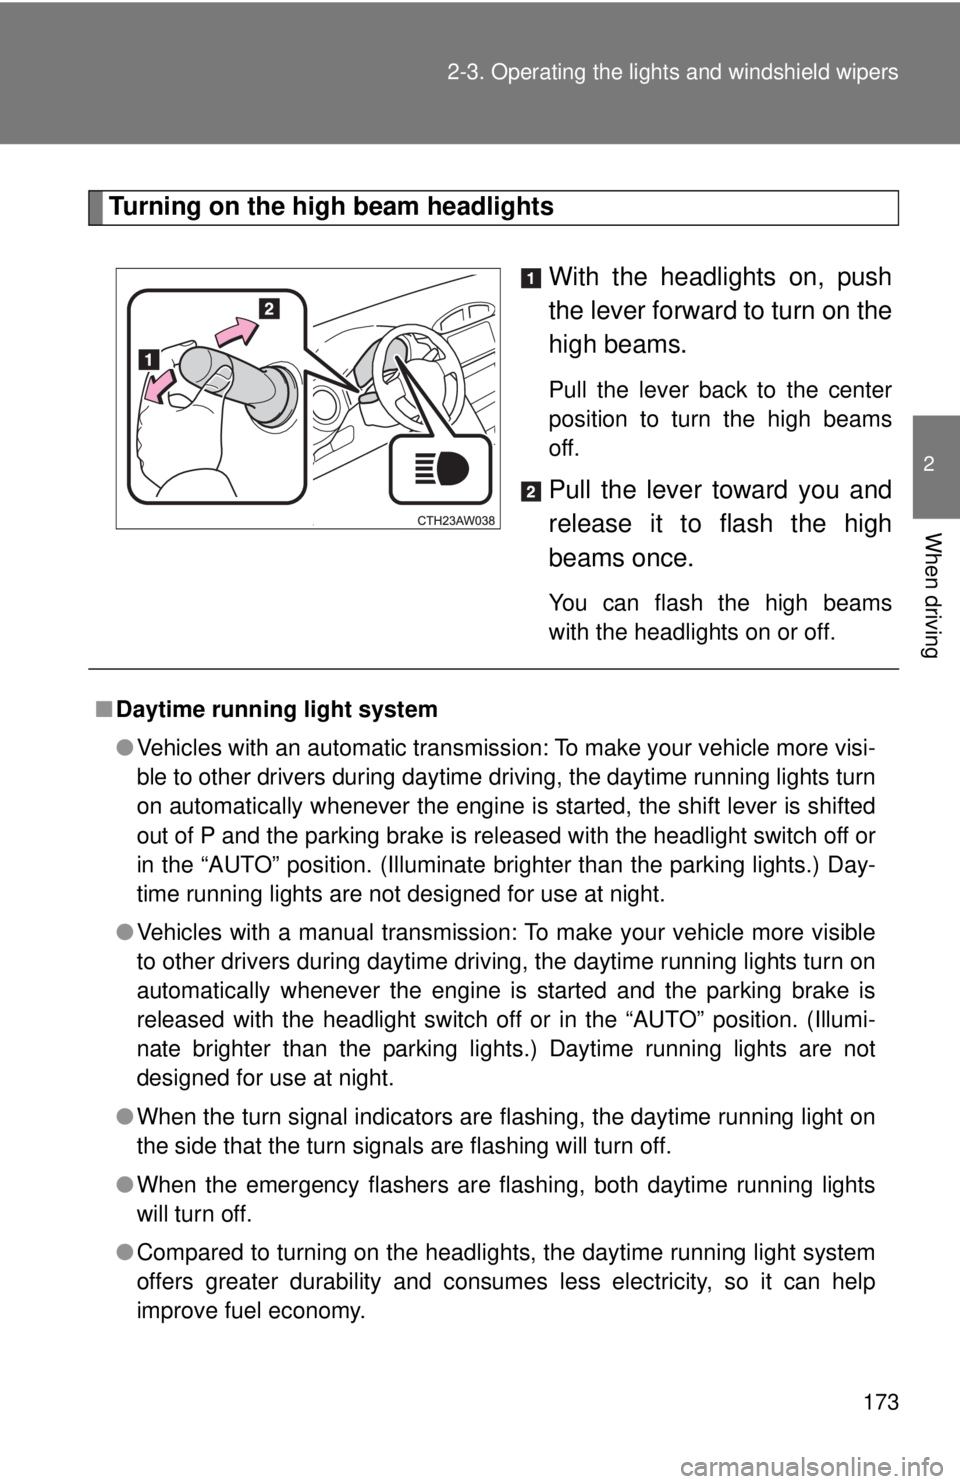
When driving Turning on the high beam headlights
With the headlights on, push
the lever forward to turn on the
high beams. Pull the lever back to the center
position to turn the high beams
off.
Pull the lever toward you and
release it to flash the high
beams once. You can flash the high beams
with the headlights on or off.
■ Daytime running light system
● Vehicles with an automatic transmission: To make your vehicle more visi-
ble to other drivers during daytime driving, the daytime running lights turn
on automatically whenever the engine is started, the shift lever is shifted
out of P and the parking brake is released with the headlight switch off or
in the “AUTO” position. (Illuminate brighter than the parking lights.) Day-
time running lights are not designed for use at night.
● Vehicles with a manual transmission: To make your vehicle more visible
to other drivers during daytime driving, the daytime running lights turn on
automatically whenever the engine is started and the parking brake is
released with the headlight switch off or in the “AUTO” position. (Illumi-
nate brighter than the parking lights.) Daytime running lights are not
designed for use at night.
● When the turn signal indicators are flashing, the daytime running light on
the side that the turn signals are flashing will turn off.
● When the emergency flashers are flashing, both daytime running lights
will turn off.
● Compared to turning on the headlights, the daytime running light system
offers greater durability and consumes less electricity, so it can help
improve fuel economy.
Page 181 of 428
1812-4. Using other driving systems
2
When driving
■ Cruise control can be set when
Vehicles with an automatic transmission
● The shift lever is in D or M and the vehicle is in the 2 nd
gear or higher.
● Vehicle speed is above approximately 25 mph (40 km/h).
Vehicles with a manual transmission
● The vehicle is in the 2 nd
gear or higher.
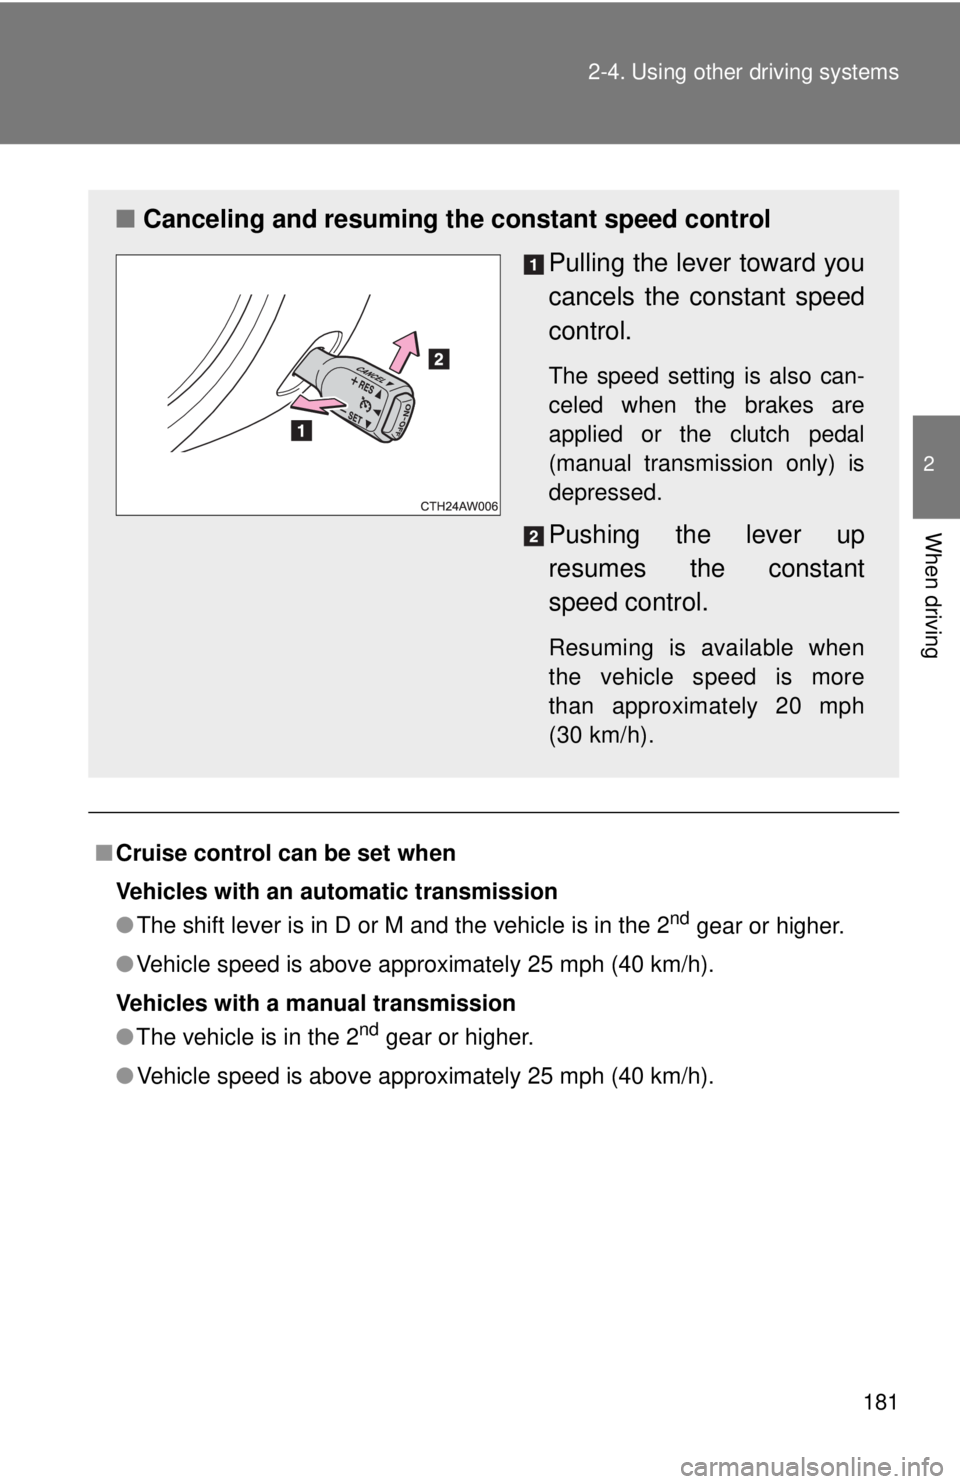
● Vehicle speed is above approximately 25 mph (40 km/h).■ Canceling and resuming the constant speed control
Pulling the lever toward you
cancels the c onstant speed
control. The speed setting is also can-
celed when the brakes are
applied or the clutch pedal
(manual transmission only) is
depressed.
Pushing the lever up
resumes the constant
speed control. Resuming is available when
the vehicle speed is more
than approximately 20 mph
(30 km/h).