TOYOTA 86 2023 Owners Manual
Manufacturer: TOYOTA, Model Year: 2023, Model line: 86, Model: TOYOTA 86 2023Pages: 449, PDF Size: 8.5 MB
Page 251 of 449
2514-6. Using other driving systems
4
Driving
When the shift lever is set to R,
the rear view camera automati-
cally displays the rear view
image from the vehicle. When
the lever is set to other posi-
tions, the image before setting
to R is displayed.
1Set the engine switch to ON.
2 Set the shift lever to R.
●The image of the rear view cam-
era is horizontally reversed as is
the case with the vehicle inside mirror or the outside mirror.
●When “Rear Camera Delay Con-
trol” is on, the r
ear view image
from the r ear view camera will be
displayed on the multimedia sys-
tem screen for a certain amount of
time after the shift lever is shifted
from R to another position. When
any of the following conditions are
met, the rear view image will be
canceled:
• The shift lever is shifted to P (vehi- cles with an automatic transmis-
sion)
• The vehicle speed becomes approximately 5 mph (8 km/h) or
more
• The parking brake is engaged
• 9 seconds have elapsed since the shift lever was shifted from R to
another position
To turn the function on and off, refer
to “MULTIMEDIA OWNER’S MAN-
UAL”.
●It may be difficult to see the image
of the rear view camera in the fol-
lowing cases. This is not a mal-
function of the camera.
• The vehicle is in a dark place (at night, in a tunnel, etc.).
• The vehicle is in an extremely hot or cold place.
• An object (such as raindrops,
snow, dirt, etc.) that disturbs the
view of the rear view camera
sticks to the lens of the camera.
• Strong light is shining directly on the camera lens ( occasionally,
there are vertical lines on the
screen).
The area from the rear end of
the bumper can be viewed.
Areas at both ends of the
bumper and areas just under the
bumper cannot be viewed.
NOTICE
●Since the camera is a precision
device, do not subject it to
strong impacts. Otherwise, mal-
function, fire or electric shock
may occur.
●If mud or snow sticks to or is fro-
zen on the camera, you must be
very careful when removing it.
Otherwise, damage to the cam-
era may cause a fire or electric
shock. Pour water or lukewarm
water over the camera to
remove mud and ice, and wipe
it with a soft, dry cloth.
●Do not put a flame close to the
camera or wirin g. Otherwise,
damage or fire may occur.
●When replacing the fuse, be
sure to use a fuse with the spec-
ified rating. Use of a fuse with a
different rating may result in a
malfunction.
●If you use the rear view camera
for a long time while the engine
is not operated, the battery may
become completely discharged.
How to use the rear view
camera
Viewing range on the
screen
Page 252 of 449
2524-6. Using other driving systems
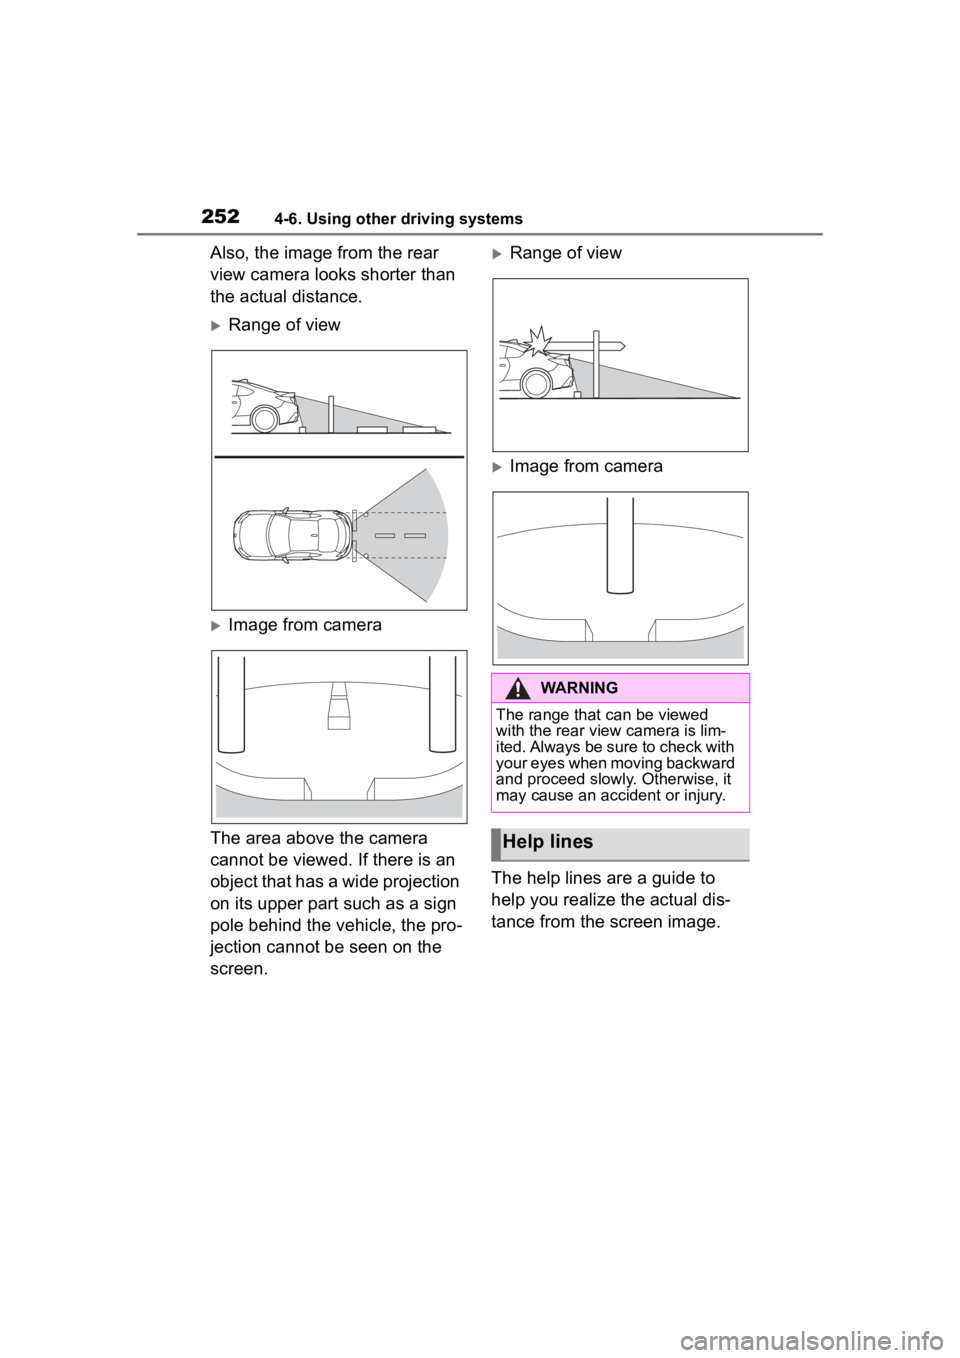
Also, the image from the rear
view camera looks shorter than
the actual distance.
Range of view
Image from camera
The area above the camera
cannot be viewed. If there is an
object that has a wide projection
on its upper part such as a sign
pole behind the vehicle, the pro-
jection cannot be seen on the
screen.
Range of view
Image from camera
The help lines are a guide to
help you realize the actual dis-
tance from the screen image.
WARNING
The range that can be viewed
with the rear vie w camera is lim-
ited. Always be sure to check with
your eyes when moving backward
and proceed slowly. Otherwise, it
may cause an accident or injury.
Help lines
Page 253 of 449
2534-6. Using other driving systems
4
Driving
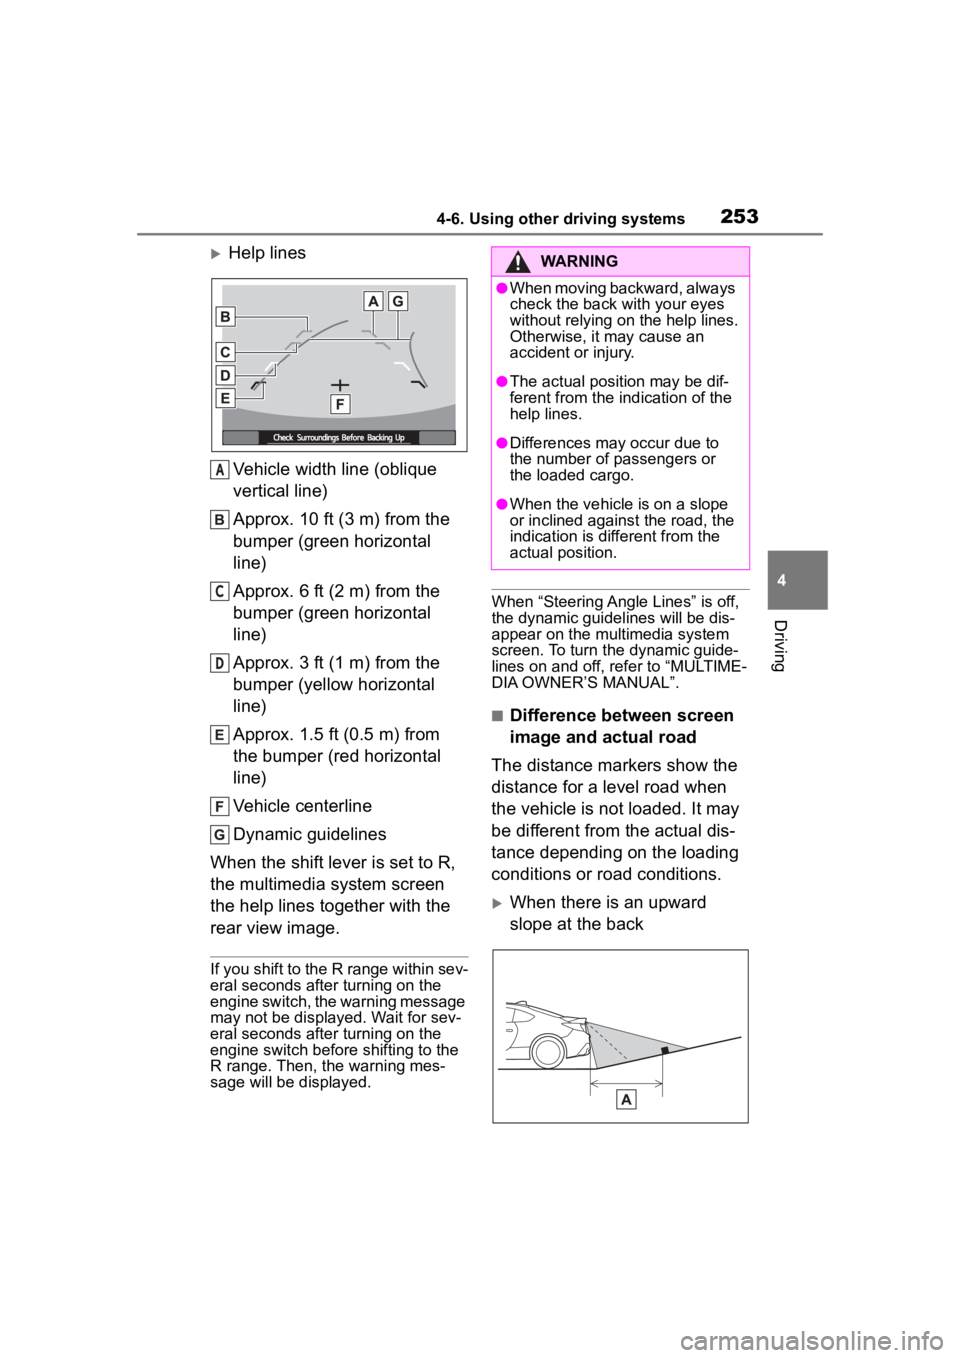
Help linesVehicle width line (oblique
vertical line)
Approx. 10 ft (3 m) from the
bumper (green horizontal
line)
Approx. 6 ft (2 m) from the
bumper (green horizontal
line)
Approx. 3 ft (1 m) from the
bumper (yellow horizontal
line)
Approx. 1.5 ft (0.5 m) from
the bumper (red horizontal
line)
Vehicle centerline
Dynamic guidelines
When the shift lever is set to R,
the multimedia system screen
the help lines together with the
rear view image.
If you shift to the R range within sev-
eral seconds after turning on the
engine switch, the warning message
may not be displayed. Wait for sev-
eral seconds after turning on the
engine switch before shifting to the
R range. Then, the warning mes-
sage will be displayed.
When “Steering Angle Lines” is off,
the dynamic guidelines will be dis-
appear on the multimedia system
screen. To turn the dynamic guide-
lines on and off, refer to “MULTIME-
DIA OWNER’S MANUAL”.
■Difference between screen
image and actual road
The distance markers show the
distance for a level road when
the vehicle is not loaded. It may
be different from the actual dis-
tance depending on the loading
conditions or road conditions.
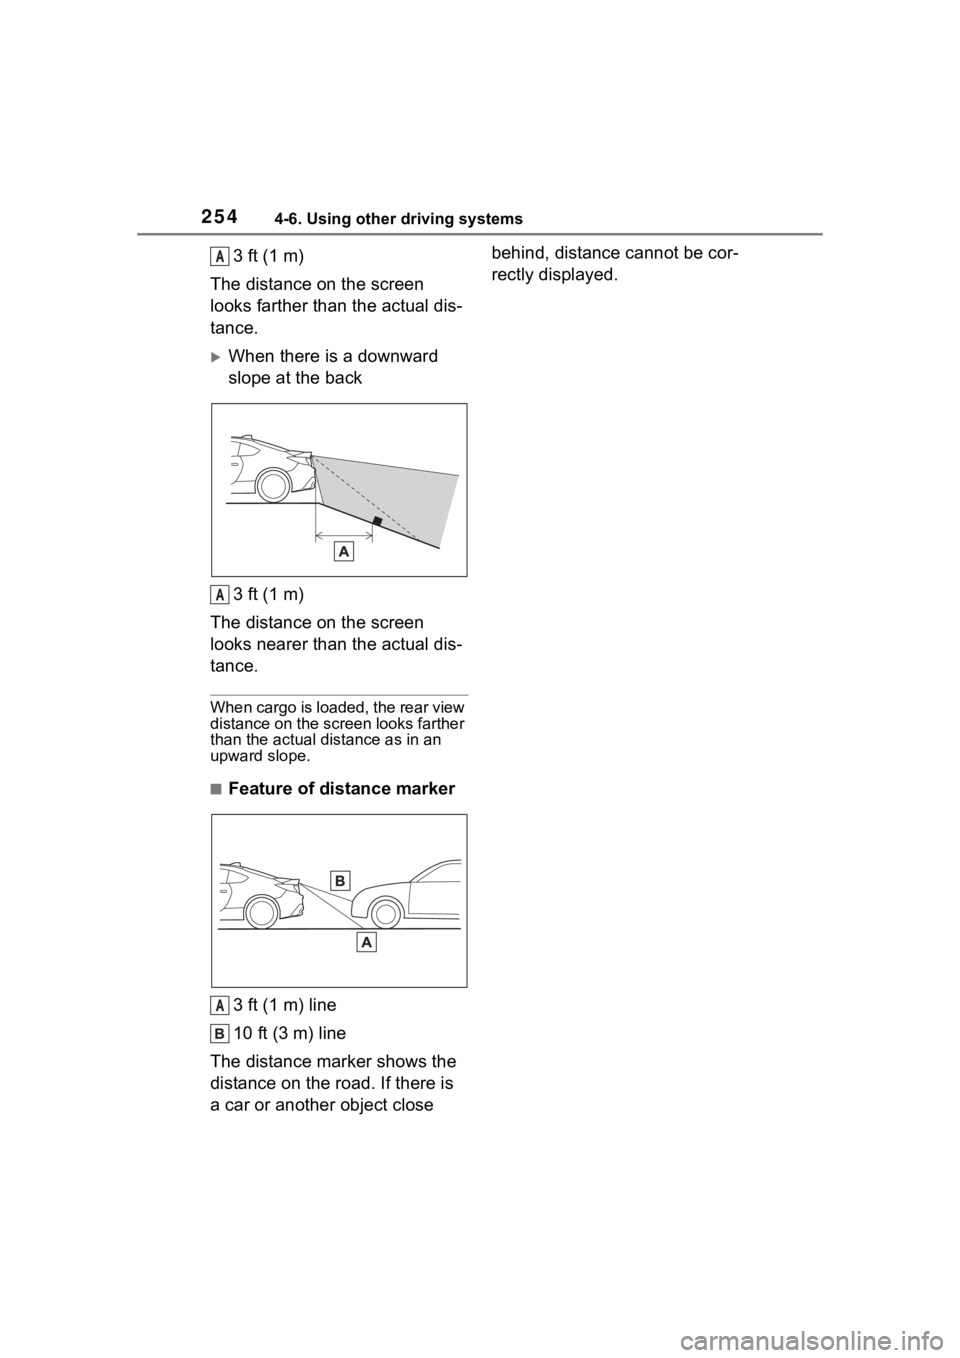
When there is an upward
slope at the back
A
C
D
WARNING
●When moving backward, always
check the back with your eyes
without relying on the help lines.
Otherwise, it may cause an
accident or injury.
●The actual position may be dif-
ferent from the in dication of the
help lines.
●Differences may occur due to
the number of passengers or
the loaded cargo.
●When the vehicle is on a slope
or inclined against the road, the
indication is dif ferent from the
actual position.
Page 254 of 449
2544-6. Using other driving systems
3 ft (1 m)
The distance on the screen
looks farther than the actual dis-
tance.
When there is a downward
slope at the back
3 ft (1 m)
The distance on the screen
looks nearer than the actual dis-
tance.
When cargo is loaded, the rear view
distance on the screen looks farther
than the actual distance as in an
upward slope.
■Feature of distance marker
3 ft (1 m) line
10 ft (3 m) line
The distance marker shows the
distance on the road. If there is
a car or another object close behind, distance cannot be cor-
rectly displayed.
A
A
A
Page 255 of 449
2554-6. Using other driving systems
4
Driving
●Conventional Cruise Control
enables you to maintain a con-
stant vehicle speed without hold-
ing your foot on the accelerator
pedal and it is operative when the
vehicle speed is 20 mph (30 km/h)
or more.
●Make sure the Conventional
Cruise Control system is turned
off when the Conventional Cruise
Control is not in use to avoid unin-
tentionally setting of the Conven-
tional Cruise Control.
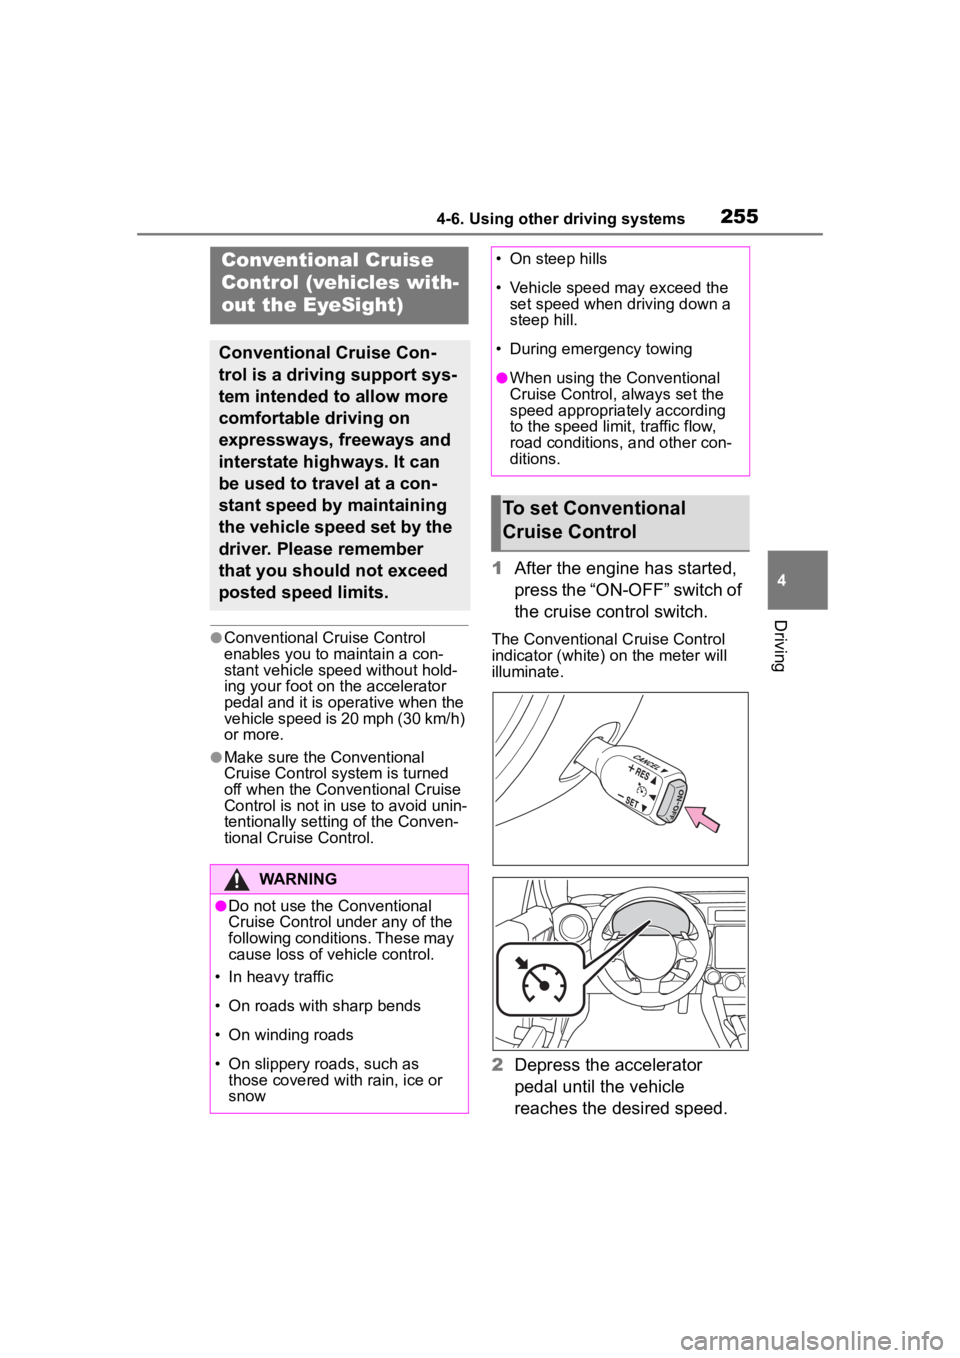
1After the engine has started,
press the “ON-OFF” switch of
the cruise control switch.
The Conventional Cruise Control
indicator (white) on the meter will
illuminate.
2Depress the accelerator
pedal until the vehicle
reaches the desired speed.
Conventional Cruise
Control (vehicles with-
out the EyeSight)
Conventional Cruise Con-
trol is a driving support sys-
tem intended to allow more
comfortable driving on
expressways, freeways and
interstate highways. It can
be used to travel at a con-
stant speed by maintaining
the vehicle speed set by the
driver. Please remember
that you should not exceed
posted speed limits.
WARNING
●Do not use the Conventional
Cruise Control under any of the
following conditions. These may
cause loss of vehicle control.
• In heavy traffic
• On roads with sharp bends
• On winding roads
• On slippery roads, such as those covered with rain, ice or
snow
• On steep hills
• Vehicle speed may exceed the set speed when d riving down a
steep hill.
• During emergency towing
●When using the Conventional
Cruise Control, always set the
speed appropriately according
to the speed limit, traffic flow,
road conditions, and other con-
ditions.
To set Conventional
Cruise Control
Page 256 of 449
2564-6. Using other driving systems
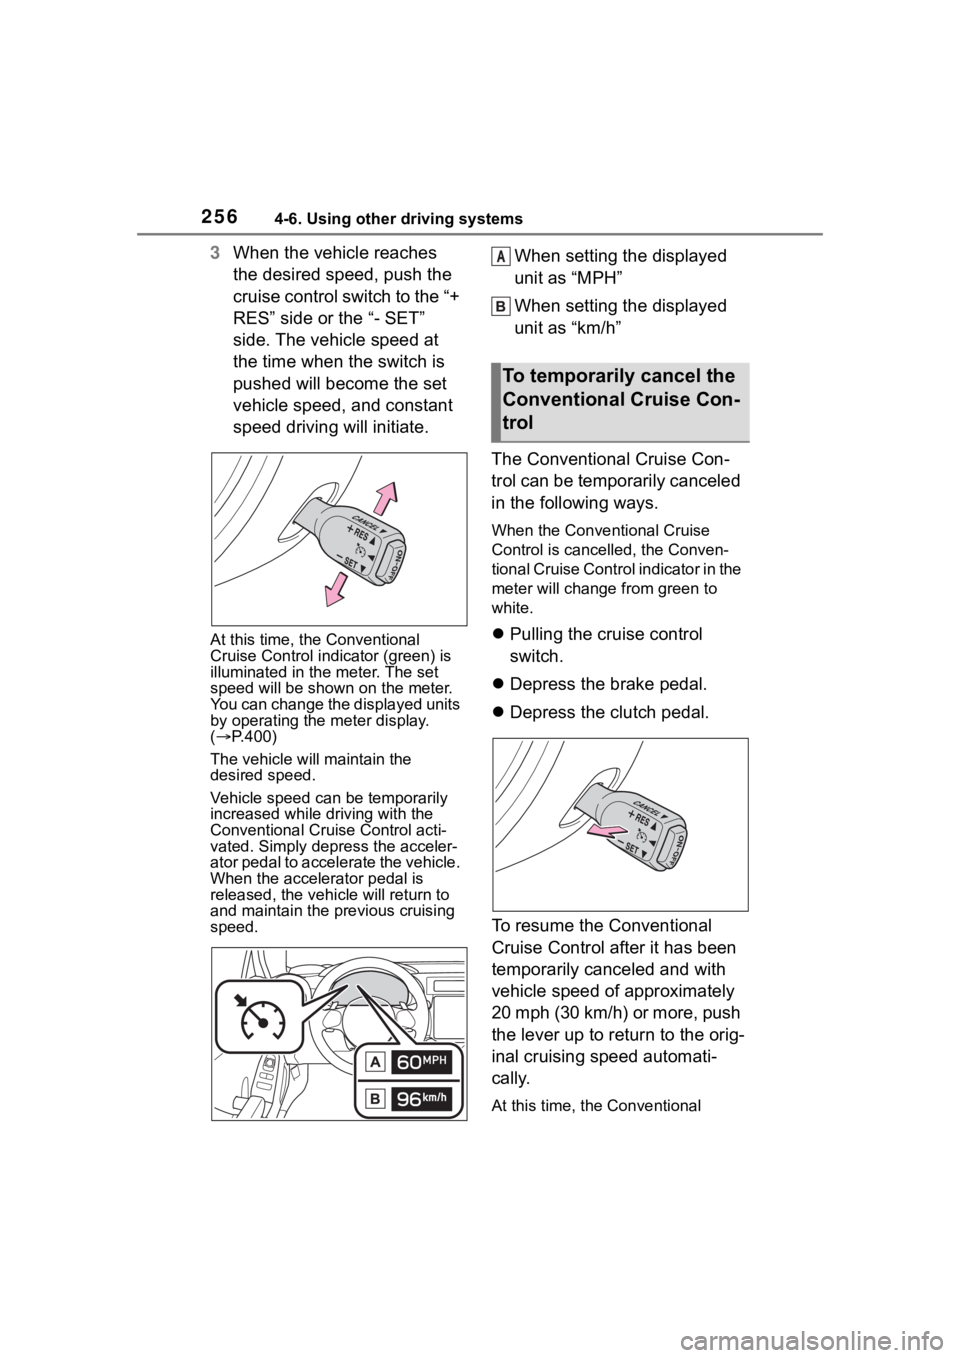
3When the vehicle reaches
the desired speed, push the
cruise control switch to the “+
RES” side or the “- SET”
side. The vehicle speed at
the time when the switch is
pushed will become the set
vehicle speed, and constant
speed driving will initiate.
At this time, the Conventional
Cruise Control indicator (green) is
illuminated in the meter. The set
speed will be shown on the meter.
You can change the displayed units
by operating the meter display.
( P.400)
The vehicle w ill maintain the
desired speed.
Vehicle speed can be temporarily
increased while d riving with the
Conventional Cruise Control acti-
vated. Simply depress the acceler-
ator pedal to accelerate the vehicle.
When the accelerator pedal is
released, the vehi cle will return to
and maintain the pr evious cruising
speed.
When setting the displayed
unit as “MPH”
When setting the displayed
unit as “km/h”
The Conventional Cruise Con-
trol can be temporarily canceled
in the following ways.
When the Conventional Cruise
Control is cancelled, the Conven-
tional Cruise Control indicator in the
meter will change f rom green to
white.
Pulling the cruise control
switch.
Depress the brake pedal.
Depress the clutch pedal.
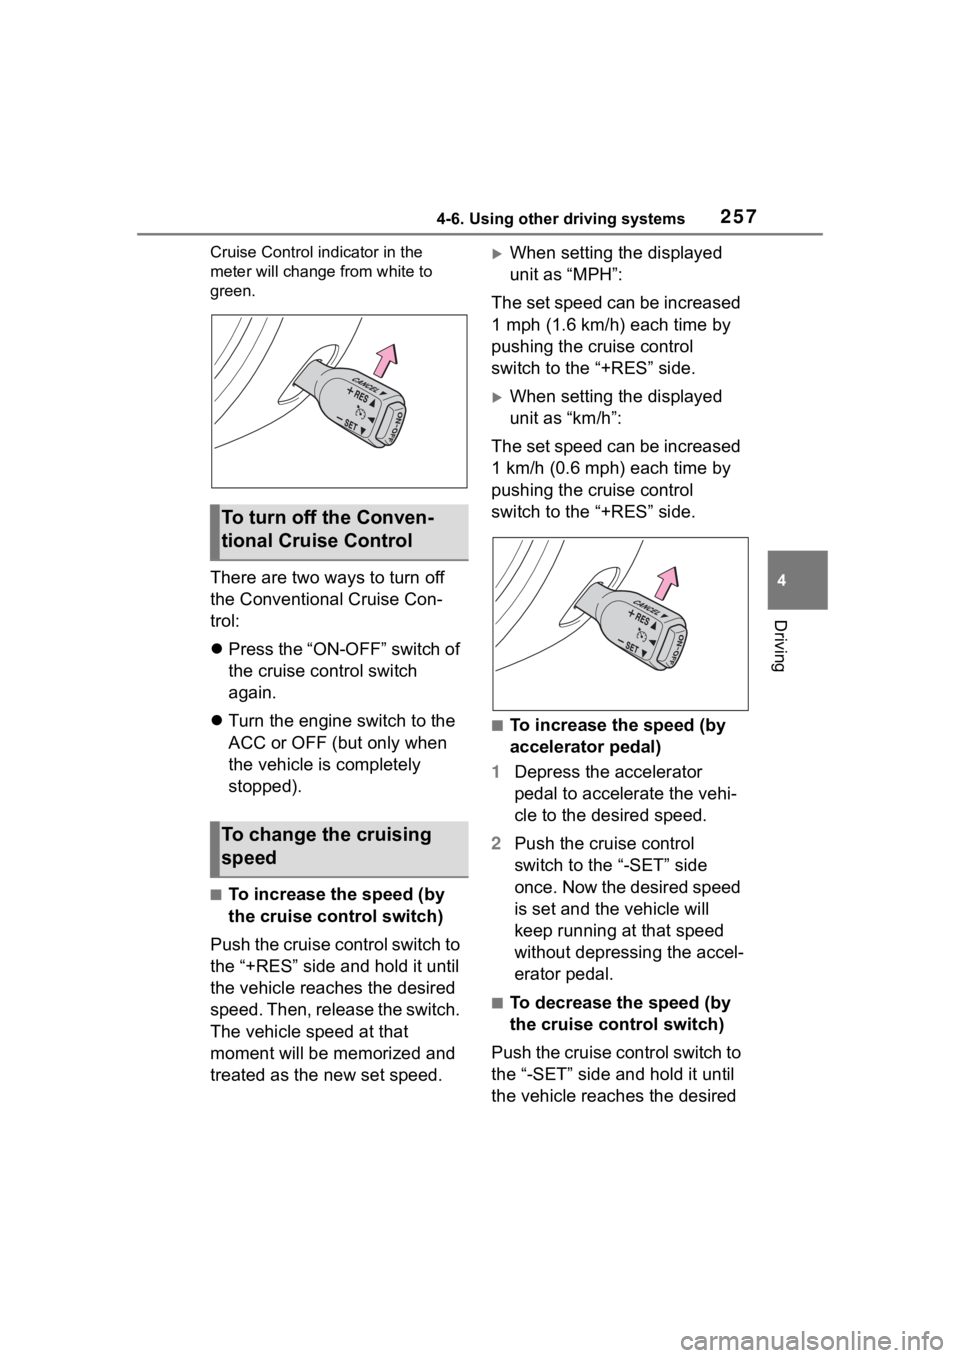
To resume the Conventional
Cruise Control after it has been
temporarily canceled and with
vehicle speed of approximately
20 mph (30 km/h) or more, push
the lever up to return to the orig-
inal cruising speed automati-
cally.
At this time, the Conventional
To temporarily cancel the
Conventional Cruise Con-
trol
A
Page 257 of 449
2574-6. Using other driving systems
4
Driving
Cruise Control indicator in the
meter will change from white to
green.
There are two ways to turn off
the Conventional Cruise Con-
trol:
Press the “ON-OFF” switch of
the cruise control switch
again.
Turn the engine switch to the
ACC or OFF (but only when
the vehicle is completely
stopped).
■To increase the speed (by
the cruise control switch)
Push the cruise control switch to
the “+RES” side and hold it until
the vehicle reaches the desired
speed. Then, release the switch.
The vehicle speed at that
moment will be memorized and
treated as the new set speed.
When setting the displayed
unit as “MPH”:
The set speed can be increased
1 mph (1.6 km/h) each time by
pushing the cruise control
switch to the “+RES” side.
When setting the displayed
unit as “km/h”:
The set speed can be increased
1 km/h (0.6 mph) each time by
pushing the cruise control
switch to the “+RES” side.
■To increase the speed (by
accelerator pedal)
1 Depress the accelerator
pedal to accelerate the vehi-
cle to the desired speed.
2 Push the cruise control
switch to the “-SET” side
once. Now the desired speed
is set and the vehicle will
keep running at that speed
without depressing the accel-
erator pedal.
■To decrease the speed (by
the cruise control switch)
Push the cruise control switch to
the “-SET” side and hold it until
the vehicle reaches the desired
To turn off the Conven-
tional Cruise Control
To change the cruising
speed
Page 258 of 449
2584-6. Using other driving systems
speed. Then, release the switch.
The vehicle speed at that
moment will be memorized and
treated as the new set speed.
When setting the displayed
unit as “MPH”:
The set speed can be
decreased 1 mph (1.6 km/h)
each time by pushing the cruise
control switch to the “-SET” side.
When setting the displayed
unit as “km/h”:
The set speed can be
decreased 1 km/h (0.6 mph)
each time by pushing the cruise
control switch to the “-SET” side.
■To decrease the speed (by
brake pedal)
1 Depress the brake pedal to
release Conventional Cruise
Control temporarily.
2 When the speed decreases
to the desired speed, push
the cruise control switch to
the “-SET” side once. Now
the desired speed is set and
the vehicle will keep running
at that speed without
depressing the accelerator
pedal.
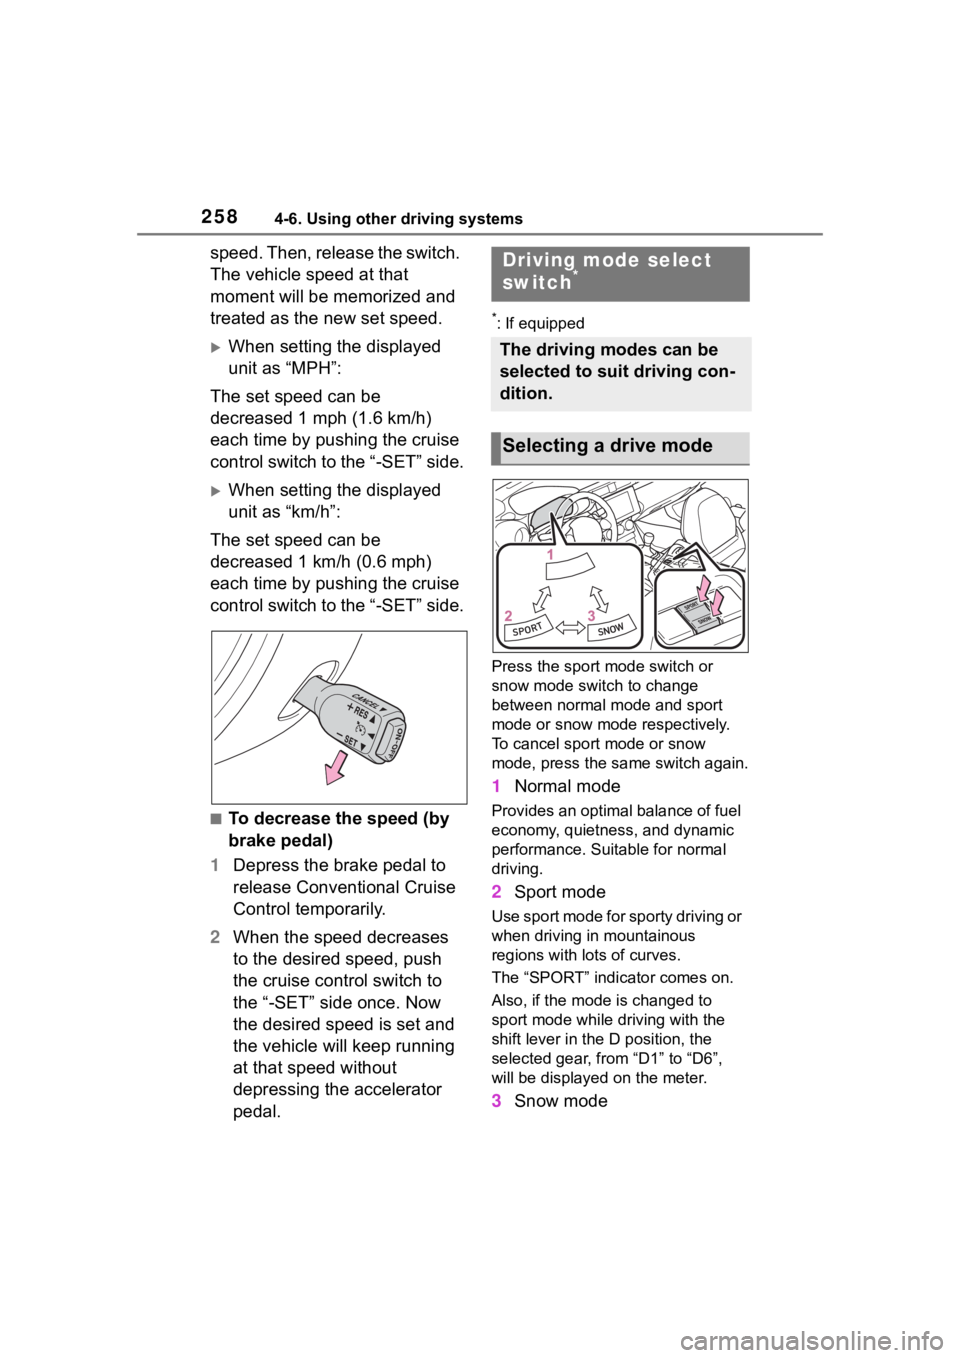
*: If equipped
Press the sport mode switch or
snow mode switch to change
between normal mo de and sport
mode or snow mode respectively.
To cancel sport mode or snow
mode, press the sa me switch again.
1Normal mode
Provides an optimal balance of fuel
economy, quietness, and dynamic
performance. Suitable for normal
driving.
2Sport mode
Use sport mode for sporty driving or
when driving in mountainous
regions with lots of curves.
The “SPORT” indicator comes on.
Also, if the mode is changed to
sport mode while driving with the
shift lever in the D position, the
selected gear, from “D1” to “D6”,
will be displayed on the meter.
3Snow mode
Driving mode select
switch*
The driving modes can be
selected to suit driving con-
dition.
Selecting a drive mode
Page 259 of 449
2594-6. Using other driving systems
4
Driving
Use snow mode for accelerating
and driving on slippery road sur-
faces such as snow.
The snow mode indicator comes
on.
■Sport mode
●In sport mode, lower gears are
used and gears change at a
higher engine speed.
●In the following situations, it may
not be possible to change to sport
mode. When the mode cannot be
changed to sport mode, a buzzer
will sound and a message will be
displayed on the multi-information
display.
• When the Adaptive Cruise Control or Conventional Cruise Control is
operating
• When the engine is cold
■Snow mode
To prevent slipping, 1st gear cannot
be selected when in snow mode.
■Automatic deactivation of sport
mode and snow mode
In the following si tuations, the driv-
ing mode is autom atically deacti-
vated:
●When the engine is turned off after
driving in sport mode or snow
mode.
●When the Adaptive Cruise Control
or Conventional Cruise Control is
activated while driving in sport
mode.
●When in sport mode and stop-
ping/starting off is automatically
performed in second gear.
( P.150)
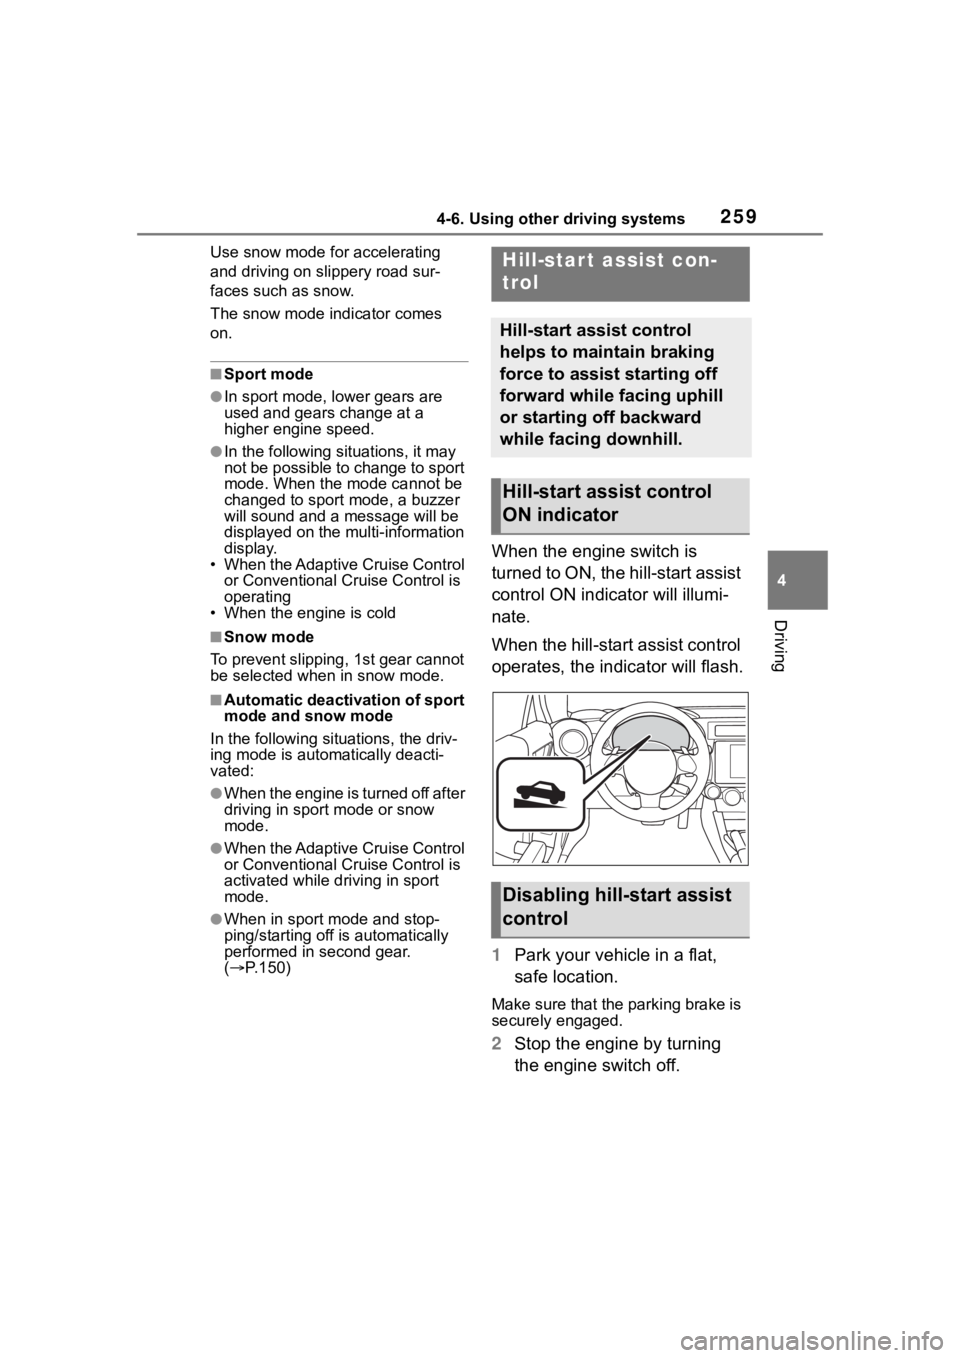
When the engine switch is
turned to ON, the hill-start assist
control ON indicator will illumi-
nate.
When the hill-start assist control
operates, the indicator will flash.
1 Park your vehicle in a flat,
safe location.
Make sure that the parking brake is
securely engaged.
2Stop the engine by turning
the engine switch off.
Hill-star t assist con-
trol
Hill-start assist control
helps to maintain braking
force to assist starting off
forward while facing uphill
or starting off backward
while facing downhill.
Hill-start assist control
ON indicator
Disabling hill-start assist
control
Page 260 of 449
2604-6. Using other driving systems
3Start the engine and check
that the ABS warning light
and slip indicator are off.
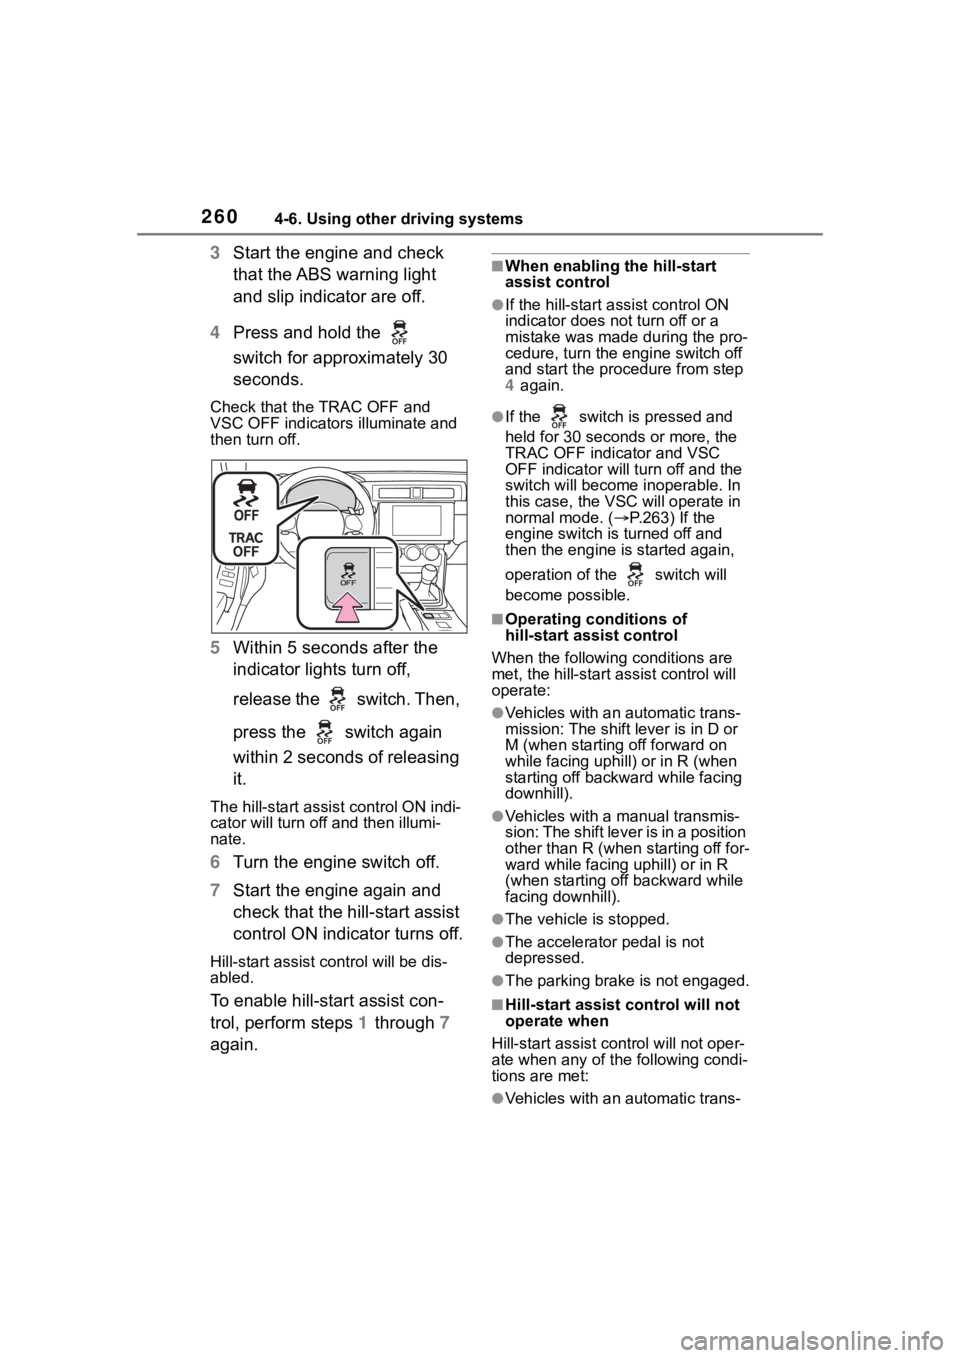
4 Press and hold the
switch for approximately 30
seconds.
Check that the TRAC OFF and
VSC OFF indicators illuminate and
then turn off.
5 Within 5 seconds after the
indicator lights turn off,
release the switch. Then,
press the switch again
within 2 seconds of releasing
it.
The hill-start assis t control ON indi-
cator will turn off and then illumi-
nate.
6 Turn the engine switch off.
7 Start the engine again and
check that the hill-start assist
control ON indicator turns off.
Hill-start assist control will be dis-
abled.
To enable hill-start assist con-
trol, perform steps 1 through 7
again.
■When enabling the hill-start
assist control
●If the hill-start assist control ON
indicator does n ot turn off or a
mistake was made during the pro-
cedure, turn the e ngine switch off
and start the procedure from step
4 again.
●If the switch is pressed and
held for 30 seconds or more, the
TRAC OFF indicator and VSC
OFF indicator will tu rn off and the
switch will become inoperable. In
this case, the VSC will operate in
normal mode. ( P.263) If the
engine switch is turned off and
then the engine is started again,
operation of the switch will
become possible.
■Operating conditions of
hill-start assist control
When the following conditions are
met, the hill-start assist control will
operate:
●Vehicles with an automatic trans-
mission: The shift lever is in D or
M (when starting off forward on
while facing uphill) or in R (when
starting off backward while facing
downhill).
●Vehicles with a manual transmis-
sion: The shift lever is in a position
other than R (when starting off for-
ward while facing uphill) or in R
(when starting off backward while
facing downhill).
●The vehicle is stopped.
●The accelerator pedal is not
depressed.
●The parking brake is not engaged.
■Hill-start assist control will not
operate when
Hill-start assist cont rol will not oper-
ate when any of the following condi-
tions are met:
●Vehicles with an automatic trans-