screen off TOYOTA AVALON 2014 XX40 / 4.G Navigation Manual
[x] Cancel search | Manufacturer: TOYOTA, Model Year: 2014, Model line: AVALON, Model: TOYOTA AVALON 2014 XX40 / 4.GPages: 346, PDF Size: 6.47 MB
Page 48 of 346
48
2. SETUP
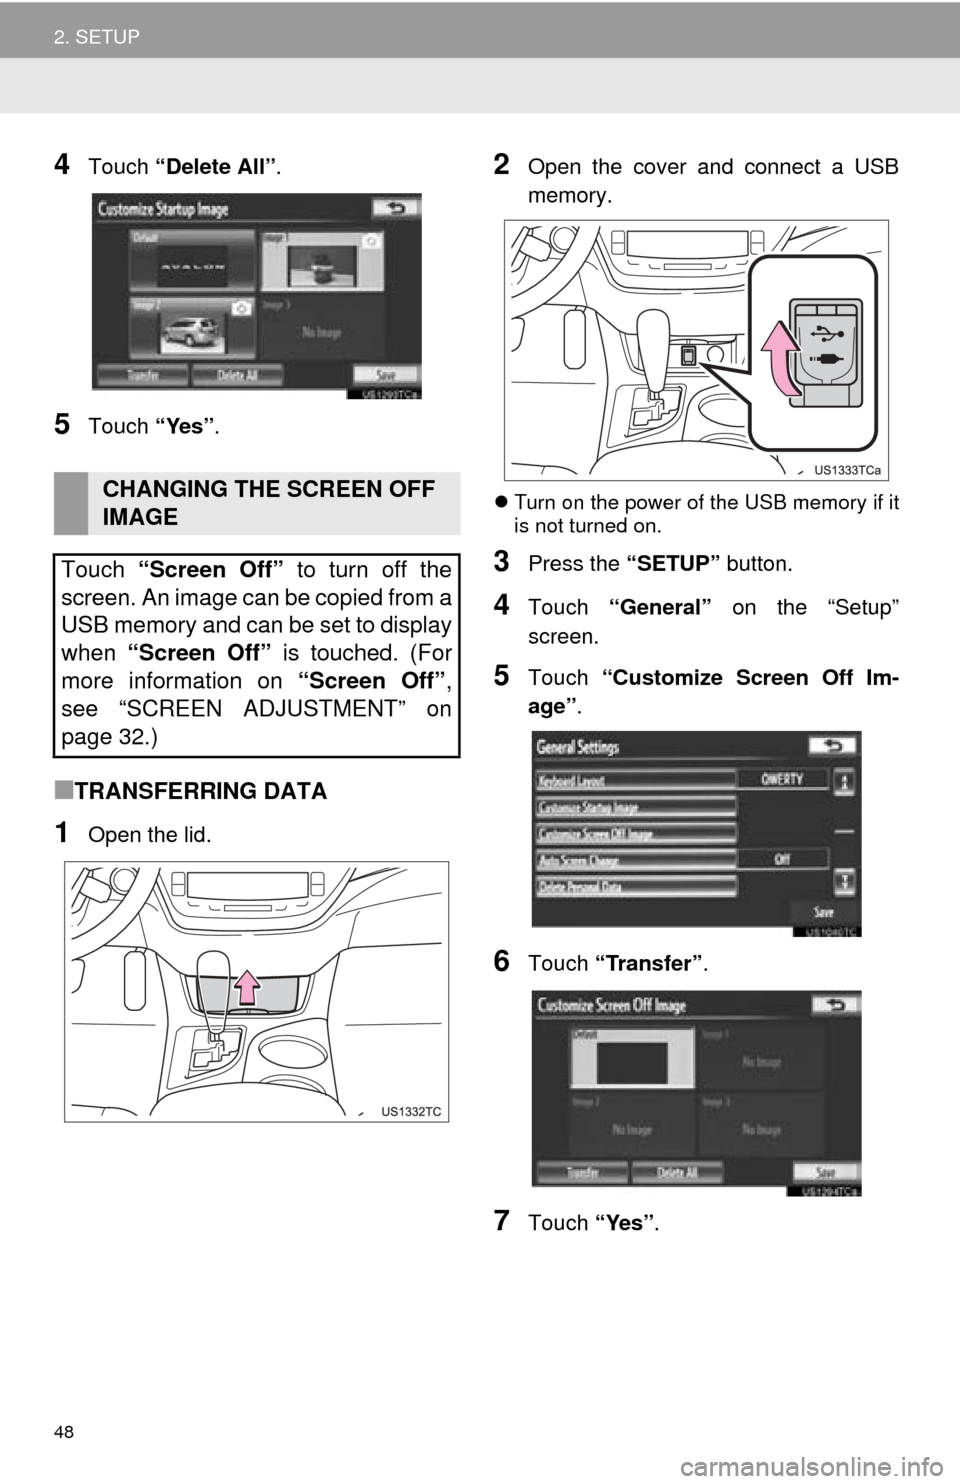
4Touch “Delete All” .
5Touch “Yes”.
■TRANSFERRING DATA
1Open the lid.
2Open the cover and connect a USB
memory.
Turn on the power of the USB memory if it
is not turned on.
3Press the “SETUP” button.
4Touch “General” on the “Setup”
screen.
5Touch “Customize Screen Off Im-
age” .
6Touch “Transfer” .
7Touch “Yes”.
CHANGING THE SCREEN OFF
IMAGE
Touch “Screen Off” to turn off the
screen. An image can be copied from a
USB memory and can be set to display
when “Screen Off” is touched. (For
more information on “Screen Off”,
see “SCREEN ADJUSTMENT” on
page 32.)
Page 49 of 346
49
2. SETUP
2
BASIC FUNCTION
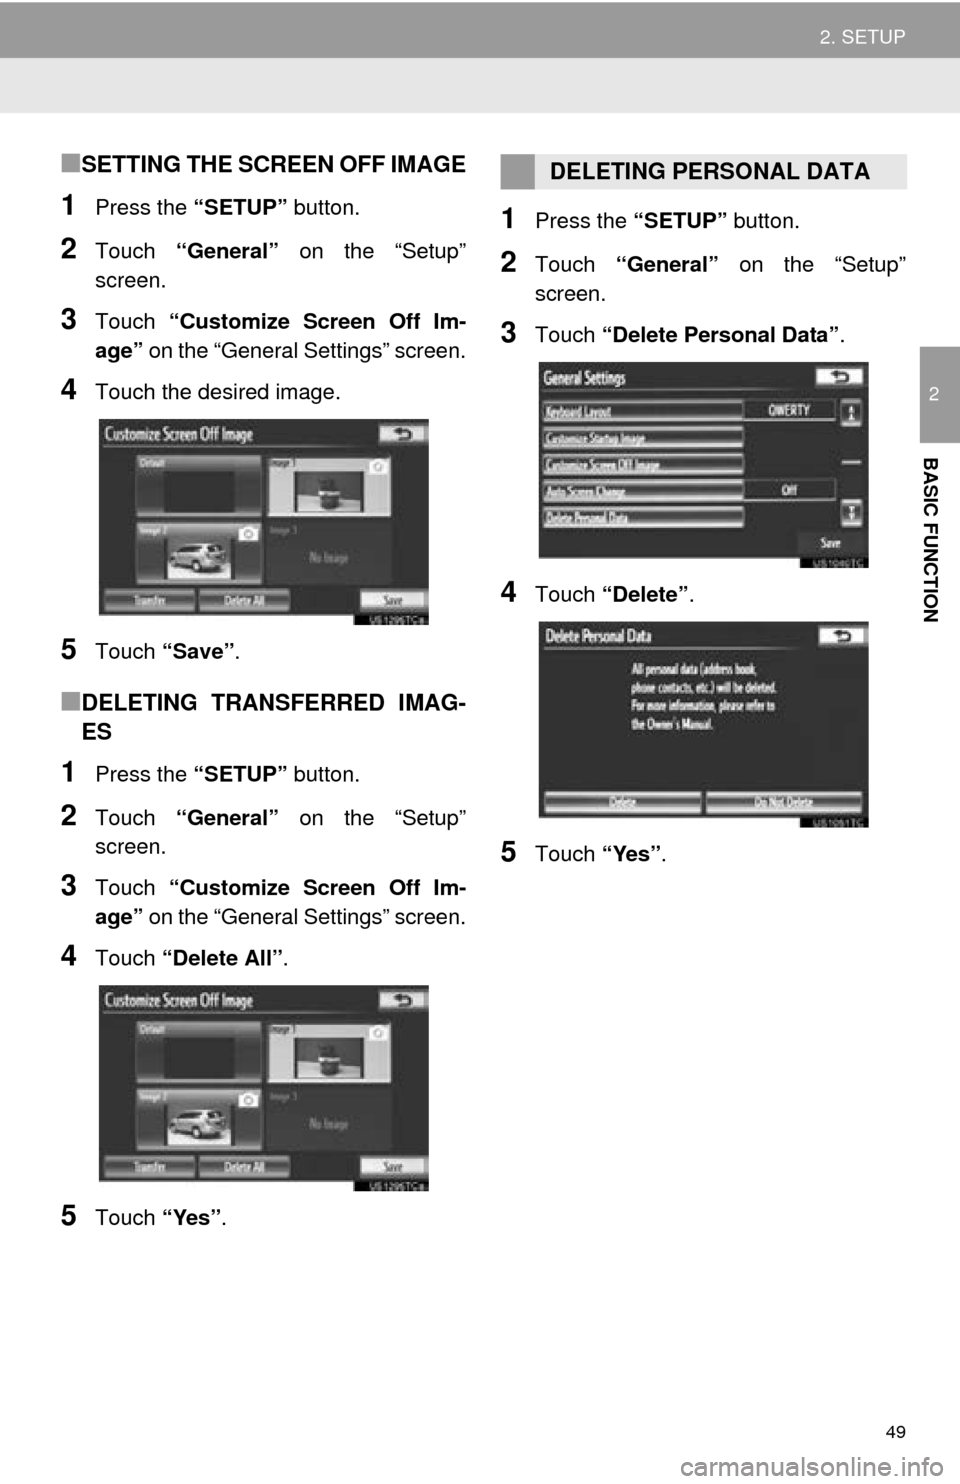
■SETTING THE SCREEN OFF IMAGE
1Press the “SETUP” button.
2Touch “General” on the “Setup”
screen.
3Touch “Customize Screen Off Im-
age” on the “General Settings” screen.
4Touch the desired image.
5Touch “Save” .
■DELETING TRANSFERRED IMAG-
ES
1Press the “SETUP” button.
2Touch “General” on the “Setup”
screen.
3Touch “Customize Screen Off Im-
age” on the “General Settings” screen.
4Touch “Delete All” .
5Touch “Yes”.
1Press the “SETUP” button.
2Touch “General” on the “Setup”
screen.
3Touch “Delete Personal Data” .
4Touch “Delete” .
5Touch “Yes”.
DELETING PERSONAL DATA
Page 50 of 346
50
2. SETUP
The following personal data can be
deleted or returned to their default set-
tings:
• Maintenance conditions
• Address book
• Areas to avoid
• Previous points
• Route guidance
• Route trace
• Phonebook data
• Call history data
• Speed dial data
•Bluetooth
® phone data
• Phone sound settings
• Phone display settings
• Message settings
• Audio setting
•Bluetooth
® audio setting
• Startup image data
• Screen off image data
INFORMATION
● This function is not available while driv-
ing.
Page 51 of 346
51
2. SETUP
2
BASIC FUNCTION
2. VOICE SETTINGS
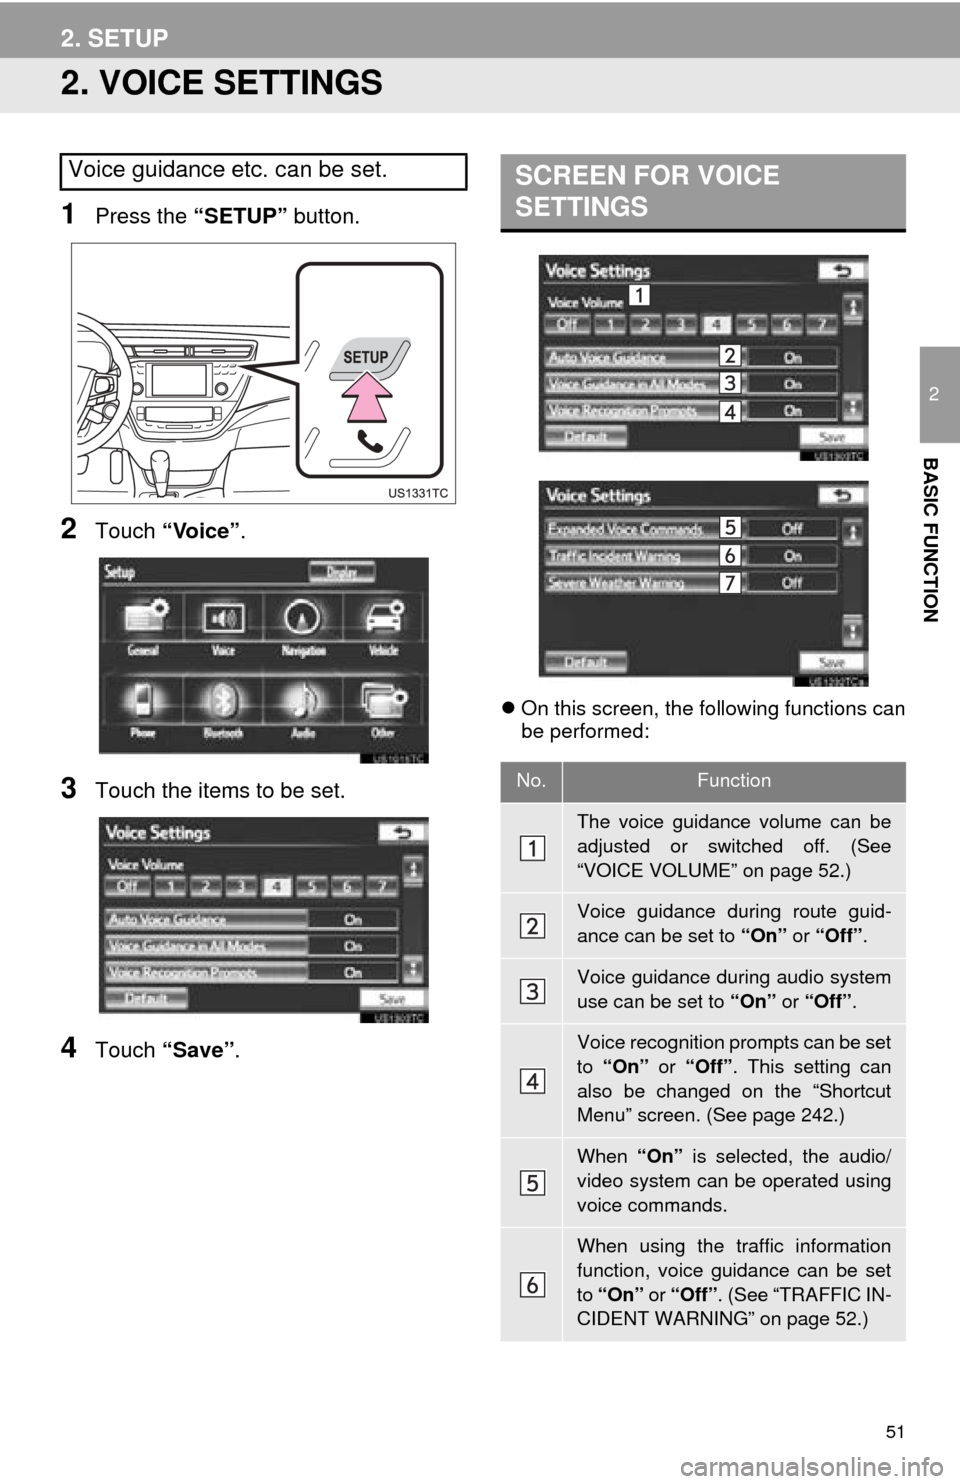
1Press the “SETUP” button.
2Touch “Voice”.
3Touch the items to be set.
4Touch “Save” .
On this screen, the following functions can
be performed:
Voice guidance etc. can be set.SCREEN FOR VOICE
SETTINGS
No.Function
The voice guidance volume can be
adjusted or switched off. (See
“VOICE VOLUME” on page 52.)
Voice guidance during route guid-
ance can be set to “On” or “Off” .
Voice guidance during audio system
use can be set to “On” or “Off” .
Voice recognition prompts can be set
to “On” or “Off” . This setting can
also be changed on the “Shortcut
Menu” screen. (See page 242.)
When “On” is selected, the audio/
video system can be operated using
voice commands.
When using the traffic information
function, voice guidance can be set
to “On” or “Off” . (See “TRAFFIC IN-
CIDENT WARNING” on page 52.)
Page 52 of 346
52
2. SETUP
To reset all setup items, touch “Default”.
1Press the “SETUP” button.
2Touch “Voice” on the “Setup” screen.
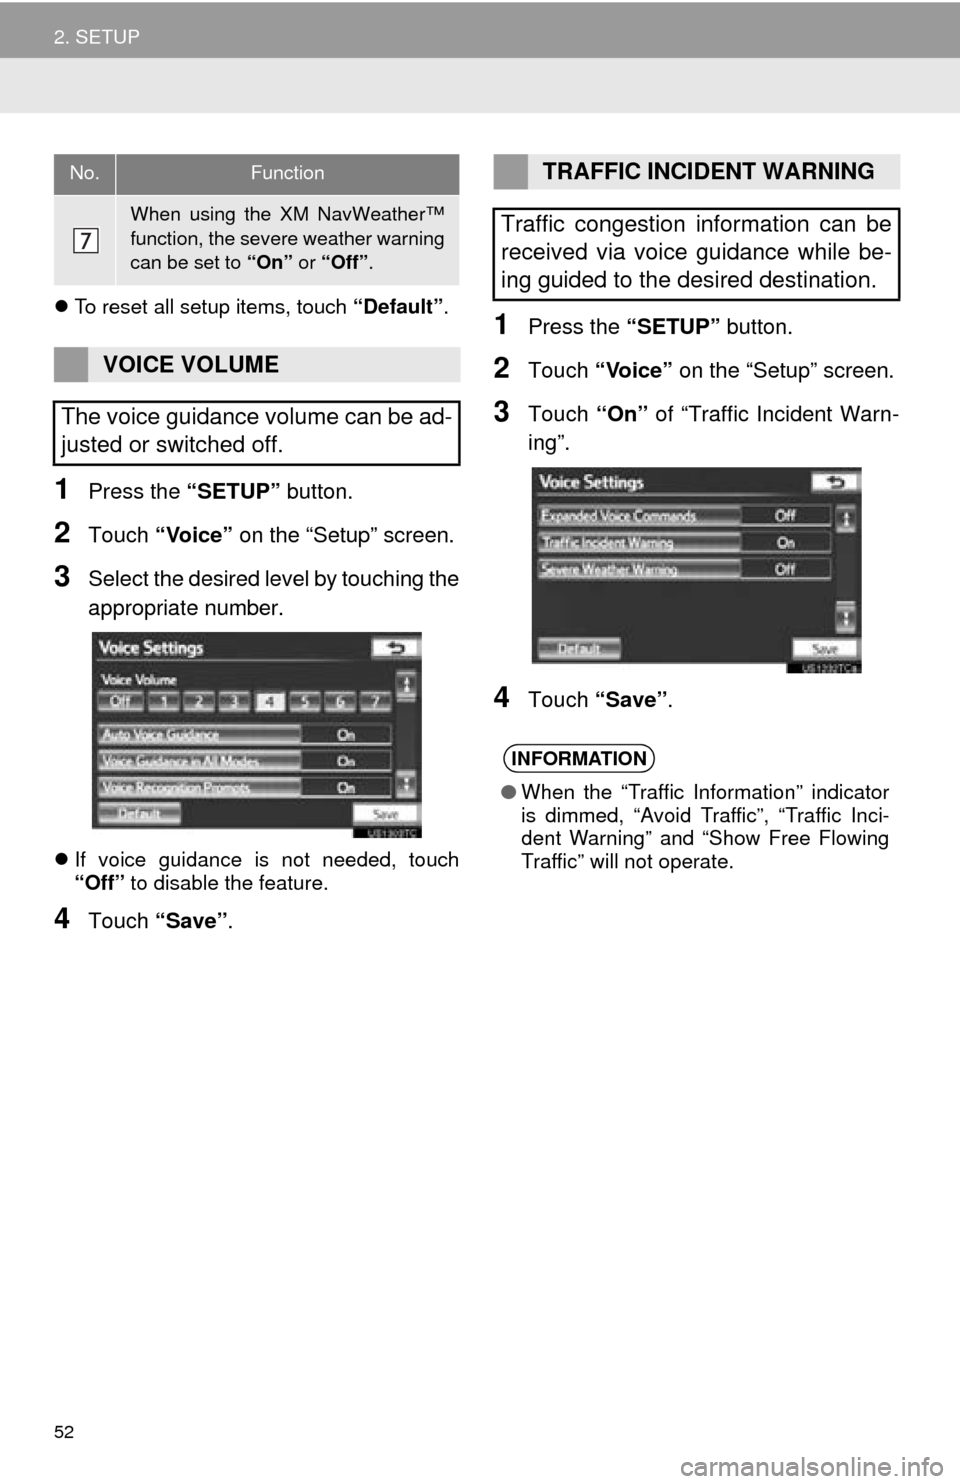
3Select the desired level by touching the
appropriate number.
If voice guidance is not needed, touch
“Off” to disable the feature.
4Touch “Save” .
1Press the “SETUP” button.
2Touch “Voice” on the “Setup” screen.
3Touch “On” of “Traffic Incident Warn-
ing”.
4Touch “Save” .
When using the XM NavWeather™
function, the severe weather warning
can be set to “On” or “Off” .
VOICE VOLUME
The voice guidance volume can be ad-
justed or switched off.
No.FunctionTRAFFIC INCIDENT WARNING
Traffic congestion information can be
received via voice guidance while be-
ing guided to the desired destination.
INFORMATION
● When the “Traffic Information” indicator
is dimmed, “Avoid Traf fic”, “Traffic Inci-
dent Warning” and “Show Free Flowing
Traffic” will not operate.
Page 74 of 346
74
2. ROUTE GUIDANCE
1. ROUTE GUIDANCE SCREEN
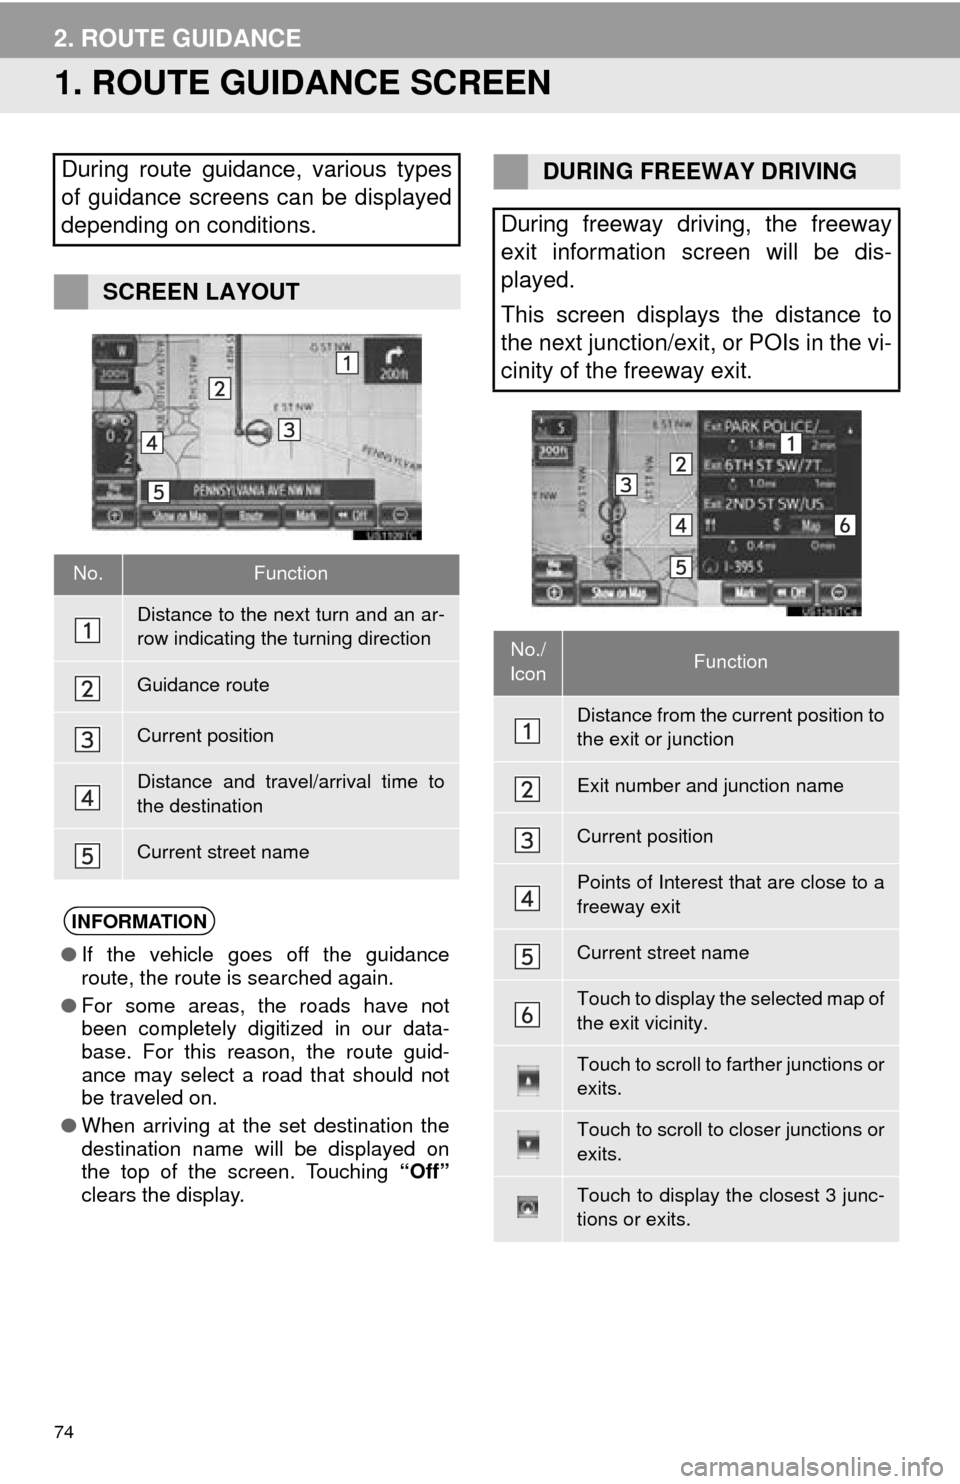
During route guidance, various types
of guidance screens can be displayed
depending on conditions.
SCREEN LAYOUT
No.Function
Distance to the next turn and an ar-
row indicating the turning direction
Guidance route
Current position
Distance and travel/arrival time to
the destination
Current street name
INFORMATION
●If the vehicle goes off the guidance
route, the route is searched again.
● For some areas, the roads have not
been completely digitized in our data-
base. For this reason, the route guid-
ance may select a road that should not
be traveled on.
● When arriving at the set destination the
destination name will be displayed on
the top of the screen. Touching “Off”
clears the display.
DURING FREEWAY DRIVING
During freeway driving, the freeway
exit information screen will be dis-
played.
This screen displays the distance to
the next junction/exit, or POIs in the vi-
cinity of the freeway exit.
No./
IconFunction
Distance from the current position to
the exit or junction
Exit number and junction name
Current position
Points of Interest that are close to a
freeway exit
Current street name
Touch to display the selected map of
the exit vicinity.
Touch to scroll to farther junctions or
exits.
Touch to scroll to closer junctions or
exits.
Touch to display the closest 3 junc-
tions or exits.
Page 80 of 346
80
2. ROUTE GUIDANCE
3. DISTANCE AND TIME TO DESTINATION
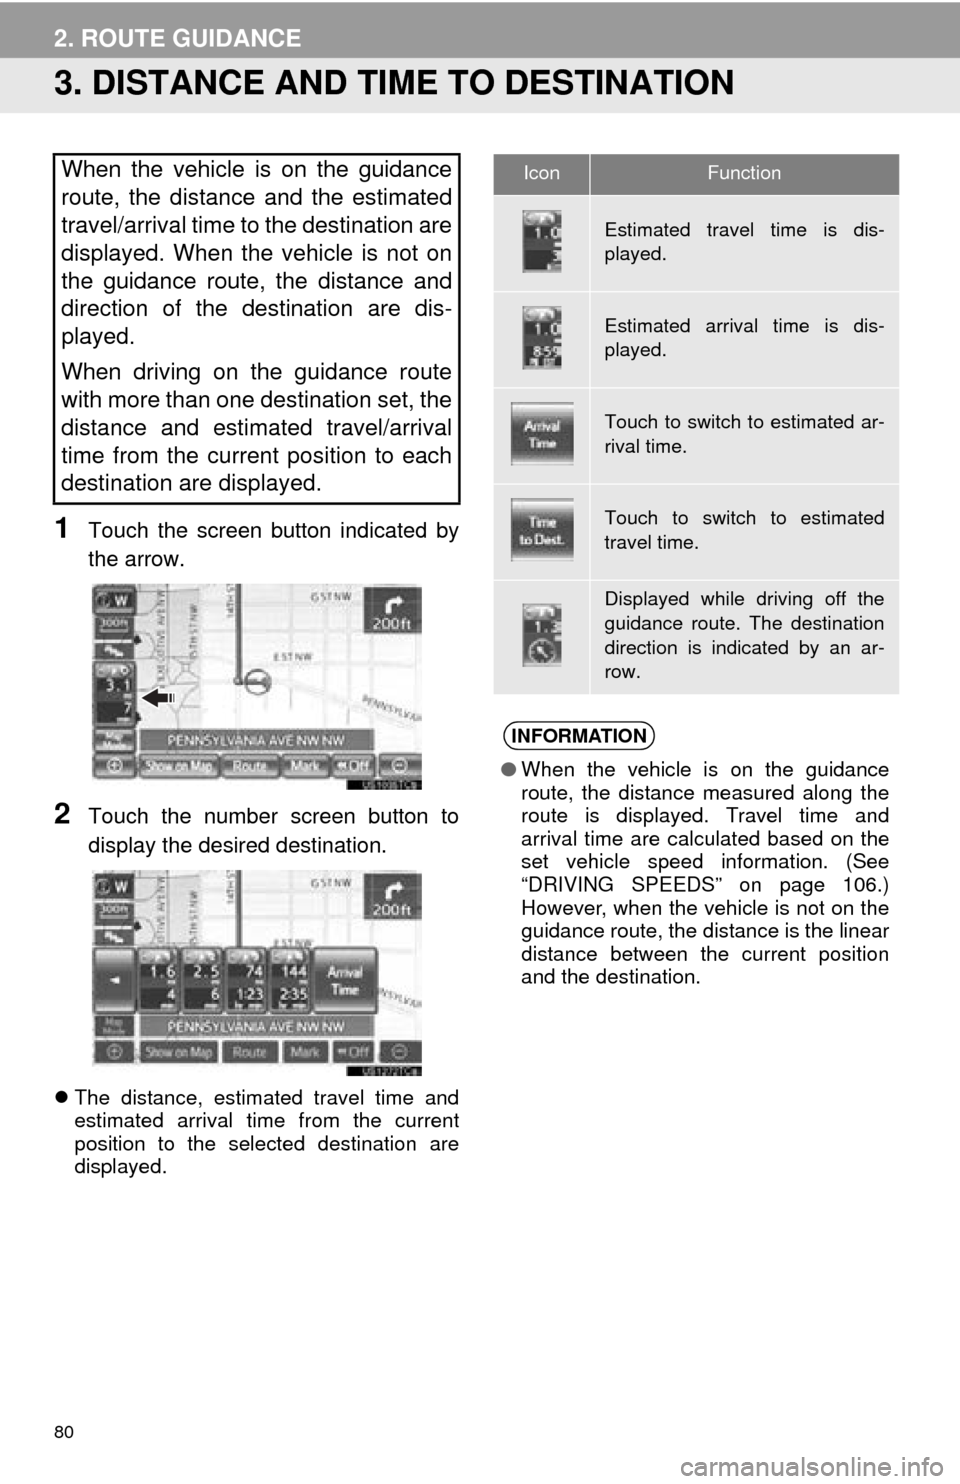
1Touch the screen button indicated by
the arrow.
2Touch the number screen button to
display the desired destination.
The distance, estimated travel time and
estimated arrival time from the current
position to the selected destination are
displayed.
When the vehicle is on the guidance
route, the distance and the estimated
travel/arrival time to the destination are
displayed. When the vehicle is not on
the guidance route, the distance and
direction of the destination are dis-
played.
When driving on the guidance route
with more than one destination set, the
distance and estimated travel/arrival
time from the current position to each
destination are displayed.IconFunction
Estimated travel time is dis-
played.
Estimated arrival time is dis-
played.
Touch to switch to estimated ar-
rival time.
Touch to switch to estimated
travel time.
Displayed while driving off the
guidance route. The destination
direction is indicated by an ar-
row.
INFORMATION
●When the vehicle is on the guidance
route, the distance measured along the
route is displayed. Travel time and
arrival time are calculated based on the
set vehicle speed information. (See
“DRIVING SPEEDS” on page 106.)
However, when the vehicle is not on the
guidance route, the distance is the linear
distance between the current position
and the destination.
Page 86 of 346
86
2. ROUTE GUIDANCE
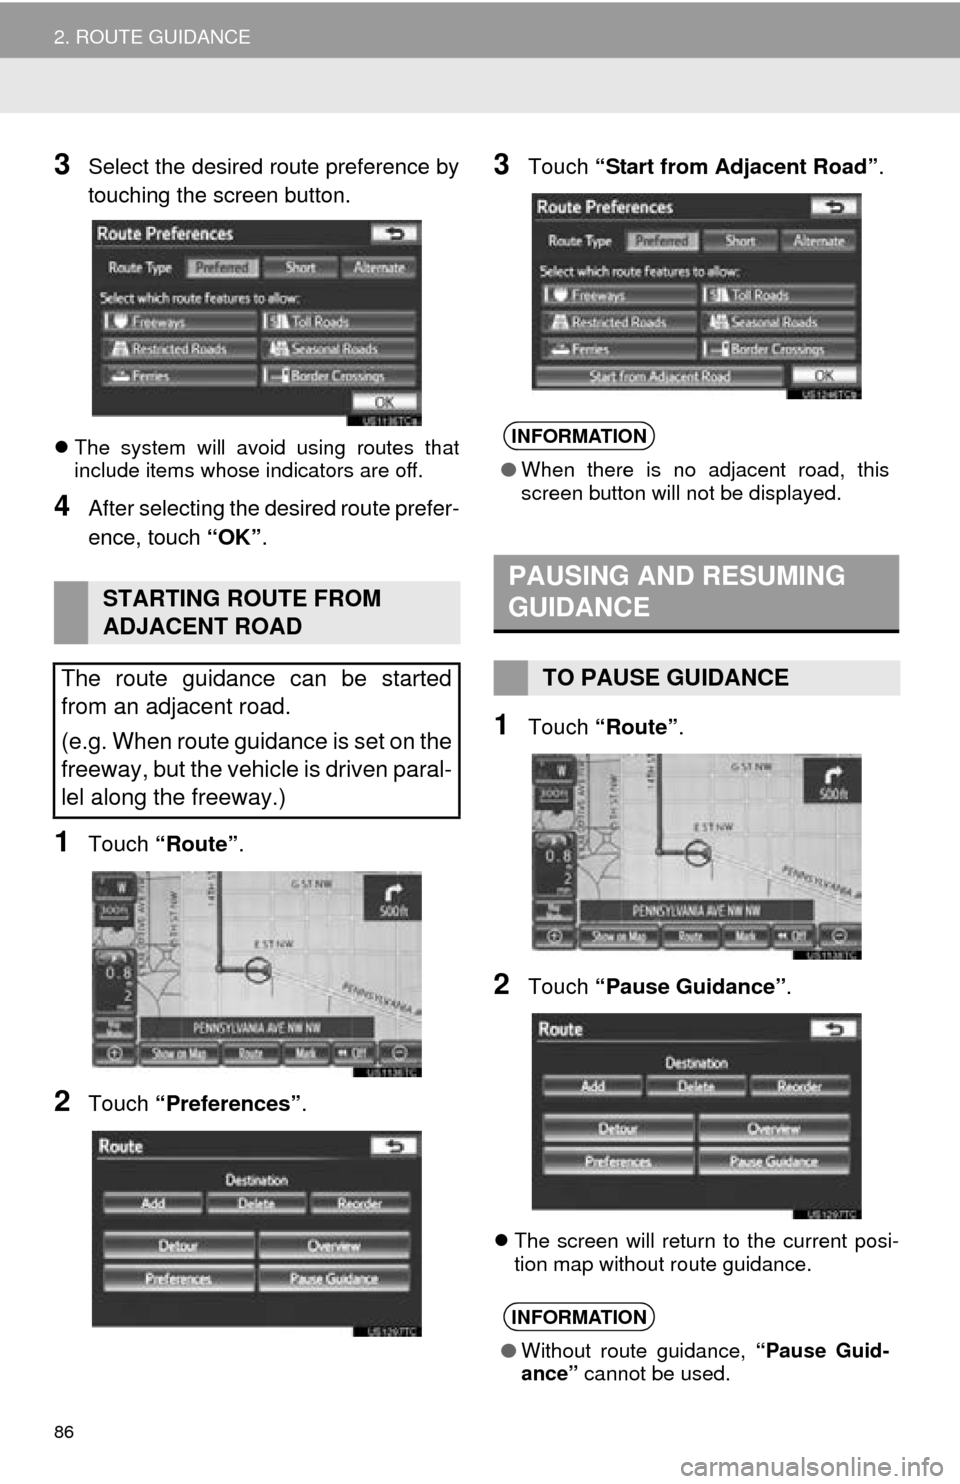
3Select the desired route preference by
touching the screen button.
The system will avoid using routes that
include items whose indicators are off.
4After selecting the desired route prefer-
ence, touch “OK”.
1Touch “Route” .
2Touch “Preferences” .
3Touch “Start from Adjacent Road” .
1Touch “Route” .
2Touch “Pause Guidance” .
The screen will return to the current posi-
tion map without route guidance.
STARTING ROUTE FROM
ADJACENT ROAD
The route guidance can be started
from an adjacent road.
(e.g. When route guidance is set on the
freeway, but the vehicle is driven paral-
lel along the freeway.)
INFORMATION
● When there is no adjacent road, this
screen button will not be displayed.
PAUSING AND RESUMING
GUIDANCE
TO PAUSE GUIDANCE
INFORMATION
●Without route guidance, “Pause Guid-
ance” cannot be used.
Page 88 of 346
88
2. ROUTE GUIDANCE
By touching the desired POI category and
then touching “OK”, the selected POI
icons are displayed on the map screen.
To turn off the Points of Interest icons on
the map screen, touch “Clear”.
“Other POIs” : Touch to display other
Points of Interest categories if the desired
Points of Interest cannot be found on the
limited choice screen.
“Find Local POI” : Touch to search for the
nearest POIs. Then select one of the cate-
gories. The system will list the points within
20 miles (32 km). (See page 88.)
2Touch “Other POIs” on the “Select
POI Icons” screen.
When a POI category is selected from
either the limited list or the complete list,
the icons of those locations will be dis-
played on the map screen.
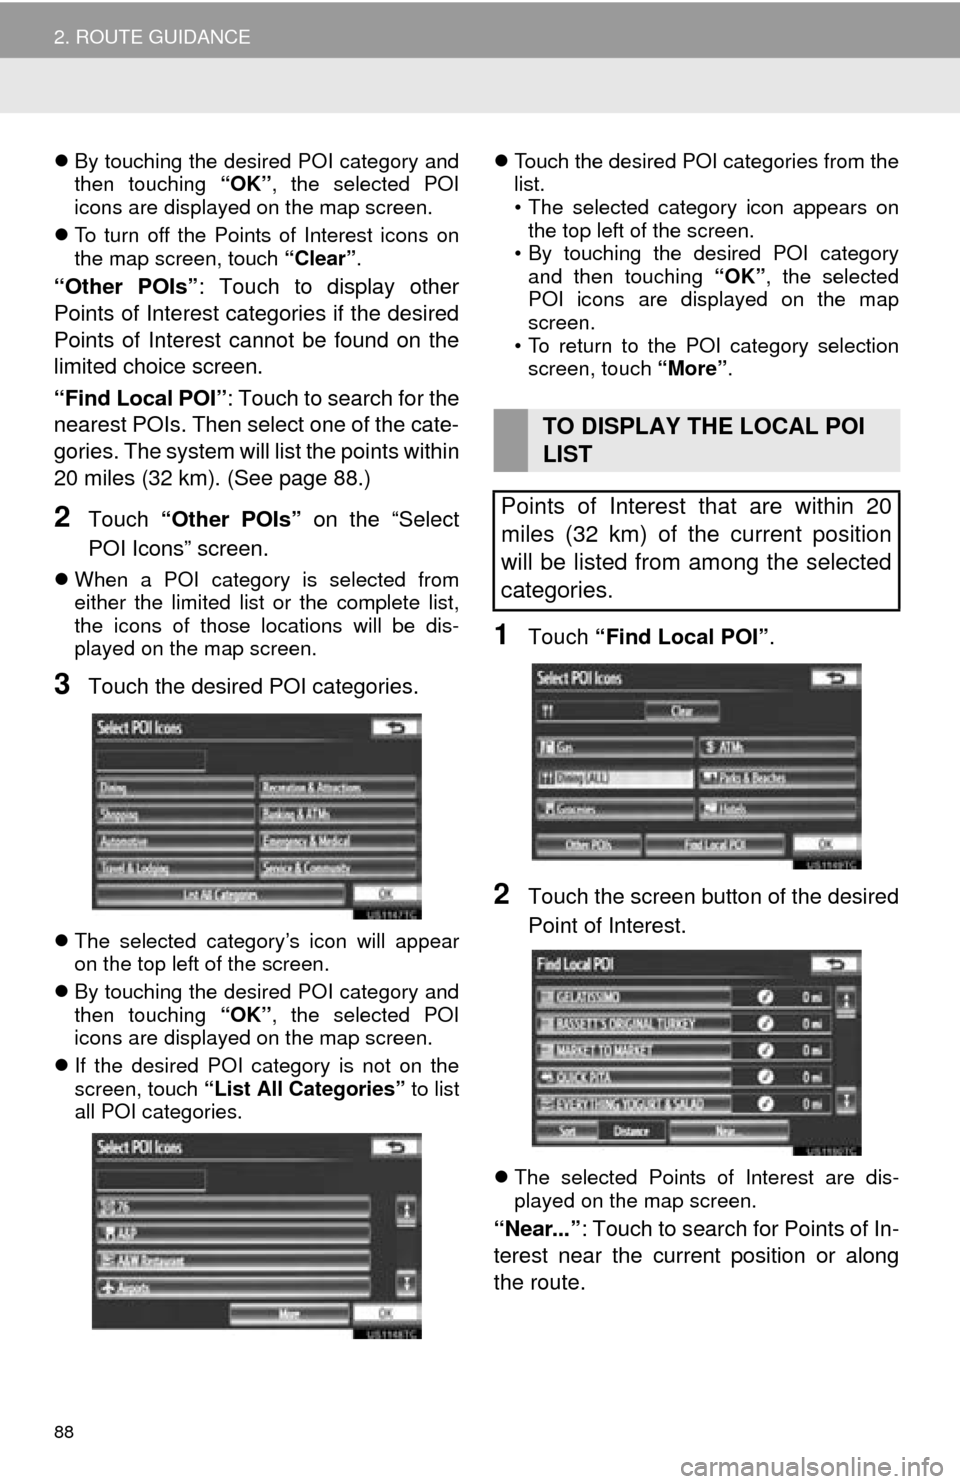
3Touch the desired POI categories.
The selected category’s icon will appear
on the top left of the screen.
By touching the desired POI category and
then touching “OK”, the selected POI
icons are displayed on the map screen.
If the desired POI category is not on the
screen, touch “List All Categories” to list
all POI categories.
Touch the desired POI categories from the
list.
• The selected category icon appears on
the top left of the screen.
• By touching the desired POI category
and then touching “OK”, the selected
POI icons are displayed on the map
screen.
• To return to the POI category selection screen, touch “More”.
1Touch “Find Local POI” .
2Touch the screen button of the desired
Point of Interest.
The selected Points of Interest are dis-
played on the map screen.
“Near...”: Touch to search for Points of In-
terest near the current position or along
the route.
TO DISPLAY THE LOCAL POI
LIST
Points of Interest that are within 20
miles (32 km) of the current position
will be listed from among the selected
categories.
Page 93 of 346
93
3. ADDRESS BOOK
3
NAVIGATION SYSTEM
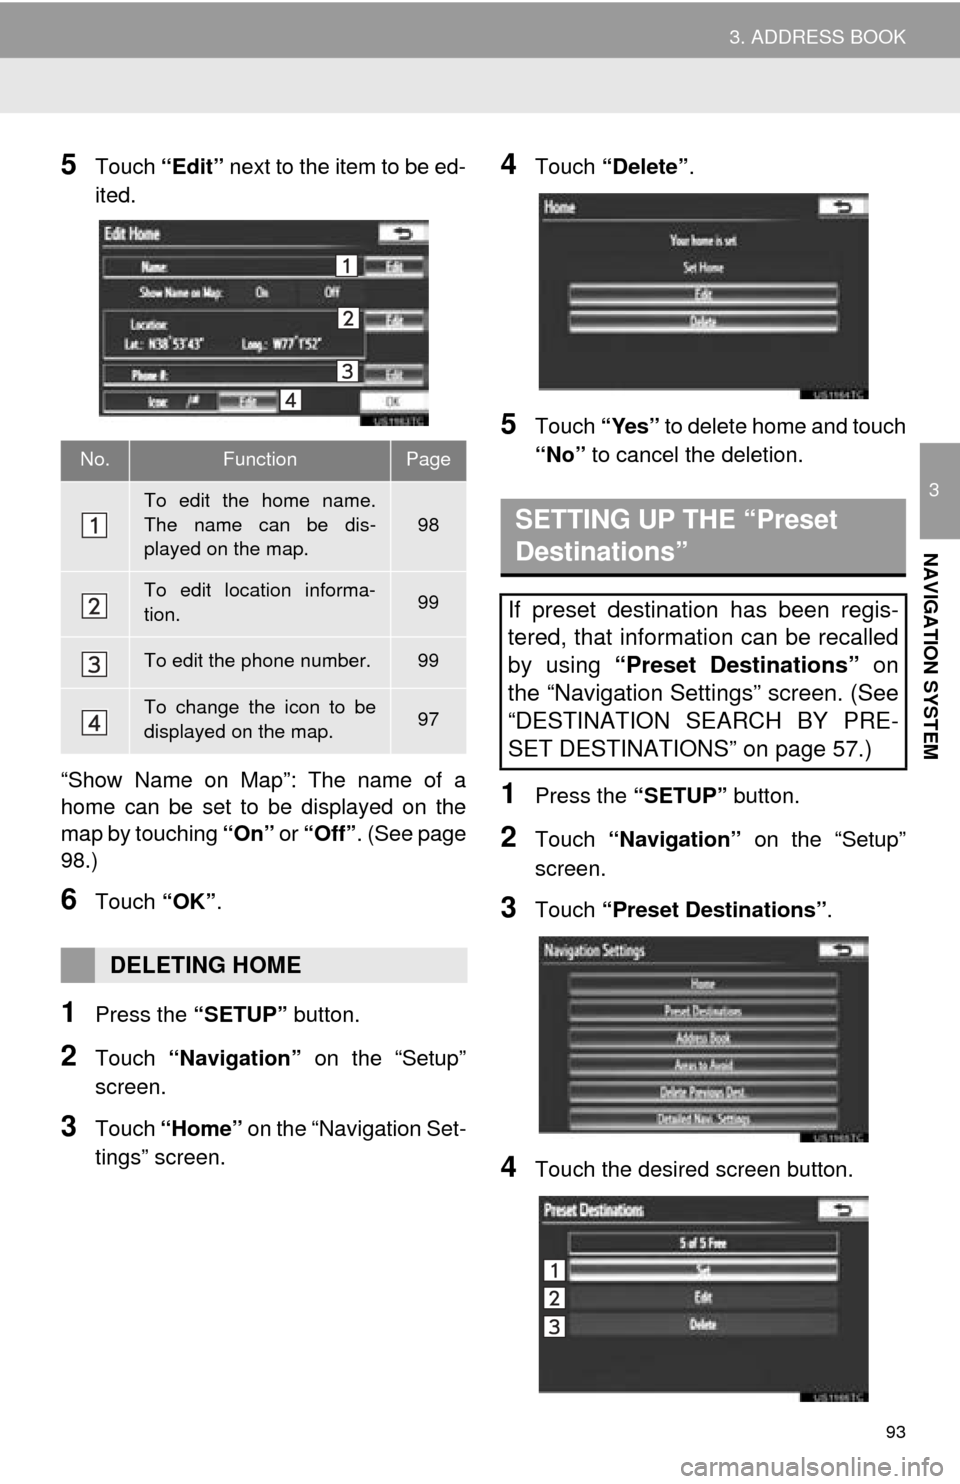
5Touch “Edit” next to the item to be ed-
ited.
“Show Name on Map”: The name of a
home can be set to be displayed on the
map by touching “On” or “Off”. (See page
98.)
6Touch “OK”.
1Press the “SETUP” button.
2Touch “Navigation” on the “Setup”
screen.
3Touch “Home” on the “Navigation Set-
tings” screen.
4Touch “Delete” .
5Touch “Yes” to delete home and touch
“No” to cancel the deletion.
1Press the “SETUP” button.
2Touch “Navigation” on the “Setup”
screen.
3Touch “Preset Destinations” .
4Touch the desired screen button.
No.FunctionPage
To edit the home name.
The name can be dis-
played on the map.
98
To edit location informa-
tion.99
To edit the phone number.99
To change the icon to be
displayed on the map.97
DELETING HOME
SETTING UP THE “Preset
Destinations”
If preset destination has been regis-
tered, that information can be recalled
by using “Preset Destinations” on
the “Navigation Settings” screen. (See
“DESTINATION SEARCH BY PRE-
SET DESTINATIONS” on page 57.)