display TOYOTA AVALON 2020 Accessories, Audio & Navigation (in English)
[x] Cancel search | Manufacturer: TOYOTA, Model Year: 2020, Model line: AVALON, Model: TOYOTA AVALON 2020Pages: 326, PDF Size: 7.79 MB
Page 37 of 326
37
1. BASIC INFORMATION BEFORE OPERATION
BASIC FUNCTION
2
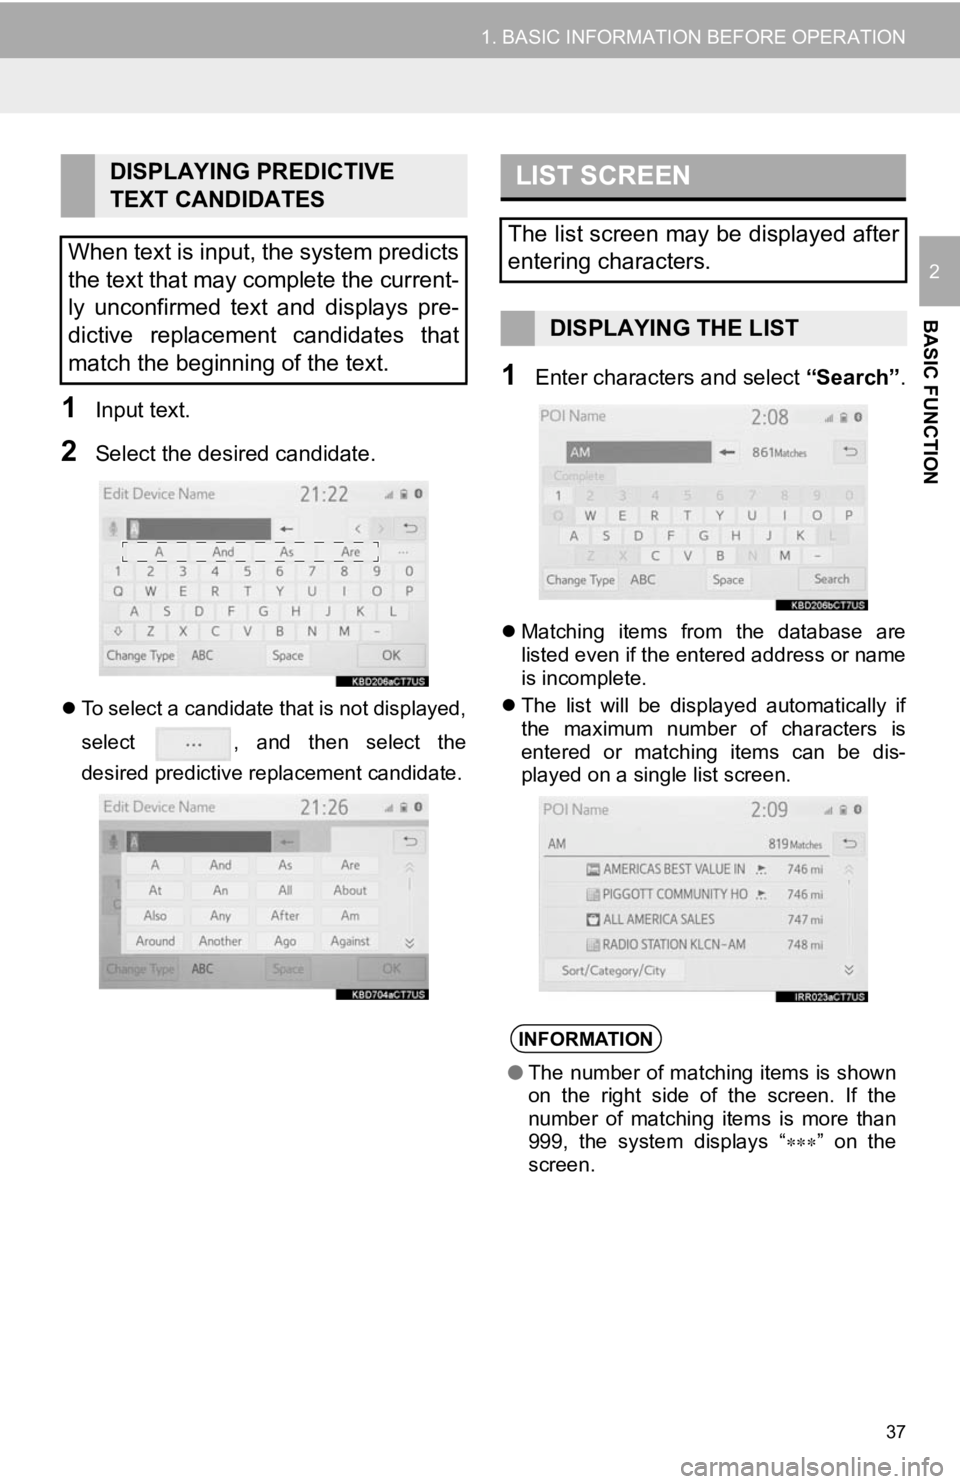
1Input text.
2Select the desired candidate.
To select a candidate that is not displayed,
select , and then select the
desired predictive replacement candidate.
1Enter characters and select “Search”.
Matching items from the database are
listed even if the entered address or name
is incomplete.
The list will be displayed automatically if
the maximum number of characters is
entered or matching items can be dis-
played on a single list screen.
DISPLAYING PREDICTIVE
TEXT CANDIDATES
When text is input, the system predicts
the text that may complete the current-
ly unconfirmed text and displays pre-
dictive replacement candidates that
match the beginning of the text.LIST SCREEN
The list screen may be displayed after
entering characters.
DISPLAYING THE LIST
INFORMATION
● The number of matching items is shown
on the right side of the screen. If the
number of matching items is more than
999, the system displays “ ” on the
screen.
Page 38 of 326
38
1. BASIC INFORMATION BEFORE OPERATION
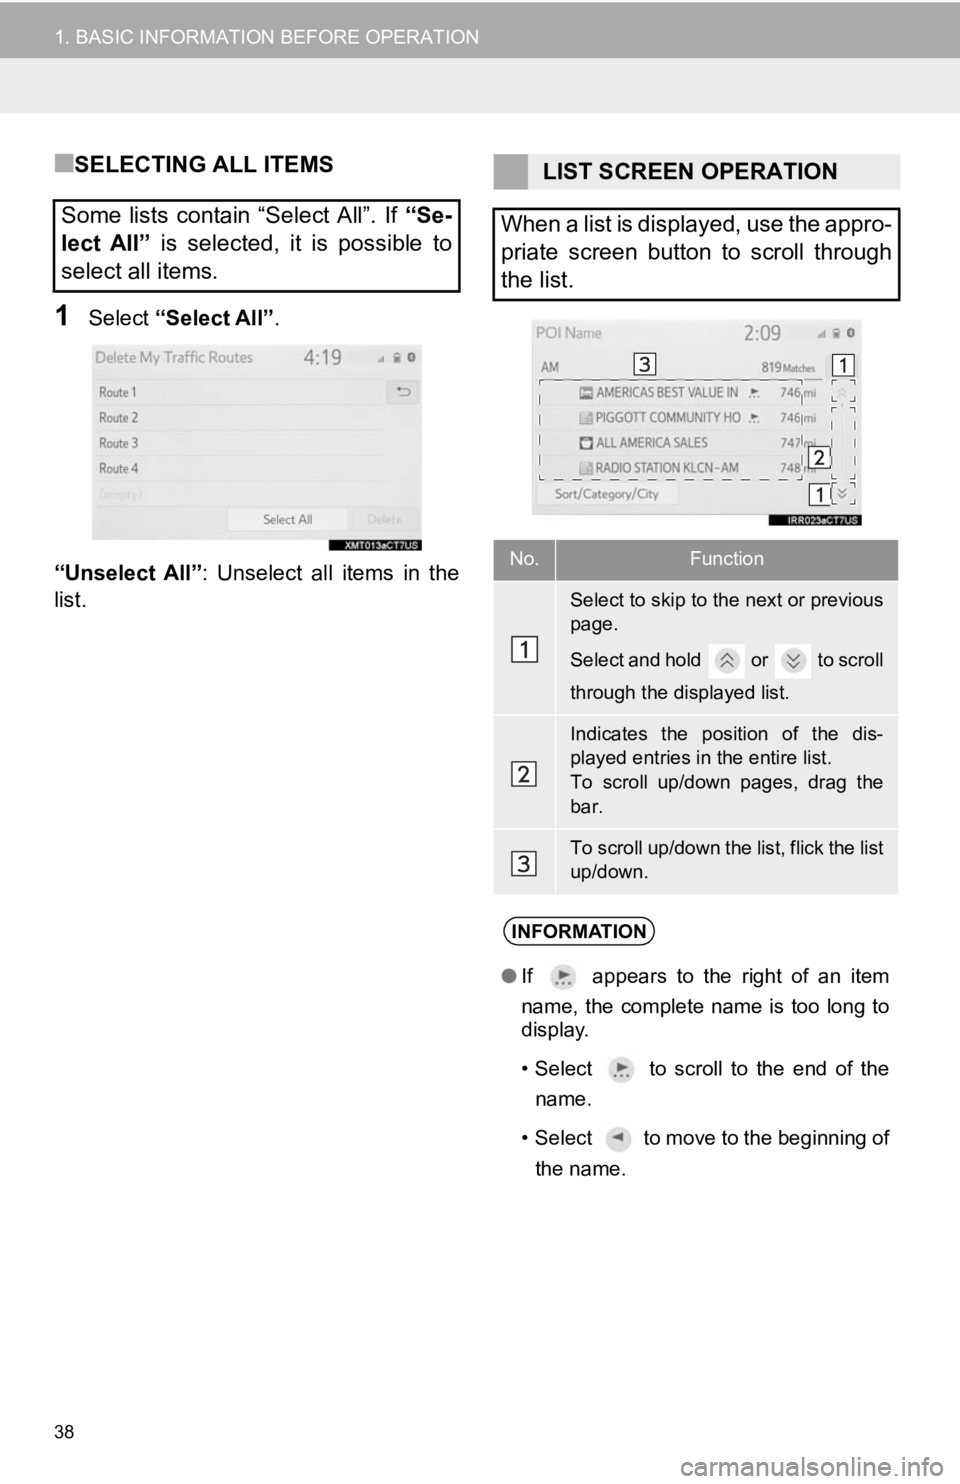
■SELECTING ALL ITEMS
1Select “Select All” .
“Unselect All” : Unselect all items in the
list.
Some lists contain “Select All”. If “Se-
lect All” is selected, it is possible to
select all items.
LIST SCREEN OPERATION
When a list is displayed, use the appro-
priate screen button to scroll through
the list.
No.Function
Select to skip to the next or previous
page.
Select and hold or to scroll
through the displayed list.
Indicates the position of the dis-
played entries in the entire list.
To scroll up/down pages, drag the
bar.
To scroll up/down the list, flick the list
up/down.
INFORMATION
● If appears to the right of an item
name, the complete name is too long to
display.
• Select to scroll to the end of the
name.
• Select to move to the beginning of the name.
Page 39 of 326
39
1. BASIC INFORMATION BEFORE OPERATION
BASIC FUNCTION
2
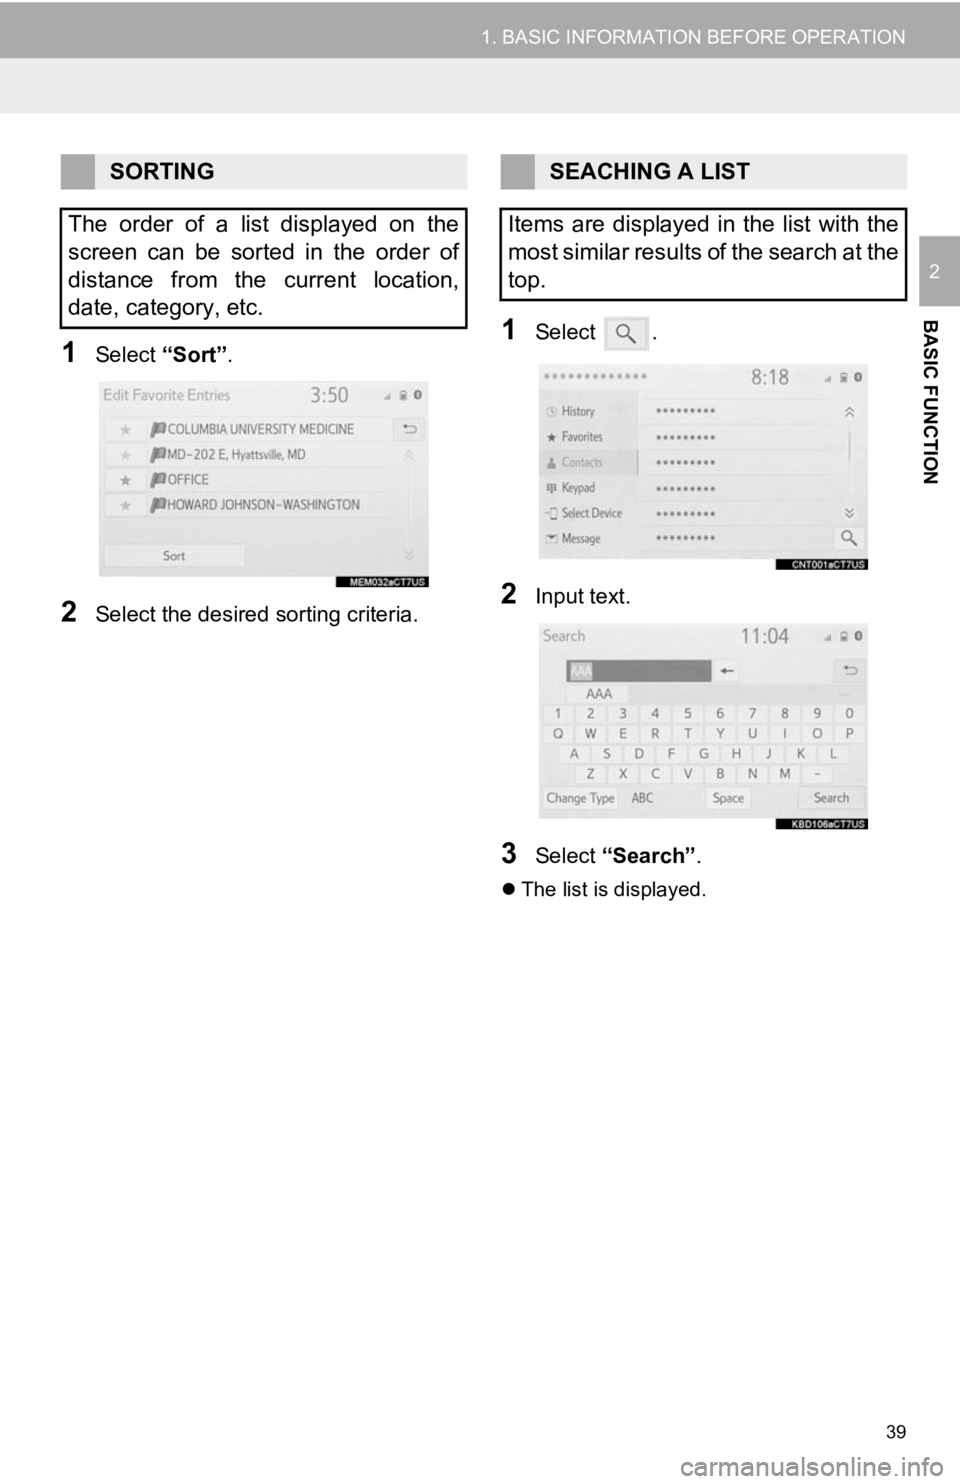
1Select “Sort”.
2Select the desired sorting criteria.
1Select .
2Input text.
3Select “Search” .
The list is displayed.
SORTING
The order of a list displayed on the
screen can be sorted in the order of
distance from the current location,
date, category, etc.SEACHING A LIST
Items are displayed in the list with the
most similar results of the search at the
top.
Page 40 of 326
40
1. BASIC INFORMATION BEFORE OPERATION
6. SCREEN ADJUSTMENT
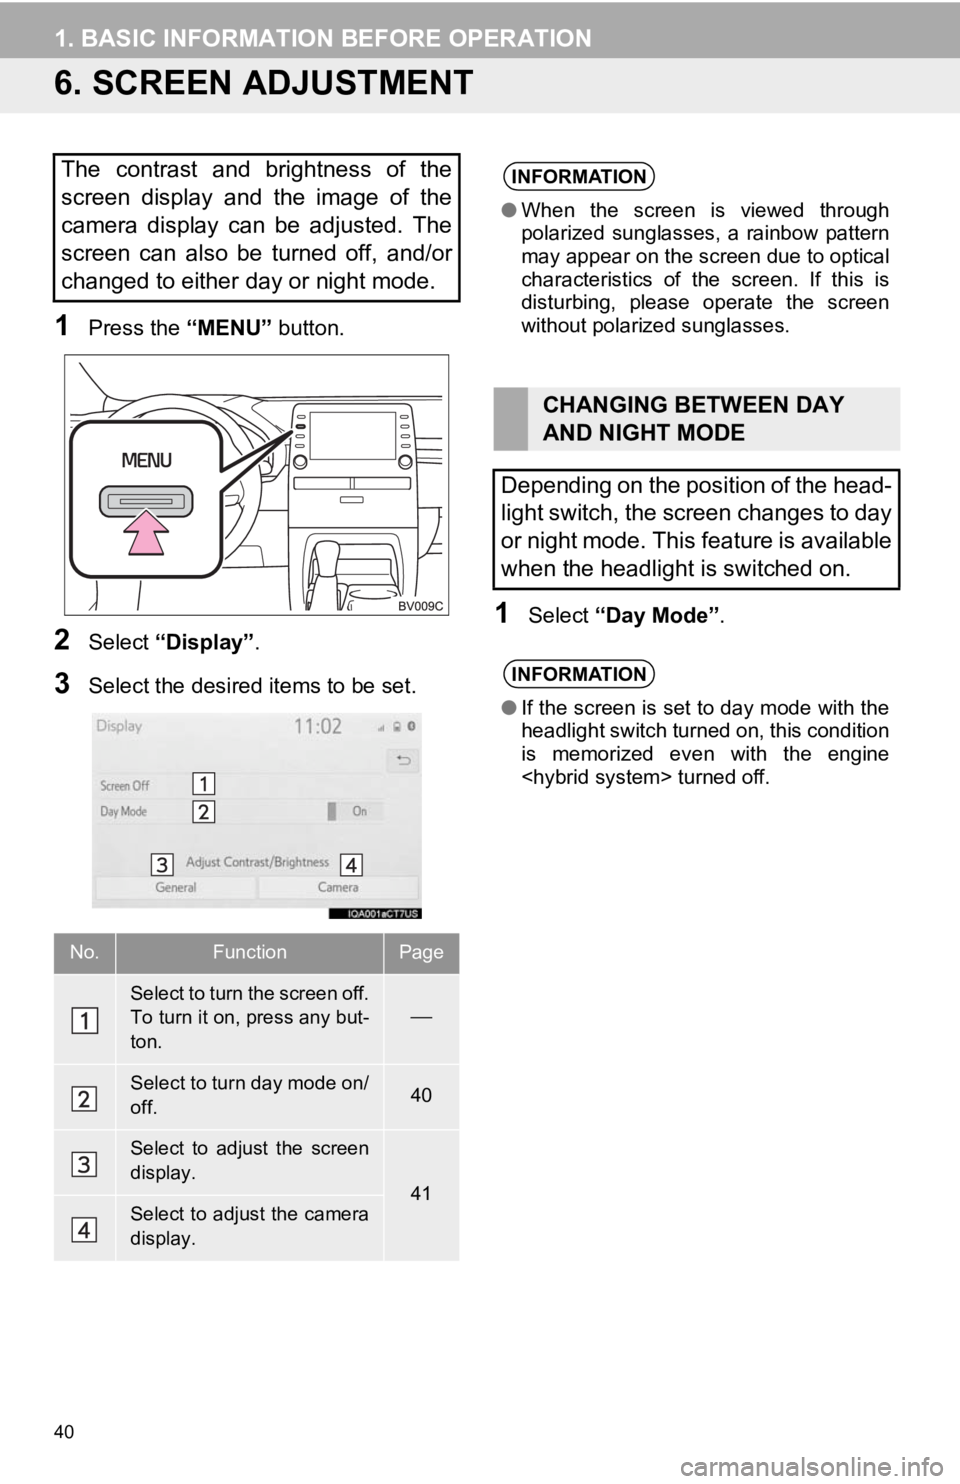
1Press the “MENU” button.
2Select “Display”.
3Select the desired items to be set.
1Select “Day Mode” .
The contrast and brightness of the
screen display and the image of the
camera display can be adjusted. The
screen can also be turned off, and/or
changed to either day or night mode.
No.FunctionPage
Select to turn the screen off.
To turn it on, press any but-
ton.
Select to turn day mode on/
off.40
Select to adjust the screen
display.
41Select to adjust the camera
display.
INFORMATION
●When the screen is viewed through
polarized sunglasses, a rainbow pattern
may appear on the screen due to optical
characteristics of the screen. If this is
disturbing, please operate the screen
without polarized sunglasses.
CHANGING BETWEEN DAY
AND NIGHT MODE
Depending on the position of the head-
light switch, the screen changes to day
or night mode. This feature is available
when the headlight is switched on.
INFORMATION
● If the screen is set to day mode with the
headlight switch turned on, this condition
is memorized even with the engine
Page 41 of 326
41
1. BASIC INFORMATION BEFORE OPERATION
BASIC FUNCTION
2
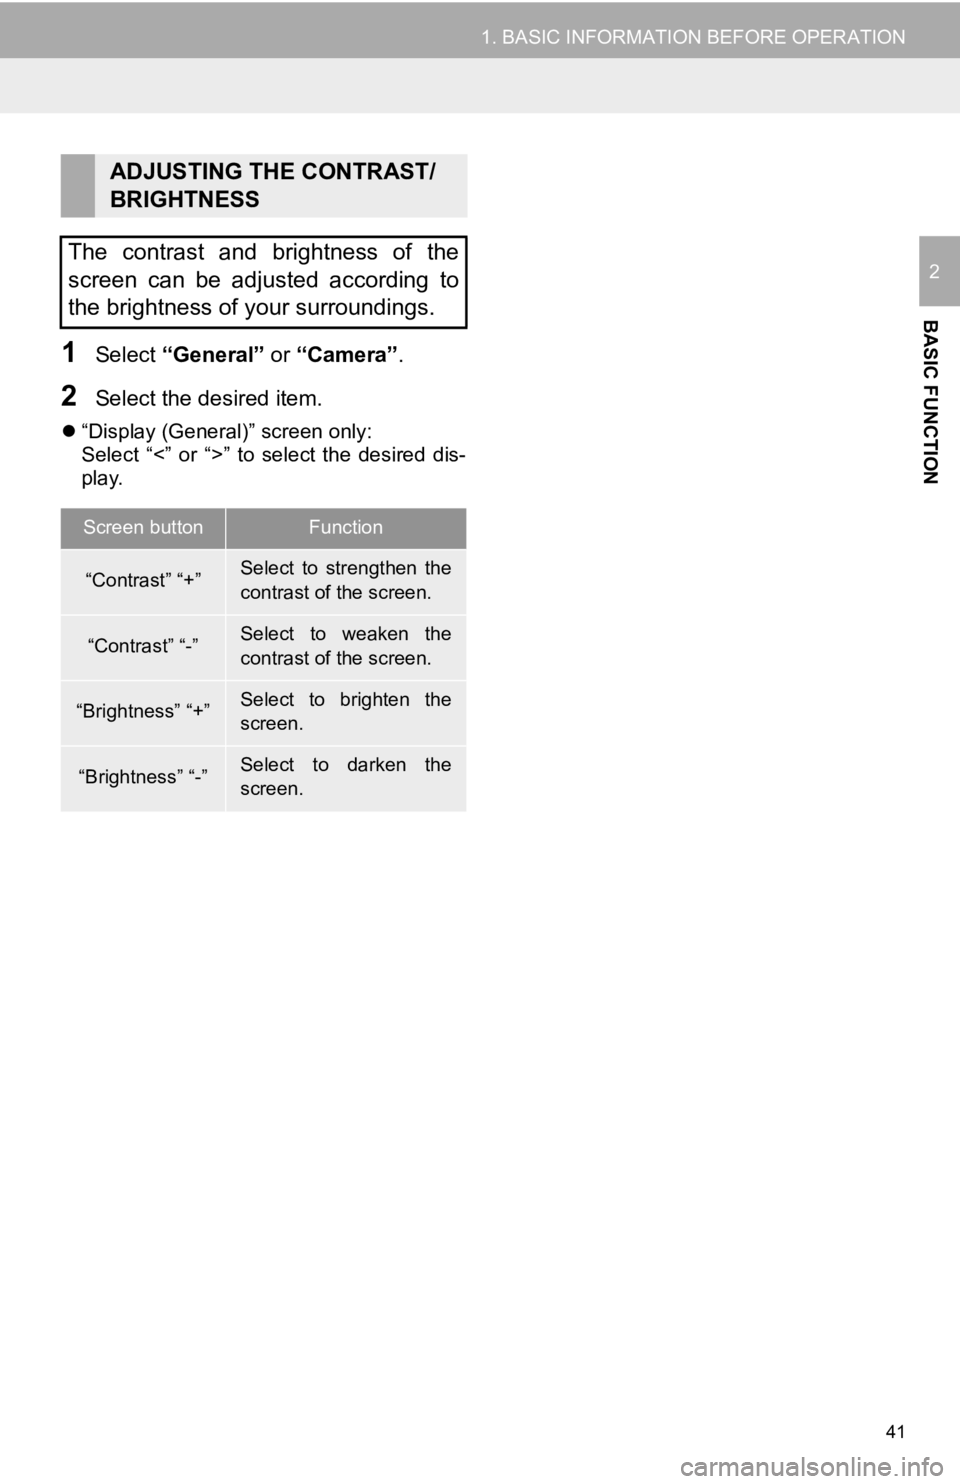
1Select “General” or “Camera” .
2Select the desired item.
“Display (General)” screen only:
Select “<” or “>” to select the desired dis-
play.
ADJUSTING THE CONTRAST/
BRIGHTNESS
The contrast and brightness of the
screen can be adjusted according to
the brightness of your surroundings.
Screen buttonFunction
“Contrast” “+”Select to strengthen the
contrast of the screen.
“Contrast” “-”Select to weaken the
contrast of the screen.
“Brightness” “+”Select to brighten the
screen.
“Brightness” “-”Select to darken the
screen.
Page 42 of 326

42
1. BASIC INFORMATION BEFORE OPERATION
7. LINKING MULTI-INFORMATION DISPLAY AND THE SYSTEM
The following functions of the system are linked with the multi-information display
in the instrument cluster:
• Phone
•Audio
• Language
etc.
These functions can be operated using multi-information display control switches
on the steering wheel. For details, refer to “OWNER’S MANUAL”.
Page 43 of 326
43
BASIC FUNCTION
2
2. CONNECTIVITY SETTINGS
1. REGISTERING/CONNECTING A Bluetooth® DEVICE
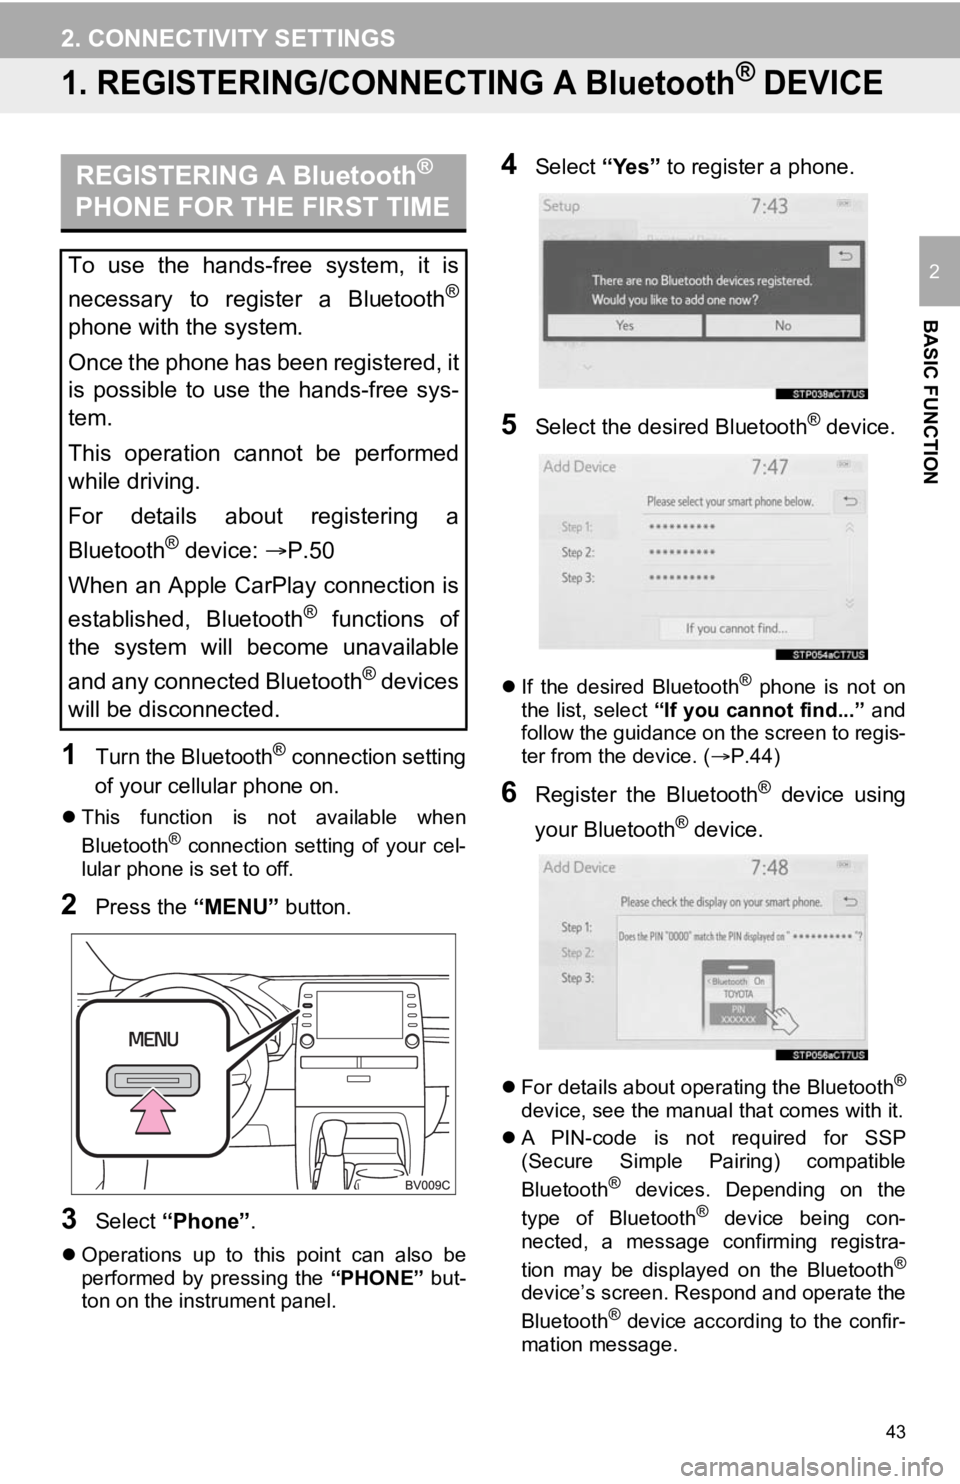
1Turn the Bluetooth® connection setting
of your cellular phone on.
This function is not available when
Bluetooth® connection setting of your cel-
lular phone is set to off.
2Press the “MENU” button.
3Select “Phone” .
Operations up to this point can also be
performed by pressing the “PHONE” but-
ton on the instrument panel.
4Select “Yes” to register a phone.
5Select the desired Bluetooth® device.
If the desired Bluetooth® phone is not on
the list, select “If you cannot find...” and
follow the guidance on the screen to regis-
ter from the device. ( P.44)
6Register the Bluetooth® device using
your Bluetooth
® device.
For details about operating the Bluetooth®
device, see the manual that comes with it.
A PIN-code is not required for SSP
(Secure Simple Pairing) compatible
Bluetooth
® devices. Depending on the
type of Bluetooth® device being con-
nected, a message confirming registra-
tion may be displayed on the Bluetooth
®
device’s screen. Respond and operate the
Bluetooth® device according to the confir-
mation message.
REGISTERING A Bluetooth®
PHONE FOR THE FIRST TIME
To use the hands-free system, it is
necessary to register a Bluetooth
®
phone with the system.
Once the phone has been registered, it
is possible to use the hands-free sys-
tem.
This operation cannot be performed
while driving.
For details about registering a
Bluetooth
® device: P.50
When an Apple CarPlay connection is
established, Bluetooth
® functions of
the system will become unavailable
and any connected Bluetooth
® devices
will be disconnected.
Page 44 of 326
44
2. CONNECTIVITY SETTINGS
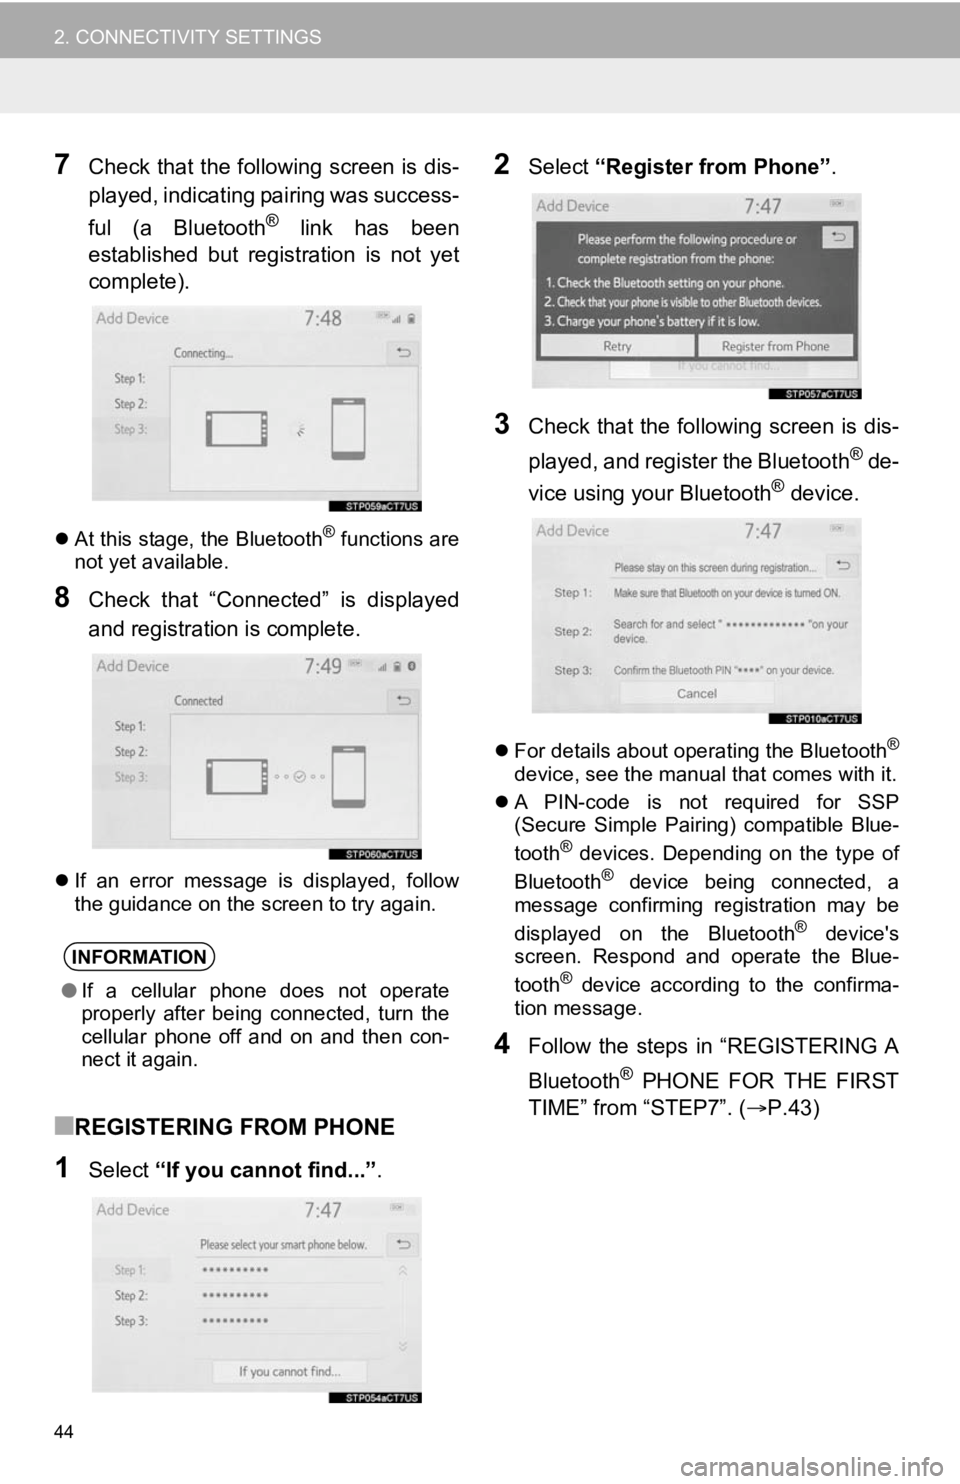
7Check that the following screen is dis-
played, indicating pairing was success-
ful (a Bluetooth
® link has been
established but registration is not yet
complete).
At this stage, the Bluetooth® functions are
not yet available.
8Check that “Connected” is displayed
and registration is complete.
If an error message is displayed, follow
the guidance on the screen to try again.
■REGISTERING FROM PHONE
1Select “If you cannot find...” .
2Select “Register from Phone”.
3Check that the following screen is dis-
played, and register the Bluetooth
® de-
vice using your Bluetooth® device.
For details about operating the Bluetooth®
device, see the manual that comes with it.
A PIN-code is not required for SSP
(Secure Simple Pairing) compatible Blue-
tooth
® devices. Depending on the type of
Bluetooth® device being connected, a
message confirming registration may be
displayed on the Bluetooth
® device's
screen. Respond and operate the Blue-
tooth
® device according to the confirma-
tion message.
4Follow the steps in “REGISTERING A
Bluetooth
® PHONE FOR THE FIRST
TIME” from “STEP7”. ( P.43)
INFORMATION
●If a cellular phone does not operate
properly after being connected, turn the
cellular phone off and on and then con-
nect it again.
Page 48 of 326
48
2. CONNECTIVITY SETTINGS
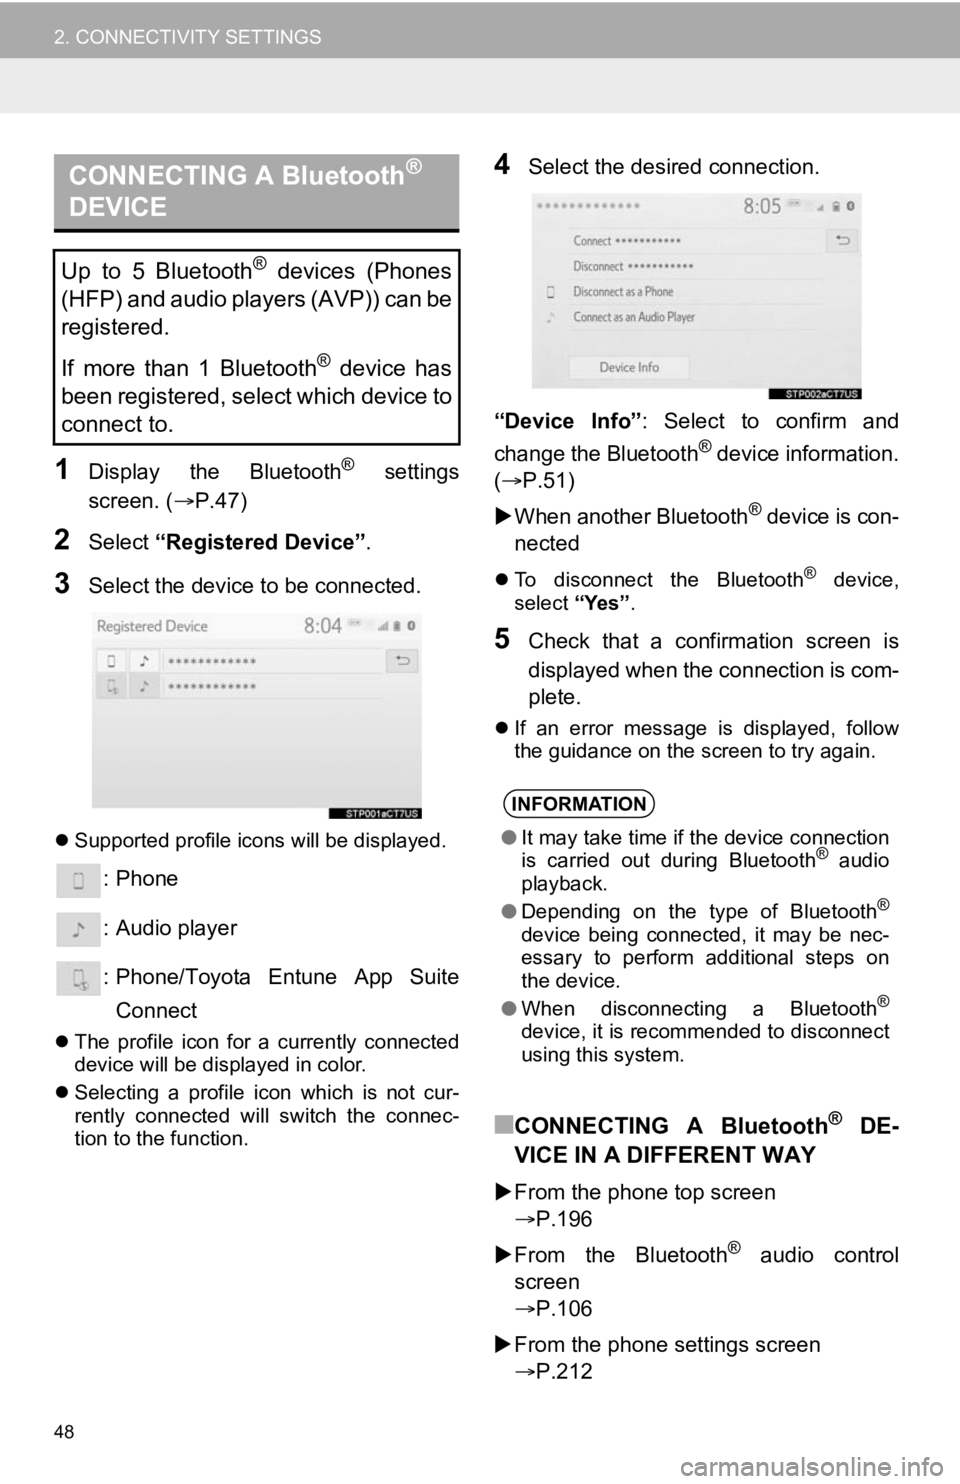
1Display the Bluetooth® settings
screen. ( P.47)
2Select “Registered Device” .
3Select the device to be connected.
Supported profile icons will be displayed.
: Phone
: Audio player
: Phone/Toyota Entune App Suite
Connect
The profile icon for a currently connected
device will be displayed in color.
Selecting a profile icon which is not cur-
rently connected will switch the connec-
tion to the function.
4Select the desired connection.
“Device Info” : Select to confirm and
change the Bluetooth
® device information.
(P.51)
When another Bluetooth
® device is con-
nected
To disconnect the Bluetooth® device,
select “Yes”.
5Check that a confirmation screen is
displayed when the connection is com-
plete.
If an error message is displayed, follow
the guidance on the screen to try again.
■CONNECTING A Bluetooth® DE-
VICE IN A DIFFERENT WAY
From the phone top screen
P.196
From the Bluetooth
® audio control
screen
P.106
From the phone settings screen
P.212
CONNECTING A Bluetooth®
DEVICE
Up to 5 Bluetooth® devices (Phones
(HFP) and audio players (AVP)) can be
registered.
If more than 1 Bluetooth
® device has
been registered, select which device to
connect to.
INFORMATION
● It may take time if the device connection
is carried out during Bluetooth® audio
playback.
● Depending on the type of Bluetooth
®
device being connected, it may be nec-
essary to perform additional steps on
the device.
● When disconnecting a Bluetooth
®
device, it is recommended to disconnect
using this system.
Page 50 of 326
50
2. CONNECTIVITY SETTINGS
1Display the Bluetooth® settings
screen. ( P.47)
2Select “Add New Device” .
When another Bluetooth
® device is con-
nected
To disconnect the Bluetooth® device,
select “Yes”.
When 5 Bluetooth® devices have al-
ready been registered
A registered device needs to be replaced.
Select “Yes”, and select the device to be
replaced.
3Follow the steps in “REGISTERING A
Bluetooth
® PHONE FOR THE FIRST
TIME” from “STEP 5”. ( P.43)
1Display the Bluetooth® settings
screen. ( P.47)
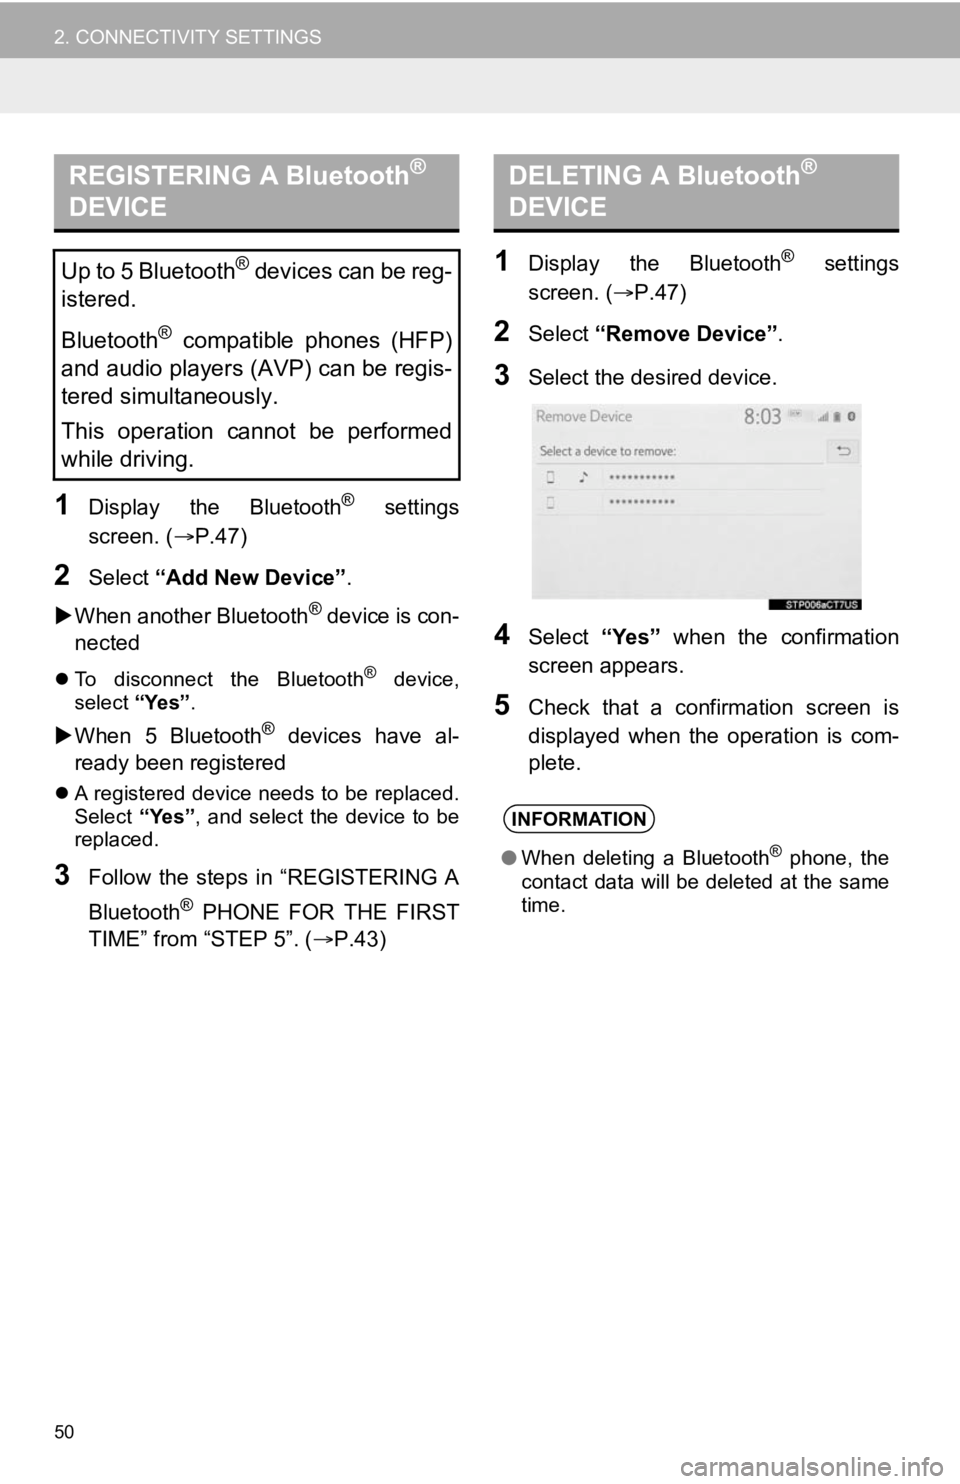
2Select “Remove Device” .
3Select the desired device.
4Select “Yes” when the confirmation
screen appears.
5Check that a confirmation screen is
displayed when the operation is com-
plete.
REGISTERING A Bluetooth®
DEVICE
Up to 5 Bluetooth® devices can be reg-
istered.
Bluetooth
® compatible phones (HFP)
and audio players (AVP) can be regis-
tered simultaneously.
This operation cannot be performed
while driving.
DELETING A Bluetooth®
DEVICE
INFORMATION
● When deleting a Bluetooth® phone, the
contact data will be deleted at the same
time.