tire size TOYOTA AVALON 2020 Owners Manual (in English)
[x] Cancel search | Manufacturer: TOYOTA, Model Year: 2020, Model line: AVALON, Model: TOYOTA AVALON 2020Pages: 540, PDF Size: 10.4 MB
Page 17 of 540
17Pictorial index
Windshield wipers . . . . . . . . . . . . . . . . . . . . . . . . . . . . . . . . . P. 210
Precautions for winter season . . . . . . . . . . . . . . . . . . . . . . . . . P. 316
Fuel filler door . . . . . . . . . . . . . . . . . . . . . . . . . . . . . . . . . . . . P. 214
Refueling method . . . . . . . . . . . . . . . . . . . . . . . . . . . . . . . . . . . P. 214
Fuel type/fuel tank capacity . . . . . . . . . . . . . . . . . . . . . . . . . . . P. 474
Tires . . . . . . . . . . . . . . . . . . . . . . . . . . . . . . . . . . . . . . . . . . P. 393
Tire size/inflation pressure . . . . . . . . . . . . . . . . . . . . . . . . . P. 478
Winter tires/tire chains . . . . . . . . . . . . . . . . . . . . . . . . . . . . P. 316
Checking/rotation/tire pressur e warning system . . . . . . . . .P. 393
Coping with flat tires . . . . . . . . . . . . . . . . . . . . . . . . . . . . . . P. 445
Hood . . . . . . . . . . . . . . . . . . . . . . . . . . . . . . . . . . . . . . . . . . . . P. 381
Opening . . . . . . . . . . . . . . . . . . . . . . . . . . . . . . . . . . . . . . . . . . P. 381
Engine oil . . . . . . . . . . . . . . . . . . . . . . . . . . . . . . . . . . . . . . . . . P. 475
Coping with overheat . . . . . . . . . . . . . . . . . . . . . . . . . . . . . . . . P. 466
Front turn signal lights/parking lights . . . . . . . . . . . . . P. 195, 202
Headlights/daytime running lights . . . . . . . . . . . . . . . . . . . . P. 202
Front side marker lights . . . . . . . . . . . . . . . . . . . . . . . . . . . . P. 202
Headlights . . . . . . . . . . . . . . . . . . . . . . . . . . . . . . . . . . . . . . . P. 202
Front turn signal lights . . . . . . . . . . . . . . . . . . . . . . . . . . . . . P. 195
Daytime running lights/parking lights . . . . . . . . . . . . . . . . . P. 202
Front turn signal lights/cornering lights . . . . . . . . . . . P. 195, 202
Side turn signal lights . . . . . . . . . . . . . . . . . . . . . . . . . . . . . . P. 195
Rear turn signal lights/r ear side marker lights/
tail lights/stoplights . . . . . . . . . . . . . . . . . . . . . . . . . . . . P. 195, 202
Back-up lights
Shifting the shift lever to R . . . . . . . . . . . . . . . . . . . . . . . . . . . . P. 189
License plate lights . . . . . . . . . . . . . . . . . . . . . . . . . . . . . . . . P. 202
4
5
6
7
Light bulbs of the exter ior lights for driving
(Replacing method: P. 419, Watts: P. 480)
*: If equipped
8
9
10
11
12
13
14
15
16
17
Page 229 of 540

2294-5. Using the driving support systems
4
Driving
WARNING
■When to disable the pre-collision system
In the following situations, disable the system, as it may not operate prop-
erly, possibly leading to an accident resulting in death or ser ious injury:
● When the vehicle is being towed
● When your vehicle is towing another vehicle
● When transporting the vehicle via truck, boat, train or similar means of
transportation
● When the vehicle is raised on a lift with the engine running an d the tires
are allowed to rotate freely
● When inspecting the vehicle using a drum tester such as a chass is dyna-
mometer or speedometer tester, or when using an on vehicle whee l bal-
ancer
● When a strong impact is applied to the front bumper or front gr ille, due to
an accident or other reasons
● If the vehicle cannot be driven in a stable manner, such as when the vehi-
cle has been in an accident or is malfunctioning
● When the vehicle is driven in a sporty manner or off-road
● When the tires are not properly inflated
● When the tires are very worn
● When tires of a size other than specified are installed
● When tire chains are installed
● When a compact spare tire or an emergency tire puncture repair kit is used
● If equipment (snow plow, etc.) that may obstruct the radar sens or or cam-
era sensor is temporarily installed to the vehicle
Page 275 of 540

2754-5. Using the driving support systems
4
Driving
●In some situations, such as the following, the rear camera dete ction function
may operate even though there are no pedestrians in the detection area.
• When a three dimensional object, such as a pole, traffic cone, fence, or parked vehicle, is detected
• When a moving object, such as a car or motorcycle is detected
• When backing up toward moving objects such as flags or puddles , or air-
borne matter, such as smoke, steam, rain, or snow
• When there is a pattern on the road, due to the road being mad e of cob-
blestone or gravel or having tram rails, traces of repair, white lines,
pedestrian crossings or fallen leaves on the surface
• When backing up on a metal cover (grating), such as those used for
drainage ditches
• When backing up toward the roadside or a bump in the road
• When an object is reflected in a puddle or on a wet road surfa ce
• When there are shadows on the road
• When backing up over a bump in the road
• If the vehicle is significantly tilted, such as when carrying a heavy load
• When backing up toward an incline/decline
• If the suspension has been modified or tires of a size other than specified are installed
• If the rear of the vehicle is raised or lowered due to the carried load
• If an electronic component, such as a backlit license plate or rear fog
light, is installed near the rear camera
• If a bumper protector, such as an additional trim strip, is installed to the rear bumper
• If the orientation of the rear camera has been changed due to a collision
or other impact, or removal and installation
• If a towing eyelet is installed to the rear of the vehicle
• When the rear camera is obscured (dirt, snow, ice, etc. are at tached) or
scratched
• When water is flowing over the rear camera lens
• If there is a flashing light in the detection area, such as th e emergency
flashers of another vehicle
■ Situations in which the rear cam era detection function may be difficult to
notice
● If buzzer may be difficult to hear if the surrounding area is noisy, the volume
of the audio system volume is high, the air conditioning system is being
used, etc.
● If the temperature in the cabin is extremely high or low, the a udio system
screen may not operate correctly.
Page 297 of 540

2974-5. Using the driving support systems
4
Driving
NOTICE
■To prevent the system from malfunctioning
● If the area around a sensor is subjected to an impact, the syst em may not
operate properly due to the sensor being misaligned. Have the v ehicle
inspected by your Toyota dealer.
● When using a high pressure washer to wash the vehicle, do not spray the
sensors directly, as doing so may cause a sensor to malfunction .
● When using steam to clean the vehicle, do not direct steam too close to
the sensors as doing so may cause a sensor to malfunction.
■ To prevent a radar sensor from malfunctioning
● If the area around a radar sensor is subjected to an impact, th e system
may not operate properly due to a sensor malfunction. Have the vehicle
inspected by your Toyota dealer.
● Observe the radar sensor handling precautions. ( P. 264)
■ To prevent unnecessary operation of the Intelligent Clearance S onar
system
In the following situations, disable the Intelligent Clearance Sonar system
as the system may operate even though there is no possibility o f a collision.
● When inspecting the vehicle using a chassis roller, chassis dynamo or free
roller
● When loading the vehicle onto a boat, truck or other transport vessel
● If the suspension has been modified or tires of a size other th an specified
are installed
● If the front of the vehicle is raised or lowered due to the carried load
● When equipment that may obstruct a sensor is installed, such as a towing
eyelet, bumper protector (an additional trim strip, etc.), bicy cle carrier, or
snow plow
● When using an automatic car wash
Page 303 of 540
3034-5. Using the driving support systems
4
Driving
■Situations in which the Rear Cross Traffic Auto Brake function may not
operate properly
In some situations such as the following, this function may not operate prop-
erly.
● Objects and vehicles which the radar sensors are not designed t o detect
• Stationary objects
• Vehicles which are moving away from your vehicle
• Pedestrians, motorcycles, bicycles, etc.
*
• Objects which are extremely close to a radar sensor
• Vehicles which are approaching from the right or left at the r ear of the
vehicle at a traveling speed of less than approximately 5 mph ( 8 km/h)
• Vehicles which are approaching from the right or left at the r ear of the
vehicle at a traveling speed of more than approximately 15 mph (24 km/h)
*: Depending on conditions, detection of a vehicle and/or object may occur.
● Situations in which the radar sensors may not be able to detect an object
• When a sensor or the area around a sensor is extremely hot or cold
• If the rear bumper is covered with ice, snow, dirt, etc.
• If heavy rain or water strikes the vehicle
• When the detection area of a radar sensor is obstructed by an adjacent
vehicle
• If the vehicle is significantly tilted
• When equipment that may obstruct a sensor is installed, such a s a towing
eyelet, bumper protector (an additional trim strip, etc.), bicy cle carrier, or
snow plow
• If the suspension has been modified or tires of a size other than specified
are installed
• If the front of the vehicle is raised or lowered due to the ca rried load
• If a sticker or an electronic component, such as a backlit license plate
(especially fluorescent type), fog lights, a fender pole or wir eless antenna
is installed near a radar sensor
• If the orientation of a radar sensor has been changed due to a collision or
other impact or removal and installation
• When multiple vehicles are approaching with only a small gap between each vehicle
• When a vehicle is approaching at high speed
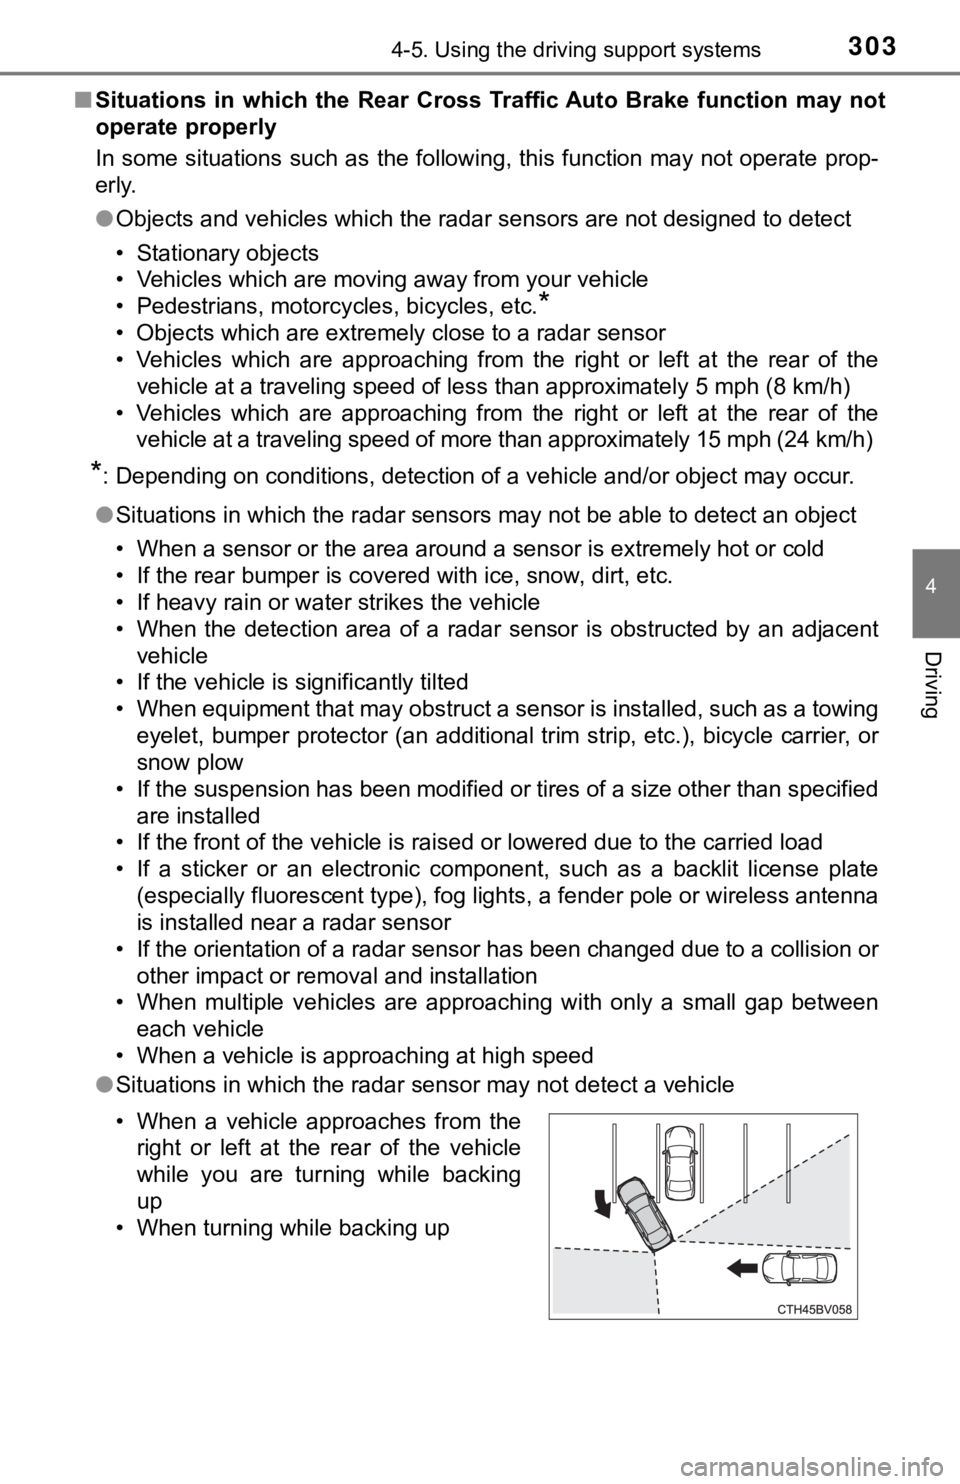
● Situations in which the radar sensor may not detect a vehicle
• When a vehicle approaches from the
right or left at the rear of the vehicle
while you are turning while backing
up
• When turning while backing up
Page 315 of 540

3154-5. Using the driving support systems
4
Driving
WARNING
■Hill- start assist control does not operate effectively when
● Do not overly rely on hill-start assist control. Hill-start ass ist control may
not operate effectively on steep inclines and roads covered wit h ice.
● Unlike the parking brake, hill-st art assist control is not intended to hold the
vehicle stationary for an extended period of time. Do not attempt to use
hill-start assist control to hold the vehicle on an incline, as doing so may
lead to an accident.
■ When the TRAC/VSC is activated
The slip indicator light flashes. Always drive carefully. Reckless driving may
cause an accident. Exercise particular care when the indicator light flashes.
■ When the TRAC/VSC systems are turned off
Be especially careful and drive at a speed appropriate to the r oad condi-
tions. As these are the systems to help ensure vehicle stabilit y and driving
force, do not turn the TRAC/VSC systems off unless necessary.
■ Replacing tires
Make sure that all tires are of the specified size, brand, trea d pattern and
total load capacity. In addition, make sure that the tires are inflated to the
recommended tire inflation pressure level.
The ABS, TRAC and VSC systems will not function correctly if di fferent tires
are installed on the vehicle.
Contact your Toyota dealer for further information when replaci ng tires or
wheels.
■ Handling of tires and the suspension
Using tires with any kind of problem or modifying the suspensio n will affect
the driving assist systems, and may cause a system to malfuncti on.
■ Secondary Collision Brake
Do not rely solely upon the Secondary Collision Brake. This sys tem is
designed to help reduce the possibility of further damage due t o a second-
ary collision, however, that effect changes according to variou s conditions.
Overly relying on the system may result in death or serious inj ury.
Page 316 of 540
3164-6. Driving tips
●Use fluids that are appropriate t o the prevailing outside tempera-
tures. • Engine oil
• Engine coolant
• Washer fluid
● Have a service technician inspec t the condition of the battery.
● Have the vehicle fitted with four snow tires or purchase a set of tire
chains for the front tires.
*
Ensure that all tires are the same size and brand, and that cha ins match
the size of the tires.
*: Tire chains cannot be mounted on vehicles with 18 and 19-inch tires.
Perform the following according to the driving conditions:
● Do not try to forcibly open a window or move a wiper that is fr ozen.
Pour warm water over the frozen area to melt the ice. Wipe away
the water immediately to p revent it from freezing.
● To ensure proper operation of the climate control system fan,
remove any snow that has accumulated on the air inlet vents in
front of the windshield.
● Check for and remove any excess ic e or snow that may have accu-
mulated on the exterior lights, vehicle’s roof, chassis, around the
tires or on the brakes.
● Remove any snow or mud from the bottom of your shoes before
getting in the vehicle.
Winter driving tips
Carry out the necessary preparations and inspections before
driving the vehicle in winter. Always drive the vehicle in a ma n-
ner appropriate to the prevailing weather conditions.
Preparation for winter
Before driving the vehicle
Page 317 of 540
3174-6. Driving tips
4
Driving
Accelerate the vehicle slowly, keep a safe distance between you and
the vehicle ahead, and drive at a reduced speed suitable to roa d con-
ditions.
● Park the vehicle and move the shift lever to P without setting the
parking brake. The parking brake may freeze up, preventing it from
being released. If the vehicle is parked without setting the pa rking
brake, make sure t o block the wheels.
Failure to do so may be dangerou s because it may cause the vehi-
cle to move unexpectedly, pos sibly leading to an accident.
● If the vehicle is parked without setting the parking brake, confirm
that the shift lever c annot be moved out of P
*.
*: The shift lever will be locked if it is attempted to be shifte d from P to any
other position without depressing the brake pedal. If the shift lever can be
shifted from P, there may be a problem with the shift lock syst em. Have the
vehicle inspected by your Toyota dealer immediately.
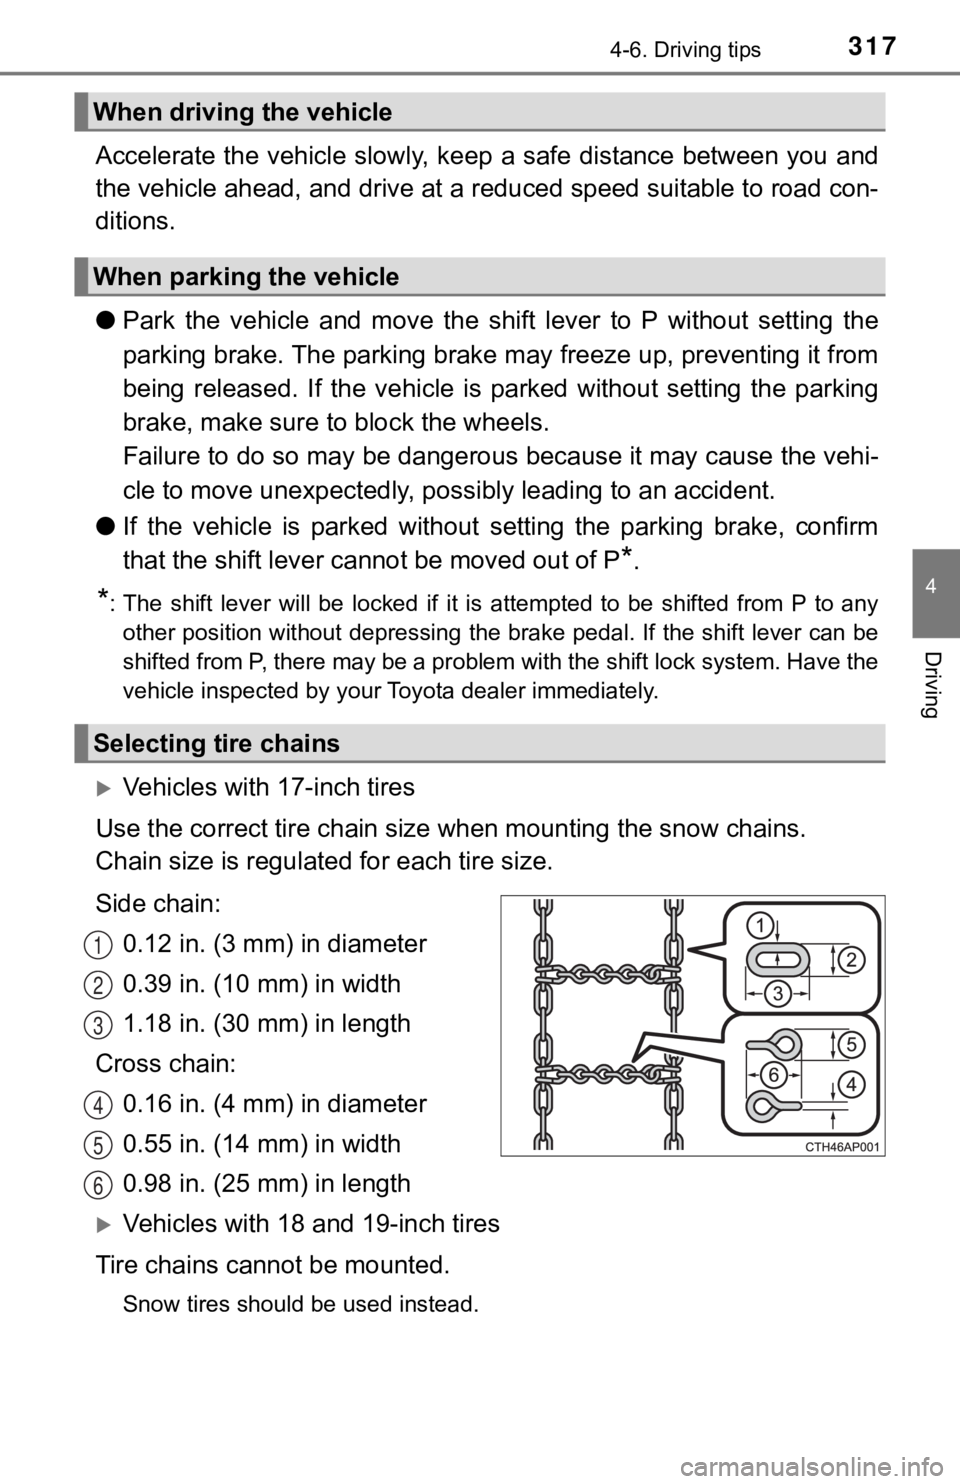
Vehicles with 17-inch tires
Use the correct tire ch ain size when mounting the snow chains.
Chain size is regulate d for each tire size.
Side chain: 0.12 in. (3 mm) in diameter
0.39 in. (10 mm) in width
1.18 in. (30 mm) in length
Cross chain: 0.16 in. (4 mm) in diameter
0.55 in. (14 mm) in width
0.98 in. (25 mm) in length
Vehicles with 18 and 19-inch tires
Tire chains cannot be mounted.
Snow tires should be used instead.
When driving the vehicle
When parking the vehicle
Selecting tire chains
1
2
3
4
5
6
Page 318 of 540
3184-6. Driving tips
Regulations regarding the use of tire chains vary depending on loca-
tion and type of road. Always chec k local regulations before installing
chains.
■ Tire chain installation
Observe the following precautions when installing and removing chains:
● Install and remove tire chains in a safe location.
● Install tire chains on the front tires. Do not install tire chains on the rear tires.
● Install tire chains on front tires as tightly as possible. Reti ghten chains after
driving 1/4 1/2 mile (0.5 1.0 km).
● Install tire chains following the instructions provided with th e tire chains.
Regulations on the use of tire chains
WARNING
■Driving with snow tires
Observe the following precautions to reduce the risk of acciden ts.
Failure to do so may result in a loss of vehicle control and ca use death or
serious injury.
● Use tires of the size specified.
● Maintain the recommended level of air pressure.
● Do not drive in excess of 75 mph (120 km/h), regardless of the type of
snow tires being used.
● Use snow tires on all, not just some wheels.
■ Driving with tire chains (vehicles with 17-inch tires)
Observe the following precautions to reduce the risk of acciden ts.
Failure to do so may result in the vehicle being unable to be d riven safely,
and may cause death or serious injury.
● Do not drive in excess of the speed limit specified for the tir e chains being
used, or 30 mph (50 km/h), whichever is lower.
● Avoid driving on bumpy road surfaces or over potholes.
● Avoid sudden acceleration, abrupt steering, sudden braking and shifting
operations that cause sudden engine braking.
● Slow down sufficiently before entering a curve to ensure that v ehicle con-
trol is maintained.
● Do not use LDA (Lane Departure Alert with steering control) sys tem.
Page 395 of 540

3956-3. Do-it-yourself maintenance
6
Maintenance and care
◆Installing tire pressure warning valve and transmitters
When replacing the tires or wheels, the tire pressure warning v alve
and transmitters must be install ed to the wheels which will be
installed to the vehicle.
When new tire pressure warning valve and transmitters are
installed, new ID codes must be registered in the tire pressure
warning computer and the tire pressure warning system must be
initialized. ( P. 396)
◆Initializing the tire pressure warning system
■The tire pressure warning system must be initialized in the fol-
lowing circumstances:
● When the tire inflation pressure is changed such as when chang-
ing traveling speed or load weight.
● When the tire inflation pressure is changed such as when the ti re
size is changed.
● When rotating the tires.
● After performing the transmitter ID code registration procedure .
( P. 396)
When the tire pressure warning sy stem is initialized, the current tire
inflation pressure is set as the benchmark pressure.
■How to initialize the tire pressure warning system
Park the vehicle in a safe place and turn the engine switch off .
The initialization procedure cannot be started while the vehicle is
moving.
Adjust the tire inflation pressure to the specified cold tire i nflation
pressure level. ( P. 478)
Make sure to adjust the tire pre ssure to the specified cold tire infla-
tion pressure level. The tire pressure warning system will oper ate
based on this pr essure level.
Start the engine. ( P. 1 8 4 )
Select on the multi-information display using the meter con-
trol switches on the steering wheel. ( P. 1 0 0 )
Select and then press and hold .
Select “TPWS” and then press .
1
2
3
4
5
6