buttons TOYOTA AVALON 2021 Owners Manual (in English)
[x] Cancel search | Manufacturer: TOYOTA, Model Year: 2021, Model line: AVALON, Model: TOYOTA AVALON 2021Pages: 548, PDF Size: 13.4 MB
Page 23 of 548
23Pictorial index
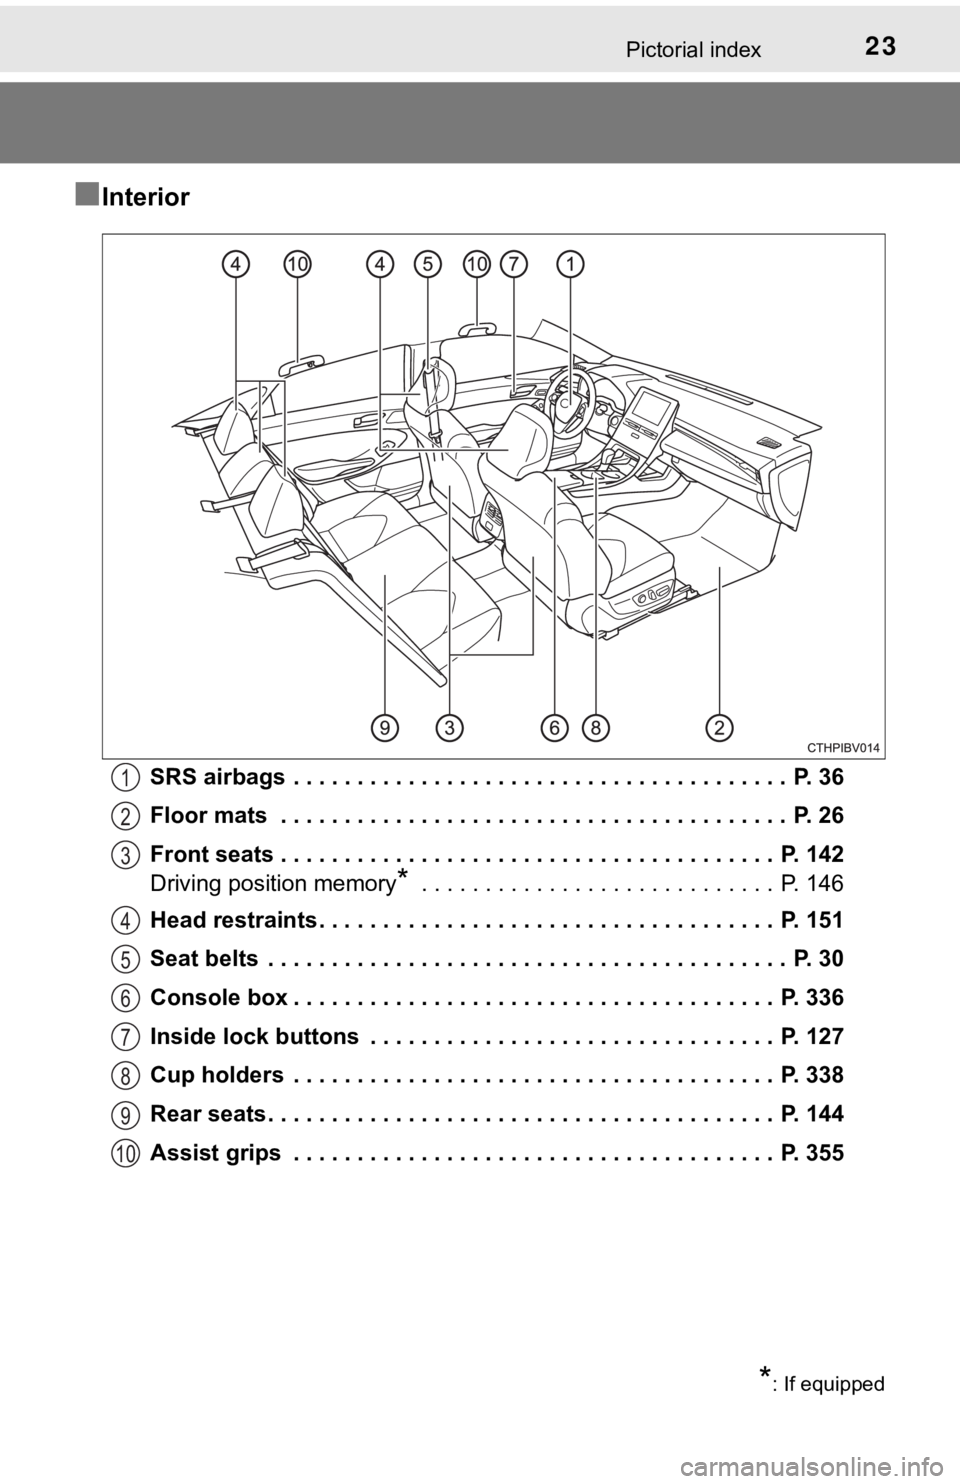
■Interior
SRS airbags . . . . . . . . . . . . . . . . . . . . . . . . . . . . . . . . . . . . . . . P. 36
Floor mats . . . . . . . . . . . . . . . . . . . . . . . . . . . . . . . . . . . . . . . . P. 26
Front seats . . . . . . . . . . . . . . . . . . . . . . . . . . . . . . . . . . . . . . . P. 142
Driving position memory
* . . . . . . . . . . . . . . . . . . . . . . . . . . . . P. 146
Head restraints . . . . . . . . . . . . . . . . . . . . . . . . . . . . . . . . . . . . P. 151
Seat belts . . . . . . . . . . . . . . . . . . . . . . . . . . . . . . . . . . . . . . . . . P. 30
Console box . . . . . . . . . . . . . . . . . . . . . . . . . . . . . . . . . . . . . . P. 336
Inside lock buttons . . . . . . . . . . . . . . . . . . . . . . . . . . . . . . . . P. 127
Cup holders . . . . . . . . . . . . . . . . . . . . . . . . . . . . . . . . . . . . . . P. 338
Rear seats . . . . . . . . . . . . . . . . . . . . . . . . . . . . . . . . . . . . . . . . P. 144
Assist grips . . . . . . . . . . . . . . . . . . . . . . . . . . . . . . . . . . . . . . P. 355
*: If equipped
1
2
3
4
5
6
7
8
9
10
Page 123 of 548
1233-1. Key information
3
Operation of each component
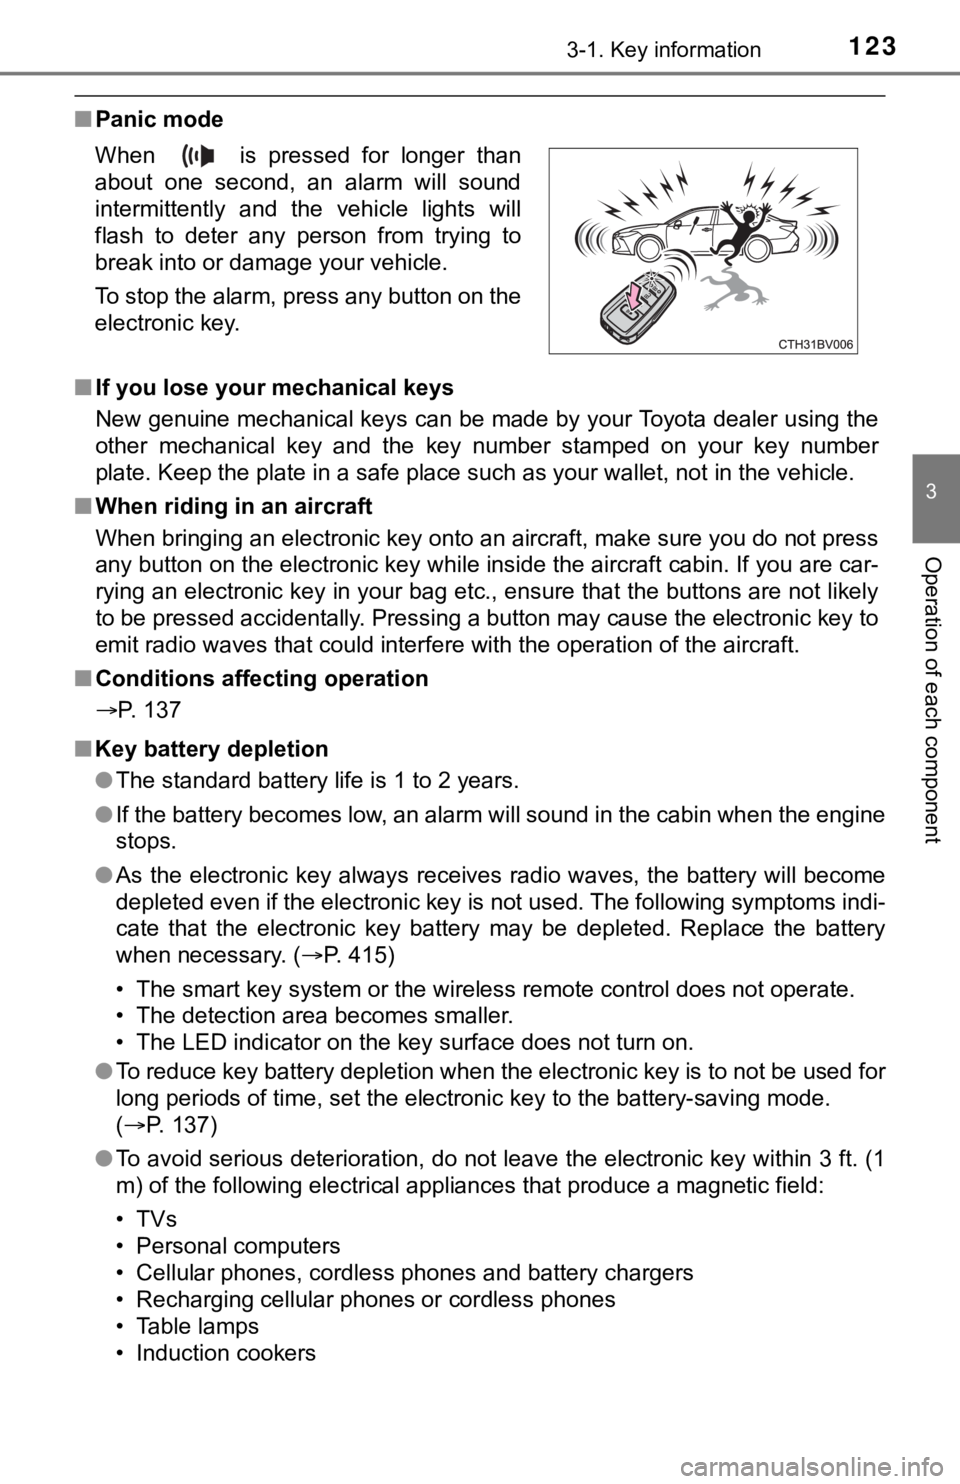
■Panic mode
■If you lose your mechanical keys
New genuine mechanical keys can be made by your Toyota dealer using the
other mechanical key and the key number stamped on your key number
plate. Keep the plate in a safe place such as your wallet, not in the vehicle.
■When riding in an aircraft
When bringing an electronic key onto an aircraft, make sure you do not press
any button on the electronic key while inside the aircraft cabin. If you are car-
rying an electronic key in your bag etc., ensure that the buttons are not likely
to be pressed accidentally. Pressing a button may cause the electronic key to
emit radio waves that could interfere with the operation of the aircraft.
■Conditions affecting operation
P. 137
■Key battery depletion
●The standard battery life is 1 to 2 years.
●If the battery becomes low, an alarm will sound in the cabin when the engine
stops.
●As the electronic key always receives radio waves, the battery will become
depleted even if the electronic key is not used. The following symptoms indi-
cate that the electronic key battery may be depleted. Replace the battery
when necessary. (P. 415)
• The smart key system or the wireless remote control does not operate.
• The detection area becomes smaller.
• The LED indicator on the key surface does not turn on.
●To reduce key battery depletion when the electronic key is to not be used for
long periods of time, set the electronic key to the battery-saving mode.
(P. 137)
●To avoid serious deterioration, do not leave the electronic key within 3 ft. (1
m) of the following electrical appliances that produce a magnetic field:
•TVs
• Personal computers
• Cellular phones, cordless phones and battery chargers
• Recharging cellular phones or cordless phones
• Table lamps
• Induction cookers When is pressed for longer than
about one second, an alarm will sound
intermittently and the vehicle lights will
flash to deter any person from trying to
break into or damage your vehicle.
To stop the alarm, press any button on the
electronic key.
Page 127 of 548
1273-2. Opening, closing and locking the doors
3
Operation of each component
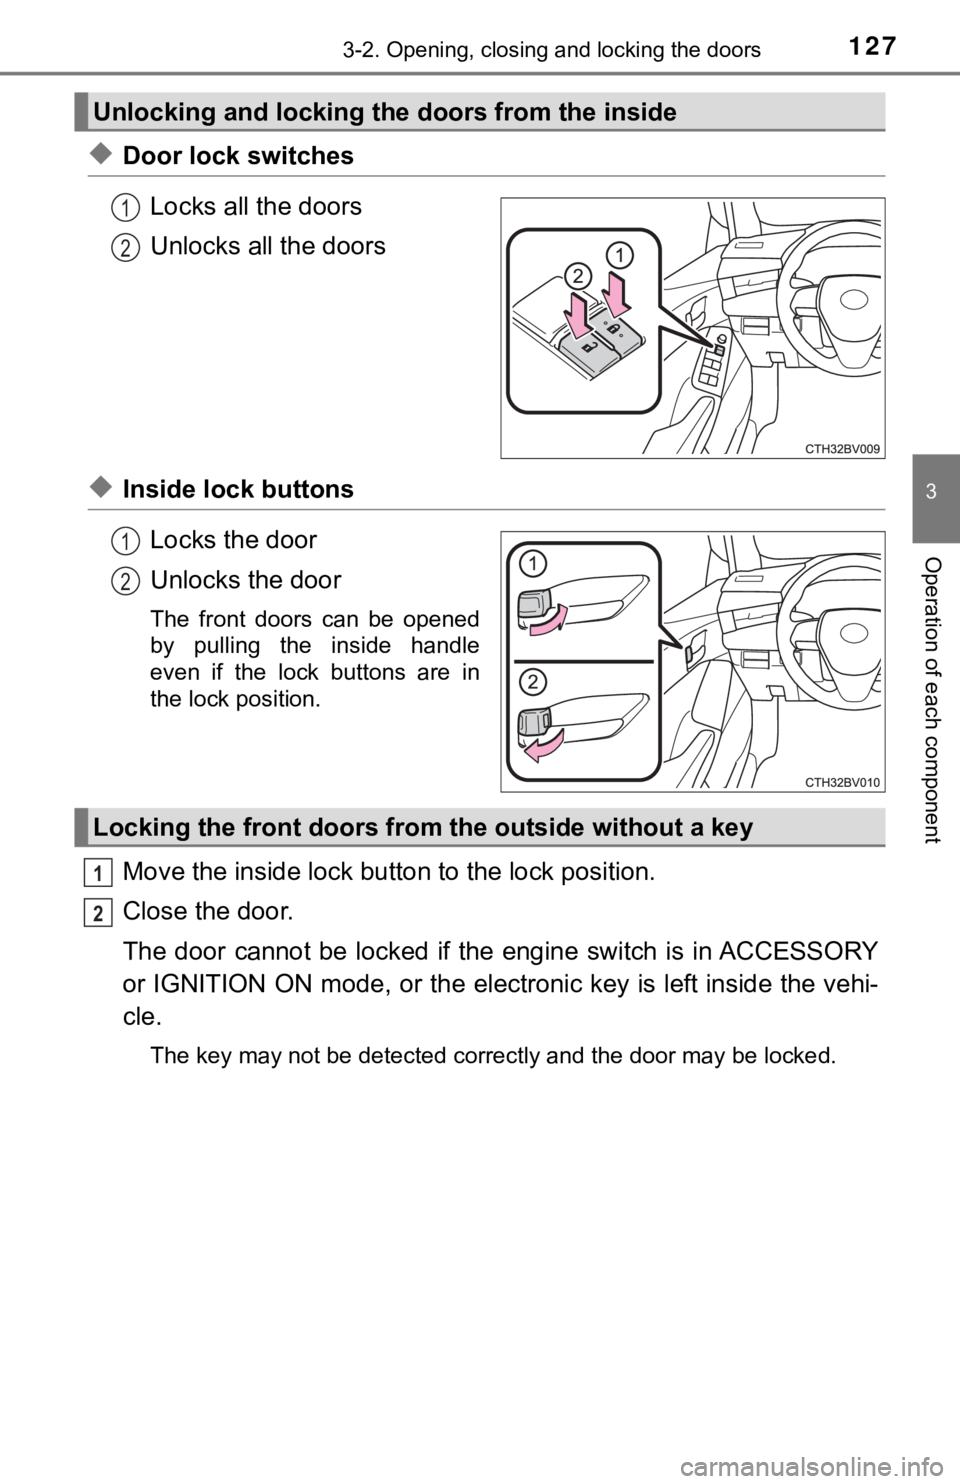
◆Door lock switches
Locks all the doors
Unlocks all the doors
◆Inside lock buttons
Locks the door
Unlocks the door
The front doors can be opened
by pulling the inside handle
even if the lock buttons are in
the lock position.
Move the inside lock button to the lock position.
Close the door.
The door cannot be locked if the engine switch is in ACCESSORY
or IGNITION ON mode, or the electronic key is left inside the vehi-
cle.
The key may not be detected correctly and the door may be locked.
Unlocking and locking the doors from the inside
1
2
1
2
Locking the front doors from the outside without a key
1
2
Page 129 of 548
1293-2. Opening, closing and locking the doors
3
Operation of each component
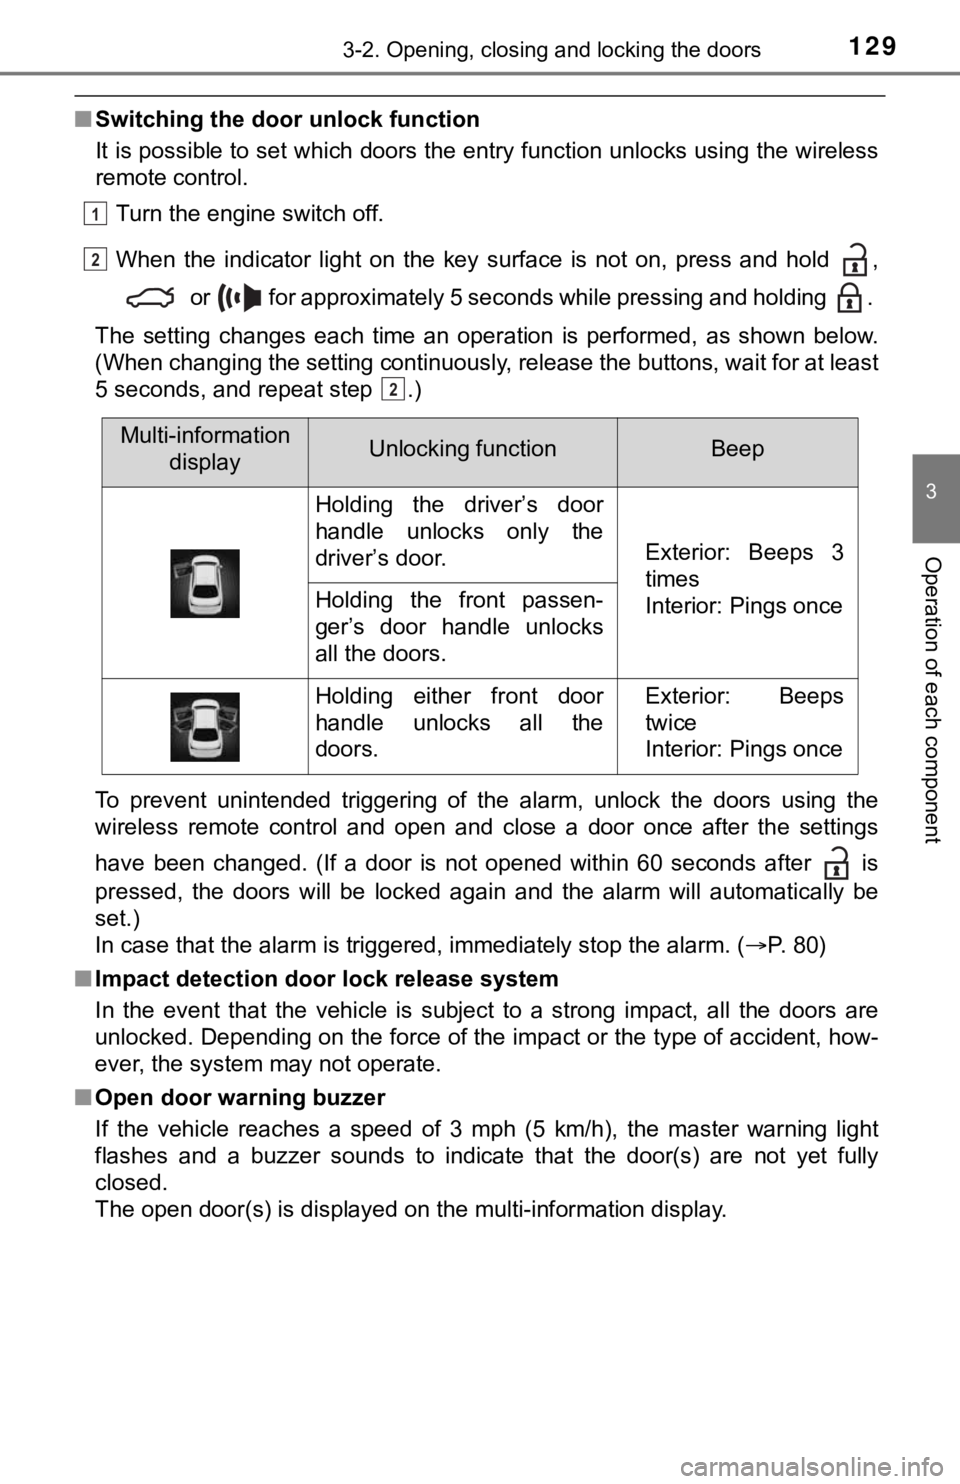
■Switching the door unlock function
It is possible to set which doors the entry function unlocks using the wireless
remote control.
Turn the engine switch off.
When the indicator light on the key surface is not on, press and hold ,
or for approximately 5 seconds while pressing and holding .
The setting changes each time an operation is performed, as shown below.
(When changing the setting continuously, release the buttons, wait for at least
5 seconds, and repeat step .)
To prevent unintended triggering of the alarm, unlock the doors using the
wireless remote control and open and close a door once after the settings
have been changed. (If a door is not opened within 60 seconds after is
pressed, the doors will be locked again and the alarm will automatically be
set.)
In case that the alarm is triggered, immediately stop the alarm. (P. 80)
■Impact detection door lock release system
In the event that the vehicle is subject to a strong impact, all the doors are
unlocked. Depending on the force of the impact or the type of accident, how-
ever, the system may not operate.
■Open door warning buzzer
If the vehicle reaches a speed of 3 mph (5 km/h), the master warning light
flashes and a buzzer sounds to indicate that the door(s) are not yet fully
closed.
The open door(s) is displayed on the multi-information display.
1
2
2
Multi-information
displayUnlocking functionBeep
Holding the driver’s door
handle unlocks only the
driver’s door.
Exterior: Beeps 3
times
Interior: Pings once
Holding the front passen-
ger’s door handle unlocks
all the doors.
Holding either front door
handle unlocks all the
doors.Exterior: Beeps
twice
Interior: Pings once
Page 137 of 548
1373-2. Opening, closing and locking the doors
3
Operation of each component
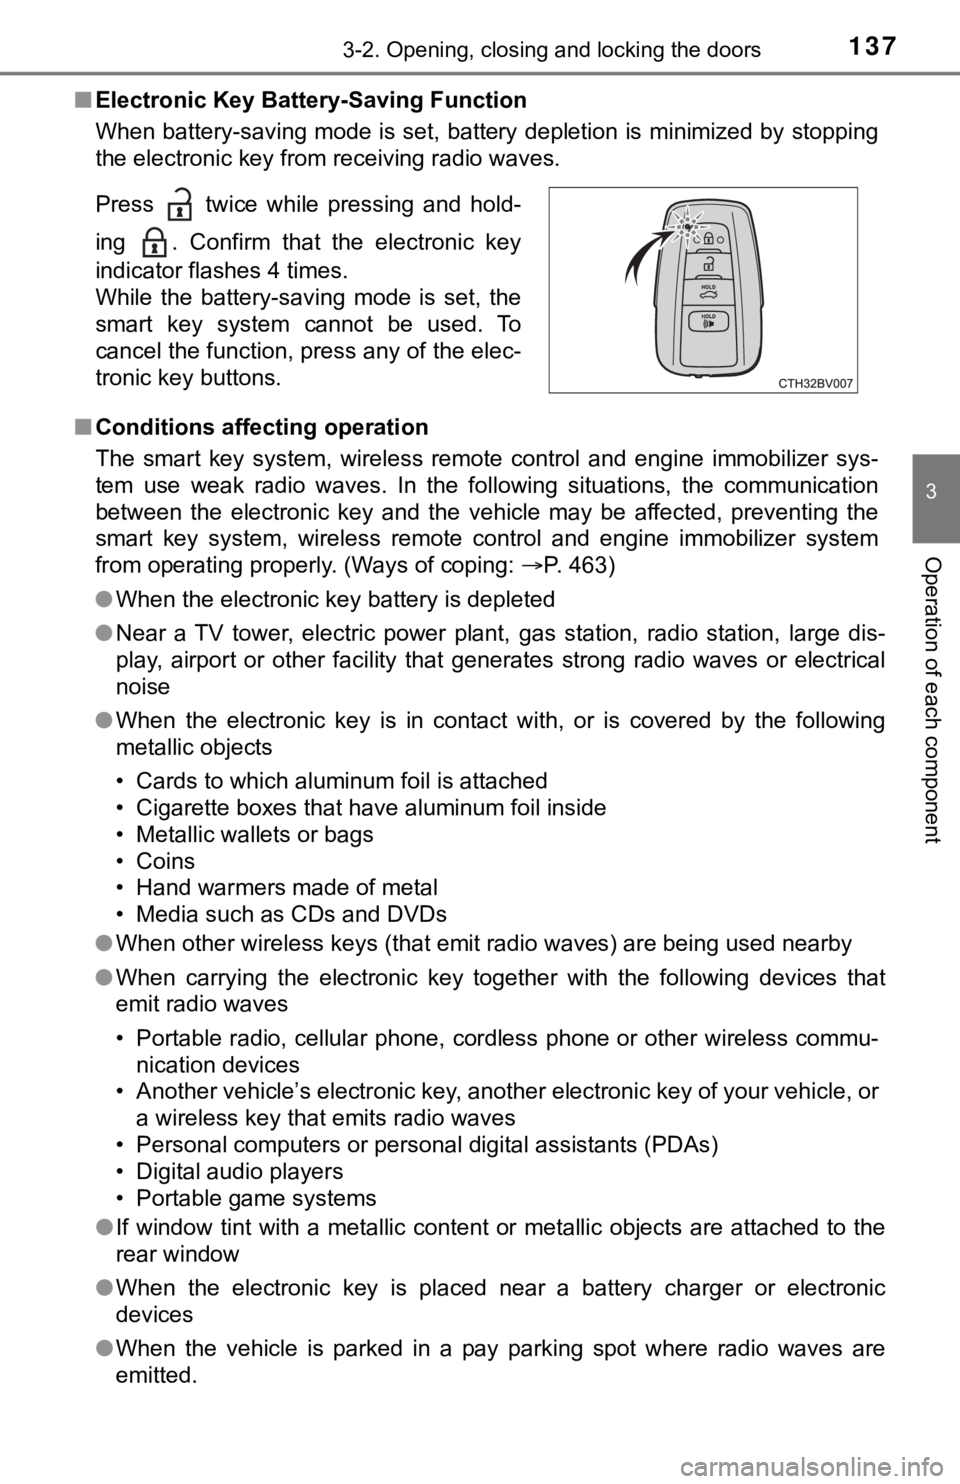
■Electronic Key Battery-Saving Function
When battery-saving mode is set, battery depletion is minimized by stopping
the electronic key from receiving radio waves.
■Conditions affecting operation
The smart key system, wireless remote control and engine immobilizer sys-
tem use weak radio waves. In the following situations, the communication
between the electronic key and the vehicle may be affected, preventing the
smart key system, wireless remote control and engine immobilizer system
from operating properly. (Ways of coping: P. 463)
●When the electronic key battery is depleted
●Near a TV tower, electric power plant, gas station, radio station, large dis-
play, airport or other facility that generates strong radio waves or electrical
noise
●When the electronic key is in contact with, or is covered by the following
metallic objects
• Cards to which aluminum foil is attached
• Cigarette boxes that have aluminum foil inside
• Metallic wallets or bags
• Coins
• Hand warmers made of metal
• Media such as CDs and DVDs
●When other wireless keys (that emit radio waves) are being used nearby
●When carrying the electronic key together with the following devices that
emit radio waves
• Portable radio, cellular phone, cordless phone or other wireless commu-
nication devices
• Another vehicle’s electronic key, another electronic key of your vehicle, or
a wireless key that emits radio waves
• Personal computers or personal digital assistants (PDAs)
• Digital audio players
• Portable game systems
●If window tint with a metallic content or metallic objects are attached to the
rear window
●When the electronic key is placed near a battery charger or electronic
devices
●When the vehicle is parked in a pay parking spot where radio waves are
emitted. Press twice while pressing and hold-
ing . Confirm that the electronic key
indicator flashes 4 times.
While the battery-saving mode is set, the
smart key system cannot be used. To
cancel the function, press any of the elec-
tronic key buttons.
Page 147 of 548
1473-3. Adjusting the seats
3
Operation of each component
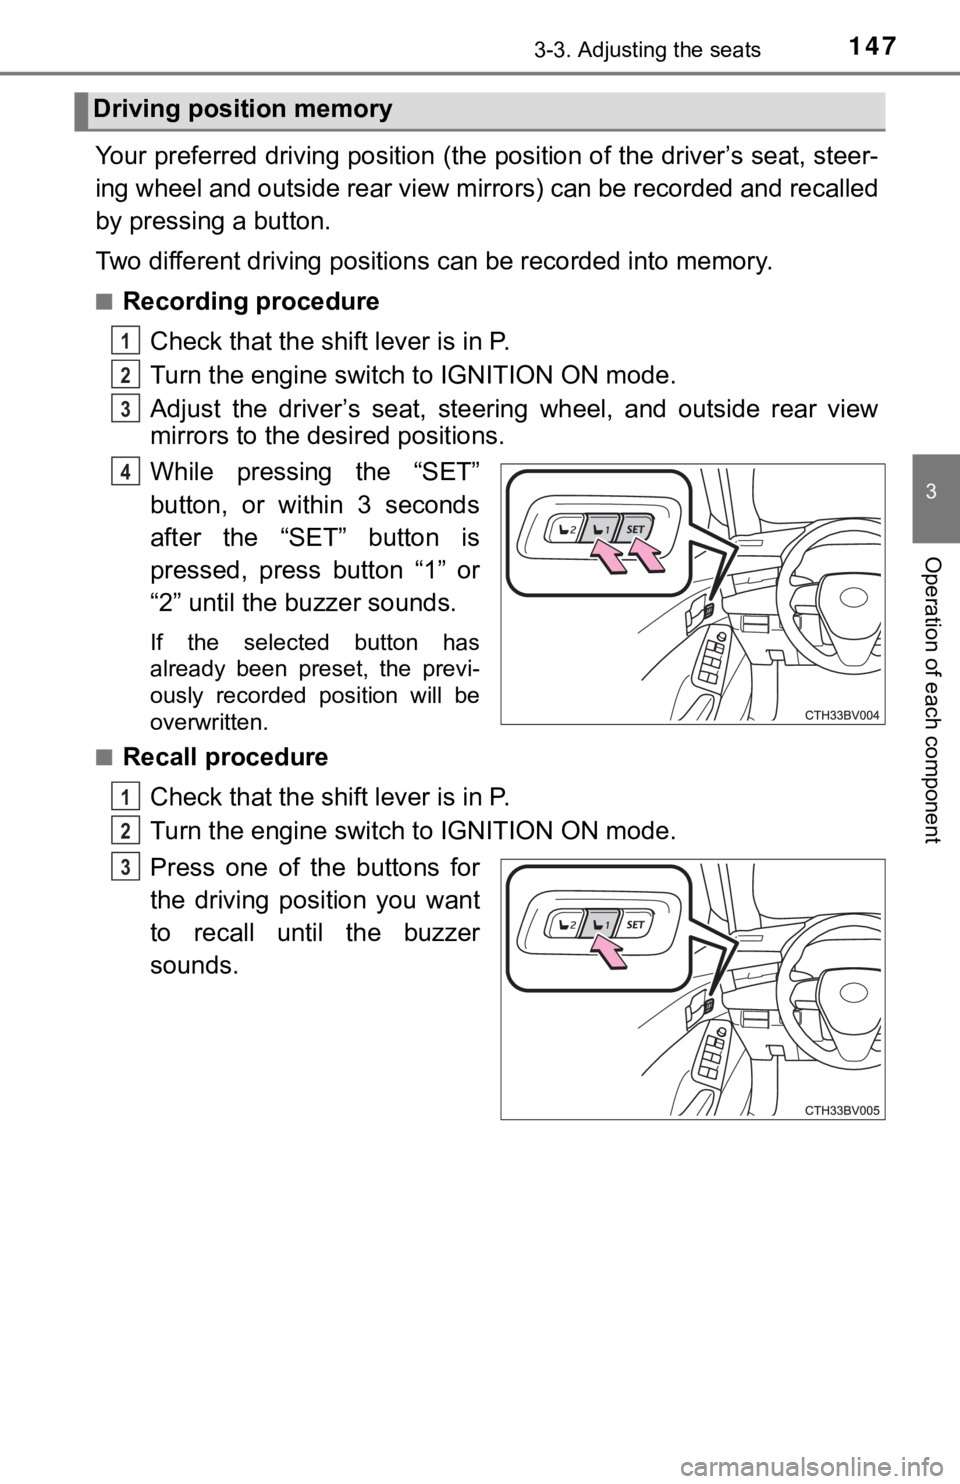
Your preferred driving position (the position of the driver’s seat, steer-
ing wheel and outside rear view mirrors) can be recorded and recalled
by pressing a button.
Two different driving positions can be recorded into memory.
■Recording procedure
Check that the shift lever is in P.
Turn the engine switch to IGNITION ON mode.
Adjust the driver’s seat, steering wheel, and outside rear view
mirrors to the desired positions.
While pressing the “SET”
button, or within 3 seconds
after the “SET” button is
pressed, press button “1” or
“2” until the buzzer sounds.
If the selected button has
already been preset, the previ-
ously recorded position will be
overwritten.
■
Recall procedure
Check that the shift lever is in P.
Turn the engine switch to IGNITION ON mode.
Press one of the buttons for
the driving position you want
to recall until the buzzer
sounds.
Driving position memory
1
2
3
4
1
2
3
Page 193 of 548
1934-2. Driving procedures
4
Driving
■If the shift lever cannot be shifted from P
First, check whether the brake pedal is being depressed.
If the shift lever cannot be shifted even though the brake pedal is depressed
and the shift release button is pushed, there may be a problem with the shift
lock system. Have the vehicle inspected by your Toyota dealer immediately.
The following steps may be used as an emergency measure to ensure that
the shift lever can be shifted.
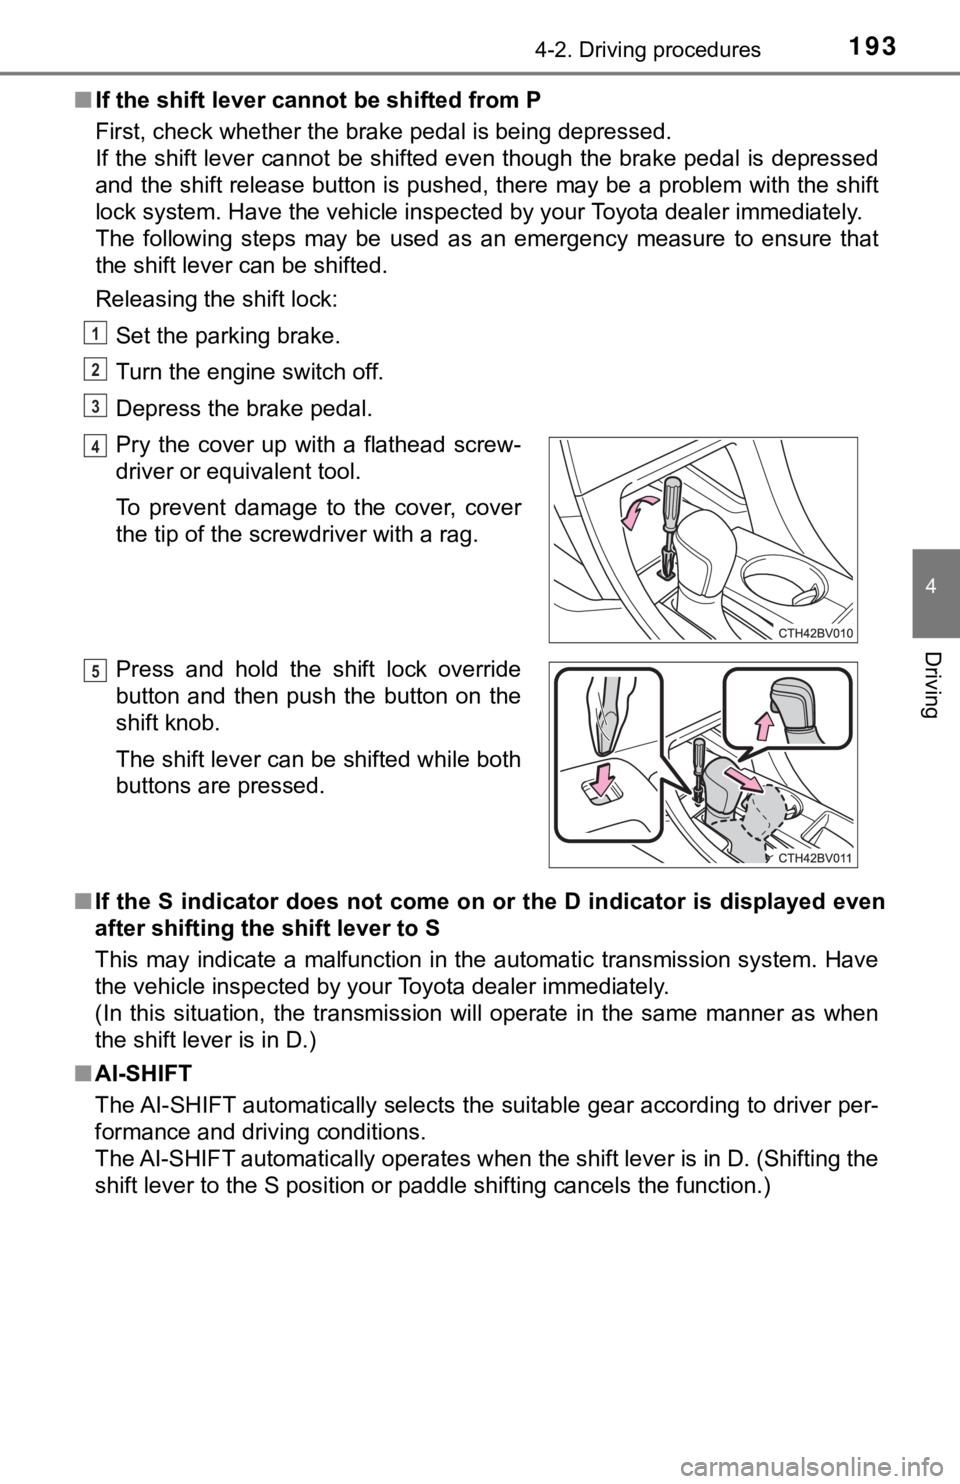
Releasing the shift lock:
Set the parking brake.
Turn the engine switch off.
Depress the brake pedal.
■If the S indicator does not come on or the D indicator is displayed even
after shifting the shift lever to S
This may indicate a malfunction in the automatic transmission system. Have
the vehicle inspected by your Toyota dealer immediately.
(In this situation, the transmission will operate in the same manner as when
the shift lever is in D.)
■AI-SHIFT
The AI-SHIFT automatically selects the suitable gear according to driver per-
formance and driving conditions.
The AI-SHIFT automatically operates when the shift lever is in D. (Shifting the
shift lever to the S position or paddle shifting cancels the function.) Pry the cover up with a flathead screw-
driver or equivalent tool.
To prevent damage to the cover, cover
the tip of the screwdriver with a rag.
Press and hold the shift lock override
button and then push the button on the
shift knob.
The shift lever can be shifted while both
buttons are pressed.
1
2
3
4
5
Page 357 of 548
3575-4. Other interior features
5
Interior features
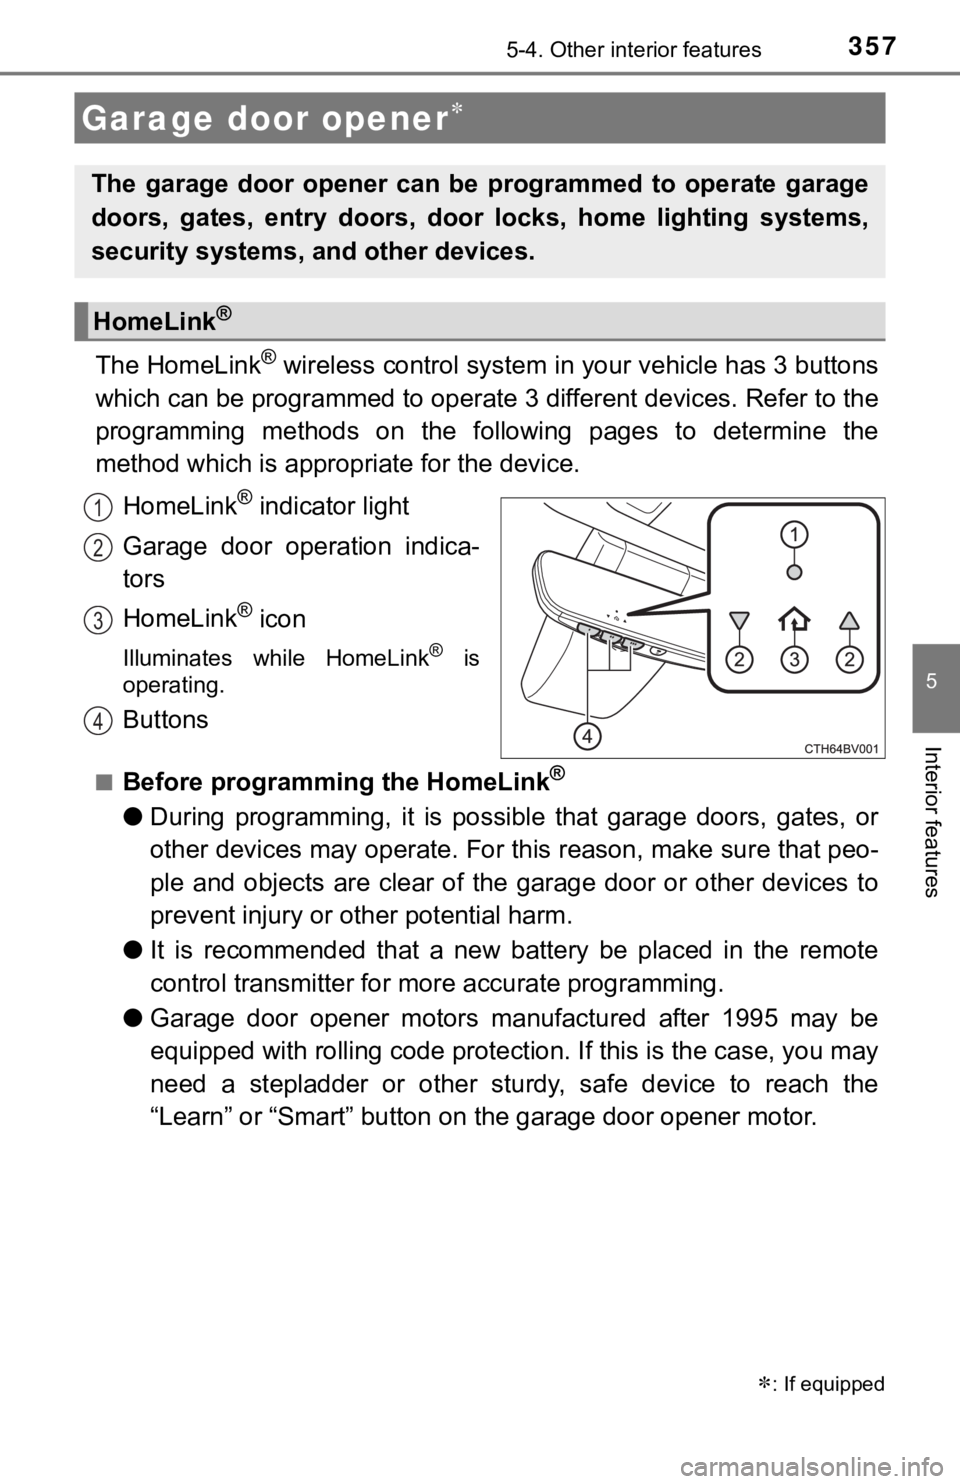
The HomeLink® wireless control system in your vehicle has 3 buttons
which can be programmed to operate 3 different devices. Refer to the
programming methods on the following pages to determine the
method which is appropriate for the device.
HomeLink
® indicator light
Garage door operation indica-
tors
HomeLink
® icon
Illuminates while HomeLink® is
operating.
Buttons
■Before programming the HomeLink®
●During programming, it is possible that garage doors, gates, or
other devices may operate. For this reason, make sure that peo-
ple and objects are clear of the garage door or other devices to
prevent injury or other potential harm.
●It is recommended that a new battery be placed in the remote
control transmitter for more accurate programming.
●Garage door opener motors manufactured after 1995 may be
equipped with rolling code protection. If this is the case, you may
need a stepladder or other sturdy, safe device to reach the
“Learn” or “Smart” button on the garage door opener motor.
Garage door opener
: If equipped
The garage door opener can be programmed to operate garage
doors, gates, entry doors, door locks, home lighting systems,
security systems, and other devices.
HomeLink®
1
2
3
4
Page 358 of 548
3585-4. Other interior features
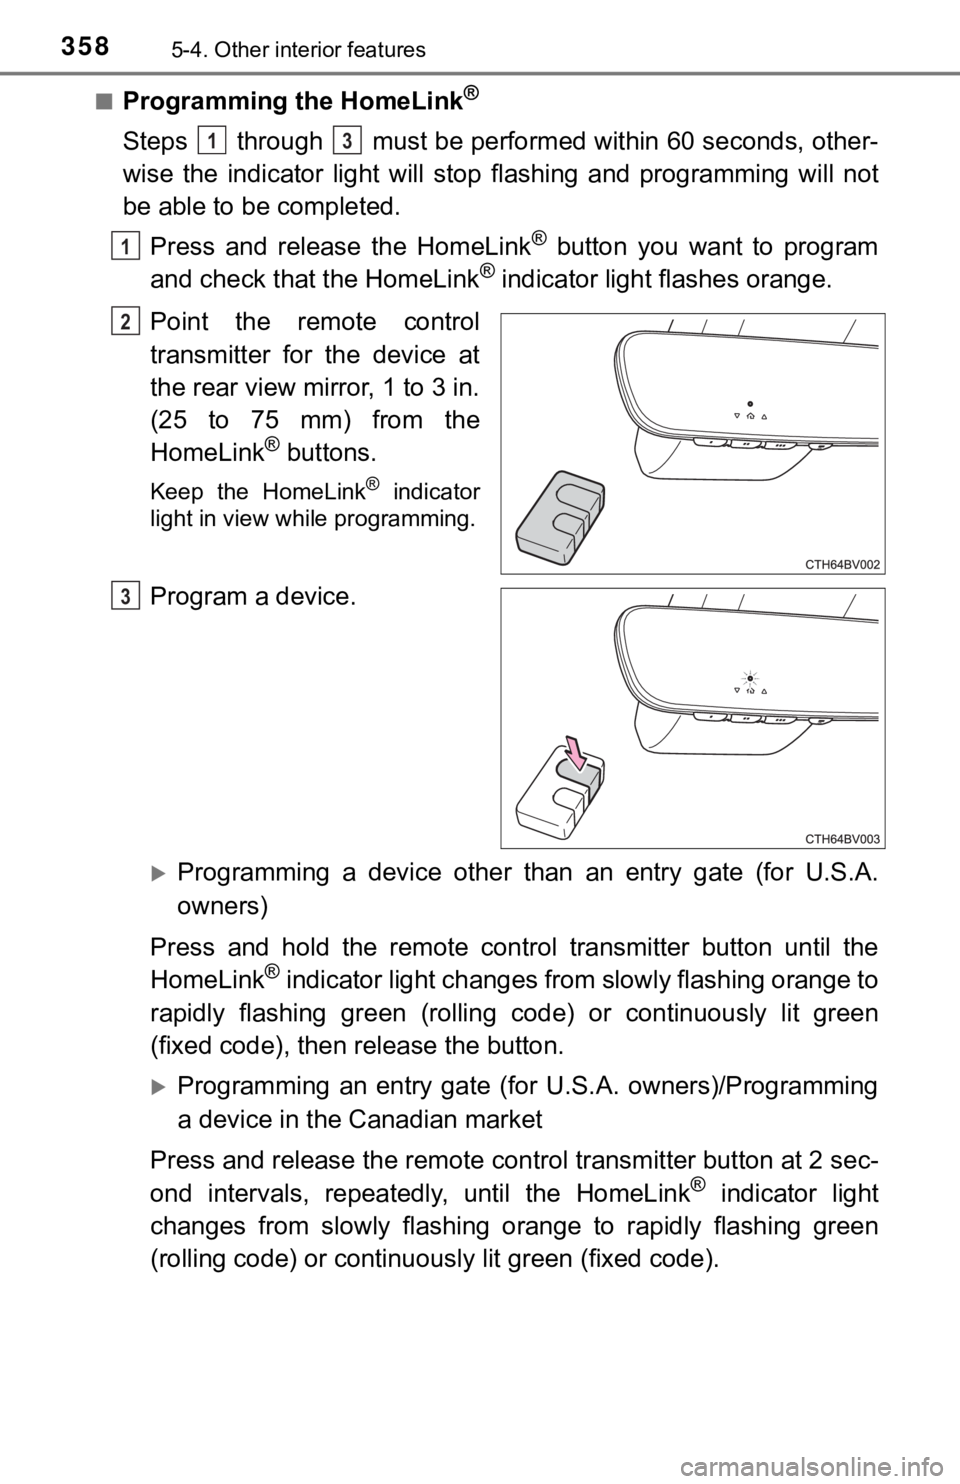
■Programming the HomeLink®
Steps through must be performed within 60 seconds, other-
wise the indicator light will stop flashing and programming will not
be able to be completed.
Press and release the HomeLink
® button you want to program
and check that the HomeLink® indicator light flashes orange.
Point the remote control
transmitter for the device at
the rear view mirror, 1 to 3 in.
(25 to 75 mm) from the
HomeLink
® buttons.
Keep the HomeLink® indicator
light in view while programming.
Program a device.
Programming a device other than an entry gate (for U.S.A.
owners)
Press and hold the remote control transmitter button until the
HomeLink
® indicator light changes from slowly flashing orange to
rapidly flashing green (rolling code) or continuously lit green
(fixed code), then release the button.
Programming an entry gate (for U.S.A. owners)/Programming
a device in the Canadian market
Press and release the remote control transmitter button at 2 sec-
ond intervals, repeatedly, until the HomeLink
® indicator light
changes from slowly flashing orange to rapidly flashing green
(rolling code) or continuously lit green (fixed code).
13
1
2
3
Page 359 of 548
3595-4. Other interior features
5
Interior features
Test the HomeLink® operation by pressing the newly pro-
grammed button and observing the indicator light:
●Indicator light illuminates: Programming of a fixed code device
has completed. The garage door or other device should operate
when a HomeLink
® button is pressed and released.
●Indicator light flashes rapidly: The garage door opener motor or
other device is equipped with a rolling code. To complete pro-
gramming, firmly press and hold the HomeLink
® button for 2 sec-
onds then release it.
●If the garage door or other device does not operate, proceed to
“Programming a rolling code system”.
Repeat the steps above to program another device for any of the
remaining HomeLink
® buttons.
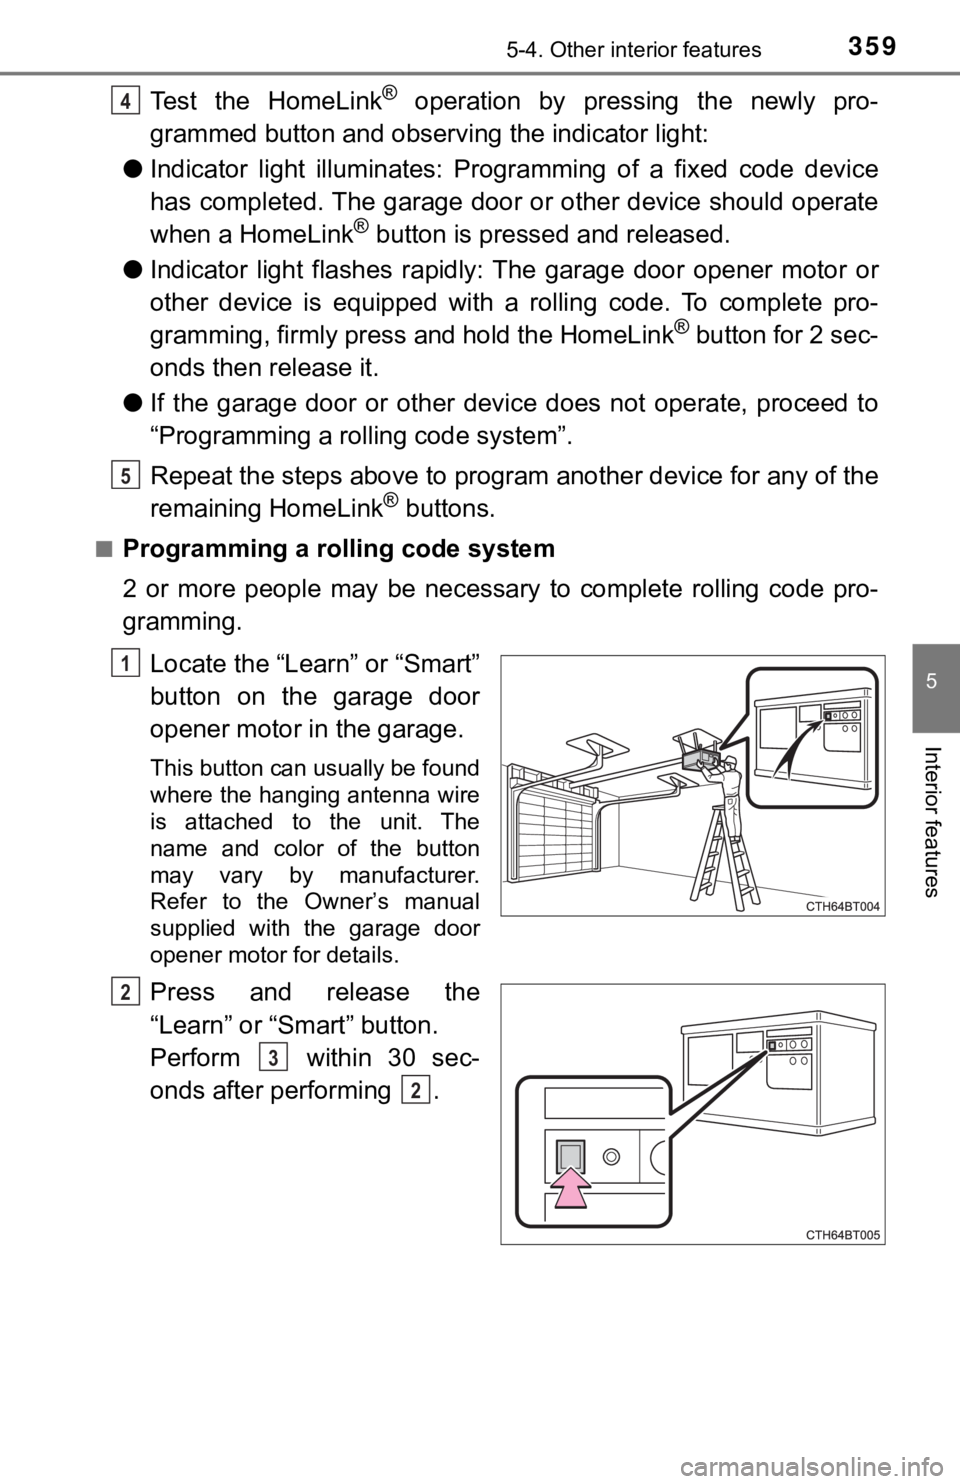
■Programming a rolling code system
2 or more people may be necessary to complete rolling code pro-
gramming.
Locate the “Learn” or “Smart”
button on the garage door
opener motor in the garage.
This button can usually be found
where the hanging antenna wire
is attached to the unit. The
name and color of the button
may vary by manufacturer.
Refer to the Owner’s manual
supplied with the garage door
opener motor for details.
Press and release the
“Learn” or “Smart” button.
Perform within 30 sec-
onds after performing .
4
5
1
2
3
2