clock TOYOTA AYGO 2021 User Guide
[x] Cancel search | Manufacturer: TOYOTA, Model Year: 2021, Model line: AYGO, Model: TOYOTA AYGO 2021Pages: 546, PDF Size: 81 MB
Page 430 of 546
4287-3. Do-it-yourself maintenance
AYGO_OM_Europe_OM9A012E■
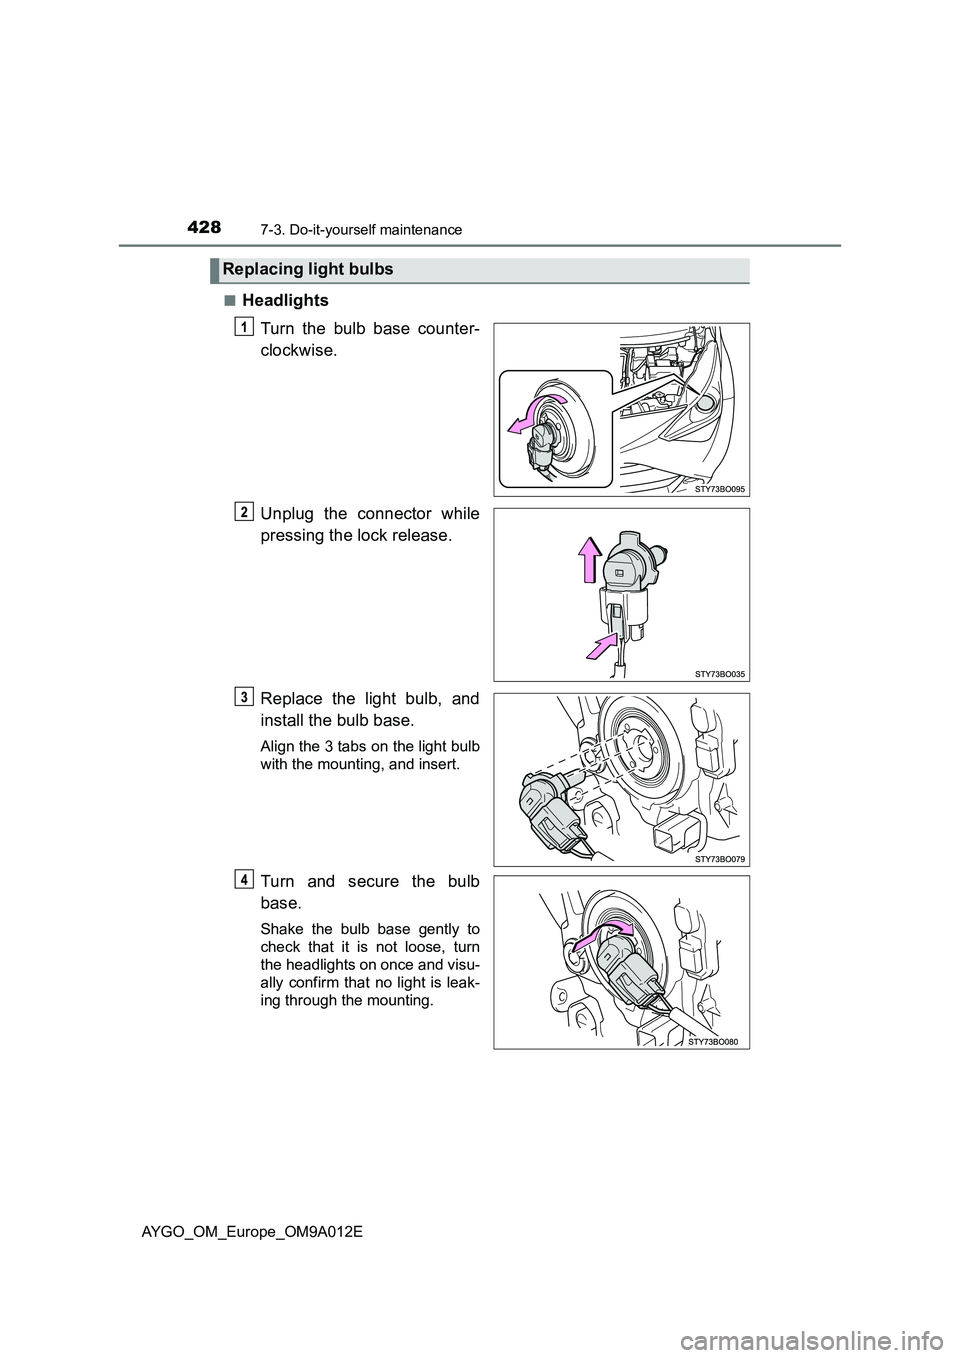
Headlights
Turn the bulb base counter-
clockwise.
Unplug the connector while
pressing the lock release.
Replace the light bulb, and
install the bulb base.
Align the 3 tabs on the light bulb
with the mounting, and insert.
Turn and secure the bulb
base.
Shake the bulb base gently to
check that it is not loose, turn
the headlights on once and visu-
ally confirm that no light is leak-
ing through the mounting.
Replacing light bulbs
Page 431 of 546
4297-3. Do-it-yourself maintenance
7
Maintenance and care
AYGO_OM_Europe_OM9A012E■
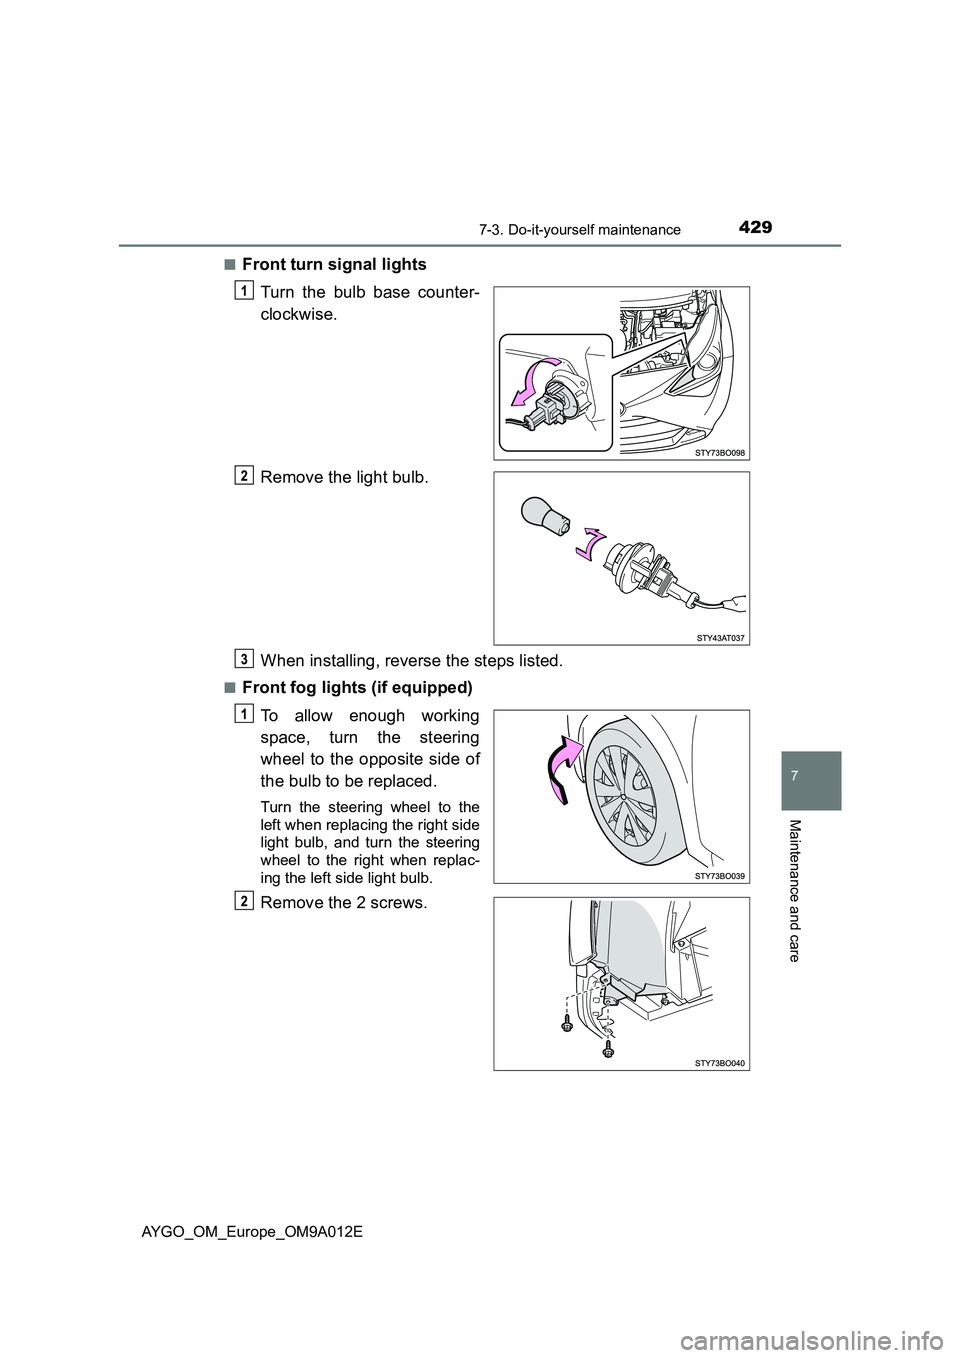
Front turn signal lights
Turn the bulb base counter-
clockwise.
Remove the light bulb.
When installing, reverse the steps listed.
■Front fog lights (if equipped)
To allow enough working
space, turn the steering
wheel to the opposite side of
the bulb to be replaced.
Turn the steering wheel to the
left when replacing the right side
light bulb, and turn the steering
wheel to the right when replac-
ing the left side light bulb.
Remove the 2 screws.
Page 432 of 546
4307-3. Do-it-yourself maintenance
AYGO_OM_Europe_OM9A012E
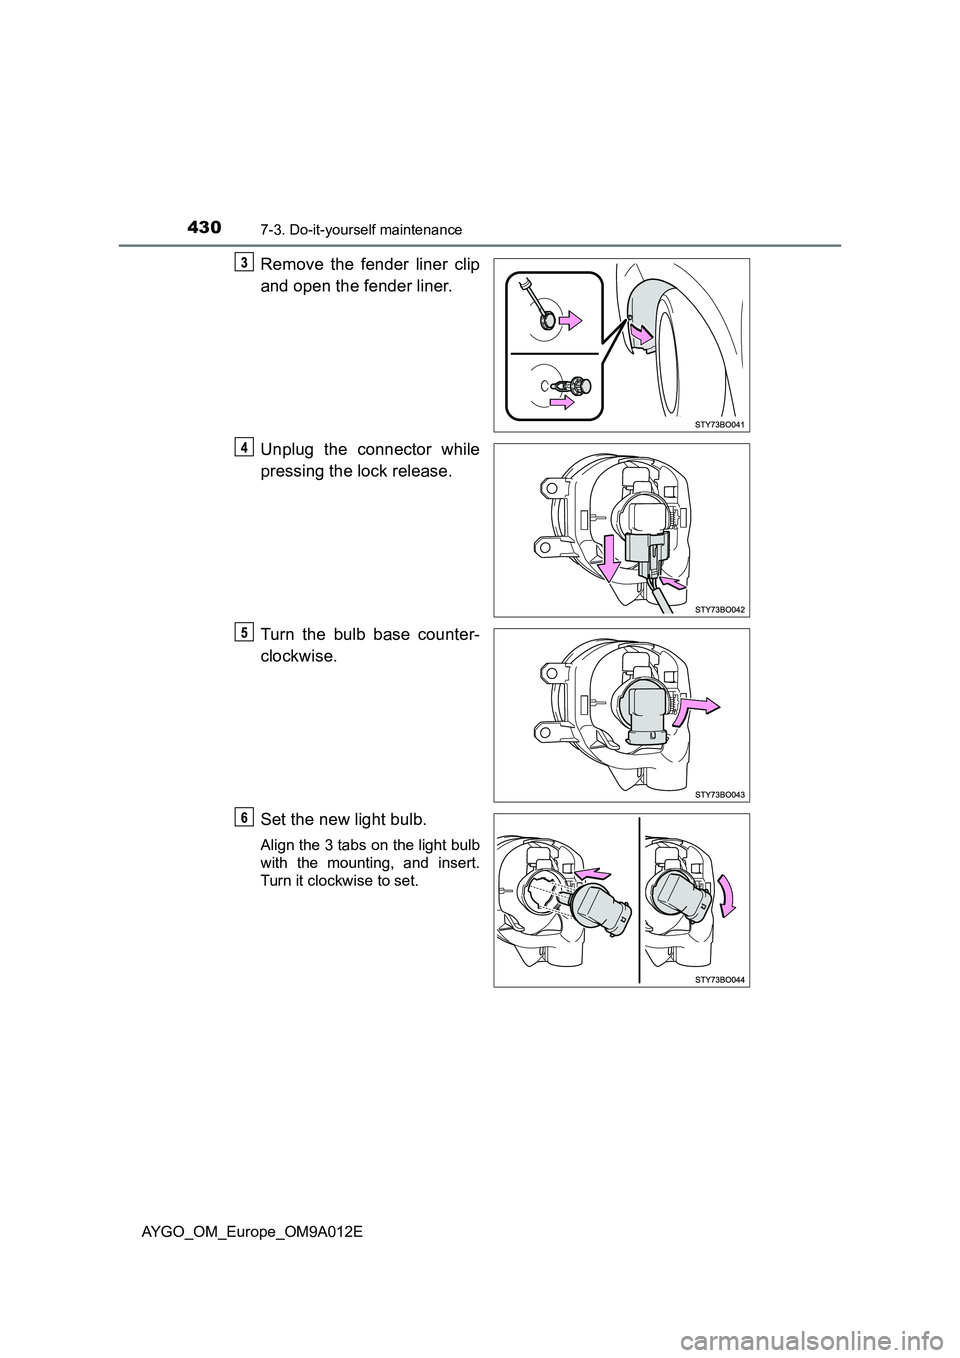
Remove the fender liner clip
and open the fender liner.
Unplug the connector while
pressing the lock release.
Turn the bulb base counter-
clockwise.
Set the new light bulb.
Align the 3 tabs on the light bulb
with the mounting, and insert.
Turn it clockwise to set.
Page 434 of 546
4327-3. Do-it-yourself maintenance
AYGO_OM_Europe_OM9A012E■
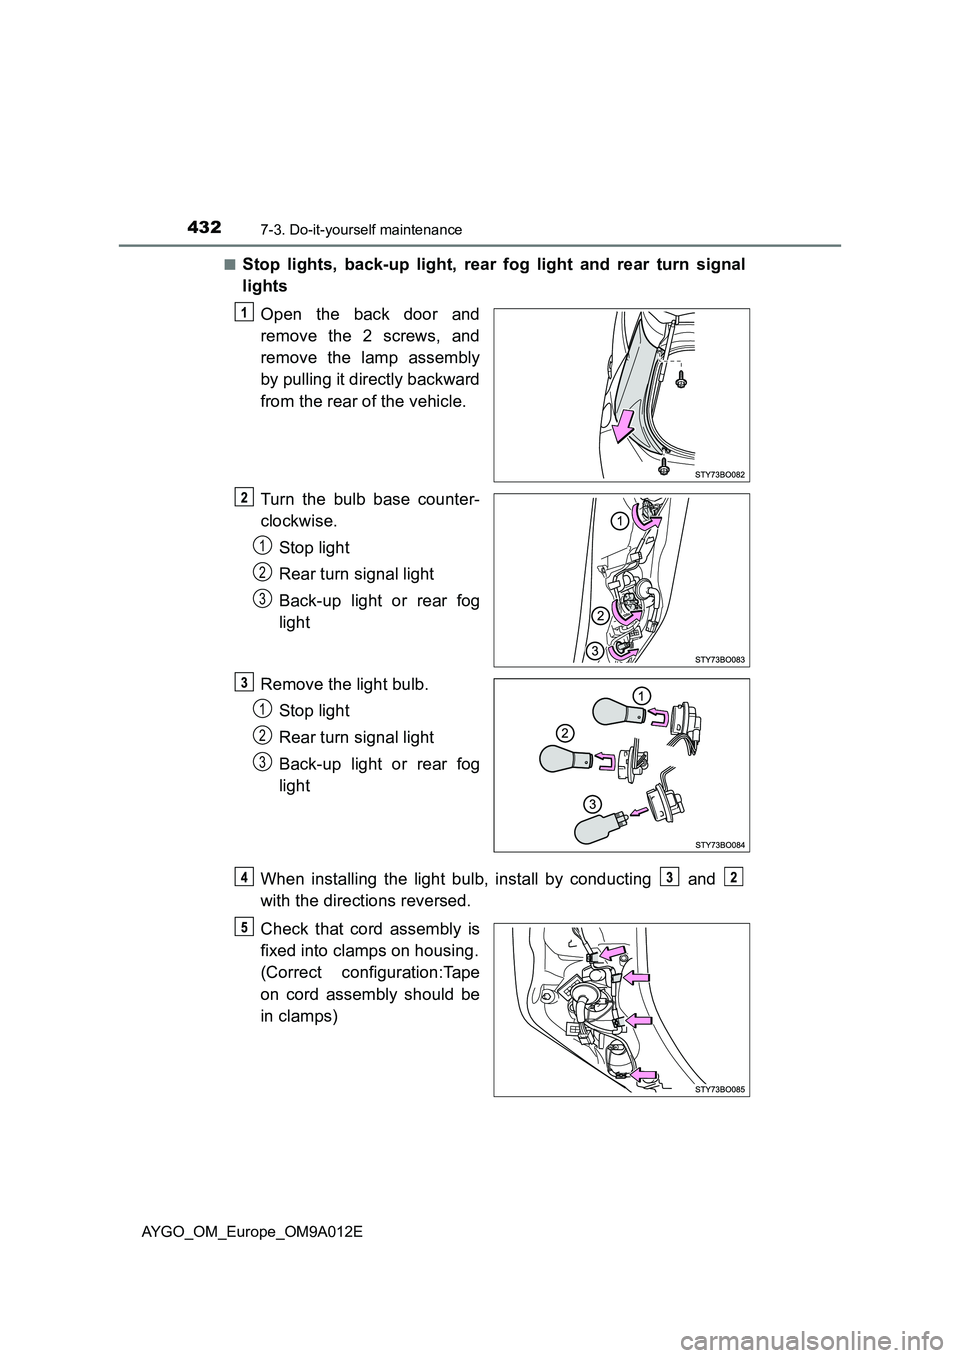
Stop lights, back-up light, rear fog light and rear turn signal
lights
Open the back door and
remove the 2 screws, and
remove the lamp assembly
by pulling it directly backward
from the rear of the vehicle.
Turn the bulb base counter-
clockwise.
Stop light
Rear turn signal light
Back-up light or rear fog
light
Remove the light bulb.
Stop light
Rear turn signal light
Back-up light or rear fog
light
When installing the light bulb, install by conducting and
with the directions reversed.
Check that cord assembly is
fixed into clamps on housing.
(Correct configuration:Tape
on cord assembly should be
in clamps)
1
2
3
1
2
3
Page 435 of 546
4337-3. Do-it-yourself maintenance
7
Maintenance and care
AYGO_OM_Europe_OM9A012E
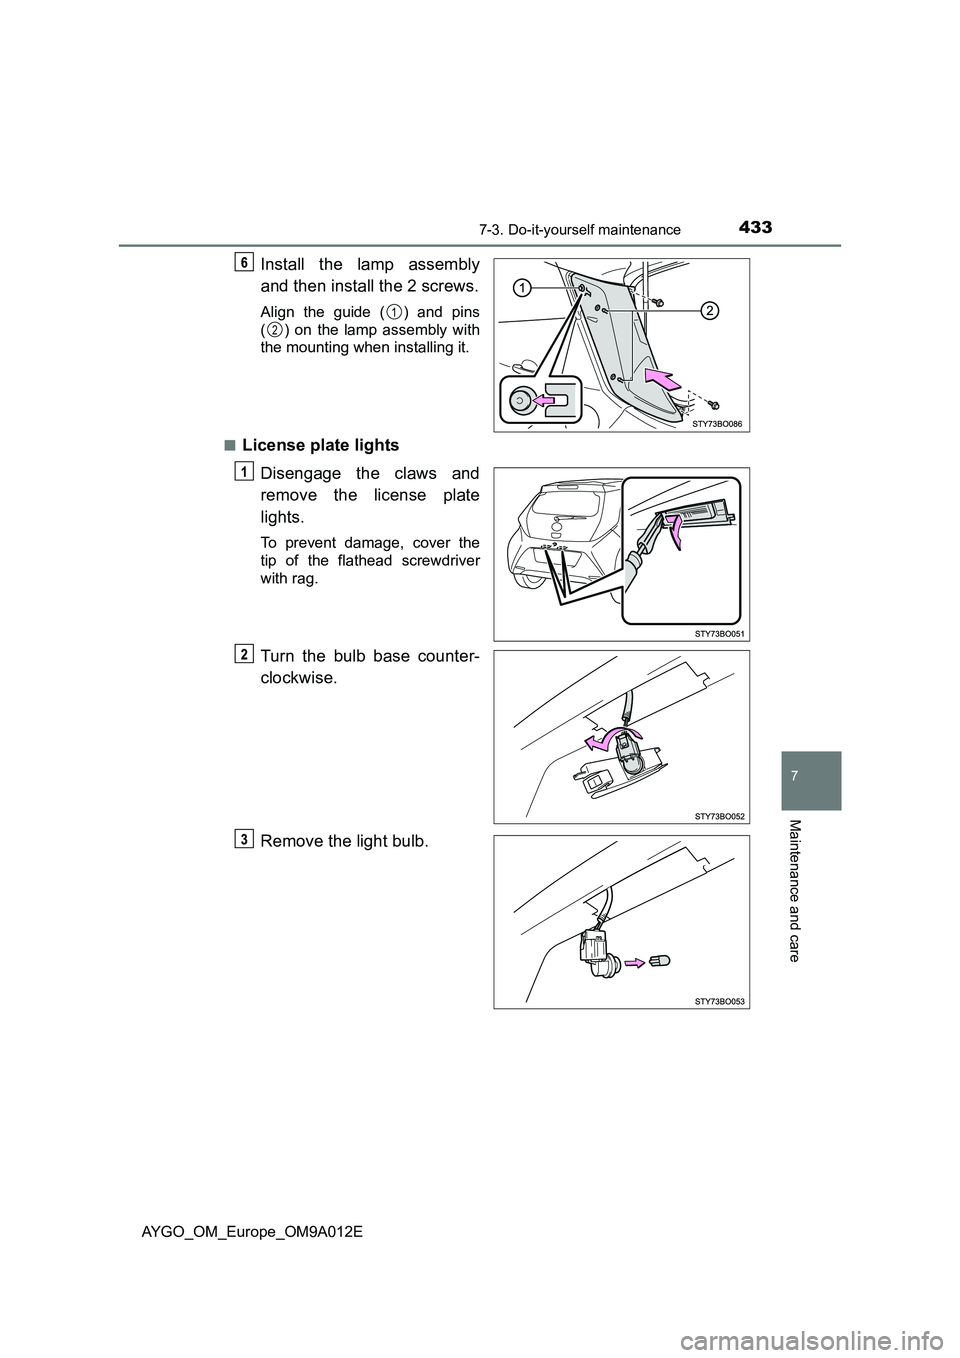
Install the lamp assembly
and then install the 2 screws.
Align the guide ( ) and pins
( ) on the lamp assembly with
the mounting when installing it.
■
License plate lights
Disengage the claws and
remove the license plate
lights.
To prevent damage, cover the
tip of the flathead screwdriver
with rag.
Turn the bulb base counter-
clockwise.
Remove the light bulb.
1
2
Page 436 of 546
4347-3. Do-it-yourself maintenance
AYGO_OM_Europe_OM9A012E
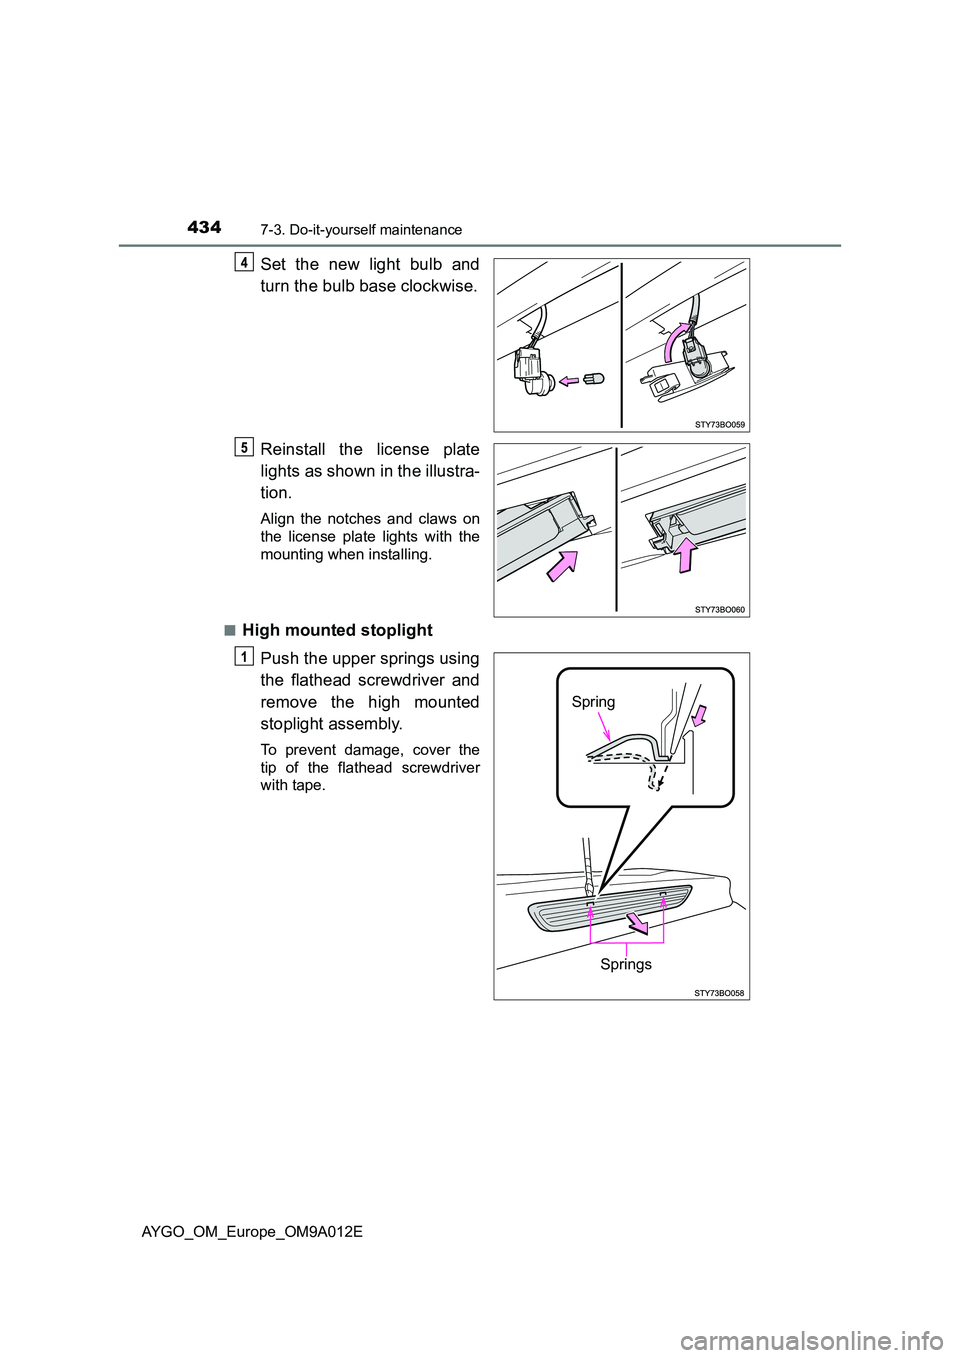
Set the new light bulb and
turn the bulb base clockwise.
Reinstall the license plate
lights as shown in the illustra-
tion.
Align the notches and claws on
the license plate lights with the
mounting when installing.
■High mounted stoplight
Push the upper springs using
the flathead screwdriver and
remove the high mounted
stoplight assembly.
To prevent damage, cover the
tip of the flathead screwdriver
with tape.
Spring
Springs
Page 468 of 546

4668-2. Steps to take in an emergency
AYGO_OM_Europe_OM9A012E
Connect the nozzle to the
valve.
Screw the end of the nozzle clock-
wise as far as possible.
The bottle should hang vertically
without contacting the ground. If
the bottle does not hang vertically,
move the vehicle so that the tire
valve is located properly.
Remove the cap from the bot-
tle.
Pull the hose out from the com-
pressor.
Connect the bottle to the com-
pressor.
Screw the end of the nozzle clock-
wise as far as possible.
Page 474 of 546
4728-2. Steps to take in an emergency
AYGO_OM_Europe_OM9A012E
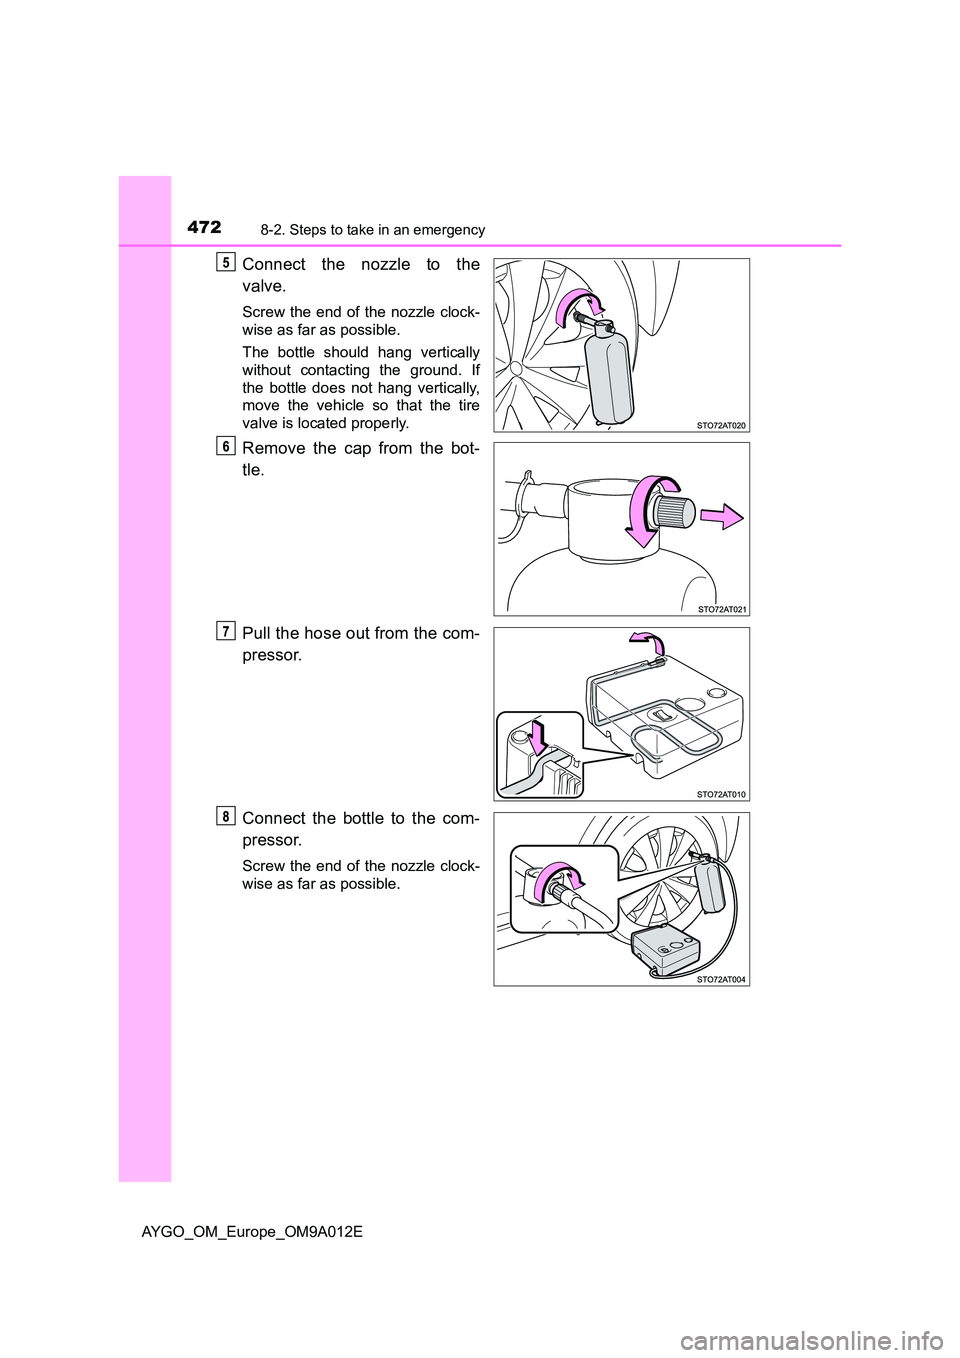
Connect the nozzle to the
valve.
Screw the end of the nozzle clock-
wise as far as possible.
The bottle should hang vertically
without contacting the ground. If
the bottle does not hang vertically,
move the vehicle so that the tire
valve is located properly.
Remove the cap from the bot-
tle.
Pull the hose out from the com-
pressor.
Connect the bottle to the com-
pressor.
Screw the end of the nozzle clock-
wise as far as possible.
Page 534 of 546
532Alphabetical index
AYGO_OM_Europe_OM9A012E
Child-protectors ....................... 135
Cleaning............................ 378, 382
Aluminum wheels .................. 379
Canvas top ............................ 378
Exterior.................................. 378
Interior ................................... 382
Seat belts .............................. 383
Clock ......................................... 374
Clutch........................................ 517
Condenser ................................ 398
Cooling system
Engine overheating ............... 504
CRS (Child Restraint
System) .................................... 52
Cup holders .............................. 368
Curtain shield airbags ............... 36
Customizable features ............ 523Daytime running light
system .................................... 233
Defogger
Outside rear view
mirrors ........................ 354, 360
Rear window ................. 354, 360
Windshield .................... 354, 360
Dimension ................................ 510
Display
Drive monitor display ............ 105
Trip information ..................... 105
Do-it-yourself maintenance .... 387
Doors
Back door.............................. 137
Door glasses ......................... 194
Door lock....................... 132, 137
Open door warning buzzer ... 145
Open door warning light........ 453
Outside rear view mirrors...... 192
Rear door
child-protectors................... 135
Side doors............................. 132
Drive monitor display .............. 105
Switching the display ............ 105
Trip information ..................... 105
Driving ...................................... 202
Break-in tips .......................... 205
Correct posture ....................... 30
Procedures ........................... 202
Winter drive tips .................... 285D