buttons TOYOTA AYGO 2021 Owners Manual
[x] Cancel search | Manufacturer: TOYOTA, Model Year: 2021, Model line: AYGO, Model: TOYOTA AYGO 2021Pages: 546, PDF Size: 81 MB
Page 20 of 546
18Pictorial index
AYGO_OM_Europe_OM9A012E
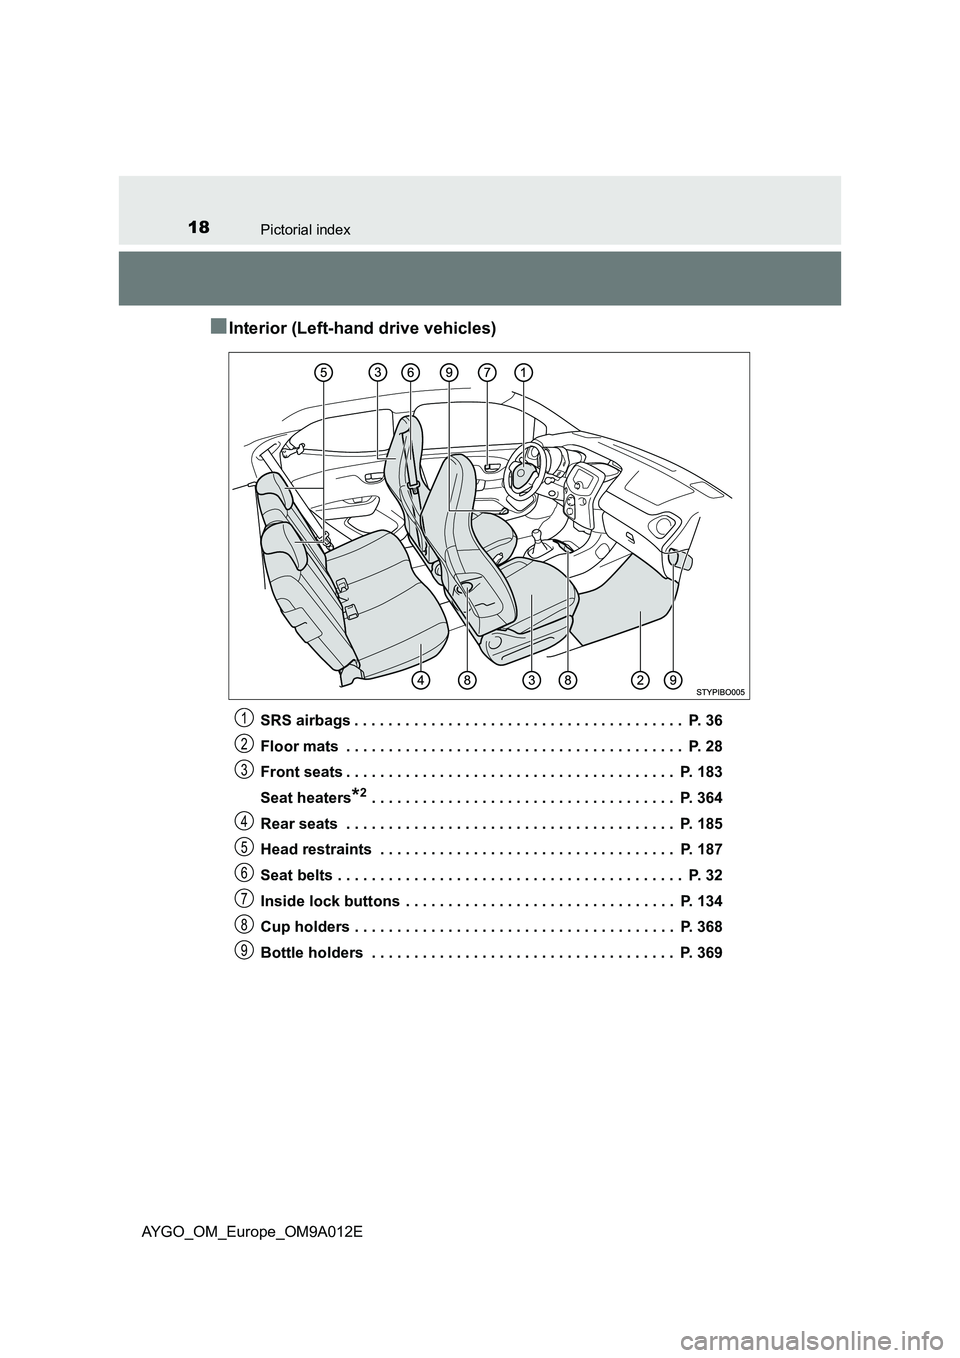
■Interior (Left-hand drive vehicles)
SRS airbags . . . . . . . . . . . . . . . . . . . . . . . . . . . . . . . . . . . . . . . P. 36
Floor mats . . . . . . . . . . . . . . . . . . . . . . . . . . . . . . . . . . . . . . . . P. 28
Front seats . . . . . . . . . . . . . . . . . . . . . . . . . . . . . . . . . . . . . . . P. 183
Seat heaters
*2 . . . . . . . . . . . . . . . . . . . . . . . . . . . . . . . . . . . . P. 364
Rear seats . . . . . . . . . . . . . . . . . . . . . . . . . . . . . . . . . . . . . . . P. 185
Head restraints . . . . . . . . . . . . . . . . . . . . . . . . . . . . . . . . . . . P. 187
Seat belts . . . . . . . . . . . . . . . . . . . . . . . . . . . . . . . . . . . . . . . . . P. 32
Inside lock buttons . . . . . . . . . . . . . . . . . . . . . . . . . . . . . . . . P. 134
Cup holders . . . . . . . . . . . . . . . . . . . . . . . . . . . . . . . . . . . . . . P. 368
Bottle holders . . . . . . . . . . . . . . . . . . . . . . . . . . . . . . . . . . . . P. 369
1
2
3
4
5
6
7
8
9
Page 26 of 546
24Pictorial index
AYGO_OM_Europe_OM9A012E
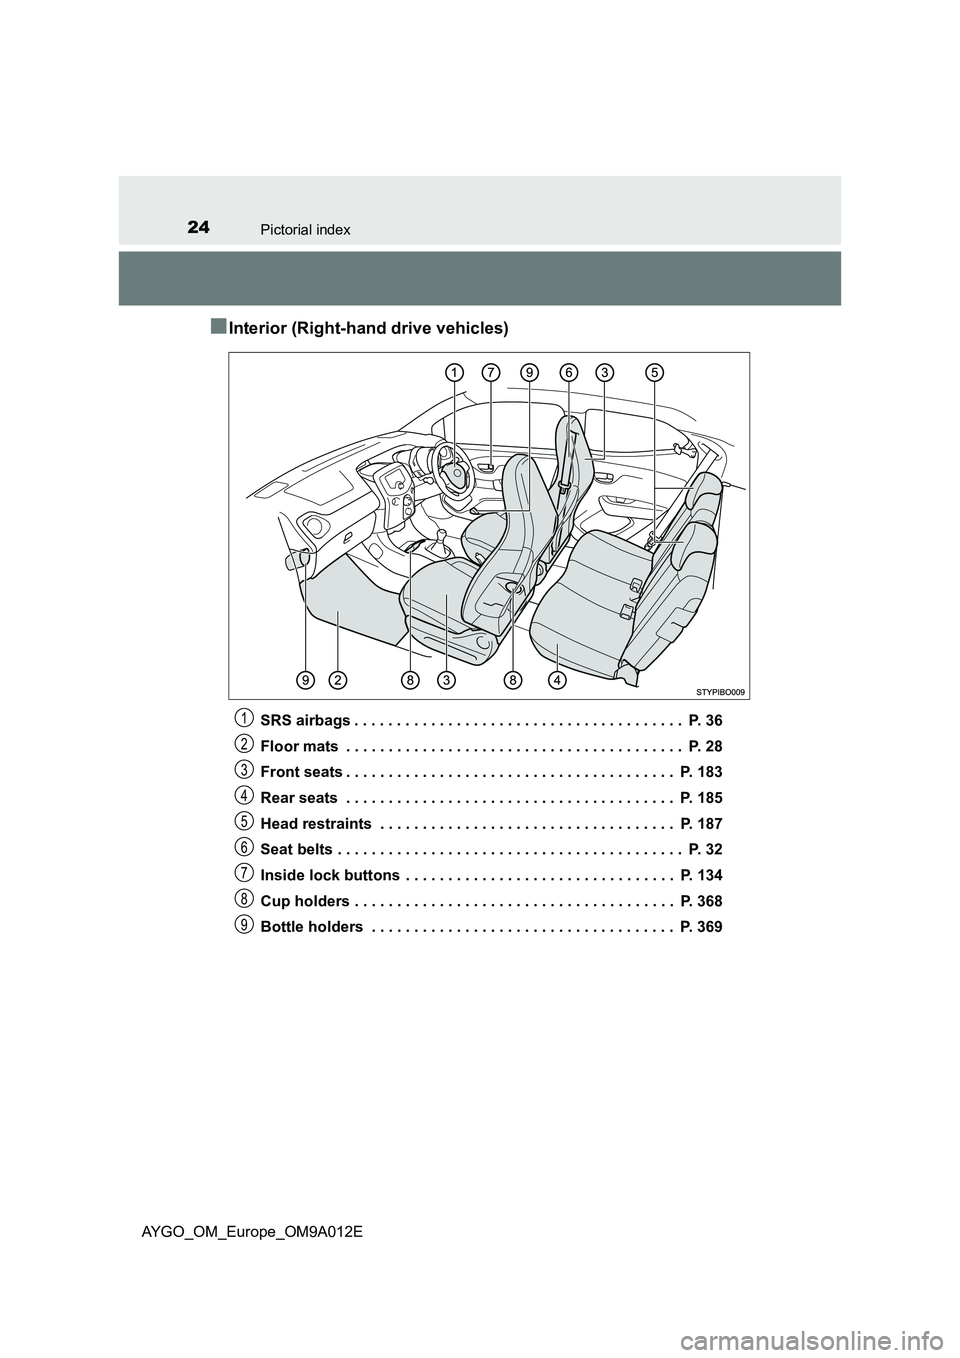
■Interior (Right-hand drive vehicles)
SRS airbags . . . . . . . . . . . . . . . . . . . . . . . . . . . . . . . . . . . . . . . P. 36
Floor mats . . . . . . . . . . . . . . . . . . . . . . . . . . . . . . . . . . . . . . . . P. 28
Front seats . . . . . . . . . . . . . . . . . . . . . . . . . . . . . . . . . . . . . . . P. 183
Rear seats . . . . . . . . . . . . . . . . . . . . . . . . . . . . . . . . . . . . . . . P. 185
Head restraints . . . . . . . . . . . . . . . . . . . . . . . . . . . . . . . . . . . P. 187
Seat belts . . . . . . . . . . . . . . . . . . . . . . . . . . . . . . . . . . . . . . . . . P. 32
Inside lock buttons . . . . . . . . . . . . . . . . . . . . . . . . . . . . . . . . P. 134
Cup holders . . . . . . . . . . . . . . . . . . . . . . . . . . . . . . . . . . . . . . P. 368
Bottle holders . . . . . . . . . . . . . . . . . . . . . . . . . . . . . . . . . . . . P. 3691
2
3
4
5
6
7
8
9
Page 72 of 546
701-2. Child safety
AYGO_OM_Europe_OM9A012E
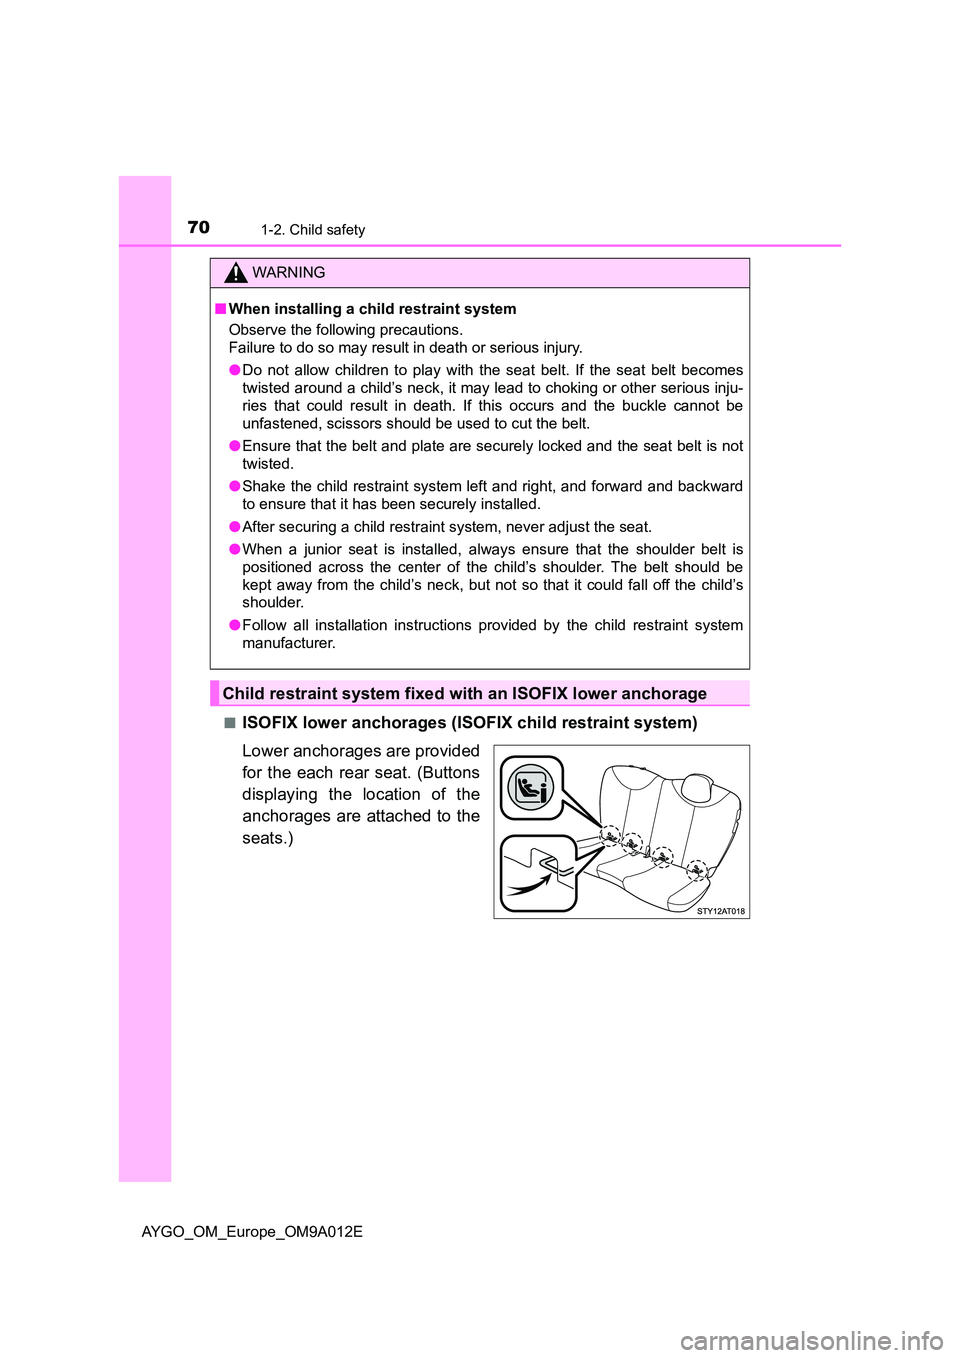
■ISOFIX lower anchorages (ISOFIX child restraint system)
Lower anchorages are provided
for the each rear seat. (Buttons
displaying the location of the
anchorages are attached to the
seats.)
WARNING
■ When installing a child restraint system
Observe the following precautions.
Failure to do so may result in death or serious injury.
● Do not allow children to play with the seat belt. If the seat belt becomes
twisted around a child’s neck, it may lead to choking or other serious inju-
ries that could result in death. If this occurs and the buckle cannot be
unfastened, scissors should be used to cut the belt.
● Ensure that the belt and plate are securely locked and the seat belt is not
twisted.
● Shake the child restraint system left and right, and forward and backward
to ensure that it has been securely installed.
● After securing a child restraint system, never adjust the seat.
● When a junior seat is installed, always ensure that the shoulder belt is
positioned across the center of the child’s shoulder. The belt should be
kept away from the child’s neck, but not so that it could fall off the child’s
shoulder.
● Follow all installation instructions provided by the child restraint system
manufacturer.
Child restraint system fixed with an ISOFIX lower anchorage
Page 105 of 546
103
2
2. Instrument cluster
Instrument cluster
AYGO_OM_Europe_OM9A012E
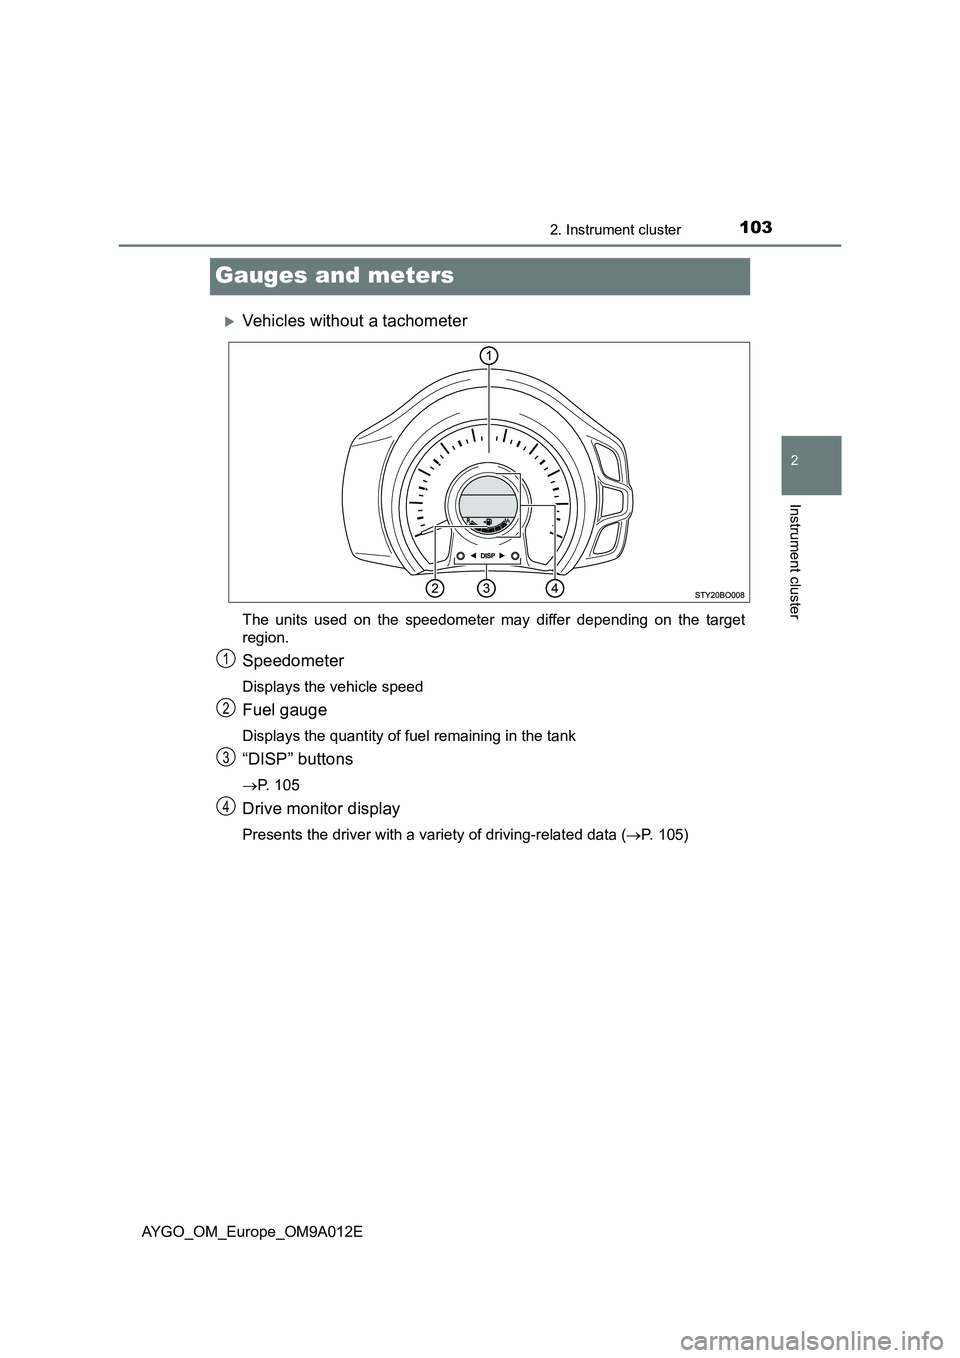
Gauges and meters
Vehicles without a tachometer
The units used on the speedometer may differ depending on the target
region.
Speedometer
Displays the vehicle speed
Fuel gauge
Displays the quantity of fuel remaining in the tank
“DISP” buttons
P. 105
Drive monitor display
Presents the driver with a variety of driving-related data (P. 105)
1
2
3
4
Page 106 of 546
1042. Instrument cluster
AYGO_OM_Europe_OM9A012E
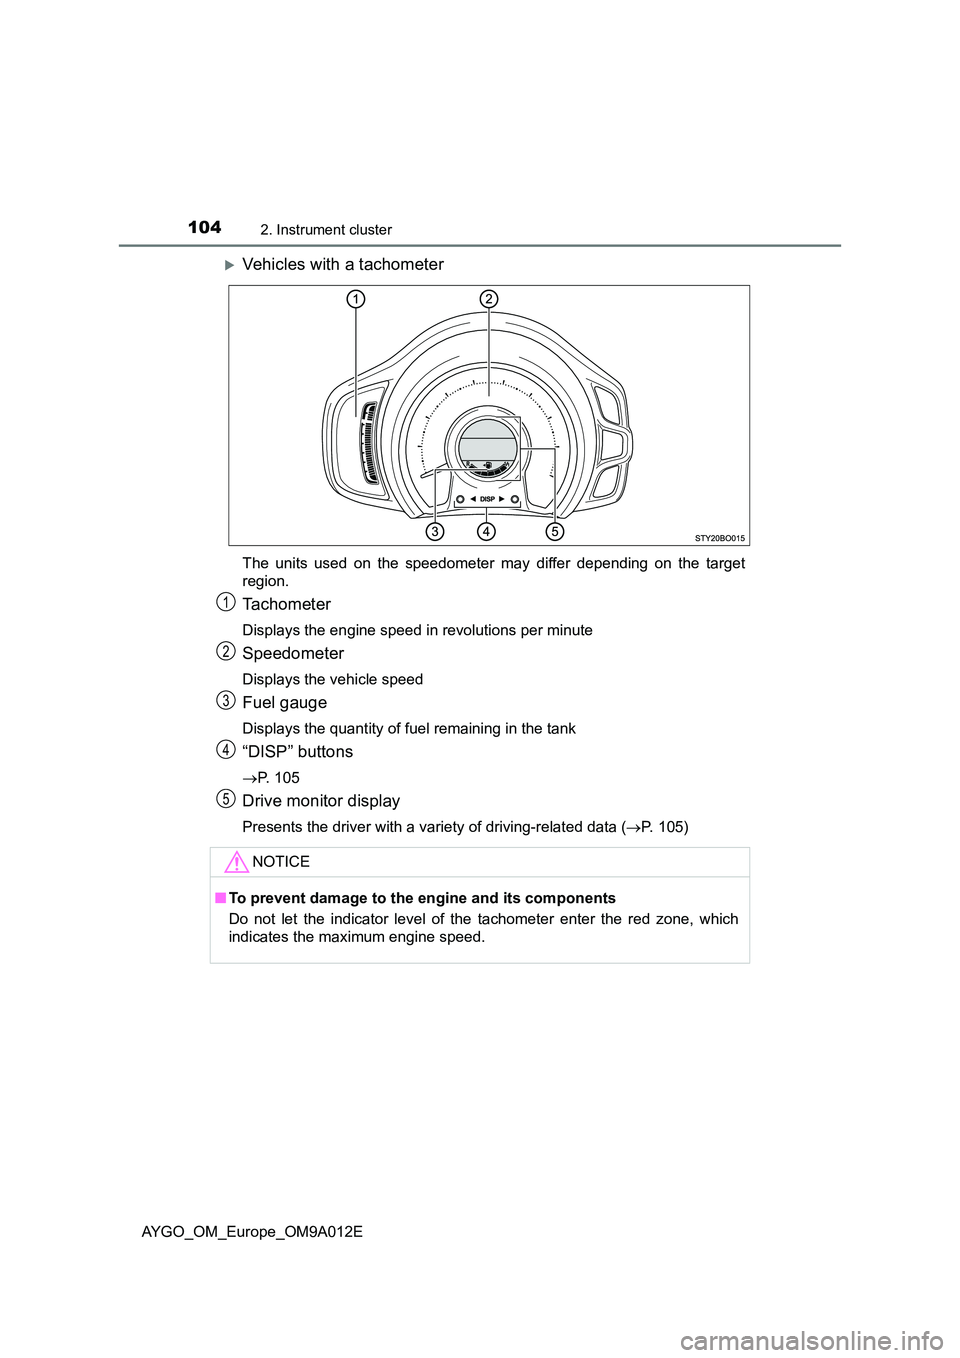
Vehicles with a tachometer
The units used on the speedometer may differ depending on the target
region.
Tachometer
Displays the engine speed in revolutions per minute
Speedometer
Displays the vehicle speed
Fuel gauge
Displays the quantity of fuel remaining in the tank
“DISP” buttons
P. 105
Drive monitor display
Presents the driver with a variety of driving-related data (P. 105)
NOTICE
■To prevent damage to the engine and its components
Do not let the indicator level of the tachometer enter the red zone, which
indicates the maximum engine speed.
1
2
3
4
5
Page 107 of 546
105
2
2. Instrument cluster
Instrument cluster
AYGO_OM_Europe_OM9A012E
Drive monitor display
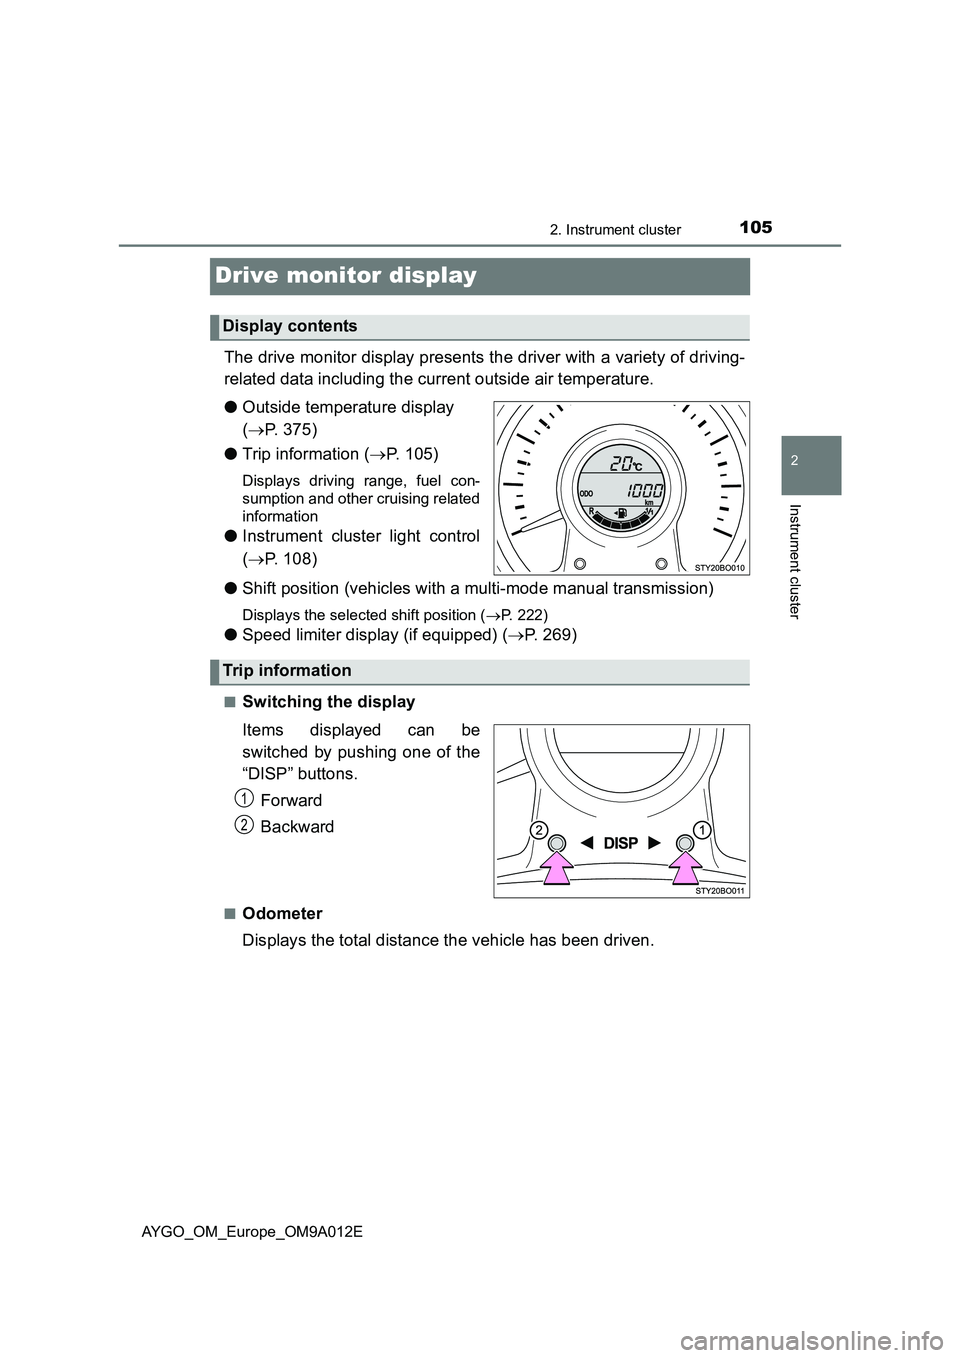
The drive monitor display presents the driver with a variety of driving-
related data including the current outside air temperature.
●Outside temperature display
(P. 375)
●Trip information (P. 105)
Displays driving range, fuel con-
sumption and other cruising related
information
●Instrument cluster light control
(P. 108)
●Shift position (vehicles with a multi-mode manual transmission)
Displays the selected shift position (P. 222)
●Speed limiter display (if equipped) (P. 269)
■Switching the display
Items displayed can be
switched by pushing one of the
“DISP” buttons.
Forward
Backward
■Odometer
Displays the total distance the vehicle has been driven.
Display contents
Trip information
1
2
Page 108 of 546
1062. Instrument cluster
AYGO_OM_Europe_OM9A012E■
Trip meters “A” and “B”
Displays the distance the vehicle has been driven since the meter
was last reset. Trip meters “A” and “B” can be used to record and
display different distances independently.
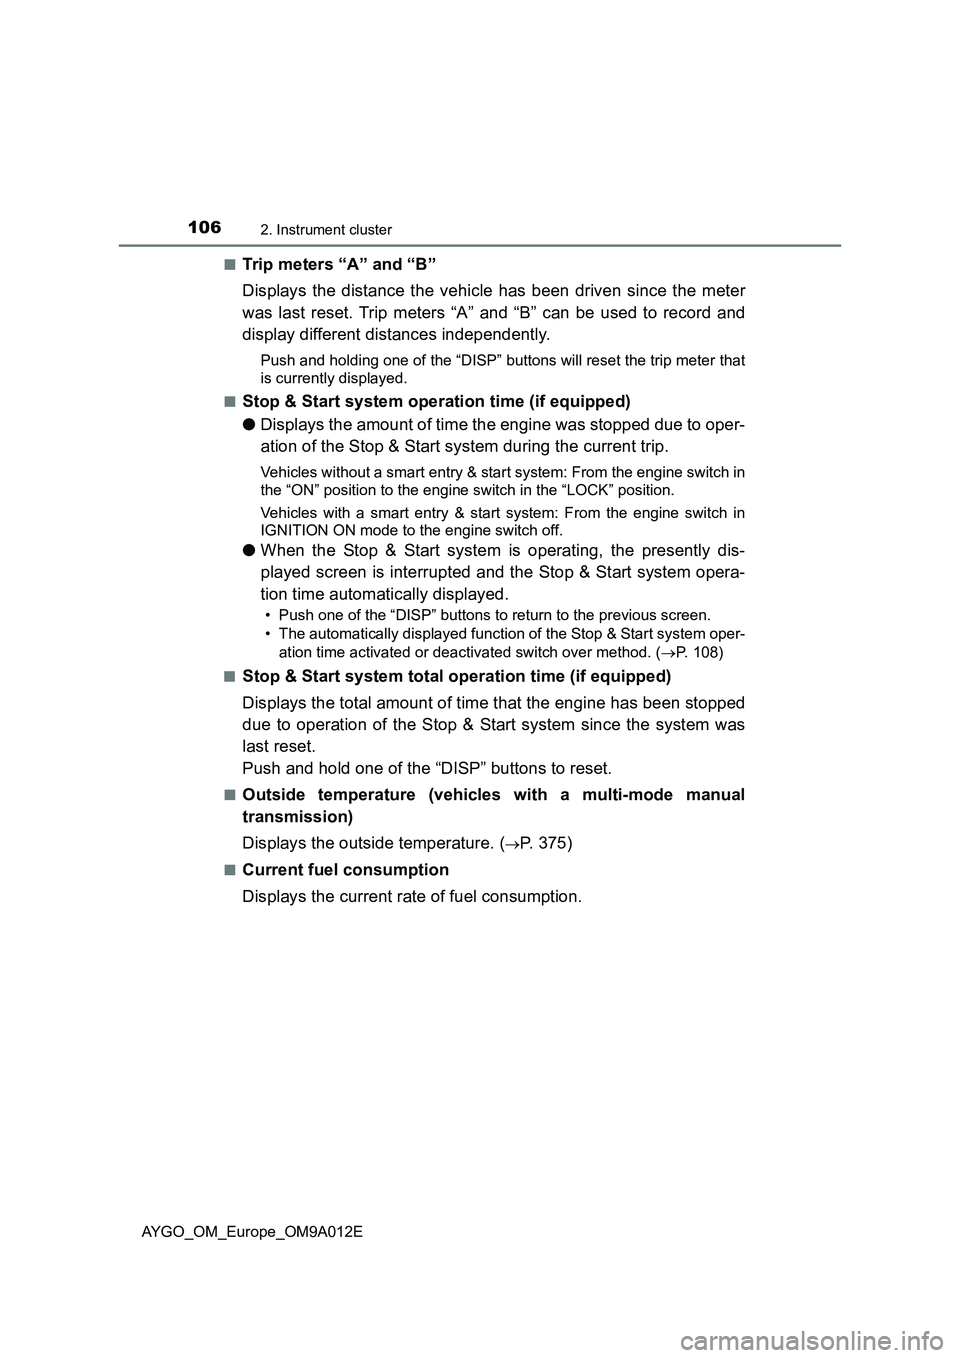
Push and holding one of the “DISP” buttons will reset the trip meter that
is currently displayed.
■
Stop & Start system operation time (if equipped)
●Displays the amount of time the engine was stopped due to oper-
ation of the Stop & Start system during the current trip.
Vehicles without a smart entry & start system: From the engine switch in
the “ON” position to the engine switch in the “LOCK” position.
Vehicles with a smart entry & start system: From the engine switch in
IGNITION ON mode to the engine switch off.
●When the Stop & Start system is operating, the presently dis-
played screen is interrupted and the Stop & Start system opera-
tion time automatically displayed.
• Push one of the “DISP” buttons to return to the previous screen.
• The automatically displayed function of the Stop & Start system oper-
ation time activated or deactivated switch over method. (P. 108)
■
Stop & Start system total operation time (if equipped)
Displays the total amount of time that the engine has been stopped
due to operation of the Stop & Start system since the system was
last reset.
Push and hold one of the “DISP” buttons to reset.
■Outside temperature (vehicles with a multi-mode manual
transmission)
Displays the outside temperature. (
P. 375)
■Current fuel consumption
Displays the current rate of fuel consumption.
Page 109 of 546
1072. Instrument cluster
2
Instrument cluster
AYGO_OM_Europe_OM9A012E■
Average fuel consumption
Displays the average fuel consumption since the function was
reset.
• The function can be reset by pushing one of the “DISP” buttons for lon-
ger than 1 second when the average fuel consumption is displayed.
• Use the displayed average fuel consumption as a reference.
■
Driving range
Displays the estimated approximate distance that can be driven
with the quantity of fuel remaining.
• This distance is computed based on your average fuel consumption. As
a result, the actual distance that can be driven may differ from that dis-
played.
• When only a small amount of fuel is added to the tank, the display may
not be updated.
When refueling, turn the engine switch to the “LOCK” position (vehicles
without a smart entry & start system) or off (vehicles with a smart entry
& start system). If the vehicle is refueled without turning the engine
switch to the “LOCK” position or off, the display may not be updated.
• The display shows “LoFUEL” when the remaining is very low.
■
Average vehicle speed
Displays the average vehicle speed since the function was reset.
The function can be reset by pushing one of the “DISP” button for longer
than 1 second when the average vehicle speed is displayed.
■
Instrument cluster light control
Displays the instrument cluster light control display.
• This screen is only displayed when the tail lights are on.
• The brightness of the instrument cluster light can be adjusted.
(P. 108)
Page 110 of 546
1082. Instrument cluster
AYGO_OM_Europe_OM9A012E
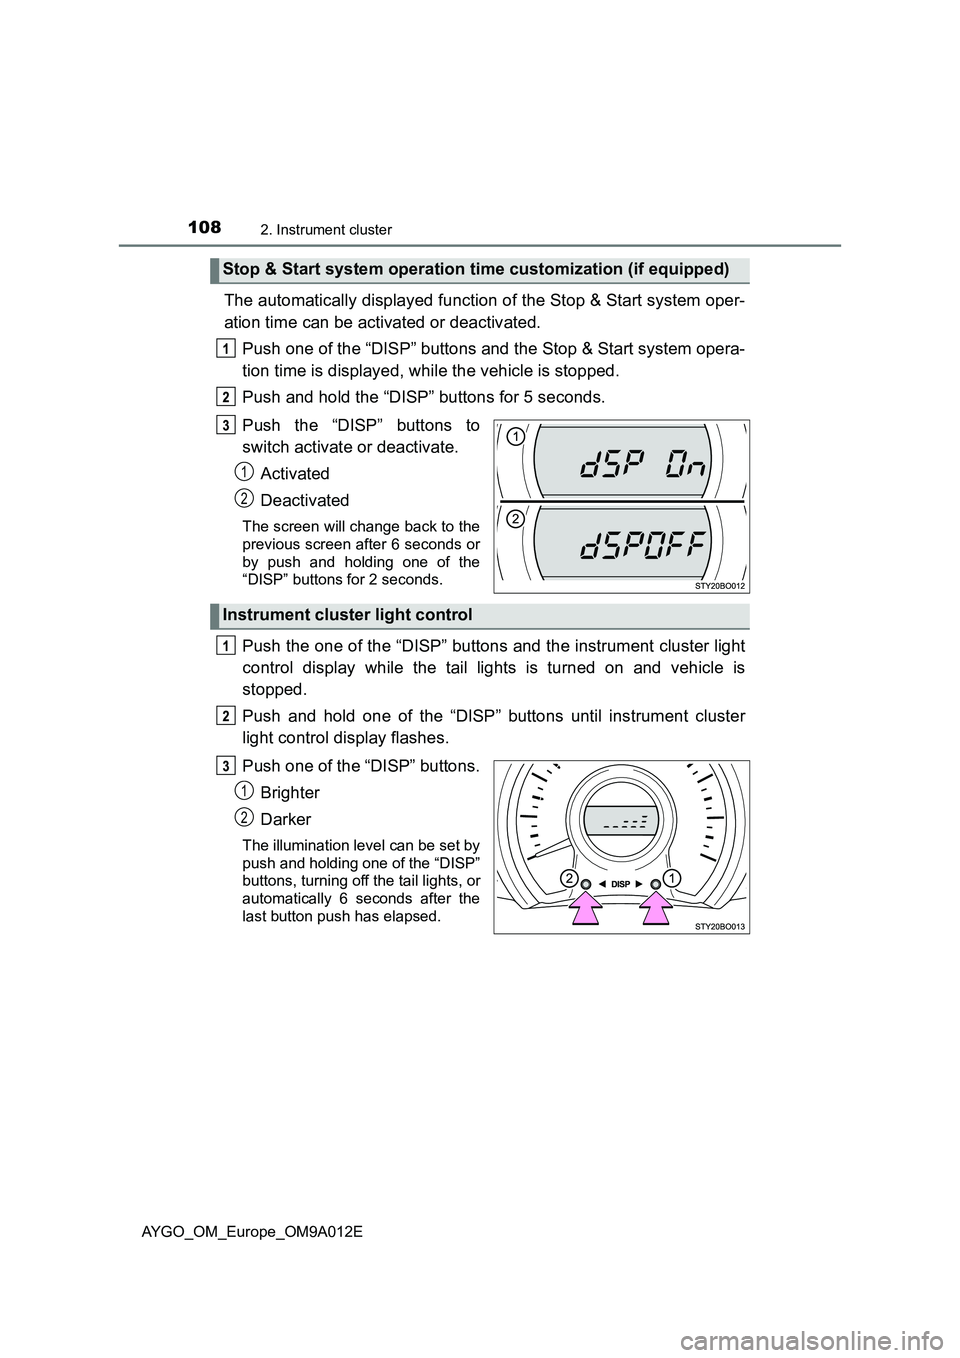
The automatically displayed function of the Stop & Start system oper-
ation time can be activated or deactivated.
Push one of the “DISP” buttons and the Stop & Start system opera-
tion time is displayed, while the vehicle is stopped.
Push and hold the “DISP” buttons for 5 seconds.
Push the “DISP” buttons to
switch activate or deactivate.
Activated
Deactivated
The screen will change back to the
previous screen after 6 seconds or
by push and holding one of the
“DISP” buttons for 2 seconds.
Push the one of the “DISP” buttons and the instrument cluster light
control display while the tail lights is turned on and vehicle is
stopped.
Push and hold one of the “DISP” buttons until instrument cluster
light control display flashes.
Push one of the “DISP” buttons.
Brighter
Darker
The illumination level can be set by
push and holding one of the “DISP”
buttons, turning off the tail lights, or
automatically 6 seconds after the
last button push has elapsed.
Stop & Start system operation time customization (if equipped)
1
2
Instrument cluster light control
1
2
Page 116 of 546
1143-1. Key information
AYGO_OM_Europe_OM9A012E
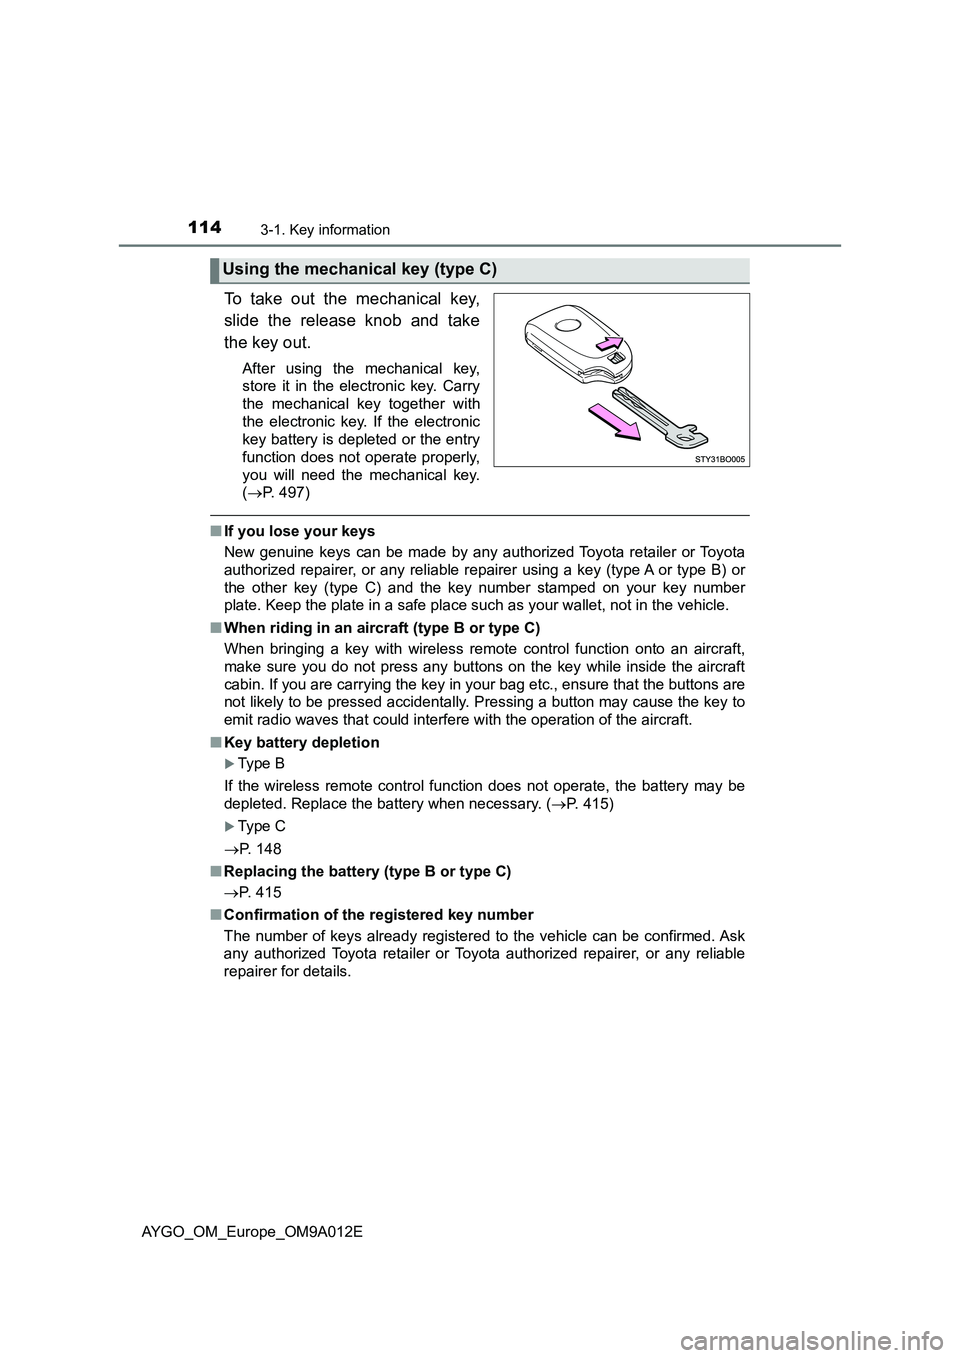
To take out the mechanical key,
slide the release knob and take
the key out.
After using the mechanical key,
store it in the electronic key. Carry
the mechanical key together with
the electronic key. If the electronic
key battery is depleted or the entry
function does not operate properly,
you will need the mechanical key.
(P. 497)
■If you lose your keys
New genuine keys can be made by any authorized Toyota retailer or Toyota
authorized repairer, or any reliable repairer using a key (type A or type B) or
the other key (type C) and the key number stamped on your key number
plate. Keep the plate in a safe place such as your wallet, not in the vehicle.
■When riding in an aircraft (type B or type C)
When bringing a key with wireless remote control function onto an aircraft,
make sure you do not press any buttons on the key while inside the aircraft
cabin. If you are carrying the key in your bag etc., ensure that the buttons are
not likely to be pressed accidentally. Pressing a button may cause the key to
emit radio waves that could interfere with the operation of the aircraft.
■Key battery depletion
Type B
If the wireless remote control function does not operate, the battery may be
depleted. Replace the battery when necessary. (P. 415)
Type C
P. 148
■Replacing the battery (type B or type C)
P. 415
■Confirmation of the registered key number
The number of keys already registered to the vehicle can be confirmed. Ask
any authorized Toyota retailer or Toyota authorized repairer, or any reliable
repairer for details.
Using the mechanical key (type C)