side TOYOTA AYGO X 2022 Owners Manual (in English)
[x] Cancel search | Manufacturer: TOYOTA, Model Year: 2022, Model line: AYGO X, Model: TOYOTA AYGO X 2022Pages: 494, PDF Size: 92.53 MB
Page 318 of 494
316
Owner's Manual_Europe_M99V08_en
7-2. Steps to take in an emergency
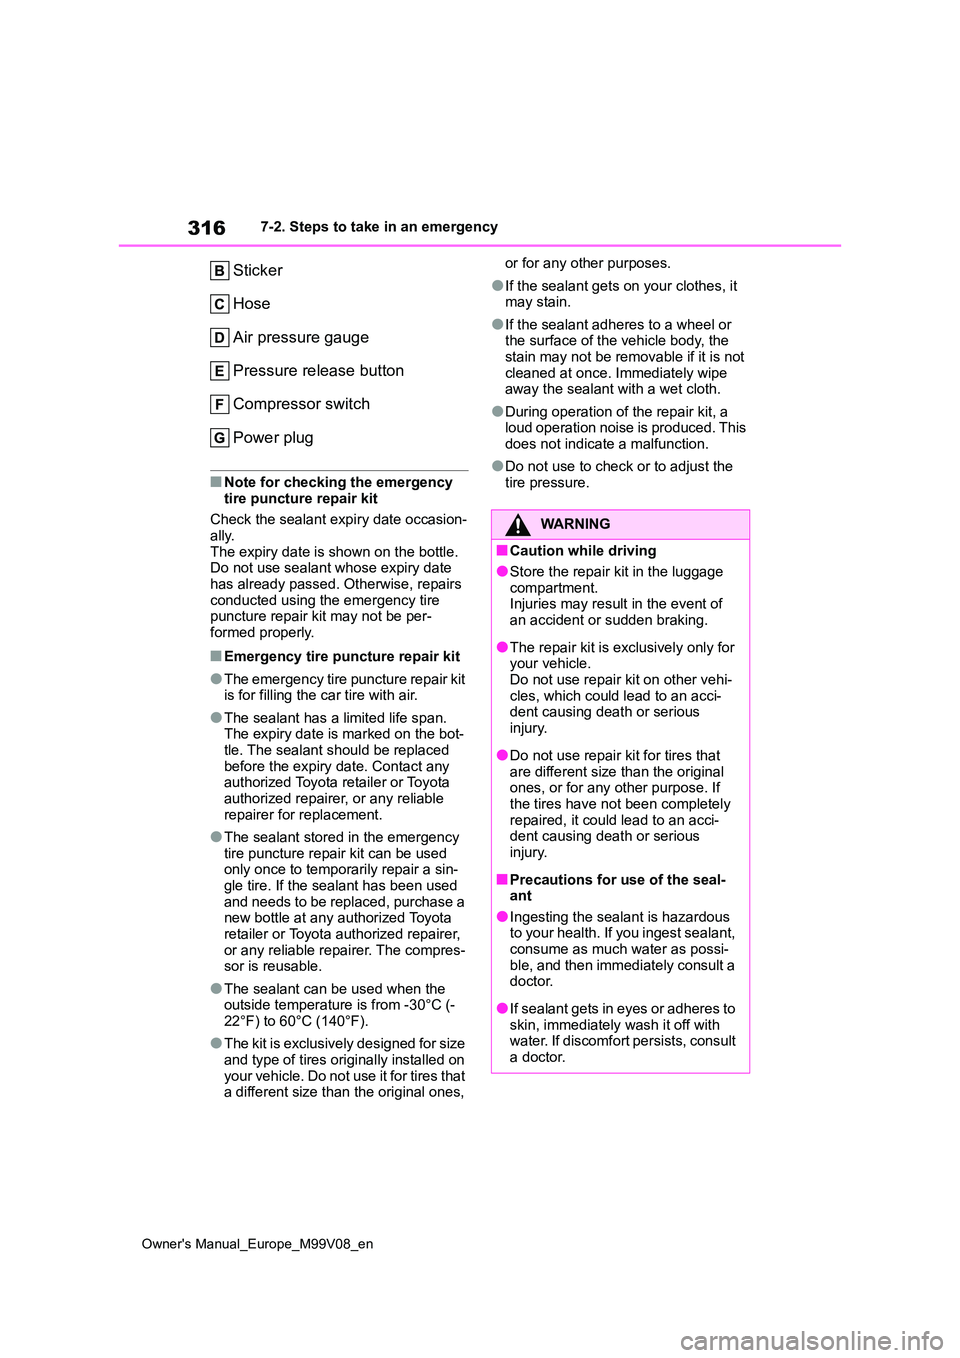
Sticker
Hose
Air pressure gauge
Pressure release button
Compressor switch
Power plug
■Note for checking the emergency
tire puncture repair kit
Check the sealant expiry date occasion- ally.
The expiry date is shown on the bottle. Do not use sealant whose expiry date has already passed. Otherwise, repairs
conducted using the emergency tire puncture repair kit may not be per-formed properly.
■Emergency tire puncture repair kit
●The emergency tire puncture repair kit is for filling the car tire with air.
●The sealant has a limited life span. The expiry date is marked on the bot-
tle. The sealant should be replaced before the expiry date. Contact any authorized Toyota retailer or Toyota
authorized repairer, or any reliable repairer for replacement.
●The sealant stored in the emergency tire puncture repair kit can be used only once to temporarily repair a sin-
gle tire. If the sealant has been used and needs to be replaced, purchase a new bottle at any authorized Toyota
retailer or Toyota authorized repairer, or any reliable repairer. The compres-sor is reusable.
●The sealant can be used when the outside temperature is from -30°C (-
22°F) to 60°C (140°F).
●The kit is exclusively designed for size
and type of tires originally installed on yo u r ve hi cl e . Do n ot u se it f o r ti r e s t ha t a different size than the original ones,
or for any other purposes.
●If the sealant gets on your clothes, it may stain.
●If the sealant adheres to a wheel or the surface of the vehicle body, the
stain may not be removable if it is not cleaned at once. Immediately wipe away the sealant with a wet cloth.
●During operation of the repair kit, a loud operation noise is produced. This
does not indicate a malfunction.
●Do not use to check or to adjust the
tire pressure.
WARNING
■Caution while driving
●Store the repair kit in the luggage
compartment. Injuries may result in the event of an accident or sudden braking.
●The repair kit is exclusively only for your vehicle.
Do not use repair kit on other vehi- cles, which could lead to an acci-dent causing death or serious
injury.
●Do not use repair kit for tires that
are different size than the original ones, or for any other purpose. If the tires have not been completely
repaired, it could lead to an acci- dent causing death or serious injury.
■Precautions for use of the seal-ant
●Ingesting the sealant is hazardous to your health. If you ingest sealant, consume as much water as possi-
ble, and then immediately consult a doctor.
●If sealant gets in eyes or adheres to skin, immediately wash it off with water. If discomfort persists, consult
a doctor.
Page 320 of 494
318
Owner's Manual_Europe_M99V08_en
7-2. Steps to take in an emergency
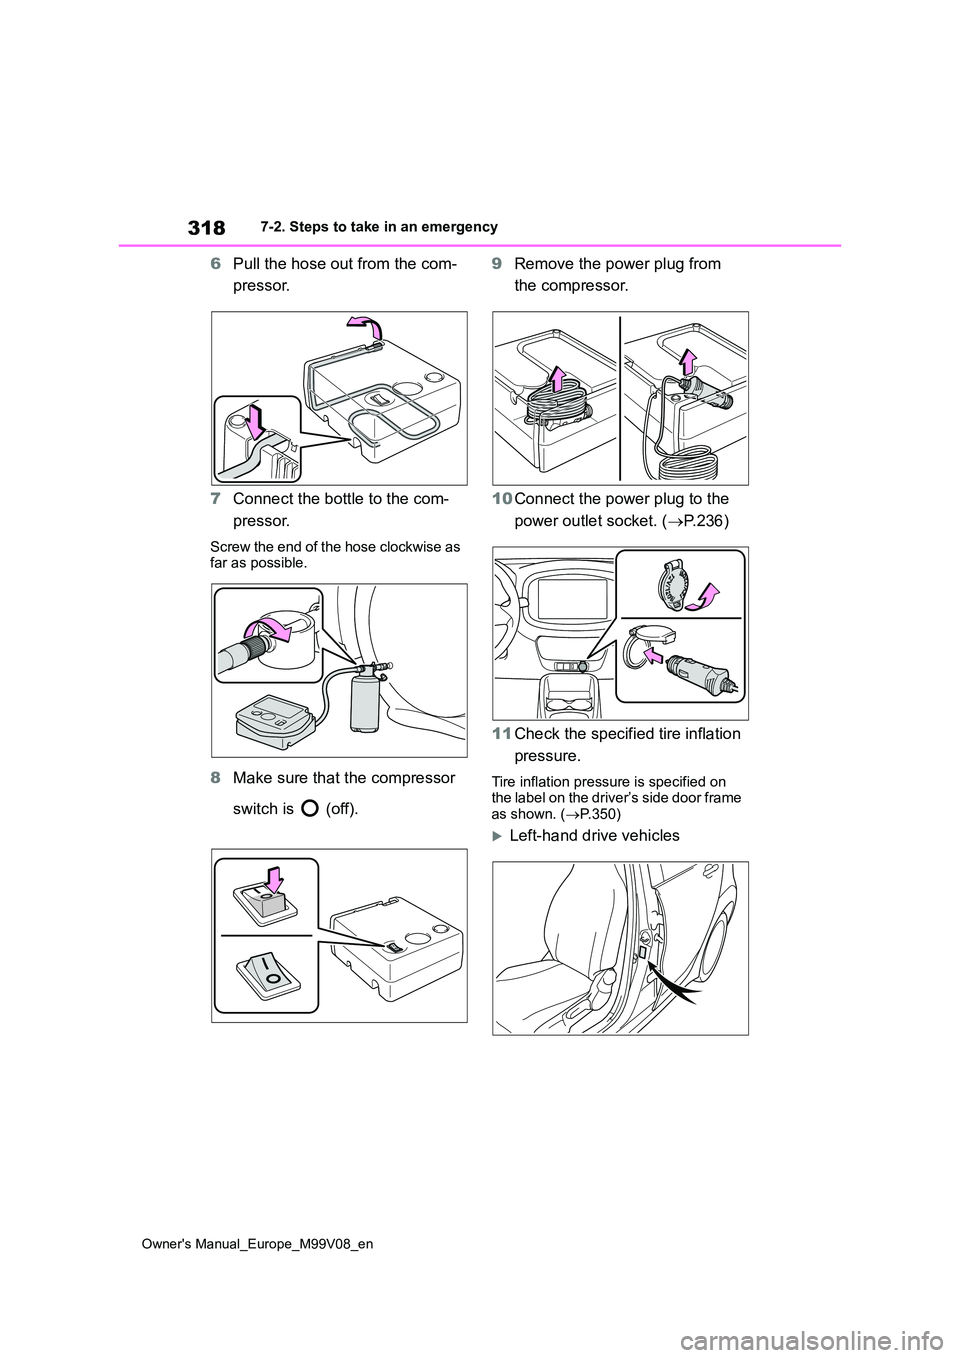
6Pull the hose out from the com-
pressor.
7 Connect the bottle to the com-
pressor.
Screw the end of the hose clockwise as far as possible.
8 Make sure that the compressor
switch is (off).
9 Remove the power plug from
the compressor.
10 Connect the power plug to the
power outlet socket. ( P.236)
11 Check the specified tire inflation
pressure.
Tire inflation pressure is specified on the label on the driver’s side door frame
as shown. ( P.350)
Left-hand drive vehicles
Page 324 of 494
322
Owner's Manual_Europe_M99V08_en
7-2. Steps to take in an emergency
replaced, make sure to tell any autho-
rized Toyota retailer or Toyota autho- rized repairer, or any reliable repairer that the sealant is injected.
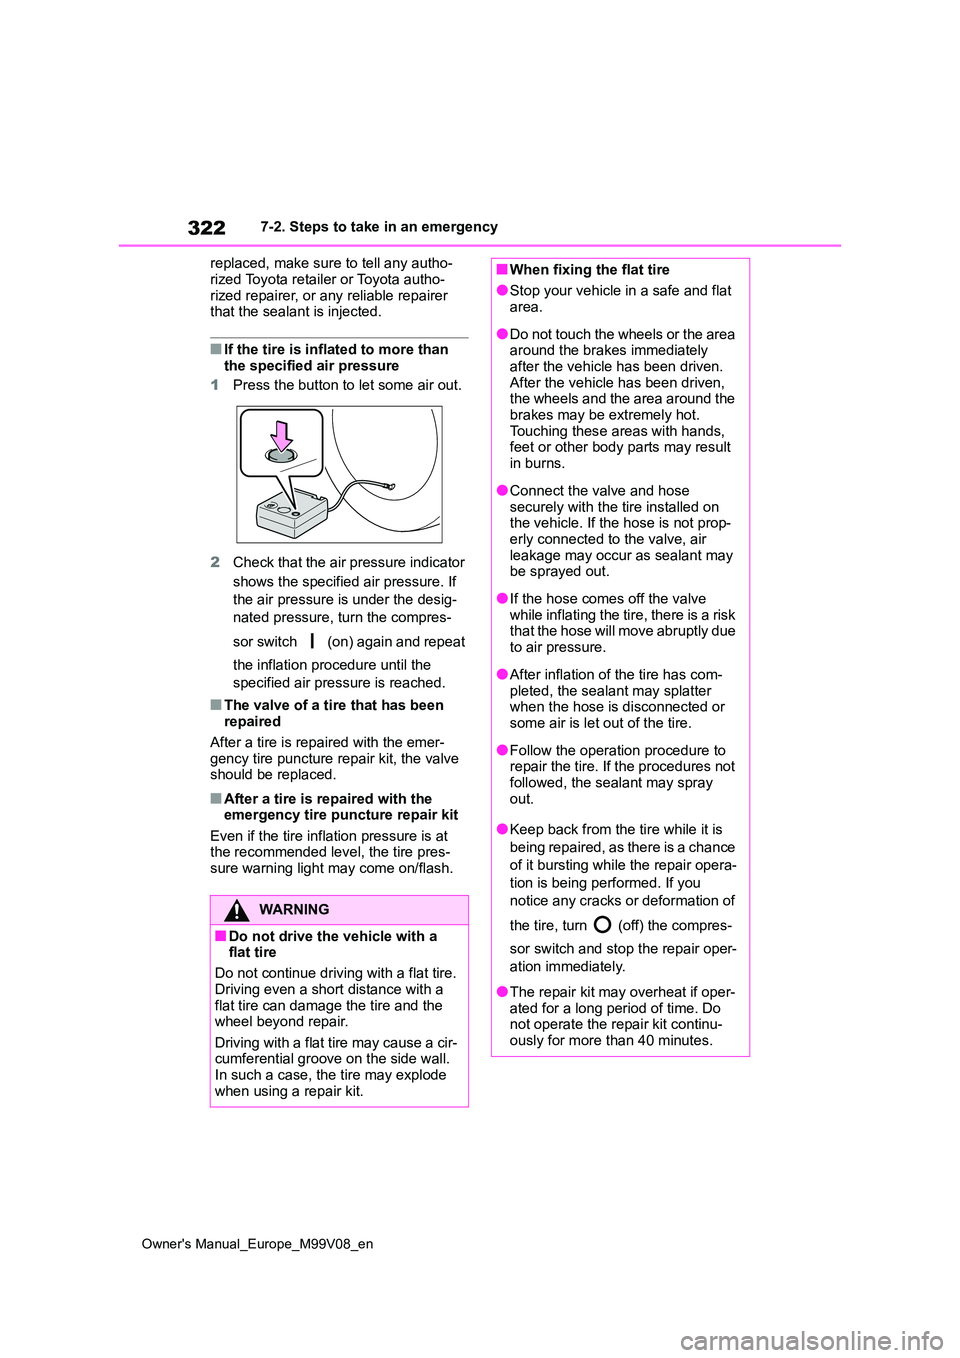
■If the tire is inflated to more than the specified air pressure
1 Press the button to let some air out.
2 Check that the air pressure indicator
shows the specified air pressure. If
the air pressure is under the desig-
nated pressure, turn the compres-
sor switch (on) again and repeat
the inflation procedure until the
specified air pressure is reached.
■The valve of a tire that has been repaired
After a tire is repaired with the emer-
gency tire puncture repair kit, the valve should be replaced.
■After a tire is repaired with the emergency tire puncture repair kit
Even if the tire inflation pressure is at the recommended level, the tire pres-sure warning light may come on/flash.
WARNING
■Do not drive the vehicle with a flat tire
Do not continue driving with a flat tire.
Driving even a short distance with a flat tire can damage the tire and the wheel beyond repair.
Driving with a flat tire may cause a cir- cumferential groove on the side wall. In such a case, the tire may explode
when using a repair kit.
■When fixing the flat tire
●Stop your vehicle in a safe and flat area.
●Do not touch the wheels or the area around the brakes immediately
after the vehicle has been driven. After the vehicle has been driven, the wheels and the area around the
brakes may be extremely hot. Touching these areas with hands, feet or other body parts may result
in burns.
●Connect the valve and hose
securely with the tire installed on the vehicle. If the hose is not prop-erly connected to the valve, air
leakage may occur as sealant may be sprayed out.
●If the hose comes off the valve while inflating the tire, there is a risk that the hose will move abruptly due
to air pressure.
●After inflation of the tire has com-
pleted, the sealant may splatter when the hose is disconnected or some air is let out of the tire.
●Follow the operation procedure to repair the tire. If the procedures not
followed, the sealant may spray out.
●Keep back from the tire while it is
being repaired, as there is a chance
of it bursting while the repair opera-
tion is being performed. If you
notice any cracks or deformation of
the tire, turn (off) the compres-
sor switch and stop the repair oper-
ation immediately.
●The repair kit may overheat if oper- ated for a long period of time. Do not operate the repair kit continu-
ously for more than 40 minutes.
Page 325 of 494
323
7
Owner's Manual_Europe_M99V08_en
7-2. Steps to take in an emergency
When trouble arises
WARNING
●Parts of the repair kit become hot during operation. Be careful when
handling the repair kit during and after operation. Do not touch the metal part around the connecting
area between the bottle and com- pressor. It will be extremely hot.
●Do not attach the vehicle speed warning sticker to an area other than the one indicated. If the sticker
is attached to an area where an SRS airbag is located, such as the pad of the steering wheel, it may
prevent the SRS airbag from oper- ating properly.
●To avoid risk of burst or severe leakage, do not drop or damage the bottle. Visually inspect the bottle
before use. Do not use a bottle with shock, crack, scratch, leakage or any other damage. In such case,
immediately replace.
■Driving to spread the liquid seal-
ant evenly
Observe the following precautions to reduce the risk of accidents.
Failing to do so may result in a loss of vehicle control and cause death or serious injury.
●Drive the vehicle carefully at a low speed. Be especially careful when
turning and cornering.
●If the vehicle does not drive straight
or you feel a pull through the steer- ing wheel, stop the vehicle and check the following.
• Tire condition. The tire may have separated from the wheel.
• Tire inflation pressure. If the tire inflation pressure is 130 kPa (1.3
kgf/cm2 or bar, 19 psi) or less, the tire may be severely damaged.
NOTICE
■When performing an emergency repair
●A tire should only be repaired with the emergency tire puncture repair kit if the damage is caused by a
sharp object such as nail or screw passing through the tire tread.Do not remove the sharp object
from the tire. Removing the object may widen the opening and disen-able emergency repair with the
repair kit.
●The repair kit is not waterproof.
Make sure that the repair kit is not exposed to water, such as when it is being used in the rain.
●Do not put the repair kit directly onto dusty ground such as sand at
the side of the road. If the repair kit vacuums up dust etc., a malfunc-tion may occur.
●Do not turn the bottle upside down when using it, as doing so may
cause damage to the compressor.
■Precautions for the emergency
tire puncture repair kit
●The repair kit power source should be 12 V DC suitable for vehicle use.
Do not connect the repair kit to any other source.
●If fuel splatters on the repair kit, the repair kit may deteriorate. Take care not to allow fuel to contact it.
●Place the repair kit in a storage to prevent it from being exposed to dirt
or water.
●Store the repair kit in the luggage
compartment out of reach of chil- dren.
●Do not disassemble or modify the repair kit. Do not subject parts such as the air pressure indicator to
impacts. This may cause a malfunc- tion.
Page 328 of 494
326
Owner's Manual_Europe_M99V08_en
7-2. Steps to take in an emergency
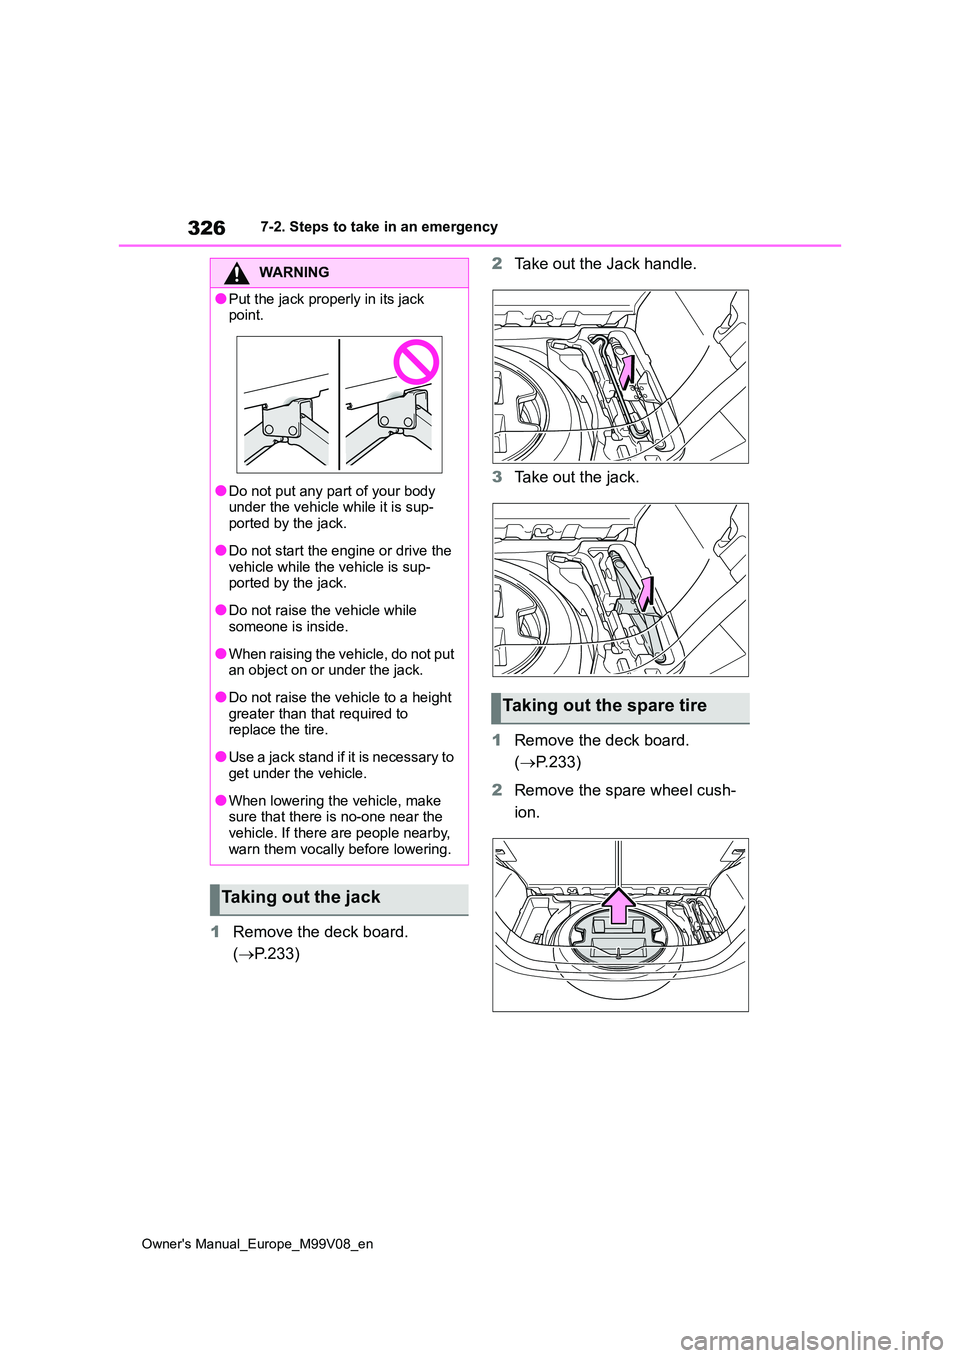
1Remove the deck board.
( P.233)
2 Take out the Jack handle.
3 Take out the jack.
1 Remove the deck board.
( P.233)
2 Remove the spare wheel cush-
ion.
WARNING
●Put the jack properly in its jack point.
●Do not put any part of your body under the vehicle while it is sup-
ported by the jack.
●Do not start the engine or drive the
vehicle while the vehicle is sup- ported by the jack.
●Do not raise the vehicle while someone is inside.
●When raising the vehicle, do not put an object on or under the jack.
●Do not raise the vehicle to a height greater than that required to replace the tire.
●Use a jack stand if it is necessary to get under the vehicle.
●When lowering the vehicle, make sure that there is no-one near the
vehicle. If there are people nearby, warn them vocally before lowering.
Taking out the jack
Taking out the spare tire
Page 329 of 494
327
7
Owner's Manual_Europe_M99V08_en
7-2. Steps to take in an emergency
When trouble arises
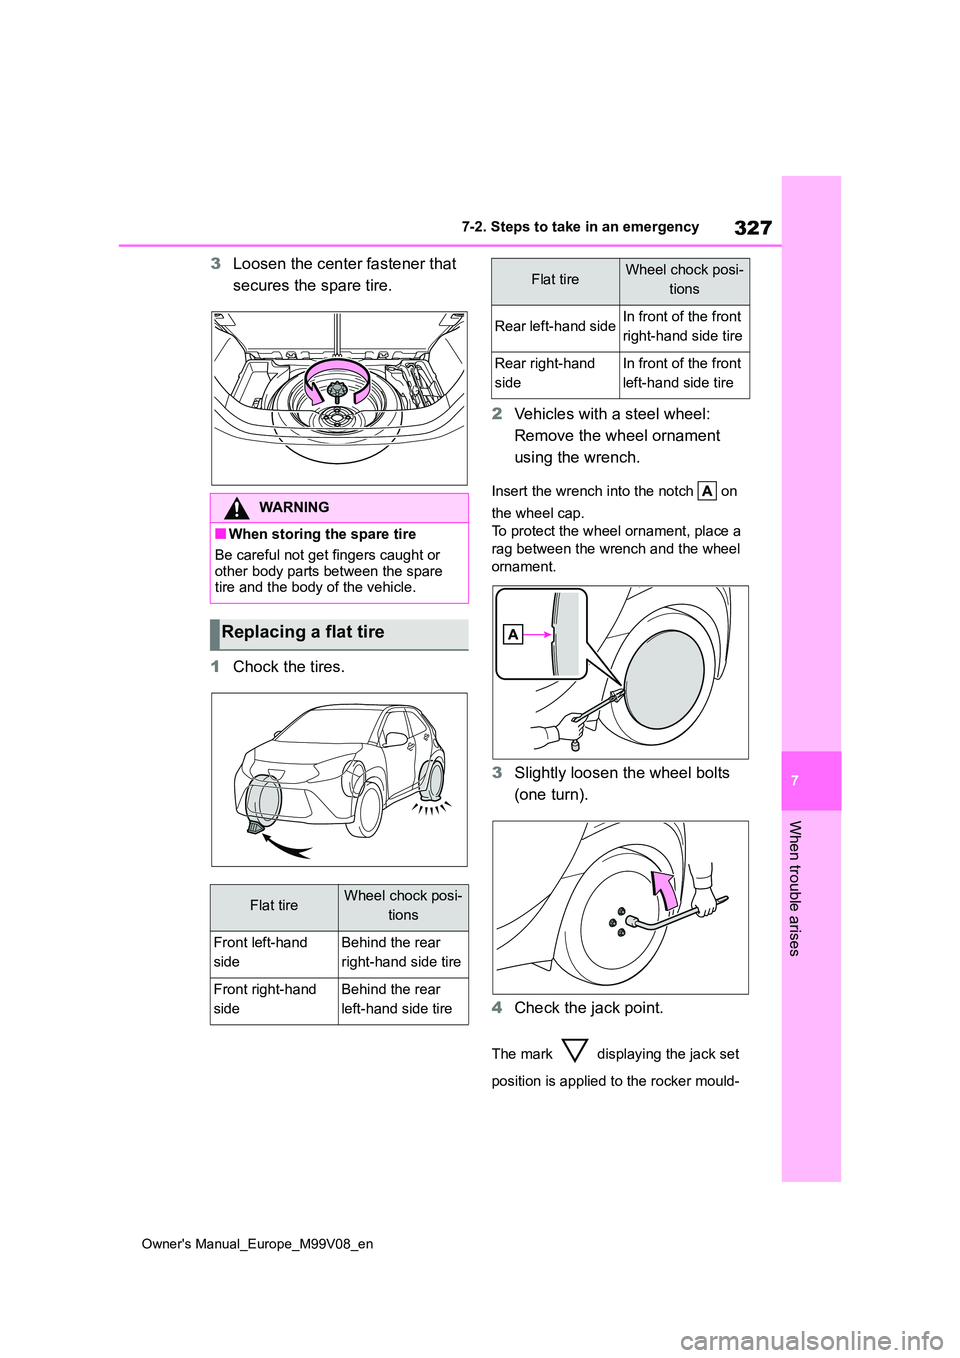
3Loosen the center fastener that
secures the spare tire.
1 Chock the tires.
2 Vehicles with a steel wheel:
Remove the wheel ornament
using the wrench.
Insert the wrench into the notch on
the wheel cap.
To protect the wheel ornament, place a
rag between the wrench and the wheel
ornament.
3 Slightly loosen the wheel bolts
(one turn).
4 Check the jack point.
The mark displaying the jack set
position is applied to the rocker mould-
WARNING
■When storing the spare tire
Be careful not get fingers caught or other body parts between the spare tire and the body of the vehicle.
Replacing a flat tire
Flat tireWheel chock posi-
tions
Front left-hand
side
Behind the rear
right-hand side tire
Front right-hand
side
Behind the rear
left-hand side tire
Rear left-hand sideIn front of the front
right-hand side tire
Rear right-hand
side
In front of the front
left-hand side tire
Flat tireWheel chock posi-
tions
Page 331 of 494
329
7
Owner's Manual_Europe_M99V08_en
7-2. Steps to take in an emergency
When trouble arises
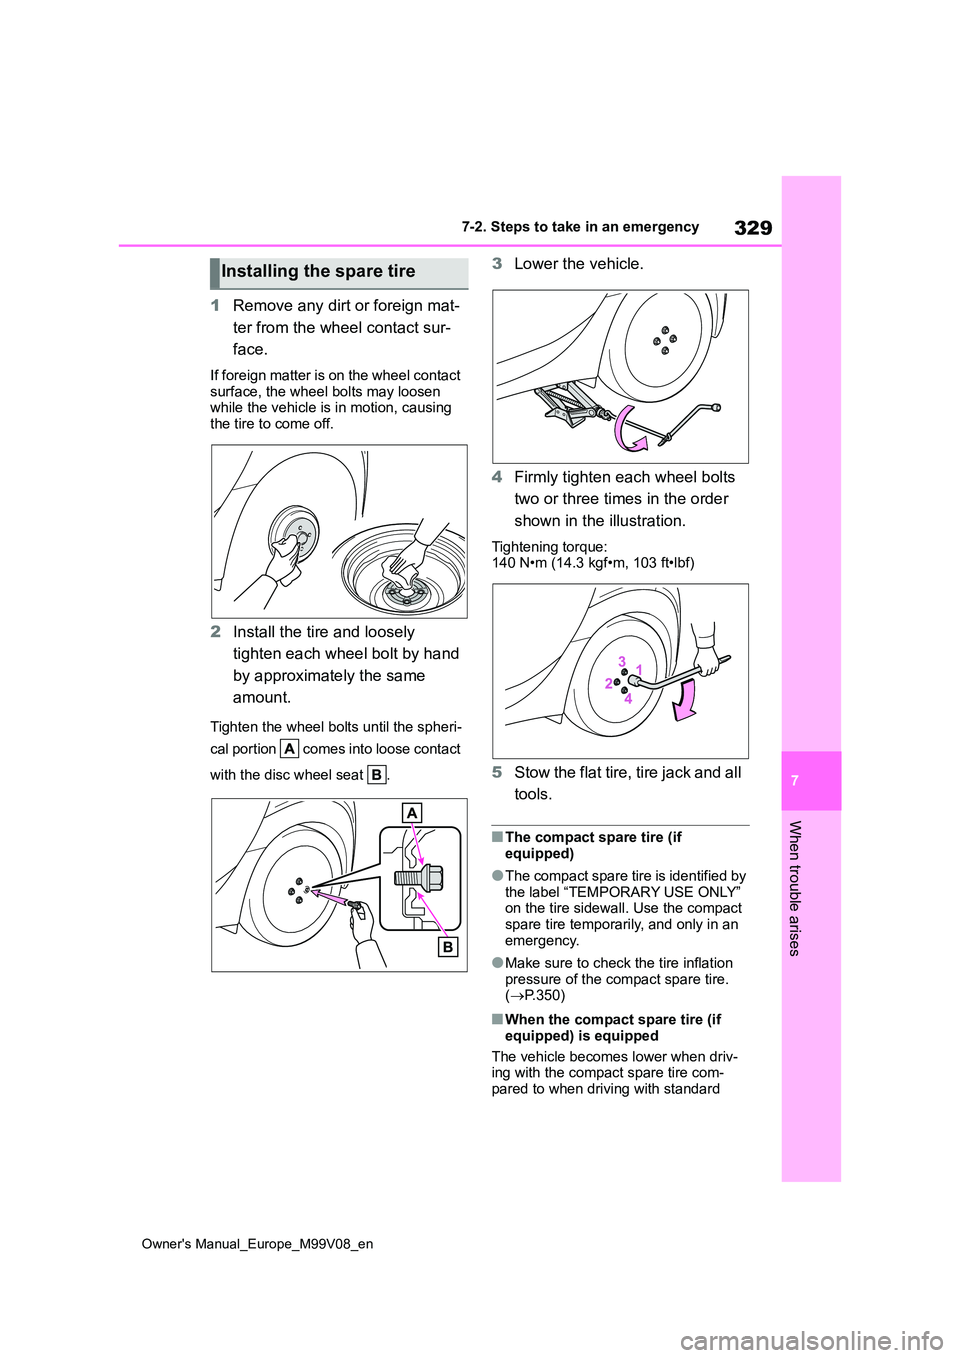
1Remove any dirt or foreign mat-
ter from the wheel contact sur-
face.
If foreign matter is on the wheel contact
surface, the wheel bolts may loosen while the vehicle is in motion, causing the tire to come off.
2 Install the tire and loosely
tighten each wheel bolt by hand
by approximately the same
amount.
Tighten the wheel bolts until the spheri-
cal portion comes into loose contact
with the disc wheel seat .
3 Lower the vehicle.
4 Firmly tighten each wheel bolts
two or three times in the order
shown in the illustration.
Tightening torque: 140 N•m (14.3 kgf•m, 103 ft•lbf)
5 Stow the flat tire, tire jack and all
tools.
■The compact spare tire (if equipped)
●The compact spare tire is identified by the label “TEMPORARY USE ONLY” on the tire sidewall. Use the compact
spare tire temporarily, and only in an emergency.
●Make sure to check the tire inflation pressure of the compact spare tire. ( P.350)
■When the compact spare tire (if
equipped) is equipped
The vehicle becomes lower when driv- ing with the compact spare tire com-
pared to when driving with standard
Installing the spare tire
Page 334 of 494
332
Owner's Manual_Europe_M99V08_en
7-2. Steps to take in an emergency
One of the following may be the
cause of the problem:
There may not be sufficient fuel
in the vehicle’s tank. Refuel the
vehicle.
The engine may be flooded. Try
to restart the engine again fol-
lowing correct starting proce-
dures. ( P.129, 130)
There may be a malfunction in
the engine immobilizer system.
( P. 7 4 )
One of the following may be the
cause of the problem:
The battery may be discharged.
( P.335)
The battery terminal connec-
tions may be loose or corroded.
( P.262)
The engine starting system may be
malfunctioning due to an electrical
problem such as electronic key bat-
tery depletion or a blown fuse.
However, an interim measure is
available to start the engine.
( P.333)
One of the following may be the
cause of the problem:
The battery may be discharged.
( P.335)
One or both of the battery termi-
nals may be disconnected.
( P.262)
There may be a malfunction in
the steering lock system (vehi-
cles with smart entry & start sys-
tem).
Contact any authorized Toyota retailer
or Toyota authorized repairer, or any
reliable repairer if the problem cannot
be repaired, or if repair procedures are
unknown.
If the engine will not
start
If the engine will not start even
though correct starting proce-
dures are being followed
( P.129, 130), consider each of
the following points:
The engine will not start
even though the starter
motor operates normally.
The starter motor turns over
slowly, the interior lights
and headlights are dim, or
the horn does not sound or
sounds at a low volume.
The starter motor does not
turn over (vehicles with
smart entry & start system)
The starter motor does not
turn over, the interior lights
and headlights do not turn
on, or the horn does not
sound.
Page 341 of 494
339
7
Owner's Manual_Europe_M99V08_en
7-2. Steps to take in an emergency
When trouble arises
1Stop the vehicle in a safe place
and turn off the air conditioning
system, and then stop the
engine.
2 If you see steam: Carefully lift
the hood after the steam sub-
sides.
If you do not see steam: Care-
fully lift the hood.
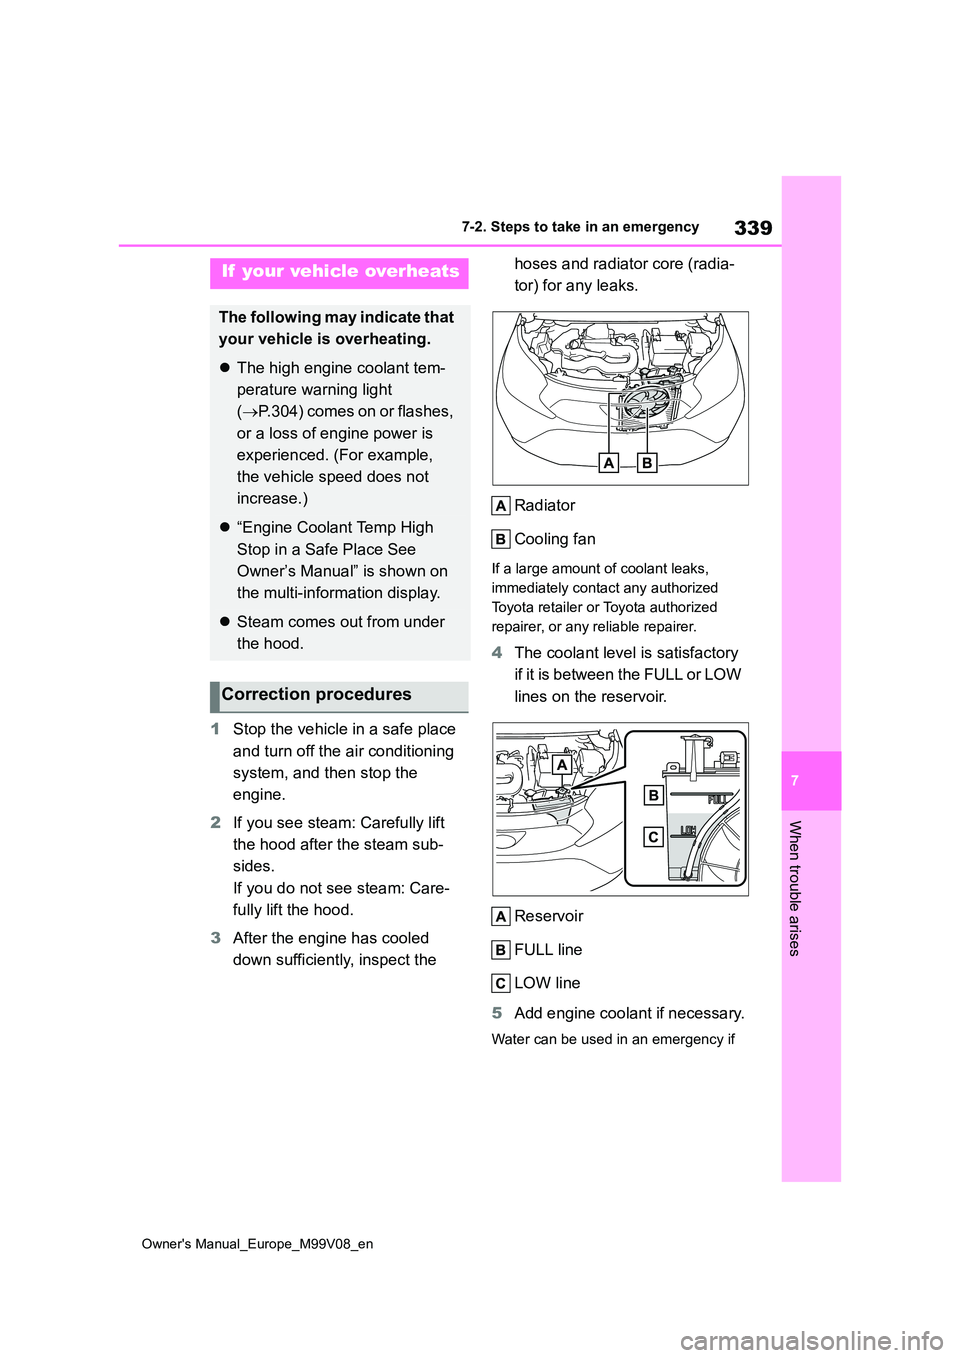
3 After the engine has cooled
down sufficiently, inspect the
hoses and radiator core (radia-
tor) for any leaks.
Radiator
Cooling fan
If a large amount of coolant leaks,
immediately contact any authorized
Toyota retailer or Toyota authorized
repairer, or any reliable repairer.
4 The coolant level is satisfactory
if it is between the FULL or LOW
lines on the reservoir.
Reservoir
FULL line
LOW line
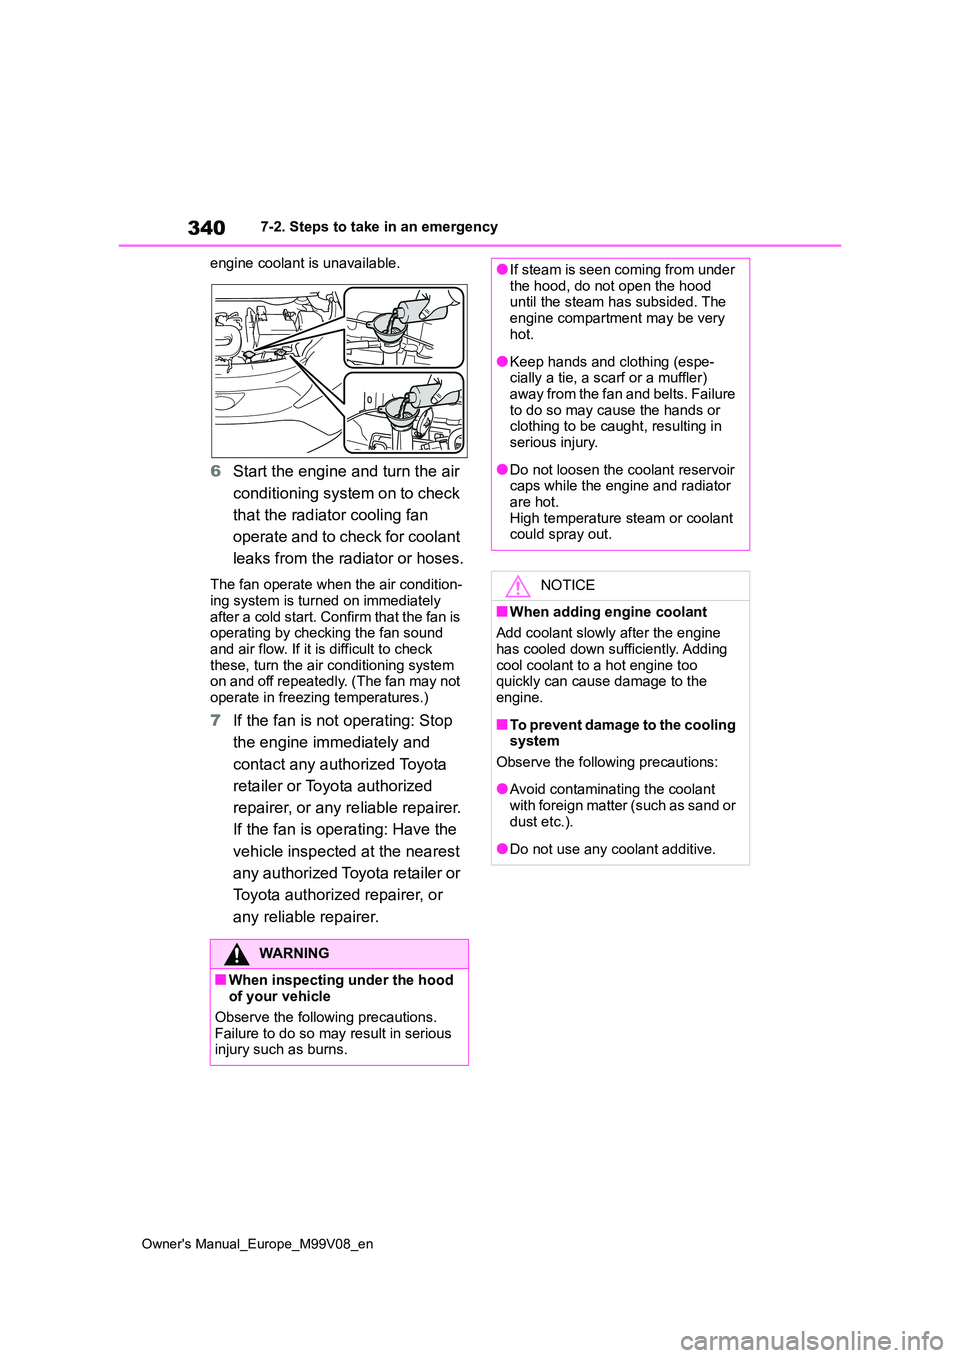
5 Add engine coolant if necessary.
Water can be used in an emergency if
If your vehicle overheats
The following may indicate that
your vehicle is overheating.
The high engine coolant tem-
perature warning light
( P.304) comes on or flashes,
or a loss of engine power is
experienced. (For example,
the vehicle speed does not
increase.)
“Engine Coolant Temp High
Stop in a Safe Place See
Owner’s Manual” is shown on
the multi-information display.
Steam comes out from under
the hood.
Correction procedures
Page 342 of 494
340
Owner's Manual_Europe_M99V08_en
7-2. Steps to take in an emergency
engine coolant is unavailable.
6 Start the engine and turn the air
conditioning system on to check
that the radiator cooling fan
operate and to check for coolant
leaks from the radiator or hoses.
The fan operate when the air condition-
ing system is turned on immediately after a cold start. Confirm that the fan is operating by checking the fan sound
and air flow. If it is difficult to check these, turn the air conditioning system on and off repeatedly. (The fan may not
operate in freezing temperatures.)
7 If the fan is not operating: Stop
the engine immediately and
contact any authorized Toyota
retailer or Toyota authorized
repairer, or any reliable repairer.
If the fan is operating: Have the
vehicle inspected at the nearest
any authorized Toyota retailer or
Toyota authorized repairer, or
any reliable repairer.
WARNING
■When inspecting under the hood of your vehicle
Observe the following precautions.
Failure to do so may result in serious injury such as burns.
●If steam is seen coming from under the hood, do not open the hood until the steam has subsided. The
engine compartment may be very hot.
●Keep hands and clothing (espe-cially a tie, a scarf or a muffler) away from the fan and belts. Failure
to do so may cause the hands or clothing to be caught, resulting in serious injury.
●Do not loosen the coolant reservoir caps while the engine and radiator
are hot. High temperature steam or coolant could spray out.
NOTICE
■When adding engine coolant
Add coolant slowly after the engine has cooled down sufficiently. Adding
cool coolant to a hot engine too quickly can cause damage to the engine.
■To prevent damage to the cooling system
Observe the following precautions:
●Avoid contaminating the coolant
with foreign matter (such as sand or dust etc.).
●Do not use any coolant additive.