tire size TOYOTA AYGO X 2022 (in English) User Guide
[x] Cancel search | Manufacturer: TOYOTA, Model Year: 2022, Model line: AYGO X, Model: TOYOTA AYGO X 2022Pages: 494, PDF Size: 92.53 MB
Page 278 of 494
276
Owner's Manual_Europe_M99V08_en
6-3. Do-it-yourself maintenance
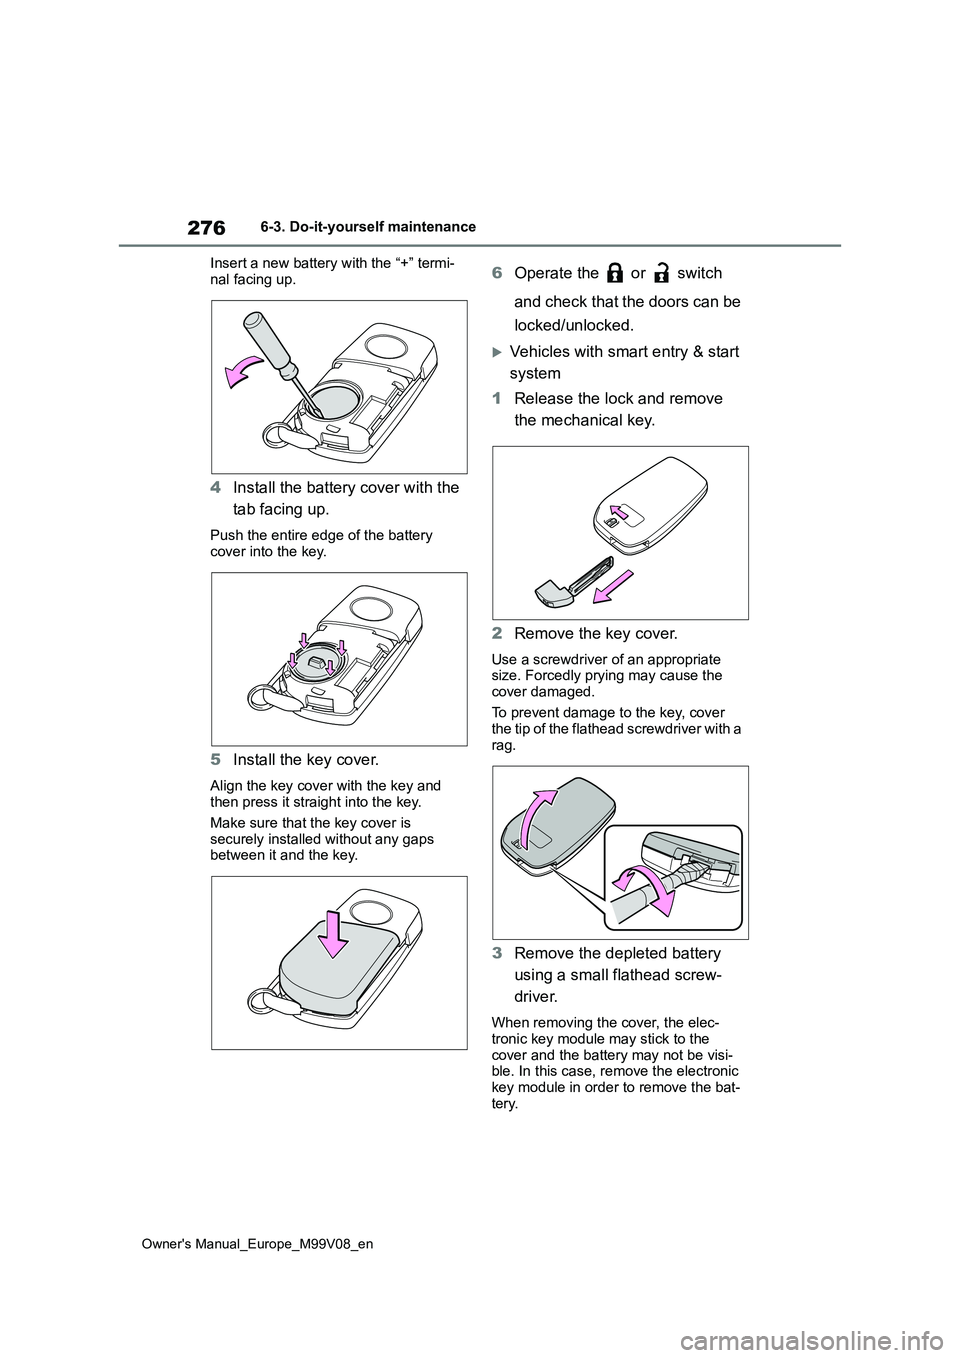
Insert a new battery with the “+” termi-
nal facing up.
4 Install the battery cover with the
tab facing up.
Push the entire edge of the battery
cover into the key.
5 Install the key cover.
Align the key cover with the key and then press it straight into the key.
Make sure that the key cover is
securely installed without any gaps between it and the key.
6 Operate the or switch
and check that the doors can be
locked/unlocked.
Vehicles with smart entry & start
system
1 Release the lock and remove
the mechanical key.
2 Remove the key cover.
Use a screwdriver of an appropriate size. Forcedly prying may cause the
cover damaged.
To prevent damage to the key, cover the tip of the flathead screwdriver with a
rag.
3 Remove the depleted battery
using a small flathead screw-
driver.
When removing the cover, the elec- tronic key module may stick to the
cover and the battery may not be visi- ble. In this case, remove the electronic key module in order to remove the bat-
tery.
Page 312 of 494
310
Owner's Manual_Europe_M99V08_en
7-2. Steps to take in an emergency
WARNING
■If both the ABS and the brake system warning lights remain on
Stop your vehicle in a safe place immediately and contact any autho-rized Toyota retailer or Toyota autho-
rized repairer, or any reliable repairer. The vehicle will become extremely unstable during braking, and the ABS
system may fail, which could cause an accident resulting in death or seri-ous injury.
■When the electric power steer-ing system warning light comes
on
When the light comes on yellow, the assist to the power steering is
restricted. When the light comes on red, the assist to the power steering is lost and handling operations of the
steering wheel become extremely heavy.When steering wheel operations are
heavier than usual, grip the steering wheel firmly and operate it using more force than usual.
■If the tire pressure warning light comes on
Be sure to observe the following pre- cautions.Failure to do so could cause a loss of
vehicle control and result in death or serious injury.
●Stop your vehicle in a safe place as soon as possible. Adjust the tire inflation pressure immediately.
●Vehicles with a compact spare tire and full-size spare tire: If the tire
pressure warning light comes on even after tire inflation pressure adjustment, it is probable that you
have a flat tire. Check the tires. If a tire is flat, change it with the spare tire and have the flat tire repaired
by the nearest any authorized Toy- ota retailer or Toyota authorized repairer, or any reliable repairer.
●Vehicles with emergency tire punc-ture repair kit: If the tire pressure warning light comes on even after
tire inflation pressure adjustment, it is probable that you have a flat tire.Check the tires. If a tire is flat, repair
the flat tire by using emergency tire puncture repair kit.
●Avoid abrupt maneuvering and braking.If the vehicle tires deteriorate, you
could lose control of the steering wheel or the brakes.
■If a blowout or sudden air leak-age should occur
The tire pressure warning system
may not activate immediately.
NOTICE
■To ensure the tire pressure warn- ing system operates properly
Do not install tires with different speci- fications or makers, as the tire pres-sure warning system may not operate
properly.
Page 318 of 494
316
Owner's Manual_Europe_M99V08_en
7-2. Steps to take in an emergency
Sticker
Hose
Air pressure gauge
Pressure release button
Compressor switch
Power plug
■Note for checking the emergency
tire puncture repair kit
Check the sealant expiry date occasion- ally.
The expiry date is shown on the bottle. Do not use sealant whose expiry date has already passed. Otherwise, repairs
conducted using the emergency tire puncture repair kit may not be per-formed properly.
■Emergency tire puncture repair kit
●The emergency tire puncture repair kit is for filling the car tire with air.
●The sealant has a limited life span. The expiry date is marked on the bot-
tle. The sealant should be replaced before the expiry date. Contact any authorized Toyota retailer or Toyota
authorized repairer, or any reliable repairer for replacement.
●The sealant stored in the emergency tire puncture repair kit can be used only once to temporarily repair a sin-
gle tire. If the sealant has been used and needs to be replaced, purchase a new bottle at any authorized Toyota
retailer or Toyota authorized repairer, or any reliable repairer. The compres-sor is reusable.
●The sealant can be used when the outside temperature is from -30°C (-
22°F) to 60°C (140°F).
●The kit is exclusively designed for size
and type of tires originally installed on yo u r ve hi cl e . Do n ot u se it f o r ti r e s t ha t a different size than the original ones,
or for any other purposes.
●If the sealant gets on your clothes, it may stain.
●If the sealant adheres to a wheel or the surface of the vehicle body, the
stain may not be removable if it is not cleaned at once. Immediately wipe away the sealant with a wet cloth.
●During operation of the repair kit, a loud operation noise is produced. This
does not indicate a malfunction.
●Do not use to check or to adjust the
tire pressure.
WARNING
■Caution while driving
●Store the repair kit in the luggage
compartment. Injuries may result in the event of an accident or sudden braking.
●The repair kit is exclusively only for your vehicle.
Do not use repair kit on other vehi- cles, which could lead to an acci-dent causing death or serious
injury.
●Do not use repair kit for tires that
are different size than the original ones, or for any other purpose. If the tires have not been completely
repaired, it could lead to an acci- dent causing death or serious injury.
■Precautions for use of the seal-ant
●Ingesting the sealant is hazardous to your health. If you ingest sealant, consume as much water as possi-
ble, and then immediately consult a doctor.
●If sealant gets in eyes or adheres to skin, immediately wash it off with water. If discomfort persists, consult
a doctor.
Page 352 of 494
350
Owner's Manual_Europe_M99V08_en
8-1. Specifications
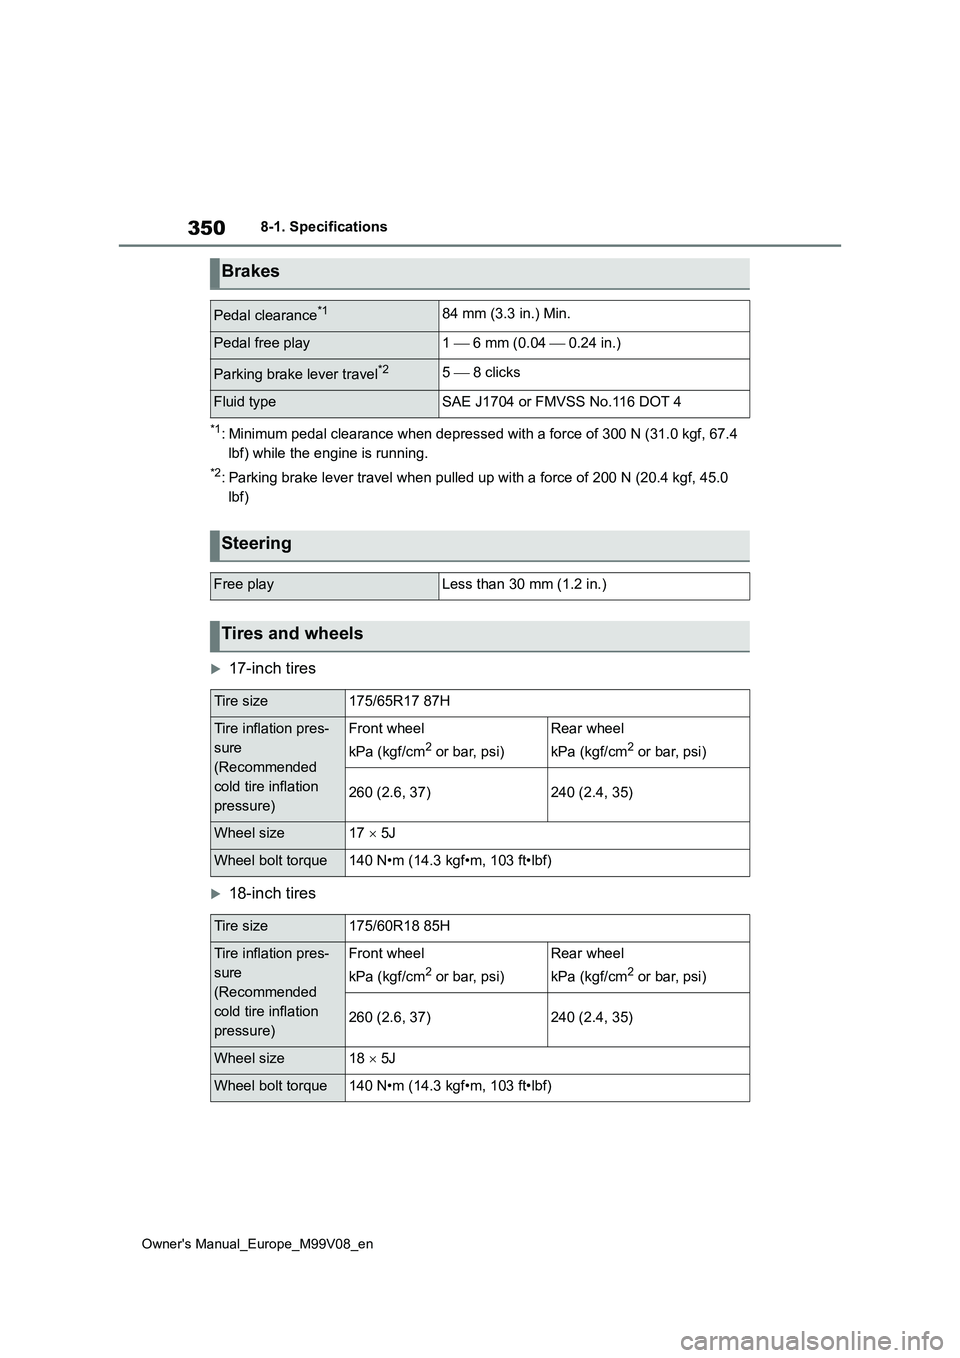
*1: Minimum pedal clearance when depressed with a force of 300 N (31.0 kgf, 67.4
lbf) while the engine is running.
*2: Parking brake lever travel when pulled up with a force of 200 N (20.4 kgf, 45.0
lbf)
17-inch tires
18-inch tires
Brakes
Pedal clearance*184 mm (3.3 in.) Min.
Pedal free play1 6 mm (0.04 0.24 in.)
Parking brake lever travel*25 8 clicks
Fluid typeSAE J1704 or FMVSS No.116 DOT 4
Steering
Free playLess than 30 mm (1.2 in.)
Tires and wheels
Tire size175/65R17 87H
Tire inflation pres-
sure
(Recommended
cold tire inflation
pressure)
Front wheel
kPa (kgf/cm2 or bar, psi)
Rear wheel
kPa (kgf/cm2 or bar, psi)
260 (2.6, 37)240 (2.4, 35)
Wheel size17 5J
Wheel bolt torque140 N•m (14.3 kgf•m, 103 ft•lbf)
Tire size175/60R18 85H
Tire inflation pres-
sure
(Recommended
cold tire inflation
pressure)
Front wheel
kPa (kgf/cm2 or bar, psi)
Rear wheel
kPa (kgf/cm2 or bar, psi)
260 (2.6, 37)240 (2.4, 35)
Wheel size18 5J
Wheel bolt torque140 N•m (14.3 kgf•m, 103 ft•lbf)
Page 353 of 494
351
8
Owner's Manual_Europe_M99V08_en
8-1. Specifications
Vehicle specifications
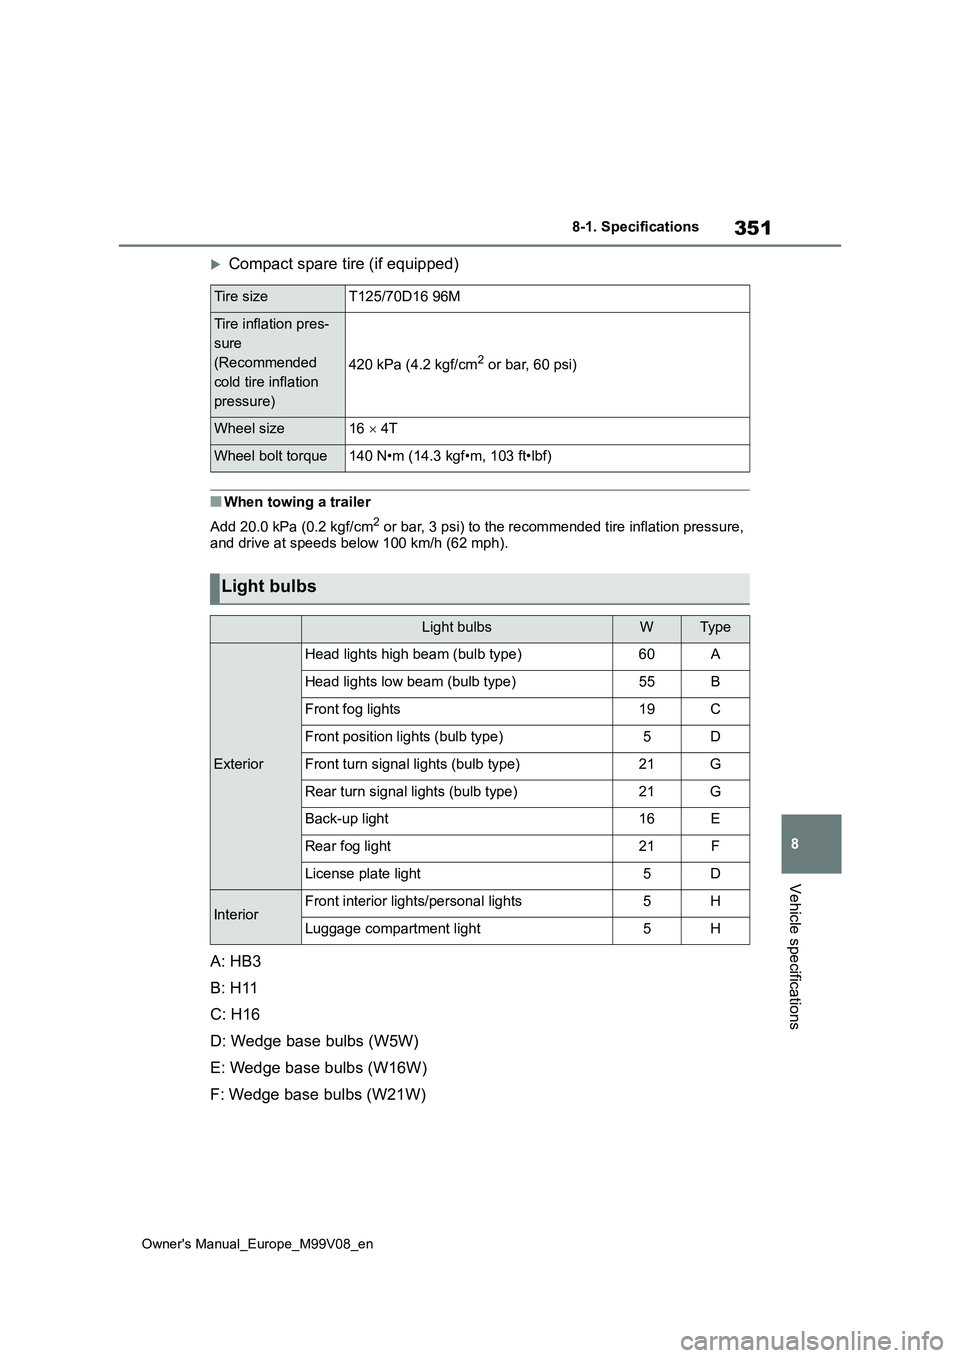
Compact spare tire (if equipped)
■When towing a trailer
Add 20.0 kPa (0.2 kgf/cm2 or bar, 3 psi) to the recommended tire inflation pressure, and drive at speeds below 100 km/h (62 mph).
A: HB3
B: H11
C: H16
D: Wedge base bulbs (W5W)
E: Wedge base bulbs (W16W)
F: Wedge base bulbs (W21W)
Tire sizeT125/70D16 96M
Tire inflation pres-
sure
(Recommended
cold tire inflation
pressure)
420 kPa (4.2 kgf/cm2 or bar, 60 psi)
Wheel size16 4T
Wheel bolt torque140 N•m (14.3 kgf•m, 103 ft•lbf)
Light bulbs
Light bulbsWTyp e
Exterior
Head lights high beam (bulb type)60A
Head lights low beam (bulb type)55B
Front fog lights19C
Front position lights (bulb type)5D
Front turn signal lights (bulb type)21G
Rear turn signal lights (bulb type)21G
Back-up light16E
Rear fog light21F
License plate light5D
InteriorFront interior lights/personal lights5H
Luggage compartment light5H
Page 363 of 494
361
8
Owner's Manual_Europe_M99V08_en
8-3. Initialization
Vehicle specifications
8- 3. In it ia li za ti on
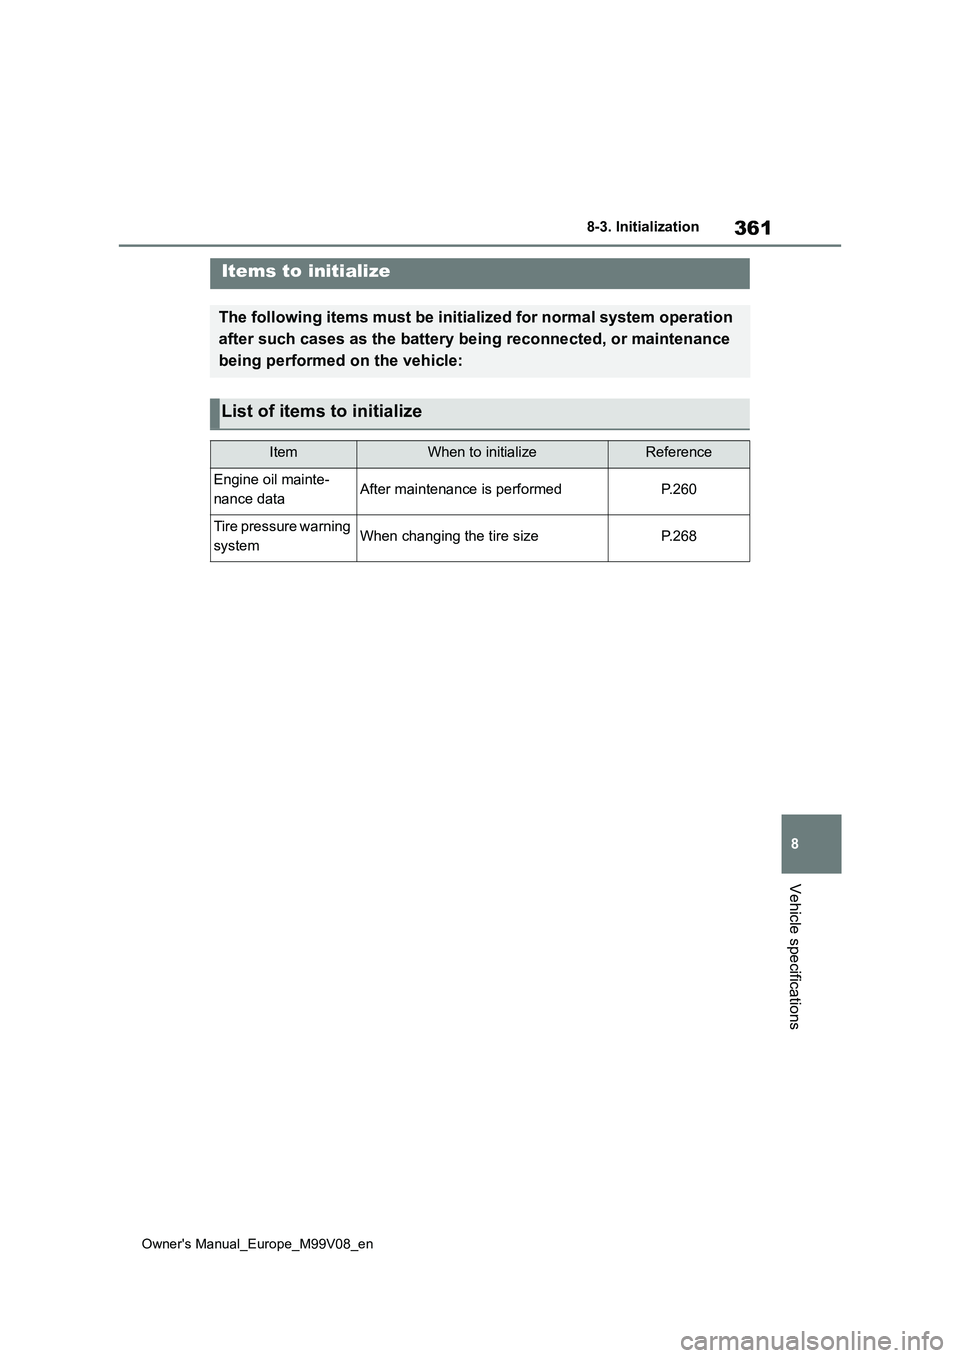
Items to initialize
The following items must be initialized for normal system operation
after such cases as the battery being reconnected, or maintenan ce
being performed on the vehicle:
List of items to initialize
ItemWhen to initializeReference
Engine oil mainte-
nance dataAfter maintenance is performedP. 2 6 0
Tire pressure warning
systemWhen changing the tire sizeP. 2 6 8
Page 377 of 494
375
Owner's Manual_Europe_M99V08_en
Alphabetical Index
Canvas top ................................. 116
Display change button ................. 81
Dynamic radar cruise control switch
................................................. 182
Emergency flashers switch ........ 296
Engine switch ..................... 129, 130
Ignition switch .................... 129, 130
Light switches ............................ 142
LTA (Lane Tracing Assist) switch 176
Meter control switches ................. 83
Outside rear view mirror switches
................................................. 112
Paddle shift switches ................. 137
Power window switches ............. 114
Rear window and outside rear view
mirror defoggers switch ........... 224
Seat heater switches.................. 228
“SOS” button ................................ 64
Speed limiter switch ................... 192
Stop & Start cancel switch ......... 199
Vehicle-to-vehicle distance switch
................................................. 182
VSC OFF switch ........................ 212
Windshield wiper and washer switch
................................................. 149
T
Tachometer ..................................... 79
Tail lights
Light switch ................................ 142
Theft deterrent system
Engine immobilizer system .......... 74
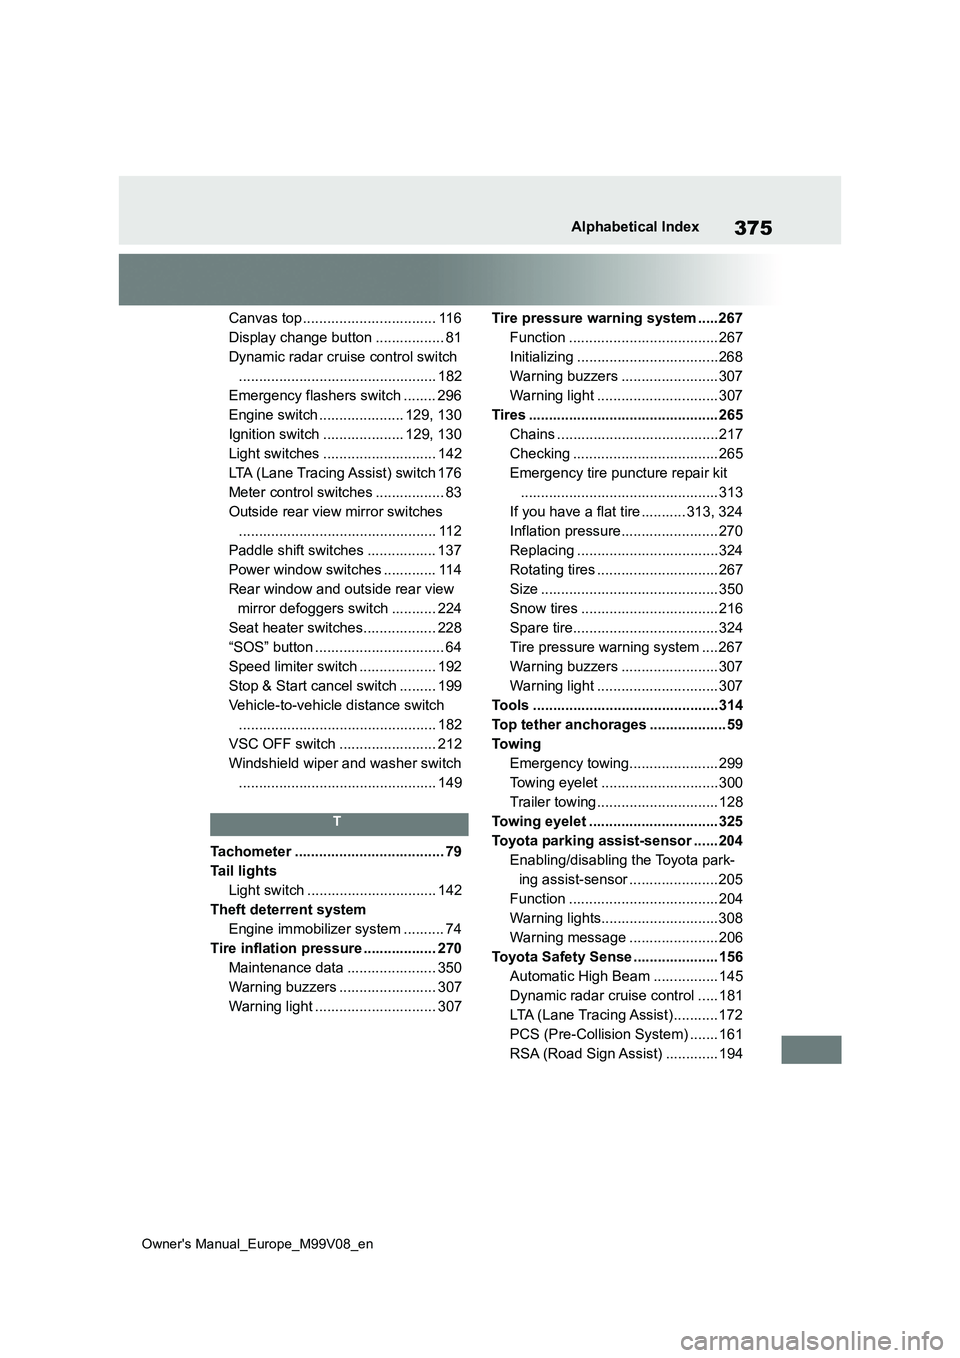
Tire inflation pressure .................. 270
Maintenance data ...................... 350
Warning buzzers ........................ 307
Warning light .............................. 307
Tire pressure warning system ..... 267
Function ..................................... 267
Initializing ...................................268
Warning buzzers ........................ 307
Warning light .............................. 307
Tires ............................................... 265
Chains ........................................217
Checking .................................... 265
Emergency tire puncture repair kit
................................................. 313
If you have a flat tire ........... 313, 324
Inflation pressure........................ 270
Replacing ...................................324
Rotating tires .............................. 267
Size ............................................ 350
Snow tires .................................. 216
Spare tire.................................... 324
Tire pressure warning system .... 267
Warning buzzers ........................ 307
Warning light .............................. 307
Tools ..............................................314
Top tether anchorages ................... 59
To w i n g
Emergency towing...................... 299
Towing eyelet .............................300
Trailer towing .............................. 128
Towing eyelet ................................ 325
Toyota parking assist-sensor ...... 204
Enabling/disabling the Toyota park-
ing assist-sensor ...................... 205
Function ..................................... 204
Warning lights.............................308
Warning message ...................... 206
Toyota Safety Sense ..................... 156
Automatic High Beam ................ 145
Dynamic radar cruise control ..... 181
LTA (Lane Tracing Assist)........... 172
PCS (Pre-Collision System) ....... 161
RSA (Road Sign Assist) ............. 194