key TOYOTA BZ4X 2022 (in English) User Guide
[x] Cancel search | Manufacturer: TOYOTA, Model Year: 2022, Model line: BZ4X, Model: TOYOTA BZ4X 2022Pages: 674, PDF Size: 120.02 MB
Page 99 of 674
97
2
Owners Manual_Europe_M42D76_en
2-2. Charging
Electric Vehicle system
■The charging port lid will be locked when
●In the following cases, the charging port lid will be locked.• The doors are locked with the wireless
remote control • The doors are locked with the smart entry & start system
• The doors are locked with the mechanical key
●The charging port lid will automatically be locked if the security feature locks the doors when the charging port lid is
closed. ( P.186)
●If the charging port lid is closed after
the doors are locked, the charging port lid will not be locked. In that case, after unlocking the doors once, the
charging port lid can be locked by locking the doors.
■Lid lifter
●The charging lid is not closed if the lifter is pushing in before closing the charging lid. In that case, while
unlocking the door, push again and release the lid lifter, and close the
charging lid again.
■Charging port lid open/close detec-
tion switch
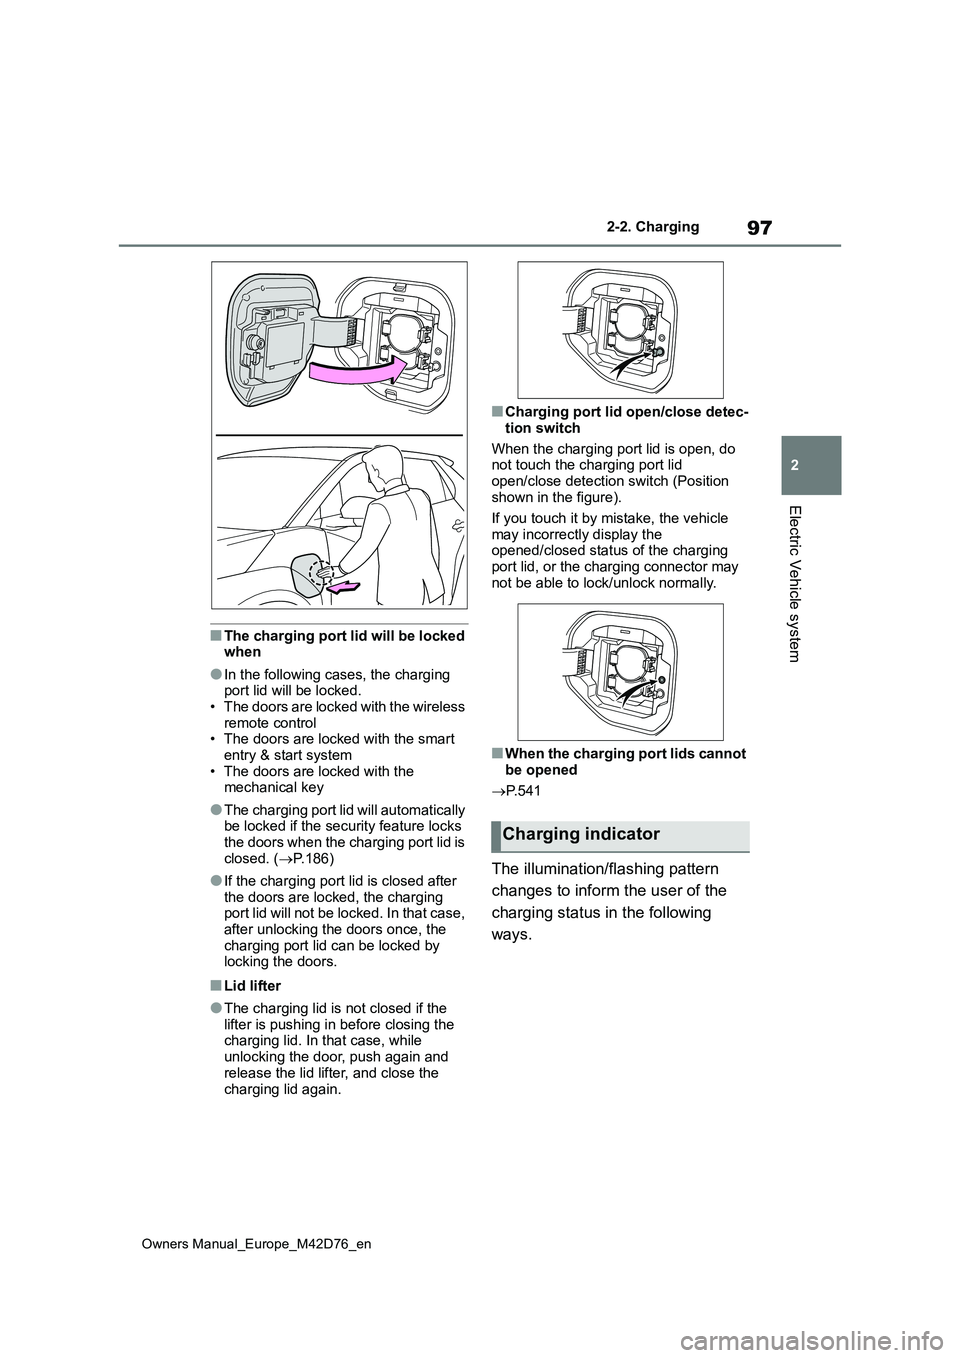
When the charging port lid is open, do not touch the charging port lid
open/close detection switch (Position shown in the figure).
If you touch it by mistake, the vehicle
may incorrectly display the opened/closed status of the charging port lid, or the charging connector may
not be able to lock/unlock normally.
■When the charging port lids cannot
be opened
P. 5 4 1
The illumination/flashing pattern
changes to inform the user of the
charging status in the following
ways.
Charging indicator
Page 106 of 674
104
Owners Manual_Europe_M42D76_en
2-2. Charging
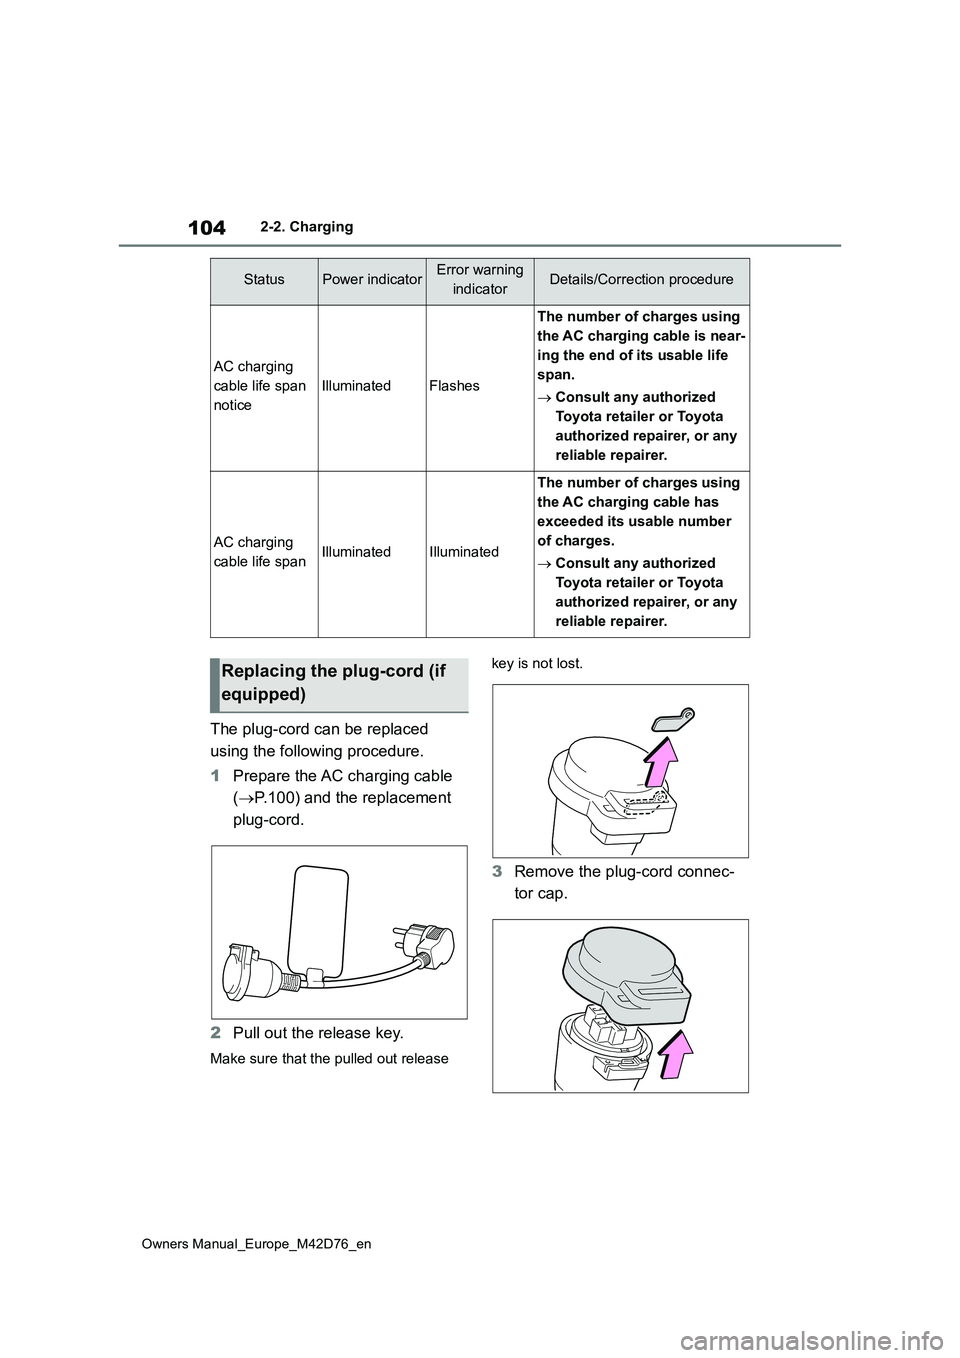
The plug-cord can be replaced
using the following procedure.
1 Prepare the AC charging cable
( P.100) and the replacement
plug-cord.
2 Pull out the release key.
Make sure that the pulled out release
key is not lost.
3 Remove the plug-cord connec-
tor cap.
AC charging
cable life span
notice
IlluminatedFlashes
The number of charges using
the AC charging cable is near-
ing the end of its usable life
span.
Consult any authorized
Toyota retailer or Toyota
authorized repairer, or any
reliable repairer.
AC charging
cable life spanIlluminatedIlluminated
The number of charges using
the AC charging cable has
exceeded its usable number
of charges.
Consult any authorized
Toyota retailer or Toyota
authorized repairer, or any
reliable repairer.
StatusPower indicatorError warning
indicatorDetails/Correction procedure
Replacing the plug-cord (if
equipped)
Page 107 of 674
105
2
Owners Manual_Europe_M42D76_en
2-2. Charging
Electric Vehicle system
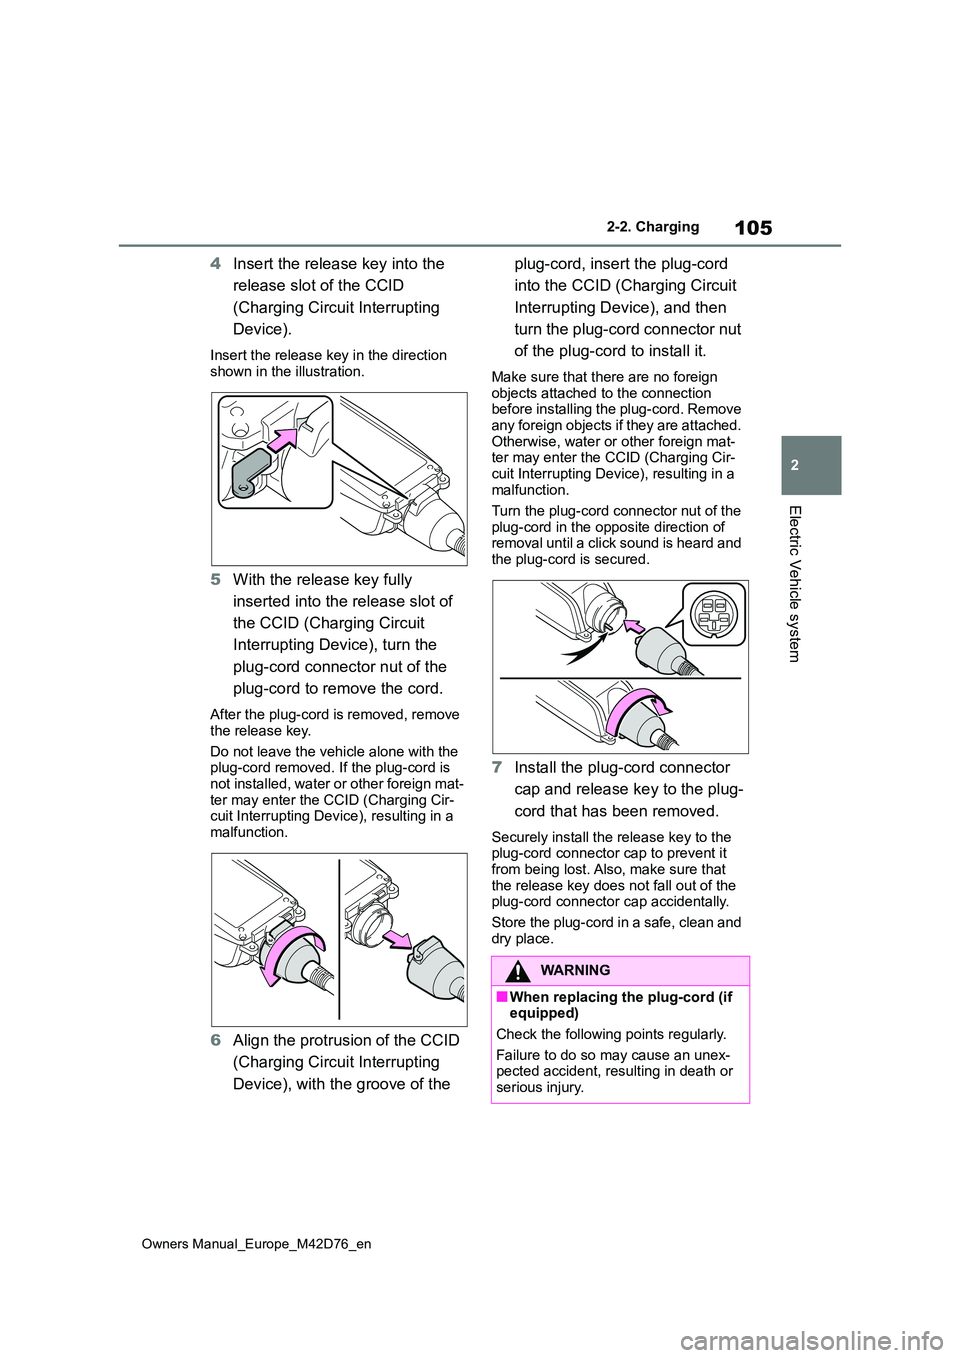
4Insert the release key into the
release slot of the CCID
(Charging Circuit Interrupting
Device).
Insert the release key in the direction
shown in the illustration.
5 With the release key fully
inserted into the release slot of
the CCID (Charging Circuit
Interrupting Device), turn the
plug-cord connector nut of the
plug-cord to remove the cord.
After the plug-cord is removed, remove
the release key.
Do not leave the vehicle alone with the plug-cord removed. If the plug-cord is
not installed, water or other foreign mat- ter may enter the CCID (Charging Cir-cuit Interrupting Device), resulting in a
malfunction.
6 Align the protrusion of the CCID
(Charging Circuit Interrupting
Device), with the groove of the
plug-cord, insert the plug-cord
into the CCID (Charging Circuit
Interrupting Device), and then
turn the plug-cord connector nut
of the plug-cord to install it.
Make sure that there are no foreign objects attached to the connection before installing the plug-cord. Remove
any foreign objects if they are attached. Otherwise, water or other foreign mat-ter may enter the CCID (Charging Cir-
cuit Interrupting Device), resulting in a malfunction.
Turn the plug-cord connector nut of the
plug-cord in the opposite direction of removal until a click sound is heard and the plug-cord is secured.
7 Install the plug-cord connector
cap and release key to the plug-
cord that has been removed.
Securely install the release key to the plug-cord connector cap to prevent it from being lost. Also, make sure that
the release key does not fall out of the plug-cord connector cap accidentally.
Store the plug-cord in a safe, clean and
dry place.
WARNING
■When replacing the plug-cord (if equipped)
Check the following points regularly.
Failure to do so may cause an unex- pected accident, resulting in death or
serious injury.
Page 108 of 674
106
Owners Manual_Europe_M42D76_en
2-2. Charging
For safety, inspect the AC charging
cable on a routine basis.
WARNING
●Do not replace the plug-cord with wet hands.
Also, do not replace in a place that is rainy or wet.
●Do not replace the plug-cord when the plug and/or charging connector are connected.
●Do not leave the CCID (Charging Circuit Interrupting Device) with the
plug-cord removed.
●Check whether there are any local
BEV-charging regulations in place, and adhere to them.
●Make sure that there are no foreign objects attached to the connection when installing the plug-cord to the
CCID (Charging Circuit Interrupting Device).
●When replacing the plug-cord, firmly turn the nut of the plug-cord until a click sound can be heard.
●When replacing the plug-cord, make sure to use the release key.
●Do not replace the plug cord in Nor-way.
NOTICE
■Precautions for the plug-cord (if equipped)
Do not use the plug-cord for any use other than charging this vehicle. Doing so may cause the plug-cord to
be damaged.
Inspecting the AC charging
cable
WARNING
■Routine inspection
Check the following points regularly.
Failure to do so may cause an unex- pected accident, resulting in death or serious injury.
●The AC charging cable, plug, charging connector, CCID (Charging Circuit Interrupting
Device), etc., have not been dam- aged
●The socket has not been damaged.
●The plug can be securely inserted
into the socket.
●The plug does not get extremely hot
during use
●The tip of the plug has not been
deformed.
●The plug is not dirtied by dust, etc.
Remove the plug from the socket before inspecting it. If any abnormali-ties are found in the AC charging
cable as a result of the inspection, immediately stop use and consult any authorized Toyota retailer or Toyota
authorized repairer, or any reliable repairer.
Page 135 of 674
133
2
Owners Manual_Europe_M42D76_en
2-2. Charging
Electric Vehicle system
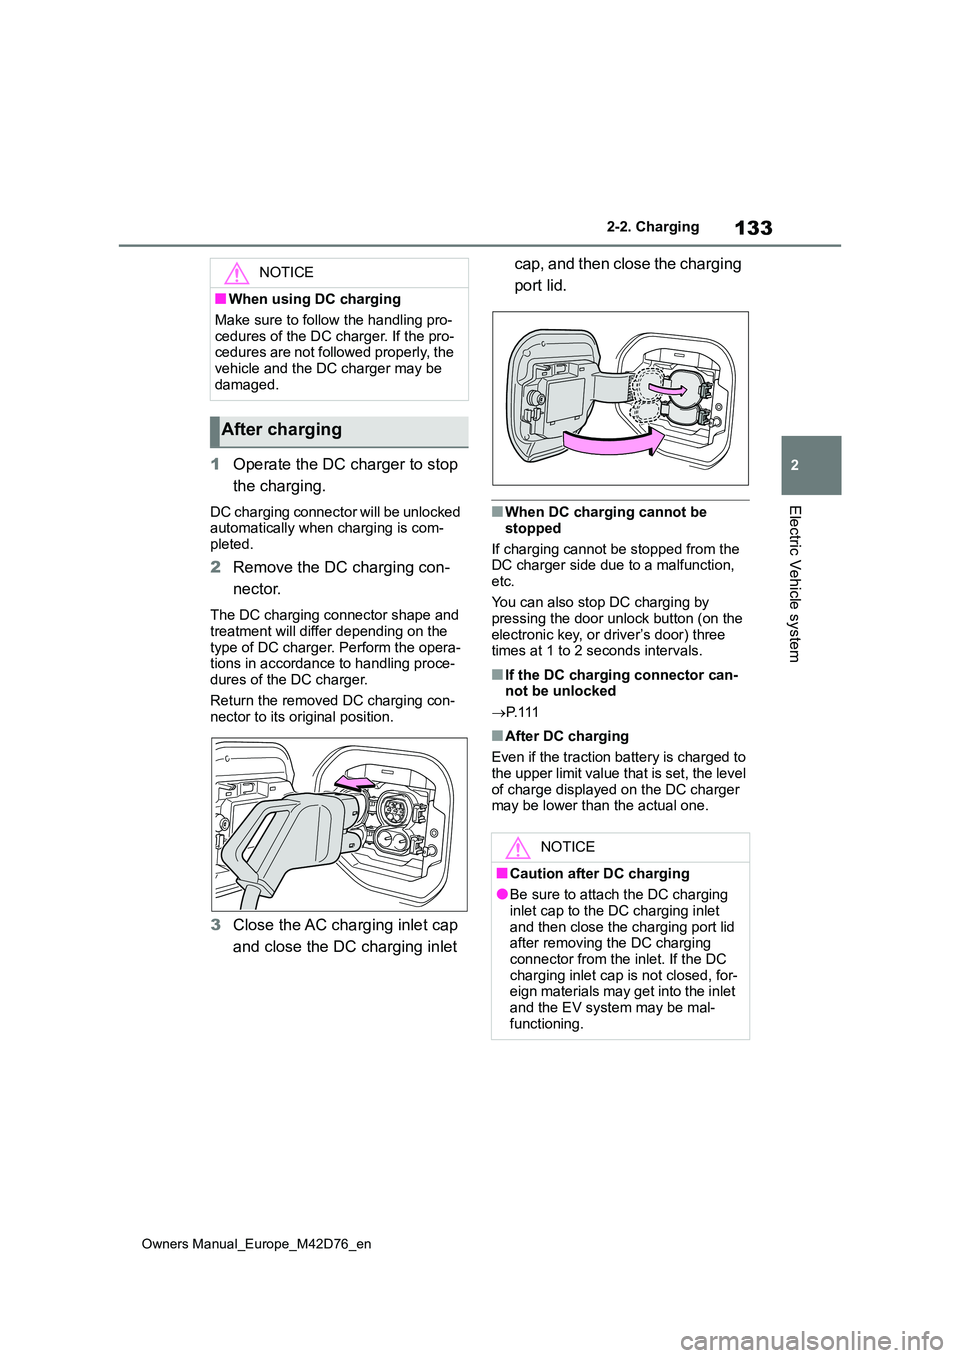
1Operate the DC charger to stop
the charging.
DC charging connector will be unlocked automatically when charging is com-
pleted.
2 Remove the DC charging con-
nector.
The DC charging connector shape and
treatment will differ depending on the type of DC charger. Perform the opera-tions in accordance to handling proce-
dures of the DC charger.
Return the removed DC charging con- nector to its original position.
3 Close the AC charging inlet cap
and close the DC charging inlet
cap, and then close the charging
port lid.
■When DC charging cannot be
stopped
If charging cannot be stopped from the DC charger side due to a malfunction,
etc.
You can also stop DC charging by pressing the door unlock button (on the
electronic key, or driver’s door) three times at 1 to 2 seconds intervals.
■If the DC charging connector can-not be unlocked
P. 1 1 1
■After DC charging
Even if the traction battery is charged to the upper limit value that is set, the level
of charge displayed on the DC charger may be lower than the actual one.
NOTICE
■When using DC charging
Make sure to follow the handling pro-
cedures of the DC charger. If the pro- cedures are not followed properly, the vehicle and the DC charger may be
damaged.
After charging
NOTICE
■Caution after DC charging
●Be sure to attach the DC charging inlet cap to the DC charging inlet
and then close the charging port lid after removing the DC charging connector from the inlet. If the DC
charging inlet cap is not closed, for- eign materials may get into the inlet and the EV system may be mal-
functioning.
Page 183 of 674
4
181
Owners Manual_Europe_M42D76_en
4
Before driving
Before driving
4-1. Key information
Keys.................................. 182
4-2. Opening, closing and locking
the doors
Side doors ........................ 185
Back door ......................... 189
Smart entry & start system 203
4-3. Adjusting the seats
Front seats........................ 208
Rear seats ........................ 209
Head restraints ................. 211
4-4. Adjusting the steering wheel
and mirrors
Steering wheel .................. 215
Inside rear view mirror ...... 216
Outside rear view mirrors . 217
4-5. Opening, closing the win-
dows
Power windows................. 219
4-6. Favorite settings
Driving position memory ... 222
My Settings ....................... 226
Page 184 of 674
182
Owners Manual_Europe_M42D76_en
4-1. Key information
4-1.Key info rmation
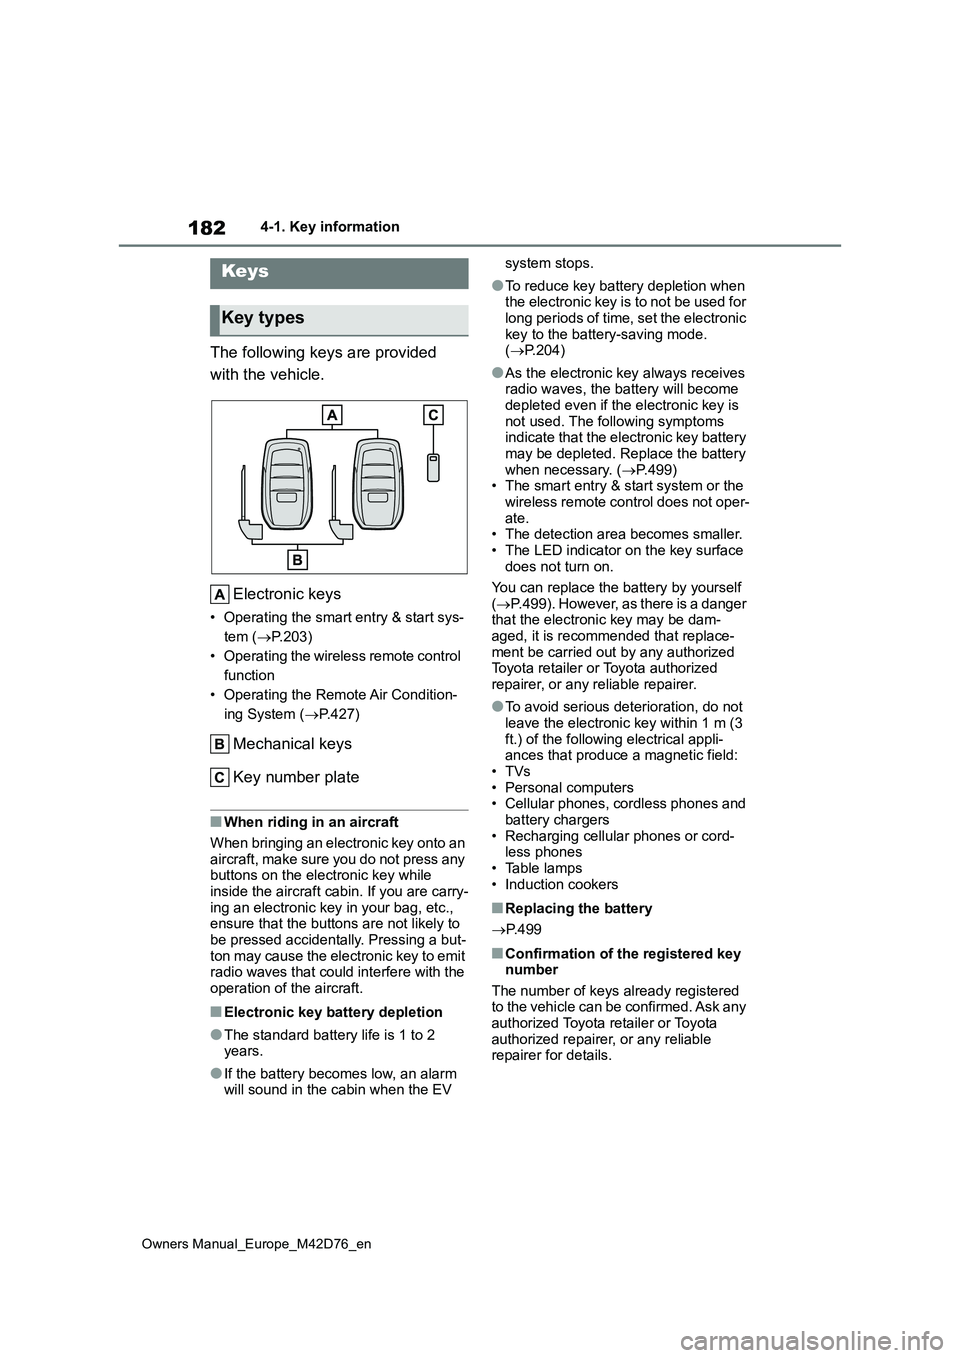
The following keys are provided
with the vehicle.
Electronic keys
• Operating the smart entry & start sys-
tem ( P.203)
• Operating the wireless remote control
function
• Operating the Remote Air Condition-
ing System ( P.427)
Mechanical keys
Key number plate
■When riding in an aircraft
When bringing an electronic key onto an
aircraft, make sure you do not press any buttons on the electronic key while inside the aircraft cabin. If you are carry-
ing an electronic key in your bag, etc., ensure that the buttons are not likely to be pressed accidentally. Pressing a but-
ton may cause the electronic key to emit radio waves that could interfere with the operation of the aircraft.
■Electronic key battery depletion
●The standard battery life is 1 to 2 years.
●If the battery becomes low, an alarm will sound in the cabin when the EV
system stops.
●To reduce key battery depletion when the electronic key is to not be used for
long periods of time, set the electronic key to the battery-saving mode. ( P.204)
●As the electronic key always receives radio waves, the battery will become
depleted even if the electronic key is not used. The following symptoms indicate that the electronic key battery
may be depleted. Replace the battery when necessary. ( P.499) • The smart entry & start system or the
wireless remote control does not oper- ate.• The detection area becomes smaller.
• The LED indicator on the key surface does not turn on.
You can replace the battery by yourself
( P.499). However, as there is a danger that the electronic key may be dam-aged, it is recommended that replace-
ment be carried out by any authorized Toyota retailer or Toyota authorized repairer, or any reliable repairer.
●To avoid serious deterioration, do not leave the electronic key within 1 m (3
ft.) of the following electrical appli- ances that produce a magnetic field:•TVs
• Personal computers • Cellular phones, cordless phones and battery chargers
• Recharging cellular phones or cord- less phones• Table lamps
• Induction cookers
■Replacing the battery
P. 4 9 9
■Confirmation of the registered key number
The number of keys already registered to the vehicle can be confirmed. Ask any authorized Toyota retailer or Toyota
authorized repairer, or any reliable repairer for details.
Keys
Key types
Page 185 of 674
183
4
Owners Manual_Europe_M42D76_en
4-1. Key information
Before driving
■If “A New Key has been Registered
Contact Your Dealer for Details” is shown on the multi-information display
This message will be displayed each time the driver’s door is opened when the doors are unlocked from the outside
for approximately 10 days after a new electronic key has been registered.
If this message is displayed but you
have not had a new electronic key regis- tered, ask any authorized Toyota retailer or Toyota authorized repairer, or any reli-
able repairer to check if an unknown electronic key (other than those in your possession) has been registered.
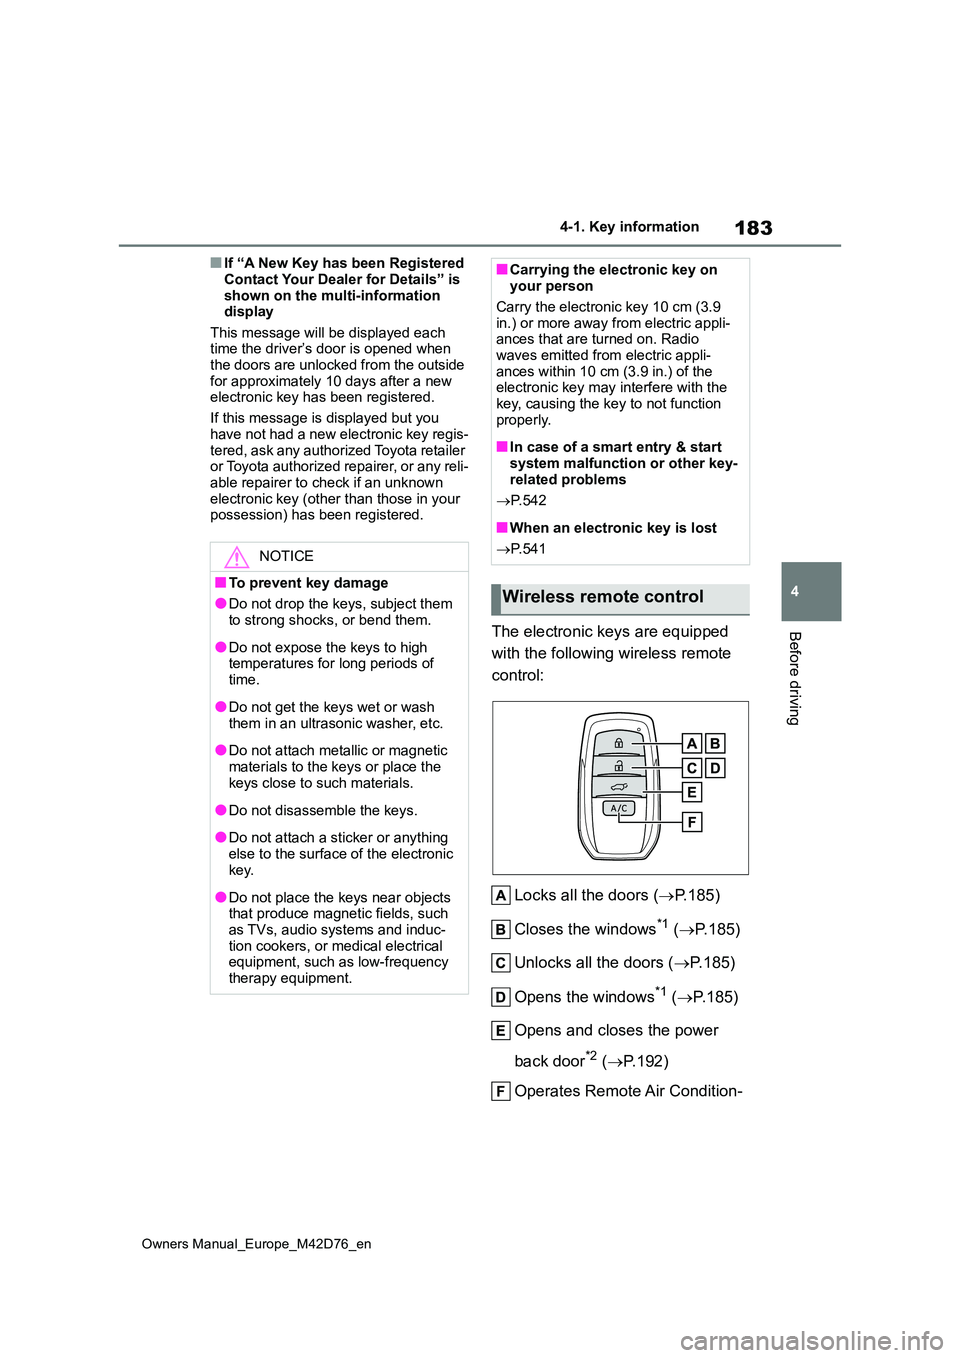
The electronic keys are equipped
with the following wireless remote
control:
Locks all the doors ( P.185)
Closes the windows*1 ( P.185)
Unlocks all the doors ( P.185)
Opens the windows*1 ( P.185)
Opens and closes the power
back door*2 ( P.192)
Operates Remote Air Condition-
NOTICE
■To prevent key damage
●Do not drop the keys, subject them to strong shocks, or bend them.
●Do not expose the keys to high temperatures for long periods of
time.
●Do not get the keys wet or wash
them in an ultrasonic washer, etc.
●Do not attach metallic or magnetic
materials to the keys or place the keys close to such materials.
●Do not disassemble the keys.
●Do not attach a sticker or anything
else to the surface of the electronic key.
●Do not place the keys near objects that produce magnetic fields, such as TVs, audio systems and induc-
tion cookers, or medical electrical equipment, such as low-frequency therapy equipment.
■Carrying the electronic key on your person
Carry the electronic key 10 cm (3.9
in.) or more away from electric appli- ances that are turned on. Radio waves emitted from electric appli-
ances within 10 cm (3.9 in.) of the electronic key may interfere with the key, causing the key to not function
properly.
■In case of a smart entry & start
system malfunction or other key- related problems
P. 5 4 2
■When an electronic key is lost
P. 5 4 1
Wireless remote control
Page 186 of 674
184
Owners Manual_Europe_M42D76_en
4-1. Key information
ing System (P.427)
*1: These settings must be customized
at any authorized Toyota retailer or
Toyota authorized repairer, or any
reliable repairer.
*2: If equipped
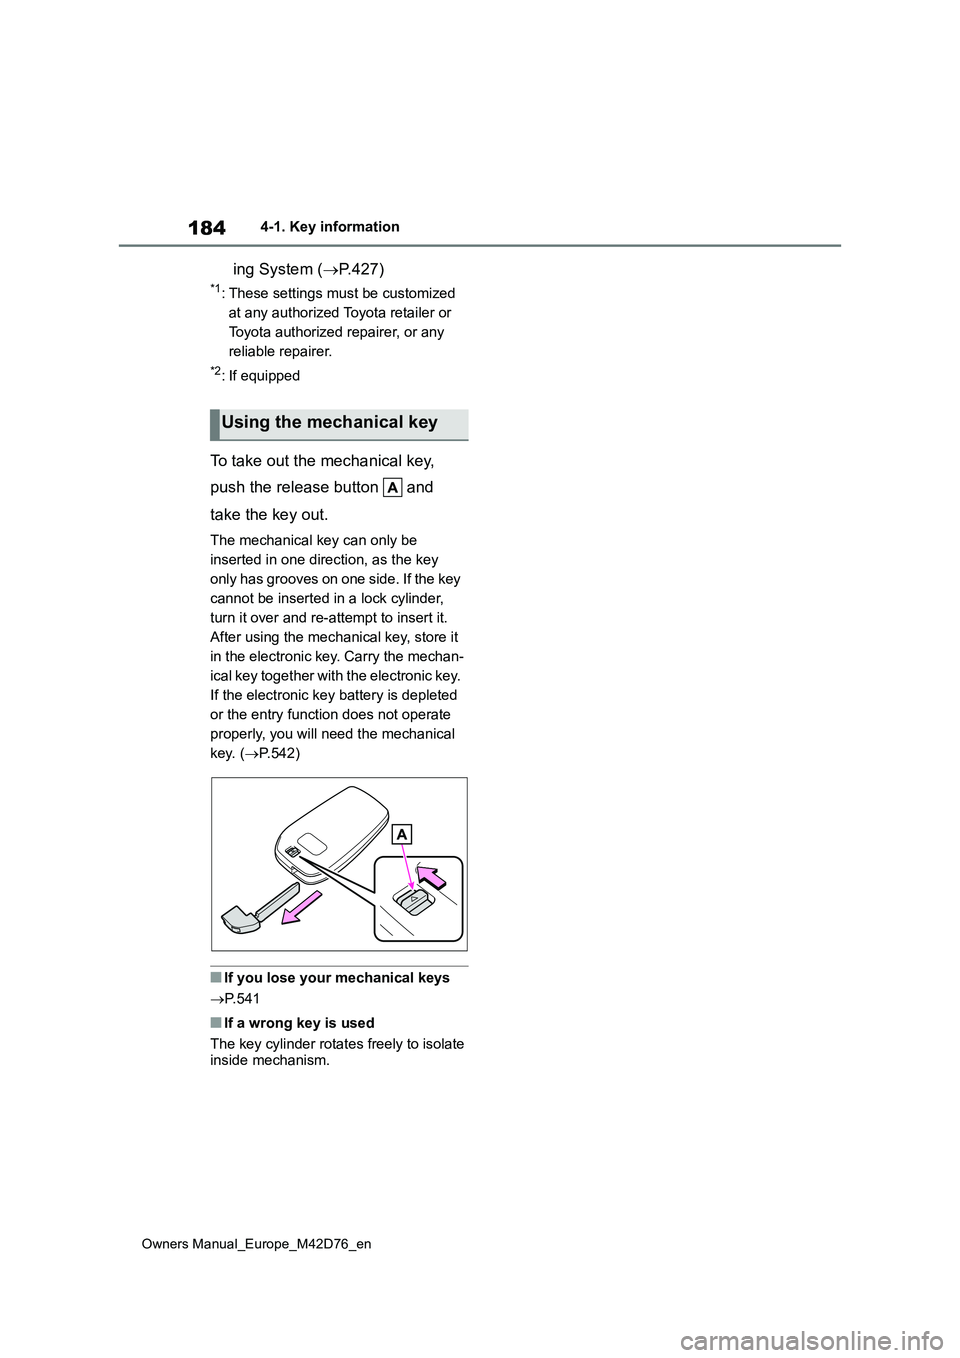
To take out the mechanical key,
push the release button and
take the key out.
The mechanical key can only be
inserted in one direction, as the key
only has grooves on one side. If the key
cannot be inserted in a lock cylinder,
turn it over and re-attempt to insert it.
After using the mechanical key, store it
in the electronic key. Carry the mechan-
ical key together with the electronic key.
If the electronic key battery is depleted
or the entry function does not operate
properly, you will need the mechanical
key. ( P.542)
■If you lose your mechanical keys
P. 5 4 1
■If a wrong key is used
The key cylinder rotates freely to isolate inside mechanism.
Using the mechanical key
Page 187 of 674

185
4
Owners Manual_Europe_M42D76_en
4-2. Opening, closing and locking the doors
Before driving
4-2.Opening, closing and lo cking th e d oors
■Smart entry & start system
Carry the electronic key to enable
this function.
1 Grip the front door handle or
rear door handle (some models)
to unlock the doors.*
Make sure to touch the sensor on the
back of the handle.
The doors cannot be unlocked for 3
seconds after the doors are locked.
2 Touch the lock sensor (the
indentation on the side of the
door handle) to lock all the
doors.
Check that the door is securely locked.
*: The door unlock settings can be
changed.
■Wireless remote control
1 Locks all the doors
Check that the door is securely locked.
Press and hold to close the windows.*
2 Unlocks all the doors
Press and hold to open the windows.*
*: These settings must be customized
at any authorized Toyota retailer or
Toyota authorized repairer, or any
reliable repairer.
■Switching the door unlock function
It is possible to set which doors the entry function unlocks using the wireless remote control.
1 Turn the power switch off.
2 Cancel the intrusion sensor and tilt
sensor of the alarm system to pre- vent unintended triggering of the alarm while changing the settings. (if
equipped) ( P. 7 8 )
3 When the indicator light on the key
surface is not on, press and hold
or for approximately 5 sec-
onds while pressing and holding .
The setting changes each time an oper-
ation is performed, as shown below.
(When changing the setting continu-
ously, release the buttons, wait for at
least 5 seconds, and repeat step 3.)
Side doors
Unlocking and locking the
doors from the outside