warning light TOYOTA BZ4X 2023 Owner's Guide
[x] Cancel search | Manufacturer: TOYOTA, Model Year: 2023, Model line: BZ4X, Model: TOYOTA BZ4X 2023Pages: 628, PDF Size: 11.91 MB
Page 156 of 628
1563-1. Instrument cluster
Owners Manual_USA_M42C01_en
■Menu icons
The menu icons will be dis-
played by pressing the or
meter control switch.
■Liquid crystal display
Small spots or light spots may
appear on the display. This phenom-
enon is characteristi c of liquid crys-
tal displays, and there is no problem
continuing to use the display.
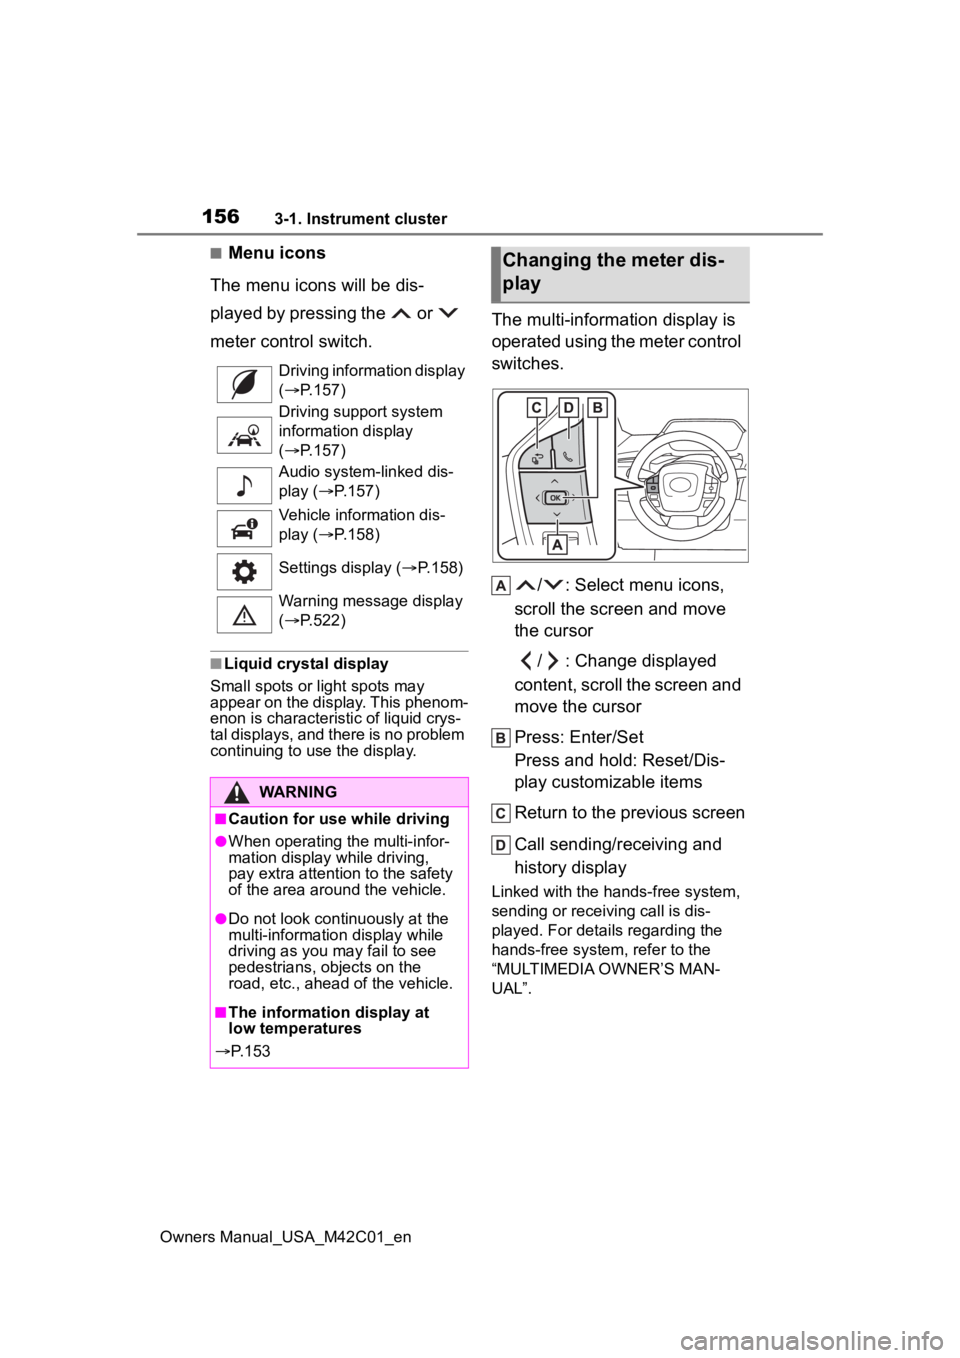
The multi-information display is
operated using the meter control
switches.
/ : Select menu icons,
scroll the screen and move
the cursor
/ : Change displayed
content, scroll the screen and
move the cursor
Press: Enter/Set
Press and hold: Reset/Dis-
play customizable items
Return to the previous screen
Call sending/receiving and
history display
Linked with the hands-free system,
sending or receiving call is dis-
played. For details regarding the
hands-free system, refer to the
“MULTIMEDIA OWNER’S MAN-
UAL”.
Driving information display
(
P.157)
Driving support system
information display
( P.157)
Audio system-linked dis-
play ( P.157)
Vehicle information dis-
play ( P.158)
Settings display ( P.158)
Warning message display
( P.522)
WARNING
■Caution for use while driving
●When operating the multi-infor-
mation display while driving,
pay extra attention to the safety
of the area aroun d the vehicle.
●Do not look continuously at the
multi-information display while
driving as you may fail to see
pedestrians, objects on the
road, etc., ahead of the vehicle.
■The information display at
low temperatures
P. 1 5 3
Changing the meter dis-
play
Page 159 of 628
1593-1. Instrument cluster
Owners Manual_USA_M42C01_en
3
Vehicle status information and indicators
• Power consumption display
Select to change the average
power consumption display Trip
Average/Total Average. ( P.157)
Select to display/not display the
audio system linked display.
Select to change the displayed con-
tent of the following:
• Display contents (AWD models
only)
Select to display/not display the
torque distribution display.
• Drive information type
Select to change the drive informa-
tion type display between after
start/after reset.
• Drive information items
Select to set the first and second
items of the drive information dis-
play to any of the following: aver-
age vehicle
speed/distance/elapsed time.
Closing Display
Select to set the i tems displayed
when the power switch is turned off.
Pop-up display
Select to enable/disable pop-up
displays for each relevant system.
Calendar
The year, month, and day can be
set.
Default setting
Select to reset the meter display settings to the default setting.
■Vehicle functions and set-
tings that can be changed
P.566
■Suspension of the settings dis-
play
●Some settings cannot be changed
while driving. When changing set-
tings, park the vehicle in a safe
place.
●If a warning message is displayed,
operation of the settings display
will be suspended.
Displays suggestions to the
driver in the following situations.
To select a response to a dis-
played suggestion, use the
meter control switches.
■Suggestion to turn on the
headlights
If the headlight switch is in other
than or , and the vehicle
speed is 3 mph (5 km/h) or
higher for a certain amount of
time when the surroundings are
dark, a suggestion message will
be displayed.
NOTICE
■During setting up the display
To prevent 12-volt battery dis-
charge, ensure that the EV sys-
tem is operating while setting up
the display features.
Suggestion function
Page 173 of 628
1734-2. Opening, closing and locking the doors
Owners Manual_USA_M42C01_en
4
Before driving
■Using the entry function (if
equipped)
Carry the electronic key to
enable this function.
WARNING
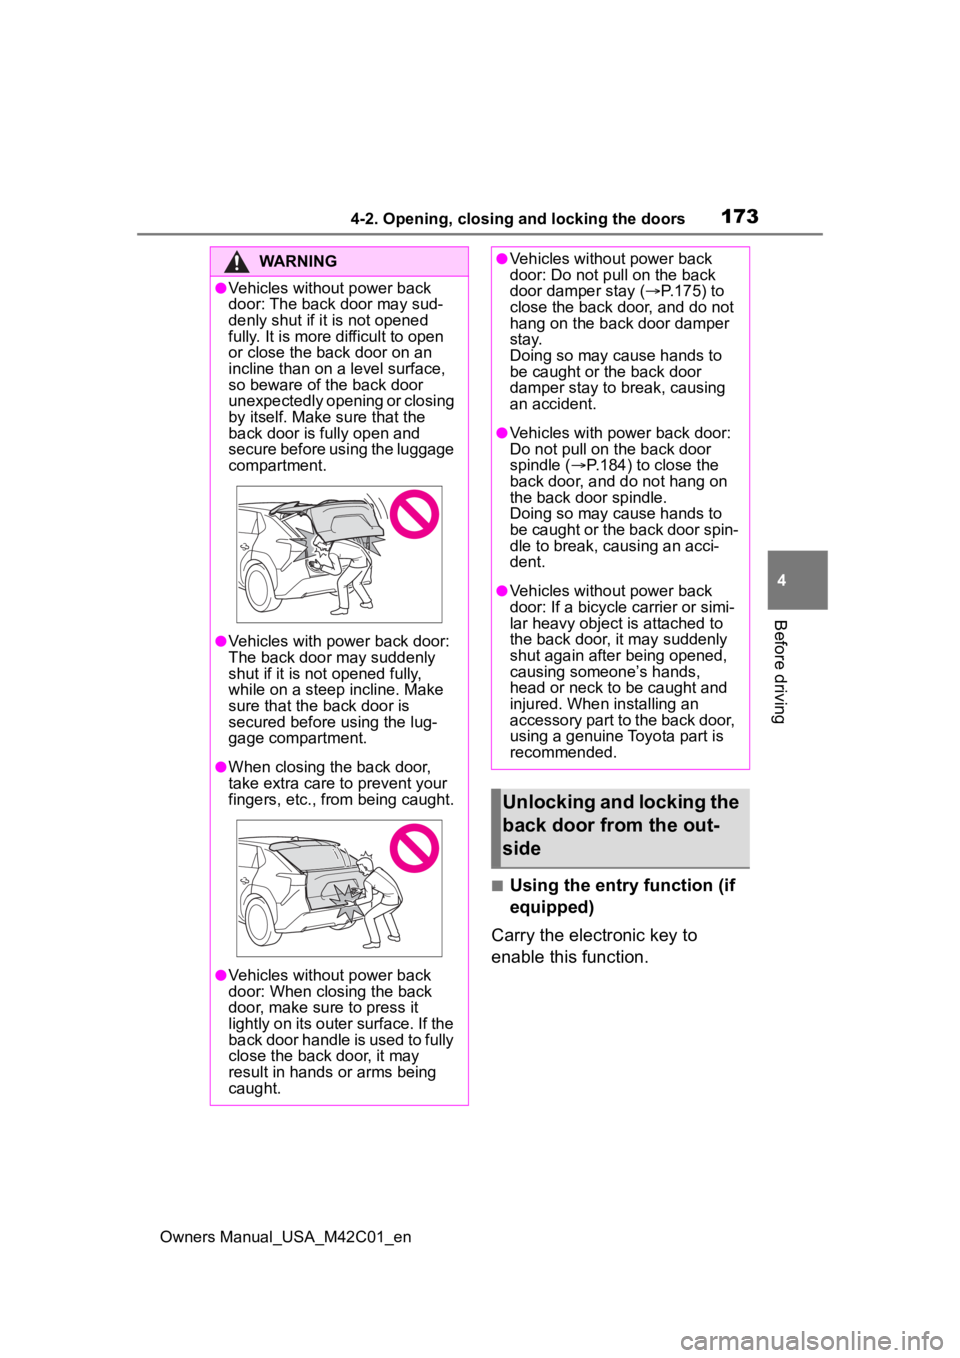
●Vehicles without power back
door: The back door may sud-
denly shut if it is not opened
fully. It is more difficult to open
or close the ba ck door on an
incline than on a level surface,
so beware of the back door
unexpectedly opening or closing
by itself. Make sure that the
back door is fully open and
secure before using the luggage
compartment.
●Vehicles with power back door:
The back door may suddenly
shut if it is not opened fully,
while on a steep incline. Make
sure that the back door is
secured before using the lug-
gage compartment.
●When closing the back door,
take extra care to prevent your
fingers, etc., from being caught.
●Vehicles without power back
door: When closing the back
door, make sure to press it
lightly on its outer surface. If the
back door handle is used to fully
close the back door, it may
result in hands or arms being
caught.
●Vehicles without power back
door: Do not pull on the back
door damper stay ( P.175) to
close the back d oor, and do not
hang on the back door damper
stay.
Doing so may cause hands to
be caught or the back door
damper stay to break, causing
an accident.
●Vehicles with power back door:
Do not pull on the back door
spindle ( P.184) to close the
back door, and do not hang on
the back door spindle.
Doing so may cause hands to
be caught or the back door spin-
dle to break, causing an acci-
dent.
●Vehicles without power back
door: If a bicycle carrier or simi-
lar heavy object is attached to
the back door, it may suddenly
shut again after being opened,
causing someone’s hands,
head or neck to be caught and
injured. When installing an
accessory part to the back door,
using a genuine Toyota part is
recommended.
Unlocking and locking the
back door from the out-
side
Page 182 of 628
1824-2. Opening, closing and locking the doors
Owners Manual_USA_M42C01_en2
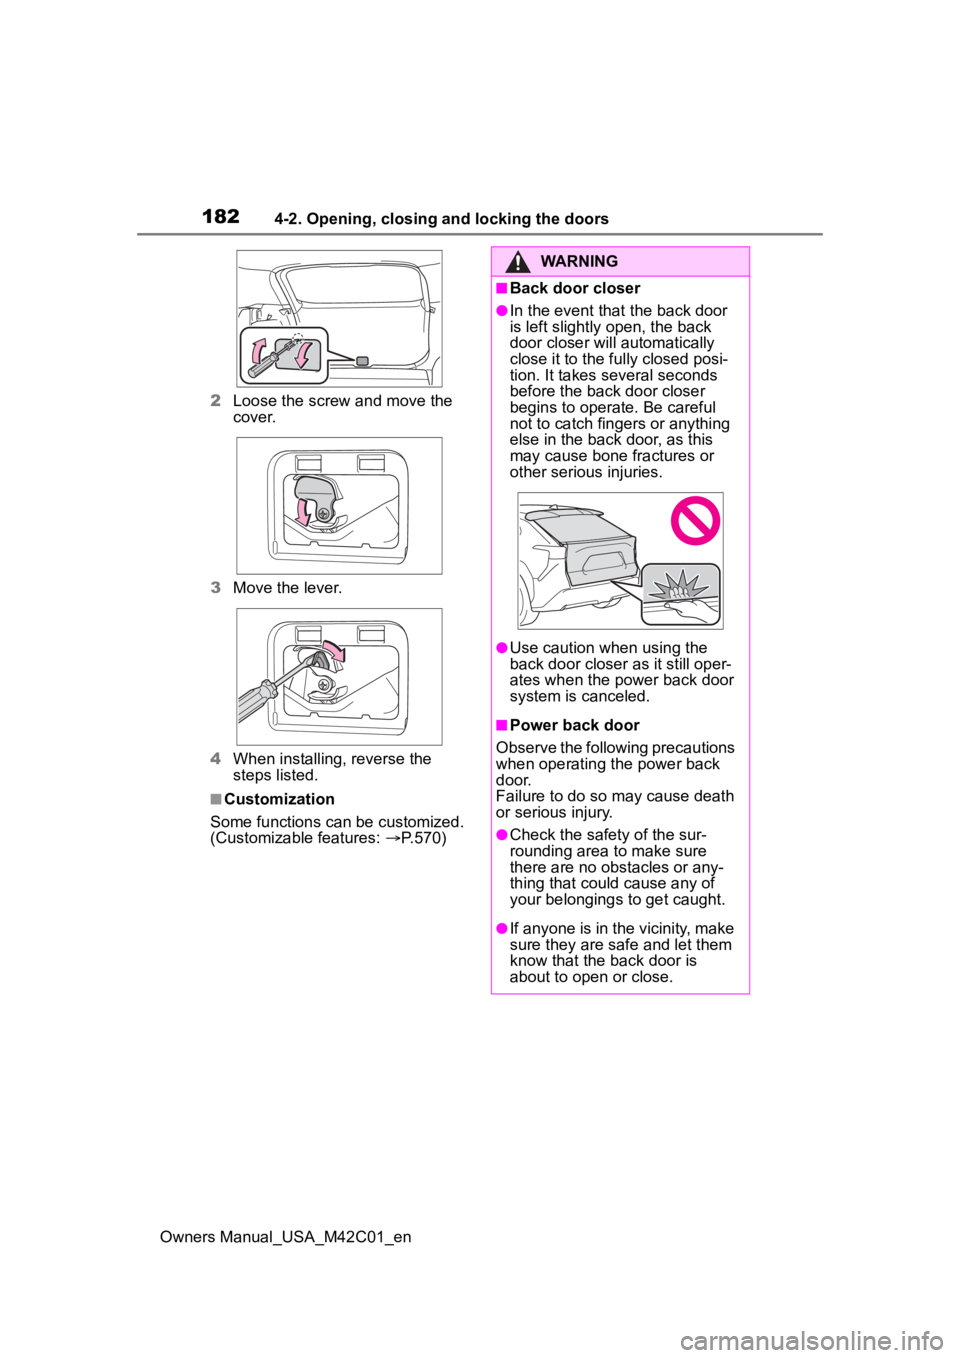
Loose the screw and move the
cover.
3 Move the lever.
4 When installing, reverse the
steps listed.
■Customization
Some functions can be customized.
(Customizable features: P.570)
WARNING
■Back door closer
●In the event that the back door
is left slightly open, the back
door closer will automatically
close it to the fu lly closed posi-
tion. It takes several seconds
before the back door closer
begins to operate. Be careful
not to catch fingers or anything
else in the back door, as this
may cause bone fractures or
other serious injuries.
●Use caution when using the
back door closer as it still oper-
ates when the power back door
system is canceled.
■Power back door
Observe the following precautions
when operating the power back
door.
Failure to do so may cause death
or serious injury.
●Check the safety of the sur-
rounding area to make sure
there are no obs tacles or any-
thing that could cause any of
your belongings to get caught.
●If anyone is in the vicinity, make
sure they are safe and let them
know that the back door is
about to open or close.
Page 190 of 628

1904-2. Opening, closing and locking the doors
Owners Manual_USA_M42C01_enlock and unlock repeatedly. In that
case, follow the fo
llowing correc-
tion procedures to wash the vehi-
cle:
• Place the electronic key in a loca- tion 6 ft. (2 m) or more away from
the vehicle. (Take care to ensure
that the key is not stolen.)
• Set the electronic key to battery-
saving mode to disable the smart
key system. ( P.188)
●If the electronic key is inside the
vehicle and a door handle
becomes wet during a car wash, a
message may be shown on the
multi-informatio n display and a
buzzer will sound outside the vehi-
cle. To turn off the alarm, lock all
the doors.
●The lock sensor may not work
properly if it com es into contact
with ice, snow, mud, etc. Clean
the lock sensor and attempt to
operate it again.
●A sudden approach to the effec-
tive range or door handle may pre-
vent the doors from being
unlocked. In this case, return the
door handle to the original position
and check that the doors unlock
before pulling the door handle
again.
●If there is another electronic key in
the detection area, it may take
slightly longer to unlock the doors
after the door handle is gripped.
■When the vehicle is not driven
for extended periods
●To prevent theft of the vehicle, do
not leave the electronic key within
6 ft. (2 m) of the vehicle.
●The smart key system can be
deactivated in advance. ( P.569)
●Battery-saving mode can reduce
the power consumption of elec-
tronic keys. ( P.188)
■To operate the system properly
Make sure to carry the electronic
key when operating the system. Do
not get the electronic key too close to the vehicle when operating the
system from the out
side of the vehi-
cle.
Depending on the position and hold-
ing condition of the electronic key,
the key may not be detected cor-
rectly and the system may not oper-
ate properly. (The alarm may go off
accidentally, or the door lock pre-
vention may not operate.)
■If the smart key system does
not operate properly
●If the doors cannot be locked or
unlocked, perform the following.
• Bring the electronic key close to the door handle and perform a
lock or unlock operation.
• Use the wireless remote control.
If the doors cannot be locked or
unlocked by perform the above, use
the mechanical key. ( P.539)
However, if the mechanical key is
used while the alarm system is set,
the warning will sound. ( P. 6 9 )
●If the EV system cannot be
started, refer to P.540
■Customization
Settings (e.g. smart key system)
can be changed.
(Customizable features: P.569)
If the smart key system has been
deactivated in a customized setting,
refer to the explanations for the fol-
lowing operations.
●Locking and unlocking the doors:
Use the wireless remote control or
mechanical key. ( P.167, 539)
●Starting the EV system and
changing power switch modes:
P. 5 4 0
●Stopping the EV system: P. 2 3 3
Page 195 of 628
1954-3. Adjusting the seats
Owners Manual_USA_M42C01_en
4
Before driving
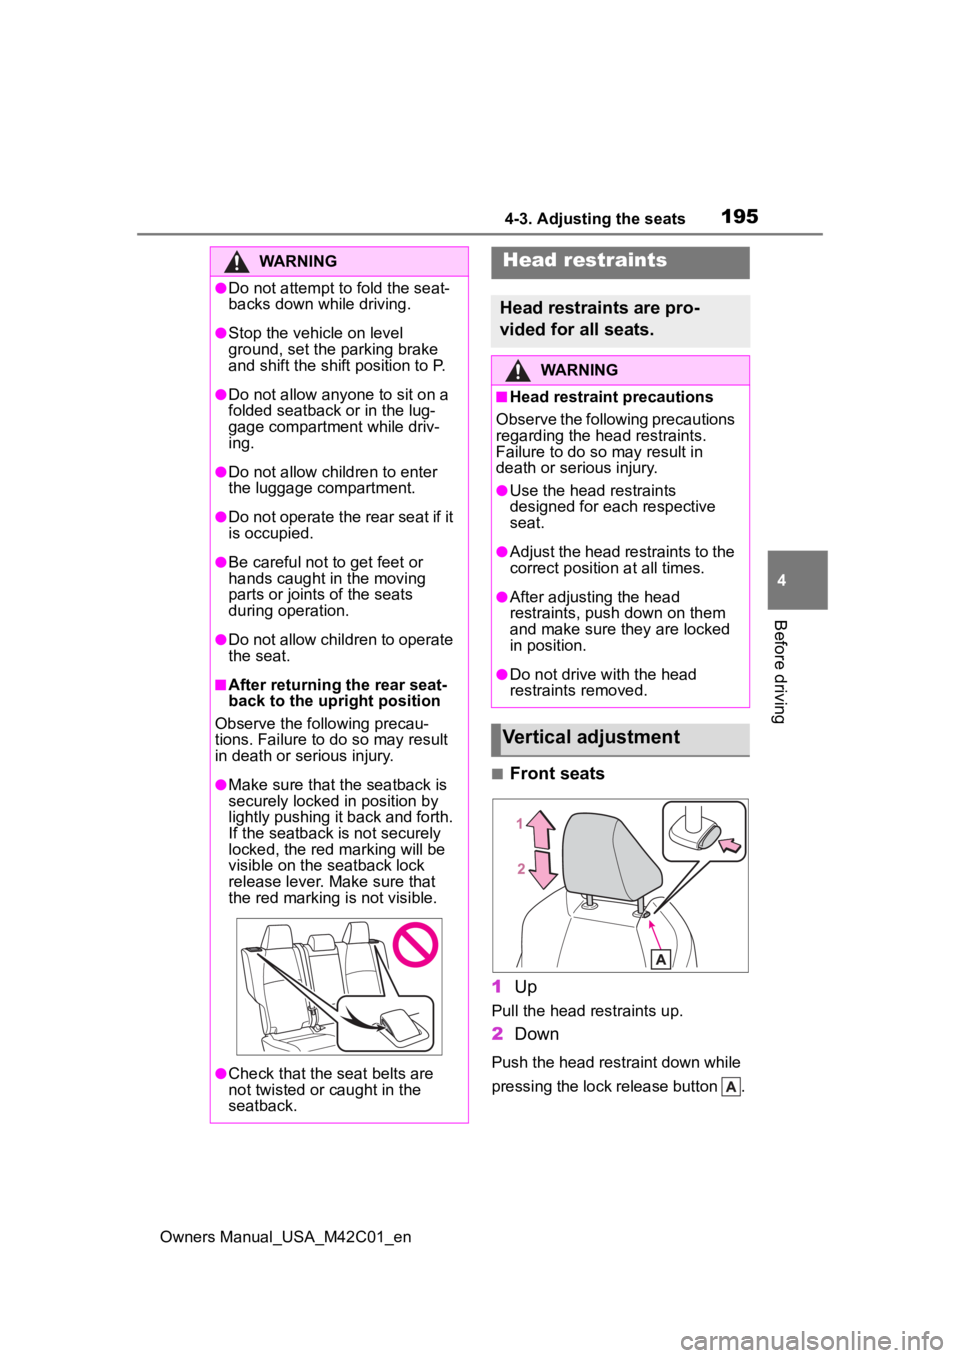
■Front seats
1 Up
Pull the head restraints up.
2Down
Push the head restraint down while
pressing the lock release button .
WARNING
●Do not attempt t o fold the seat-
backs down while driving.
●Stop the vehicle on level
ground, set the parking brake
and shift the shift position to P.
●Do not allow anyo ne to sit on a
folded seatback or in the lug-
gage compartment while driv-
ing.
●Do not allow child ren to enter
the luggage compartment.
●Do not operate the rear seat if it
is occupied.
●Be careful not to get feet or
hands caught in the moving
parts or joints of the seats
during operation.
●Do not allow children to operate
the seat.
■After returning the rear seat-
back to the upright position
Observe the following precau-
tions. Failure to do so may result
in death or serious injury.
●Make sure that the seatback is
securely locked in position by
lightly pushing it back and forth.
If the seatback is not securely
locked, the red marking will be
visible on the seatback lock
release lever. Make sure that
the red marking is not visible.
●Check that the seat belts are
not twisted or caught in the
seatback.
Head restraints
Head restraints are pro-
vided for all seats.
WARNING
■Head restraint precautions
Observe the following precautions
regarding the head restraints.
Failure to do so may result in
death or serious injury.
●Use the head restraints
designed for each respective
seat.
●Adjust the head restraints to the
correct position at all times.
●After adjusting the head
restraints, push down on them
and make sure they are locked
in position.
●Do not drive with the head
restraints removed.
Vertical adjustment
Page 200 of 628
2004-4. Adjusting the steering wheel and mirrors
Owners Manual_USA_M42C01_en
*: If equipped
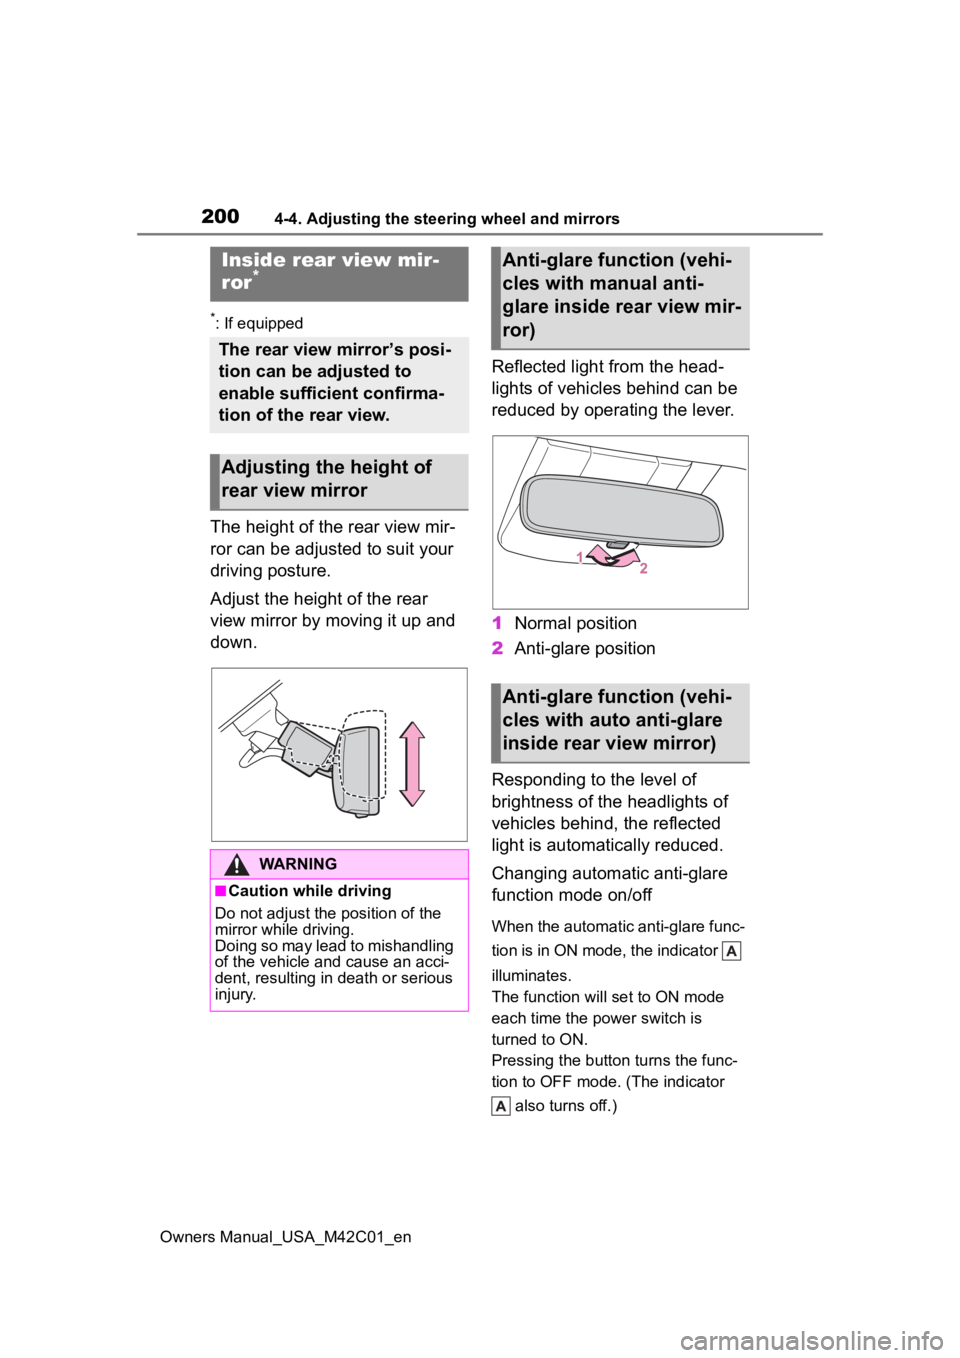
The height of the rear view mir-
ror can be adjusted to suit your
driving posture.
Adjust the height of the rear
view mirror by moving it up and
down.Reflected light from the head-
lights of vehicles behind can be
reduced by operating the lever.
1
Normal position
2 Anti-glare position
Responding to the level of
brightness of the headlights of
vehicles behind, the reflected
light is automatically reduced.
Changing automatic anti-glare
function mode on/off
When the automatic anti-glare func-
tion is in ON mode, the indicator
illuminates.
The function will set to ON mode
each time the power switch is
turned to ON.
Pressing the button turns the func-
tion to OFF mode. (The indicator also turns off.)
Inside rear view mir-
ror*
The rear view mirror’s posi-
tion can be adjusted to
enable sufficient confirma-
tion of the rear view.
Adjusting the height of
rear view mirror
WARNING
■Caution while driving
Do not adjust the position of the
mirror while driving.
Doing so may lead to mishandling
of the vehicle and cause an acci-
dent, resulting in death or serious
injury.
Anti-glare function (vehi-
cles with manual anti-
glare inside rear view mir-
ror)
Anti-glare function (vehi-
cles with auto anti-glare
inside rear view mirror)
Page 205 of 628
2054-4. Adjusting the steering wheel and mirrors
Owners Manual_USA_M42C01_en
4
Before driving
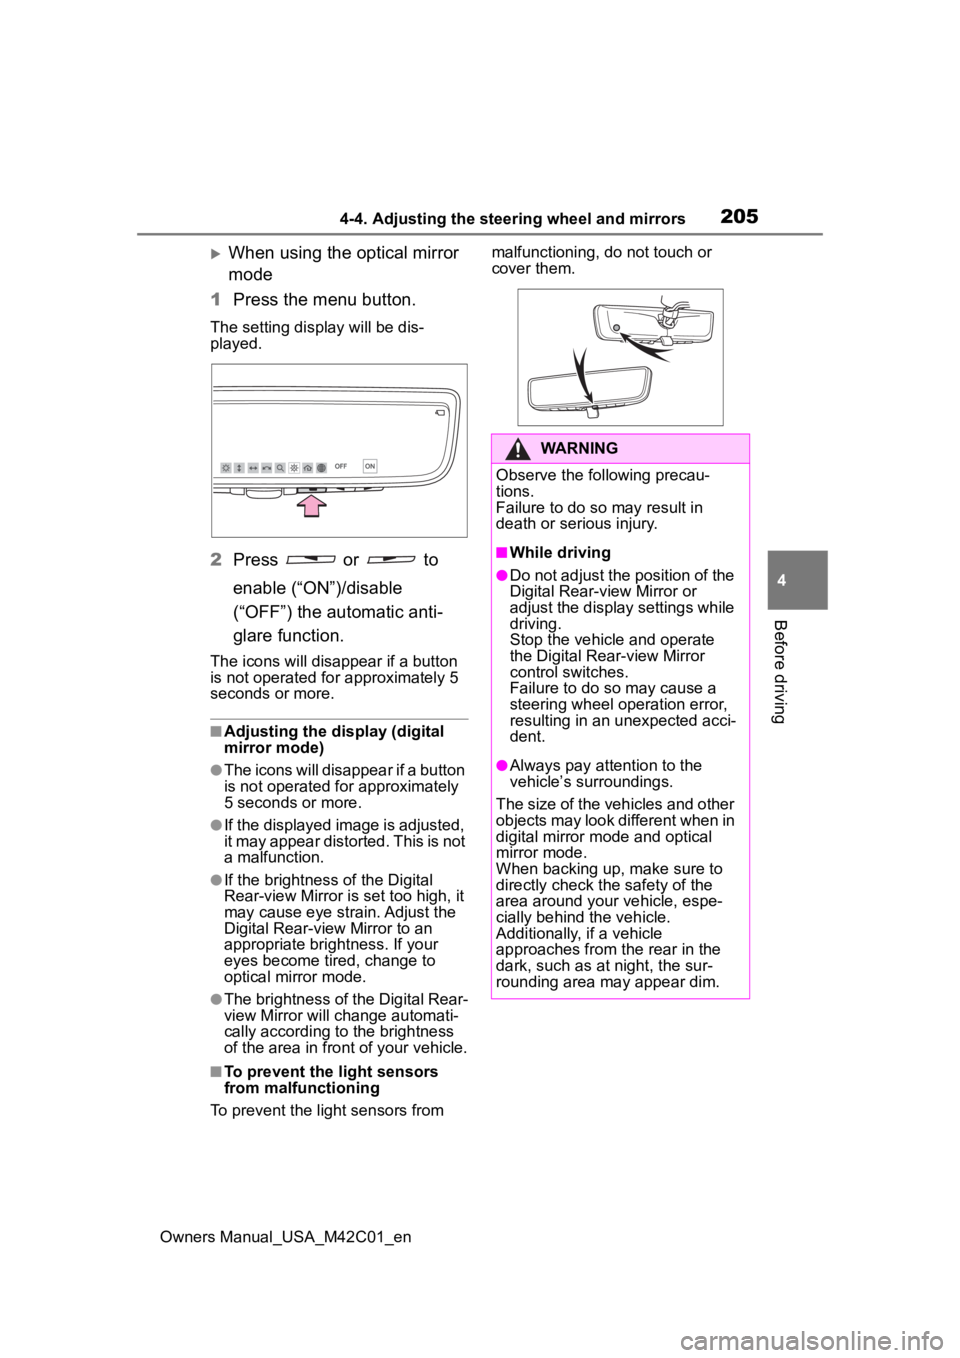
When using the optical mirror
mode
1 Press the menu button.
The setting display will be dis-
played.
2Press or to
enable (“ON”)/disable
(“OFF”) the automatic anti-
glare function.
The icons will disappear if a button
is not operated fo r approximately 5
seconds or more.
■Adjusting the display (digital
mirror mode)
●The icons will disappear if a button
is not operated for approximately
5 seconds or more.
●If the displayed image is adjusted,
it may appear distorted. This is not
a malfunction.
●If the brightness of the Digital
Rear-view Mirror is set too high, it
may cause eye strain. Adjust the
Digital Rear-view Mirror to an
appropriate brightness. If your
eyes become tired, change to
optical mirror mode.
●The brightness of the Digital Rear-
view Mirror will ch ange automati-
cally according to the brightness
of the area in front of your vehicle.
■To prevent the light sensors
from malfunctioning
To prevent the light sensors from malfunctioning, do not touch or
cover them.
WARNING
Observe the following precau-
tions.
Failure to do so may result in
death or serious injury.
■While driving
●Do not adjust the position of the
Digital Rear-view Mirror or
adjust the display settings while
driving.
Stop the vehicle and operate
the Digital Rear-view Mirror
control switches.
Failure to do so may cause a
steering wheel operation error,
resulting in an unexpected acci-
dent.
●Always pay attention to the
vehicle’s surroundings.
The size of the vehicles and other
objects may look different when in
digital mirror mode and optical
mirror mode.
When backing up, make sure to
directly check the safety of the
area around your vehicle, espe-
cially behind the vehicle.
Additionally, if a vehicle
approaches from the rear in the
dark, such as at night, the sur-
rounding area may appear dim.
Page 206 of 628
2064-4. Adjusting the steering wheel and mirrors
Owners Manual_USA_M42C01_en
■Cleaning the mirror surface
If the mirror surface is dirty, the
image on the display may be dif-
ficult to see.
Wipe the mirror surface gently
using a soft dry cloth.
■Cleaning the camera
If it is difficult to see the Digital
Rear-view Mirror image
because water, snow, mud, etc.
is stuck to the camera lens,
operate the rear camera washer
or change to optical mirror
mode. ( P.253)
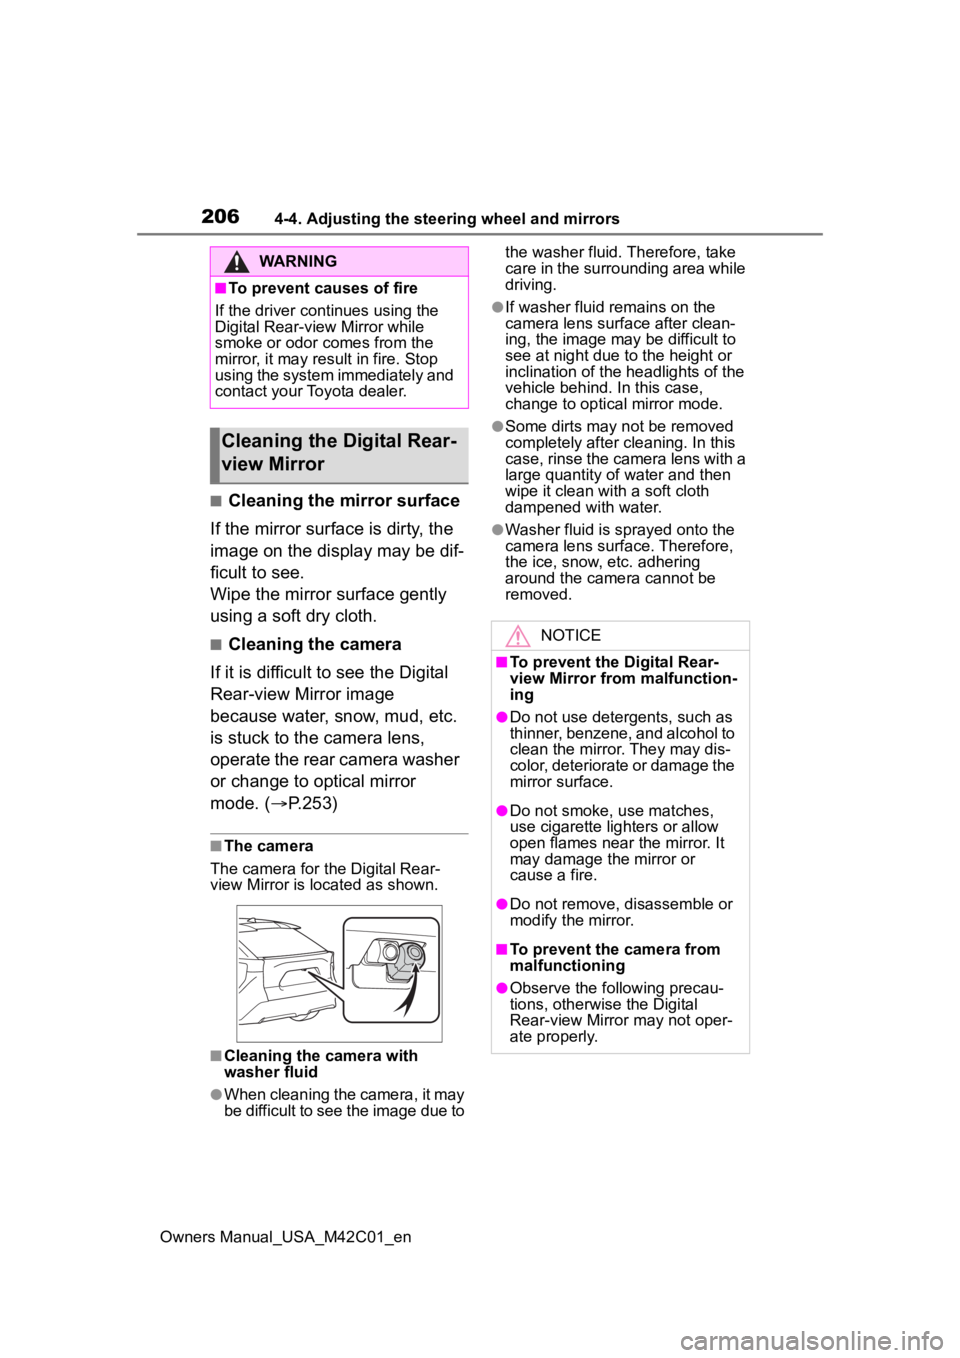
■The camera
The camera for the Digital Rear-
view Mirror is located as shown.
■Cleaning the camera with
washer fluid
●When cleaning the camera, it may
be difficult to see the image due to the washer fluid. Therefore, take
care in the surrounding area while
driving.
●If washer fluid remains on the
camera lens surface after clean-
ing, the image may be difficult to
see at night due to the height or
inclination of the
headlights of the
vehicle behind. In this case,
change to optical mirror mode.
●Some dirts may n ot be removed
completely after cl eaning. In this
case, rinse the camera lens with a
large quantity of water and then
wipe it clean with a soft cloth
dampened with water.
●Washer fluid is sprayed onto the
camera lens surface. Therefore,
the ice, snow, etc. adhering
around the camera cannot be
removed.
WARNING
■To prevent causes of fire
If the driver continues using the
Digital Rear-view Mirror while
smoke or odor comes from the
mirror, it may res ult in fire. Stop
using the system immediately and
contact your Toyota dealer.
Cleaning the D igital Rear-
view Mirror
NOTICE
■To prevent the Digital Rear-
view Mirror from malfunction-
ing
●Do not use detergents, such as
thinner, benzene, and alcohol to
clean the mirror. They may dis-
color, deteriorate or damage the
mirror surface.
●Do not smoke, use matches,
use cigarette lighters or allow
open flames near the mirror. It
may damage the mirror or
cause a fire.
●Do not remove, d isassemble or
modify the mirror.
■To prevent the camera from
malfunctioning
●Observe the fo llowing precau-
tions, otherwise the Digital
Rear-view Mirror may not oper-
ate properly.
Page 220 of 628
2205-1. Before driving
Owners Manual_USA_M42C01_en
■When starting off on a uphill
The hill-start assis t control will acti-
vate. ( P.387)
■Driving in the rain
●Drive carefully whe n it is raining,
because visibility will be reduced,
the windows may become fogged-
up, and the road will be slippery.
●Drive carefully whe n it starts to
rain, because the road surface will
be especially slippery.
●Refrain from high speeds when
driving on an expressway in the
rain, because there may be a
layer of water between the tires
and the road surface, preventing
the steering and brakes from
operating properly.
■Restraining the EV system out-
put (Brake Override System)
●When the accelerator and brake
pedals are depressed at the same
time, the EV system output may
be restrained.
●A warning messag e is displayed
on the multi-information display
while the system is operating.
■Breaking in your new Toyota
To extend the life of the vehicle,
observing the following precautions
is recommended:
●For the first 200 miles (300 km):
Avoid sudden stops.
●For the first 600 miles (1000 km):
• Do not drive at extremely high speeds.
• Avoid sudden acceleration.
• Do not drive at a constant speed for extended periods.
WARNING
Observe the following precau-
tions.
Failure to do so m ay result in
death or serious injury.
■When starting the vehicle
Always keep your foot on the
brake pedal while stopped with
the “READY” indica tor is illumi-
nated. This prevents the vehicle
from creeping.
■When driving the vehicle
●Do not drive if you are unfamil-
iar with the location of the brake
and accelerator pedals to avoid
depressing the wrong pedal.
• Accidentally depressing the accelerator pedal instead of the
brake pedal will result in sudden
acceleration that may lead to an
accident.
• When backing up, you may twist your body around, leading to a
difficulty in operating the pedals.
Make sure to operate the pedals
properly.
• Make sure to keep a correct driving posture even when mov-
ing the vehicle only slightly. This
allows you to depress the brake
and accelerator pedals properly.
• Depress the brake pedal using your right foot. Depressing the
brake pedal using your left foot
may delay response in an emer-
gency, resulting in an accident.
●The driver should pay extra
attention to pedestrians. As
there is no engine noise, the
pedestrians may misjudge the
vehicle’s movement. Even
though the vehicle is equipped
with the Acoustic Vehicle Alert-
ing System, driv e with care as
pedestrians in the vicinity may
still not notice the vehicle if the
surrounding area is noisy.